tylersloan Posted April 4, 2011 Posted April 4, 2011 love the rims and tire choice what are you thinking for paint ?
speedy5963 Posted April 5, 2011 Posted April 5, 2011 looking good so far, will look forward to seeing the pics as it comes along
Ryan S. Posted April 6, 2011 Author Posted April 6, 2011 love the rims and tire choice what are you thinking for paint ? I think I'm going to go with Testors lacquers. A combo of Graphite Grey and Firey Orange. Sorry for no updates. Life is busy. Hopefully I'll get some work on this in a few days or this weekend.
Lanny Haas Posted April 6, 2011 Posted April 6, 2011 Doing the same thing to my bed on a 50 Ford F-1 except I cut the wood into planks with about a 1/16 inch between and than Im adding plastic strips, that I will bare foil. Like the look of what you got going there.
Ryan S. Posted May 16, 2011 Author Posted May 16, 2011 Ok, a little update for now. I took all your suggestions and Stasch's bed Tut and I redid the wood bed. I got some Evergreen I-beam the same width as the birch plywood I was using and cut everything to shape and to fit. Now I've got to stain the wood. When everything is done I'll bmf the rails. Thanks for the suggestions to do this everyone, I think it's going to pay off big time. Thanks for looking.
Ryan S. Posted May 16, 2011 Author Posted May 16, 2011 So one thing that has always bothered me about these mid 50's Ford truck is the way that the front of the hood bulges up. I went back and forth with this idea but today committed to sectioning it to take care of the problem. I've seen all the great body work done here on the forum and I figured that a simple pie-style sectioning of the hood couldn't be all that hard. So here we go! Started by taping a line where I would cut. Highlighted that line with a sharpie... removed the tape and readied for cutting with a razor-saw. Here we have the cut completed and sanded out. I didn't cut all the way back so that the hood still matched up with the cowl. Glued back together with Tenax and CA. No sanding yet, but here is what the profile will look like. Just a slight forward slope. Perfect. Sanded and smoothed... ... and hit with a first coat of Squadron green putty. I'm going to let this dry, sand it smooth and, if it stops raining here today, I'll get a light coat of primer on it to see how it looks. I'll rinse and repeat as necessary until it's all smooth! Thanks for taking a look!
Ryan S. Posted May 16, 2011 Author Posted May 16, 2011 Just a couple more shots with some primer and mocked up to see the profile. It's subtle, but a vast improvement to my eyes. Still needs some more sanding and priming to get 100%, but it's getting there.
Dr. Cranky Posted May 16, 2011 Posted May 16, 2011 I'm loving it. It's going to be a wonderful model. Keep it going.
MikeMc Posted May 18, 2011 Posted May 18, 2011 That looks 100% better...well done!! The pie cut makes the lines much smoother!! Keep it coming!! B)
Ryan S. Posted July 2, 2011 Author Posted July 2, 2011 So I couldn't leave well enough alone so I moved the front wheel openings forward about 3-4 mm. I neglected to take any photos of that process as one day I just decided to dive in head first on it. Having done this, of course, means that the suspension points on the front end needed to be moved as well to mach the new openings. After some deliberation I decided that it would just be easiest to move the whole front frame clip forward by adding some plastic to the frame. The following pictures show a little of what I did, as well as the results. As always, thanks for looking and any/ all comments etc welcome! These are just some quick mock ups. The front wheel isn't attached, which is why it looks a little too far forward in the wheel well. I just wanted to get an idea of how it all looked.
Agent G Posted July 2, 2011 Posted July 2, 2011 (edited) That is coming together very nicely. Your "trimming" of the hood really adds to the overall look. It's subtle yet accomplishes so much. I like that because if you hadn't seen the build photos, you look and say "what did he do?" The wheel openings are a case in point. You didn't show the process, yet when I first viewed the new pics I said Hmmmmm, THEN I read what you did........... The bed is just money. G Edited July 2, 2011 by AgentG
MikeMc Posted July 2, 2011 Posted July 2, 2011 That is coming together very nicely. Your "trimming" of the hood really adds to the overall look. It's subtle yet accomplishes so much. I like that because if you hadn't seen the build photos, you look and say "what did he do?" The wheel openings are a case in point. You didn't show the process, yet when I first viewed the new pics I said Hmmmmm, THEN I read what you did........... The bed is just money. G Gotta agree with G...100% custom, but so subtle you really don't know what was done!!!! Foose did the front wheels on his own Effie and it makes a HUGE difference!! Three thumbs up :D
Ryan S. Posted July 2, 2011 Author Posted July 2, 2011 Gotta agree with G...100% custom, but so subtle you really don't know what was done!!!! Foose did the front wheels on his own Effie and it makes a HUGE difference!! Three thumbs up :D Thanks guys! The Foose '56 was what had me thinking about moving the wheels forward, then lownslow did it to his that's on the bench here and I was sold. I am happy with the subtlety and I hope when it's done people look at it for a while before seeing the changes. Still have to finess some of the body work and work on the suspension. I'd like to get it a little lower if I can. Maybe one of these days it'll see some paint
Ryan S. Posted April 12, 2012 Author Posted April 12, 2012 (edited) I got inspired to pull this one back out and get back on it. I realized I had two directions going on this one; custom and some modern. I think I want to give it more of a classic custom feel and the first place to make a change is the interior. I felt that some tuck and roll was appropriate so I broke out the half round and got to gluing. I've done the door panels and the bench seat thus far. I might do a head liner as well, but I'm getting low on stock, so we'll see. There's some gaping on the seat, but I've got some thread that I'm going to do some piping with once it's painted, so it won't be seen in the end. Here you can see how I've been busy with the bondo, primer and sand paper, trying to get things all smoothed out. As always, thanks for taking a look! Edited April 13, 2012 by Ryan S.
AUGIEDOGGIE Posted April 12, 2012 Posted April 12, 2012 i like what im seeing so far keep the pics coming
rmvw guy Posted April 13, 2012 Posted April 13, 2012 I am like'n this one a lot! Nice work so far, wait'n for more!
Malard Posted April 13, 2012 Posted April 13, 2012 If you don't mind me asking what size is that half round?
Ryan S. Posted April 13, 2012 Author Posted April 13, 2012 Thanks you all! If you don't mind me asking what size is that half round? I'm not sure right off hand, I'll try to look and see if I still have the packaging and I'll let you know tomorrow. I'm at work for now.
Joker Posted April 13, 2012 Posted April 13, 2012 Thanks for the update Ryan. With the tuck and roll interior and sectioned hood I believe the build is leaning towards traditional. Got a 53 Ford here under "On the workbench". Just have to finish the chassis.
Ryan S. Posted April 13, 2012 Author Posted April 13, 2012 I agree, and that's the direction I'll continue to take it. I was planning on putting a more modern Chevy 350 in it, but now I'm thinking I'll see how the Caddy motor from the Revell 49 Merc looks. I just hope, at 1/25, it doesn't look too small in the 1/24 engine bay. Thanks for the update Ryan. With the tuck and roll interior and sectioned hood I believe the build is leaning towards traditional. Got a 53 Ford here under "On the workbench". Just have to finish the chassis.
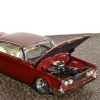
Ryan S. Posted July 6, 2012 Author Posted July 6, 2012 Oh my gosh, an update! I've been putting some more work in on this one as I'd like to see it finished. I've built up the Caddy motor and I think it looks right at home in the '55 engine bay. It doesn't look too small. Wheels and tires are detailed. I used the drum-brakes and wheel backs from the '60 Starliner. The wood bed is in and the top of the rails are foiled. I've still got to put some cross supports under it and foil the bottom as well. Chassis is painted gloss black lacquer, the wheels aren't glued in place yet. I've still got to finish the body work but once that's done and painted the rest should all fall in place. Thanks for looking!
Recommended Posts
Create an account or sign in to comment
You need to be a member in order to leave a comment
Create an account
Sign up for a new account in our community. It's easy!
Register a new accountSign in
Already have an account? Sign in here.
Sign In Now