SpreadAxle Posted April 10, 2011 Posted April 10, 2011 This has been on the bench for a little over a year, and I've been meaning to show them here, I just kept forgetting to post them. Some of you have seen these, others haven't, so here goes. I've taken a Freightliner DD and an SD kit, and switched the cabs on the frames. The tandem axle daycab will be a Ryder truck with a DD 6-71 engine pulling a reefer. The single axle sleeper will be pulling a pair of livestock trailers like one would see out west. The headlight assemblies, molded too high by AMT, have been lowered. Starting with the sleeper cab, I shortened it to 75 scale inches, and converted to single headlights. This will be it's paint scheme, just different colors. I have enough blue ones for now. The intake will be a regular air cleaner and stack, rather than the frontal intake provided by the kit. Here's the Cummins NTC 290 that will power it. One of its 2 trailers in progress. Here is the dashboard for it. The switch panels are part of a photo etch set offered by Harald Weber. Next post is the daycab.
SpreadAxle Posted April 10, 2011 Author Posted April 10, 2011 Now the Ryder daycab. The engine is a DD 6-71 that I got from STS. I added various parts from AMT 8V-71s and some scratchbuilding to complete the engine. I will use the kit's air cleaner on this truck. Here's the frame for it. I shortened the fuel tanks. The driver's side tank was moved forward to be parallel to the passenger side tank. Also, the DD frame was shortened by 27 scale inches. I have a nice photoetch replacement for the shortened bumper I made. I'll show it when I make more progress. Here's the shortened tank with a kit tank for comparison.
SpreadAxle Posted April 11, 2011 Author Posted April 11, 2011 I did a little work 2day and made a change. This change was in regards to the fuel tanks. With moving the driver's side tank moved forward on the daycab, I had to move the filler neck to the rear, which I found a way to do. Now with my single axle sleeper, I kept thinking maybe the smaller tanks would look good on it, too. Inspired by a pic in my Freightliner book, as well as many pix on Hank's, I decided to cut down it's tanks as well. The kit's normal tank size just looked too big for this truck, and it will give it a neat look I think. On both sets, the driver's side filler neck has been moved to the rear. For one of the tanks, I cut a piece away from a scrap Freightliner tank, and grafted it into place. For the other, I drilled a hole just enough to accept a piece of K and S aluminum tubing. I still have to putty and sand around that tube. I did make some progress on the frames today as well, but this was my main project today.
Old Albion Posted April 18, 2011 Posted April 18, 2011 Ray, This is quite a project and will certainly be a challenge. I have seen this posted on another web site and was impressed with your concept then and now. The WF photoetch kits are great. I bought 3 or 4 of them expecting just a few parts. Instead there was enough parts in each kit for about 3 Freightshakers. So needless to say I have plenty of surplas stock for future builds. Anyone interested in a photoetch set for a WF a Kw W900a or an Astro check out this web site. The quality is exceptional. https://ssl3.world4you.com/modelmakershop/index.php?cat=c126_Czech-Truck-Modell.html&page=3&XTCsid=1d5aa4bigu4i1j2qk3o4d5nuc6 Good Luck with the rest of the builds. Dave
SpreadAxle Posted May 2, 2011 Author Posted May 2, 2011 OK, today has been work on my headlights day on these cabs. AMT molded the headlights too high on the cab, so I lowered them. The daycab will retain its dual headlights, but I converted the other to singles. That's where I've had trouble is getting the headlight holes in the right spot on the sleeper cab. After many nights studying Robert Gabrick's book, Freightliner Trucks 1937-1981 Photo Archive, along woth some other pics, I was finally able to determine how to line them up. The headlights were taken from an AMT Ford Snowplow kit. The lines represent where the outer and lower edges of the headlight bezel will line up. A closer view. I started with a pilot hole made with a #56 drill, then I opened the hole a little with a knife. After that, a cone shaped attachment for my dremel was used to open the hole. Using the bit shown, I then countersunk the headlight, so the bezel is basically flush with the cab face. I still have to putty and clean up the hole a little. The headlight is just sitting in place for now, not permanently attached. Still working on the daycab's headlight buckets as well as another cab for a future project. I figured I would at least eliminate that step on this cab and get it out of the way. I'll post pix of the other cabs later tonight.
SpreadAxle Posted May 5, 2011 Author Posted May 5, 2011 I was going to post these Sunday night, but I screwed up the opening on the passenger side. So, more putty, more sanding, more dremel work...you get the idea had to happen. They're still in need of some clean-up, but I wanted to post some progress. Here is the daycab, headlights lowered into their proper position. Almost done with sanding on both cabs, maybe now I can throw some more primer down. I drilled out the vents, which went well until the bit wandered once or twice on me. I'll have to fix that, but I think when touched up, the open vent will be an improvement to the appearance of the cab.
mackinac359 Posted May 5, 2011 Posted May 5, 2011 The cab looks so much better with the lights down lower. Tim both cabs are looking great ray.
Aaronw Posted May 5, 2011 Posted May 5, 2011 I've been wanting to do the single headlight conversion for several years now, but just keep putting it off. This will be very helpful, and maybe I'll finally get around to building mine. This is what I want to build. It is an ex-Chevron fuel tanker converted into a water tender and was one of the first heavy trucks I drove back in 1993.
SpreadAxle Posted May 5, 2011 Author Posted May 5, 2011 (edited) Thanks everyone.I'm just glad to have this step just about done, as it's been a pain getting it to look right. Maybe now I can get back to finishing the frame and interior. Aaron, that looks like it will be a cool project you have in mind. When you fill in the headlight area to make the conversion to singles, make sure you draw the lines like I did. It really helps line them up. The outer and lower edges of the headlight are what you are lining up with the lines. Tim, thanks. Your explanation on your website is what I used as far as lowering them down. Edited May 5, 2011 by FlatbedKW
Old Albion Posted May 6, 2011 Posted May 6, 2011 Ray, Great progress! This project is coming along very well! The headlights are a bit awkward to move. But with patience the result has a big impact on the overall appearance of the truck and well worth doing. I'm surprised that non of the aftermarket guys have not made a cab with the headlight positions corrected also with some options for single headlight etc. As for using Tim's web site. I agree an invaluable source of information. Tim built an excellent Freightshaker in orange and yellow a while back. This build inspired me to build my blue and orange WF. (Thanks Tim!) Keep us posted with progress. Dave
SpreadAxle Posted May 6, 2011 Author Posted May 6, 2011 I'm surprised that non of the aftermarket guys have not made a cab with the headlight positions corrected also with some options for single headlight etc. As for using Tim's web site. I agree an invaluable source of information. Tim built an excellent Freightshaker in orange and yellow a while back. This build inspired me to build my blue and orange WF. (Thanks Tim!) Keep us posted with progress. Dave Thanks Dave. I did pitch the idea of offering just the front section of the 3 piece cab with the single headlight option to one of the resin casters. Although he's busy with a few projects, he did say he would see what he could come up with. Hopefully, he'll go forward with the idea. And yes, Tim's site is an excellent source of info(and why I got back into building).
SpreadAxle Posted May 9, 2011 Author Posted May 9, 2011 Ok, I finally have the cabs ready for primer. I've been sanding and sanding and puttying and sanding this weekend. The vents on the lower right face of the cab have been repaired with .010" sheet plastic. Here's the sleeper cab. Headlight holes are basically done. I'll know more after the primer is laid down. Now here is my daycab. The photoetch grille is by Harald Weber. I'm not sure if he still makes these, but he's a member over @ MTDG on Yahoo. It's a nice set. The grille is just taped in so I could show it. What do you think of how it looks? Thanks for looking. I'll be glad to get some color on these cabs finally. Then I can return to working the frames.
Aaronw Posted May 9, 2011 Posted May 9, 2011 Thanks Dave. I did pitch the idea of offering just the front section of the 3 piece cab with the single headlight option to one of the resin casters. Although he's busy with a few projects, he did say he would see what he could come up with. Hopefully, he'll go forward with the idea. And yes, Tim's site is an excellent source of info(and why I got back into building). That is a good idea. With the way the cabs are made a new front would work for both the day cab and sleeper. Since it is a fairly simple smallish part (compared to most cab conversions) it shouldn't terribly expensive either.
SpreadAxle Posted May 9, 2011 Author Posted May 9, 2011 That is a good idea. With the way the cabs are made a new front would work for both the day cab and sleeper. Since it is a fairly simple smallish part (compared to most cab conversions) it shouldn't terribly expensive either. I'm hoping he can manage to find the time to do it. There are a lot of modelers that I think would be very interested. He did say he liked the idea.
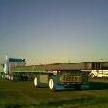
SpreadAxle Posted July 16, 2011 Author Posted July 16, 2011 I have been progressing on this one, although the daycab has gotten most of my attention lately. The color is pactra Daytona Yellow RC Car paint lacquer. Seemed to be close to Ryder yellow. Here it is from the rear. I made some new mounts for the wind fairing. Here's the trailer it will pull. It's an AMT Fruehauf reefer I rebuilt from an ebay purchase. Mods include air brake details, reefer fuel lines and battery cables, and the side door from an Ertl Great Dane. Just a few little things and it will be finished. The Green is Krylon Hunter Green.
Paul B Posted July 17, 2011 Posted July 17, 2011 Both are coming along nicely. Don't forget to add defrost drain lines to the reefer.
Kostas Parchas Posted July 17, 2011 Posted July 17, 2011 Don't know how I missed these two builds, nicely coming so far!!! Kostas.
Recommended Posts
Create an account or sign in to comment
You need to be a member in order to leave a comment
Create an account
Sign up for a new account in our community. It's easy!
Register a new accountSign in
Already have an account? Sign in here.
Sign In Now