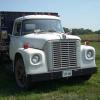
Kit Basher Posted May 15, 2011 Posted May 15, 2011 When I saw the Monogram F250 Super Duty kit, I thought "Cool, I can build a model of my 1:1 truck", like this: When I got the kit I found it is an F250 extended cab, with a V8, automatic trans, 4x2, bucket seats, power windows, body side moldings, and the wrong mirrors. My truck is none of those. Other than that, they are just the same! So I got the Lindberg Off Road 4x4, and the Monogram '80 Bronco kits. The Bronco has the right mirrors! Here's the kits: The first thing I did was sand the body side moldings off the cab, bed, and tailgate. I looked at a lot of posts, and it seems like at least half the people who use the Super Duty kit cut down the cab. But I couldn't find anybody who said how they did it. So here's how I did it. It may not be the best way, but it's one way. Turns out that 3/4" masking tape is just the right amount to remove, so I put a strip on each side, covering the back window. Then I connected them with a strip across the roof. Traced on both sides of the tape, and that gave me two parallel cut lines: I cut inside the lines with my razor saw, flat sanded the two pieces, and taped them together: Ran around the seam on the inside of the cab with liquid cement, Standard cab! nuff for now, more later.
Nick Winter Posted May 15, 2011 Posted May 15, 2011 Very nice so far, We got a '89 Bronco on the Farm, great little rig, your 1:1 truck looks to be in great shape aswell. Nick
Kit Basher Posted May 16, 2011 Author Posted May 16, 2011 Thanks, Nick. I don't know what 20 years is in truck years, but I wish I aged that gracefully!
Kit Basher Posted May 17, 2011 Author Posted May 17, 2011 Time to shorten the frame. I didn't trust myself to keep everything straight after I cut it, so I built this jig. The rear section of the frame can slide forward in the jig while still staying in alignment. I wanted to make a strong joint without adding reinforcements that would make the frame rails thicker, so I decided to use a half lap joint. I had to cut away some floor pan to do that. Here is the shortened frame. I think it is just as strong as the original. Comments and advice always welcome. nuff for now, more later.
Kit Basher Posted May 23, 2011 Author Posted May 23, 2011 More frame work. I'm using the front axle from the Bronco, but front crossmember is much to low. I started by adding a piece of styrene to the back side to keep it together and widen it. Then I cut off the crossmember, and added a piece to replace it. There's another piece added to the front of the crossmember to match the back. My truck has dual front shocks, so I widened the shock mounts, and added bosses for the springs. Made some shocks, and destroyed ball point pens for the springs. This is the stance I'm looking for. I'll have to jack up the frame in the rear. Fortunately, Ford did this by adding spacer blocks between the axle and the springs. So I did that too. Made new U-bolts and shocks, sits just right. Advice and comments always welcome! nuff for now, more later.
Mudpit602 Posted May 23, 2011 Posted May 23, 2011 The wheel base looks dead on. Looking really good so far.
Kit Basher Posted May 23, 2011 Author Posted May 23, 2011 Thanks Mudpit. I'm working on an "extra piece". when I get that done, I should be able to finish the frame.
Kit Basher Posted May 25, 2011 Author Posted May 25, 2011 (edited) My truck has a receiver hitch, so I made this. Square brass tube, square and sheet styrene, and a little piece of aluminum sheet. The tie rod on the F250 is bass ackwards! It's even backwards from the way it's shown in the instructions. It should bend up with the steering box connection away from the axle. By the time I got it bent the right way, it was just about to break, plus I didn't like the way it was just hanging there in the breeze, so I built a steering box. Added back the floor pans I cut away with sheet and strip. Here is the finished frame. And the finished frame with the receiver hitch and spare. Advice and comments always welcome. nuff for now, more later. Edited May 25, 2011 by basher
Guest Posted May 26, 2011 Posted May 26, 2011 When I got the kit I found it is an F250 extended cab, with a V8, automatic trans, 4x2, bucket seats, power windows, body side moldings, and the wrong mirrors. Lots of nice looking work! So, the new F250 has bucket seats now? I guess Revell did make one small change to them.
Kit Basher Posted May 26, 2011 Author Posted May 26, 2011 Thanks, plowboy. To be precise, it's sort of a bucket/bench seat. I'll be posting a pic soon. I checked out your F150 before I started this one, I like it a lot. But you never said how you cut down the cab, and I had to wing it on my own!
Kit Basher Posted May 26, 2011 Author Posted May 26, 2011 (edited) Here's the interior. The bucket gets cut down pretty much the same as the cab. After I took this pic, I found I needed to cut even more. It should be cut all the way to the "pillar"(A.), and the little "shelf"(B.) is almost gone. I also raised the rear of the tunnel to clear the driveshaft by cutting on the red line and bending it up. I had to add a piece of "floor pan" to make up for what I cut away on the frame(A.), carve out a space for the transfer case, and fill in the seat depressions on the drivers side(B.). The only bench seat was the back seat from the Bronco, and it was much too narrow. So I cut it in half, and cut the center section out of the F250 seat. I cut the backrest off the center section of the F250 seat and replaced it with a piece of styrene. Glued the whole thing together. Not a perfect match for my vinyl bench seat, but it'll do. Now to make it a manual trans. The gearshift from the Lindberg is perfect, the transfer case shifter, not even close. The transfer case shifter is kinda notched into the tunnel, so I added a block to the bottom of the boot, and made a new lever. It will get a blob of epoxy to make a knob. Shift levers in place, had to add a clutch pedal, manual transmission! Now I can cut the prndl off the steering column! No power windows in a work truck! Sanded off the power controls and made some cranks. Here is the finished interior. (Yes, there is a dot of blue paint in the middle of the steering wheel. ) Sorry for the crappy pictures. Advice and comments always welcome. nuff for now, more later. Edited May 26, 2011 by basher
Kit Basher Posted May 27, 2011 Author Posted May 27, 2011 I really wanted to ignore these blobs of plastic on the fender. I just can't do it, they gots to go! They are gone! Filled back in. While I was at it I cut off the air cans. I will put new ones back later. You can also see part of the new heater blower. Wiped out details that don't exist on the 1:1 firewall. The cut out, set back section matches the 1:1, to make room for the 4.9L. Made a new heater blower and added a clutch master cylinder (hard to see). This stuff will show up better with paint. Advice and comments always welcome. nuff for now, more later.
Kit Basher Posted May 30, 2011 Author Posted May 30, 2011 (edited) The rear driveshaft from the F250 works fine with a little alteration. The rear driveshaft from the Lindberg makes a perfect front driveshaft. The last is the steering shaft with a u-joint from the Lindberg. Here's the exhaust system. The F250 converter is a cylinder, I "sectioned" it to make it an oval. The muffler is from one of the pens I destroyed for front springs. Here is the "go" for this show. 4.9L EFI from Kitchen Table resins. This thing is a total mish mash. Tranny, transfer case, starter, and oil filler from Lindberg, alternator from the Bronco. I cut the resin intake runners apart to make them wider. Not wide enough, but the best I could do. Had to make the distributor, coil, air pump, and p/s pump, and the brackets for the alternator and p/s pump. The pulleys are from all three kits. The belt is cloth tape. The 2 bbl. lookin' doohickey attached to the big box on top of the engine (don't you just love technical talk?) is from the F250. Advice and comments always welcome. nuff for now, more later. Edited May 30, 2011 by basher
highway Posted May 30, 2011 Posted May 30, 2011 The 2 bbl. lookin' doohickey attached to the big box on top of the engine (don't you just love technical talk?) is from the F250. Oh, you mean the throttle body connected to the intake plenum??
Kit Basher Posted May 30, 2011 Author Posted May 30, 2011 Oh, you mean the throttle body connected to the intake plenum?? Yeah, that.
charlie8575 Posted May 31, 2011 Posted May 31, 2011 VERY nice conversion. Definitely a job to be proud of if this keeps up. Charlie Larkin
Kit Basher Posted May 31, 2011 Author Posted May 31, 2011 Thanks Charlie, I'll keep doin' the best I can.
Kit Basher Posted June 3, 2011 Author Posted June 3, 2011 Here is the perfect example of the "Snowball Effect". Since I used the Bronco front axle, I had to use the Bronco wheel mounting system, which consists of the wheel back and a bushing that glues to a stub on the axle. No problem, that will work fine on the back axle too. BUT, the F250 has the best wheels, and the Lindberg has the best tires. To use the Lindberg tires, I have to use the Lindberg wheel backs. Also, the Lindberg has brake backs, instead of just plastic model wheel backs. SO, I had to open up the centers of the Lindberg wheel backs to fit the Bronco bushings, and open up the brake backs the same way. Then I had to sand down the backs of the F250 wheels so the whole package would fit in the tire. Sanded down the bushings to adjust the track, here's the wheel backs ready for paint and mounting. Sometimes the simplest things... Advice and comments always welcome. nuff for now, more later.
Guest Posted June 3, 2011 Posted June 3, 2011 Sometimes the simplest things... But it's those simple things that makes a big difference in a model. I've spent many hours modifying/tweaking suspensions and mounting plates to get the tires and wheels to fit just right. It's always time well spent IMO.
Recommended Posts
Create an account or sign in to comment
You need to be a member in order to leave a comment
Create an account
Sign up for a new account in our community. It's easy!
Register a new accountSign in
Already have an account? Sign in here.
Sign In Now