highway Posted July 2, 2011 Share Posted July 2, 2011 Everybody that knows me says I need help! (I think they mean the psychiatric kind) Your friends sound like my friends!! Quote Link to comment Share on other sites More sharing options...
Kit Basher Posted July 2, 2011 Author Share Posted July 2, 2011 Hey you guys notice we've got a regional thing going here? Kentucky, West by god, Vajanya, and Maryland. Sounds like a map out of Daniel Boone's pocket. Quote Link to comment Share on other sites More sharing options...
jeffs396 Posted July 2, 2011 Share Posted July 2, 2011 Nice job so far Hugh! About that bumper, to do it correctly I think chrome plating or alclad is going to be your only option. I'd section the bumper by cutting with a razor saw right thru the middle of the rubstrip. Use masking tape to protect and act as a guide. Then block-sand down to the proper dimensions, getting rid of the strip. Round off your cut-lines to reproduce the stamped-in look of the 1:1, and polish the bare plastic with at least 1200 grit paper. Leaving the plating on during this process will give you a good guide to be sure not to take too much off & keep everthing straight. Then re-attach the upper & lower sections with strip styrene from behind, creating your recess. You may have to thin the bumper from behind also for the correct scale thickness prior to gluing. If you take your time & prep the two sections properly, very little finish work will be required prior to replating or alclad. Strip the chrome, prime, and check your work. something like Mr. Surfacer brushed into the recess will fill any voids left from the surgery, followed by more sanding A bit of work, but worth it for the accuracy! A spare bumper couldn't hurt either! Good luck! Quote Link to comment Share on other sites More sharing options...
Kit Basher Posted July 2, 2011 Author Share Posted July 2, 2011 Thanks, Jeff. Ohio could be on Mr. Boone's map as well! I think I'm gonna go with a variation of Roger's idea. The channel on the 1:1 bumper is barely 3/16" deep. In 1/24 that's only 1/128". So I took strips of the thinnest styrene I had, and laminated them on the bumper leaving the channel. I already sanded the top strip flush with the top of the bumper, it looks pretty good. I think I can feather the bottom strip into the bumper as well. I won't be able to work on it until after the 4th, but I'll update as soon as I make some progress. Quote Link to comment Share on other sites More sharing options...
highway Posted July 3, 2011 Share Posted July 3, 2011 Hey you guys notice we've got a regional thing going here? Kentucky, West by god, Vajanya, and Maryland. Sounds like a map out of Daniel Boone's pocket. So what point on that map are we going to pick to meet up at!?!? Quote Link to comment Share on other sites More sharing options...
Guest Posted July 17, 2011 Share Posted July 17, 2011 Any update on this one Hugh? Quote Link to comment Share on other sites More sharing options...
Kit Basher Posted July 17, 2011 Author Share Posted July 17, 2011 Yes Roger. Thanks for asking. I finally finished that blue blinkin' bumper just today. I've also been working on some paint touch ups and started putting the cab together. I hope I will have something to show in the next few days. Quote Link to comment Share on other sites More sharing options...
Guest Posted July 17, 2011 Share Posted July 17, 2011 You painted the bumper blue blinkin'??! That won't look right! Seriously though, I bet your efforts have paid off. Can't wait to see it finished up. Quote Link to comment Share on other sites More sharing options...
Kit Basher Posted July 20, 2011 Author Share Posted July 20, 2011 I got a little update. Here is that bumper. Hours of work but worth it (I guess!) Under the hood: advice and comments always welcome. nuff for now, more later Quote Link to comment Share on other sites More sharing options...
Guest Posted July 20, 2011 Share Posted July 20, 2011 Looks awesome! Definitely worth the effort Hugh! Now,you wanna tell us how you did it? Quote Link to comment Share on other sites More sharing options...
highway Posted July 20, 2011 Share Posted July 20, 2011 Looks awesome! Definitely worth the effort Hugh! Now,you wanna tell us how you did it? Yeah Hugh, share with the class or I'm hunting that bumper down and taking it for mine!!!! Quote Link to comment Share on other sites More sharing options...
Kit Basher Posted July 20, 2011 Author Share Posted July 20, 2011 Thanks, Roger. I basically followed your idea. I sanded off the trim strip, and glued a narrow strip of thin styrene along the top corner of the bumper. Leaving the channel, I glued another strip of styrene on the face of the bumper. Then it was a lot of sanding, priming, and polishing to get it all smooth enough for Alclad. The hardest part was getting the new plastic to blend smoothly into the bumper. Thanks for the suggestion, I don't think I would have come up with that on my own! Quote Link to comment Share on other sites More sharing options...
Kit Basher Posted July 20, 2011 Author Share Posted July 20, 2011 Yeah Hugh, share with the class or I'm hunting that bumper down and taking it for mine!!!! It wouldn't do you any good, Matthew, it's got the air dam on it! Quote Link to comment Share on other sites More sharing options...
Guest Posted July 20, 2011 Share Posted July 20, 2011 The bumper definitely looks nice and is a great improvement over the kit bumper. I wish I had done that to mine. One thing I wish I had done on mine and it's not too late to do it on yours is add some straight pin heads on it to simulate the bolt heads in the bumper. I may still go back and do it on mine because it just looks like it's missing something. If I knew for sure that I could match the paint back up,I would add the recess like you have done. Quote Link to comment Share on other sites More sharing options...
Kit Basher Posted July 20, 2011 Author Share Posted July 20, 2011 You know Roger, I thought about those pin heads, but the pins I have are too big. Even if I could find smaller pins now, I wouldn't do it, that Alclad is too tricky to mess with. Quote Link to comment Share on other sites More sharing options...
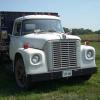
highway Posted July 20, 2011 Share Posted July 20, 2011 It wouldn't do you any good, Matthew, it's got the air dam on it! Yeah, but I can cut that off Hugh!! It doesn't matter much anyway, because my better half informed me I have more to make in the way of the front bumper anyway, because I forgot that I wanted to see if the towing company I bought my truck from might still have the bumper from the truck they had, and this pic is like that bumper!! So I have more than just a channel to worry about!! Quote Link to comment Share on other sites More sharing options...
Kit Basher Posted July 20, 2011 Author Share Posted July 20, 2011 Holy guacamole! Now that is a bumper! Crazy as it sounds, I think that one might be easier. At least you don't have to chrome it. Remind me not to play chicken with you! Quote Link to comment Share on other sites More sharing options...
highway Posted July 20, 2011 Share Posted July 20, 2011 Holy guacamole! Now that is a bumper! Crazy as it sounds, I think that one might be easier. At least you don't have to chrome it. Remind me not to play chicken with you! The actual one is only about the width of the brush guard part on the one I hope I can get, but that was the closest pic I could find to it! Still nothing to play chicken with though, MOVE OR BE MOVED!! Quote Link to comment Share on other sites More sharing options...
Kit Basher Posted July 27, 2011 Author Share Posted July 27, 2011 The body and the interior are permanently attached to the frame. The back window is in. I wanted door windows in my truck. The passenger side is all the way up, the driver's side is part way down. I had to eat a whole tub of chocolate chip cookies to get the plastic for the windows. The sacrifices we make for our hobby! Started on the underhood details. The clutch tube is attached to the clutch master cylinder, and the steering shaft is in place. Next is the starter wire and the hose from the air pump to the air can, then a bunch more stuff. Advice and comments always welcome. nuff for now, more later. Quote Link to comment Share on other sites More sharing options...
jeffs396 Posted July 28, 2011 Share Posted July 28, 2011 Almost there Hugh, looking GREAT! Quote Link to comment Share on other sites More sharing options...
highway Posted July 28, 2011 Share Posted July 28, 2011 I had to eat a whole tub of chocolate chip cookies to get the plastic for the windows. The sacrifices we make for our hobby! You should have called me, I would have been more than happy to help you out! Nice job so far Hugh! Quote Link to comment Share on other sites More sharing options...
Kit Basher Posted July 28, 2011 Author Share Posted July 28, 2011 Thanks, Jeff Thanks, Matthew. I am thinking about building a 1/12 scale all aluminum B29, which would require drinking a LOT of beer, just for the aluminum, of course. I will let you know! Quote Link to comment Share on other sites More sharing options...
Guest Posted July 29, 2011 Share Posted July 29, 2011 It's looking real nice Hugh! Watching yours has made me want to get back in on my F250 and start an F150 4x4 of my own. You've done a lot of nice work on this build and shown some great ideas. I guess the next update will be the finished product? Can't wait to see it! Quote Link to comment Share on other sites More sharing options...
Kit Basher Posted July 29, 2011 Author Share Posted July 29, 2011 Thanks, Roger. I don't know, I may slip in another update or two before I'm done. It seems like there's still a lot left to do. I spent most of yesterday working under the hood, and I'm still not done. Then there's bumpers, grille, mirrors, decals, windshield, etc. And I still have to make those badges. Don't hold your breath! Quote Link to comment Share on other sites More sharing options...
gray07 Posted July 31, 2011 Share Posted July 31, 2011 Looking great Quote Link to comment Share on other sites More sharing options...
Recommended Posts
Join the conversation
You can post now and register later. If you have an account, sign in now to post with your account.
Note: Your post will require moderator approval before it will be visible.