diymirage Posted June 22, 2011 Author Posted June 22, 2011 I haven't done anything "that" bad have I? dont sweat it....we're just riling on you on a side note i finally bit the bullet last night and dumped the GTX into some dot3 the container was too smal for the entire body so i only submerged the driver side in it i went to check it when i woke up this morning and from under the snakeskinned paint/primer i was greated by some nice white styrene
DiscoSpud Posted June 22, 2011 Posted June 22, 2011 dont sweat it....we're just riling on you on a side note i finally bit the bullet last night and dumped the GTX into some dot3 the container was too smal for the entire body so i only submerged the driver side in it i went to check it when i woke up this morning and from under the snakeskinned paint/primer i was greated by some nice white styrene always a good sign! you should see my F250. besides the body pannels, grille, interior and half the chassis it's mostly missing in the parts bin. coverred in hideous glue stains. to cover up the crappy bodywork i want to make a wild custom, combining body pannels from both the f 250 and a 53 vette
diymirage Posted June 23, 2011 Author Posted June 23, 2011 that ougtha be interesting Aaron let me know where it is and ill have a look-see
DiscoSpud Posted June 23, 2011 Posted June 23, 2011 that ougtha be interesting Aaron let me know where it is and ill have a look-see The glue bomb invitational, pics up soon. i was thinking of even doing a concept drawing first before I start building.
mrm Posted June 25, 2011 Posted June 25, 2011 Hi guys. Is it too late for me to get in on this CBP? It will be my very first CBP.
diymirage Posted June 25, 2011 Author Posted June 25, 2011 Hi Mike, there is still plenty of building time left and the more the merrier let us know what model your building and we'll ad you to the list im hoping to get mine in primer (again) today
Jairus Posted June 25, 2011 Posted June 25, 2011 I am almost ready for primer. A bit of sanding yet to do still. Mixed up my lime green "Antifreeze" paint the other day. Two step process... requiring a gold underbase applied first. Maybe I can find some time this evening.
diymirage Posted June 25, 2011 Author Posted June 25, 2011 sounds good Jairus i was planning on doing the brakes on the "ssat today but everything went south so now that is prosponed to tomorrow after church it did however leave me with a few hours to work on the GTX got a chance to finish the interior, slap some primer on the body AND lay down the silver once the dries i will skip the red alltogether and go straight to black then a quicky clearcoat and ill try to ad the red in decal form cant wait to see how it comes out this time
DiscoSpud Posted June 27, 2011 Posted June 27, 2011 sounds good Jairus i was planning on doing the brakes on the "ssat today but everything went south so now that is prosponed to tomorrow after church it did however leave me with a few hours to work on the GTX got a chance to finish the interior, slap some primer on the body AND lay down the silver once the dries i will skip the red alltogether and go straight to black then a quicky clearcoat and ill try to ad the red in decal form cant wait to see how it comes out this time Actually mate, with a bit of patience i know just what you can try. Lay down the red as you did, leave it for a week at least (Tamiya paints are awesome for this) then tape out your design. Spray the black top coat and leave for no more than two days, gently remove the mask and it should have worked.
diymirage Posted June 27, 2011 Author Posted June 27, 2011 Actually mate, with a bit of patience i know just what you can try. Lay down the red as you did, leave it for a week at least (Tamiya paints are awesome for this) then tape out your design. Spray the black top coat and leave for no more than two days, gently remove the mask and it should have worked. thats what i did the first time somehow the black paint got too stuck to the tape and when i removed the mask off came the paint (look at the pictures i posted, its very clear by the wheelwells) so this time im trying to put the red on as a decal
DiscoSpud Posted June 27, 2011 Posted June 27, 2011 that's no good. Best of luck this time round mate
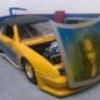
diymirage Posted June 29, 2011 Author Posted June 29, 2011 allright guys....welcome to plan C (plan B was to cut out the yellow center from the factory decal and just use the red outline over the new paintjob...all went well untill the red outline decided to go from a single peice into million peices) so....feast you eyes on this...plan C i took a little bit of artistic freedom here but i wanted it to look as close as possible to the hotwheel (which i why i didnt want to go with a solid panel) since the base coat is black (actually a very nice looking metallice black from duplicolour) i have to use white decal paper since the red would fade into the background if i used clear paper so leaving the panel empty was not an option
diymirage Posted June 30, 2011 Author Posted June 30, 2011 victory might still be mine the decals are aplied and clear coat is drying as we speak (on second thought i should have printed the panels on a red background so i could cut it without worrying about the halo effect but that will be noted for next time) here are some mockups...let me know what you think
CorvairJim Posted June 30, 2011 Posted June 30, 2011 Eelco: With the marbled effect, your GTX looks more like a Hot Wheels car than the "Real" Hot Wheels! That looks like the sort of effect they would have used if they'd thought of it!
diymirage Posted June 30, 2011 Author Posted June 30, 2011 thanks guys too bad the good people at hotwheels got the paint right the first time
Jairus Posted July 5, 2011 Posted July 5, 2011 Been working hard this last week. Finished three t-shirt designs and helped wrap a top fuel dragster. But for the three day weekend I spent some time just modeling, and managed to finish up the wheels for my build. The redline is hand painted with acrylic red and the wheels are aluminum Revell items with Lindberg '66 Chevelle hub caps turned-down and used as inserts. Finished chassis... .... oops, how'd that get there? Yeah, I know you guys hate slot cars. But if I am going to build a contest car it'll be a darned contest car! If it's going to be a slammer or curbside.... well, why bother making it just a dust collector? So for this build I assembled a chassis that can run it around the track at a good scoot! Plus it has been my experience that slot car collectors pay way better than do model car collectors and I already have a couple buyers for this... Plus, in some way... it makes my build more realistic in that it actually rolls and moves just like the REAL HOT WHEELS CAR! Anyway, here it is with the body. Time for some paint... onward we go!
Jairus Posted July 5, 2011 Posted July 5, 2011 P.S. after I finish the Deora... I think this might just be my next project: (with two motors of course!)
CorvairJim Posted July 6, 2011 Posted July 6, 2011 Of course it'll have two motors... After all, if it didn't, it couldn't very well be called the "TWIN MILL", now could it???
Jantrix Posted July 6, 2011 Posted July 6, 2011 P.S. after I finish the Deora... I think this might just be my next project: (with two motors of course!) Jairus, I've often thought about doing a twin-mill type thing. If you do try this, you would be a fool not to get someone to cast a mold before you finish it. I know that I would would a resin copy and I'm sure I'm not alone. Great work going on here, keep it going!
Jairus Posted July 9, 2011 Posted July 9, 2011 Just a quick pic to show that paint is finally on my build. The green is a custom mixed candy lacquer lime metal flake, about 4 or 5 coats with one color sanding session between. Here it has two coats of Tamiya clear and here it will wait a day to gas out before wet sanding again to ensure it is satiny smooth. Hopefully two final coats of clear will leave a glass smooth finish with-out the need for polishing. Painting of the interior and tinting the window glass are next.
Jairus Posted July 9, 2011 Posted July 9, 2011 Color check. Wish I had some gold pearl clear... but, not too bad overall.
diymirage Posted July 10, 2011 Author Posted July 10, 2011 thats coming together nicely Jairus i really like the detailing on the wheels and the lot cat chassis, no point in letting a good car go to waste i havent done anything to mine since i put the decals on, just havent had any time
Jairus Posted July 22, 2011 Posted July 22, 2011 FYI, for the few who are still reading this thread. THE DEORA IS DONE! Finished it up last night and hope to take some pictures today. Posting might be a problem as I had a pretty major hard drive failure and cannot thus far post pictures. Slowly rebuilding the computer most of the day today and transferring files to the new hard drive. But... if all goes well, should be able to post final shots this afternoon or Saturday.
Jairus Posted July 22, 2011 Posted July 22, 2011 (edited) Everything is now painted. Window glass is tinted with Tamiya clear blue to match the little Hot Wheels car. Body has received many coats of Tamiya clear with wet sanding between to the point that I am sick of it. Good enough! Interior has been painted with a dark grey to match the H.W. car and now time for assembly. Edited July 22, 2011 by Jairus
Recommended Posts
Create an account or sign in to comment
You need to be a member in order to leave a comment
Create an account
Sign up for a new account in our community. It's easy!
Register a new accountSign in
Already have an account? Sign in here.
Sign In Now