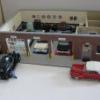
modelercarl Posted July 4, 2011 Posted July 4, 2011 I have posted some earlier pic's of this project and some members have asked for updates. I have finished the main "structure" finally, the interior walls, floors, and have the exterior "bricked". Have some doors to build, install window lentils, and "cap" the walls. Then I can detail the interior at my leisure as I find or discover things to add for some "character". FYI...the walls are 1/4" poplar, I used Sherwin-Williams Color-To-Go samples for wall paint, Tamiya Texture Paint Pavement Effect (light gray) for the front apron, Valspar spray gloss interior/exterior for the "epoxy" floor and colored electrical tape for the colored parking guidelines. The doors are clear .06 thick clear acrylic cut/trimmed to size with .020 thick styrene strips added for the finished effect. The brick is Houseworks Brickmasters common joint brick #H8206 (corner pieces and sheet) and Miniature Brick & Stone Mortar #0R599 (Grey). All in all I am pretty happy with this project....never done anything like it before and I think it will be a good setup for photographing future builds and I imagine it is a "living" project, because I will always see something and think "hey, that might work in my diorama"
ra7c7er Posted July 4, 2011 Posted July 4, 2011 Really cool. How did you get the ramp cut into the base? Those yellow posts are all over shops here. Mechanics must not be able to drive. Did you make any of the walls removable for taking photos?
Eshaver Posted July 4, 2011 Posted July 4, 2011 Looks like you used Basswood. The grain is beautiful . You really need to study a 1-1 garage as I may too quick to jump on this , but it's too sterile . Seriously, look at a typical shop and then study the "Super Sanatary " dioramas that pass for dioramas in shows . I like the overal layout . You obviously have done the homework there . Ed Shaver
modelercarl Posted July 4, 2011 Author Posted July 4, 2011 Really cool. How did you get the ramp cut into the base? Those yellow posts are all over shops here. Mechanics must not be able to drive. Did you make any of the walls removable for taking photos? I used a belt sander held at a very shallow angle to form the incline, just kept moving it back and forth until I had what I wanted. A lot of places around here have the posts protecting the door frames...some show evidence of being hit so I guess some mechanics get a little too agressive when moving cars into the garage! I think I would be pretty upset to take my car in for service and find out some wrench jockey has banged it up hitting one of those. Originally I planned on all the walls just being screwed together so that I had the option of removing one or two for pictures but with the bricking system I used it required the mortar between the joints so I couldn't do that. I didn't cover the rear wall so I was able to leave that removable and I am hoping when I get more detail and clutter in the garage it will work out.
modelercarl Posted July 4, 2011 Author Posted July 4, 2011 Looks like you used Basswood. The grain is beautiful . You really need to study a 1-1 garage as I may too quick to jump on this , but it's too sterile . Seriously, look at a typical shop and then study the "Super Sanatary " dioramas that pass for dioramas in shows . I like the overal layout . You obviously have done the homework there . Ed Shaver I bought the wood at Loew's and it was labelled "poplar" You're right the grain is beautiful, a shame to cover it all up. And you are right again about the look being sanitary. I based this on a garage we had back in the late 50's in the town where I grew up. A guy had a 2 stall and did pinstriping and flame jobs along with light body and interior work and his place was always immaculate....no painted floors but other than that pretty sterile. It did have some "clutter" in it which I will be adding as I find stuff for the garage and I think in a year or so it will not seem so "sterile". I wanted the garage to replicate that early one from my memory but also I am one of those model builders who doesn't want to weather and trash a build so that it looks like it is all "used up" so I "did my way"
Tony T Posted July 4, 2011 Posted July 4, 2011 Nice work on that! The yellow bumper posts are a nice touch, too. I've seen places that have them on the inside as well!! Part of what I love about a diorama. It isn't really ever done. I'm always looking for stuff for mine. Mostly stuff for outside, but have a few things for inside. Fun stuff for a change of pace!
Sixties Sam Posted July 4, 2011 Posted July 4, 2011 Very nice diorama! Just enough details to make it interesting. Garage dio's are never "finished". You can keep adding details as you feel like it. Nice work! Sam
Eshaver Posted July 5, 2011 Posted July 5, 2011 (edited) Carl, I beleive it's John Reid who did the How I build diorama thread . Look closely at his work . You need to be careful in striking a delicate balance of Clean , too clean and too worn . I hope that makes my point clearer . Mabye I can present it in pictures if that still dosen't make sense . Ed Shaver Edited July 5, 2011 by Eshaver
modelercarl Posted July 5, 2011 Author Posted July 5, 2011 I appreciate all of the comments. Ed, I understand what you are saying and I envision this garage diorama acquiring some clutter on the floor, some shelving going up on the walls with stuff on them, maybe some posters, some misc. car parts, etc. Maybe I will even find something to add to the outside too. In the past couple of days after getting my first diorama this far I am realizing that this is really a WIP, so hopefully in the coming months it will acquire the look of working garage, still well maintained, but a working garage. Thanks again for the comments.
Recommended Posts
Create an account or sign in to comment
You need to be a member in order to leave a comment
Create an account
Sign up for a new account in our community. It's easy!
Register a new accountSign in
Already have an account? Sign in here.
Sign In Now