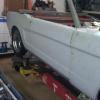
Galant409VR4 Posted June 30, 2012 Share Posted June 30, 2012 (edited) Hey All Very new here and new to modeling (well its been awile anyways). Just got the Revell Shelby GT500 1/12 scale kit in the mail today. Well I got the block halfs glued together and the bottom side if the motor sanded smoth. For the body of the car I sanded some casting lines out of in them wet sanded it with IDK maby 500-600 grit and just go done primering it. I used krylon rubby brown primer out of a can (IDk if this in normal but the cans almost gone LOL). Question when I wet sand the primer what grit should I use? I was thinking 2K grit. Edited June 30, 2012 by Galant409VR4 Quote Link to comment Share on other sites More sharing options...
Jantrix Posted June 30, 2012 Share Posted June 30, 2012 So far so good. Take your time and you should have no issues. looking forward to seeing your work. Welcome to the forum. Quote Link to comment Share on other sites More sharing options...
Galant409VR4 Posted June 30, 2012 Author Share Posted June 30, 2012 What do you do If a part is deformed on thr tree? One of my door handles is just a round blob of plastic LoL Quote Link to comment Share on other sites More sharing options...
cobraman Posted June 30, 2012 Share Posted June 30, 2012 Contact customer service and request a replacement part. I have built this kit and it is pretty nice although kind of simple. Quote Link to comment Share on other sites More sharing options...
Galant409VR4 Posted June 30, 2012 Author Share Posted June 30, 2012 Will have to do that on Monday I asume there customer serive isnt open on the weekends. but Ya it is simple no working steering or doors or trunk. Revell says its a skill level 3. Quote Link to comment Share on other sites More sharing options...
Galant409VR4 Posted June 30, 2012 Author Share Posted June 30, 2012 (edited) Update today Well today Im back at it again. Got the motor, oil pan, and supercharger painted krylon matte silver.For the Headers i scraped the casting lines off so there smother looking now, them I used krylon metalic stainless steel. When I spraid the stainless steel the metalic started building up on the headers so what I did was after they dried I took a dry wash cloth and wiped away all the exess* metalic. Over all I think it turned out good. The pic on the right is before and the pic on the left is after I wiped away all the exess* metalic Sorry for the crappy pics. Edited June 30, 2012 by Galant409VR4 Quote Link to comment Share on other sites More sharing options...
Ira Posted June 30, 2012 Share Posted June 30, 2012 Great Start! Quote Link to comment Share on other sites More sharing options...
oldscool Posted June 30, 2012 Share Posted June 30, 2012 This is a perfect kit for someone just getting back into the hobby and you are doing a great job so far. Quote Link to comment Share on other sites More sharing options...
Galant409VR4 Posted July 3, 2012 Author Share Posted July 3, 2012 (edited) Update Hey all Put some time in on the kit today. I got the motor almost done what do you guys think? Uploaded with ImageShack.us Uploaded with ImageShack.us Uploaded with ImageShack.us Some of the detailing paint isnt purfect on the bolts but its ok... I also got the chassis painted gold but havent done any detail painting on it yet. Will post pics of that. The motor suround area I painted Krylon Navy rattle can blue but it also doesnt have any detail ither...Pics to come Thanks Dan Hey Im new Edited July 3, 2012 by Galant409VR4 Quote Link to comment Share on other sites More sharing options...
'08SEAL Posted July 3, 2012 Share Posted July 3, 2012 Great job Quote Link to comment Share on other sites More sharing options...
cobraman Posted July 3, 2012 Share Posted July 3, 2012 Engine looks great. Quote Link to comment Share on other sites More sharing options...
Recommended Posts
Join the conversation
You can post now and register later. If you have an account, sign in now to post with your account.
Note: Your post will require moderator approval before it will be visible.