dimebolt Posted September 30, 2012 Posted September 30, 2012 (edited) Here's a few pics of what I got done with the cuda today. Mainly just prep work for the photoetch before primer and block sanding. Thanks for looking. Corey Edited October 27, 2012 by dimebolt
Dr. Cranky Posted September 30, 2012 Posted September 30, 2012 Oh, I really like that grill. Very nice. Keep it going.
vintagedragfan Posted September 30, 2012 Posted September 30, 2012 sweet Corey, I planned on doing something like that to my grille, looks awesome!
dimebolt Posted September 30, 2012 Author Posted September 30, 2012 Thanks guys! My FIRST time doing any photoetch, so let me know if you see me doin something wrong, or know of a better way on something. Corey
dimebolt Posted October 1, 2012 Author Posted October 1, 2012 (edited) Here's a few pics of todays progress. Fixed fenders, and valance. Got everything sanded smooth and primed. Block sanded, and primed again. The new seams I made on the fenders need more filler, and sanding. Then block sand the whole thing again. I"m gonna open and hinge the trunk after everything's smooth as glass, work with it to make sure it's not binding, and then get a color coat on it. Thanks for looking. Corey Edited October 1, 2012 by dimebolt
dimebolt Posted October 1, 2012 Author Posted October 1, 2012 Here's what it's gonna look like, but no vinyl top, pro street, with DEEEP rear/skinny front body color steelies with dog dishes. And maybe even some trim rings of some sort. Thanks for looking. Corey
W-409 Posted October 1, 2012 Posted October 1, 2012 Lookin' good! The photoetch grille (and other photo etched parts too) is great "bonus". What kit is this? Monogram?
Intmd8r Posted October 1, 2012 Posted October 1, 2012 Hey Corey, This kit looks familiar! It's far beter off in your capable hands. Tripple black is exactly how I woudl have built it. The progress looks good so far. Steve
dimebolt Posted October 1, 2012 Author Posted October 1, 2012 Lookin' good! The photoetch grille (and other photo etched parts too) is great "bonus". What kit is this? Monogram? Thanks Niko. Yeah it's Monogram. Built this same kit when I was like 13. Time to do it the way I wanted to back then. Corey
dimebolt Posted October 1, 2012 Author Posted October 1, 2012 Looks good so far Corey! Glad to see you corrected the front splash pan. If you're planning on painting the grille different than the body color, you can also cut it loose. That's how I did mine. I also glued my rear valence in before primer and paint because it's such a pain to get it in right after the chassis is installed. The chassis will still fit like it should. You just have to slide the rear of it in first. It will also help to cut the license plate loose from the rear bumper and glue it to the inside of the body. If you're going to open up the trunk, I would go ahead and do it before final sanding because more than likely,it will need more primer after you cut it out. Thanks Roger. The grille is going to be body color. Trunk is open, and I already have it in more primer; waiting for it to dry. Probably going to do a custom chassis, as I dont like the limitations presented with the kits chassis. Molded in exhaust, etc. Corey
dimebolt Posted October 1, 2012 Author Posted October 1, 2012 sweet Corey, I planned on doing something like that to my grille, looks awesome! Thanks Bill. It ought to be pretty cool when it's done. The powerplant however, won't be near as awesome as the one going in your's. That thing is a MONSTER!!! Corey
VW Dave Posted October 1, 2012 Posted October 1, 2012 At the risk of sounding repetitive, I like what you've shown us so far....and I really like the grille too. I see that you sanded the edges of the door handles and gills off....adding PE to those as well?
dimebolt Posted October 1, 2012 Author Posted October 1, 2012 Thanks Fred and Dave. Yeah man, it's gonna get the photoetch treatment throughout. Corey
dimebolt Posted October 1, 2012 Author Posted October 1, 2012 (edited) Got the trunk cut open and another coat of primer. Body prepped and 2 light mist coats. Then 15 min later, a wet coat. Missed part of the engine bay. It'll get lightly wet sanded with 2000 grit, then shot again. Then some clear if everything goes well. Wet sanded, and cleared again. And another time. Alot of people don't know it, but; every time you wet sand clear, it practically doubles the shine when you clear it again. Well, alot of people do realize it. Just one of the many little tricks I learned from my mom's ex husband. He painted semi trucks for a living. Corey Thanks for looking. Corey Edited October 1, 2012 by dimebolt
Randy D Posted October 1, 2012 Posted October 1, 2012 Hi Corey, That is wonderful body work. That paint is superb !!! Randy
dimebolt Posted October 2, 2012 Author Posted October 2, 2012 Thanks Fred and Randy. Gonna see what I can get done on the engine tonight. Will post up before I go to bed. Corey
dimebolt Posted October 2, 2012 Author Posted October 2, 2012 Hey Corey, This kit looks familiar! It's far beter off in your capable hands. Tripple black is exactly how I woudl have built it. The progress looks good so far. Steve Thanks man, you're too kind. I've got pretty high expectations of this build. I'm just gonna take it one step at a time, and not get into too big of hurry. But I can't wait to see it finished!!! Corey
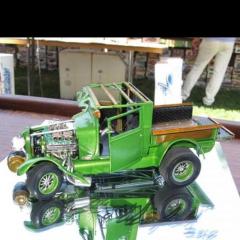
dimebolt Posted October 2, 2012 Author Posted October 2, 2012 This is approximately what the stance is gonna be like. Thanks for looking. Corey
Recommended Posts
Create an account or sign in to comment
You need to be a member in order to leave a comment
Create an account
Sign up for a new account in our community. It's easy!
Register a new accountSign in
Already have an account? Sign in here.
Sign In Now