Pullin Gears Posted November 7, 2012 Posted November 7, 2012 I'm working on an easy, fun build. It's a promo so there's no motor. I scratchbuilt the hood out of evergreen sheet plastic and half-round. You can see the "Bullhorn" exhaust that will exit the front fenders, sitting on the ground next to the paint-detailed tail lights. The wing and chute mount were also scratch built. I need to add some sort of strut for support. The decals in the rear window are slixx left overs. The idea is that this is a turbo car, so inside I scratch built an intercooler and related plumbing. Next, I will build a roll cage, fuel cell, and some electronics.
W-409 Posted November 7, 2012 Posted November 7, 2012 Looks Great! Love the color and that hood scoop too. These cars are really popular in the USA Drag Strips and that's why I'm suprised that they can't be seen much in this scale. But good to see yours, it looks great. Can't wait to see more.
Pullin Gears Posted November 7, 2012 Author Posted November 7, 2012 Thank you, It is actually molded in gray, I'm partial to these Camaros, I own a 1:1 86 Z28.
Mooneyzs Posted November 8, 2012 Posted November 8, 2012 Very Cool Build you got going. It's always goo to do a fun and easy build.
FAST442 Posted November 9, 2012 Posted November 9, 2012 Looks very cool, gonna add the huge hole in the grille for that monster turbo?? We have a lot of the stock suspension drag radial cars here in Chicago!!
Ry4ns302 Posted January 14, 2013 Posted January 14, 2013 Awesome! The guys that built my 1:1 toy have one remarkably close to that! Check out mouth racing.com for more pics if interested
Pullin Gears Posted January 17, 2013 Author Posted January 17, 2013 Kyle, the front wheels are prostars, avaliabe in older revell-monagram pro stock kits. I think you can get them in resin now. The rears are a centerline style I got from my parts box. More pics coming soon.......
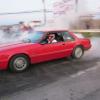
Pullin Gears Posted February 5, 2013 Author Posted February 5, 2013 Hey guys! Sorry it's been so long since I've posted, life got in the way! Here is some progress on the Camaro: I have a roll cage almost finished The shifter is from Replicas and Miniatures of Maryland I got the tires sanded and detailed, the wheels painted, window decals on, chute mounted and wired, and some burnout rubber on the quarters I also lowered the front end, it will have this stance when it's finished
tyrone Posted February 5, 2013 Posted February 5, 2013 Looks Awesomee Kevin... I really like this build... where did you find those M/T decals on the slicks? those are smaller than the one I have...
Pullin Gears Posted February 5, 2013 Author Posted February 5, 2013 Thanks Jeremy and Tyrone!, the M/T logos are actually free hand. The tires are goodyear nascars with the logos facing in. I sanded the outside then used a Jelly Roll white pen( you can get them at Michaels) to make the logos( it will dry on the vinyl)
Mooneyzs Posted February 5, 2013 Posted February 5, 2013 I have to agree with Tyrone here, nice job on lettering of your tires. I thought they were a decal lol. Looks perfect to me.
Davewilly Posted February 6, 2013 Posted February 6, 2013 Looking great....Like the decals all on the back window
Pullin Gears Posted March 25, 2013 Author Posted March 25, 2013 Thanks Guys! I finally made it back to the bench to wrap up the Camaro.... I painted the cage semi-flat black, with heat shrink used to replicate roll bar padding and detail wire used for zip-ties I also scratch-built a battery box with more detail wire used for the cables. I also finished the rear down bars of the cage The roll bar is installed for good and the interior is finished! More pics! I also wired the shift light after I glued it on for the third time(kept hitting it mocking up the cage). All Done! Do you guys usually post your finished drag cars in the "Underglass" section too?-Thanks
Recommended Posts
Create an account or sign in to comment
You need to be a member in order to leave a comment
Create an account
Sign up for a new account in our community. It's easy!
Register a new accountSign in
Already have an account? Sign in here.
Sign In Now