zadfz Posted November 20, 2012 Share Posted November 20, 2012 (edited) I'll first introduce myself as it's my firt post on this forum. Im 32 and from Montreal, Canada. I started modeling 12 years ago. I did a few that I put in the garbage ! Nothing worth pics as it was very basic without any mods. Following all your project since 6 months, last friday I found myself buying a new kit. I'm a little afraid since I have no experience for the results that I expect. Hope you will give me some tips along this build. So first pics, the box itself ! Then, I made a fast mock-up to see the stance i wanted. Didn't adjust play with the suspension height yet, I justed want to see where I'll go. I decide to play with the radiator cover by giving it a angle. Haven't decide yet which engine I will choose, I don't no yet if the clearance is good. I think I will have to extand the frame about 1/8" to 3/16". The angle you see in the picture is less that what I want, I will correct this later. Now the trickiest part (for me) !!! The choptop. I plan cutting about 3/16" of the top height as you can see. I started cuting, now in two separate part. Tonight I will weld them together, I must say, i'm really nervous about this step, It will be the first time, hope it will be easy. Edited January 15, 2013 by zadfz Quote Link to comment Share on other sites More sharing options...
Droppedgmc Posted November 20, 2012 Share Posted November 20, 2012 don't be afraid to cut it can't wait to see it done Quote Link to comment Share on other sites More sharing options...
zadfz Posted November 20, 2012 Author Share Posted November 20, 2012 don't be afraid to cut it can't wait to see it done The cut is already done, and it was pretty easy. The tricky part for me is to glue them together and to have a nice fit. I can't stop thinking wich process i'm gonna use. Wish me luck Quote Link to comment Share on other sites More sharing options...
crazyrichard Posted November 20, 2012 Share Posted November 20, 2012 nice very nice !!! i did this exact same kit , i also chopped the roof , lined up pretty great i must say !! gonna follow this ! Quote Link to comment Share on other sites More sharing options...
tooltas Posted November 20, 2012 Share Posted November 20, 2012 its just plastic man cut it up Quote Link to comment Share on other sites More sharing options...
cobraman Posted November 21, 2012 Share Posted November 21, 2012 Nice start. That is a very nice kit to work with. Quote Link to comment Share on other sites More sharing options...
zadfz Posted November 21, 2012 Author Share Posted November 21, 2012 So yesturday I made the choptop. It was my first time so the results is not perfect. There was 2 trunk in the kit, I decided to use this one I was looking at the trunk and I tought it was missing something. So I grab my lighter and came up with this result. You won't see all the details because the picture are from a telephone. Next step, the frame extension. I just have time to cut the frame, I will glue it up tonight. So, the homework for tonight: - Finish the frame extension - Sand the bondo of the choptop. My question is, is 120 grip is to low for sanding the bondo ? Quote Link to comment Share on other sites More sharing options...
Ira Posted November 21, 2012 Share Posted November 21, 2012 GREAT PROGRESS!!! 120 Sandpaper should only be used for the Tuffest Sanding. I use 220 sandpaper a lot for sanding putty and 320 for finishing. I also use a Laquer Primer/Filler from Dupli-Color, it fills in many imperfections. Quote Link to comment Share on other sites More sharing options...
Modelbuilder Mark Posted November 21, 2012 Share Posted November 21, 2012 looking like a good start to me Quote Link to comment Share on other sites More sharing options...
zadfz Posted November 22, 2012 Author Share Posted November 22, 2012 Little progress. I sanded the bondo on the chassis and primed it. Still need little more bondo and sanding. I have finished to modify my frame. Forgot to take picture Will try to have pics at the end of the day. Little progress on the engine. I choose to go with the v8 dual carb that was in the kit. Started assembling and painting. Quote Link to comment Share on other sites More sharing options...
zadfz Posted November 22, 2012 Author Share Posted November 22, 2012 I must apologized for my writting. I speak french and not perfect in english. Wish you understand all my comments ! Quote Link to comment Share on other sites More sharing options...
wagoneer Posted November 22, 2012 Share Posted November 22, 2012 Benoit, You're English is rather good. Certainly much better than my French, 'je parle un petit peu de Francais' is about my limit! Quote Link to comment Share on other sites More sharing options...
Duntov Posted November 22, 2012 Share Posted November 22, 2012 OK!!!... This is some very nice work.... keep it going..... you are doing a great job on this kit!!! Quote Link to comment Share on other sites More sharing options...
H.A.K Posted November 23, 2012 Share Posted November 23, 2012 Lookin good. Quote Link to comment Share on other sites More sharing options...
zadfz Posted November 23, 2012 Author Share Posted November 23, 2012 Didn't have time yesturday to make a big progress. More bondo and don't know how to tell it in english, I had a piece of styrene on top of the windshield Quote Link to comment Share on other sites More sharing options...
Mr Dedo Posted November 24, 2012 Share Posted November 24, 2012 I'm watching your build with great interest, as it is a new approach to a remarkable kit by a modeler unafraid to try something new. Quote Link to comment Share on other sites More sharing options...
zadfz Posted November 25, 2012 Author Share Posted November 25, 2012 In the week-end, it's hard to find time with the kids ! I made a little progress. Here we go ! Finished sanding the chasis. It's not perfect but I wanted it this way as it's a ratrod. I wanted a rough look. Started working on the interior And finally, little progress on the engine Quote Link to comment Share on other sites More sharing options...
H.A.K Posted November 25, 2012 Share Posted November 25, 2012 Lookin real good. Quote Link to comment Share on other sites More sharing options...
crazyrichard Posted November 26, 2012 Share Posted November 26, 2012 looks great ! exactly what i did with this kit after the chop i also made a sort of sunvisor woth styrene , i chopped the roof lower but its pretty much the same idea the pannellines all line up ver well on this kit when you chop the roof so its easy to add a visor witch hides the bit of lenght you miss at the front after chopping very curious on the rest Quote Link to comment Share on other sites More sharing options...
derby1018 Posted November 26, 2012 Share Posted November 26, 2012 I will be following this Quote Link to comment Share on other sites More sharing options...
zadfz Posted November 30, 2012 Author Share Posted November 30, 2012 So, after a few days of break, here is an update. Fast mid-progress mock-up I think I won't go the same way it "should be". The interior will be simple but clean. All the mechanical parts and the frame will be clean and rust free. For the chasis, i want a rough look, so it will be rusty. As I worked in a compagny that produce signs, I have the chance to have the hand on a nice paint kit. What I liked is it's waterbase paint, so easy to clean. You have different color in the paint. I choosed the bronze. Once painted, you have the choice for the aging process. I'm gonna use a mix of them. As I wanted a rough look, I applied the paint with a brush insteed of an airbrush. The results is perfect. Here is a pics of the bodyparts paint. (No aging yet) Forgot to show the dent I made on the passanger door and on the bottom of the trunk Quote Link to comment Share on other sites More sharing options...
Dr. Cranky Posted November 30, 2012 Share Posted November 30, 2012 Interesting progress, we will continue to watch. Quote Link to comment Share on other sites More sharing options...
zadfz Posted November 30, 2012 Author Share Posted November 30, 2012 Little progress on the interior Painted misc parts More progress on the engine Quote Link to comment Share on other sites More sharing options...
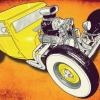
zadfz Posted December 6, 2012 Author Share Posted December 6, 2012 Finally I took my DSLR out of the closet to provide you better pics ! Here are the last progress. The frame done Frame + Engine almost done Last mock-up before final "glueing" (right term ???) For the front grill, I made a custom one from a piece of aluminium brush plastic at work with a laser engraving system. Here is the design Here is the final result of the grill, but please help me decide, don't know if I go with my custom grill or one of the 2 optional that was with the kit Quote Link to comment Share on other sites More sharing options...
zadfz Posted December 6, 2012 Author Share Posted December 6, 2012 Need to go now. I have to go work on my costum exhaust line. I'll update the topic as soon as I get picture Quote Link to comment Share on other sites More sharing options...
Recommended Posts
Join the conversation
You can post now and register later. If you have an account, sign in now to post with your account.
Note: Your post will require moderator approval before it will be visible.