Chas SCR Posted December 13, 2012 Posted December 13, 2012 The tape is for where all the points of measuer line is to do all mods on the sides and the hood and top. There is also some nose work will be done off the center line. There will be over 20 diffrent mods done to the body in all. The tape is for where all the points of measuer line is to do all mods on the sides and the hood and top. There is also some nose work will be done off the center line. There will be over 20 diffrent mods done to the body in all. If you was tired of seeing "Runt" in build mold here is the next one in line, "Brute Force" The body mods are now starting to be in place as I open up the vents so they can be molded into the body work
72 Charger Posted December 13, 2012 Posted December 13, 2012 It looks good so what are the other 19 mods going to be ?
Chas SCR Posted December 13, 2012 Author Posted December 13, 2012 Hood, nose, rear tail section, under pan section, ruff, all for 4 fenders, front and back window section. A lot of the stuff as two to three changes in them.
Chas SCR Posted December 13, 2012 Author Posted December 13, 2012 Thanks for the kind words. I will have pics of the rim center as it's in ruff stage but will be changed using some cad programs and then in to the 3D Printing when it goes out. A lot of the parts will either be done in the new 3d stuff or changed and then in resin cast for the bigger parts. Plans are for this to having full working hood and trunk.
James2 Posted December 13, 2012 Posted December 13, 2012 that is a beautiful Camaro. Good luck, I am following.
Ford guy Posted December 13, 2012 Posted December 13, 2012 This is going to be totally cool ! Looking forward to watching the progression. Roy the Ford guy
Chas SCR Posted December 14, 2012 Author Posted December 14, 2012 Some of the body mods are a lot of vents was put into this car. The hood vents and also nose air induction vent and the relocation of the round running lights. The ruff was just a special job that did to change the look of the car when looking at it from the rear. I open up the trunk and will be doing all the inner work on that and brace with brass parts and then painting them. The turn does not open like a normal camaro as it was changed to open more from the top with a thick lip that will be not seen when the spoiler is put on.
72 Charger Posted December 14, 2012 Posted December 14, 2012 lookin good so far I will be watchin this one for sure
tjones87 Posted December 14, 2012 Posted December 14, 2012 How did you remove the turn signals from beside the headlights? i am replicating my 1:1 camaro and will have to do that as well...thanks
Chas SCR Posted December 15, 2012 Author Posted December 15, 2012 ground it out and will be filling it in with putty and smoth it out. The light was relocated to the lower front end area.
tjones87 Posted December 15, 2012 Posted December 15, 2012 ok cool...thats what i was planning on doing...I am having to recreate the original rectangle turn signal, like the non rs camaros....any idea on what you will do for the bumper? i am looking forward to seeing that as well...keep up the good work
Chas SCR Posted December 15, 2012 Author Posted December 15, 2012 Bumper is in the same location, The middle part bumper will be made out of the resin grill using the upper support part of that as it has the same design and angle that is needed to make the two part one that goes across the grill area.
tjones87 Posted December 15, 2012 Posted December 15, 2012 sounds like a plan...will be watching this build closely..maybe give me some ideas for my build. keep up the good work
Chas SCR Posted December 16, 2012 Author Posted December 16, 2012 Front air vent for the LS7 motor intake. This is just the same on how they did the real car as it is really wider the what the intake vent looks like., On the Front side vent this is just a outer vent to let out the heat and then the rear vent also I made a part that has a tube that will go to the rear brakes. The top ruff part is just a mod that they did and the molds is just some of the parts that this car will have on in resin from rim ring sizes to the duel fans for the radiator to the oil coolers
Chas SCR Posted December 16, 2012 Author Posted December 16, 2012 CHECK OUT BOB BERTELSONS BRUTE FORCE CAMARO AREA 51 PAINTED AND RPM HOTRODS DID THE INTERIOR IN THIS MONTHS ISSUE OF POPULAR HOT RODDING !!!!!!
Plasticfanatic Posted December 17, 2012 Posted December 17, 2012 This really looks great, like the body modifications a lot. This is going to be a great looking model.
Chas SCR Posted December 17, 2012 Author Posted December 17, 2012 Putty the running boards in smooth and also got the marker lights taken out and smooth to the fenders front and rear. Both sides are now smooth fitted and also have the vents put in place. The rear section has been cut out and then filled in also.
pharr7226 Posted December 17, 2012 Posted December 17, 2012 The body mods look great. I like the use of the tape to make your reference points easier to locate. I will borrow that one for sure. I'm looking forward to your updates.
Chas SCR Posted December 17, 2012 Author Posted December 17, 2012 Thank you for the kind words. After every thing goes in if it is right then here is how it ends up. I was also able to get the vents with in +/- .005 from any part of where you take a measuerment at. Front the fender body line down to the dooer jam in or to the outer edge of the fender in. Also the vents are with in +/- .003 at any one point from each other in size or angle.
scalemodelworld Posted December 17, 2012 Posted December 17, 2012 These mods look awesome. I'm loving seeing how you're doing them.
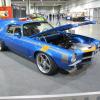
Scale-Master Posted December 17, 2012 Posted December 17, 2012 I'm not sure if you realize this, but the body you started with is an RS, the real car shown in the photos is a Standard. So the nose (around the grille) on your model is much too long. (Notice the line that denotes the Endura (RS only) nose extension.) You'll also have to widen the lower valance a bit if you want those proportions to be correct since the Standard version uses the parking lights that are under the bumpers. The RS front valance has no provisions for those lights and is a different shape.
Chas SCR Posted December 17, 2012 Author Posted December 17, 2012 Very good eye Mark! But here is the catch, They did start with an RS and shorten the nose a little but also made it bigger. They move the lights from the top to the bottom under the bumper and narrow the bumper up by 1/2 of what the real one was to make this look right. The valance was also remade to fit the new mods on the car. Here is a photo of the car after this was done on all the work from the nose.
Scale-Master Posted December 17, 2012 Posted December 17, 2012 No, it started as a Standard as shown in your photo. Reworked, yes, but not an RS. The sub-structure of an RS header panel is different since it is made to accept an Endura bumper/nose. That is a standard nose and valance being reworked in that photo. (Plus I researched the real car.)
Recommended Posts
Create an account or sign in to comment
You need to be a member in order to leave a comment
Create an account
Sign up for a new account in our community. It's easy!
Register a new accountSign in
Already have an account? Sign in here.
Sign In Now