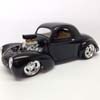
Dinky Posted November 19, 2013 Share Posted November 19, 2013 (edited) I will build this one for my kid for Christmas for surprise. Will be difficult to keep it out of sight for him but I will do everything I can. Will be build straight from the box, hard enough to be ready in time Unboxed yesterday evening Edited December 24, 2013 by Dinky Quote Link to comment Share on other sites More sharing options...
lanesteele240 Posted November 20, 2013 Share Posted November 20, 2013 I have this one and a dinosaur truck in the stash. Cant wait to see it come together Quote Link to comment Share on other sites More sharing options...
Dinky Posted November 20, 2013 Author Share Posted November 20, 2013 Cool, would like to have the Dino also but they are very hard to find for normal price here in Holland. I will have an update in the weekend. The quality of this box is bad compared to the Lindberg trucks I build lately. There are so many sinkmarks in visible places and lot of stuff that must be long sanded before it looks normal. Quote Link to comment Share on other sites More sharing options...
crazyrichard Posted November 20, 2013 Share Posted November 20, 2013 cool ! will make your kid very happy Quote Link to comment Share on other sites More sharing options...
lanesteele240 Posted November 21, 2013 Share Posted November 21, 2013 Dinky, i only gave 5 bucks each for both of the trucks at a local cheap shop. I went back to get two more of each the next day and they were all gone. They had like 10 of each left when i got mine. The decals on the dino truck look to be a real challenge. Im going to make a tank track van monster truck out of it. Cant wait to start but i have other builds to finish Quote Link to comment Share on other sites More sharing options...
Dinky Posted November 21, 2013 Author Share Posted November 21, 2013 Thats a great deal Gary I have seen the Dino and the decals are real challenge indeed, seems the front one seems to be the most difficult even with Micro SOL and SET. Quote Link to comment Share on other sites More sharing options...
slusher Posted November 21, 2013 Share Posted November 21, 2013 That will be a great gift. Very cool project also.. Quote Link to comment Share on other sites More sharing options...
Dinky Posted November 24, 2013 Author Share Posted November 24, 2013 Made a start today with the body, i'm not satisfied with the red part so this will be sanded and repainted this week. When ready it will get some clear coat. Quote Link to comment Share on other sites More sharing options...
Jantrix Posted November 24, 2013 Share Posted November 24, 2013 Awesome! Great paint work. Quote Link to comment Share on other sites More sharing options...
Dinky Posted December 2, 2013 Author Share Posted December 2, 2013 Finally some time and the red parts now how I wanted it to be, I was a little enthusiast spraying the clear coat so I forgot the decals. I will add them later and maybe give it a second layer gloss. Quote Link to comment Share on other sites More sharing options...
crazyrichard Posted December 7, 2013 Share Posted December 7, 2013 awsome finish (again haha) Quote Link to comment Share on other sites More sharing options...
Dinky Posted December 16, 2013 Author Share Posted December 16, 2013 Finally some time to work on the Ninja Turtle. The tooth decals are on, lucky me.... soon they hit the water they broke in pieces but I was able to use them. I gave the body one extra clear coat to protect the decals. First experience with Alclad paint (blower and valve covers), very nice stuff but goes off very easy. Some progress on the chassis Tried one off the wheels with a red outside edge, I like it and im going to do the others also. There are some molding holes in the rims but these will not be visible because the hub will come in front. 8 days until Christmas....... Quote Link to comment Share on other sites More sharing options...
crazyrichard Posted December 18, 2013 Share Posted December 18, 2013 awsome , and like always super clean work !! Quote Link to comment Share on other sites More sharing options...
BluePopsicle Posted December 18, 2013 Share Posted December 18, 2013 I want 4 of these! I would love to do each of the turtles. Quote Link to comment Share on other sites More sharing options...
Dinky Posted December 18, 2013 Author Share Posted December 18, 2013 And some more progress, driver compartment ready and the front axle is on. Test fit for the body. Dryfit of the first wheel, I still had doubts but now I'm sure and I'm going to do the other wheels the same. Now first some putty and paintwork before I can proceed with the chassis. Quote Link to comment Share on other sites More sharing options...
Matt P Posted December 19, 2013 Share Posted December 19, 2013 This is coming along very nicely. keep up the good work. Quote Link to comment Share on other sites More sharing options...
blackbeard Posted December 19, 2013 Share Posted December 19, 2013 coming along nicely love those ninja turtles Quote Link to comment Share on other sites More sharing options...
Dinky Posted December 19, 2013 Author Share Posted December 19, 2013 Thanks guys Quote Link to comment Share on other sites More sharing options...
BluePopsicle Posted December 19, 2013 Share Posted December 19, 2013 This is looking really nice. Good job. Quote Link to comment Share on other sites More sharing options...
Davewilly Posted December 19, 2013 Share Posted December 19, 2013 Great paint on the body! Looks pretty cool! Quote Link to comment Share on other sites More sharing options...
crazyrichard Posted December 21, 2013 Share Posted December 21, 2013 (edited) like always such clean building .. awsome.. Edited December 21, 2013 by crazyrichard Quote Link to comment Share on other sites More sharing options...
Dinky Posted December 22, 2013 Author Share Posted December 22, 2013 Thanks Richard Scoop is filled, painted and placed, after that I could finally add the rear part of the roll cage. Without that I couldn't install the rear shocks and the rear axle. And another dry fit The end is in sight and Christmas also Quote Link to comment Share on other sites More sharing options...
Dinky Posted December 23, 2013 Author Share Posted December 23, 2013 Teaser Quote Link to comment Share on other sites More sharing options...
Dinky Posted December 24, 2013 Author Share Posted December 24, 2013 Finished, the end pics are in the Under Glass topic: http://www.modelcarsmag.com/forums/index.php?showtopic=83196 Quote Link to comment Share on other sites More sharing options...
heroncustom Posted December 24, 2013 Share Posted December 24, 2013 wow just wow u did a fantastic job im kinda jelous my daughters fav turtle is raph!! keep it up! and merry christmas! Quote Link to comment Share on other sites More sharing options...
Recommended Posts
Join the conversation
You can post now and register later. If you have an account, sign in now to post with your account.
Note: Your post will require moderator approval before it will be visible.