Pocherphile Posted March 1, 2014 Author Share Posted March 1, 2014 OK, time for me to 'fess up. I'm not just a fanboy cheerleader for you guys. I actually build some stuff. After a layover for (attempted) medical repairs, I've decide to finally start my 'bucket' car, maybe my last build because it will take me forever-the Sedanca K-72. Thanks (again) to Skip and Harry and a little local advice from a certain Pocher Phile, I've been wading through tons of research and Koo's disc for help. So far, three + weeks of 8-10 hour days has seen me de-burr, redrill, de-seam and test fit everything on the chassis. Thank you Pocher, Blacksmith to the Stars. I see I'm still cursed with 'Anal-itis', and doing things that won't be seen-taking untold hours. However, I'm nowhere near as talented as you guys and would be pleased with a 'near museum', almost OOB neat build with some of Marvin's jewels sprinkled on. I'm no machinist and lack those tools so don't look for John Haddock-type work. If I were more accomplished, I'd do a complete car and a separate display chassis with right clevises, linkages and bolt together stuff. -just love this old hardware. Speaking of which-this 1932 example is carrying most all the same chassis equipment that you guys work with on the Brass Era cars. Not much progress there in 20 years. Anyway, I'll post a progress shot once in a while but no WIP-too labor intensive for me at this stage. Feel free to pop in with advice or corrections anytime. I need the help. PS-Please hound Harry to re-start and post his Sedanca, and stop with these 'little toy cars'. You have my undivided attention, any build of a Pocher even if SOB, is a task and I am looking forward to seeing what you bring to the table. Take as much time as needed and detail whatever tickles your fancey. I have built many Pochers and I will be the 1st to tell you, this particular kit is not a easy kit to build, but if one takes their time and pays attention by many many dry fits, a truely stunning piece can be had right out of the box. Now wheres those photos man! Rick Cato, notice that big ole smile you made today with this news. Quote Link to comment Share on other sites More sharing options...
Pocherphile Posted March 1, 2014 Author Share Posted March 1, 2014 And to prove I am working on it.................. Quote Link to comment Share on other sites More sharing options...
Cato Posted March 1, 2014 Share Posted March 1, 2014 Very glad to see that. Don't get your expectations up. I can easily disappoint this crowd... Quote Link to comment Share on other sites More sharing options...
sjordan2 Posted March 1, 2014 Share Posted March 1, 2014 (edited) My biggest puzzlement with that kit is the shape of the fenders. Does anyone have images of a 1:1 with those fenders? I've seen hardtop saloons with such fenders, but never a sedanca, and I have tons of reference material. Edited March 1, 2014 by sjordan2 Quote Link to comment Share on other sites More sharing options...
Pocherphile Posted March 1, 2014 Author Share Posted March 1, 2014 My biggest puzzlement with that kit is the shape of the fenders. Does anyone have images of a 1:1 with those fenders? I've seen hardtop saloons with such fenders, but never a sedanca, and I have tons of reference material. That has been a debate among Pocher builders for awhile now. The story goes that when Pocher went to get the measurements for the Sedanca, one which was available to them @ the time, seems this particular vehicle was a custom coach and not the norm as was coming from the factory coach works. Some have even suggested the reason for these fenders was to make it easier for Pocher to put out the 3 versions of the Roll's that they marketed. But as with all things, one can correct if they have the skill's. I have seen this Model take Best Of Show at contest from the US to EU and the fenders as used were the ones w/the kit. Then we get into the nut and bolt counter's..........none of the kits as produced by Pocher are a exact copy of the vehicles they rep, but rather a as close as they could get, within the scale and ability to produce for each kit mfg'd. I know a fella that set out to correct every mis-take and error of a Pocher kit..........that was well over 20 years ago, it is not done! Could it be done, I guess so, but why.......I say go with what you have and enjoy that kit. Just my 2 cents worth. Quote Link to comment Share on other sites More sharing options...
Harry P. Posted March 1, 2014 Share Posted March 1, 2014 I agree with Skip... when I started this kit I remember not finding ANY Sedanca with fenders like in the kit. But since RRs were available with custom coachwork, the fenders are "right" as far as I'm concerned! Quote Link to comment Share on other sites More sharing options...
Pocherphile Posted March 1, 2014 Author Share Posted March 1, 2014 Ref photo of engine with the type of carb as comes in the Fuman kit............. Quote Link to comment Share on other sites More sharing options...
Cato Posted March 1, 2014 Share Posted March 1, 2014 Guys-don't wish to thread-jack anyone's work here. For the record-me four-never found these fenders in all my research. But I do love them with a bit of reservation. I'll work to get ride height down so no 'dead-cat' space. I crave this discussion but will start a tentative 'almost WIP' thread of my own and welcome all such input. Harry-should I put it here or in WIP? Updates will be infrequent, but I hope discussion is frequent. And you have permission to jack my thread with your Sedanca's renewed progress...hint....hint... Quote Link to comment Share on other sites More sharing options...
Harry P. Posted March 1, 2014 Share Posted March 1, 2014 Post it as a WIP on its own. Quote Link to comment Share on other sites More sharing options...
Cato Posted March 2, 2014 Share Posted March 2, 2014 Post it as a WIP on its own. Will do. Quote Link to comment Share on other sites More sharing options...
Pocherphile Posted March 2, 2014 Author Share Posted March 2, 2014 (edited) Some progress made on engine.........as all know, the motor comes w/tubing for the sparkplug and I agree, not very good. Opened up the cylinder head top and inserted alum turned sparkplugs. I have also drilled holes to replicate the X12 bolts/nuts that hold the cylinder heads on........these are nuts threaded onto a rod, will have to adjust them all to be uniform and flush when installed for good. Bottom of block to get the rough treatment w/Mr Hobby 1000, this is finer than the 500 used on the Fiat block. Edited March 2, 2014 by Pocherphile Quote Link to comment Share on other sites More sharing options...
Pocherphile Posted March 2, 2014 Author Share Posted March 2, 2014 (edited) I jump around too while building to dry fit each component and hope to do away w/surprises! The frame in the Fuman kit is Ok, but needs some attention with putty and a sanding stick to true it up. Rivet holes have been drilled and the frame is straight and as true as I could get it w/o a jig. Per the ref pictures I am using, added a brass rod to the front of the frame, seems this was not apart of the kit, but there is a hole in one side of the frame. Drilled the other side, cut a piece of brass rod, added the part. I also taped the frame down while glueing to keep it as flat as possible. Have seen many of these not set w/all 4 on the ground. Engine sets nice and flush within the sub-frame. I thought about going the route of replacing the leaf springs, but I decided they were good enough for the version of the Mercer I was building and cut down on build time........I do not want to spend hours on one aspect of the build. Took pretty much the whole day to do the frame as it it. Rick Edited March 2, 2014 by Pocherphile Quote Link to comment Share on other sites More sharing options...
f1ford48 Posted March 2, 2014 Share Posted March 2, 2014 that sub frame was the Mercers secret to its handling. a nice low center of gravity for cornering. Quote Link to comment Share on other sites More sharing options...
Belugawrx Posted March 3, 2014 Share Posted March 3, 2014 My guess is it's highly weathered and oxidized black, which would turn gray as it weathered and oxidized. Of course, if you want to recreate the look of oxidized black you'll probably want to actually use a dark gray to begin with. I concur... Just a thing... flat file that Mercer badge on the rad and Qtip the sludge out and paint it again... if its possible?? Looks awesome Quote Link to comment Share on other sites More sharing options...
sjordan2 Posted March 3, 2014 Share Posted March 3, 2014 I have a hard time believing that a car as gray as shown was ever black. For example, back in high school, my grandmother gave me a barn find Model T truck with original paint, and it was as black as the day it was born. Quote Link to comment Share on other sites More sharing options...
Pocherphile Posted March 3, 2014 Author Share Posted March 3, 2014 Rivets added.......brass round head nails, I still build wood ships on occassion.......last one done me in for awhile. I also used SS 1.0mm rivets from Scale Hardware for the smaller attachment points. PE washers and machined bolt heads finish out the small details. Also, this yellow plastic is tough to photograph..........so for very pleased with how the frame has turned out, for me, get it straight and level and the rest is down hill. Rick Quote Link to comment Share on other sites More sharing options...
f1ford48 Posted March 3, 2014 Share Posted March 3, 2014 I have a hard time believing that a car as gray as shown was ever black. For example, back in high school, my grandmother gave me a barn find Model T truck with original paint, and it was as black as the day it was born. the car is Grey- you can see the incredible difference between a Stutz and a Mercer [same exact car]-also on youtube- ''mercer stutz simeone automobile museum official video'' Quote Link to comment Share on other sites More sharing options...
Cato Posted March 3, 2014 Share Posted March 3, 2014 Rivets added.......brass round head nails, I still build wood ships on occassion.......last one done me in for awhile. I also used SS 1.0mm rivets from Scale Hardware for the smaller attachment points. PE washers and machined bolt heads finish out the small details. Also, this yellow plastic is tough to photograph..........so for very pleased with how the frame has turned out, for me, get it straight and level and the rest is down hill. Rick Love straight and tidy foundations. It shows in correct stance in the finished products. Those rivets are cool-but tiny. I have used a PE sheet of rivets, screw and hex-heads from Scale Mtsps in 1/12 scale-should work fine here in 1/16. Quote Link to comment Share on other sites More sharing options...
Pocherphile Posted March 3, 2014 Author Share Posted March 3, 2014 Have debated about how to achieve the color variation as seen in the photo for #22......I believe the best way to achieve is a base coat of black to add depth and shadow, then overspary with a lets say German Panzer Gray lightened a tad. When I look a the cowl, to me there is no doubt as to what color this was, solid black very worn and chipped off. I will paint the car as she might have looked early on in her career, the colors rich but with signs of use. I normally do not build period specific because you always end up finding that you did not get it right, so this will be a interpretation of what I believe this ole gal was back in the day. Thanks for the info/tip on the Youtube.............. Cato, yes the revits are very small, but I have a ton of them for building F1 in 1/12th scale, the larger brass ones are wood ship nails. I also agree, the straighter the frame, the better the stance, but you know how it goes, just one item not added correctly can change everything.............ie: I added the front axil today, everything was going well until time to line up and mount w/the mounting plate for the front leaf springs.........seems when I inserted the brass rod, I squeezed too much and pulled the FLS's in some and the plates would not match up w/axil..........so, with baited breath, pucker factor @ work and a set of pliers, the brass rod was removed w/o breaking anything apart. After that all went well. Front end installed. Quote Link to comment Share on other sites More sharing options...
Cato Posted March 3, 2014 Share Posted March 3, 2014 Only when you have talent do you get away with that-I never do.. Quote Link to comment Share on other sites More sharing options...
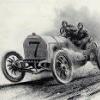
Pocherphile Posted March 3, 2014 Author Share Posted March 3, 2014 (edited) Here is some interesting Mercers of the racing type..................> 10-09-1911 Philadephia Fairmount Park 200 Mile Race # 11 Hughie Hughes, 1st Place In the 2nd photo, the fellow wearing the arm band is the mechanic, he must have the arm band on to be able to work on the car. Notice the belly pan on 3rd photo.........most racers had this, is also on a the Fiat, but the Pocher kit does not include. Edited March 3, 2014 by Pocherphile Quote Link to comment Share on other sites More sharing options...
Pocherphile Posted March 3, 2014 Author Share Posted March 3, 2014 Only when you have talent do you get away with that-I never do.. The above photos exspress what I am saying, the Mercer was truely America's 1st Stock Car, go to the dealer, buy one, strip it down, take to track and turn it loose..........of course as time goes by, one would modify f/speed. For that reason, one can build it anyway they desire and still be within the realm of the world of Mercers as race cars. of course, B/W photos make it very hard to tell what the color is, unless one has work with B/W and then you know by the hue pretty close what the color is. At best, a educated guess! Rick Quote Link to comment Share on other sites More sharing options...
Pocherphile Posted March 3, 2014 Author Share Posted March 3, 2014 I do have a question, from the photos I noticed something, whats up w/a double pair of goggles? Rick Quote Link to comment Share on other sites More sharing options...
sjordan2 Posted March 3, 2014 Share Posted March 3, 2014 Is that in picture 1? I guess it's just a backup if you get one too muddy. Quote Link to comment Share on other sites More sharing options...
Pocherphile Posted March 3, 2014 Author Share Posted March 3, 2014 (edited) Is that in picture 1? I guess it's just a backup if you get one too muddy. Good idea, if you look @ all three photos, the driver in 2 is wearing a double pair, in the last one, the mechanic. I guess they could get pretty nasty very quickly. And is it me, but I believe from the face, one fella is in all three photos? In photo 1 he is setting in the mech's seat, in the last 2 he is driving and I believe the guy in the mech's seat is the driver in the 1st photo.......so, looks like this crew could pull double duty. Rick Edited March 3, 2014 by Pocherphile Quote Link to comment Share on other sites More sharing options...
Recommended Posts
Join the conversation
You can post now and register later. If you have an account, sign in now to post with your account.
Note: Your post will require moderator approval before it will be visible.