hookedonplastics Posted August 3, 2014 Share Posted August 3, 2014 Greetings from Colorful Colorado! I have been experiencing an issue lately with candies and transparent paints. I have even found evidence of my issue in fine (thin?) solid colors as well(I think the latest was an opaque red from Tamyia shake and shoot). Here it is - when I am shooting the candies and transparents, I am experiencing a problem with the pigments receding from panel edges and peaks. I have even experienced this with some pearls. Any insight would be greatly appreciated, AND if this has already been addressed somewhere else, a road map would be appreciated as well! Thanks in advance, Russ Quote Link to comment Share on other sites More sharing options...
philo426 Posted August 3, 2014 Share Posted August 3, 2014 It is very important that the paint be mixed thoroughly.Spend at least a minute mixing it with a clean popsicle stick.Several light coats are preferable to a few heavy coats..I used Tamiya Clear Red over a silver base to paint my Roth road Agent. What do you think? Quote Link to comment Share on other sites More sharing options...
Modelmartin Posted August 3, 2014 Share Posted August 3, 2014 It sounds like your coats of paint are too heavy. Build up with several very light coats and let dry thoroughly and then hit it with a wet coat (just wet enough to gloss) that isn't too heavy. Quote Link to comment Share on other sites More sharing options...
hookedonplastics Posted August 4, 2014 Author Share Posted August 4, 2014 Thanks for the input guys. I really appreciate it. I will slow down next time and work in thinner coats. Quote Link to comment Share on other sites More sharing options...
High octane Posted August 4, 2014 Share Posted August 4, 2014 Too many thin coats and you'll soon lose the "candy effect" of the base coat showing through. Go easy on the coats, as one builder I know of used too many coats of candy red and ended up with a maroon colored body instead. Quote Link to comment Share on other sites More sharing options...
jwrass Posted August 5, 2014 Share Posted August 5, 2014 Russ, Look at my response in this section (MBQ&A) titled Candy Paint Jobs/Hot Rods a thread started by 10thumbs on July 2nd. That should get you headed in the right direction! jwrass Quote Link to comment Share on other sites More sharing options...
montecarlo1980 Posted August 10, 2014 Share Posted August 10, 2014 A very skilled painter named Gary Seeds once gave me the best advice with candy and transparent paints, especially for use on our model cars. He said always "Mist" your candy coats first. Not a light coat, but a very fine misting coat to where the body is still showing your base coat and hardly looks covered with paint at all. Once you get that very first fine mist coat on and you still see the base coat, stop and let it dry for a bit. Misting your candy colors on is key to get an even final coat. Especially if you're not able to shoot it through an airbrush and going the rattle can route. Misting helps to stop that receding from panel edges. I used to hate working with candy colors till I learned that trick. Quote Link to comment Share on other sites More sharing options...
hookedonplastics Posted August 12, 2014 Author Share Posted August 12, 2014 Thank you so much for all the input, guys. The information has been really helpful. I realize too, that this info will help me with my pearl clear coats as well. Thanks again! Quote Link to comment Share on other sites More sharing options...
Ace-Garageguy Posted August 12, 2014 Share Posted August 12, 2014 Here's another "candy" thread. http://www.modelcarsmag.com/forums/index.php?showtopic=91151&hl=%2Bcandy+%2Bcolors#entry1213480 Also, shooting color, especially candies, over bare plastic that hasn't been thoroughly scuffed is guaranteed to have color receding from panel edges. If you study the models presented on this forum, you'll see it's a pretty common problem, about as frequent as grainy orange-peel. Be SURE to scuff your bare plastic before applying ANYTHING. I use the Comet or Soft Scrub and a toothbrush method, with HOT water. This insures that ALL the surface will be adequately scuffed...even down in the nooks and crannies adjacent to details. It also insures that all the tooling lubricants will be removed. These lubricants, transferred to the plastic during the molding process, can also create edge-receding and fisheye problems. I DON'T recommend scuffing with sandpaper or ScotchBrite, which CAN SOFTEN or even OBLITERATE DETAILS, and it rarely really gets into all the crevices. Quote Link to comment Share on other sites More sharing options...
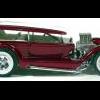
Bernard Kron Posted August 12, 2014 Share Posted August 12, 2014 I don't use an airbrush, because of problems finding a workspace with proper ventilation to the outside. Instead I use rattle cans which allow me to shoot simply outdoors without being tied to a compressor. Over the past couple of years I've begun experimenting with candy and metalflake effects. I thought I would share some of my experiences. First off I think Ruben Arrendondo's (montecarlo1980) comment regarding Gary Seed's advice to mist coat transparents is important and worth noting. The key to great transparent effects is control over the depth and hue of the final color and light mist coats is an excellent way to get there. I agree that paint loading up around the edges and reveals of bodywork is a sure sign of getting the paint down too heavily. One reason I used to do that was to develop a gloss coat. I finally abandoned it because of this problem. My solution now is to focus on the depth and color aspects and leave it to my clear coats to handle the final gloss. I've found that the best approach to creating good transparent effects is to treat all the layers as system, starting with the primer and working your way out. The color of your primer can have as important an influence on the final effect as the color and flake of your metallic base or your transparent color coat. Last week ago I experimented with a metalflake effect that is a good example of this. This will repeat some material from a post I did a few days ago in the Workbench section so I apologize in advance for the repeat. In this case I was using a Duplicolor metallic paint as my color coat. Regardless if they’re solids or metallics, Duplicolor paints are fairly transparent and very sensitive to the color and texture of your undercoat. It's probably because their rattle can paints are sold mainly as touch up paints and this characteristic makes feathering them in easier. I have done several candy-like paints jobs using Duplicolor metallics over a gold or silver base coat. Duplicolor makes a range of heavily flaked transparent paints called Metal Specks. I used Metal Specks Silver as the base coat for my flake paint job. The Metal Specks paint is also quite transparent with no toner in it, just metal flakes in a clear base. So it shows a bit of the primer color to it. Fortunately there is plenty of silver flake to it so it reveals the color coat very effectively. The Metal Specks is quite coarse so I buried it in three coats of clear before moving on to the color coat. This is important because you can polish the clear without disturbing the flake if you need to, and the smooth finish allows you to control how much color you put down. You can spray your color very thinly and stop at any point that you get the effect you are looking for. Then seal it and develop the gloss you want when you move on to your clear. The color coat is Duplicolor Medium Quasar Metallic. A bright medium blue. If you shoot it over a white base coat it is a very rich but brilliant medium blue, only a couple of shades darker than a French racing blue. But it’s so transparent that if you shoot it over a dark primer like a red oxide, or even a bright gold metallic, it will totally change color. Over red oxide it changes to a muddy dark olive blue green, and over gold it will show as a dark emerald blue-green metallic. What I was looking for was a rich, deep medium blue with a visible flake and strong metallic highlights. After experimenting with various combinations I settled on red oxide primer, followed by a base metallic coat of Metal Specks silver. Here are some photos taken in bright direct sunlight showing the progression of layers. I almost stopped after the first coat, except the shade was a bit too light and the metalflake had that super-aggressive coarse "sparkle" popular on speedboats and certain especially tacky styles of Naugahyde. Oh, and cheap aftermarket steering wheels, too! It took 3 light coats to get me where I wanted. Under artificial light the effect is a little more subdued. Quote Link to comment Share on other sites More sharing options...
Ace-Garageguy Posted August 12, 2014 Share Posted August 12, 2014 Bernard, that really looks terrific. I recall seeing fiberglass dune-buggies and speedboats with huge flake buried under topcoats of clear gelcoat (in the mold, shot inside-out), and period customs and race cars with monster flake as well. It took a special gun to shoot the flake, it was so incredibly huge, and you have captured the look perfectly in scale. Thanks for the how-to. Quote Link to comment Share on other sites More sharing options...
Bernard Kron Posted August 13, 2014 Share Posted August 13, 2014 Thanx Bill. Under artificial light the flake doesn't quite pop as much. To get the monster flake look I would probably go with a true clear paint or darker Duplicolor metallic and limit myself to one coat and then immediately go to clear. The same line of Metal Specks comes in Red, Blue, Green and Copper and I'm thinking of doing a drag car using some sort of multi-colored Metalflake scheme.... Quote Link to comment Share on other sites More sharing options...
Recommended Posts
Join the conversation
You can post now and register later. If you have an account, sign in now to post with your account.
Note: Your post will require moderator approval before it will be visible.