StevenGuthmiller Posted February 8, 2015 Posted February 8, 2015 BTW how do I edit the title to signify an update? Just go to your first page of the thread & click on "edit" at the bottom of your first post. Then click on "use full editor". Then you can type whatever you like in the "Topic Title" box, or anywhere else for that matter. Steve
peekay Posted February 8, 2015 Author Posted February 8, 2015 Thanks guys. Rob, it was very helpful to know in advance about these problems, and I'm confident now that she'll turn out alright. Touch wood. Steve, thanks for the help with the edit. Yes, I'm more into the aesthetics of cars than the mechanicals. My first car was a 1964 VW and even with the help of my copy of "VW Maintenaince for Complete Idiots" I got nowhere. Having said that, I very much enjoy it when someone else does a great looking scale undercarriage.
Tom Geiger Posted February 8, 2015 Posted February 8, 2015 BTW how do I edit the title to signify an update? Go to Post 1, your first entry. Click on the editor. Once that appears you'll see, "Use Full Editor". Then you will notice that the title is editable.
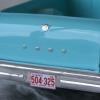
peekay Posted February 19, 2015 Author Posted February 19, 2015 Did the battery again using another of Roadhawg's very nice decals.. The headlights were a bit rough and wouldn't fit nicely so I cleaned them up, then painted and foiled them. No lenses for the blinkers so I made a pair. (Actually I made four, two for the carpet!) The bumpers have ugly mold seams on the sides and the rear has VERY visible sprue attachment points. Here I've dealt with the latter problem but I will finish the work and have them re-chromed eventually. The rear needs quite a bit of work to make it sit straight and I had to notch the exhaust pipes where they interfered. I should replace them with aluminum tube. Then I made my usual antenna with a 0.55x25mm syringe needle and an 009 electric guitar string. All in all, quite a frustrating kit but I'm calling it done and will now post it in Under Glass.
John Goschke Posted February 20, 2015 Posted February 20, 2015 Beautiful build, Peter! Great job overcoming the fit problems and getting it to sit right. Just one final detail if it's not too late... the red "blinkers" on the kit are actually intakes for duct work that have a red-painted screen over them. The parking light/signal lenses on the real car are clear plastic set into the corners of the bumper, like all the '57 Chryslers (though not well-defined on this kit.)
peekay Posted February 20, 2015 Author Posted February 20, 2015 My goodness John, you're right! I always pull a few photos from the net and pin them on the wall behind my bench for reference. The car I used looks pretty much the way I've done it - but I've just checked and all others are as you describe - and AMT actually got it right, as shown in my photo above. Anyway, it's not too late - I didn't glue the lenses as I want to deal with the mold seam problems on both bumpers and have them re-chromed! Thanks for the input!
Greg Pugh Posted February 21, 2015 Posted February 21, 2015 Wow! This is gorgeous! I especially LOVE the engine!!
Recommended Posts
Create an account or sign in to comment
You need to be a member in order to leave a comment
Create an account
Sign up for a new account in our community. It's easy!
Register a new accountSign in
Already have an account? Sign in here.
Sign In Now