408calirides Posted April 10, 2014 Share Posted April 10, 2014 (edited) Been a while since i posted on here and been a while since i did models but i'm slowly getting back into them so i thought i'd come back with something different. THIS STARTED OUT WITH A RESIN 50 CHEVY PANEL 1950 CHEVY CANOPY BODY: resin panel converted to canopy, cut sides out & added bed rails, scratch built middle split panel with window, cut rear lower door with hinges and chains, custom made wood floor boards, custom made inner rear fender panels, INTERIOR: custom made split bench seat w/back seat panels, floor shifter, hinged glove box, custom gauges, traffic view finder, sticky felt flocking for headliner, 48 chevy steering wheel, vintage flashlight, misc manuals, seat belts, ENGINE/BAY: stock 216 converted into a 235, distributor wires, fuel & vaccum lines, single stock exhaust and carb, exhaust straight tubing ran to the back, federal chrome siren, fender rods SUSPENSON: stock with dropped leafs WHEELS: 15' artillarys, wide white walls EXTRAS: side roll up canopies that can be rolled up to show fruit or rolled down to close up shop, saftey star, fog lights, hinged rear stop/talilight, custome made fruit stands & painted fruit. custom made side mirrors, headlight visors, bug deflector, side gas tank filler, l&r spotlights Theres probably some stuff i'm missing but alot of this stuff was scratch built. Edited April 10, 2014 by 408calirides Quote Link to comment Share on other sites More sharing options...
408calirides Posted April 10, 2014 Author Share Posted April 10, 2014 THEN CAME THE SIDE PANEL RAILS AND MIDDLE INNER SPLIT WINDOW SECTION Quote Link to comment Share on other sites More sharing options...
408calirides Posted April 10, 2014 Author Share Posted April 10, 2014 ONCE ALL THAT WAS FIT, SANDED AND GLUED DOWN, NEXT CAME PRIMER WET SANDING AND THE DECISION TO CUT OPEN THE REAR LOWER HATCH , THAT WAS HARD BECAUSE THEN I DIDN'T THINK OF THE HINGES THAT WERE GOING TO BE A PAIN TO MAKE! Quote Link to comment Share on other sites More sharing options...
408calirides Posted April 10, 2014 Author Share Posted April 10, 2014 SO NEXT WAS THE FLOOR BED, SIDE INNER FENDERS, HINGING, AND TALGATE CHAINS, MAN ALOT OF REDOS ON THIS PART: Quote Link to comment Share on other sites More sharing options...
408calirides Posted April 10, 2014 Author Share Posted April 10, 2014 cont... Quote Link to comment Share on other sites More sharing options...
408calirides Posted April 10, 2014 Author Share Posted April 10, 2014 SOME INNER FENDER WELL PICS, THESE WERE MADE FROM STOCK 50 CHEVY TRUCK FENDERS: Quote Link to comment Share on other sites More sharing options...
408calirides Posted April 10, 2014 Author Share Posted April 10, 2014 (edited) ONCE ALL WAS HINGED, CHAINED, MOCKED AND FIT, NEXT WAS DECIDING ON OPEING DOORS AND WHAT MORE DETAIL I CAN ADD, ONE OF THE TRICKIEST ISSUES WAS HOW TO MAKE THE REAR TAILLIGHT AND HINGE IT ON THE REAR LOWER DOOR, BUT GOT THE MIND THIKNIG AND CAME UP WITH THIS ALL FROM THE END OF A TRUCK TRANNY! Edited April 10, 2014 by 408calirides Quote Link to comment Share on other sites More sharing options...
408calirides Posted April 10, 2014 Author Share Posted April 10, 2014 CUT OPEN GLOVE BOX AND HINGED, CUT GAUGES OUT MOVED THEM BACK AND ADDED PLASTIC COVER TO THEM, CUT OPEN DOORS, AND USED PLASTIC DOORS FROM 50 TRUCK, ALSO HAD TO CUSTOM MAKE THE SPLIT SEATS. I USED SEVERAL BENCH SEATS FROM THE 50 TRUCK, ALSO HAD TO MAKE THE BACK SEAT PANEL THAT THEY SIT IN, SPLIT THE CENTER TRACK FOR THE SEATS TOO. THE HARDEST PARTTOO WITH THE INTERIOR WAS HINGING THE DOORS, CUS I HAD THE MAKE THE HINGE SMALL SO THAT I CAN ADD THE INNE PANEL TO HOLD UPTHE DASH BOARD. Quote Link to comment Share on other sites More sharing options...
408calirides Posted April 10, 2014 Author Share Posted April 10, 2014 (edited) I'LL CONTINUE WITH REST OF THE BUILD PROCESS, PAINT IS A FIFTIES AQUA AND DECEIDED TO GO WITH ARTILLARY WHEELS, BED WAS MADE FROM 4 OTHER 50 CHEVY TRUCK SPARE BEDS I HAD. Edited April 10, 2014 by 408calirides Quote Link to comment Share on other sites More sharing options...
408calirides Posted April 10, 2014 Author Share Posted April 10, 2014 I TRIED TO GET AS MUCH PROGRESS PICS AS I COULD DURING THE BUILD BUT I WANTED TO GET IT DONE SO BADLY THAT I MISSED TAKING SOME DURING THE PROCESS. SO AFTER ALL THE SCRATCH BUILDING, MODIFING, MOCK FITMENTS, GLUELING, SANDING AND PRIMER HERE WAS THE RESULT: Quote Link to comment Share on other sites More sharing options...
408calirides Posted April 10, 2014 Author Share Posted April 10, 2014 PREPARING THE STANDS & FRUIT, ALL HAND PAINTED Quote Link to comment Share on other sites More sharing options...
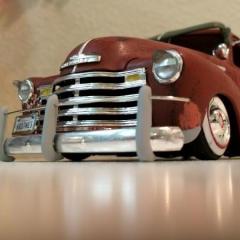
408calirides Posted April 10, 2014 Author Share Posted April 10, 2014 AND THE GRAND FINALLY, THE BUILD COMPLETED: Quote Link to comment Share on other sites More sharing options...
408calirides Posted April 10, 2014 Author Share Posted April 10, 2014 CONT.... Quote Link to comment Share on other sites More sharing options...
408calirides Posted April 10, 2014 Author Share Posted April 10, 2014 CONT... Quote Link to comment Share on other sites More sharing options...
blubaja Posted April 10, 2014 Share Posted April 10, 2014 Amazing!!! Love this! Quote Link to comment Share on other sites More sharing options...
wrecker388 Posted April 10, 2014 Share Posted April 10, 2014 Cool! Quote Link to comment Share on other sites More sharing options...
BLOODBANE Posted April 11, 2014 Share Posted April 11, 2014 This is a sweet build... Quote Link to comment Share on other sites More sharing options...
Sixties Sam Posted April 11, 2014 Share Posted April 11, 2014 That's great! Very nice work on the conversion. I made a similar canopy truck based on a 40 Ford panel truck a few months ago. Yours is way nicer than mine! Great job! Sam Quote Link to comment Share on other sites More sharing options...
Danno Posted April 11, 2014 Share Posted April 11, 2014 Outstanding! Quote Link to comment Share on other sites More sharing options...
slusher Posted April 11, 2014 Share Posted April 11, 2014 Fabulous build. Great detail also. What did you make the fruit out of?? Quote Link to comment Share on other sites More sharing options...
Prince Ital Mike Posted April 11, 2014 Share Posted April 11, 2014 Beautiful!!! I love it, thanks for the progress pictures too!!! Quote Link to comment Share on other sites More sharing options...
ChrisR Posted April 11, 2014 Share Posted April 11, 2014 Very nice project! Quote Link to comment Share on other sites More sharing options...
PappyD340 Posted April 11, 2014 Share Posted April 11, 2014 EXCELLENT job!! Quote Link to comment Share on other sites More sharing options...
Silver Foxx Posted April 11, 2014 Share Posted April 11, 2014 Beautiful , so much great work on this , unusual build and I love it . Quote Link to comment Share on other sites More sharing options...
peekay Posted April 11, 2014 Share Posted April 11, 2014 Beautiful , so much great work on this , unusual build and I love it . I agree! Quote Link to comment Share on other sites More sharing options...
Recommended Posts
Join the conversation
You can post now and register later. If you have an account, sign in now to post with your account.
Note: Your post will require moderator approval before it will be visible.