

Mblur05
-
Posts
13 -
Joined
-
Last visited
Mblur05's Achievements
MCM Member (2/6)
-
Bill, I love the Engine looks dead on, any chance you can cast another and send to me?
-
Well I did get the grill headlight and GMC from Ron Andrews, he had it and sent one for $1.50. But I wouldn't mind another one with both 62 and 66 GMC letters. Love the looks of the V6 3d printed I'd take that as is and the gmc grille/letters.
-
I was looking to build the GM 305 V6 as well but need the specs to put it in CAD, never been able to get them. If you have the specs I can put it in 3D CAD, no problem. I want to make a GMC Suburban using the '66 Revell kit but just haven't had the time yet. If you already have the engine made then I would want one, same goes for the V6 emblems!
-
1960's GMC V6 engine dimensions?
Mblur05 replied to Mblur05's topic in General Automotive Talk (Trucks and Cars)
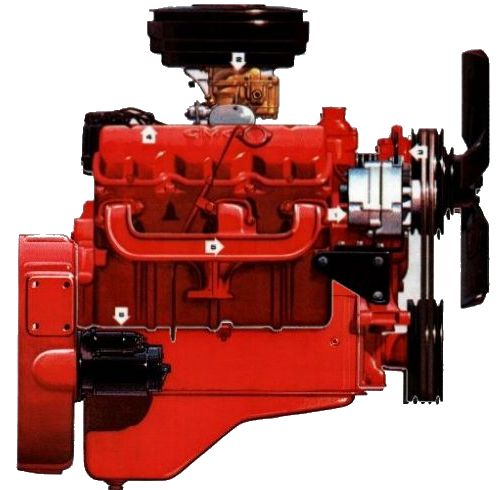
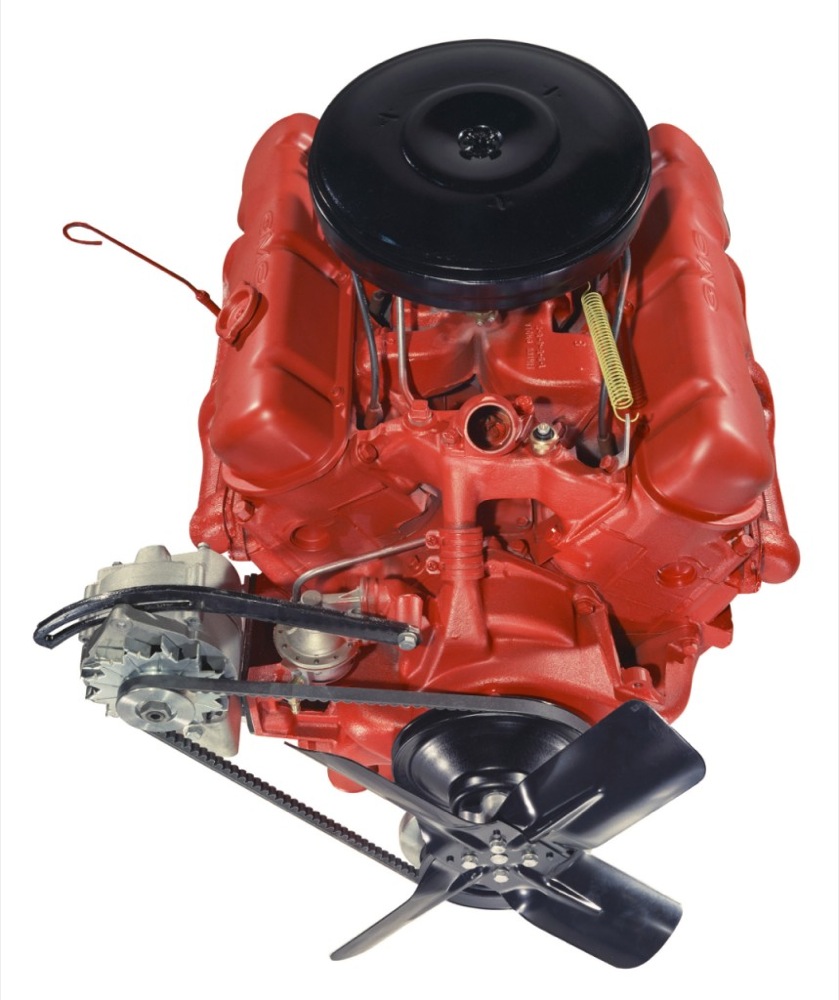
Thanks for the info and that is impressive how he scratch built the entire 702 GM V12 engine. Still I'd rather have exact specs to try and make a 1:25 scale model version so Carmak let me know about the specs and if you have hi-resolution photos from all different angles of the engine would be great too. If there are any drawings or blue prints out there that would be helpful too. I think if someone wanted to cast the 3D printed parts for resale since I don't have a way to do that, I'm open to work out a deal as modeling in CAD takes some time. I have no doubt there would be a lot of interest especially if I made the 702 v12 in CAD for those who want one for making big tractor-truck models. The great thing about Solidworks is it's an assembly program so I can build all of the parts and these engines are interchangeable as it seems. I'm also working on making the 4x4 K frame since I was able to find specs/drawings on those even though it's Chevy but it should be about the same as GMC!
-
1960's GMC V6 engine dimensions?
Mblur05 posted a topic in General Automotive Talk (Trucks and Cars)
I'm looking to make a scaled model of GMC's big block 305 V6 engine and I can't find any specs or actual dimensions or drawings of the engine. If someone already has it modeled in CAD let me know since I want to model the engine in Solidworks to make a GMC version of Revell's Suburban kit and 3D print everything. I just want to have the correct specs to model it properly. If you have the actual engine and you measured it or you know someone with the dimensions of the engine or if you somehow have GMC original blueprints of the engine that would be great.. I won't ask questions lol. I know about the gmcguy6066 website but I couldn't find any drawings with dimensions.
-
66 GMC grill and tailgate
Mblur05 replied to Nick Notarangelo's topic in Truck Aftermarket / Resin / 3D Printed
I found the 64-66 grille on Shapeways. Bill, can you post photos of those GMC items you mentioned, any way you could duplicate them? I requested to Revell that they should do a GMC version and a 4x4 version model of their trucks and the new Suburban. I heard back from them and they liked the idea of having a GMC Suburban for those years. So who knows if they will make a kit especially with the famous GMC V6 that was in their trucks 1960-66. -
66 GMC grill and tailgate
Mblur05 replied to Nick Notarangelo's topic in Truck Aftermarket / Resin / 3D Printed
Yeah I want the same GMC '62-'63 grille too....I'm looking to get the new Revell 1966 Suburban that's coming out soon and WIP a GMC Suburban 4x4 (K1001). I've been looking for that grille to see if anyone has made it since Modelhaus stopped. If anyone has the resin copies available or could cast new ones that would be great. I want to do a 1:1 just like the one Mel Gibson had in "The Man Without a Face" movie. Granted that was a 1962 Suburban with the wrapped windshield so I was thinking of mashing the 1960 AMT Chevy kit cab with the new Revell Suburban. I just need the GMC grille but I guess I'd have to fab it if nothing is available. http://www.revell.com/model-kits/trucks/85-4409.html#.WNdjWPkrLIU
-
1990 F250 Supercab 4x4 LWB
Mblur05 replied to Mblur05's topic in WIP: Model Trucks: Pickups, Vans, SUVs, Light Commercial
One thing I realize I didn't do is add the chrome wheel well trim as that was standard on the XLT Lariat. -
1990 F250 Supercab 4x4 LWB
Mblur05 replied to Mblur05's topic in WIP: Model Trucks: Pickups, Vans, SUVs, Light Commercial
Here are some photos I made a bit better in photoshop fixing the colors. The first photo I cleaned up the lighting. Also I forgot to mention I made the custom front mud flaps which were only on the front. Better view of the engine. Mud flapsand step Trailer brake plug with wire shown. You can see the hole for changing the Oil filter in the frame.
-
1990 F250 Supercab 4x4 LWB
Mblur05 replied to Mblur05's topic in WIP: Model Trucks: Pickups, Vans, SUVs, Light Commercial
Thanks everyone, it took a lot longer than I ever thought it would (2 months) but I enjoy seeing it completed and I will always have those memories of us and his truck. Now I'm realizing that I spent quite a bit of money on this model than I thought I would've but it was worth it to me. -
The Bench Seat is from the Ranger 80's pickup. I fab'd my own backing for the seat too. You can see the front leafs I already added to make the frame HD with styrene parts. I felt that the original cross member on the f250 frame was the perfect height to set the front axle on to keep the 4x4 height so I just added the cross member from the F150 shortbox on top and used the dremel tool. The F250 Floor box, see the cut out for the on the side of the hump for the 4x4 shifter I made plus the hole to position the 5spd shifter. Clutch was added after this. all Suspension and shafts setup -glued, custom rear shocks, notice the drop down pieces for the rear leafs on the side of the frame to help add the lift. I added Ranger pick up rear axle hubs so I could use the inner wheels for that kit. You can't see it but I added a button on the left corner of the floor just under the steering wheel you can make out a round dark blur, its for the floor switch high beams. The decals of the dash gauges and ac/heat/radio, I created in photoshop from brochure images I fixed up from the internet. If you look close on the right hand side that is an XLT Lariat decal on the dash. Power windows/doors-buttons are painted. I added the spare tire from the shortbox kit which looked like the original stock road tire it came with and the standard f250 rim. Not painted just removed the chrome.I had to make my own spare tire holder -broke the original, this one fits with the hitch in place. Notice I moved the steering on top after realizing where it should be, connected that to the steering box I custom made with a shaft from the Offroad f150. Below you can see the wires I added to make it more realistic, I had to use internet images of engine bays to figure out what should be there. Its not 100% accurate but it works. Decals added like oil and washer fluid. I wasn't sure on the battery wire so I just lined it to the firewall. Yes I added a dipstick for the oil after I had assembled everything which took some patient. You barely see it but there is a steering shaft going to the firewall just under the air box intake hoses. She barely fits on the bigger deluxe display case from AMT. The End. The time it took to make this was long in my book but it was worth it. Thanks- Mark


.jpg.1459252f53ba8ba2a3c611a743951dca.jpg)
.jpg.c87129d906c7e3172f5b2136d52483c4.jpg)
.jpg.bbe42302160101988c296d15f4302a0d.jpg)
.jpg.8664adb91917de3739f40524fa840d1c.jpg)
.jpg.7876eb430da4a9a3718d9da1ead14606.jpg)
.jpg.3b74d6e65f4cfc1fe47ecc116f73a64a.jpg)
.jpg.054b6d250cfa9246783acb6d72714e4b.jpg)
.jpg.57ab8a864c95188d07cc1cb6b24ea0d3.jpg)
.jpg.42a9e785da2539c8299e785987853fa6.jpg)
.jpg.ea59ce8be8a0be0442bbc7a1a07188a1.jpg)
.jpg.26f1968cd0aa5b954224a27639f44520.jpg)
.jpg.81e7123baf82d338070a45a429ac1c78.jpg)
.jpg.f4f4c8207537682511b66cfbf074d601.jpg)
.jpg.423e94c599916a4cdf6b0939a8ea93fe.jpg)
.jpg.4c1c9304fef5ac44e4dababff74c8354.jpg)
.jpg.750da415caf26d577152c1e1786dafe4.jpg)
.jpg.be75749e0e6c2a41e55a1a3c8a88a9b2.jpg)
.jpg.4e479cc6ea4972902c556f8bffa1e091.jpg)
.jpg.04f5169078cc819e87f8cf2cf942ba38.jpg)
.jpg.3b324087a6cd94453171981b1ed69c21.jpg)
.jpg.cfd49a2032290a3fe614da5566d3ee6c.jpg)
.jpg.6de9e44d5f7e7b6f5a26523fce53d920.jpg)
.jpg.5560e47554652fa6f4022162bc62f51c.jpg)
.jpg.e68acedbaa856b576337cea4b1c4a767.jpg)
.jpg.2072a157186529b158c684d76d5965d3.jpg)
.jpg.dab6834b37f2d15257d58d3efbe5bc37.jpg)
.jpg.77a6e6ef9eaaea59ded1b7fbf23f3f45.jpg)
.jpg.7ae1864c7acd6ed9c5681037aadaf29b.jpg)
.jpg.f502cb4e32c6d0937deb4b124e17af99.jpg)
.jpg.e37a8dac724314ba445552fff483bd0f.jpg)
.jpg.7e07666006ca13dd00562fa07bb1f917.jpg)
.jpg.7fa29c5fb6ebc8e7db33b290596e04bf.jpg)
.jpg.c9bd71e022e3dd7d8084bf605bde2552.jpg)
.jpg.4812df92819ba56be7580663cf270d7e.jpg)
.jpg.6be0b2669eedce8b1a633cbd8e72ab38.jpg)
.jpg.72a4eda1c2a289db08059c2eae7953d0.jpg)
.jpg.a0e8657273664cd09aac78c85bdd216a.jpg)
.jpg.c9f5680dcea26321ae46b20cbcb4714c.jpg)
.jpg.cfd3ac5f9713cb6ba1aad749ee9dfd6e.jpg)
.jpg.071c7393974f65ab685e22acb9bcc7e6.jpg)
.jpg.eafb53870652917851903809a5283a3e.jpg)
.jpg.15ce347ae2795c59495e3010a9a6c786.jpg)
.jpg.6d9bd34c8e4ee9fc12f23ee76ff982f6.jpg)
.jpg.735cb3ca8b297739a0a430a3c3e0fc82.jpg)