Ron Hamilton Posted March 20, 2016 Share Posted March 20, 2016 (edited) Edited August 5, 2016 by Ron Hamilton Quote Link to comment Share on other sites More sharing options...
disabled modeler Posted March 20, 2016 Share Posted March 20, 2016 Nice Ron....one of the cars I use to race in was a 70 Cutlass sport...liked them ever since. Quote Link to comment Share on other sites More sharing options...
afx Posted March 20, 2016 Share Posted March 20, 2016 This is a great project Ron. Quote Link to comment Share on other sites More sharing options...
Bob Ellis Posted March 21, 2016 Share Posted March 21, 2016 You grafted a common 70 442 roof on the Revell? Quote Link to comment Share on other sites More sharing options...
Deathgoblin Posted March 21, 2016 Share Posted March 21, 2016 Looks really good! I wondered about doing that. Quote Link to comment Share on other sites More sharing options...
Ron Hamilton Posted March 24, 2016 Author Share Posted March 24, 2016 (edited) You grafted a common 70 442 roof on the Revell? It is a lot more than that. The '68 through '72 442 Hardtops had different trunk and fender contours than the convertible. When doing this one, the first time, I cut the roof and trunk kid from an AMT '69 442, and grafted it to the Revell convertible body. Needless to say, it did not work. The second time, I used the roof, and quarters from a JoHan 442 body, retaining the front clip, doors, and part of the quarter panels from the Revell body. After a lot of fitting, filing, sanding, puttying and eyeball engineering, I think I have a body that works. The interior is another matter. The '72 442 Hardtop had the Cutlass S seat stitch pattern, which is not present in the Revell kit. So I re-did the interior to the proper specs. Johan's '70, which I based my conversion on, had a weak interior, with moulded in front seats and console, with faint detail at best. The Revell parts were much better defined, so I used them as a base. I used plastic sheet and rod, along with a little carving, filling and sanding, to "re-upholster" the interior. Sorry, I did not take any photos, but I think it came out fine. I used a combination of Johan and Revell parts to make the interior work, and I can tell you, it was quite a bit of work to get the "jig saw puzzle" of the interior and glass to fit in the body and chassis. The glass is from the AMT '69 442, which had to be trimmed to fit.. Last week, I painted and foiled the body. Earlier this week, I fitted the interior, glass, and chassis. At this time, I am attempting to download pictures to photo bucket, which is fighting me all the way. Edited August 5, 2016 by Ron Hamilton Quote Link to comment Share on other sites More sharing options...
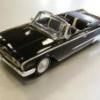
Ron Hamilton Posted August 5, 2016 Author Share Posted August 5, 2016 In this photo, you can see where I made the cuts in the Revell and JoHan bodies and mated them together. It was a lot of cutting and pasting, and the finished model is well worth it. I am going to take better pictures of the completed build when I come back home on Monday. Quote Link to comment Share on other sites More sharing options...
Can-Con Posted August 5, 2016 Share Posted August 5, 2016 (edited) OK Ron, "stupid question time" ,, why didn't you just graft the Revell underhood area to the JoHan body which is actually a '72 anyway? Just curious why the extra work . Looks good though. Edited August 5, 2016 by Can-Con Quote Link to comment Share on other sites More sharing options...
Ron Hamilton Posted August 10, 2016 Author Share Posted August 10, 2016 OK Ron, "stupid question time" ,, why didn't you just graft the Revell underhood area to the JoHan body which is actually a '72 anyway? Just curious why the extra work . Looks good though.I wanted to make sure that the "superior" Revell parts (interior, front end with clear headlamps, chassis) would fit. You know I would not take the easy way out. Quote Link to comment Share on other sites More sharing options...
om617 Posted August 10, 2016 Share Posted August 10, 2016 Is this still in progress or did you finish it? Quote Link to comment Share on other sites More sharing options...
Ron Hamilton Posted August 11, 2016 Author Share Posted August 11, 2016 Is this still in progress or did you finish it?Oh it is done Tommy. I want to take some decent pictures of it so that I can post them on the board. It looks almost as good as yours!!!!!! Quote Link to comment Share on other sites More sharing options...
Ron Hamilton Posted August 22, 2016 Author Share Posted August 22, 2016 I was able to get some photos of the build over the weekend. I am going to post them Under Glass. Quote Link to comment Share on other sites More sharing options...
Recommended Posts
Join the conversation
You can post now and register later. If you have an account, sign in now to post with your account.
Note: Your post will require moderator approval before it will be visible.