TruckerAL Posted February 13, 2023 Posted February 13, 2023 I decided to jump in and give this build off a go. It's my first time doing anything like this so why not. Hopefully I'll remember to update this tread as I go along! This is my entry, an Italeri 378, with a whole lot of aftermarket goodies. May hinge all of the doors as well, but we shall see!
J.B. Customs Posted February 13, 2023 Posted February 13, 2023 Glad to see you jumped in there is a lot of Cool builds going on can’t wait to see what you do with the 378 1
tbill Posted February 13, 2023 Posted February 13, 2023 I love that kit, looking forward to your spin on it. 1
TruckerAL Posted February 13, 2023 Author Posted February 13, 2023 Couldn't get any pictures last night, but I did get the basic frame assembled up so far. I also got a few of the aftermarket goodies cleaned up. Should make some more progress on it Friday? 1
TruckerAL Posted February 18, 2023 Author Posted February 18, 2023 Update #1, no pictures yet, I will take some tomorrow. The cab and sleeper pieces have been cleaned up, and puttied up excess holes. Sleeper door, and driver side door are cut out and hinged. Some frame pieces modified and drying. Moving right along! 1
TruckerAL Posted February 19, 2023 Author Posted February 19, 2023 The hinged doors, and the first time plumbing the brake chambers. Working on the rear system now! 2
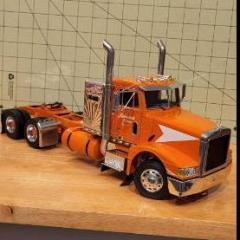
TruckerAL Posted February 19, 2023 Author Posted February 19, 2023 Just a quick early mock up to see how everything fits and looks. The hood and cab line up fantastic, and I got the sleeper panels done. The resin roof was a struggle. Had to shorten the sleeper sides 2mm to have it fit. Putty is applied now and drying 2
TruckerAL Posted February 19, 2023 Author Posted February 19, 2023 Wrapping up for the night. Got all the air lines plumbed and ready to go. I have the air tanks above the battery box plumbed as well not pictured 2
TruckerAL Posted February 27, 2023 Author Posted February 27, 2023 Another weekend update. Wasn't able to do a whole lot since I was focused on wrapping up my California Hauler(in under glass), and sorting out a truck parts collection I bought. But today I managed to get progress made! -Got the front rims reworked a bit, sanded off the old molded on lug nuts and added 3d printed ones, along with a hub cap. It will all be rechromed -Did some engine wiring and plumbing on this 60 Series based off the memory of the one I rebuilt, and internet pictures. Got the ECU wire looms, and some air compressor lines. Scratchbuilt an oil fill tube, and a crank case pressure tube for now! -Started the interior modifications. Shaved off the molded on floor mat(I'll make my own), and pedals. Got rid of the center console and made a styrene strip piece to cover it up. Using wider AMT seats so I'll need to modify the seat bases. The biggest nightmare is going to be the sleeper details! 2
TruckerAL Posted February 27, 2023 Author Posted February 27, 2023 C.b. radio ready to get painted and installed! 2
Gary Chastain Posted February 27, 2023 Posted February 27, 2023 ?lovin the detail, it just puts your build at a new level. 2
TruckerAL Posted March 4, 2023 Author Posted March 4, 2023 Another weekend update. Wish I could build during the week, but oh well! Here's what all happened tonight: -Got the bumper and lights fitted up, along with the sleeper(not pictured) and cab light panels ready to go. -Got most of my interior work all done for now. Need to modify the shifter, mock up the AMT foot pedals, and tweak a few things on the interior for the sleeper. Made up storage space for underneath the sleeper, and 2 cabinets for now. Also on the sleeper I removed the molded in lights and will be replacing them with some 3d printed ones. I also drilled out some holes for the air lines. -The cab firewall wiring/plumbing is almost done. Just need to add a few more wires, lines, looms and such and we'll be in business! -Last second I decided to add another pair of 1/4 fenders for inbetween the 2 rear axles. I absolutely love how they look in real life, so I decided why not try ro replicate that on my model here? Should come out fantastic! If all goes well, next weekend this project may finally be in the paint booth! 2
TruckerAL Posted March 11, 2023 Author Posted March 11, 2023 The day has come. I was able to get this ongoing project ready for paint this weekend! I'm hoping tonight I can get the first coats on, then the second and final coat tomorrow. Then let it dry until the following weekend! The last 2 pictures are all parts that need to be chromed. This is going to be a while lol 2
TruckerAL Posted March 12, 2023 Author Posted March 12, 2023 First coat of paint has been laid earlier today. The second coat will go on tomorrow. It'll dry for a full week then I'll add the clear, polish, and get to assembling it. Making great progress. Pics to come soon? 1
TruckerAL Posted March 12, 2023 Author Posted March 12, 2023 Well everything at the moment is drying, all the final coats are on, and one coat of clear on the body pieces. I'll polish it out when the clear dries. Here's a little sneak peek of the chrome parts. I'll photograph the body parts after the polish stage! 3
TruckerAL Posted March 13, 2023 Author Posted March 13, 2023 It's not done just yet, but I got some engine parts on. So far so good, it's all starting to come together 1
Rockford Posted March 13, 2023 Posted March 13, 2023 Looking great! What are you using for the chrome? It looks excellent! 2
tbill Posted March 13, 2023 Posted March 13, 2023 Fantastic work so far! And agree that whatever you’re using for chrome paint looks dynamite. 1
TruckerAL Posted March 13, 2023 Author Posted March 13, 2023 Thansk everyone for following along! The chrome paint I'm using is the new revell chrom spraypaint. Expensive yes, but the results are absolutely amazing, as you can see! 1
Recommended Posts
Create an account or sign in to comment
You need to be a member in order to leave a comment
Create an account
Sign up for a new account in our community. It's easy!
Register a new accountSign in
Already have an account? Sign in here.
Sign In Now