SpreadAxle Posted October 25, 2009 Share Posted October 25, 2009 I started this one last summer as just a project to tinker with between other builds. It's the Revell Snap 359, with some modifications. Many Revell AG 359 parts were used. The old Black Magic and Black Widow kits. There have been a few struggles, but overall, these two kits go together very well. Not pictured are the RevellAg tanks. I have stripped the tanks, and sanded the seams. Not sure if they will be body color or Alclad polished aluminum yet. I can't decide. 4 starters, I swapped in pretty much the entire Revell AG rear suspension . Shock mounts have been scratchbuilt. Under the hood you can see the Revell AG steer axle and steering gear box. The shaft is K and S brass tube. The engine, which still needs more details, is(or will be when I'm finished) a Silver 92 Detroit from AMT's KW K100 Aerodyne. After finding a real Silver 92 powered 359 @ the Truck Paper's website, I saw it had a single air cleaner, but on the driver's side, so I made that change as well. With a just little grinding, the Revell Ag visor fits this cab nicely. Here is my headliner and overhead console when first installed. They were created by cutting the roof of a Revell AG cab, and grinding it down from the outside until I could fit it inside this cab. The overhead console is made of other interior scraps. Quote Link to comment Share on other sites More sharing options...
Jim B Posted October 25, 2009 Share Posted October 25, 2009 Nice, Ray. Looks good with the visor & the 8V92TA. I have "plans" to put one in one of these kist as well. Have you run into any major issues getting the engine to fit? Quote Link to comment Share on other sites More sharing options...
SpreadAxle Posted October 25, 2009 Author Share Posted October 25, 2009 (edited) Now for the painted interior pieces. The color is tamiya flat blue. I still have some things to do, but this interior was a bit of an experiment for me. I never went this far detailing an interior. Using several 359 brochures, memories of a blue 359 wrecker I saw in person with this exact interior, and what I have at my disposal, I came up with this. It still needs visors, but here is my overhead. I cut away the CB radio that is molded to the bottom of the kit's dashboard and discarded it. Instead, an AMT CB with BMF on its face went up to the overhead. The stereo is from the KFS "Cab Junk" photo etch set. As to the air horn cord, I'm not sure of the material, but it was sent to me by Win Hill(thanks Win ). He used it for the same purpose on a truck he built. The interior tub and dash come from the kit. The seats, steering wheel, gearshift, and upper rear wall came from RevellAG. The floor and lower door panels are "carpeted" with a material I found in an ad in SAE years ago. It's a bit thick, though. The used and abused road atlas is another KFS "Cab Junk" item. It just comes as the outer cover spread open. I cut a strip of paper to size and folded it for the illusion of pages, then folded the atlas cover around them. The steering wheel holes were drilled out, and the upper surfaces of the seats were my attempt at using paint to achieve the cloth/crushed velvet look. Darker shades of blue were dry-brushed over the lighter blue. Thanks for looking. I will post more later Edited October 25, 2009 by FlatbedKW Quote Link to comment Share on other sites More sharing options...
SpreadAxle Posted October 25, 2009 Author Share Posted October 25, 2009 Thanks Jim. This engine drops in nicely. Just cut the tabs on the frame and move them forward just a hair. You don't have to modify the air cleaner, but the one I found online was that way, so I figured why not. I will send my engine pix of that truck to you. It's an in '84 daycab 359 that's for sale. Hopefully they will help. If you look at MMTA's website, you will see Silver 92 in a Pete. It shows a right side air cleaner. You can see how the intake pipe is run. I do want to try to make the more updated vavle covers for this engine that you will see in the pix. The edges don't have the soft curve like the kit engine I used. We'll see. Quote Link to comment Share on other sites More sharing options...
Murphy's Law Posted October 25, 2009 Share Posted October 25, 2009 (edited) You wouldn't still have the sleeper from the Black Magic kit, would ya? If so, are you willing to part with it? Edited October 25, 2009 by Murphy's Law Quote Link to comment Share on other sites More sharing options...
SpreadAxle Posted October 25, 2009 Author Share Posted October 25, 2009 You wouldn't still have the sleeper from the Black Magic kit, would ya? If so, are you willing to part with it? I may if I haven't chopped it up completely. I'll have to look. I'll let you know. Quote Link to comment Share on other sites More sharing options...
SpreadAxle Posted October 26, 2009 Author Share Posted October 26, 2009 I was going to spray a coat of primer on my hood when inspiration struck. I whipped out my trusty Dremel and I removed the flat section from the front of the hood where the grille snaps into place, and I trimmed the grille out as well. It already has a dramatic effect on its appearance. I have some grille material that resembles the real thing, and that will be used to fill in the grille. Quote Link to comment Share on other sites More sharing options...
SpreadAxle Posted December 14, 2009 Author Share Posted December 14, 2009 I haven't done much of anything to this one in over a month. I'm trying to perfect my bodywork techniques. To review, I'm keeping it to a single air cleaner, just moved to the driver's side. Also, I filled in the tab holes on the cab and sleeper. I'm just happy to be in the primer stage with it. Quote Link to comment Share on other sites More sharing options...
Porky Posted December 14, 2009 Share Posted December 14, 2009 Great work so far Ray, I like it. what you done with the gill is very cool and I think really improved the look of the truck. Quote Link to comment Share on other sites More sharing options...
Murphy's Law Posted December 14, 2009 Share Posted December 14, 2009 Nice job. I had thought about doing the grill, but was unsure of how strong the spars would be. Any luck on the sleeper? Quote Link to comment Share on other sites More sharing options...
Jim B Posted December 14, 2009 Share Posted December 14, 2009 Looking good, Ray. I like the 8V92 you've put in there. Any ideas on color choice? Quote Link to comment Share on other sites More sharing options...
Brizio Posted December 14, 2009 Share Posted December 14, 2009 Nice looinkg job!!! Quote Link to comment Share on other sites More sharing options...
rronning84 Posted December 14, 2009 Share Posted December 14, 2009 Looks like it is coming along nicely. Quote Link to comment Share on other sites More sharing options...
Chuck Most Posted December 14, 2009 Share Posted December 14, 2009 I've got two of these kits stashed, but this is the first time I've seen anyone building it! Looking great so far! Quote Link to comment Share on other sites More sharing options...
Old Albion Posted December 14, 2009 Share Posted December 14, 2009 Ray, This looks great so far. I like the use of the Detroit. As for colour there is a Pete almost similar to yours on Youtube with an 8V92TA. This things is a beast. It is painted a grey metallic colour. Looks superb!! Best Wishes Dave Quote Link to comment Share on other sites More sharing options...
SpreadAxle Posted December 16, 2009 Author Share Posted December 16, 2009 (edited) Nice job. I had thought about doing the grill, but was unsure of how strong the spars would be. Any luck on the sleeper? I knew I forgot something. Yes, I have a sleeper for the RevellAG 359. I have the silver one from the recent re-issue, but it's at home. Next time I get home, I'll send it your way. Pm me your address when you get a chance. The grille spars are strong enough. Thanks for the compliments everyone. The main color on this will be a dark metallic gray. JimB:I know you had an idea of doing a V8 detroit in a Snap Pete kit. Here's 2 pix you might like from an '84 daycab 359. Edited December 20, 2009 by FlatbedKW Quote Link to comment Share on other sites More sharing options...
Nova-ss Posted December 16, 2009 Share Posted December 16, 2009 Good work and a great job on a snap kit.keep up the good work.Thank ya,Chris Quote Link to comment Share on other sites More sharing options...
Jim B Posted December 16, 2009 Share Posted December 16, 2009 Thanks for the pics, Ray. Those are what I needed. Quote Link to comment Share on other sites More sharing options...
Murphy's Law Posted December 16, 2009 Share Posted December 16, 2009 PM sent Ray. Thanks again! Quote Link to comment Share on other sites More sharing options...
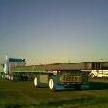
SpreadAxle Posted September 4, 2011 Author Share Posted September 4, 2011 It's been forever since I updated this one. I painted it when I was home last time, and had so much going on I forgot to post pix. So , here she is with the main color. The stripes will be added as soon as I know all body work is done. I think you'll like the paintjob when it's complete. The color is Duplicolor Medium Gray Metallic lacquer. DSGM347. Cab and air cleaner. Air cleaner, visor, and firewall. I decided to go with painted tanks on this one. I managed to get rid of the hideous seam on the tank ends, with a LOT of work. Passenger side of the hood. Quote Link to comment Share on other sites More sharing options...
SpreadAxle Posted September 4, 2011 Author Share Posted September 4, 2011 Driver's side during repair to the hood. I didn't cut the air cleaner opening quite right and needed to reshape it. I got it fairly close. However, after painting, the putty shrunk a little, so I will have to correct that. I think the stripes will cover that portion of the hood when they are on, so hopefully, after some more reshaping, it won't be visible under the stripe. I also went with the updated, more boxy valve covers as well. Quote Link to comment Share on other sites More sharing options...
bandit1 Posted September 4, 2011 Share Posted September 4, 2011 nice so far i am actually doing something similar for the dual air breathers on an amt 359! keep it up looking good so far! Quote Link to comment Share on other sites More sharing options...
mackinac359 Posted September 4, 2011 Share Posted September 4, 2011 Cool to see someone building a left-only breather. Tim Quote Link to comment Share on other sites More sharing options...
BigBad Posted September 4, 2011 Share Posted September 4, 2011 (edited) Detroit Diesel 8V-92!! WoooHoo! I can almost hear it screaming! So, if you're using the Black Magic's suspension, I suppose you are going to use that kit's wheels and tires as well? Edited September 4, 2011 by Z06Bob Quote Link to comment Share on other sites More sharing options...
SpreadAxle Posted September 4, 2011 Author Share Posted September 4, 2011 Detroit Diesel 8V-92!! WoooHoo! I can almost hear it screaming! So, if you're using the Black Magic's suspension, I suppose you are going to use that kit's wheels and tires as well? Up on the steer axle I will be. On the drives, I'm not sure. Also present are parts from Revell AG's Black Widow Pete which had included 2 hole rear wheels. I stripped the chrome and they are molded in white plastic. I want to use them, but with a tire that looks more like a drive tire. Quote Link to comment Share on other sites More sharing options...
Recommended Posts
Join the conversation
You can post now and register later. If you have an account, sign in now to post with your account.
Note: Your post will require moderator approval before it will be visible.