le_marbrier Posted February 21, 2013 Posted February 21, 2013 (edited) Hi everybody, the IH Transtar just finished (well almost, you're right) I've started my first Scania Truck Build and first wrecker. The colour will be the same as the box-art. I tried to detail a little more the dashboard, especially the middle part, which was full of emptiness, adding some parts. Edited February 21, 2013 by le_marbrier
kilrathy10 Posted February 21, 2013 Posted February 21, 2013 Looking good, Man...Looking good....This thing is expensive to get around here....I have several rigs with this wrecker body, but can't get any more....Can't afford it... Awesome work on the engine...Looks good, green...Keep up the good work...
le_marbrier Posted August 17, 2013 Author Posted August 17, 2013 (edited) some new pics of this wrecker................I think it's my first and last yellow painted truck..............because at this point, it's my fourth yellow Tamiya's can.........and it's not even perfect AT ALL..........quite disappointed I am..... lol Edited August 17, 2013 by le_marbrier
griffin Posted August 18, 2013 Posted August 18, 2013 What colour undercoat you have used?? I have read somewhere to put silver under white and yellow colours. gr chris
metalhead Posted August 18, 2013 Posted August 18, 2013 Isn't that the same wrecker body in the Western Star kit? Looks familiar.
le_marbrier Posted August 18, 2013 Author Posted August 18, 2013 (edited) What colour undercoat you have used?? I have read somewhere to put silver under white and yellow colours. gr chris Tamiya grey primer. The only one I get. Should have used the white one. After an other pass (not sure it's the right word) the result is quite better Isn't that the same wrecker body in the Western Star kit? Looks familiar. It's the same wrecker body than the Italeri's. Only the other two Revell Wreckers have a different one I think Edited August 18, 2013 by le_marbrier
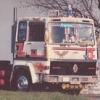
Force Posted November 23, 2013 Posted November 23, 2013 (edited) It's the same wrecker body than the Italeri's. Only the other two Revell Wreckers have a different one I think Well it's not that strange as this whole kit is originally made by Italeri and reboxed and issued by Revell AG. I built the first Italeri version back in the late 80's, kit No 772, and here is a couple of pictures of it. Edited November 23, 2013 by Force
kilrathy10 Posted November 23, 2013 Posted November 23, 2013 (edited) Hey, Man....Nice build, so far....I like that interior, too......I agree that Yellow is a hard color to lay down.....But I've learned to use it to my advantage....If you use flat black as a primer, as the yellow tends not to fill the recesses and the edges very well, anyway, You'll find that those places show up darker and looks like you've used a black wash, instead of showing up as faded paint....I hope you can follow what I'm saying....In other words, your door panel lines and such look like it's done on purpose.....It's kinda like using alclad chrome....I recommend you try that the next time you try to lay down yellow...Or any other color, that matter....All my paint jobs have flat black as primer.... Edited November 23, 2013 by kilrathy10
le_marbrier Posted January 2, 2014 Author Posted January 2, 2014 (edited) Hey, Man....Nice build, so far....I like that interior, too......I agree that Yellow is a hard color to lay down.....But I've learned to use it to my advantage....If you use flat black as a primer, as the yellow tends not to fill the recesses and the edges very well, anyway, You'll find that those places show up darker and looks like you've used a black wash, instead of showing up as faded paint....I hope you can follow what I'm saying....In other words, your door panel lines and such look like it's done on purpose.....It's kinda like using alclad chrome....I recommend you try that the next time you try to lay down yellow...Or any other color, that matter....All my paint jobs have flat black as primer.... yes I see what you mean. First I tought it would be a good idea, but it was not....Better luck next time ! Some weathering on the upper part of the wrecker trying to hide the glue problem on the paint.........but I know you should glue before painting..... light weathering on the cab and crane but too heavy, I think, inside the hood Today another pics : Edited January 2, 2014 by le_marbrier
le_marbrier Posted January 2, 2014 Author Posted January 2, 2014 (edited) mistake sorry Edited January 2, 2014 by le_marbrier
tbill Posted January 2, 2014 Posted January 2, 2014 looks great so far. I don't think I have seen one of these yet. keep up the good work!
kilrathy10 Posted January 3, 2014 Posted January 3, 2014 This looks really good.....Man, I want one of these, so bad....They're so expensive, here, though....Maybe I can trade for one.....Great job, so far, Man....You've been working on this one for quite some time, now .....I hope you get it done, soon....I'd love to see the finished product....
le_marbrier Posted January 3, 2014 Author Posted January 3, 2014 (edited) Well I hope to finish it for the end of.......the year (get some time lol) In fact the front bumper and the "basket" above the roof (take a look to the box art) need some more paint : it's not exactly the same color than the truck yet. I'm working on the chromed parts and the last parts for now on, next the decals because the weather is quite bad : 10/15 °C is not good for spraycan paint. I think I had to wait for Spring time.............Think I will make a try before it, I'll not be that patient Then, waiting for better weather I may start a Revell K100 aerodyne or an Italeri Magirus-Deutz 360M19 or a trailer for my finished trucks Edited January 3, 2014 by le_marbrier
le_marbrier Posted January 26, 2014 Author Posted January 26, 2014 (edited) hi, some new pics. Most of the decals on. Chromed parts too. The parts above the cab are not glued, it's a test Edited January 26, 2014 by le_marbrier
kilrathy10 Posted January 28, 2014 Posted January 28, 2014 It's getting there....Nice work, so far....Gonna look really good....
le_marbrier Posted July 27, 2014 Author Posted July 27, 2014 almost finished, some details to add and it will be over
kilrathy10 Posted August 6, 2014 Posted August 6, 2014 Very nice work, Man.....It looks pretty good.....I like the subtle weathering you've done....Turned out pretty nice....
tbill Posted August 6, 2014 Posted August 6, 2014 that was well worth the effort, that looks great! nice job.
Recommended Posts
Create an account or sign in to comment
You need to be a member in order to leave a comment
Create an account
Sign up for a new account in our community. It's easy!
Register a new accountSign in
Already have an account? Sign in here.
Sign In Now