vc273
-
Posts
270 -
Joined
-
Last visited
Content Type
Profiles
Forums
Events
Gallery
Everything posted by vc273
-
Have been working the rear end the past couple of nights. Thought I would have the rear done an half an hour but because the chevelle kit that I am using was started by someone else the bracing and wheelie bars were either bent, twisted or broken so had to scratch up my own parts or straighten what was salvageable. All the white parts of the rear end are styrene and although not a big fan of wheelie bars on a street car decided to keep them for a different look. Also got a light coat of color on the inner guards and firewall just to see how the color would look and am happy with it and thinking of doing the roof in white and possibly a beige interior. Cheers and thanks for looking Steve
-
Had the same type of problem once before and I covered a set of tail lights with bare metal foil then removed it after the paint work and I have also used blu tac the stuff you stick posters on the wall for masking as well with great success. Hope this may help you
-
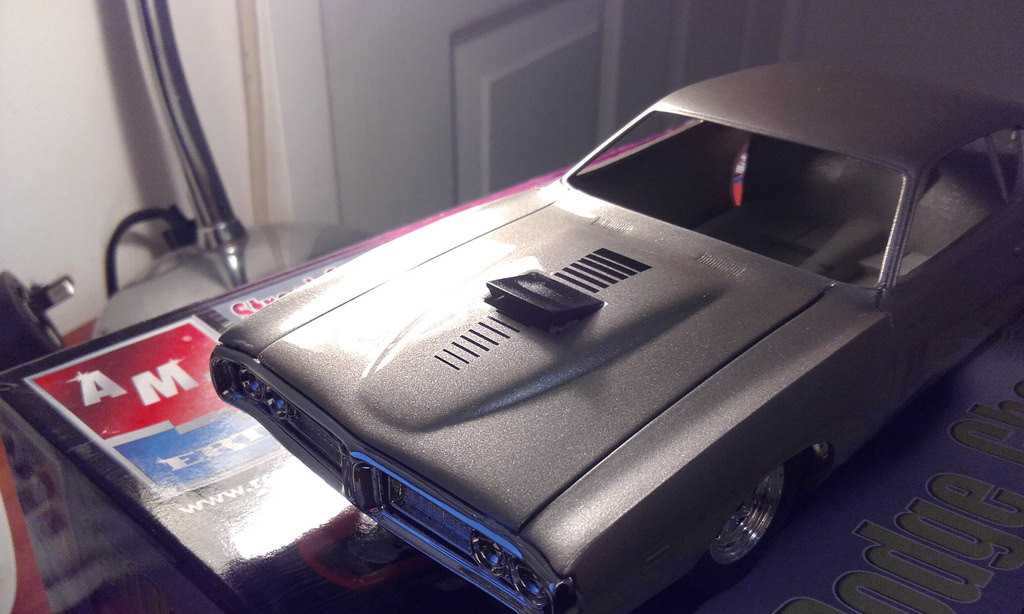
Will be working on this one over winter and hopefully will have it finished by the end of the year. Started off by adding tubs to the rear end to suit the rims and slicks I got from the parts box. While I was at it I also came across the wheelie bar set up that I will be using and also decided on a supercharged injected twin plug hemi for motivation. Started on the roll cage using the original center loop and scratched up the rest with still more to go. Also finished the firewall recess to be able to fit the hemi in. Will post progress while I go along. Cheers and thanks for looking Steve
-
Have been working on this over the past couple of nights and now have modified the firewall for a cleaner appearance and will also be smoothing of the inner guards. Found the interior tub for the chevell in one of the parts box that was more detailed rear firewall and cut it out to replace the dodges one and then re installed the dodges rear parcel shelve. Going to use a set of buckets from the dodge superbee pro street kit and the roll cage started as the dodges original one that I modified with some extra bracing. Also primed the plenum chamber and removed the chrome from the horns and drilled them out. Still have yet to modify the manifold and will be scratching my own valve covers as I dont have any suitable aftermarkets ones for this build. Cheers and thanks for looking Steve
-
Thanks everyone for your comments. Playing around last night was thinking of possibly injecting the motor so after looking through my induction parts box found the induction from one of the chev kits that I parted out. After dropping it on the 440 found the plenum chamber just looked to skinny and small so decided to scratch up my own. Not a 100% if I like it or not will decide after I clean it up and prime it. Will also have to modify the manifold to suit the 440 as well but in using this set up will have to scratch up a cowl induction scoop. Cheers and thanks for looking Steve
-
Coming along real nice, looking forward to seeing more of this.
-
Started this one about 10 years ago in the days that I didn't use primer and the paint work turned out okay but chipped real easy so decided to strip it and start over. Have a couple of pro street rear floor pans that I am checking at the moment and may use the chevelle rear end but will cut the axles from the diff and install a dana center. Using rims from the parts box and the fronts are from the ford woody street rod and the rears from the willys pro street kit. Going to use the 440 out of the revell limited edition dart kit and will be using a big single 4 barrel for the induction. Havent worked out interior details yet but thinking of more modern buckets for the front and either 3 buckets in the back or leaving the rear seat out altogether. Not sure on color yet but thinking of adding some styrene to the rear pillars so I can have the roof a different color from body. Have posted a couple of mock up pics and will be a build that I will be progressing with over the winter. Cheers and thanks for looking Steve
-
Have the engine in mock up at the moment and hope to have it finished this weekend. Have painted the block in model master hemi orange, stripped the manifold,supercharger and valve covers of their chrome and painted the covers and manifold in krylon metallic aluminum and the supercharger, injection in magnesium. Made up my own magneto and added the plug wires, still have the fuel system,hoses and blower belt to finish off. Am going to try something different with the belt as I pulled apart an old printer the other day and the belt is a perfect match just have to cut it to length and glue it together. Cheers and thanks for looking Steve
-
Thanks dodgelover for your comment. Thought I would post a pic of this one I have on the go at the moment
-
Very cool looking gasser
-
Thanks everyone for your comments. Have painted the hemi and waiting for it to dry at the moment. Will post a couple of pics latter on today
-
Thanks everyone for your comments. Hope to have the engine done before the weekend and then onto the interior.
-
Hi started this one about 10 years ago which I had painted and mocked up but never got back to it until a couple of weeks ago. Had to strip back the paintwork as I painted it back in the days when I didn't use primer and it started chipping all over the place. Got the body and hood all cleaned up and started with duplicolor grey primer and then hit it with duplicolor vivid yellow from the spray can. Polished up the paintwork about a week ago, did the bmf and c stripes and now waiting for a clear coat. While I was at it I decided on a change of look from when I painted it originally by swapping out the rims to give it a more street/strip look from the late seventies/early eighties style. Found the rims in the parts box which came from the henry j gasser kit and also modified the front stub axles and to raise the front just a little. At the moment has good-year slicks on the rear but came across some tall profile street tyres that I will be using instead. Making up some traction bars for the rear end at the moment unless someone knows of a kit that has a decent looking set. Changed out the motor as well and decided to put in a dohc hemi for something a little different but will swap out the air cleaner for something a bit more old school to keep with the theme of the car. Thinking of going for a brown interior on this one instead of the usual black/white. Hope to have some clear coat on saturday along with a couple of more bodies needing it, as its just turned winter here but we should be having a 20 degree day. Cheers and thanks for looking Steve
-
Hi started this one back up while I am waiting for good weather for painting as there a few changes I wanted to make to it. Started off by bringing the front of the car down a bit as the beginning of the build I had lower profile tyres but then settled on these tyres which raised the front so with a little cutting and sanding and a bit of glue think it now looks better. Also while in one of my parts boxes came across an old build up of a 392 hemi from the revell willys gasser so into the oven cleaner for a good strip and clean and now have it mocked up on the chassis. Have pinned the upper radiator hose to the heads and will wire and detail once painted But in using this engine have now had to remove the gearbox cross member and move it forward because of the new gearbox on the hemi. Have also go most of the wheelie bar set up done and finished off the body with bmf and a good polish. Hope to have some more done by the end of the weekend. Cheers Steve
-
Thanks David for your comment. Hope to have a bit more done this weekend. Have nearly sorted out the the floor pan details just a little more paint detailing and have to finish off the exhaust. With the exhaust used a combo of the dodge superbee pro street exhaust up to and including the mufflers, from the mufflers to the exhaust tip are revell pro street willys and removed the original exhaust tips from the kit which I am using to finish off the exhaust. Anybody that has this kit and hasn't had a good look at it will find the kit is supplied with 440 exhaust manifolds and not hemi ones. Also scratch built coil overs for the rear end but unfortunately no matter what I tried there isnt enough room to get them in so will have to detail the pro street superbee's ones. Cheers and thanks for looking
-
Thanks for the comments everyone. John not the power thats the problem its getting it down to the ground. Used the 392 as I needed something a little different under the hood from the usual 426 as I already have 64 dodge pro stock and a pro street both with 426 hemi's
-
Thanks everyone for your comments. John started the plug wiring and dissy last night so hope to have a few pics of the engine in the next day or two but have posted one before I started the wiring. Have now got the clear coat on the body and gave it a good buff up, painted the black outs on the doors as the street machine kit didn't come with them and finish of the bmf on the door handles and locks then another couple of clear coats to seal everything in. Cheers and thanks for looking Steve
-
Hi this one is being built more as a street gasser than full on drag build. Started with the lindberg ramchargers kit and added a gasser front end to it along with a 392 hemi from one of the willys gasser kits with parts box headers that I heated and bent with scratch built collectors. The blower belt came from the parts box as well as the rims and tyres. Have modified the interior with a scratch built dash fascia, roll cage, shifter mount and using revell 66 charger buckets. With a bit of luck wont be too far from finishing, cheers and thanks for looking Steve
-
Hi been working on this one when I have been waiting on things to come together on the Dodge truck I have on the go. Wasn't really happy with this kit as it didn't allow me to build the stock version only the street machine version so out came a 70 superbee pro stock floor pan. Kept the kits front chassis and modified it to fit the superbee floor pan so I could keep the engine bay looking original. Then had to shorten the rear of the chassis to fit. Plan for this build is a pro street that the whole family can enjoy, that's why I have gone for a total stock interior. Had to modify the rear section of the door trims and also the rear seat to get everything to fit nicely over the tubs, only down fall was the original floor pan had all the interior detail whereas the superbee has a separate interior floor pan which I couldn't use. Gave the body work a clean up and glued the rear apron on and used super glue to fill in the gaps and filed it down for a smooth finish. Now had to modify and trim off the original mounting of the rear bumper so now it slides in from the outside. Gave it a coat of duplicolor primer, sanded the whole thing down then gave it a few coats of duplicolor parchment rattle can. Painted the scoop, front and rear air dam in semi gloss black and thought it still looked a little plain. Found a decal from the amt 71 duster in the decal box and added it to the bonnet for that different look. Painted the interior in some plain brand rattle can paint that I got from the cheap shop and am actually surprised how well it went on and looks. The lid was of a light shade of red but came out a much deeper red thankfully. Made a start on the engine but now have to find a set of headers as the kits supplied exhaust manifolds are for a 440 not a hemi which also came with the kit. Will post updates as I go along. Cheers and thanks for looking

-
Wasn't really happy with this kit as it didn't allow me to build the stock version only the street machine version so out came a 70 superbee pro stock floor pan. Kept the kits front chassis and modified it to fit the superbee floor pan so I could keep the engine bay looking original. Then had to shorten the rear of the chassis to fit. Plan for this build is a pro street that the whole family can enjoy, that's why I have gone for a total stock interior. Had to modify the rear section of the door trims and also the rear seat to get everything to fit nicely over the tubs, only down fall was the original floor pan had all the interior detail whereas the superbee has a separate interior floor pan which I couldn't use. Gave the body work a clean up and glued the rear apron on and used super glue to fill in the gaps and filed it down for a smooth finish. Now had to modify and trim off the original mounting of the rear bumper so now it slides in from the outside. Gave it a coat of duplicolor primer, sanded the whole thing down then gave it a few coats of duplicolor parchment rattle can. Painted the scoop, front and rear air dam in semi gloss black and thought it still looked a little plain. Found a decal from the amt 71 duster in the decal box and added it to the bonnet for that different look. Painted the interior in some plain brand rattle can paint that I got from the cheap shop and am actually surprised how well it went on and looks. The lid was of a light shade of red but came out a much deeper red thankfully. Made a start on the engine but now have to find a set of headers as the kits supplied exhaust manifolds are for a 440 not a hemi which also came with the kit. Will post updates as I go along. Cheers and thanks for looking Steve
-
Really nice build
-
Thanks everyone for your comments.
-
Thanks everyone for your comments and your tips. Steve noticed the wheel placement after everything was together and with the time restriction of 4 weeks to do the build, I didn't want to start pulling things apart, as I just met the dead line as it was. Thanks for the tip on the plug wiring Walter will keep that for future reference, will have to get the manifolds closer to the block in future. Cheers Steve
-
Hi built this one as a motm on another forum and thought I would post the finished build here. Built almost box stock just added a few details such as plug wires and the chrome trim on the front apron. Painted in duplicolor jasmine yellow which is almost a perfect match for the original banana color. Interior painted in a mix of flat, semi-gloss and gloss black and bmf. Cheers and thanks for looking
-
Hi thanks everyone for your comments. Have been working on a chassis that I found in the parts box and think it will work with the build to give it that fabricated look. Still have a bit more modificatins to do to it and then will be making up a flat floor pan to suit. Cheers and thanks for looking Steve