Karl LaFong
-
Posts
334 -
Joined
-
Last visited
Content Type
Profiles
Forums
Events
Gallery
Everything posted by Karl LaFong
-
Revell Ed Roth 57 Bel Air - Suddenly It's 1963!
Karl LaFong replied to Karl LaFong's topic in Car Kit News & Reviews
I'd have to agree that reissuing this 57 Chevy vs. the snap kit is an odd business decision. When I bought it I was well aware of the pitfalls of this kit (like I said, I like the challenge), but it seems that this kit would give the Revell haters plenty of ammo. I'm not a rivet counter, but it's even obvious to me that it doesn't look right - not as bad as a Palmer, but not as good as AMT's circa 1962 version. Coupled with the ill-fitting parts, it's hard to imagine what Revell was thinking in '63. BUT, people did build the kit and even won contests with it (check out old issues of Car Model & Model Car Science) and it did lead to the original 55 & 56 Chevys, so somebody was buying the kits. Moving to the present day, I'm guessing that because of the smaller parts content (& less styrene), Revell could have issued the snap kit with correct wheels and the Roth decal sheet and made a nice profit. More importantly, they would not have had further tarnishing of their reputation. In answer to Scott's question, I guess it's closer to Revell's 56 Ford truck kit - with patience, it can be built, but probably would be best displayed with the doors open.. -
Revell Ed Roth 57 Bel Air - Suddenly It's 1963!
Karl LaFong posted a topic in Car Kit News & Reviews
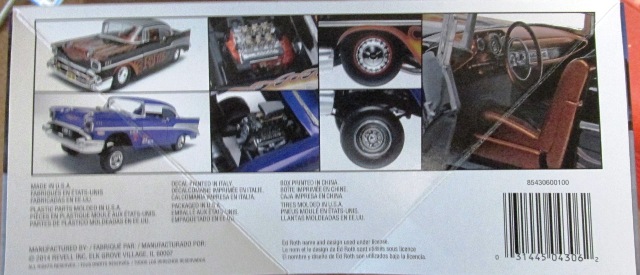
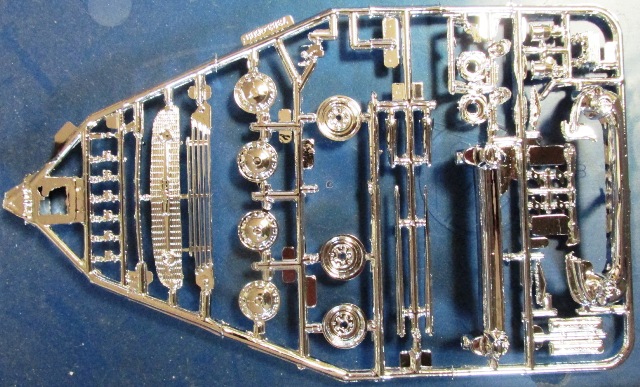
On Saturday I picked up the latest incarnation of the much loved (or loathed) 1957 Chevy Bel Air, which was originally introduced in 1963. This is the one with opening doors, trunk, and steerable wheels. Back in the day this kit was controversial because of the afore mentioned features - it was The End of Modeling As We Know It, since opening doors, etc. were the domain of Master Modelers like Dave Shuklis. Now anybody could walk into a hobby shop, plunk down $1.98, and have an award winning model. In theory. Actually, this kit was and is a bear to assemble. Except for the decals, tires, and chrome wheels, it's pretty much a straight re-pop of the Revell/Revell Monogram Hot Rod Magazine version. The stock hubcaps and chrome reverse wheels have been restored, so for the first time in 30+ years a stock version can be built. The tires are no name black walls, but with some whitewall trimming, the wheels will fit the AMT B.F. Goodrich tires found in kits like the '62 Pontiac. There is a drag version, but no slicks or roll bar. The glass is clear, but too small, there's a considerable gap between the glass & body for both the front & rear windows. The only solution I've been able to find is a sheet of .005" clear Evergreen and trial & error fitting. Compared to a Revell/Mongram example I have (yes, I AM a glutton for punishment) there are far fewer sink marks, but there is plenty of flash (see the chrome tree below). Considering the age of the mold, it's no worse than some AMT repops from the same era. Oddly, on my old kit, the copyright on the frame is 1985, on the current version the copyright is 1973. I was also pleasantly surprised to see that the kit was molded in the U.S.A. The decal sheet was printed in Italy - no word if it was by Cartograf. (see below). Not to beat a dead horse, but compared to the AMT and 21st Century 57 Chevys, the proportions off - it's been a complaint since the '80s and it would seem to be unreasonable to fix it now. FWIW, I like it, warts & all. I wouldn't recommend this kit for the casual builder, but if you like the experience of modeling circa 1963, this is WAY cheaper than buying the original issue.
-
Nice! Going for a gasser look?
-
Posted this one before. Plenty of patina!
-
Robert, If you use the belly pans for lining up the frame halves, you shouldn't have any problems. I've found that if you paint all the frame parts while they are on the trees, then touching up where they attached, you'll still have a neat assembly. Generally, the touched up areas are in places where they can't be seen after assembly. You can scratch build a magneto from aluminum tubing and plastic rod - it'll actually look better than the kit magneto!
-
Looks GREAT!
-
1961 Ranchero
Karl LaFong replied to crazyjim's topic in Model Trucks: Pickups, Vans, SUVs, Light Commercial
Good job! I like the color combo. -
Rattitude Adjustment
Karl LaFong replied to Steven2's topic in Model Trucks: Pickups, Vans, SUVs, Light Commercial
Well done! -
Thanks!
-
The in progress pictures can be found here : http://www.modelcarsmag.com/forums/index.php?showtopic=85320 Since the last update I added a front tube grill and plaque from an old Revell Custom grills parts pack, upper front bumpers from the AMT '63 Ford, spotlights & antenna from an AMT (SMP?) 61 Valiant, and the custom taillight option found in the kit. Thanks for looking!
-
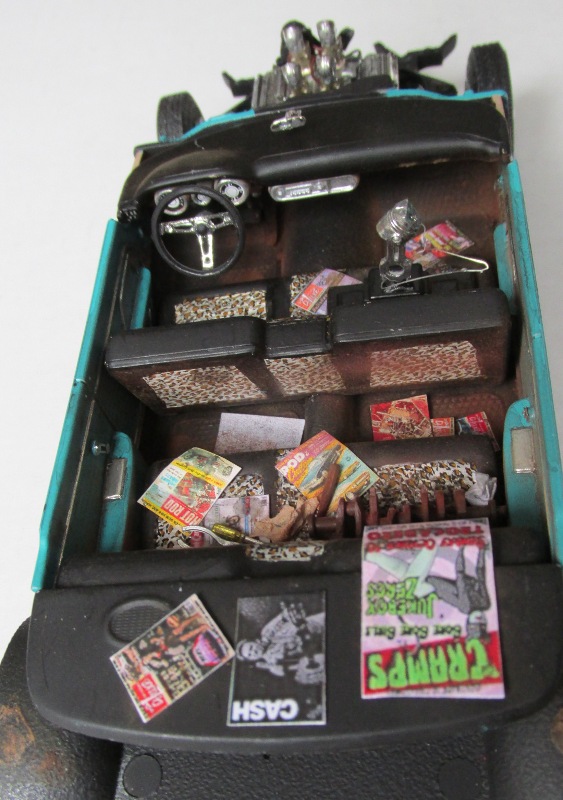
The interior is finished. The trophy is from the AMT 49 Merc kit, the tools are from the Styline Falcon Ranchero, steering wheel is from the Beatnik Bandit (I think), and the crankshaft is from one of the AMT engine packs. Weathered with washes and Micoromark's Doc O'Brien's weathering powders. I hope to shoehorn this into the body tonight.
-
Sweet!
-
Looks good - just the right amount of weathering. Great idea for the headliner! Rust rules!
-
Looks good!
-
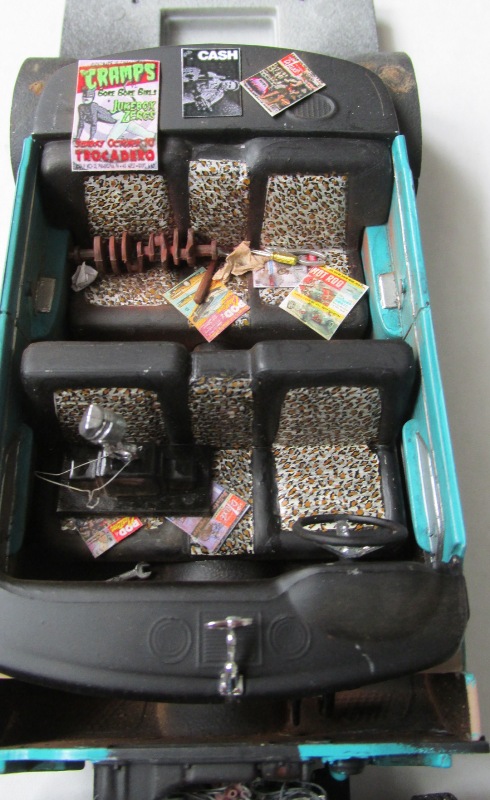
Got the interior started. Basically kit based, the side panels were painted Tropical Turquoise, topped with Dullcoat. The seat decals are the Leopard Upholstery from Scale Motorsports. I printed out some scale magazines & posters for the interior and some PA license plates.
-
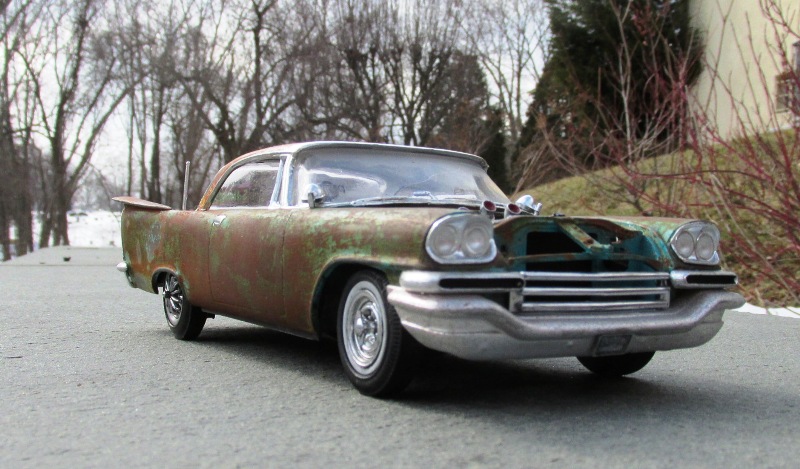
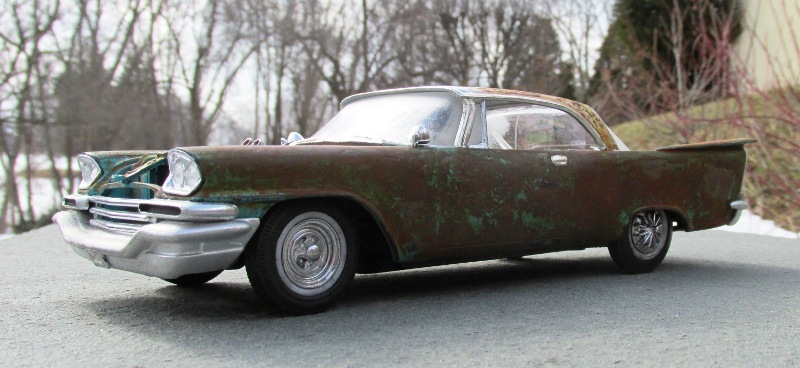
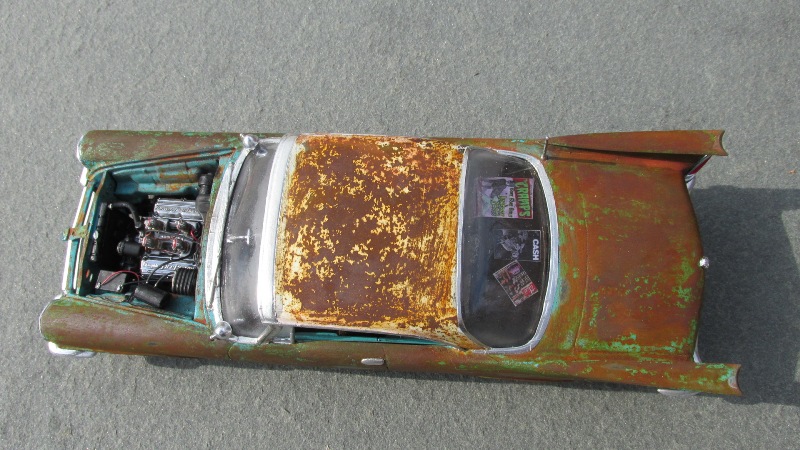
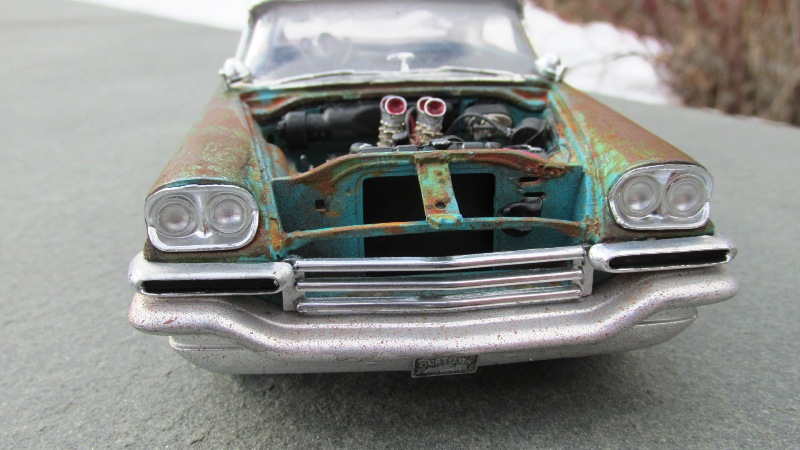
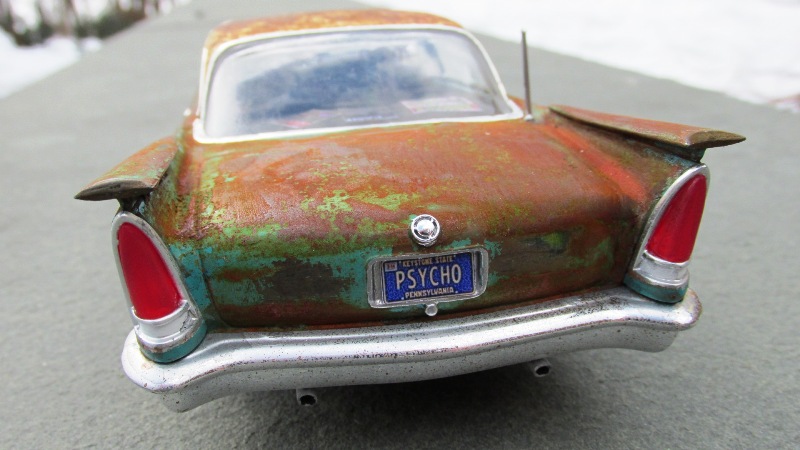
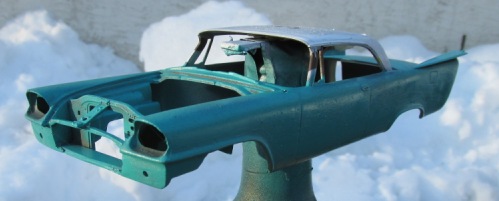
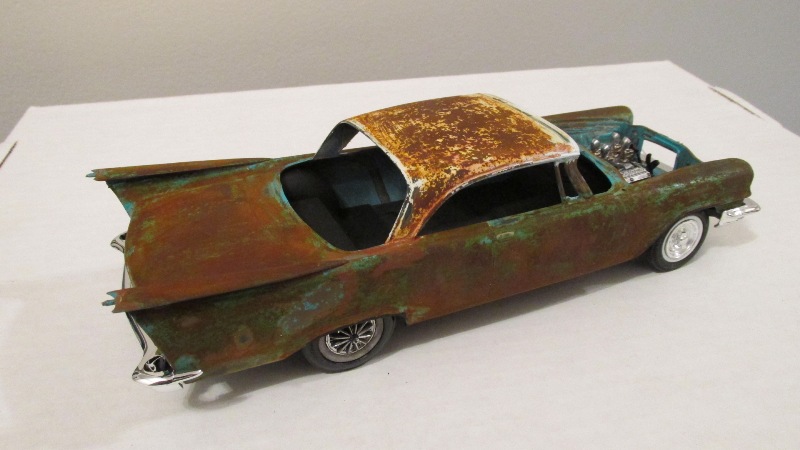
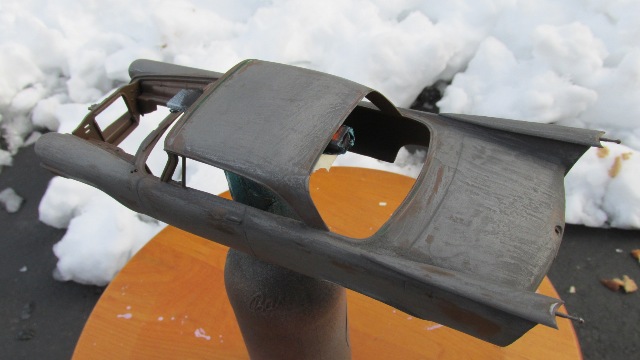
Did some more work on the Chrysler. The top was painted Testor's Classic White, the body Testor's Tropical Turquoise; both are rattle cans colors. After letting them dry for a few hours, the rubber cement was removed with a combination of a rough sponge, my thumbnail, and various grits of sandpaper (320, 400, 800 2000), exposing the Sophisticated Finishes Metallic Iron and other paints. The body received a coating of Sophisticated Finishes Instant Rust; after 1.5 hours it received another coating. The body was placed in a plastic bag and allowed to dry overnight. This resulted in a nice rusty patina. The front wheels were attached; they are from the AMT 62 Pontiac custom with spinners from the Aurora Wheels Parts Pack. Yeah, the bumpers are way too shiny; they will be toned down.
-
So far, so good! What color(s) will it be?
-
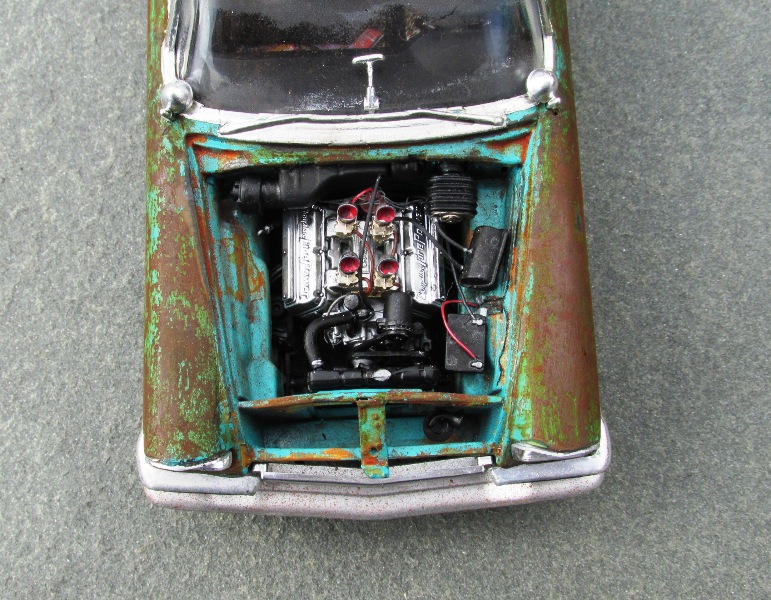
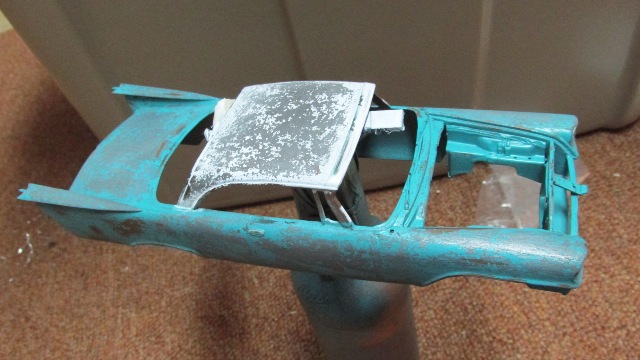
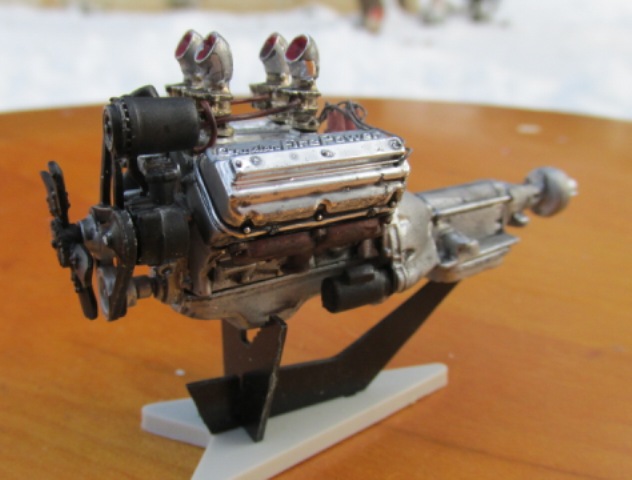
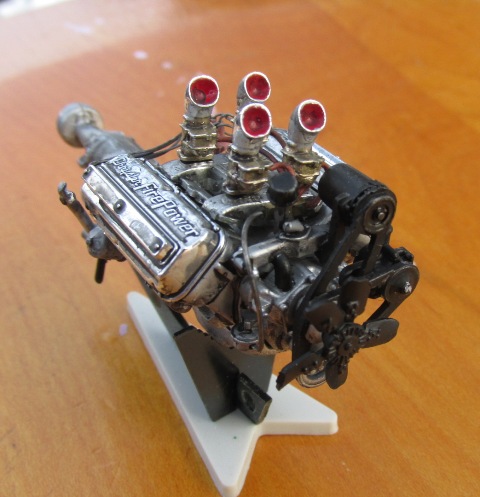
While I was rummaging through my kit stash, I came across a pre-painted AMT ’57 Chrysler & odds & ends of a regular issue Chrysler. I’ve wanted to do a non-300 version (e.g. Saratoga), but scratch building the hood always stopped me. But if I used an induction system that didn’t require a hood… So I came up with the idea of a ratty kustom. The engine was built mostly stock, with the addition of a Replicas & Miniatures distributer, Predicta valve covers, Outlaw manifold, and carbs from the new issue Tweedy Pie. It was painted Testor’s metallic silver enamel and given a black wash. The rear tire/wheel is kit tire with an Aurora Parts Pack wheel mounted on an AMT ’57 T-bird hubcap. The Aurora piece was cut down to fit flush with the T-bird wheel. I removed the side trim, removed the 300 grill surround, and modified a Monogram ’59 radiator support to make the new grill support. The horizontal fins are from the AMT 61 T-bird Stylene kit. The body was painted with Plasticote black primer, followed with Tamiya red brown. I’ve wanted to use Sopristicaed Finsishes Rust system for some time, so I decided to try it on this kit. I applied two coats of Iron Metallic Surfacer. After it dried for 24 hours, I found it to be pretty rough – in the future I’ll use a finer brush. In hit it with vaious grits of sandpaper (320, 400, 800, & 1000 grit) to smooth out the finish. After the last series of pictures were taken, I applied rubber cement to the body with a sponge. The plan is to paint over the rubber cement, allow the top coat to dry, then remove the rubber cement, exposing the metallic surface underneath. To be continued…
-
David, With the parts pack Caddy, you have a choice of a Hydramatic or an in-out box. If you are doing a drag car, the in-out should fit with no or little problems; the Hydramatic may take some finagling to fit underneath the floor board. You'll also need to make a motor mount and check for clearance with the wire axle.
-
Looks good!
-
Nice! I like the way you were thinking way out of the box.
-
Yup - using the belly pans when gluing the frame will result in a squared frame - MUCH easier than the AMT Double Dragster or Revell Tony Nancy double dragsters!
-
way cool!
-
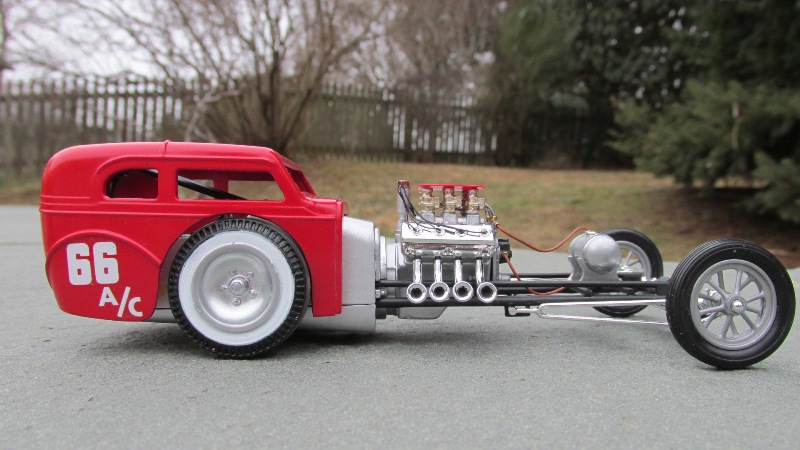
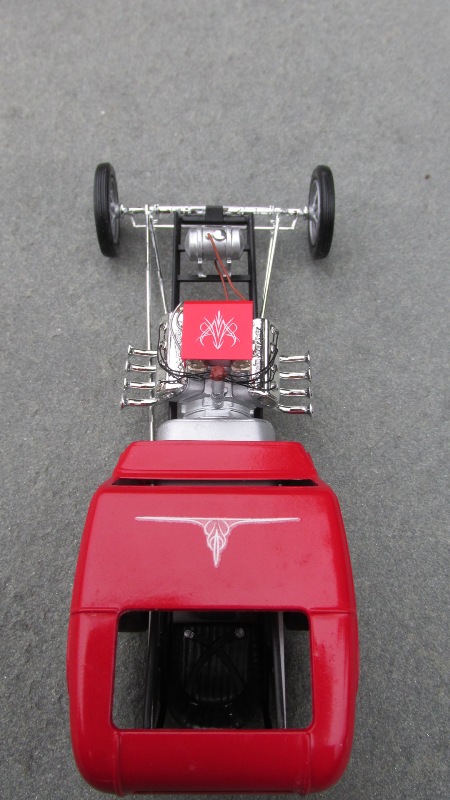
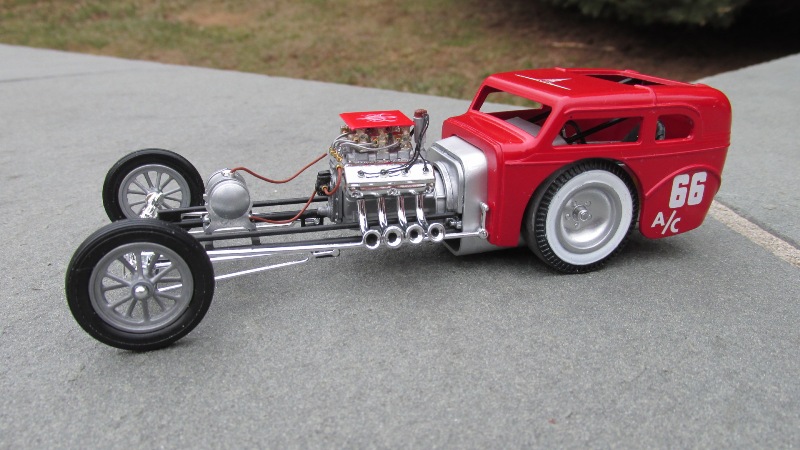
Thanks to all for the positive comments! The coupe color is Tamiya Italian Red, the dragster body is Testor's Model Master Metalizer Aluminum.
-
I finished the Bantam coupe. Details & in-progress photos can be found here: http://www.modelcarsmag.com/forums/index.php?showtopic=83989 Revell deserves major kudos for this kit - well engineered and fun to assemble. Would have been nice if they included a fuel pump & non-plated Moon discs, but that's why I have a spare parts box...