
Tukkerdax
-
Posts
135 -
Joined
-
Last visited
Content Type
Profiles
Forums
Events
Gallery
Everything posted by Tukkerdax
-
Thanks a lot, if you want to see the diorama, you can look at : http://www.modelcarsmag.com/forums/index.php?showtopic=87697 on this forum..
-
Thank you all for the nice comments...
-
Hello friends, I like to show you my volksrod using the revell box volkswagen beetle 1968.The name edmund and jones come from the resin headlights i used, there are the "edmund and jones" type. I made a topchop and placed a new frontaxle. I also used other wheels and rims as you can see. Placed some extra engine parts and made a custom fuelpipe, custom taillights, and smaller backwindow.The pictures i made in front of my latest nissenhut diorama, which you can find also on this forum if you are interested. I hope you like them...
-
Nissen hut including camaro 69 1/24 # FINAL FOTO's #
Tukkerdax replied to Tukkerdax's topic in WIP: Dioramas
Hello Curtis, I simply printed decals on decalpaper ( avoiding white colours ) and then apply to the wall, using realy a lot of micro sol ( red bottle )) for setting on the bricks. To make it less shiny, i used several powders on it, white and black, but not too much... greetz Eric -
Nissen hut including camaro 69 1/24 # FINAL FOTO's #
Tukkerdax replied to Tukkerdax's topic in WIP: Dioramas
Hello, I finisched this diorama, and put the final foto's here. I hope you'll like it. Eric -
PERFECT ! I like every detail. weathering is outstanding.
-
Nissen hut including camaro 69 1/24 # FINAL FOTO's #
Tukkerdax replied to Tukkerdax's topic in WIP: Dioramas
I've been working on the roof. So i made several corrugated plates including weathering.. I also made my graffiti work on the bricks, Charlie Brown and some name MAX... It's a little bit shiny at this moment because of the micro sol fluid. It needs to dry a bit. I hope you enjoy sofar. -
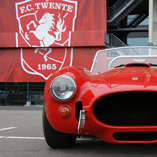
Stunning cobra. Only it Seems to me That the exhaust is a little bit too high maybe? Looks as if the doors hits them when opening.Can be the angel of the foto.
-
Outstanding job ! looks very realistic. Just curious, where do you get the plumbing materials on the roof, valves and so on.. i llke to use them also in a diorama i'm planning after my nissenhut is ready.....
-
Nissen hut including camaro 69 1/24 # FINAL FOTO's #
Tukkerdax replied to Tukkerdax's topic in WIP: Dioramas
Thank you all for the compliments! I continued with the so called "stelcon plates " in front of the building ( don't know the english name for it, sorry ).Therfore i used angular styreen of 2 mm. for the steel edges and made them rusty including some wheatering. I carved the baseplate in the right pattern and placed the steel edges, and put some grass Now i have to make the lifting holes ( 2 in each plate ). -
Nice details, very nice !
-
nicely done sofar !
-
Nissen hut including camaro 69 1/24 # FINAL FOTO's #
Tukkerdax replied to Tukkerdax's topic in WIP: Dioramas
Thnx, In my first post i could not post more pictures, so i will continue with more.. I made a power box.. And made some wood above the big doors styrene doors.. finisched doors with hairspray and salt method.. [/u -
Hello, A few weeks ago I started a diorama for my recent build phatom green camaro 69 from Revell. I started with a wooden base and some styreen plates. I really made some progress.. I hope you like it. My inspiration The camaro The base progress on the building wall lamp Hope for more posts this weekend.. Eric
-
very very clean build... This is TOP !
-
Nice job , and a cooool car...
-
Looking good! Really love it !!
-
awsome job sofar !! like your workingmethod...I would put the sidemirror on the roofedge....
-
32 ford landspeed car > black paint is on !
Tukkerdax replied to crazyrichard's topic in WIP: Model Cars
Looks Nice sofar !! -
Thnx everybody ! I finished this diorama, and tried to make some outdoor pictures. There is only 1 picture i'm satisfied with , the most of them are too dark because of less sunlight. I'll post more pictures later... Thnx for watching ! Eric
-
I made a little service point with waterconnection en hose between the 2 pumps. The diorama is now nearly finished. I have to put some more vegetation . When ready i will post some outdoor pictures.... grtz. Eric
-
24 Hours of Le Mans Heller Martini Porsche 917
Tukkerdax replied to GlueTube's topic in WIP: Dioramas
looks good ! Like to see more from the whole setting..... -
My latest GULF edition Ford 32 sedan
-
nicely done Richard, maybe you can put additional 1 or 2 ( steel ) cables to the top of the roof in a "V" for holding the lamp straight , i think it's quite a heavy one(. just an idea..) but as always... TOP !!
-
A little update. I almost finished the pumps, put some more wheatering and the acrylic glas in front. I also put some vegatation, this need some more variation... now i'm going to finish the big sign and some additional details.