
Bluzboy66
-
Posts
358 -
Joined
-
Last visited
Content Type
Profiles
Forums
Events
Gallery
Everything posted by Bluzboy66
-
NICE '57!!
-
Thanks Mike G.! That's House of Kolor Candy Red Base with my own custom-mixed Candy Red on top, followed by 2-part clear. The real magic is in the Candy Red intermediate coat......that's what gives the paint job a deep look. Mike
-
I've got a shelf full of the Model King Stockers that I'd like to get to work on!.....the Monte Carlo, '66 Impala, Laguna, Torino, Cyclone, Malibu, some of the Early Modifieds, etc.,......and I'm looking for inspiration. Show 'em if you got 'em!! I'm especially interested in seeing your fictitious racers, but replicas of actual cars are welcome as well! Here's my Donnie Allison 'North Ga. Oil Co.' Monte Carlo. Definitely not a dead-on accurate replica, just a fun, out-of-the-box build....... Mike
-
From one Mike to another! Welcome Mike! Mike
-
Here's mine, posted here a while back, and nicknamed 'Wild Cherry'...... Mike
-
Nice green, huh? Alex snagged that Duplicolor shade from my stash. I was saving it for an R&R Resin '68 Plymouth Fury III I'm working on! Definitely nails the 70's vibe. Mike
-

Modelhaus 1964 Dodge D100 Pickup
Bluzboy66 replied to Terry Jessee's topic in Truck Kit News & Reviews
I'd 'heard' that Model King Dave Burket is/was working with someone on a '67 to '72 Ford, but I haven't seen anything in print to validate it. Next time I speak to him, I'll pry a little. Mike -
My boy, Alex, just finished building the new '76 Gremlin kit. It turned out AWESOME. I'll have him post some better pics in the Under Glass section. It's fun watching him at 15 years old.......instead of sweating details, he just jumps right in and gets building! Still a bit of BMF and paint detail left, but it's just about there. Mike
-
I'm planning out a build-up of the new Vantasy, and eye-balling the decal sheets. I'd thought of doing a Candy/Emerald Green paintjob, and using the green panel decals........until......??.........my decal sheet has two passenger-side green panels!!......no driver's side. One of the decals has a cut-out for the sliding side door handle, and the other doesn't. Has AMT since revised this, or, are all of them this way? .....compare the green panels to the correctly-printed purple/pink versions below them on the same sheet in the pic. Mike
-
WOW, I remember that ad! I used to love looking at it. I'd love to have a 1:1 of that pickup. Mike
-
Yup, absolutely. MY mistake. I had all of my old vans kits out looking at all of the variances, and it's the DODGE that has the bi-folds. Thanks for the correction. So, it seems as though the biggest differences between the A-Team and the new/old Vantasy are the side and roof ribs, license plate recess in the rear door on the Vantasy, and the GMC parts in the A-Team version. Mike
-
'64 Plymouth with a 'hardtop'..... '64 Plymouth with a 'sedan' roof....... Cool '63 Dodge wagon...... and a '66 Charger.......
-
Late to the party on this one, BUT...... The A-Team was a GMC van, so it had the GMC grill. The first release of the A-Team van had NO chrome-plated parts, whereas the newer release did have chrome-plated parts. The A-Team van also had a raised rib along both sides of the body, which is (thankfully) gone on this new, back-dated re-release. Round2 has added 'Chevy Van' to the front fenders in this new release, as well. The A-Team van had ribs on the roof, whereas the new release is smooth, like the 70's AMT kit. Good stuff. I'm so glad they brought this old van back out. Mike
-
I'm in! I'll take some Cutlass kits, and I'll be interested in seeing what else becomes available. Mike
-
70s Ford mild custom van
Bluzboy66 replied to Mr Stock's topic in WIP: Model Trucks: Pickups, Vans, SUVs, Light Commercial
YES!, a van for a change! I like what you're doing with this old Ford. The roll pan on the front looks perfect! Mike -
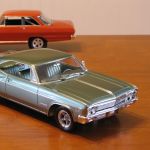
Looks great so far. I built one of these '66s, and immediately bought a few more. NICE kit! Mike
-
Perfect color!
-
Thanks, Michael. The Mysterion kit is a bit of a challenge to build. My biggest issue is, it has a lot of very tiny chrome parts, which, of course, have to be scraped before they are glued together. Revell did a great job of replicating this Roth creation, down to every itty bitty chassis and suspension part, but wow, my eyes were fried after I finished up with those sub-assemblies! Other than that, the body-to-interior bucket-to-chassis fit was problematic. I had to chop, trim, and manipulate things into alignment, BUT, it finally went together! I swapped out the kit's plain black rear tires and chrome wheels for a nice set of Modelhaus resin whitewall slicks and deep dish 5-spoke wheels from a Barris T Buggy kit. I also modified the kit's headlights......the big cyclops light doesn't even come with a lens!! I found a suitable one in the parts box. Then I cut the heads off of some straight pins and glued them into small holes in the center of each of the two headlights, to mimic the look of the old Lucas lights. Overall, I like how the Mysterion turned out, and I'm looking forward to building the Road Agent next. Hopefully THAT kit will be a little easier to get together. Mike
-
One of my most recent builds, the Mysterion. Thanks for starting this thread, Adam........can't get enough of Ed Roth!......... Mike
-
That Camaro looks PERFECT!! Nice job. I've got one of those old AMT Camaro kits sitting dusty on the rack.....you've inspired me to pull it out and have a closer look! Mike
-
Hey, even with no pics, GLAD TO HAVE YOU BACK IN THE HOBBY! Now keep at it! Mike
-
'77 GMC Wrecker
Bluzboy66 replied to BOSWELL891's topic in WIP: Model Trucks: Pickups, Vans, SUVs, Light Commercial
Nice build!! I love these old Chevy trucks. I gotta get me one of these kits! Mike -
SWEET! Love the de-raked bobber stance.
-
Thanks guys! MIke
-
A few of you mentioned how difficult it is to build the Mysterion. 'Difficult' might be an overstatement, and 'finicky' is probably a better word.... 1. The chassis and suspension require some patience to get aligned properly, and I found myself walking away from the table a few times. BUT, the parts DO fit together fairly well, and build up nice. Scraping all of that chrome is a chore, but it pays off in the end. ALTHOUGH, If I had it to do over, I'd probably strip all of the chrome from the suspension parts, assemble them, and then Alclad them as sub-assemblies. That would give me a chance to assemble the rear axle halves, smooth the seams, and trim all of the sprue barbs from the various teeny tiny chassis pieces prior to assembly and Alclad. A side note - The only parts I'd leave chromed are the main frame side beams....they look awesome fully chromed! 2. I found it strange that the interior bucket wouldn't fit up into the body without some trimming around the back, between the bubble hinges, at the 'control panel' that sits in the body behind the bubble......that's definitely an engineering flaw. My kit is a recent reissue. Could the interior's poor fitment be a byproduct of a hasty retool of the mold somewhere along the line?? Regardless, it only took a few minutes to rectify. Just be sure to address it BEFORE paint or flocking. Also, on the topic of flocking - the real car had silver/gray FUR!....long, flowing, wavy fur. I thought of gluing miniature fur into the bucket, but decided to go with standard gray flocking instead. Mostly because it was easier, but I also didn't want any bubble fitment issues after the fact. 3. Installing the two engines might have been a challenge had I installed them one at a time. Based on my experience with the kit, I recommend getting the engine and chassis mounts scraped and ready for glue, and then installing them TOGETHER to insure proper alignment. Then prop the chassis square, and let everything cure evenly. 4. The body had its share of minor issues. I wanted the paint to be ultra slick, so I spent extra time smoothing and blending the seams prior to primer. I also filled and smoothed the afore mentioned 'control panel' seams.....to the rear of the bubble, on the rear deck of the body. The little door is a separate piece, and I guess some builders would want it to be removable, hinged, or propped open.......not me. I wanted it gone, so I filled it. I like the look. SMOOTH. Although, hinged would be pretty trick! 5. The bubble, its hinges and actuator rods require just a little finesse to make work and close smoothly, and the hinge perches are VERY delicate, but, I was surprised to find that it all went together and worked perfectly without much issue at all. I fully expected a fight here, and that just wasn't the case. Thankfully! One recommendation - remove enough plastic around the edge of the bubble's body-colored ring surround (prior to paint, obviously) to prevent binding when the bubble is in the closed position. Primer, color, and clearcoat will add thickness here, and that gap can close up tight as the finish process progresses. You won't want to have to 'pry' on the bubble every time you decide to display it open.......you'll surely snap the delicate hinges in the process. Spend time on this little detail, and you'll be rewarded everytime someone asks, "does the bubble open??". 6. Wheels, tires - the kit's front wheels and tires are perfectly fine, but the rear tires just looked too large in my opinion. That, and I wanted nice, clean whitewalls. Modelhaus to the rescue. I always have a stash of those pie crust whitewalls on hand, and this was a perfect application. I'll use the kit's plain black slicks on some drag car build down the road. I also used Modelhaus' chrome 5-spokes on the rear. In fewer words, building the Mysterion was a labor of love. I really enjoyed seeing the car come together, as each step had me imagining what was going through Roth's mind as he created this beauty. The man was an extreme visionary in a time when custom fiberglass fabrication and hand-blowing acrylic bubbles were brand new concepts. The cyclops "eye" headlight, dual engines......?? The man was ahead of his time, and there's never been anyone else like him. Now, how about you guys post some pics of YOUR Roth cars?!, Mike