
Bluzboy66
-
Posts
358 -
Joined
-
Last visited
Content Type
Profiles
Forums
Events
Gallery
Everything posted by Bluzboy66
-

Show Us Your Stash!
Bluzboy66 replied to Bluzboy66's topic in General Automotive Talk (Trucks and Cars)
-
Show Us Your Stash!
Bluzboy66 replied to Bluzboy66's topic in General Automotive Talk (Trucks and Cars)
Thanks! I'll do my best! Mike -
Show Us Your Stash!
Bluzboy66 replied to Bluzboy66's topic in General Automotive Talk (Trucks and Cars)
-
I spent Sunday evening in my little basement utility room/model kit 'vault', sorting and and rearranging my kit collection. This is the first time I've really had the chance to go through everything in one sitting. After pulling the absolute junk, flattening the empty boxes, and eBaying some of the extra fluff, here is my 'Collection'! This is the stuff that makes me tick as a modeler..... Mike Close-ups.....
-
What is your dream model kit?
Bluzboy66 replied to Jordan White's topic in General Automotive Talk (Trucks and Cars)
A well detailed, properly proportioned, well-equipped, long-bed mid-80's Chevrolet Fleetside pickup. I think Revell is the company that could pull this off. I'm impressed by their modern tools. Their chrome plating looks great, molding is clean and crisp. Come on Revell, bring us an 80's Chevy pickup..... Mike -
Revell 54 Chevy Questions
Bluzboy66 replied to Rob D's topic in General Automotive Talk (Trucks and Cars)
Rob, Welcome! You're going to love this forum. If you can give me an idea of what types of wheels and tires you're looking for, I may be able to help. I have plenty of extras, and/or, I can guide you on where to find exactly what you're looking for. Ideally, you'll want to start buying some new kits to keep the fire burning, AND so that you can scavenge the extra parts from those kits to use on future builds......especially wheels and tires. Mike -
Excellent idea, and yours turned out great. Maybe I'll give that a shot on my next '65 Chevelle build. Whatever I decide to do, I'm going to try and resin cast a few extras before gluing it all up. I've never cast anything, but if there was ever a reason to learn the technique, this would be a perfect one. Mike
-
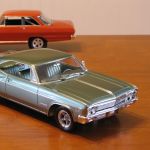
Guys, Hope this finds you all enjoying a Saturday evening of kit building. I spent the earlier part of the evening watching the B'more Ravens lose to the Steelers, so I needed to do something to lift my spirits. So, I found myself digging through some old kits, and the Revell '65 Chevelle caught my fancy......again. I'd sprayed this one years ago, and it turned out lousy, so I stripped it, put it back in the box and set it aside until I could muster up another head of steam. I think this on deserves a second go 'round. As with most of my builds, I learn a lot about the 1:1 car as I progress with the kit build. Let me start by offering this to those of you who care to learn about the 1965 Chevelle SS 396 Z-16 Big Block!.... Z-16 Chevelle Website So, here I go, jumping back into this old stalled Chevelle project, when my eye falls on the rear tail light panel. For the first time, I realized that it just didn't look like all of the '65 Chevelles I've seen over the years. So, I Googled away, and found that, yes, Revell gave us the proper Z-16 tail light panel. It's a little wonky, but they did a pretty good job with it.... The Chevelles I've seen have THIS tail light panel.... OR, if you see a factory-correct, non-Z-16, Tuxedo Black SS, it'll have a tail light panel that resembles THIS.... With me so far? Me, I guess I want something different, and, as it turns out, more 'common'. SO, I reworked MY kit's tail light panel to resemble the more common, non-Z-16 Chevelle SS. I cut everything out between the rear quarter panels, and below the top edge of the trunk lid, reused some of the pieces, and used Plast-struct for everything else. Hindsight being 20/20, I should have taken a few pics as went along. But, oh well, here's what I have so far.... Once the glue dries on my revised tail light panel, I'll use my scribes and sanding sticks to refine everything a bit. I'll use Bare Metal foils for all of the aluminum and chrome trim accents, and I'll use Keith Marks decals for the scripts. Oh, and I'm thinking of using the bumpers from the AMT '65 El Camino, if they'll work.....they don't have the big fugly bumper guards, whereas the Revell kit's bumpers do. In the end, I'll have an '65 SS Chevelle that 'looks' right to my eye, even though the proper Z-16 would be the more desirable car to most SS fans. Sometimes you just have to go with your heart. I'll post more pics as I progress. Mike
-
This is my Saturday Night setup.....my dining room table! I use one of the large self-healing mats, and do most of my detail work right there where it's nice, comfy, and clean, and I can interact with the wife and kids. All of the dirty work is done in my backyard shop, where I have a Pace paintbooth and a large very well-lit workbench. That's nice when I want to be left alone. Here's my latest project on the dining room table, a Revell '65 Chevelle..... Mike
-
Amt 2010 Dodge Challenger R/T classic
Bluzboy66 replied to Mr mopar's topic in Car Kit News & Reviews
I'm with ya Walt. I can't tell you how many old kits I have in my collection because of the box art, alone! My latest infatuation has been the old 70's custom van kits. The box art is 'far out', man. !! Mike -
You're right, Curtis. Man, if I got graded or judged every time I made a typo....whew!....I would have failed this test many times over! Mike
-
Exactly, Marc. You nailed it.....you cleared ONE model, and you formed your opinion. Trust me, I understand your frustration, and your wariness to continue using urethane. I really do. Before I continue with this reply, I want to 'clear' up one thing.....professional grade acrylic urethane is NOT "AMBER". It's CRYSTAL CLEAR. Please don't confuse the modern 2-part automotive-grade ACRYLIC urethanes with the old nasty POLYurethanes of the past. It's not the same animal. Unfortunately, many adventurous model builders who choose to shoot 2-part urethane clear over a model for the first time never mature past that point. They have a bad, or unsatisfactory experience, so they 'chalk it up', wash their hands of it, and go back to their particular comfort zone, be it enamel, lacquer, water-based acrylics, whatever. That's all fine and good, BUT, then you'll have hit a wall with your modeling/finishing skills. How about MASTERING the use of urethane, and THEN form an opinion one which you prefer, and why. Again, I understand why many prefer to just use basic Testors enamel. It's easy, it's traditional, it's cheap, etc. I have a close friend who has been building for 50 years. He prefers Testors #1814 spray bomb clear. Hey, it works for him, and he's happy with the results. Who am I to argue? That said, if you'll go back and read my earlier post, which many obviously have not, you'll see where I mentioned PROPER MIXING and application, AND the fact that urethane can be REDUCED in viscosity. Once reduced, urethane will airbrush as lightly and smoothly as a healthy dose of enamel or lacquer. PROPERLY applied to a 1/25 scale model, urethane WILL give you a THIN, GLOSSY finish. Take this from someone who sprays nitrocellulose LACQUER daily. I'm a full-time luthier, and have been spraying guitars for almost 30 years. I've used EVERY type of finish out there (including varnish and French-polished shellac!), and lacquer IS my finish of choice on GUITARS.......just not on model cars. Again, I detailed why in my previous post. At this point, I've said just about all I can say, and I'll gracefully bow out of this conversation. There have been some excellent points made in this discussion, and the safety aspects have been WELL covered (genuine THANKS to those who posted......ALWAYS safety first!). Unfortunately, many of the posters are misguided and ill-informed, and this Forum will forever be their soapbox. All I can say is, take the time that you've spent here, and go back to the bench. There's absolutely no substitute for hands-on experience. AND, the experienced builders/posters will benefit from zipping their lips, and opening their ears and eyes from time to time. We can ALL improve our skills, that's a fact. I have the photos, posts, and articles to prove it. Mike
-
I'm glad that youy guys are posting the specific hazards associated with using urethanes. That is truly appreciated, and should really be a separate post altogether, complete with a 'sticky'. Seriously. A lot of the other muckity muck and mumbo jumbo is a bit over the top, but that's to be expected. The original poster asked for "Too Shiny?" opinions, and that's exactly what he's getting - opinions. Me, I like shiny, and I'll continue to reduce and apply my properly prepared urethanes to achieve it. Folks, be careful, READ the precautions and/or tech sheets, and follow safety protocol, REGARDLESS of which finish you use. We want you here for a long time! Mike
-
For me, there is a simple answer. I always try and arrive at a finish that is as thin as possible, AND as smooth and glossy as possible. IF you accomplish all three in the same paint job, you've nailed it! IT'S IN THE APPLICATION, fellas!!!! To start with, urethane IS the standard modern finish for 1:1 automobiles. MOST classic car and musclecar restorations include urethane as a final topcoat. Many 1:1 automotive paint suppliers/jobbers won't even mix lacquer these days. Like most of you that have been building model cars for some time, I started out using enamels. Me personally, I've just never been happy with enamels. After years of frustration, I eventually moved on to lacquers - acrylic and nitrocellulose-based, and STILL like using them for main-body base coats, interiors, engines, chassis, etc. Still, lacquers are fragile and temperamental, and the hardened finish can check and crack over time (ask me how I know). I'd been using urethanes on 1:1 motorcycles and guitars for years, and recently moved on to using 2-part acrylic urethane clear over lacquer and/or urethane base coats for my model car bodies, pretty much exclusively. I absolutely agree though, MOST urethane clear paint jobs are entirely too thick, and obscure panel separation lines and detail. THOSE are the paint jobs that give urethane a bad name. While my first attempts at spraying model car bodies with urethane were weak at best, it took some time to find the perfect balance of sprayable viscosity, airbrush pressure(s), final film thickness, and overall gloss. All of this having been said, I feel that I've finally sorted things out and I'm able to spray a thin, smooth, glossy finish that needs very little sanding or buffing. Keep in mind, there are supplemental additives available that will help you to make urethane work for YOU. Urethanes and activators are available in various cure rates, and reducers are available to thin urethanes down to proper scale viscosity and final film thickness. Just like anything else, you need to do your homework, practice, practice, practice, and I'm sure that you'll find that urethane simply IS the proper finish for model cars. After all, it IS the 1:1 automotive industry standard finish, and that IS the finish you're trying to replicate, correct?? Just my 2 cents! Mike
-
".....what the real car would've or SHOULD'VE had". ???? Wha? "Should've had"? ....This is wrong on many levels. Wow. If I thought this way, I'd just give up altogether. I'm sure that we ALL try and replicate 1:1 cars as close as we can, and we improve our skills one kit at a time. In the end, we should build for OURSELVES, and NOT to impress the critics. If you're simply trying to impress someone else, you're completely missing what makes our hobby so special to begin with. Mike
-
Decals stick to a gloss surface best. I've had pretty good luck with spraying a gloss coat over the base color, applying the decals of choice, and then dull-coating the car, OVER the decals. That way you'll get the matte finish you're going for, and your decals won't lift. Mike
-
Don, I feel your frustration. I've often become discouraged about halfway through a build, and just pushed forward to 'get it done'. What's strange is, it's the troublesome builds that push me to do better next time, and it's also THOSE builds that become oddly nostalgic to me. In time, you may look back on this '49 and smile, remembering the challenges that you faced during the build, and how it inspires you to improve your skills one kit at a time. Me? I like your '49. I'd try a touch of light weathering on it....maybe some pastel dust, and go for a moonshine runner look. Those old runners were clean and simple on the exterior, and all business under the hood....just like that little green Ford. You nailed that look! Mike
-
-
Way to go in '10! Man, that black 'Stang looks sinister. Mike
-
B-e-a-u-tiful paint on that '57! Real classy. Mike
-
Nice touch! Wish I woulda painted mine like that!
-
Real nice job on that '71.....cool color too! Guess I'll have to jump into the bidding pit on one of those kits as well. Mike
-
NICE build there, Lou. Classic, clean build. Mike
-
NICE build. REAL nice. I sure hope that we see more of these built-up. Mike
-
Wow. Soooooooo clean! Mike