

mustang1989
-
Posts
6,658 -
Joined
-
Last visited
Content Type
Profiles
Forums
Events
Gallery
Posts posted by mustang1989
-
-
I can tell that you're a fella that likes to do a fair amount of research on any given build to get the best out of it. It's fun as well as entertaining to read about the different camo schemes and the fact that they were repainted with each deployment.
-
Man this is just NUTS Nolan. That bike looks almost as if you could get on it, start it and ride away..............
Very convincing work bud.
-
Great improvement man and well worth the extra effort.
-
To me, the research portion of model building is as much fun as building the model itself. Good catch bud.
-
The amount of detail that can be put into these ships is simply amazing and you're already off to a great start with this Anton. This is really going to be a good one to watch.
-
Never in a milliion years would I have ever guessed that car was from a Revell kit. Master class work on that Anton.
-
 1
1
-
-
Now THAT'S.........a cool build. Beautiful car and it's equally as cool that you were around this car.
What scale is your build Anton?
-
2 hours ago, Mattilacken said:
Cool man! These ships are way cool and the history is realy interesting!
Here is a pic of my build rougly 22 years ago (2002). A bit rough to say the least, this was before i spraypainted. Fun fact... the sign in german behind the carrier is something my dad found way back on one of the german Destroyers found in the fjords around Narvik.
First off, we all started from somewhere Anton. If I showed you some of my builds from 22 years ago it would be the same..... "a bit rough". But hey, we're back in this thing and learnin' along the way right? Secondly, that sign is REALLY neat. I've got a Luftwaffe Pilots Badge in my hobby room in a shadow box along with my father in laws awards and medals.
-
I am SO dialed in to this build Anton. I've never built a naval vessel before but builds like this sure inspire me to try one out.
Following..........
-
On 11/6/2024 at 5:29 AM, David G. said:
The cowls look much more in scale now, nice work!
David G.
Still workin' on the engine panels Dave. I managed to get the other side looking like the one pictured above, have them both primed in the same marble fashion as the rest of the aircraft and have been working on the supercharger air intake for the last couple of bench sessions. I should have some photo worthy updates soon.
On 11/6/2024 at 7:24 AM, Old Buckaroo said:This is some really fine work, love the detail to the office and what you've done with the engine. The FW's have always been my most favorite of Axis flavor aircraft to model
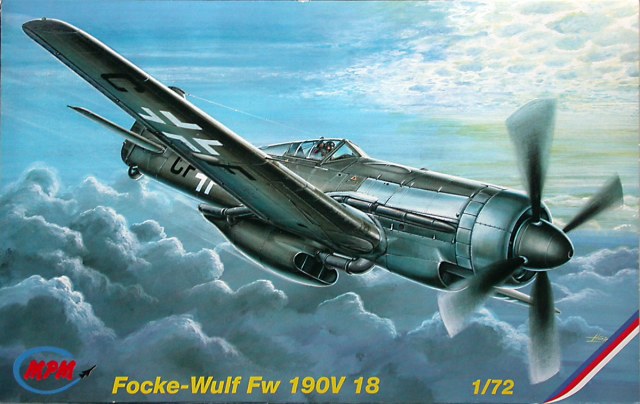
Thanks a lot Sean. They are my favorite as well and this will make my third Fw190 variant to build AND I've got two other variants in the stash. My ultimate holy grail Fw190 to build though is going to be the V-18. Such an awesome looking bird.

-
 1
1
-
-
These trucks are just bad "A" IMO and you've done a great job with this one Scott! Good lookin' ride with some good weathering buddy.
-
2
-
-
3 hours ago, David G. said:
Thanks Joe. I'm just glad that it worked out that way. Sometimes it doesn't, as I think you may know.
=D-
Man I hear you there Dave. I had an Fw190D-9 that I was building about 10 years ago and I cut the nose off and replaced it with an entire engine/ nose assembly from an Aires detail set. I can't tell you HOW many times I test fit that whole nose assembly into place.....it must've been fifty times. Then, when the day of reckoning came, and it was time to adhere the whole nose module onto the completed airframe......nothing wanted to fit! What tha hay??!! I wrestled with that for around 2 hours and then all of a sudden.....everything just clicked right into place.
-
On 11/8/2024 at 6:34 AM, David G. said:
I decided that I needed to at least try to fix the wings. It's supposed to be a fixed wing after all.
") (sorry)
(sorry)
Check out the update below.
=D-
Given all of the hard work that you've put into this build, it was a good move to make the wings fit a bit better. That looks A LOT better brutha Dave.
-
The last couple of days at the bench have been spent on re-working the engine cowlings. These are two piece panels that are hinged in the middle to give two folding leafs to gain more access to the engine area on both sides of the engine. Dragon has put both leafs together to make a single opening panel. What I did was cleaned up the injector pin marks on the inside of the panels and cut about 80% of the way through the join of the two panels to give the proper open look of these panels. Untouched panel on the left and the modified panel on the right.
I started by making passes through the join line with an X-Acto knife and when I got most of the way through the panel I used the troweling tool to make a V into the plastic to where the bottom panel could be opened and glued to the top panel with a clean joint.
-
Lookin' good on this one and love the whitewash on this Pat.
-
1 hour ago, rv1963 said:
Thanks for the idea Joe, this kit is not worth the expense or the trouble to find out if those 3D decals fit, I rather enjoy trying to get the kit to the next level the old school way. Those decals are really awesome though.
No problem at all Rob and I totally get it. Looking forward to seeing more of your work on this one.
-
5 hours ago, slusher said:
Looking great Joe!
Thank you Carl. Let's just hope I can keep up the good pace. lol
-
16 minutes ago, David G. said:
Thank you Robert. The paint is working out well for me, I just wish I could get a better fit for the wings.
=D-
That is ALWAYS a problem for me......except with Tamiya kits. lol
-
You're at a point now to where it's not too late to consider using Quinta Studios 3D decals for the instrument panel. Quinta doesn't offer a set for the Revell kit but they do for the Eduard, Tamiya and Zvezda kits and they might be able to fit that instrument panel area that you've got there.
Check it out:
-
14 hours ago, David G. said:
Thank you Joe, I appreciate your following along and the support you offer.
Yeah, this is turning out to be quite an adventure story, isn't it?
Hey man.....we're birds of a feather (no pun intended) .....it's what we do bro.
Most of these aircraft builds do have quite the adventure behind them in the building process. lol
-
1
-
-
6 hours ago, TransAmMike said:
Well Joe you are doing a fantastic job on this one. Gonna be an impressive build Buddy?
Thanks for taggin' along Mike and for the comments pal.
2 hours ago, rv1963 said:Looking good Joe, the paint effects look real good never tried that before.
'Preciate it Rob. That's the base prep work and the color will go over this in thin coats for what's called color modulation and is supposed to replicate a worn effect in the paint.
-
This is looking good so far Rob. There's a good number of parts to that interior that I don't remember seeing on typical Revell kits before.
Is this the kit that you have?
-
5 hours ago, David G. said:
Wow! Fabulous work on this Joe!
I just love all the extra detail you're adding.
David G.
Thanks Dave! I'm learning alot from you with that Widow build of yours man!!
-
On 10/27/2024 at 7:27 PM, Steve H said:
Oops… hit the wrong button ?…
photos…
I just love seeing those red fenders behind the front wheels.
Thank you to all that followed this build, and commented. It was a fun journey for me, and I am very pleased with the way it turned out.


Battleship Tirpitz, 1/350 Trumpeter
in WIP: All The Rest: Motorcycles, Aviation, Military, Sci-Fi, Figures
Posted
That's frickin' crazy right there but it's pretty ingenious!! LOL! WOW!!