kpnuts
-
Posts
1,582 -
Joined
-
Last visited
Content Type
Profiles
Forums
Events
Gallery
Everything posted by kpnuts
-
Tamiya 1/12 Porsche 910
kpnuts replied to kpnuts's topic in WIP: Other Racing: Road Racing, Land Speed Racers
Thanks dave -
Tamiya 1/12 Porsche 910
kpnuts replied to kpnuts's topic in WIP: Other Racing: Road Racing, Land Speed Racers
Great that worked. I'm back woo how. -
Tamiya 1/12 Porsche 910
kpnuts replied to kpnuts's topic in WIP: Other Racing: Road Racing, Land Speed Racers
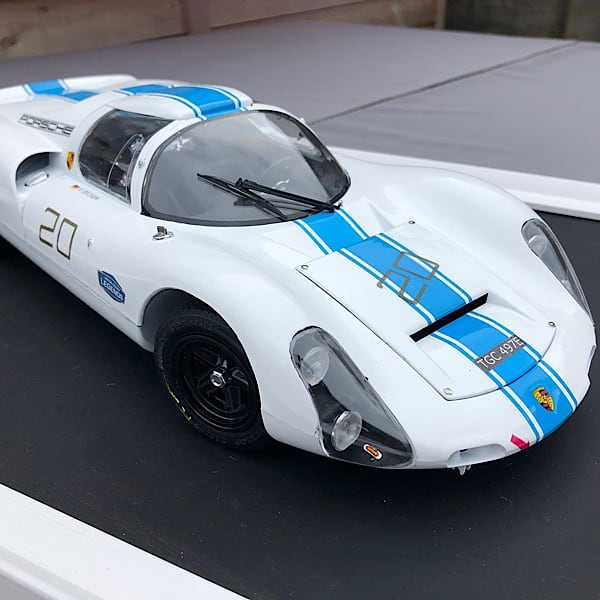
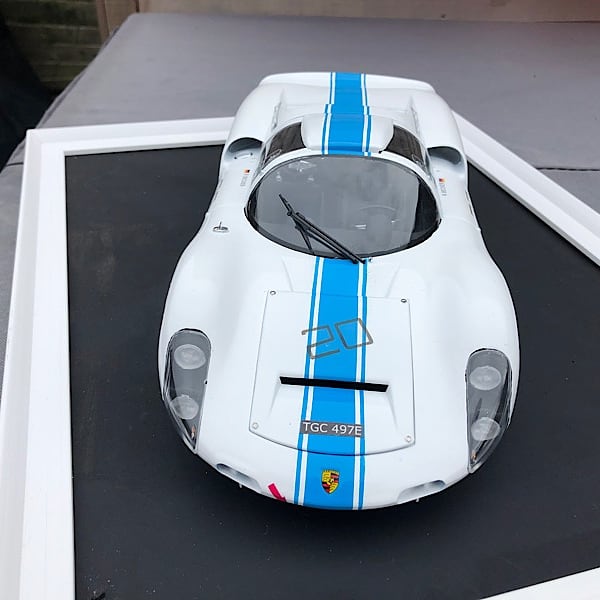
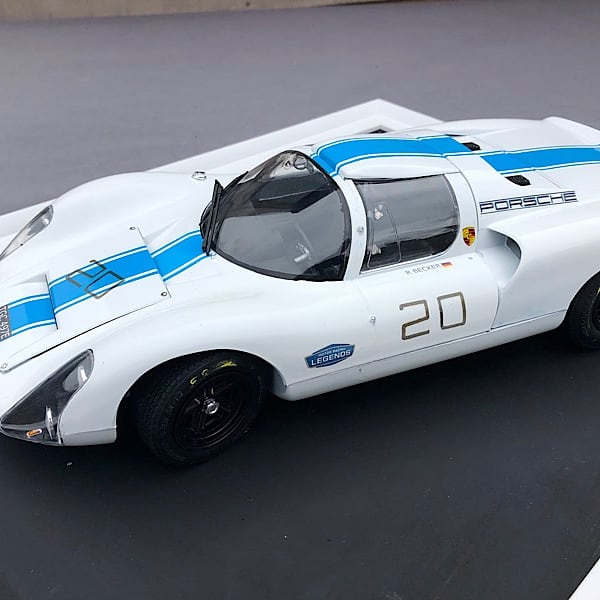
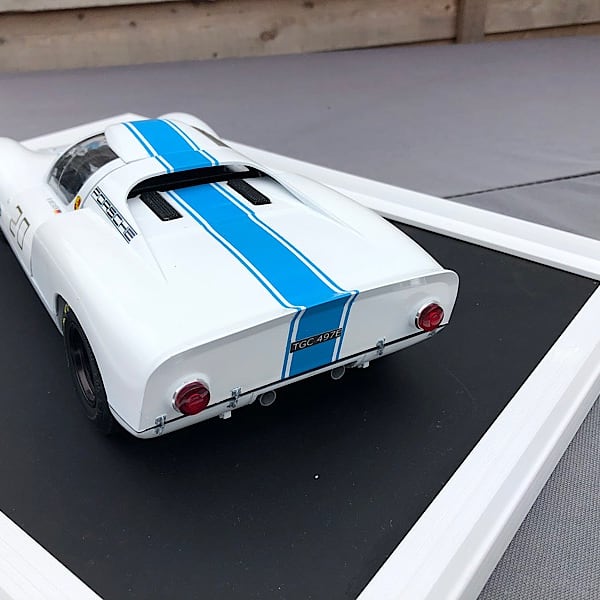
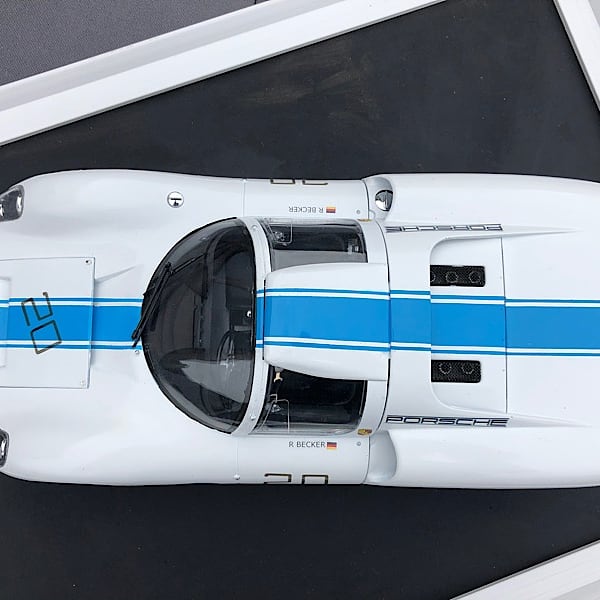
OK this was finished ages ago but I'm going to try what a few kind forum members have suggested, so here goes if it works here is the finished article.
-
Hi all I think this will be my last post on here, I asked on my 910 build why I could no longer post pics and got no reply on July 07 last year.
-
Tamiya 1/12 Porsche 910
kpnuts replied to kpnuts's topic in WIP: Other Racing: Road Racing, Land Speed Racers
Can anyone tell me what in the forum update changed to stop me posting pics -
Humbrol Fiat 131 Abarth Rebuild
kpnuts replied to Spottedlaurel's topic in WIP: Other Racing: Road Racing, Land Speed Racers
Looking great like what you've done so far. -
Tamiya 1/12 Porsche 910
kpnuts replied to kpnuts's topic in WIP: Other Racing: Road Racing, Land Speed Racers
Sorry none of my pics show after the latest update (strange it all works everywhere else and I've not changed anything) -
Tamiya 1/12 Porsche 910
kpnuts replied to kpnuts's topic in WIP: Other Racing: Road Racing, Land Speed Racers
Did more work on the 910 made the porsche decals for the side (quite pleased with them) masked and painted the windscreen and built the dashboard. Working on the font for the number 20 (proving quite difficult) [img]https://i.ibb.co/d4PSXX2/IMG-6897.jpg[/img] [img]https://i.ibb.co/WKn5c4D/IMG-6896.jpg[/img] [img]https://i.ibb.co/Jmdn6Zd/IMG-6895.jpg[/img] [img]https://i.ibb.co/fQw7sNm/IMG-6893.jpg[/img] [img]https://i.ibb.co/Hx1ngx1/IMG-6892.jpg[/img] [img]https://i.ibb.co/z6tJMYy/IMG-6891.jpg[/img] [img]https://i.ibb.co/19JYFsr/IMG-6890.jpg[/img] [img]https://i.ibb.co/9g5K4fF/IMG-6894.jpg[/img] -
Tamiya 1/12 Porsche 910
kpnuts replied to kpnuts's topic in WIP: Other Racing: Road Racing, Land Speed Racers
OK some pics of progress so far, I really don't like the tamiya idea of doing the suspension, it's s=€t took ages to do and is very fragile (must be why they give you one extra of each suspension part) I generally like tamiya kits but not a fan of this one for design of assembly luckily I didn't do the suspension in the order tamiya suggest as it would have been even harder to accomplish done in the way the instructions suggest. [img]https://i.ibb.co/rHJB6NV/IMG-6868.jpg[/img] [img]https://i.ibb.co/k5vXZSX/IMG-6869.jpg[/img] [img]https://i.ibb.co/0YhhmV4/IMG-6870.jpg[/img] [img]https://i.ibb.co/61dC1Jv/IMG-6871.jpg[/img] [img]https://i.ibb.co/Tk7Pz0N/IMG-6872.jpg[/img] [img]https://i.ibb.co/M5g7SZg/IMG-6873.jpg[/img] [img]https://i.ibb.co/177jJjt/IMG-6876.jpg[/img] [img]https://i.ibb.co/Bgx0151/IMG-6877.jpg[/img] [img]https://i.ibb.co/0y3KBfV/IMG-6881.jpg[/img] -
Tamiya 1/12 Porsche 910
kpnuts replied to kpnuts's topic in WIP: Other Racing: Road Racing, Land Speed Racers
You wouldn't believe how hard the suspension on this is and don't get me started on the connection of the wheels to the drive shafts. I've started scratching the slide throttle linkage for it, the guys at work hate this system, there is a plate with 3 holes in it the size if the venturi of the flutes that runs on bearings and slides forwards and backwards to enlarge or reduce the air fuel ratio by sliding the hole thus reducing or enlarging the venturi, it's prone to leaks and not a great system. This car had other throttle linkage systems which were better but the one depicted in the kit is this one so (as it's the car I've worked on it's the one I will try to depict) -
More work converting the 934
-
Tamiya 1/12 Porsche 910
kpnuts replied to kpnuts's topic in WIP: Other Racing: Road Racing, Land Speed Racers
Bit more work on this one. -
Tamiya 1/12 Porsche 910
kpnuts replied to kpnuts's topic in WIP: Other Racing: Road Racing, Land Speed Racers
I've sanded down the bleed through and Resprayed the white, you can still the blue through it, unsure whether to give it another coat since I'm going to spray the bule again in the same place. -
Tamiya 1/12 Porsche 910
kpnuts replied to kpnuts's topic in WIP: Other Racing: Road Racing, Land Speed Racers
Hi all more done on this. -
Tamiya 1/12 Porsche 910
kpnuts replied to kpnuts's topic in WIP: Other Racing: Road Racing, Land Speed Racers
Thanks mate. -
Tamiya 1/12 Porsche 910
kpnuts replied to kpnuts's topic in WIP: Other Racing: Road Racing, Land Speed Racers
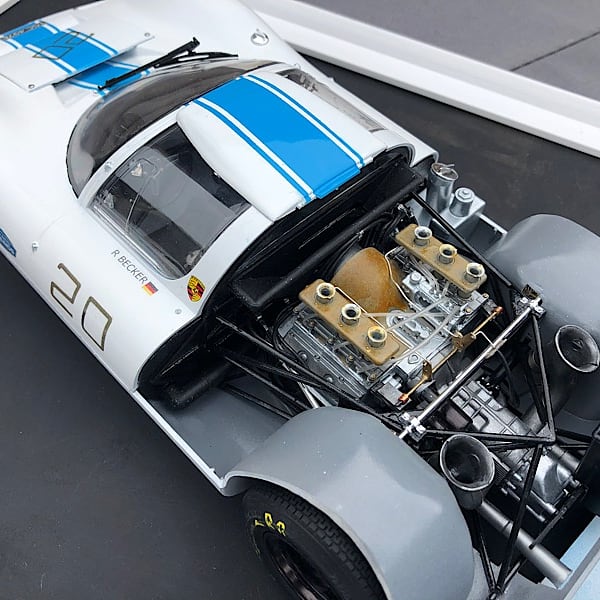
OK so a little bit of added detail (and it is little) Take a piece of solder and flatten it. Cut into 7mm lengths paint the tip satin black put a couple of bends in it, repeat 12 times and you have sparkplug retaining clips. Take some heat shrink tubing cut into 2mm lengths Add to end of plug leads and you have plug caps -
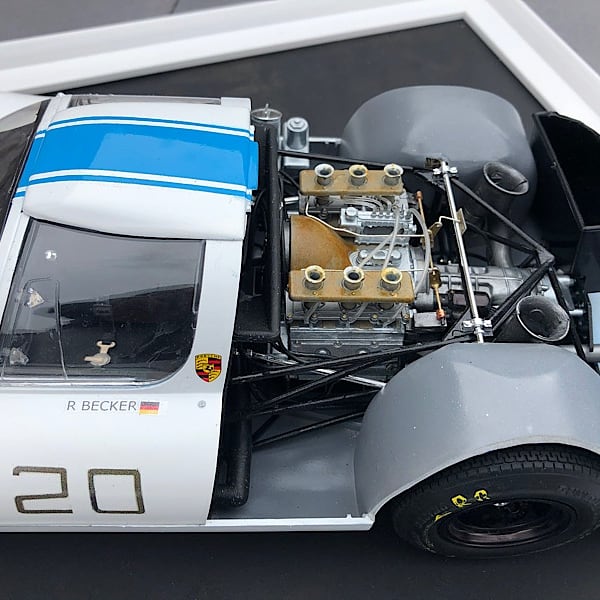
Hi all added some of the masking for the white stripe. The engine in the kit is the 4 cam engine the one in the workshop is the 904/6 which is what I'm supposed to be basing this on I don't think I can modify the 4 cam engine into a 6 cylinder boxer engine so I suppose I will have to try scratch building one ? not sure my skills are up to that but we will see, and there I was thinking this would be an easy build
-
Tamiya 1/12 Porsche 910
kpnuts replied to kpnuts's topic in WIP: Other Racing: Road Racing, Land Speed Racers
I wasn't happy with the scale of the kit supplied fuel lines (nearly double the size they should have been at just over 1mm (the actual lines are a tad over 6mm) The only photo ref I have atm is this I know they are metal in the pic but back then they were clear nylon because they were lighter than metal ones but when they added more ethanol to modern fuel they started to fail (the nylon ones that is) and so modern cars have metal, anyway I've gone of subject metal ones is the only ref I have atm and the nylon ones were a tad smaller so the kit ones are definitely over scale. I stretched the kit ones which made them thinner. I've done some weathering on the engine as well and added a few ancillary parts. -
Tamiya 1/12 Porsche 910
kpnuts replied to kpnuts's topic in WIP: Other Racing: Road Racing, Land Speed Racers
Got the white on next is masking up for the blue, also got some of the engine and gearbox done. -
Tamiya 1/12 Porsche 910
kpnuts replied to kpnuts's topic in WIP: Other Racing: Road Racing, Land Speed Racers
Start on painting the engine. -
Tamiya 1/12 Porsche 910
kpnuts replied to kpnuts's topic in WIP: Other Racing: Road Racing, Land Speed Racers
Made a start on this primed the main body and glued the main part of the engine together, added some 1/24 scale kits for size ref. -
MFH Porsche 917-43 hippie
kpnuts replied to Chris Smith's topic in WIP: Other Racing: Road Racing, Land Speed Racers
Amazing detail -
Restoration of a Porsche 934
kpnuts replied to kpnuts's topic in WIP: Other Racing: Road Racing, Land Speed Racers
Started the rusting on this (still a long, long way to go) it a fine line between beliavable and too far quite pleased with the start I know some of the rust looked very granular and there is not enough colour variation but it's definitely a good starting point. I've decided not to have a tree growing out of it instead it will be a bramble (undecided whether winter spring or summer with nice juicy berries on it) im finding it very difficult to decide on the final setting, I was thinking of having the bonnet chucked on the roof with gouges and scratches or as it is now but I could sling the doors I could sling anywhere in the car or maybe even have one laying on the ground no where near the car almost over grown. -
It was supposed to arrive Monday cost 73 quid in customs charges then they wanted 12 quid to deliver it today, I didn't pay it but it still arrived today. I'm sooo excited.
-
Did a colour test (seems OK) got some sink marks to fix. Here's what's in the box