

JohnnyK
-
Posts
208 -
Joined
-
Last visited
Content Type
Profiles
Forums
Events
Gallery
Everything posted by JohnnyK
-
Magnifier 1/12 Ford Gt40
JohnnyK replied to kpnuts's topic in WIP: Other Racing: Road Racing, Land Speed Racers
That looks to me to be a reboxed Trumpeter GT40. I bought that kit a few years ago for $350. You will have a lot of fun building that model. It's a well engineered model. I don't remember the engine block being chrome plated on the Trumpeter kit? -
Great color, great paint job. Just great!!!
-
Great looking model. That is one of the best looking cars ever. The split rear window is what makes that car look so great.
-
Here is a pic of the interior. I know that black and white is kind of boring, but I figured that B&W would look best with the purple exterior.
-
Thanks for the kind words everyone!
-
Nice trick with the rear window and fantastic color.
-
1/8 Ford Cosworth DFV engine
JohnnyK replied to mad mike's topic in WIP: Other Racing: Road Racing, Land Speed Racers
Man, that is really nice. Love those nuts and bolts. How did you paint "Ford" on the valve covers? -
Yep, that is a very funky color. I didn't want it painted in a "typical" Camaro color.
-
Thanks Pappy.
-
This kit is almost 30 years old. Build issues include fitment of the headers and the bumpers. However, it has a nice engine and great wheels. The box art shows a green painted car. I thought that the green color was horrid, so I painted my model in Tamiya Purple. I used a Molotow chrome pen to highlight the brightwork around the windows. Except for the prewired distributor the model was built straight from the box. The wheels have a lot of nice molded detail, but it is difficult to see the detail. I used Tamiya Panel Line Accent paint to bring out the detail. I also used the Panel Line on the grill. The headers were designed to be attached to the engine block by a simple butt joint.That would never hold so I drilled holes in the headers and glued wires into the holes. The wires were then inserted into holes drilled into the engine block for a nice strong joint. The bumpers had the same attachment problems as the headers, so I used wires to hold them in place.
-
1/12 Tamiya ELF P34 six wheeler
JohnnyK replied to JohnnyK's topic in Other Racing: Road Racing, Salt Flat Racers
Isn't that call theft? The 1/12 cars take up a lot of space. -
1/12 Tamiya ELF P34 six wheeler
JohnnyK replied to JohnnyK's topic in Other Racing: Road Racing, Salt Flat Racers
Thanks everyone. I had a choice for my next build, a 1/12 scale Ferrari 312 , a 1/12 scale Camaro, or a 1/24 scale Camaro. The 1/12 scale ELF exhausted me, so no more 1/12 scale models for a while. I chose the 1/24 scale Camaro. The should be fun. -
1/12 Tamiya ELF P34 six wheeler
JohnnyK replied to JohnnyK's topic in Other Racing: Road Racing, Salt Flat Racers
Thanks to everyone for the kind words. I agree with Cobraman, the reason that I chose to build this model is because it is such an unusual car. Six wheels on a race car????? Now for a few mode detailing tips. The top photo is a picture of the toted from the actual 1:1 car. The bottom photo is how the tires look straight from the kit. They are way too clean looking. First I added stainless steel valves. Next I added wheel weights. The weights are small pieces of plastic that are covered with a piece of BMF to simulate the duct tape that secures the wheel weights on the actual 1:1 car. Finally I wanted to make the tires look dirty. I used Aqua Line Brown Mud as a wash on the tires. This technique only works with this product since it is water soluble, even after it dries. First I painted on the Brown Mud. Next I ran the tire over some paper towle to remove the excess wash. The wash can be reactivated with water in the event it gets too dry. The final result is a nice dirty tire (left tire). I added Brown Mud to the sides of the tires and I used a white roller ball pen to mark which side of the car the tires go on. I think that the final results look pretty realistic. -
1/12 Tamiya ELF P34 six wheeler
JohnnyK replied to JohnnyK's topic in Other Racing: Road Racing, Salt Flat Racers
Following is how I detailed the hoses. The top photo shows how the coolant hoses look straight out of the box. The hoses are molded with depressions for hose clamps, but none are included with the kit. The second photo shows the coolant hoses after I added hose clamps from my 1/12 Ford GT Mk 2. The Ford's kit included about a hundred extra PE hose clamps. The oil cooler and the radiator took three days to install!!! Day one: I installed the mounting bracket assembly (black bent pipe and silver bracket) to the car's body and let the glue set overnight. The glue has to set solid otherwise the weight of the oil cooler and radiator will pull the mounting assembly out of proper alignment. Day two: Install the oil cooler to it's mounting bracket and let the glue set overnight. Step three: Install the radiator in the same manner as the oil cooler. This is a photo of some of the oil hoses. I added thin stipes of wine bottle foil onto the ends of the hoses to represent the compression fittings that are on the 1:1 car's oil hoses. One more thing, I removed the transaxle's plastic bolt heads and replaced them with stainless steel bolt heads. -
Well, I finally finished this beast. My review of this model follow the photos. MY REVIEW This model has over 370 parts and is one of Tamyia's first 1/12 scale models. Except for the exhaust system, it goes together pretty easily. There are a number of rubber oil lines that are tedious to install. The four wheel front suspension has a large number of moving parts which takes a long time to assemble. When finished, the streeng does not function due to interference from the brake cooling ducts. In fact, I find that the steering on all 1/12 scale models does not function properly. The engine is the real star of this model. When finished, it just looks outstanding. Too bad that the exhaust system is a disaster. The exhaust pipes are not molded very well (I replaced them with aluminum tubes) and the assembly of the exhaust headers is a nightmare. The only thing worst would be the exhaust headers on Tommy Ivo's four engine Showboat. The decals are really poor. They are very stiff and crack easily. I used a lot of MicroSol. I painted the model with Tamiya 'Blue" from a rattle can. This was the most difficult model that I have ever built. An incredible amount of patience is required. However, the final result is a very nice and unique model.
-
1/12 Revell Ferrari F2002
JohnnyK replied to wardsmodelbuilder's topic in WIP: Other Racing: Road Racing, Land Speed Racers
I have another question. Why did you feel that it was necessary to remove the prepainted red color? -
1/12 Revell Ferrari F2002
JohnnyK replied to wardsmodelbuilder's topic in WIP: Other Racing: Road Racing, Land Speed Racers
Chris, I share your pain in building this kit. I just finished building the Tamyia 1/12 scale ELF 6 wheeler. It had 370 parts and it required a lot of patience. John -
Those are fabulous builds. I love 1:12 scale cars. I got a Tamiya 1:12 Ferrari 312T for Christmas. I need to finish my Revell 1962 Corvette Gasser before I start the Ferrari.
-
This is the web page for the blower: http://www.grainger.com/product/1TDR3?cm_re=AZIDPRR This is a heavy duty blower ($112.00) and it is very quite. Please note that the round flange shown in the photo above does not come with the blower. The round flange is from Home Depot.
-
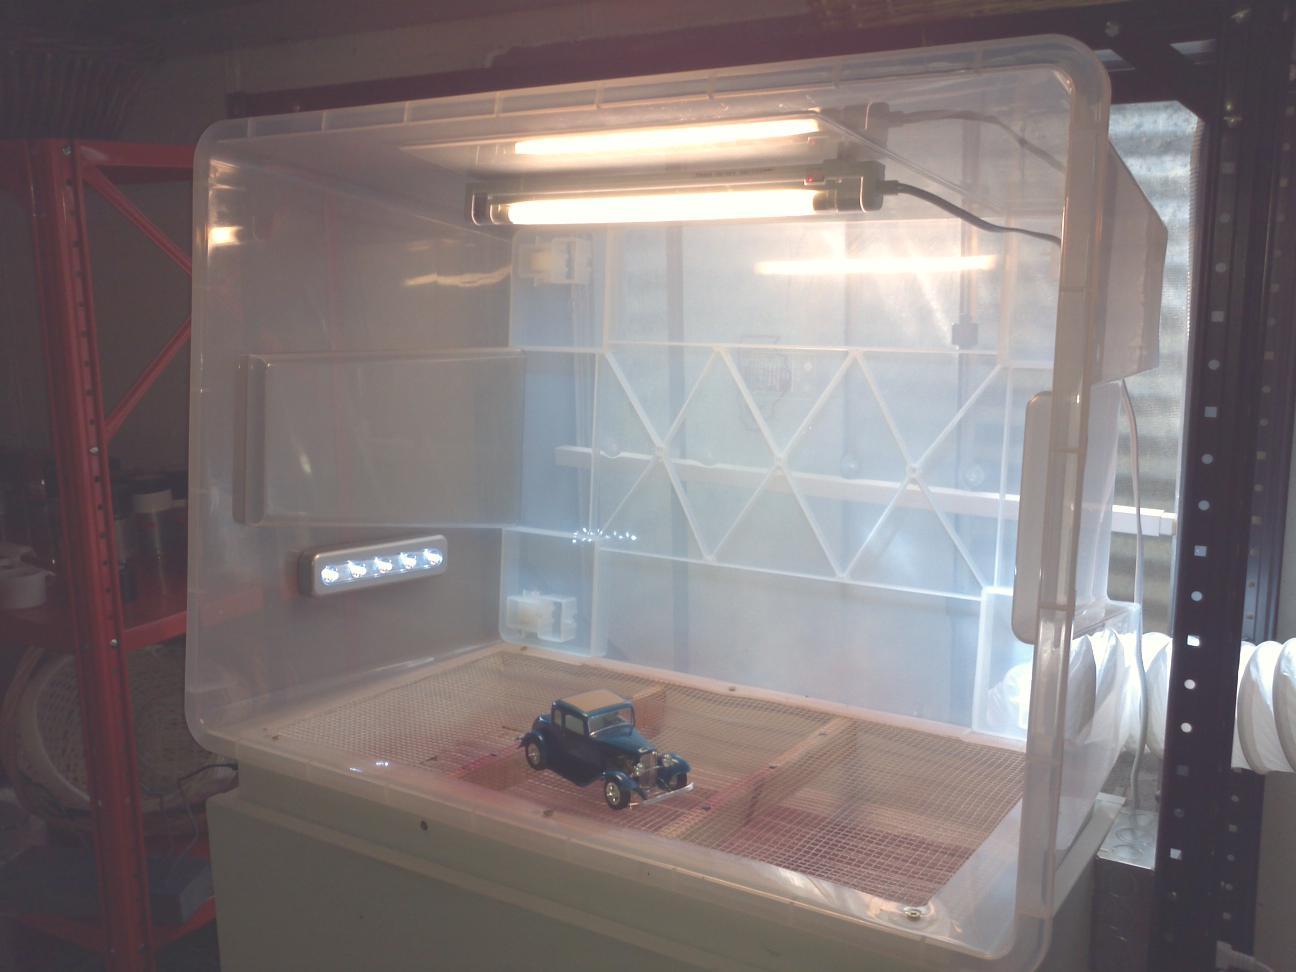
I built my own spray booth. It is a downdraft system and exhausts directly to the outside through the exterior wall of the house. The spray booth is constructed from a plastic storage tub that I bought at IKEA. I also bought the tub's cover so that I can keep the model protected from dust after it is painted. The bottom plenum/filter box is constructed from MDF boards. The exhaust fan is from Granger. The exhaust fan is designed so that the fan's motor is not in the exhaust's air stream, so no paint can gunk-up the motor. It probably cost about $200 to build. The exhaust fan was over $100.00.

-
Does anyone know if there will be a model car show in the Chicagoland area in the near future?
-
I just finished super detailing my Tamiya Lotus Type 49 kit
JohnnyK replied to JohnnyK's topic in Model Cars
Wow!! Thank you so much for the very kind words. I really appreciate them. -
I just finished super detailing my Tamiya Lotus Type 49 kit
JohnnyK replied to JohnnyK's topic in Model Cars
Yep, this car has no wings and no ground effects devices on it. However, I can imagine that it was difficult to control at high speeds. The Lotus 49B had two wings on its nose and a huge, tall wing at the rear. -
I just finished super detailing my Tamiya Lotus Type 49 kit
JohnnyK replied to JohnnyK's topic in Model Cars
Following is a photo of how I took the pictures. Nothing special. Just three ceiling can lights and a floor lamp.
-
I just finished super detailing my Tamiya Lotus Type 49 kit
JohnnyK replied to JohnnyK's topic in Model Cars
Before I started this build I went to The Home Depot and bought a bunch of wires of different sizes. I used some of these wires to simulate the battery cable at the starter, ignition wires, wires behind the dashboard, general engine wiring, etc. Very simple and very cheap.


.jpg.ae4f7f5993de1e668aafaff7e175cc22.jpg)
.JPG.e4c3523a481343884b57aa7e0dfc22b4.JPG)