Chris D
-
Posts
106 -
Joined
-
Last visited
Content Type
Profiles
Forums
Events
Gallery
Everything posted by Chris D
-
Looking great Chris. I like the name for it - maybe not that creepy photo behind it though :-) Chris
-
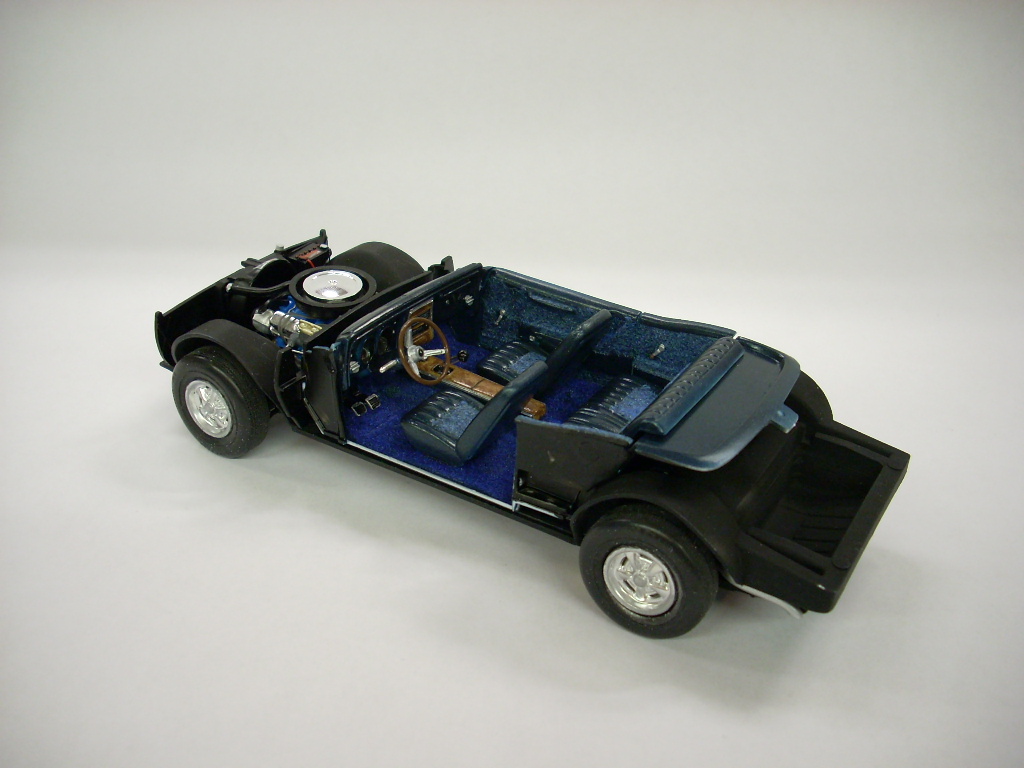
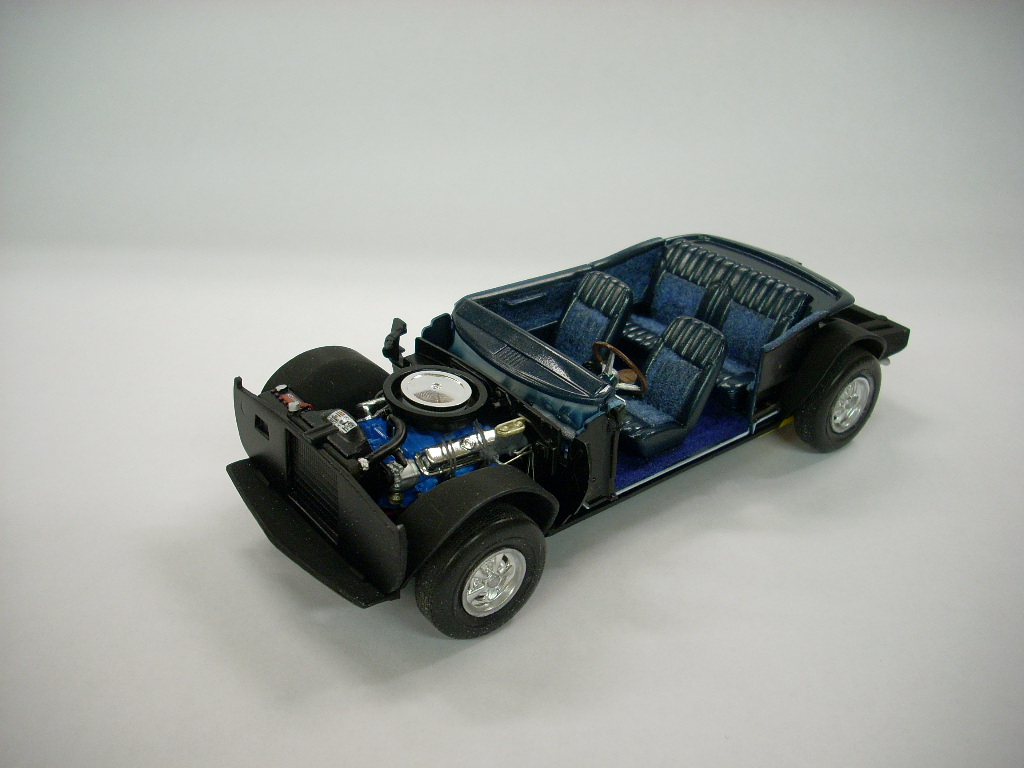
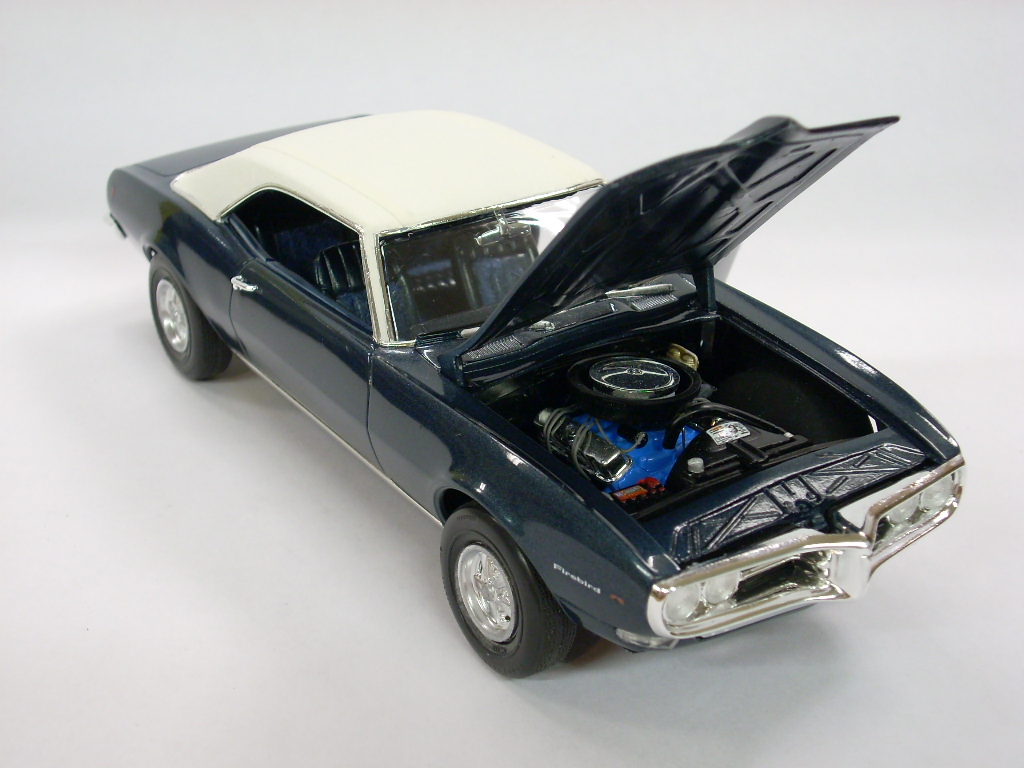
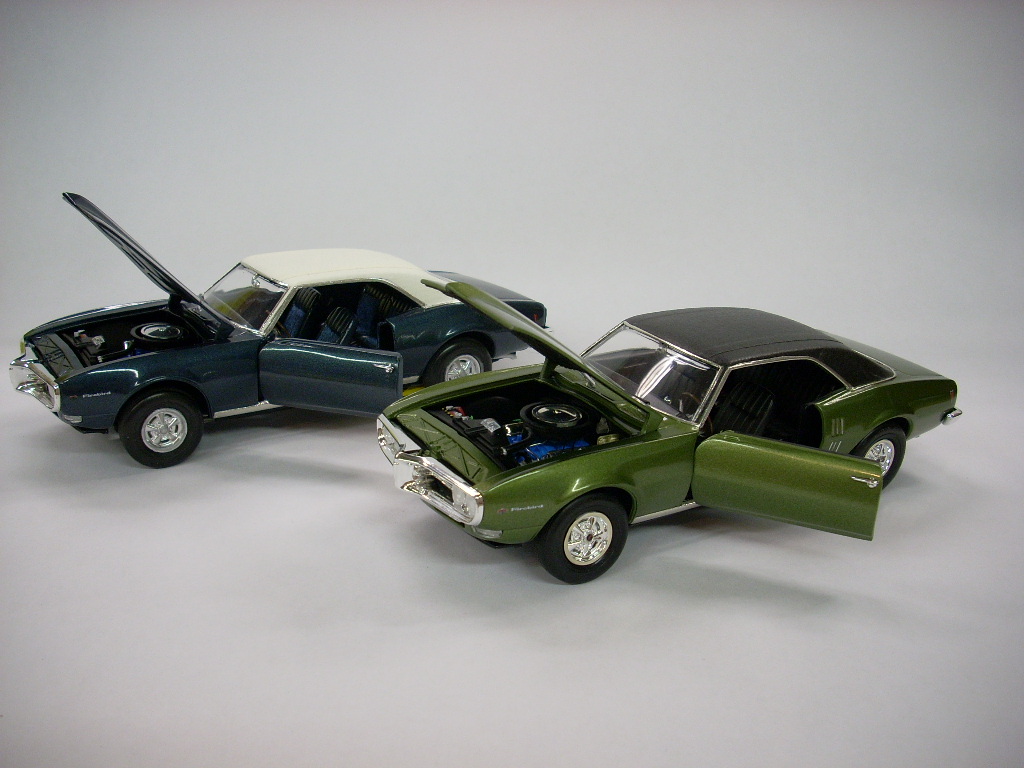
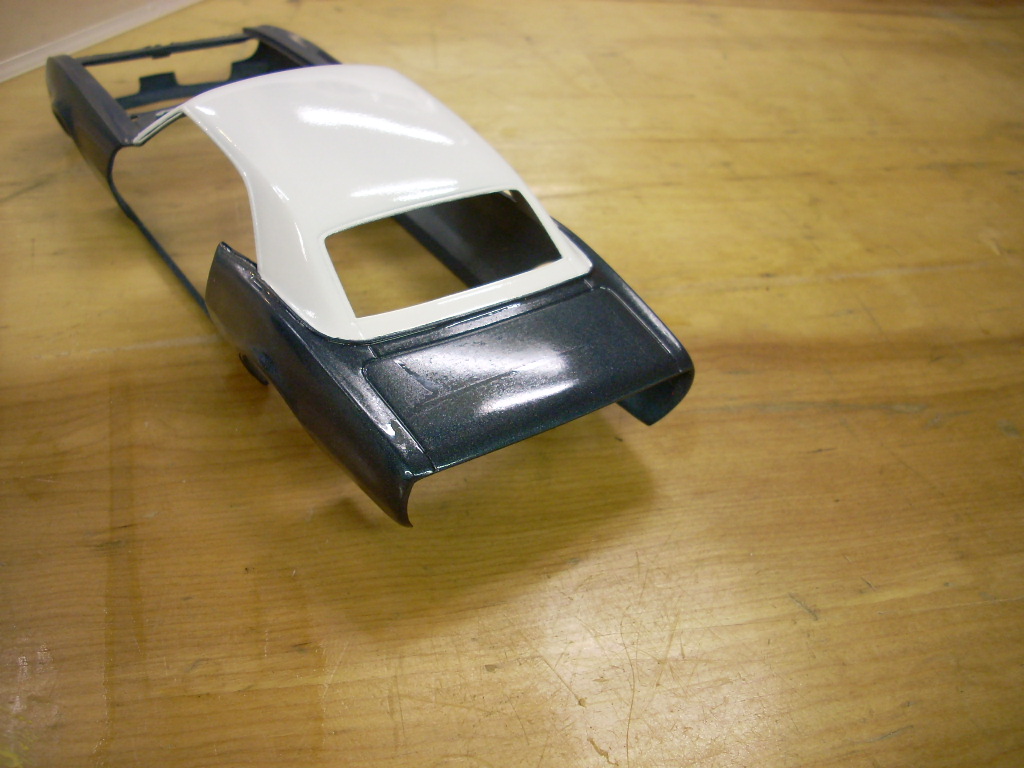
Hello again, This weekend I not only finished up the #1 car but also the #3 car. The #3 car represents the car after I "Restored" it by replacing all the sheet metal, interior, and engine (from 350 to 455 Pontiac). I didn't have any photos of the 1:1 version of this car in this state of its life so I had to go a lot on memory - as bad as it is. To accomplish the 1:1 restoration, all the sheet metal had to be replaced on the car, here is a photo of some of the body panels in my bedroom at that time (Circa 1978)... I cut the door from the body so that I could pose it like the other photos of the car I have. The doors are not hinged, rather just fixed in place. You may notice the fake vents behind the doors have been removed. The 1:1 car had Camaro quarter panels on it as I could get those much cheaper than I could Firebird quarter panels. Color is Tamiya acrylics, custom mixed with Royal Blue, Perl Blue, and black. Clear coat is Tamiya clear. The engine is from a parts kit I picked up at a swap meet, I think it was tagged 421 Pontiac which is close enough to 455 for me. Engine is wired and plumbed a bit. The interior door panels didn't match the 1:1 with regard to shape so I just did the best I could with the kit parts to replicate them by painting and flocking. Didn't turn out the best but it passes. Dash is detailed with the standard decals and some painting. Chrome trim is line-o-tape chrome 1/64". Center console and radio panel is hand painted to look like burl wood which is pretty close to the 1:1. After having a lot of trouble with the exterior paint (about 4 attempts) I finally accepted what came out of the air brush without polishing it. On the last go around I had to paint the roof white prior to putting the vinyl roof on and when I did that, I masked off the blue and the masking appeared to have ruined the paint. Luckily, I left it alone for a week and the mess fixed itself - very strange but I was happy. The while vinyl roof was a bit easier to install than the black ones on the other cars - for some reason this came off the backing material easier. I added the standard decals and Bare Metal Foil for the trim. As I am building 4 cars at the same time along with dioramas, I can't say for sure how many hours I have in it, but aside from the paint job nightmares I created, it was a fun build. Thanks taking a few moments to look at the car, as always I appreciate comments and suggestions. Chris D. A photo of #1 (Factory original - Green) and #3 custom street car in blue after restoration.

-
Hello everyone, Thank you very much for the kind words, it is really appreciated! Regarding the wheels, I agree anything would be better than what I have on there. Here is the 1:1 car when I owned it, being steel wheels I suspect the car when new had hubcaps of some sort. When I get some time, I will have to investigate that and try to come up with the correct wheels and air cleaner. Also, the car had a 350, it was not a 400 so that is why I ended up with the aftermarket resin hood. Again, thank you all for the comments and suggestions. Chris D.
-
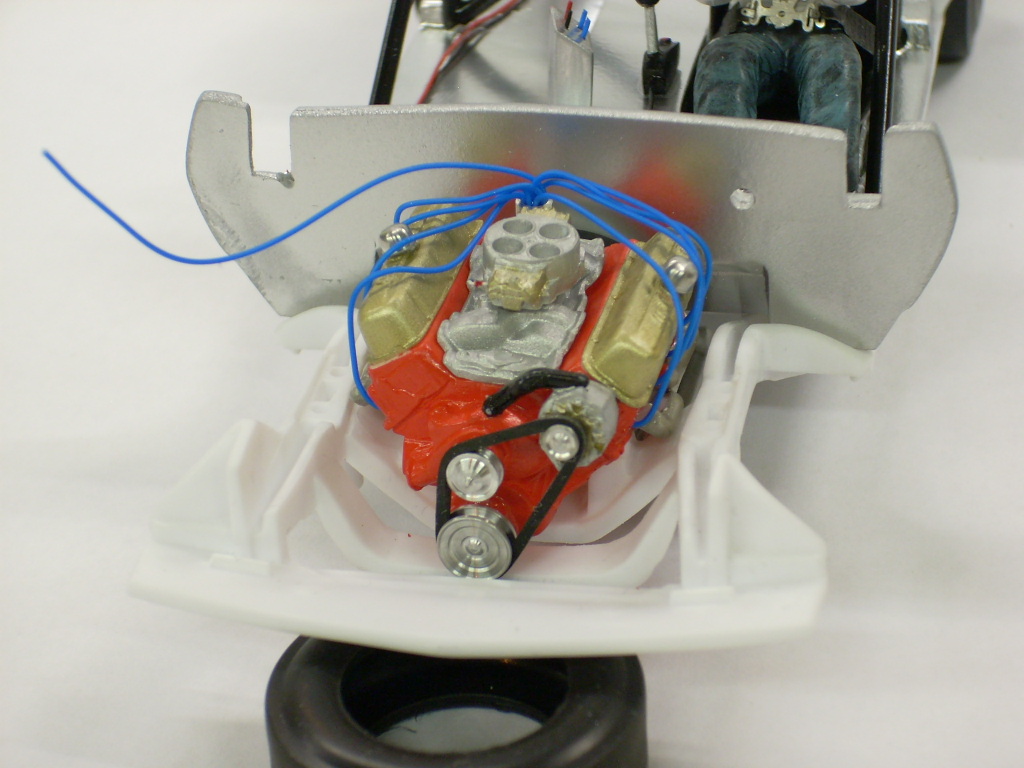
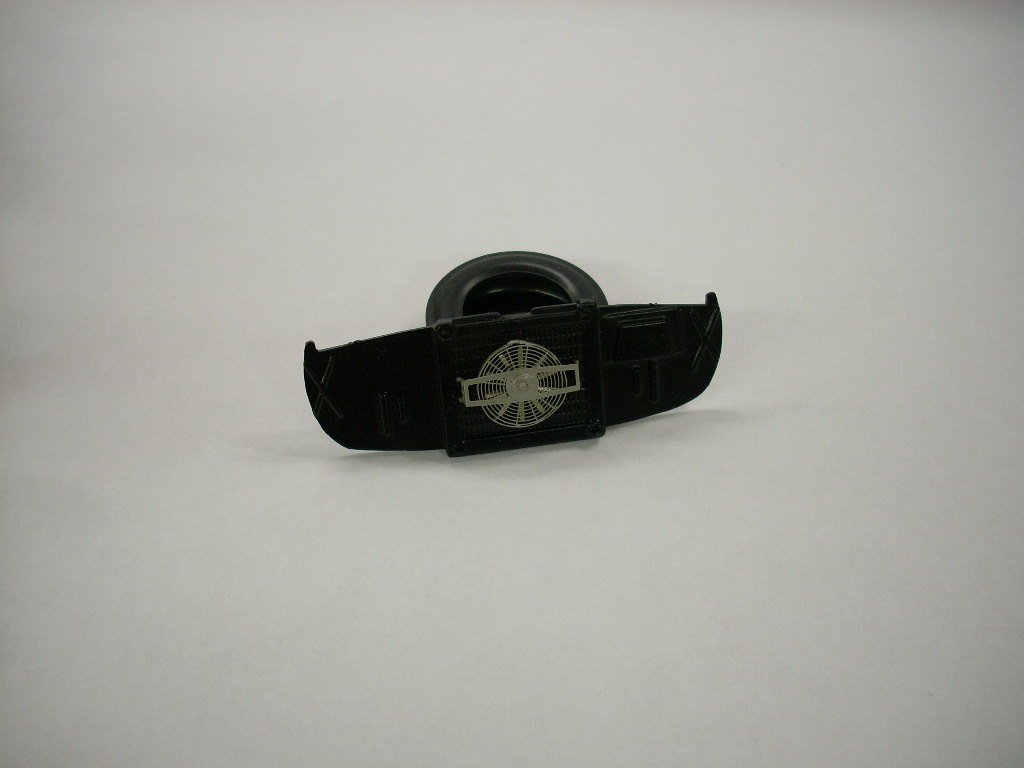
Didn't get the parts needed that are holding me up on the drag car. Some came in so I moved onto those little tasks. I finished making the electrical panel and finished up the shifter and got those installed. Glue squeezed out the bottom of the electrical panel - made me made but didn't come up with a way to hide the problem yet - GRRR. I got some work done on the engine. Finally got some headers, painted and installed them. Then I was able to run the plug wires. I picked up some aluminum breathers and installed them. On the 1:1 car they had dump lines running to the headers - I felt it getting too busy in the model so I didn't want to add them. I also found some pulleys and belt so I installed them. That turned into a lot more work than I thought it would but I learned a number of things doing it so that was fun. Didn't turn out as good as I would like but I am okay with it. Here you can see some of the other engine details. For some stupid reason I decided to use A/N fittings on the carb, they are so small I question the effort to use them. Once I get them plumbed with braided line I might like them better. The 1:1 car had an electric fan, but a different style. The type on the 1:1 used an electric motor to spin a fan mounted to the water pump. I didn't want to scratch build one but in the end it would have been much easier than this thing. Putting together all those little etched parts was challenging for these old eyes and shaky hands. The end result is okay. I painted everything except the fan Titanium Silver and left the fan in stock nickle finish. The contrast isn't enough so it doesn't have the "cool" factor for all the work. I also finished up version #1 of this car which is the factory stock version. I posted that in the "under Glass" section if you want to take a look at that one. Thanks for looking and as always, comments are appreciated and welcomed. Chris D
-
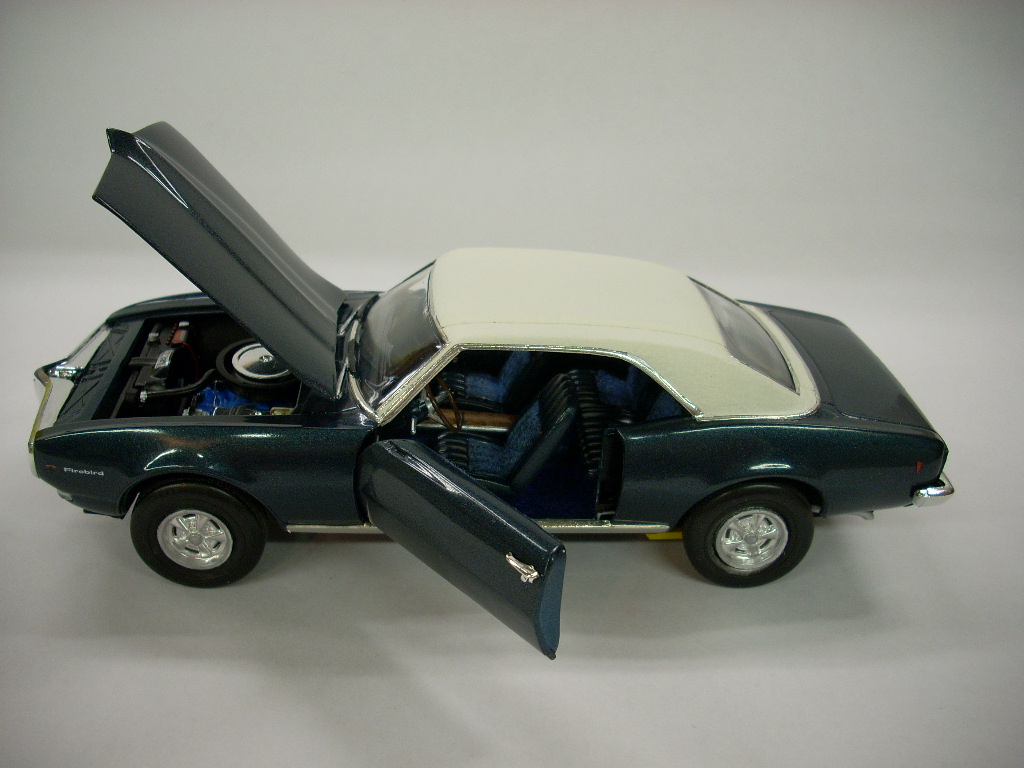
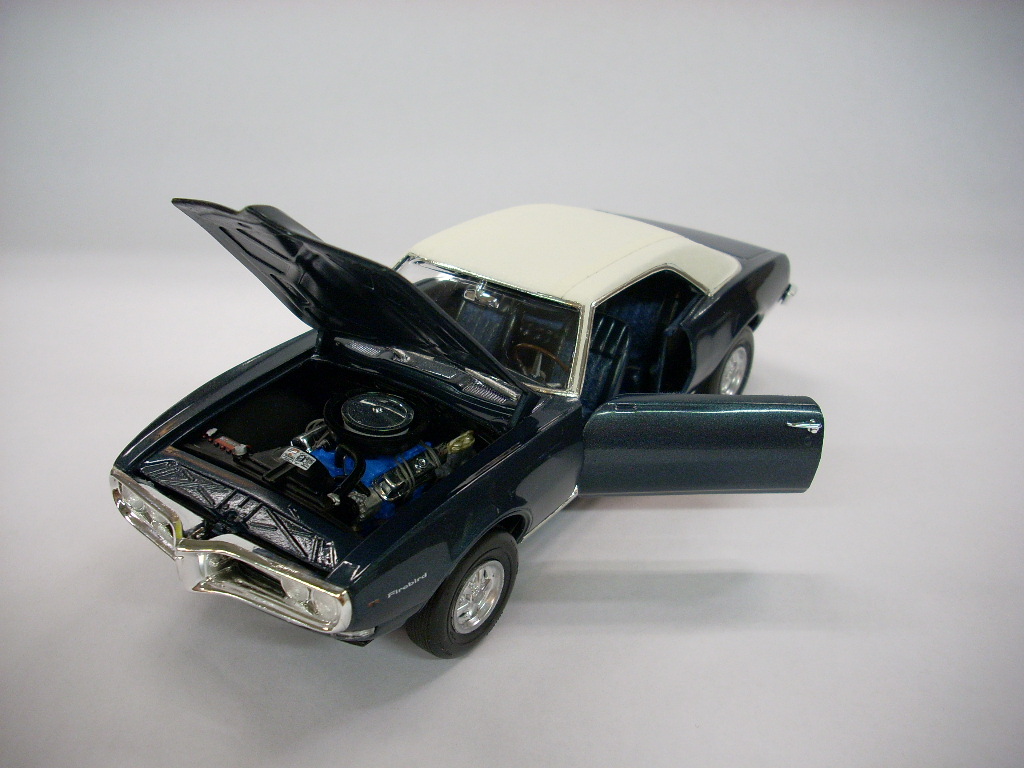
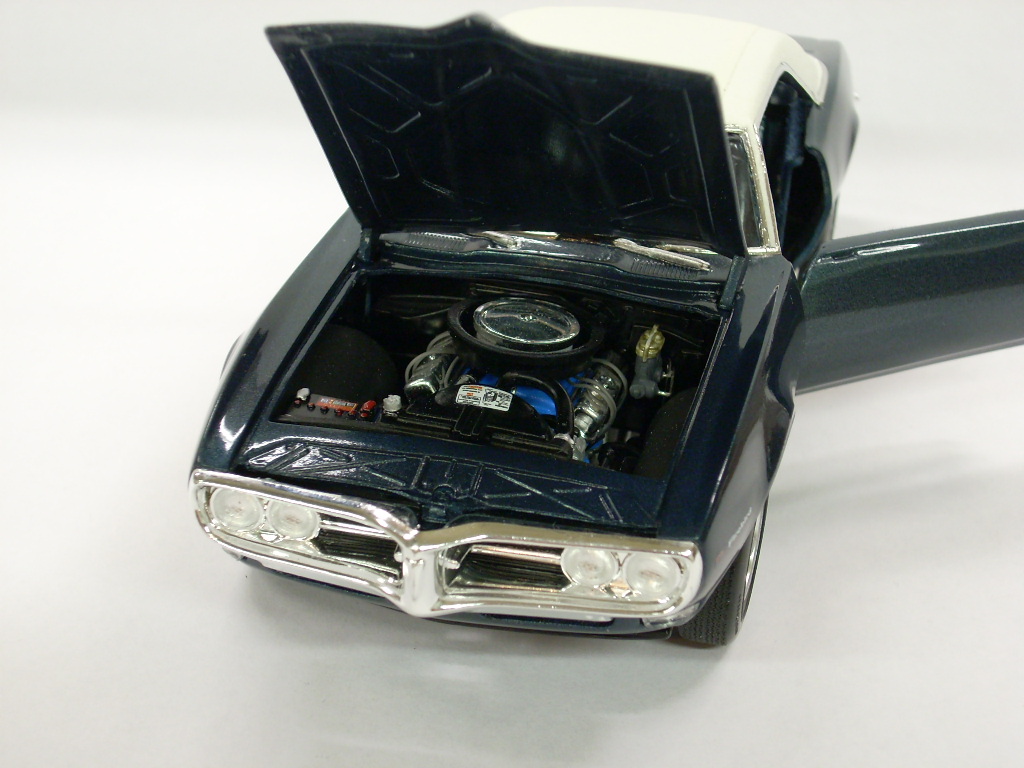
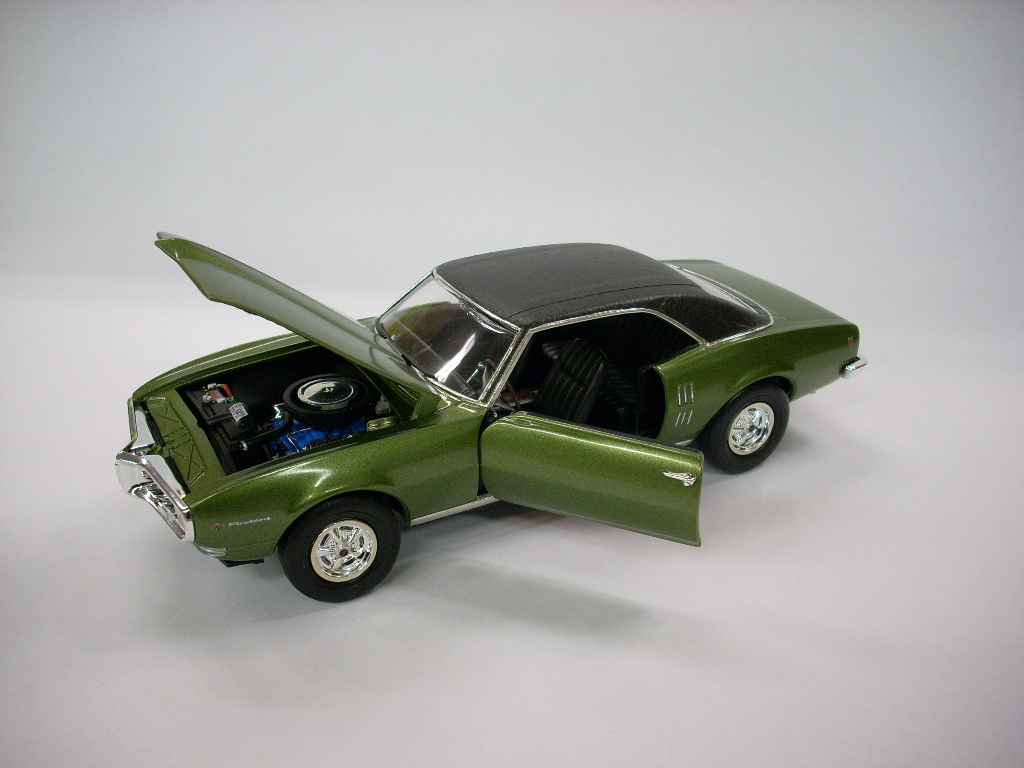
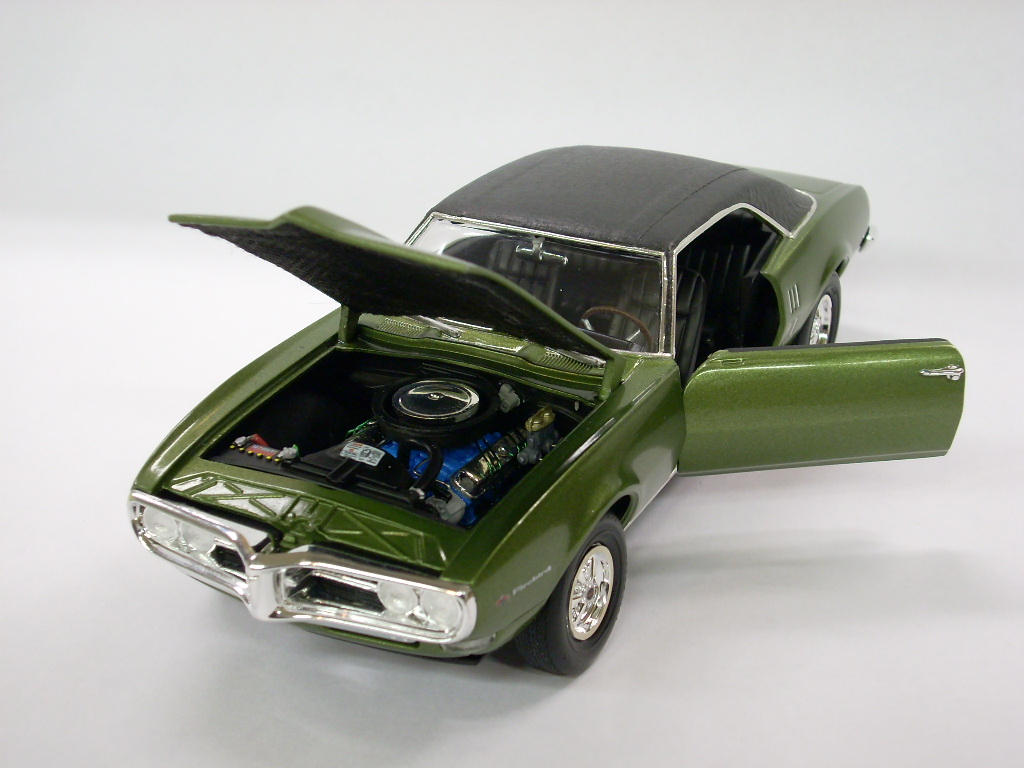
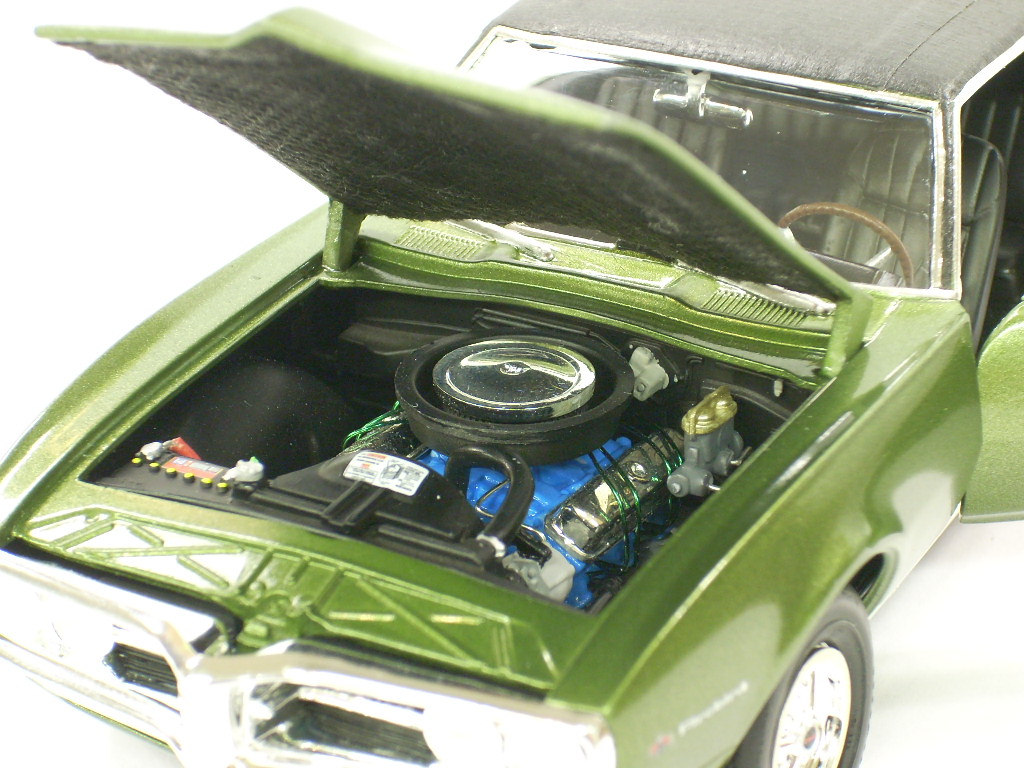
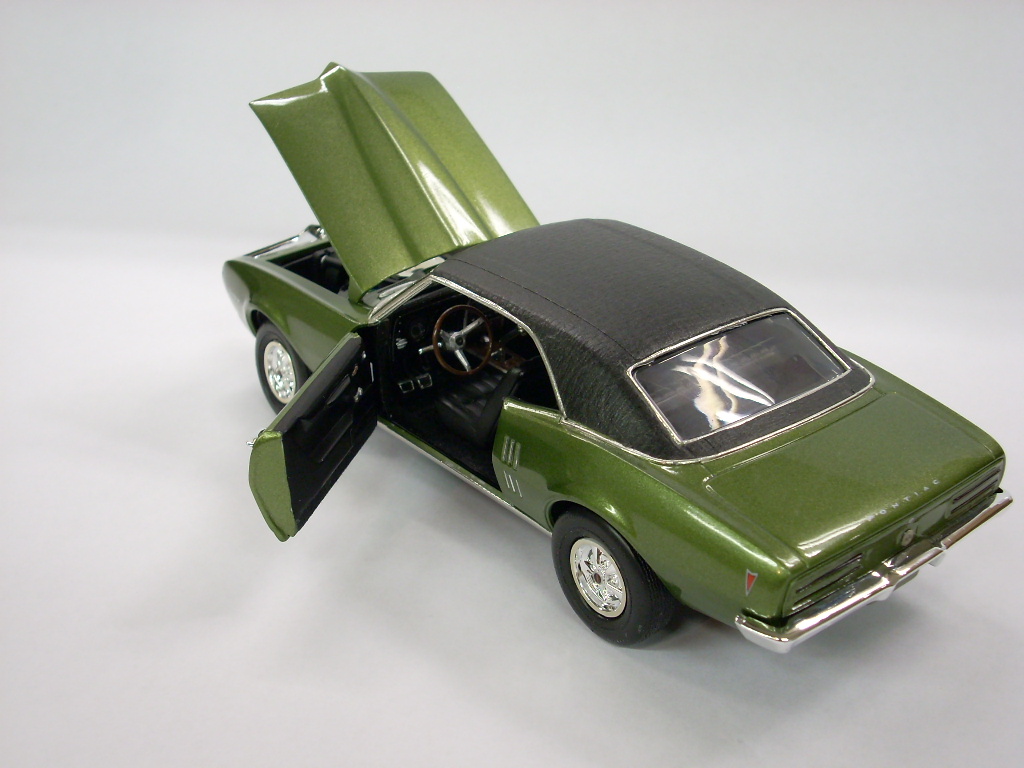
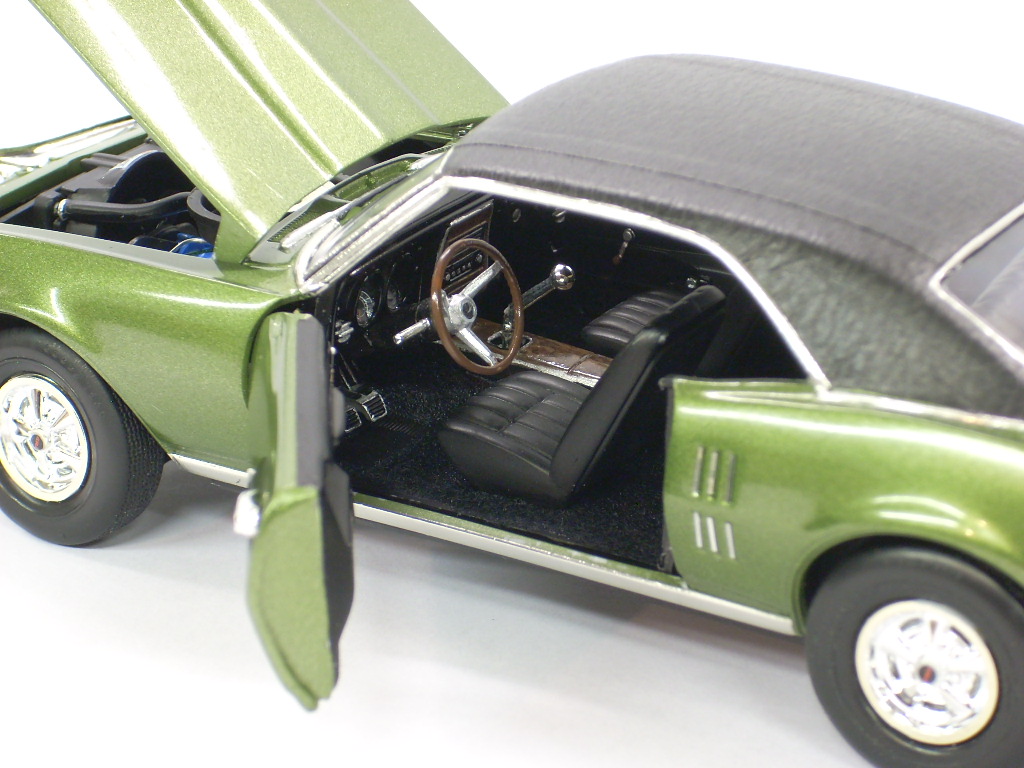
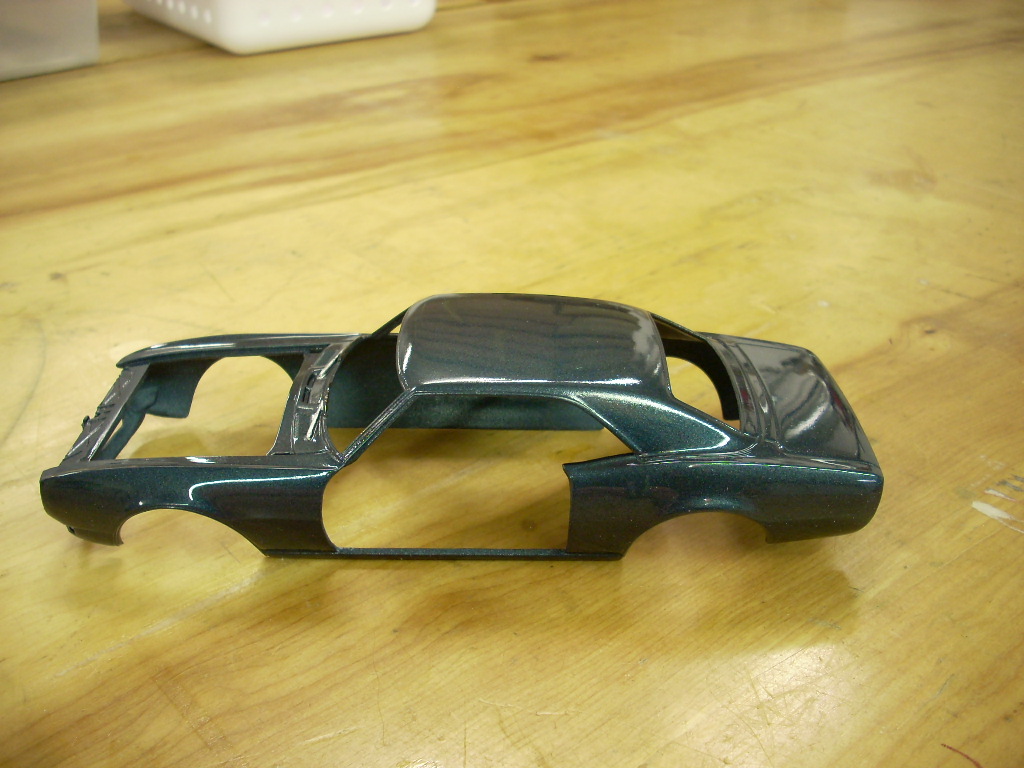
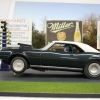
Hi all, I am close to being finished with the #1 of 4 firebirds I am building (#2 car is in the diorama section and #4 version in the drag racing section). Most of the build is out of the box. I flocked the carpet, plumbed the and wired the engine, bare metal foiled the trim, cut out the door (not hinged), and added the vinyl roof. The paint is Vedoro green from scale finishes. All around I am pretty happy with the way it all turned out. Two details I wanted to add but failed too many times and gave up are the wheel opening trim and the red ring decals for the tires. Hope you enjoy it, comments always welcome, and thanks for taking the time to look at it. Chris D.
-
Cheap air brush booth extractor
Chris D replied to aurfalien's topic in Model Building Questions and Answers
I have one and I do like it. It is not designed to handle all paints though, someone sprayed lacquer on it and apparently the plastic melted a bit. With that said, I have sprayed anything and everything and don't have a problem with mine. The vent hose goes out the window just fine and I use an old towel rolled up to fill the gap along the widow to the side of the discharge nozzle. For most air brush work, the vent fan sucks out the mist handily, however, with a bigger spray gun or a rattle can, you can at times generate more mist than it can evacuate so you have to let it catch up a little. For the cost, it is a very good value in my opinion and I certainly am glad I have one. Chris D. -
Hey Chris, Your really rockin on this bird. I notice in the later photos you are using the stock 400 hood, did you give up on the custom hood or are you just using the 400 hood for mock up while building? Also, could you post a photo of the detail work you did on the front cowl / windshield wiper area? You did some detail work there that I can see very clearly and I am very curious what that looks like. Thanks! Chris D
-
what you got is a great model, thanks for sharing. Chris D
-
outstanding, very finely crafted. Chris D
-
Kool, Kewl, and Cool, no matter how you spell it, that is a cool looking model Chris D
-
Be sure to post photos of the build process for that hood - I will be watching that one close. That is going to make a really mean statement! Chris D.
-
Making tape leaving marks on the paint...
Chris D replied to Chris D's topic in Model Building Questions and Answers
Update... To further clarify, the color coat was shot about 2 weeks prior, and the clear coat (tamiya clear) was shot about 1 week prior to the "masking tape" event. Bother were bottle paints and airbrushed. Both were thinned with the Tamiya thinner for acrylic paints. Just air dried at room temperature in a fairly dry atmosphere - fall in Illinois is generally dry air time. Here is the crazy part, I just went out to the garage to study this problem further and it wasn't there! The car was there but the problem is mostly gone!!!! Some elves must have got in the shop and polished the car up pretty good. Upon careful inspection, there are still some small marks here and there, but all the nasty stuff that showed up in the photo is gone. I can almost see where the ends of the tape pieces were but that is about it. I suspect the adhesive did something to the clear finish (which must not be fully cured yet). After sitting for the past day and a half, the clear cured more and the chemical reaction went away in that curing process. Just grasping at straws for an explanation, in either case I am glad it seems to be getting better. Maybe by next weekend it will be completely cured! Thanks to everyone for all their comments, ideas, and suggestions. Chris D. -
Hi everyone, thanks much for all the kind comments. I got all the parts on order I need to complete the project, I sure hope they all show up. Chris D
-
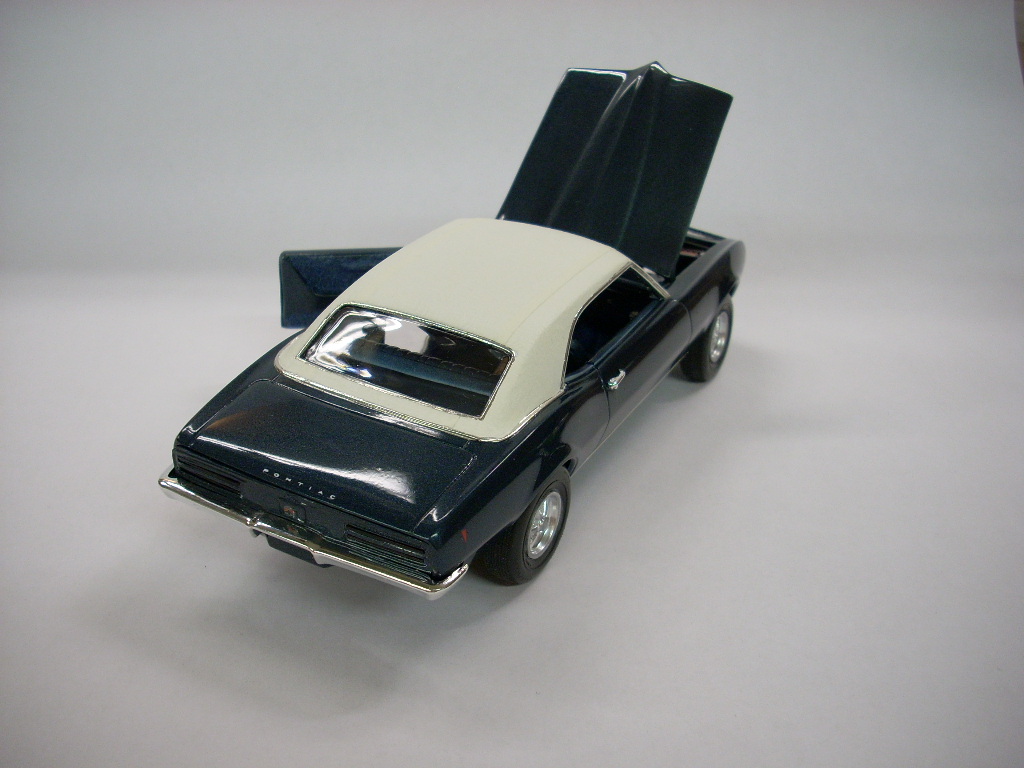
Hi guys, thanks for the comments. I sure hope it polishes up, I would have to start all over with the paint - again. Regarding the open door, that was a quick and stupid decision I made when I started the 4 models. I knew from the beginning i was going to do dioramas for all 4 cars and I was going to have the original photos next to each diorama (for proof I actually had the real car). The original photos show the car in two of its phases with the drivers door open. As I moved through the build, and put more thought into it, I decided to do the drag car diorama to match the photo of the car launching off the starting line. No need for an open door there. The showroom version also doesn't need the door open. A bit more thought in the beginning would have certainly changed how I would have handled the doors. Thanks again for the comments ! Chris
-
wow, thats a cool model and some great craftsmenship chris d
-
looking good keep the updates coming chris d
-
Hi everyone, I could use some advice here. I painted the car dark blue two weeks ago with Tamiya Acrylic paint. Today, I masked it off so I could paint the white top. As soon as the white paint was dry to the touch I removed the Tamiya masking tape and could see that the blue paint was really messed up. It looks like the tape glue left a nasty residue but it doesn't feel sticky or anything. It just looks awful and I am not sure what went wrong or how to fix it. Has anyone else had this problem and if so, how did you fix it? Here is what the paint used to look like.. Thanks for any and all help or comments. Chris D
-
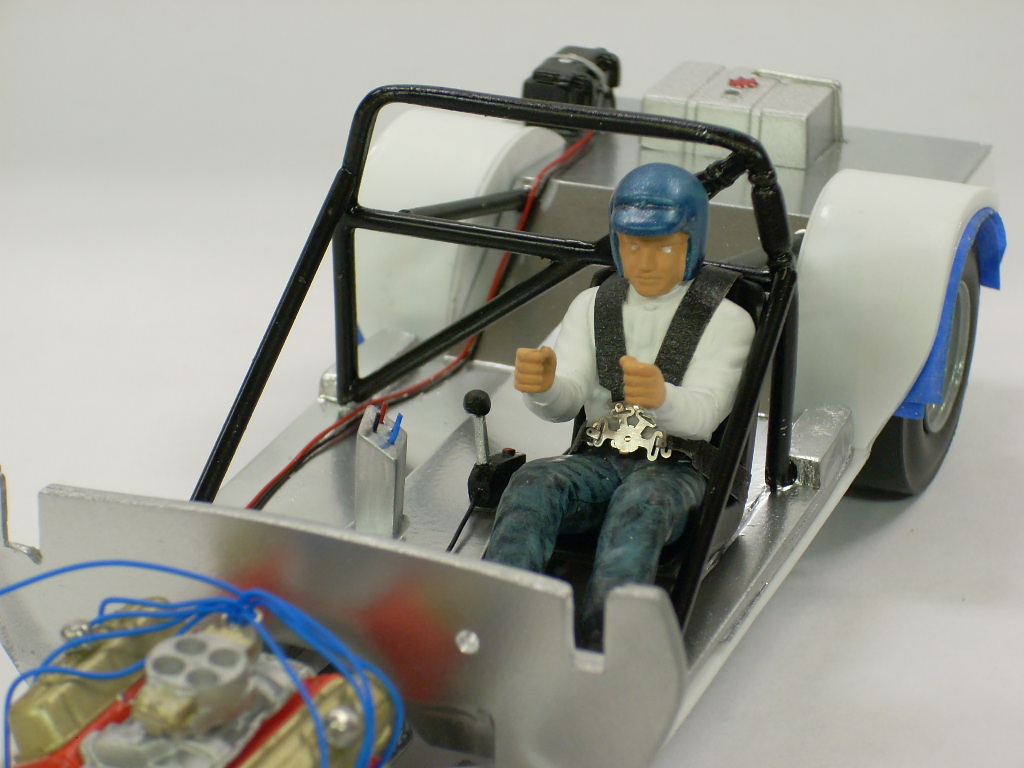
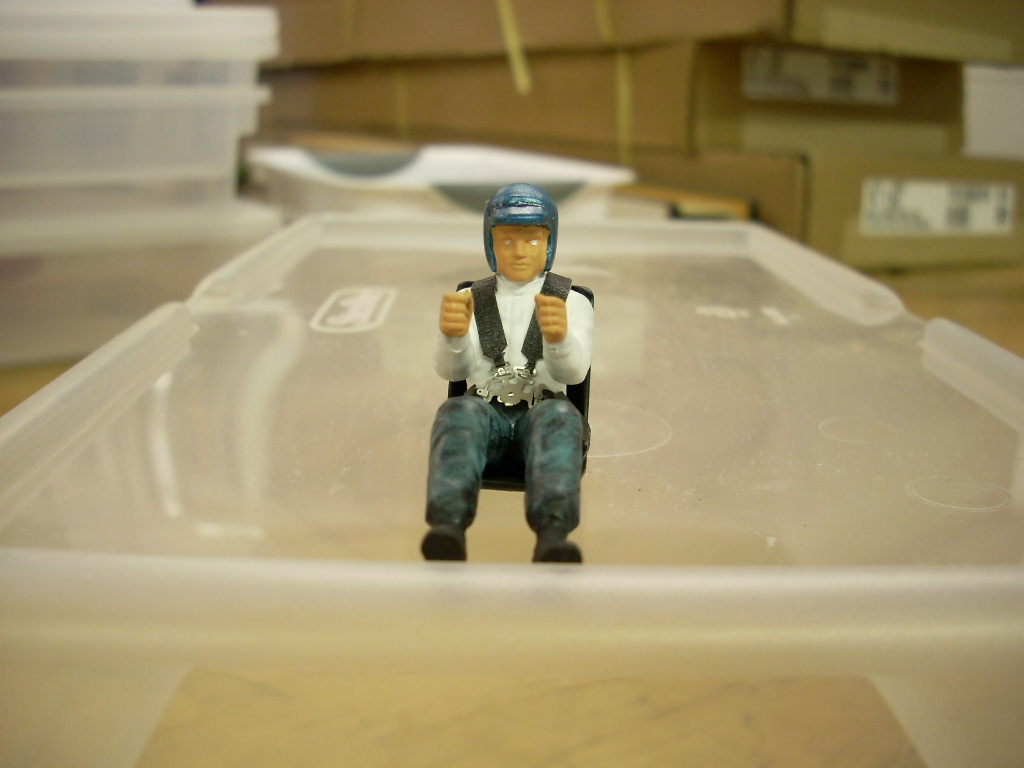
Another day of frustrations. Continued work on the rear suspension. Realized that I didn't order enough rod ends to complete the four link suspension. I got the upper links made and installed. Wasn't very easy to do with the limited room for everything - I swear the real car was much easier to work on! It was so frustrating working with the small rod ends and especially the jam nuts, I could barely see the darn things. Running into a road block due to a parts shortage I moved onto Mini-Me and made up the racing harness and strapped him to the seat. I know, in a real car you wouldn't attach the seat belts to the seat, instead they would be attached to the chassis and roll cage. Doing the correct way was too much work trying to figure our where I could attach things during assembly etc. so I cheated. Still didn't fix his spooky eyes though. I sprayed the interior tub with Model Master Chrome Silver as I thought it looked more like aluminum than the aluminum paint. That paint seems to take forever to dry, much longer than the Tamiya acrylics. I brush painted the roll cage. After all that was somewhat dry I moved onto installing the fuel cell (not correct to the real car but it fits) and added the battery box. The battery box is wired and the fuel cell is plumbed with a line running through the floor where the fuel pump will be. The battery box location and looks are pretty close to the original car with the exception of where the cables ran, I didn't wire them to the kill switch and I am not sure how I routed them to the front of the car. The fuel cell and battery box will not be too visible when the car is finished as the trunk will not open. I got some work done on the engine. Not too happy with it at present but I probably have time as I still have not received my parts from Reliable Resin nor have I received a response from them to my email request. That was it for the drag car progress today. I also worked on the factory original car by adding bare metal foil to it for the trim. My first time working with that and it wasn't too bad to work with, rather easy to be honest. The only area I really failed at was the wheel opening trim, after several attempts I gave up. I will try again on a day when I am not so frustrated. Yesterday, I realized the white vinyl top was so thin it would show the blue paint through the vinyl so I masked the street car off and painted a coat of white on the roof. This turned into a disaster. The blue paint was shot 2 weeks ago and it was Tamiya acrylic paint. When I removed the masking tape this is what I saw... I don't know what went wrong, I used tamiya masking tape and have not had a problem like this before. I didn't try to polish it off or anything yet as I want the white paint to cure a bit before working on it some more. If anyone has any idea how to fix it, please let me know. I will also post this in the Q/A section. Time to order more parts so I have something to do next weekend. Thanks for looking and feel free to comment. Chris D.
-
"Holy Grail" Models?
Chris D replied to Billy Kingsley's topic in General Automotive Talk (Trucks and Cars)
Ha, that is easy, my holy grail kit is the one that will turn out as good as I want it to be. Just can't seem to find that one! Chris D. -
Great looking diorama John, Love all the cars in the staging lanes, just fun to look at! Chris D
-
Glen, you made me laugh good with that comment, thank you! Kerry, thanks for the comments, I am giving it the best I can do! Hopefully today will be more productive, if not on the drag car, perhaps the other two. More updates tonight. Chris D
-
half a dozen 69 camaro's *new pic's 3-8* all 6 complete!
Chris D replied to tbill's topic in WIP: Model Cars
Hi Tom, Looks like you will be having way to much camaro fun!!! If by chance you end up with 2 extra real spoilers, let me know I will buy them from you as I need two for my firebirds. Chris D. -
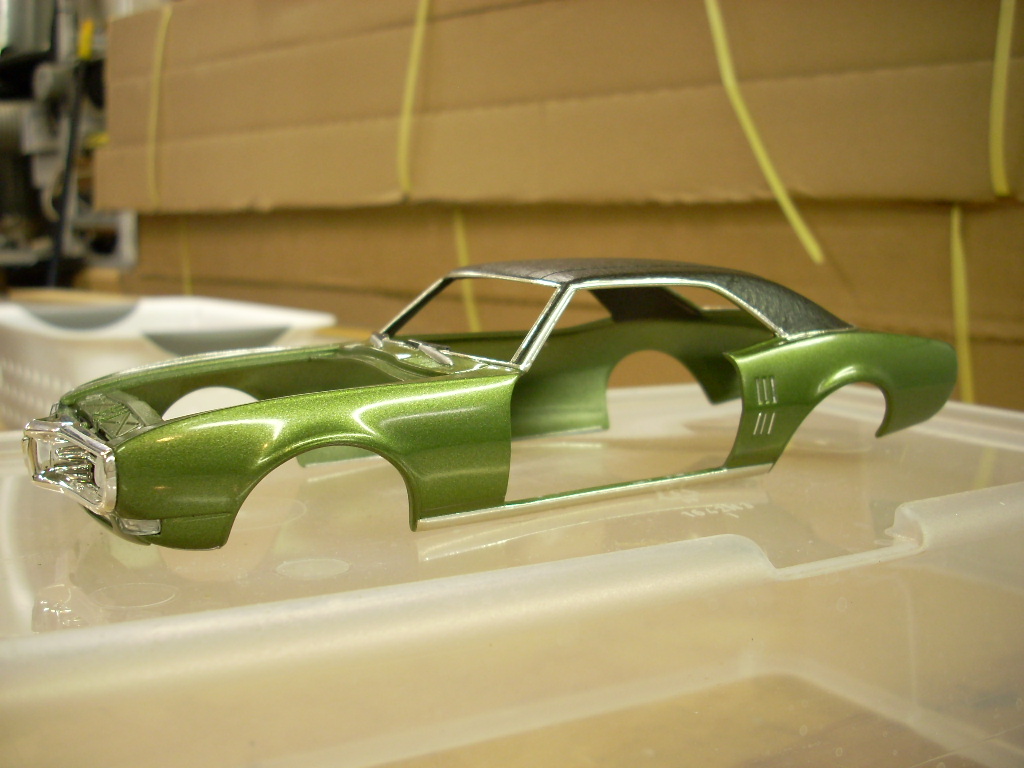
I did get some bench time today, but it sure didn't seem like I got anything done - Grrrr First up was Mini-Me, I painted that thing up this morning. Still have to figure out how to paint the pupils. Getting the white for the eyes took everything I had and the pupils are much smaller. I am gong to try a pin to see if I can get a dot of black there but will have to wait for a day of steady hands. I then was going to start detailing the bodies for 2 of the other firebirds. I tried to use that Line-O-Tape product. I bought a wide variety of widths and even used it on the interior. The first thing I used it on was the trim panel under the door - easy test as it was a straight piece of tape and easy to apply. Then I tried to do the wheel opening trim which isn't that tight of a curve. Even at just 1/64 wide I could not get that to lay flat so I gave up on that will will try to use Bare Metal Foil for the trim - never used that but hope it isn't too hard to work with. The Showroom New version of the car was Vedoro Green so I purchased that from Scale Finishes. That paint, along with their primer worked really good. For the street car and the drag car, the car was painted a dark metallic blue. I custom mixed some Tamiya paints and got really close to the original color (as I remember it). The car also had a white vinyl top and I purchased the white vinyl top kit from Model Garage. Turns out that it is a bit too thin and the dark blue would show through. I am going to have to mask off the car and paint the roof white before putting on the vinyl roof. This is the "Showroom New" car body (#1 car). This is the street car body which would be the restored version of the car (#3 car) Back to the drag car version, well, let me start by saying working on the real car was much easier, I am sure of it!!! I purchased from RB Motion coil over shocks and some rod ends and tubing to make up the four link suspension. I also purchased some brackets from Dirt Modeler. Laying out the components was difficult to say the least. Working with the incredibly small parts is enough to make a person go mad. They are so little!!! I spent hours just getting the brackets on the rear end. It took forever to come up with a way to hold parts in the mock up to make sure things would line up etc. Part of the problem was the hole in the brackets was about .010" larger in diameter than the axels. Finally, in a last attempt to save my sanity, I cut some .005" thick styrene and wrapped that around the axels to make up for the larger hole in the bracket. Gluing that on was a bear. Once I got everything glued, I sanded the axels down a bit to reduce their size until I got a snug fit with the brackets. Now that they didn't flop around, i was able to line up all 4 pieces and glue them to the axels. Needless to say, I was exhausted from all the tinkering with these tiny little parts. My goodness those little parts are just SOOOO LITTLE! Tomorrow I will attempt to make up the links and get the rest of the four link suspension completed. Chris D
-
It's Saturday morning and that means it time to start working on the model again!!!! Matthijs, thank you for the compliments and I guess the warning. I will do a search here for the Reliable Resins and see what kind of mess I got myself into. I did send them an email yesterday in hopes they will respond. Dennis, I hope to have some updates today on this car. I am sort of stuck on waiting for parts but hope to be able to find something to do on it. Kerry (from God's country), Thank you for the encouragement. However, as I mentioned before, the camera makes things look much better than they really are Well at this point I am assuming I won't see parts from R.R., so I am off to shop for some big block chevy headers. Chris D.
-
Thanks for the comments Jason! It is Friday and that means bench time for the next 2 days! I got some of the 4 link components in the mail yesterday, I sure hope the rest show up because I really want to get that part of the build done. For some reason, building the 4 link has me worried a lot. I am also stuck on the engine. I ordered some headers from a company (reliable resin) about 6 weeks ago and have not seen any sign of them yet. Their website says it can take 4 to 6 weeks, well, time is running out :-( I really don't want to attempt the DIY header route just yet, looks like a very complicated process. Chris D.