

Rotorbolt73
-
Posts
404 -
Joined
-
Last visited
Content Type
Profiles
Forums
Events
Gallery
Everything posted by Rotorbolt73
-
To get the Eckler flairs to fit, I had to cut/trim the front edge of the fenders and grind in a grove for the flair to sit into at an angle in order for the front to fit flush with the front nose. The rear of the flair sits outside further out from the door front edge. I used my own mix of sprue glue to help blend in the flairs. I'll sand these areas flush later after they have dried fully.
-
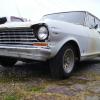
Thanks Carl. Glad you're following along. OK its been some time and I've moved on to the front. This will involve using the front fender flairs and headlight buckets from the Eckler kit. The headlight "lenses" I'm not too sure of because they are nothing but chrome squares..maybe I can find something better in my parts box.. here I have the parts to be used. I've already cut out the headlight doors from the 82 body..
-
1963 Nova Pro-Street FINISHED 5-8-15
Rotorbolt73 replied to am73grand's topic in WIP: Drag Racing Models
Nice work on the Nova. As the owner of a real 1st gen chevy II, I can understand the limited engine room the stock front clip/ suspension gives. I too, remember the Rick Dobberton 65 Nova from back in the day and the pro street craze that was all the rage then. Glad you decided to go with the centerlines as those would be more period correct. The subframe connectors are an interesting detail. I know those make a world of difference in the real cars. I've never built the trumpeter Nova kit, but from what I've seen, It looks to be pretty nice..Question though, why did you back half the kits stock chassis when you could have just used the floor/ chassis from the AMT 66 pro street nova instead? -
A pair of 66 Novas- small update for now on the wagon
Rotorbolt73 replied to microwheel's topic in WIP: Model Cars
The AMT 67 chevelle, stock version, has those rallys with the 67 specific center cap. So does the AMT 67 impala. I would use either of those over the Revell 67 chevelle as the AMT wheels would look more in scale and fit the nova kit tires better since the Revell version is a bit larger in rim diameter and might look too big. I need to pick up a few of these "grumpy's" Novas as I haven't built the stock version since the 89 issuie. They released the pro street version more than the stock version over the years. The stock chassis/ suspension is pretty much the same as the 1st gen Novas and could be used under the " rat packer" 65 Nova or the "BossNova" 64 wagon. to help convert either back to stock. It would have been neat if they included the stock chassis plate with related rear suspension/ stock exhaust and stock/ cragar wheels/ tires along with the stock interior all in with the pro street kit and made the 66 nova a 3 in 1 kit allowing you to built it as stock, street machine or pro streeter. -
A pair of 66 Novas- small update for now on the wagon
Rotorbolt73 replied to microwheel's topic in WIP: Model Cars
Nice project. Although, AMT never altered / cut up the tooling when they released the pro street version back in the day. There were two setups of tooling made up for this kit back in 89. the stock release first and then the pro street right after. They both pretty much remained unchanged in various releases for two decades until recently with the grumpy's toy version.. I'm really digging that 4dr wagon body. Didn't know someone offered it. One I really wish someone would make avaliable in resin would be the 1st gen 62-64 nova post sedan in both 2 and 4dr bodies.. -
Chevy Nova "Beverly Hills Cop" Revell 1/25
Rotorbolt73 replied to TROOPERFRANCO's topic in Model Cars
That came out very nice. Excellent photography. -
Ditch that blue Testors glue..And fast! Its junk and won't hold anything together for long. The Testors glue in the orange tube is better. Thats my primary glue I use. But I also use super glues in the gel type as well.. Some guys on here use a variety of different glues depending on what you're bonding together. Always glue your sub assemblies together first before painting them..Always make sure your glue joints are bare plastic. you will usually have to scrape the paint or any chrome plating off the areas where they join before gluing. You can retouch your glue joints with paint later to cover them up after its dried.. Whenever you get to gluing in the glass, theres a few tricks to it to avoid making a mess of it..In some cases I've seen guys use elmers white glue to hold the glass in because it won't attack the plastic and dries clear. You can also use blue painters tape trimmed to fit and cover/ mask off the glass on both sides to protect it as you glue it into place by the un-masked edges and remove the tape masking after the glue has fully dried. this avoids finger prints and glue mars on the glass.. Never use super glue on clear plastic parts or it will cloud the edges near the glue joint. Since this is a race car, are you going to put any decals on it?
-
Spark plug wires can be typically found at your local hobby shop, Thats IF there is one in your local area. You can get creative and use other local sources of material to do the same job. Radio Shack usually carries a selection of various color small gauge wire that comes in spools. Or you can take a old regular telephone wall cord and cut the outer insulation back to reveal the small wires inside and use those. I use some 26 gauge Fiber Craft brand bright wire I found in the floral / craft department of my local wal mart. Been using the same spool of wire for years and probably going on 50 builds with plenty left to use. its unpainted silver wire. But after I put it on the engine, I paint it any color I want.. Your local Hobby Lobby probably has something similar that would work. It just not located in the model kit area. You'll have to ask someone working there or look around..
-
We all start somewhere. just don't get discouraged too much and definately never give up. Its a learn as you go thing. I remember back when I was 13 building these and brush painting everything..I had no idea what spray paint was or how to use it. My father built models back in the 60's as a kid and finally showed me how to actually paint them with spray paint. At first he painted a couple for me as I watched. Then afterward he turned me loose and let me have a try at it. My first few were alright and were better than anything I could have done with a brush..But I had yet to learn about primers and the different types and brands of paint and what would work and wouldn't work. Most of it was through trail and error. But back then I had no idea paint could be stripped off if I messed up. I didn't learn that trick until years later when I met up with some older builders at my first model contest who a lot of experience and wisdom. One of them suggested the yellow can easy off oven cleaner method..And that what we used back then before all these other methods came about. Works, but I wouldn't suggest using it as it is very caustic and messy. Burns too if you get it on your skin.You have to wear rubber gloves and a resparator as the fumes are quite strong..Currently, I will use easier methods such as purple power in a tupperware container. commonly called the "purple tank" by many. That will usually get most enamel paint off as well as chrome.You can even strip paint off clear plastic with it without harming the plastic..For lacquers and more stubborn paint, such as Tamiya, I'll use 91% isopropyl alcohol. but always use rubber gloves cause this stuff will dry your hands out fast.. Consider yourself fortunate to have the internet and all these resources, instant information and experience from older modelers from across the country to draw from. Something I never had when I was your age as the internet and sites like this didn't exist. keep at it and good luck..
-
Cannonball Run 2015 " The Sleeperball"
Rotorbolt73 replied to wagonmaster's topic in Community Builds
This sounds like fun. Count me in as well. Might as well add to my collection of WIPs. Heres my entry. MPC 1976 Chevrolet Caprice. 70's era land yacht.. -
By mating the two body sections together, you can see how much difference is in the width between the two. The 84 rear clip is slightly wider than the 82. This can be fixed by narrowing the 84 tail. To retain the license plate opening dimensions, the rear 84 clip was cut into 3 sections. The amount of plastic removed was minimal. about the width of a hacksaw blade. I then glued the 3 sections back together and then to the body. I then final trimmed the rear glass opening to fit the rear glass / window louvers. Now it fits a lot better and can be easy blended in with body filler later. I'll let this dry real good and then move on to the front. Stay tuned.
-
Moving on..I figured the best place to cut the remaining rear section of the 82 was just behind the rear wheel lips. Before I did that, I transferred the rear window opening curvature pattern to the 84 tail by scribbing a line from the back while the 84 tail was overlaid on the 82 body. This gives me a centered opening that I can trim from later to better fit the rear glass. This best demonstrates why I used the convertible body as a donor. I then cut the rest of the 82 rear off..Overlayed the 84 rear again to determine how much to trim off the 84 tail ahead of the wheel openings. Then cut those areas off as well.. Note the rear window louver piece from the "dragon vette" kit and how well it fits the 82 body despite the scale difference.
-
OK. here we go..This Monogram 82 Corvette is what I'm starting with. It already has the correct front nose and rear glass to accept the louvers from the "dragon vette" kit. However, the rear clip needs to be changed over to a later 84-88 style. This is where I'm going to start the body mods. First step is to cut off the rear clip from the monogram 84 vette convertible glue bomb parts kit. I chose the convertible because the rear has more "meat" on the top area that is not there with the hardtop models rear glass. This gives me more plastic to work with in shaping the area to fit the 82 rear glass. By cutting off the 84 tail first, I will be able to determine where to splice the 84 tail into the rear of the 82 by laying it over the body after I cut the rear tailight panel off at the "factory" seam. .As you can see, the body width between the two is pretty close.
-
Thanks Carl, good to see you here!..I appreciate the suggestions Monty..If its the same one, I 've seen that post in my research..The guy started on it but never finished..Already started on that 1/24 scale body..Soo too late. Working with what I already have and don't plan on buying any more parts kits for it as I feel I've spent enough so far.. Besides I like 1/24 scale better and it will match the 1/24 Monogram 77 trans Am better anyway. Not to mention the figures i'm thinking about building to display with the cars.. But I agree. Yes it would be easier to start with a 1/25 scale 70's C3 era body. Actually, the "dragon vette" kit itself would make a good starting point combined with the "eckler vette" parts if one wanted to build it in 1/25th... But I've never been one to go the easy route either.The C4 84-88 vette junk body I have is a monogram 1/24 that matches the 82 body easier than the smaller scale MPC C4 vettes will.. the dragon vette is the only one that comes with the rear louvers. The rear spoiler will be made from the spoiler out of the eckler vette by reversing it..I'll post progress pics soon.
-
The Revell is more closer to 1/24 scale with the AMT is a smaller 1/25th scale. You can tell the Revell kit is patterned off the old Monogram 1/24 64 GTO kit just by comparing the chassis plate / suspension parts and engine bay/ firewall areas.. they are practically the same parts.. I've built both kits and tend to like the Revell version mostly because I like 1/24 scale better. But they are both great kits either way..
-
I don't mind the pic. I just couldn't figure out how to get that one on here from google yet..So Thanks..that helps me out.. I'm not much of a vette guy, but I've always like the looks of this particular car. Always wanted to build it since the 80's when I first saw it.. Never could figure out what year it was and didn't know it was a custom deal untill recently. Thats why I needed those parts kits..The movie car is supposedly a 77 and appears to have an aftermarket Daytona body kit on it..also looks to have an 84-88 rear tail clip and an 82 nose as well.. Working a trade deal out for the BBS rims right now. Since I'm working with the Monogram 1/24 scale body, the only ones that will work right are the ones from the monogram 79 camaro kit or the 80's Buick grand national kit. Still trying to figure out how to make that wild looking daytona hood. No Vette kit in this scale I know of yet has this hood. No aftermarket resin is avaliable either. So looks like I'll have to make it..At least the "dragon vette" kit has the rear window louvers.. Not sure what engine it had in it since it was never shown in the movie. Can't find any info on it..yet anyway..On a positive note, that might give me some creative freedom with it...I do know the car had an automatic in it judging by the movie footage during the final race scene. I also plan on building Minty's 77 yellow Trans Am, Skank's 66 barracuda and maybe Oggie's red 83 Dodge Daytona. I always liked the bad guys cars better than the turbo interceptor in the movie..
-
Awesome..I love stuff like this. How did you do the buildings? are those in a "kit" or did you scratchbuild them? I recognize the G scale train figures. I have some but not the ones sitting down. How well do the seated figures fit inside the cars? A suggestion for the road pavement might be some of that spray textured paint followed with flat black and maybe weathered with a dark grey wash of some type. I've used painted sandpaper for a parking lot on my custom hot rod shop diorama years ago... It sorta works but is difficult to glue on. I used a thin layer of wood glue and it made the sandpaper want to roll up. Had to use some books to keep it held down until dry. But it still showed a bunch of imperfections from the gluing process when I painted it flat black. texture looks great but I would be more apt to try the textured paint next time. that or a better glue like a spray on 3M brand . But I do like your excellent work here. If I had the space, I would build dioramas on this scale.
-
New to this forum. So this is my first post. One of my projects that I'm working on currently. I'm going to build Packard Walsh's custom Corvette from the 80's movie "The Wraith" . I've seen guys start on similar builds of this subject, but have never seen one finished. I'm going to change that..This is what I'm starting with. A Monogram 82 Vette kit I got this past Christmas. To build it, I'll be using parts from these two kits and this gluebomb body I got off ebay. Still collecting the needed parts for it.. I'll be posting progress pics as I go along..
-
I frequent another model forum that I've been with for years, but was invited here by a friend I've done a bit of trading with..I already recognize some guys here and i'm pretty sure some of you will already know me..I've been building for a long time. Since the 70's. I build all types depending on my moods and what inspires me. Live in Tennessee and a member of the Memphis Riff Raff model car club... I'll let some of my work speak for me. Here are my first builds for this year. The Corvette from the movie "Hot Rods to Hell" Monogram 56 Chevy rebuilt from a gluebomb parts kit.