

Rotorbolt73
-
Posts
404 -
Joined
-
Last visited
Content Type
Profiles
Forums
Events
Gallery
Everything posted by Rotorbolt73
-
Excellent work on that 32 Jon. Duplicating a real car is a lot more work and more difficult than just building one out of the box.. I've been there done that as well. My first contest when I was 17, I won 1st in my category because I built a model of my actual car that I was driving in high school. The judges even saw the real thing out in the parking lot, so they knew the work I put into it..especially since I had to convert a pro street kit back to stock..Anyways. I don't compete anymore. I've only done it maybe 4 times in the last 25 years. I found it rather silly to go up against other builders standards, styles and skill levels. Or even budgets for that matter.. Everyone is different and each build is as individual as the builder themselves. I get more satisfaction in just participating. I would rather just show my work to inspire other builders just the same as other builders have inspired me over the years. particularly the younger builders. The lasting impression or impact one of my builds could have on someone is worth more than any trophy. Of all the contests I've ever been to over the years, I still remember all the builds that left an impression on me while the ones that actually won or placed are forgotten..Who would you think the real winners are? Since we are showing pics.. Here is one from my last contest several years ago that I felt was overlooked. I think it had to do with the dark blue I painted it in. For some reason I've noticed dark colors get passed by..Anyway..enjoy.
-
Nice and clean work. I like the light tan interior against the red.
-
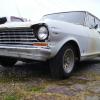
Very nice. but its not a 62. its a 65 Nova.
-
Chevy 292 L6 inline 6 custom motor WIP
Rotorbolt73 replied to Motor maker's topic in WIP: Model Cars
Cool. Love 6 bangers. Looks like the block is evergreen scratchbuilt with a resin head. Nice work. Never thought about trying replicate that engine..much less using his 6 cyl power manual for reference.. -
I converted one of these kits back to stock / mild street machine. I filled in the hood hole and rear wheel openings and used the roof and other parts from the monogram 56 chevy.
-
The fall of Drag Racing , an article from . . .
Rotorbolt73 replied to Greg Myers's topic in WIP: Drag Racing Models
Out in my area, we had the Lakeland drag strip. This is where the drag racing scenes from the movie "Two Lane Blacktop" was filmed. The strip was shut down in 79 to make way for a shopping mall. The remains were left to deteriorate and become overtaken by the woods next to the mall. The mall itself was closed and abandoned a few years ago. Eventually, what was left of the strip after 30 years was cleared out to make way for residential development. Of course since the ecomony went sour in 08 nothing has been done with the land. Last time I drove by it, the only thing I saw was the main unpaved dirt road cut through the woods right where the strip itself used to be. -
What cars interest you in resin 1/25
Rotorbolt73 replied to 5.0man's topic in Car Aftermarket / Resin / 3D Printed
63-64 Chevy II Nova sedan 66 Ford F100 custom cab -
1961 Starliner Mild Custom. Update, 8/8 Finished!!
Rotorbolt73 replied to StevenGuthmiller's topic in WIP: Model Cars
Ohh..OK. I wasn't aware of that. I thought most of them started out as promos with everything molded shut with one piece chassis plates and were retooled later with better chassis detail with opening engine bays. Maybe I'm confused on the old kits. Those were before my time. -
Impressive technique and great realistic results.
-
1961 Starliner Mild Custom. Update, 8/8 Finished!!
Rotorbolt73 replied to StevenGuthmiller's topic in WIP: Model Cars
Nice project. Looks like the hood is molded shut on it? If so, sounds like you're going to cut it open since you mention the T bird engine. Check out my 61 Galaxie styline kit build over in the drag car section. Cutting open the hood and building up the engine bay is pretty easy if the starliner is similar to the galaxie kit. I'm even using the thunderbird engine in it as well..I'll keep an eye on this build for sure. look forward to seeing the build progress. -
Thats neat. I thought about doing a used car lot diorama myself. I've got some figures similar in poses and some times I'll play around and arrange them like this around whatever build I'm working on to make it look like the car is being sold... That guy is gonna have a hard time selling that 57 in the back without a bumper! Show us more of the layout. The sales building seems familiar..Great work!
-
YES. I want to do this. Just like you did yours. Even have a AMT 55 Chevy to build. If you have pics, schematics, parts list, it would make it easier to understand.
-
Nice work. I'm building on a diorama garage myself. Actually its my big one that i started many years ago. Can you post a link to where you printed off the boxes and fan belt sleeves??
-
Man that looks good. I've always liked this kit. Has a lot of potential. I built one of these last year out of a gluebomb I found on ebay. I converted the body back to full stock and built it in a mild street machine form. I filled in the hole in the hood and returned the rear wheel openings back to stock. I bought a gluebomb monogram 56 chevy to use as a parts donor. I used the roof off the 56 on the 55 body to un-chop it along with other stock parts from it and various other 55 kits to complete the build. Turned out great and was a perfect match for the 56 and 57 monogram chevys I built prior to the 55. Later, I used the chopped roof from the 55 kit and put it on the gluebomb donor 56 and built it up as well. I have another one of these 55 kits I plan to build soon. The primer red gasser you mentioned is inspiring. Here is a pic of the one I built and converted last year. I hope you don't mind. Edit: I deleted the pic from this post. Didn't want to detract from your build..Just wanted to show you..
-
Thanks for the continued interest guys. That would be neat to see how the nova chassis fit in that fairlane body Alan. Heres a few pics of my progress. As I said earlier, I found some coil over shocks, I believe from the Revell 32 Ford kit, made some shock mounts on the spring hangers and crossmember, then made up a driveshaft from my parts box items. Since I cut the hoof off, I had to cut off the molded in locating posts for the front chassis plate and interior tub. This left the underside kinda' plain and rough looking. So after looking at some referance pics online, I made the underhood bracing out of thin evergreen sheet. Now it looks better like it should. Digging around in my parts again, I found a radiator support that would work and had a nice upper brace curvature already. This is one I had cut out of a AMT 65 Chevelle wagon body 26 years ago. Never throw parts away. you will eventually use them. It did have the molded in screw posts as typical of those old AMT kits. I cut the post humps flush with the support wall and filled in the remaining recess with evergreen half round rod. I then added some evergreen sheet scraps to the ends to extend the support on both sides. I amazingly still had the Chevelle radiator from the same wagon kit as well. I cut a upper fan cowl and side tanks off another parts box radiator and glued them to the Chevelle radiator for better detail. I then notched the mounting section on the front bumper to clear the radiator bottom tank. After a mock fit of the front engine bay, everything seems to be going together fine.
-
I remember these cars. Back when I was in automotive trade school in the early 90's, we had one of the prototype Chevy Beretta indy convertibles GM made. From what I know there were only two made. My school had the teal green one with a black top that was functional.
-
Man I could be mistaken about early 60's Fords. I'm not much of a Ford guy. Fairlane could have been a trim level designation at that time. Just like the starliner bubble tops and sunliner convertibles. I just know by 64 the Fairlane was a midsize model line. But the 60-63 models I'm not familiar with much.
-
Thanks for the interest and comments guys. This isn't near as much work as it seems Alan. Its a pretty straight forward conversion/ update. Now the corvette I just built..that was a lot of work.. No Michael, this is a Galaxie. Fullsize car of the era. The Fairlane was redesignated as a midsize in the 60's. They both look similar in styling. Been messing around with it some more today. Got a few details like the rear shocks and drive shaft figured out. Glued the firewall into the body and filled the center floor gaps in the transmission tunnel area to blend better with the lower edge of the firewall.
-
Shot of the underside of the front suspension section. The Ford engine fits asweome here. Note the "slushbox" transmission and how it transitions into the molded in tailshaft behind the cross member. Excellent illusion to blend in with. Amazingly, the offenhauser headers clear everything with no mods. I also cut down the kit wheel back shafts to fit the suspension track width. I even retained the metal axel piece for added strength. Shot of the rough chassis mockup and stance. Stay tuned.
-
Heres an overview of some of the main pieces I'll be using. The AMT jumbo slicks and some skinny front white wall tires with the steelie rims from the Revell 64 fairlane kit. The Ford rear end and leaf springs I found in my parts box. No idea what kit this is from either. It was from an old unknown gluebomb and was broken in a few places. I repaired and narrowed the track width with evergreen tube to fit the Ford chassis.. More digging through my parts turned up this early 60's Ford engine. I think its from a AMT Thunderbird kit but i'm not sure. Most of the pieces for it were there and it fit pretty good. Has a tri carb setup but I might change that later. I filled in the metal axel hole slot in the block that was typical of early AMT kits. Heres a shot of the rear end with the AMT Racemaster jumbo slicks. The fit is great. Still have to find some shocks and a driveshaft in my parts. Shot of the engine mockup in the opened up bay. Everything seems to clear nicely so far.
-
After finishing my Wraith Corvette build, I started digging around in my unfinished projects stash looking for something to mess around with before I start building the yellow firebird from that movie. I typically enjoy building super stock drag cars and gassers. So I jumped back on this build that I've been working on periodically. This is the reissued AMT 1961 Ford galaxie styline kit. I got this as a christmas present from my inlaws a couple years ago. Its a pretty basic curbside kit centered around exterior 60's style customizing with very little chassis detail. Comes with some neat custom parts but I don't normally build customs. The hood is molded shut on the body and it has a one piece chassis plate. But since this was so different as a subject, I immediately started brain storming with it. First thing I noticed was the large rear wheel openings in the chassis plate. I had a set of AMT MH Racemaster jumbo slicks that fit perfectly in there and my decision was instantly made to build it as a super stock drag car. Since I wanted an engine in this, I carefully cut loose the hood and set out to make the necessary modifications to convert this kit into something better. I moved on to the chassis plate and cut out the molded in front suspension/ engine bottom and the molded in rear end. Used my dremel tool to grind off the molded in drive shaft, stock single exhaust and muffler. I filled the rear hole using the plastic customizing sheet that came with the kit. Also filled the rear sections of the gas tank and frame with plastic where the plate screws normally went. The 61 galaxies shared the same if not similar suspension chassis parts as the 57 Fords. Luckily, I had these front suspension pieces in my parts stash thanks to the generosity of a friend in my model club. He had build a Revell 57 Ford sedan into a gasser and gave me all the left over stock parts. After some minor fit work , the front upper and lower A arms fit rather nicely. I used the engine mount cross member from the AMT 57 ford kit. The AMT Ford suspension parts will work as well, but the Revell parts were better detailed. Heres the engine bay detail in progress. I had a firewall in my parts stash that fit perfectly with a little trimming on the edges. I have no idea what kit it is from..Note the use of the Revell Ford steering box and the relocated master cylinder wall mount and steering column section. I had to cut small slots in the fender wells to slip the upper A arms through to glue them to the frame. I have yet to figure up a radiator support.
-
Packard Walsh's Corvette From " The Wraith"
Rotorbolt73 replied to Rotorbolt73's topic in Model Cars
Thanks guys. This was probably one of my most involved builds...Yes Jesse, At one point in the build when it was in final primer I actually did consider having a resin caster use this body as a master to make a mold so that a resin body could be made available. I decided not to bother with all that and if anyone wanted to build one, I have at least shown them one way out of many possible methods to build it. The build of one of these could be cut down to 3 kits if one wanted to build it in 1/25 rather than the 1/24th I built mine in. One way would be to use the MPC dragon vette kit itself as the basis with the AMT eckler kit providing the majority parts along with a MPC or AMT mid 80's vette kit for at least the tail and the BBS rims depending on the kit options.. -
Packard Walsh's Corvette From " The Wraith"
Rotorbolt73 replied to Rotorbolt73's topic in Model Cars
Final shot. Its not perfect but this was the best I could do in replicating this car. -
Packard Walsh's Corvette From " The Wraith"
Rotorbolt73 replied to Rotorbolt73's topic in Model Cars
some more pics of the body. A lot of work went into the various body mods. -
Packard Walsh's Corvette From " The Wraith"
Rotorbolt73 replied to Rotorbolt73's topic in Model Cars
More pics of the interior, engine and chassis.