

Karmodeler2
-
Posts
423 -
Joined
-
Last visited
Content Type
Profiles
Forums
Events
Gallery
Everything posted by Karmodeler2
-
Keep in mind Mike, that I was an amateur (and still am, kind of) (yes, I know...preposition!!!!) until I started using this stuff on a regular basis. There are hazardous, but if you buy a real good, changeable charcoal filter, type mask, and WEAR it when you spray the stuff, you will be okay. I, and a lot others, will just shoot a few small parts without wearing the mask, which is wrong. The paints themselves are very easy to mix and spray and the tips that are on the info sheets will help you. I was intimidated at first, just like with casting my own parts, machining and the like, but after working with the stuff, I think I'm over that now. I would encourage you to try it. That's how I ended up using it....I just tried it and liked it. I tend to add a little more reducer than recommended so I can get it to lay down nicer and flow better. Remember, the model paints use oxygen to dry. (enamels along with typical lacquers) When you get into the urethanes, you are expediting the hardening/curing process by adding a hardner, and either speeding up or slowing down the drying/flowing time with the reducer. It's just that simple. And the green Chevy Pickup is Tamiya British Racing Green, with Tamiya clear on top. So if you have this stuff, you are half way there. I use Tamiya and automotive urethanes, and just about everything in between. And the best way to improve is practice. So get some plastic spoons, put a simple base color down (silver, black, red...just a color nothing fancy like candies) and then mix up some urethanes and use different PSIs and mixes to get the result you are looking for. It's a cheap way to practice and you can get free spoons at McDonald's. Spray the back side and write what you did to get that look on the inside of the spoon. Hope this helps. David
-
You are welcome J. It's the least I can do to pass on what has been taught to me. David
-
In my 35+ years of building models, I have never seen a model with an expiration date on the box. Any time constraint is strictly imposed by the builder. We all have 4 months to wait. It is whether we choose to do so or not. (and to help you out, it's 4 weeks........not 4 hours, not 4 months......4 weeks that I wait for my paint to gas out...which is my technique). Most eye catching models were not built over night.(Except for Mark Jones ) It takes time to do it right, which is where most people make the choice to just get it finished vs. doing it correctly. Just my 2 cents. David
-
You are welcome....it's the least I could do. (Sorry about the past photos....I'll pay for your therapy!!). If you look close, you can see you house!!! David
-
resistance soldering equipment
Karmodeler2 replied to my80malibu's topic in General Automotive Talk (Trucks and Cars)
The equipment I use is adjustable, so I use a setting that melts the solder and joins the two. If it's thin brass, I use a lower setting. I have had small brass parts vaporize (almost, nothing left but a little black crumb) because I had the heat too high and it caused the brass to glow red.....real red red hot, then it just crumbled. It's hard to give you a set voltage/wattage because of the different sizes/thicknesses of brass/bronze/copper. If you are asking for advice on equipment, I recommend the following: I use the one from Micro Mark made by American Beauty. They have it on sale right now. It is expensive, but man, does it work GREAT. I mainly use it for intricate work. Dirk Joseph turned me onto a torch that Radio Shack sells for $20. It's butane and you can control the flame. It's awesome too. I use at least 3 methods for soldering and all 3 have their place and purpose. I would recommend the set up from Micro Mark. I bought the set up with the tweezer hand piece, but I ordered the needle nose one today. You will want to order extra tips (for the one you choose). You will also want to keep a sanding stick close by. When you use the resistance, it forms some slag on the tips, (from the flux) and you can take a sanding stick, grab it with the needle points, and move it back and forth to get a clean surface. Both your metal and your tongs need to be clean for the electricity to pass through. Hope this helps. David -
Chas, Let me address your response as I go, since you have stated some obvious things to me, that might not be so obvious to you. "You way mis my point..You just stating that your way is the right way and thats not true.." Not true. I never said my way was the "right" way. Read my post. I said you were mis-informed. I was saying that your statement of having to buff the car with in hours or days was incorrect. "The truck looks good but no different from any one els that was on the table that look like a trailer queen style paint job." The truck won it's class, you are correct and was in contention for best paint, so it must have been somewhat different than the others on the table. If it was not different, it would not have won, it would have blended in with all the others. Also a fact for you is that you do not have to win or place in a class at GSL for the master awards. My Aston Martin did not even place, but went home with best paint. So your statement about my truck is false when you said "you won your class so it would go after the Master awards (Paint) being one of them" "A model is a heck of a lot different then doing real cars for one." Not true, If you are using automotive base, reducer and hardner, then the only difference is size. You spray side mirrors on real cars and they are not much bigger than 1/18 scale cars or sometimes, even 1/24, depending on the 1:1. But the rules of the chemicals do not change. They don't know what they are going on, so the properties do not change. "It's the paint under the clear that makes it look better not the clear" I have to say that this could not be true. If you laid down the sweetest base, and put a crappy clear coat over it, you would still have an ugly paint job. The base did nothing for it. The two work together, and when done properly, compliment each other. As far as waxing or buffing, they are two different things. Waxing is something you do long after the paint has dried and cured (read the spay out sheet). Buffing is something that is done after sanding and prior to putting the car back together (on a ground up). I do NEITHER for at least one month and sometimes longer. There are several ways to do things and get similar results. This is my TECHNIQUE. It has garnered several Best Paint awards for me over the years (not bragging, just stating the facts) and when countless people ask you for your technique, and you do seminars at places like GSL and the IPMS Nationals on paint, then someone must think you know what you are doing. Hopefully this will clear things up for you. Sincerely, David
-
4 hours?.....I'm talking 4 weeks. And the orange peel is something that surfaced AFTER I had cut and buffed (too soon mind you) and placed the model on a shelf, only to pick it up a year later and see the entire body had finally gassed out and created an orange peel effect on a surface that was final cut with 12000 grit and then polished to a mirror finish. All I was trying to say is that letting something gas out for a month or more will not prevent you from being able to cut and buff it. You implied that it would be, and I felt you were mis-informed on that particular fact. ....and 99% of the time? Are you saying that only 1% need to be cut and buffed? There is no painter in the world, who can paint a concours paint job that needs no cutting or buffing even 30% of the time. I have been to several restoration shops, and have restored two cars myself, and have been to Leno's Garage, The Nethercutt collection (winners of BOS at Pebble Beach more than the next 3 competitors combined) and other high end shops and even THEY can't paint cars that don't need attention when they leave the booth. If you got someone who shoots paint that needs no cutting or buffing, then I'd like to see the guy who could put all the companies that make sandpaper, polishes, buffing pads, and buffers out of business!!! Please share the pics of your work, or his to show us what you mean. Sincerely, David And this one was left alone for over a month and I spent around 8 hours on the hood cutting and buffing, so you can imagine the rest of the vehicle. And it was in contention for Best Paint at GSL , but my Aston Martin beat it.
-
Hey Chas, I'm not sure who has told you that you have to wet sand right away but they have mis-informed you. Chemicals such as paint are made up of many different chemicals and these chemicals, when mixed together, have reactions and results, which is what we are after. However, they tend to gas out much longer than the 72 or 16 hours that the spray out sheets talk about. In fact, it can take up to a year for some paints to cure, while they may dry in the hours specified for the product. I have painted a model, and one week later cut & buffed it, only to pull it out of the cabinet a year later for a model show, and it's full of orange peel. It was not that way when I put it away. That being said, I now wait at LEAST one month (mark it on the calendar) and sometimes longer to cut and buff. I have never had a problem with wet sanding or getting a finish that is nice. If it's Tamiya clear, I start with 3000 or 4000. If it's PPG urethane, I can cut it with 2000 first, then work up to 12000. I just did the Cunningham below and it was shot with Tamiya clear, waited a month, cut it with 3000 (sanded it) and then used their blue cap polish, their white cap polish then the green liquid wax. I did not go past 3000 with sand paper. As you can see, the sun is reflected in the pic, along with the camera lens below the trunk line. Not a bad finish and I know it's gassed out most of the solvents that it is going to. I know that high end paint shops (restoration facilities for the Duesenbergs, Bugatti's and the like) will paint a car and wait for a year to cut and buff. So it can be done with awesome results. And a year in full scale is 15 days, so I'm a little past that (yes, this is sarcasm). In this last pic, you can see my head, and camera taking the shot. This car was cut and buffed 2 months after I shot it (cause that's when I could get to it. It has been done for 2 years now. Hope this helps. David
-
Gary, You need to get the info sheets for the products you are using so you know all the important stuff like mix ratios, pot life, PSI's and a lot of other GREAT info that changes for every product, so it's hard to remember everything unless you use this stuff everyday. The pot life for 2021 is about 4-6 hours. You should only mix what you need as it will harden and serves very little purpose other than being a lake on a diorama. David
-
Ditto David
-
Not only did he win "best paint" and "best use of color as a design", he won the well coveted, but awarded in private, "most use of masking tape as a taping medium", "most use of Para Film on one model" and " Most sheets of bare metal foil used on one model". I have tried to win these in the past, and I am envious of him for doing so!!! All awards with one model. What a trophy hog!!!! David
-
just make your own decal and throw it on the end of the cap. I'm sure you could do that without any copyright lawyer finding you. And you know why Lawyers are buried 12 feet down in the earth instead of 6 feet like everybody else? Because deep down, they are really nice people. David
-
Jeff, Len is correct. When you start getting into the urethanes, you start getting into some really nasty solvents that will eventually kill you if you don't take the necessary precautions. Of course anything can kill you, but you can be proactive to prevent this one from doing so. The model paints are docile compared to the urethanes (I am referring to the automotive kind). The big thing to remember with urethanes is this: to avoid compatibility issues, it is best to stick with the hardner, reducer and clear made by the same company. Mixing a PPG hardner with a DuPont clear will cause all kinds of problems either up front, or down the road. While they are docile when sprayed over all bases (color coats), they perform best when mixed with like chemicals that the chemist designed them to be mixed. You will find the urethanes are more expensive than model paints, but you get a more because most paint jobbers don't mix bases or sell clears in less than a quart. You will need to buy the clear, the hardner and the reducer. I use PPG and the Concept 2021 is AWESOME. I have areas that don't need to be buffed when I spray it. It is suppose to be a 4:1:1 mix meaning 4 parts clear, 1 part hardner, 1 part reducer. I generally mix about 2-3 parts reducer to get it to flow better. It won't matter on a model if you over reduce it. What ever product you use, ask for the mix sheet and the MSDS sheet so you know how to mix it and how to spray it. I have sheets on all my products because each one is different and I can't remember. I have a paint folder with the sheets and when I am spraying a particular product, I grab the sheet and it tells me mix ratio, PSI, Flash times, recoat times, pot life and all. It's nice to have this on hand. Go to Home Depot and get you a mask that has changeable filters (canisters) and buy a few extra canisters while you are there. Trust me. I bought only the mask, and when I went to get new cans, they said "oh, we don't sell that kind of mask anymore" so I had to fork out anther $30 for a new mask.....and this time I bought a few extra cans. And your lungs are worth $30. Trust me. David
-
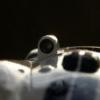
Yes, I have several lenses (copied from just about every kit...I tend to make molds of all my lenses since this is one of those parts that seem hardest to find) and I decide on the light ring and how big it needs to be to fit the fender or the area it goes. I then will decide how big the lenses need to be, and will pull out the different bags of lenses and use my calipers to get one that will be close. I then start machining the bases and machine the ID to match the OD of the lens. It is a UV stable (non-yellowing) resin and it is a two part mix. Most of my lens molds are one piece molds, but sometimes the markings are on the inside, and it's domed, so I have a two piece mold. If you look close, I actually machined a trim ring that fits inside the bezel for the headlight and holds the lens. The problem is I did not make it "tall" enough and it fits flush (actually a little sunken) with the front of the light bezel. I wish it was sticking out a little more to show more relief. I am contemplating doing these over so you can see the detail just like on the real one. David
-
Thanks Bob. I hope to be in ATL in Nov with it. Do you know of anyone who makes the C4KR? David
-
2 More Caddys: '57 Eldorado Biarritz & '70 Coupe Deville
Karmodeler2 replied to Monte's Motors's topic in Model Cars
Thanks Roger. I am in the middle of converting the 58 to the 57 and am 80% done. I did not know this was offered. Figures, story of my life. I do a complete re-do of a kit, and then 80% into it, I find the thing already done!!! Thanks for the info. David -
Thanks Sam. I don't do anything that someone else could not do....I just spend a little more time on the details.......we all could do it, we just sometimes aren't motivated to do it. I happend to like this car, but it took me 3+ years to get it done. So I even lacked the motivation at one point. Thanks for looking. David
-
Thanks Lee, Mike, Mark, Jim and Romell for the kind words. I am glad you enjoyed the pics and the labor of love. I learned a lot about these cars in my research and have fallen in love with the race cars from this era. I don't know why, because it is not something that would have interested me 6 or 7 years ago. I guess we change as we get older. David
-
2 More Caddys: '57 Eldorado Biarritz & '70 Coupe Deville
Karmodeler2 replied to Monte's Motors's topic in Model Cars
Where did you get a '57 Biarritz body in 1/24th scale? David -
Need Decal Help
Karmodeler2 replied to Karmodeler2's topic in General Automotive Talk (Trucks and Cars)
Thanks Dave. I sent him an email. David -
Need Decal Help
Karmodeler2 replied to Karmodeler2's topic in General Automotive Talk (Trucks and Cars)
I thought only a participle could do that -
I was on this forum a while back and saw someone that was doing decal work as a business. They would print out what you needed in any amount that you needed. There was a link in the post and some examples. Can anyone help me locate this gentleman? I can't seem to find it in the forum and can't remember what area of the board I saw the info in. (I know......preposition!!!! Thanks for you help! David
-
Thanks Harry, Niko, Simon, Steve and the others for the kind comments. I am glad that I finally was motivated to finish this after it sat for 3 years in it's primer state. Thanks everybody for looking and for the comments. David
-
Thanks Curt! Do you know if the C4RK is going to be made in resin by anyone? I would love to do one of those too. Paul still offers this kit (C4R) and now comes with some photoetch and the decal sheet is nice too. Everything he does seems to be really nice. I think it's about $100. I know of a shop that can get one for you if you want it. Call Peggy at Model Car Masterpieces at 714-751-8232. Mention my name and she'll be glad to charge you an extra $40!!! (Just Teasing!!!!) David
-
Only had to paint this one once.....can you believe it? Hope to see you in ATL this year......along with your better half!!! David Thanks for the kind words.