

Karmodeler2
-
Posts
423 -
Joined
-
Last visited
Content Type
Profiles
Forums
Events
Gallery
Everything posted by Karmodeler2
-
It's in the WIP somewhere, but here is my link that has all the photos I took along the way. Enjoy. David http://s194.photobuc...nningham%20C4R/
-
about the reflection....me too!!!!!!!!!! The brake light bezels were turned, then I turned a piece to fit into the bezel (so the fit would be tight) then made a mold to do a casting of the lens. I used tinted UV stable resin to do the lenses. That way, I know the color will be consistent. Also, if I had to paint them, it would change the OD of the lens and it might not fit. You have to cast both at the same time to ensure you mixed the resin with the same amount of tint (very hard to match and guess at the same time if you do one at a time). I make two molds, it's easier that way. David... And thanks for the kind words......notice you can't see MJ's house in my paint....so it's not that good!!!
-
The rivet heads to simulate snaps of different sizes came from Scale Hardware and I drilled all the holes before I painted the body. http://www.scalehardware.com/threaded-hex-bolts-c-1?zenid=99942d9d457f0a577ac90084c04d2772 The screw and bolt head detail around the windows is photo etch. The straps are scratch build using the cover of a 3 ring binder note book (they have a grain detail that is really small and looks like leather). I made the buckle out of .0010 plastic and the pin is a rivet left over from where I cut the head off. The two ends are 2 pieces of .0010 plastic, one with a square notch cut in one and the other just a little bit bigger. This forms a square block with a notch, that is square, on the bottom side. This lets the strap fit under the "anchor" so to speak, and keeps it close to the car. The screw heads on top of them are photo etch. The scale is 1/24th and it's a Paul Fisher kit. The steering wheel is resin, painted to look like wood. Thanks for the kind words. David THanks Andy for the kind words. David
-
THanks Mark!! I am starting to like these cars from the 50's race era! David
-
....
Karmodeler2 replied to MoparWoman Jamie's topic in WIP: Model Trucks: Big Rigs and Heavy Equipment
Hey Jim, The following link has great stuff, and the tools to mount all the nuts and bolts. They are stainless (no rust) and brass, and nickel plated brass (no rust again). I use their stuff all the time and the tools to work with them are a must. My hands are too big for that small stuff. David http://www.scalehardware.com/threaded-hex-bolts-c-1?zenid=99942d9d457f0a577ac90084c04d2772 http://www.scalehardware.com/socket-wrenches-c-4 -
1969 Ford C-Series Hy-Ranger
Karmodeler2 replied to cargostar's topic in WIP: Model Trucks: Big Rigs and Heavy Equipment
Make one and cast it. Much easier. David Then you have plenty for more builds and you can sell them to your friends. -
I got that book when I was about 8 years old and my neighbor gave it too me for Christmas because she knew I was a truck fan. That picture on the front of that book still gets me excited about trucks (I still have the book). Your model is a great representation of the cover. You just need the guy leaning against the truck and lighting his cigarette!!! Nice build. David
-
Here are the final shots of the build. I added quite a few detail pieces to make it a little nicer "curbside". Hope you like it. David Here you can see the camera lens (below the trunk) that is not too far away, and then the sun, which I think is a little farther away. Man, do I hate micro lenses!!!!! Look at the glue near the window support on the far side. Also, don't cut your windows with a serrated pair of scissors!! here is the link to the build. David http://s194.photobucket.com/albums/z83/Karmodeler2/Cunningham%20C4R/
-
I say "real" too. I think I got this one right also. I could not find the vote box, though. David
-
I use CO2 and fill my tanks much more than once every year and a half. It all depends on what you use it for. I use it for models, real car parts, real cars....etc, and other jobs. One word of advice. If you do not weigh it when it's full, and when it's empty, and know what you have left in the tank, you will be in the middle of one of your nicest paint jobs and the tank will run out. My tanks show 1100 psi, then when going to empty, go to 500 then to nothing in shorter time that it took you to read just this one sentence. It was not pretty and there was nothing I could do about it. I was warned and ignored it. Now I have 3 tanks. When one runs low, I swap it out. I do not have to pay for the test, as I bought the tanks, and exchange them at a welding supply place for $17 each time. They take care of the test. Each place is different. There are tricks to tell how much you have like pouring water on the outside of the tank.....a condensation line will form to show you how much you have, but if you have it strapped to your desk, that's not an option. If you know the weights, you can tell when you are getting close. I use it exclusively and would never consider using anything but. I have tried nitrogen (to keep my regulator from freezing) but was not happy with it and went back to CO2. Good luck. David
-
The guy lives in the south and every morning, he backs out from under an oak tree and the corner brushes a limb off of another tree because of the angle that he backs. He just barely brushes the tree a little every morning. 40 years later, a small wear mark appears on the corner!!! David
-
Scratchbuilding vs. Kitbashing
Karmodeler2 replied to Harry P.'s topic in General Automotive Talk (Trucks and Cars)
Thanks Harry. There have many here who use the term scratch-built when it is definitely kit bashed. Those of us who use sheet plastic, brass, aluminum, stainless and the like,( also in the rod, tube, and bar assortments), get pretty testy when we see "kit bashing" being done and called scratch-building. And we are the ones that get chastised for bringing this up. Thanks for putting this out!! David -
It was an American thing. Never a British thing...where they were made. The stupid Americans attached the XK series to it, and it did not belong there. They thought that it would sell better that way. kind of what I said in my first post on the subject.....we screwed it up! David Might be rare in Chicago, but certainly not in the south. I see them all the time in FL and especially at shows. David
-
And just so you know, not that you asked: There is no such thing as an XKE. That is an American term that the Brits do no use nor did they ever use it. The XK 120, 140 and 150 were called "XK". The C type, D type and then the next one in the series is the E type. This car is called an E type, not an XKE. There, I feel better. David
-
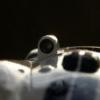
I was with Bob Tulis's mechanic today (the one from the 70s-80s, when he ran these cars) and he is working on an engine swap in the TR6, owned by Bill Warner here in FL. If you do decide to do these colors, make sure you put the two "4"s on the trunk backwards. He told me the story today as to why they were that way and it was hilarious. Bob's wife was in charge of putting the numbers on the car, and when she went to trace the numbers, she did it from the back side of the vinyl for the trunk numbers. When she was done, the numbers where backwards, and Bob thought it was cool and left it that way. You can see that in this pic. David
-
Is that MJ's house in the reflection? And you live in PHX and he lives in LGB? Man, that IS some nice paint!!!!
-
Painting both sides of a models hood
Karmodeler2 replied to Darren B's topic in General Automotive Talk (Trucks and Cars)
Okay, To be COMPLETELY different here is what I do. I find where the hinges or some other thing will be glued to the hood. I find the area outline of said part. I cut a piece of masking tape the shape of the outline and put it on the hood where eventually the parts will be glued, then superglue a piece of sprue to the tape.(maybe even two {one on each outline of the hinge area} and connect the two with a cross brace to give it strength). I spray both sides of the hood, then hang it up to dry. After it's dry, I then snap off the sprue from the tape, remove the tape, polish the hood, and then glue the hinges where there is no paint. If the hinges are molded on, GREAT. Superglue sprue to the edge of the hinge (farthest point from hood) and when done, snap it off, clean up the area and paint flat black. This is a delicate process, but one I use every time. You must exercise caution as the mounting tabs (surface area) is normally not sufficient enough for you to be whipping around the hood. It will come off if you are rough with it. Knowing this, I always spray it last, have a special stand set up to hold it before and after I paint it and to keep it from getting bumped while it dries. I go through a dry run to make sure that the movement while I'm spraying is sufficient to paint it and that the mounts will hold. I have a double action so I test that the air pressure I have will not blow the hood from it's mounting points. I have had a few come off after a painted them, but since doing the dry run now, I am able to test the glue holds and see if it will withstand the movement before I put paint on it. David -
What do you think is most important?
Karmodeler2 replied to bigmikevee's topic in General Automotive Talk (Trucks and Cars)
Mark, this is a MODEL forum. Quit posting your WIP on 1:1 builds or you are going to get banned!!! And, according to him, if a turned part looks like a turned part, no matter what scale: wouldn't that be the object of modeling? To have a small part look exactly like a full scale one? Man, does this ever give me a headache!! David -
Why exactly do you post?
Karmodeler2 replied to bigmikevee's topic in General Automotive Talk (Trucks and Cars)
Oh yeah, and the Girls!!! Thanks Jairus, I forgot!!! David -
Why exactly do you post?
Karmodeler2 replied to bigmikevee's topic in General Automotive Talk (Trucks and Cars)
I post, to show others my work. Some like it. Some don't. I really don't care either way. I build for me (Hey Andy!!!!) and I build to be better, more accurate with each model. I love to compete and OOB is my favorite class. I post my work to let others see, what might be for some, a kit completed they have never seen. I comment to either 1) express my satisfaction with their build and skills, or 2) express, in truthful terms, what I see that needs improving. If you claim you made something, and I know for a fact it's a kit piece, I'm going to call you on it. That's why I comment. Most here can not handle the truth, so I just keep most of it to myself. They are not going to improve their skills if they take it personally. They could harbor all that energy and progress to being a better modeler with the honest criticism, but that would require effort on their part, and that's just too hard these days. Anxious to see what others have to say on this, given the other hot topic going on right now. David -
Hey Christian, A few of my friends say that I'm am insane for painting a car 23 times, I just call it "persistent". It keeps the guys with the white lab coats at bay!!!! I know there is a fine line between insanity and what we do. I enjoy bashing through that line frequently! David
-
I have to say, Christian, that we all possess most of these. It is whether or not we take the time to hone them. I would have NEVER thought that I would be at the level I am today, 35+ years from when I started. I would have NEVER thought that I would own a lathe and a mill and machine my own parts. Same with chroming my own brass parts, making molds and casting parts and the like. It is taking the time to learn things,(time management...like learning how to chrome stuff instead of watching something stupid on TV like American Idol); painting a model 23 times to get it right (patience and perfecting my painting ability), buying stuff second hand (equipment), hanging out with those who are creative and trying to learn from them and getting their input. You see, we all have the ability to build better. It is whether we choose to do so, or just accept the model the way it is. As Mark Moore says, "good enough" can always be better! When I see a high bench mark, it inspires me to build better. Others, it causes them to turn and run. It is in this moment, that they, and I, have chosen what path we want to walk. My closest friends in this hobby are some of the best. Their work inspires me to be a better modeler. Others are turned off by it. It's a choice. David
-
Jim, I agree with you and the original thinking that came up with it!!! I see so much stuff here that is absolute ccrap......yeah, I said it, absolute ccrap. (spelled that way to get past the language gods) And the little followers that praise the thread starter on how great he builds are just as bad. Problem is, you never know how bad you build until you see something well done. The first time I saw something well done, it motivated me to be better on EVERY build and I still do it today. These clowns will never improve because they are lied to, by well intentioned people, about how great they are. There, I feel better, and am off my soapbox. And am looking for the new folder called "Shooting Gallery" with a subscript that says "Honest Critique, tread with caution" David
-
what type of airbrush do you use?
Karmodeler2 replied to DrewCfromSC's topic in Model Building Questions and Answers
You are right Donn. Thanks for keeping be grounded and for keeping me humble. I do remember the first time I used an airbrush.....I was petrified. And it was not until years later that I got comfortable with the single. When I finally stepped out to try the "double" world, I could feel a little of the fear coming back. We do seem to forget some of the hurdles we cross when we are well past them. Thanks!! And sorry to hear about your loss of seniority and vacation. I hope to see you at a show, but I don't think I can make the August one in NC. I'm too many days on the road with the job now, and when I get home, I like home!!! David -
So Gramps is true they have in-breeding in WV? Four thumbs? Just teasing you....I know what you were saying! David