Chariots of Fire
-
Posts
2,781 -
Joined
-
Last visited
Content Type
Profiles
Forums
Events
Gallery
Everything posted by Chariots of Fire
-
 Hi, Juergen: I will post some photos of the AP Mack as a cement mixer. I have some as it is being built as well as the finished model. Will need to get them uploaded in Photobucket first. Charlie
 -
That's some nice work. I like the old Dodge as well. Tractor and trailer look great together!
-
Juergen: The wheels are directly from the Yat Ming '38 Ford pumper diecast and they are correct for the actual truck. I modified them by removing the flange that held the soft tire on the rim and sanded the outer edges smooth. The tires were originally from a Matchbox Dodge Power Wagon. It had tires the correct size. The tread pattern is typically military mud and snow. The actual truck had tires with a slightly different pattern but these seemed to do the trick. Both the wheels and tires I had cast in resin. The inner surface of the tire was smoothed up so that the wheel would fit inside. They can be separated for painting and then will be put back together and installed on the axles.
-
That rig is well done! Nice kit bashing for sure. The hose load that Jim shows is one I've used for years. Sewing elastic comes in two sizes; 1/4" and 1/8". The former is good for 2-1/2" or 3" supply lines. The latter for smaller hand lines. You need to stain it first, though before installing it in the bed. I did a tutorial on the Scale Firehouse site on making hose loads in case you are interested. Looking forward to seeing it finished!
-
Since the last post I've been doing some cleanup and a bit of finish work. Now that the doors are done and fit some work on the interior was begun. The dashboard is complete, a seat was finished and weathered and the floorboards are done. The headlights came from a '37 Ford p/u kit. Instead of installing them on the fenders where they would be useless the builders of the actual truck mounted them high and on a pivot that would allow them to be tilted down out of the way when travelling in the woods. Not much good however, if you are chasing hot spots in the woods at night!
-
Seagrave Truck 1
Chariots of Fire replied to Trailking120's topic in WIP: Model Trucks: Big Rigs and Heavy Equipment
Glad to see one of those in the building stage. Lots of work that is for sure! You said you used BMF for the door hinges on the body. Are you using BMF on the chrome trim on the front as well? -
After much tinkering and fitting, I got the doors to open and close on the cab. I used small "H" hinges and superglued them in place. Small pins were pushed into the edges of the door to help hold them solid. The heads of the pins were ground down to make sure there was clearance and no binding when the doors are closed. Here's the body back on the truck with the side bar open and the door open. And with the door closed and the bar back down in position. And if you were a tree standing in the woods and the truck was coming at you to knock you over, this is the view you would get!
-
Got a couple of those kits but have never built one. You've got a good start. You should get pretty nice coverage with red over the primer you selected. Keep us posted!
-
Here is a closeup of the mesh. Those diamonds are less than a millimeter across. I got it at Scale Link Ltd out of the UK.
-
One other thing in the photo that might be of interest. Note that the two firefighters manning the hand lines are directing the water slightly ahead of the front and sides of the truck. Normally both would not work at the same time as the truck would be following the edge of the burn putting out the ground fire that is on one side of it. That way as the truck approaches it is not running over hot flames. The trucks today work in tandem with the second piece picking up what fire the first truck did not extinquish. On this truck the lines are small gallonage but high pressure streams. Wide pattern fog streams are not used but rather a narrow fog or even a smooth bore nozzle might be used. The narrow and more powerful stream bores into the duff and reduces the chance of a rekindle after the truck has passed. A fog pattern would only get the surface fire and leave the hot material underneath.
-
Here's a photo of the real truck on a demonstration run through a pine forest. Look closely and you will see that it has taken down a pitch pine that is about 6" diameter. These trees generally go over quite easily because their root structure is shallow and the soil where they grow is very loose and sandy. The one thing that can happen is that the root ball lifts up with it and sometimes can get caught between the tire and the fender opening. When that happens the only thing to do is either tow the truck out or cut off the root ball. When trees of this size go over then generally stay over. One very important rule of thumb for operating trucks such as these even today is that you never try and go against the grain in the path that is made. The truck would very quickly get hung up or taken out of commission by a punctured radiator, broken tie rod or worse. I have seen the results of a tree going right through the top of a fiberglas fender such as what is used on current rigs. With the newer models they are armored inside the fender well to keep that from happening. This rig is really a first generation style of brush truck. And they made a couple of mistakes in the design that has since been realized and corrected for modern rigs. First the rear overhang is excessive and at the same plane as the lower side rails. Today that overhang very short and much higher allowing for a good angle of departure when leaving hilly ground or dropping into the ruts of a dirt road from the side. Secondly the top rails taper in toward the front. The explanation given in the patent drawings was that when approaching two trees the truck could run between them spread them apart and then slide through with the wider and parallel bars that are on the body. The flaw in that however, is that sometimes the trees are a little to stubborn and don't want to move that easily and the truck gets wedged inbetween. Nowdays the upper as well as the lower side rails run parallel from front to back so that if the front end slips through it's almost certain the back will also. Today also there is much more protection in front over the hood and top of the cab in the form of small but stiff barwork and steel plates. You also see in the photo where the crew would ride. Today they do much the same thing although the area they stand in might be a bit lower so that they could duck out of the way of heavy tree branches. Still the chance of getting a good slap in the face from a tree that comes over the top is pretty good! Been there---done that!
-
Now that KS has stopped providing brass mesh I needed to find a new supplier. I found one in England called Scale Link Limited that has sheets of diamond pattern, and square pattern in a variety of sizes. I chose the thin diamond mesh for this rig and cut some strips to add to the body sides. They will be painted separate from the body so that the primer coat and color coats won't fill in the holes. They are quite small. Anyway here is the rig with the mesh taped in place just to see how it looks. There is a douple pipe rail on top of the body, I suppose doubled up to give it more stiffness without the piping being oversized. I used brass for the first one to give the body sides stiffness as well and to provide better support for the brass mesh. Over that I glued a piece of plastic rod of the same diameter.
-
Here's an update on progress with the project. The front crowder plate has been mated to the sides temporarily. Once completed, the side rails opposite the doors will be cut free and will be hinged at the back end. For now things are just in place for fitting purposes.
-
Nice photo! Coming along very well!
-
HI David. I think I have solved that problem. The photos of the rig show that they indeed taper so I've ordered some thick wall plastic tubing that I can taper using my lathe. But turning the headstock just a bit I can taper the tubing (I think!). The piece that extends along the cab doors is hinged at the body and drops into a slot just ahead of the doors. There is additional skirting and tubing that will extend the base tubing on the body toward the front tires. The plate in the front is just the beginning of quite a bit of fiddling and tweaking to get it right.
-
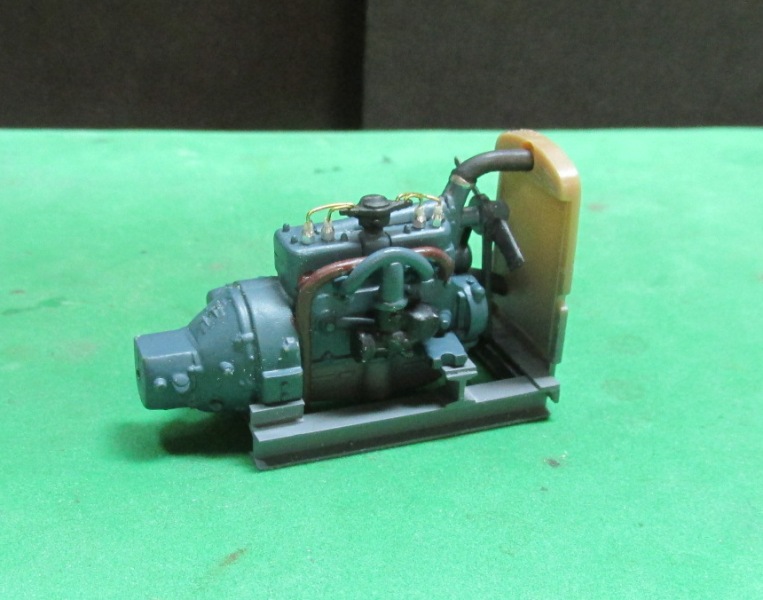
I got some work done on the engine and pumps for the rear also. This rig had two pumps, both powered by the Ford Model B engine. One from a direct shaft and sprocket and chain mechanism and the other from a takeoff unit attached to the side of the transmission. Lots of plumbing to be done on this rig!
-
Got a bit more done on the body and front plate that protects the truck as it travels through the woods. I used 3 pieces of an ALF kit cab to construct the front plate. You can see where I filled in the headlight and turn signal locations with plastic and a bit of filler.
-
it's been a while since posting any progress on this build but the holidays and a bad chest cold sort of got in the way of any modeling work. But all is well now and we're back at it. Frame is about done and a Ford flat head 8 has been added along with brass working driveshafts. The upper body is built but will need a lot more work before it is ready for mounting on the frame. But here is where it will sit. The pumps are powered by a Ford Model B engine, one of which I found in a '32 Ford kit. I added a frame for it to sit on and will mount it in the back of the body.

-
KW C500 OIL FIELD
Chariots of Fire replied to Swamp Dog's topic in WIP: Model Trucks: Big Rigs and Heavy Equipment
David that is some super work! Hope you are up and running soon! -
Progress has been made on the frame, rear axle assembly and the front axle assembly. The cab now sits where it should. Next to do is to fit the 85 horse V-8 in place along with the driveshafts and transfer case. These are the parts that make up most of the front and rear axle assemblies. The rear axles and top and bottom torque rods in place. Here's the front axle and the assembly that allows the front tires to be posed in a turning position. The little bolt and washer hold the front wheel on the axle.
-
Myles Standish State Forest is only a few miles away from here and back in the late 30's and into the 50's this rig served for forest fire protection. Thanks to Brian Austin I have the patent drawings for this rig as well as some other photos. A lot of scratch building here but the Yat Ming '38 Ford was a good starting place. Tom Coolidge cast the front fenders, hood and windshield. I had a Ford COE of the same vintage and I was able to graft in the back of the COE cab. The frame has just been started and the tires and wheels are done.
-
Engine 51 resurrected
Chariots of Fire replied to Chariots of Fire's topic in Model Trucks: Big Rigs and Heavy Equipment
Phil: It is a combination of things. I mentioned most of the details of the build above. Cab is resin, body from an ALF kit and sheet plastic. -
Engine 51 resurrected
Chariots of Fire replied to Chariots of Fire's topic in Model Trucks: Big Rigs and Heavy Equipment
Couple of questions above. The color is Rustoleum red and the hose is sewing elastic. It comes on two sizes; 1/8" and 1/4" flat width. I stain it will a wash of thinner and Floquil "earth". The older cotton jacket hose even when new was this color. Now most is white if it is not synthetic single jacket which you can get in just about any color of the rainbow. -
Engine 51 resurrected
Chariots of Fire replied to Chariots of Fire's topic in Model Trucks: Big Rigs and Heavy Equipment
LA County got it back and is either still under restoration or the restoration is complete. Been a while since I checked. -
Engine 51 resurrected
Chariots of Fire replied to Chariots of Fire's topic in Model Trucks: Big Rigs and Heavy Equipment
Made them up on my computer and ALPS printer.