Warren D
-
Posts
1,839 -
Joined
-
Last visited
Content Type
Profiles
Forums
Events
Gallery
Everything posted by Warren D
-
I've put the skid plate on both Brockway dumps I've built. Not sure I've seen them on the real thing but it does make them look tougher, especially with the squared fenders.
-
I like the idea. I've had a build that requires a pair of cylinders outboard of the frame. The build stalled as I'm trying to figure out how to make it work as the cylinders sit almost vertically and they don't have any recesses in the body. Thus a very short distance form the bottom of the cylinder support to the bottom of the dump body but they need to extend quite a ways to get the bed to dump. Lots of segments!
-
Great idea! When you cut them off, do you loose the flare on the inner ones? Looks like they might come apart if you aren't careful?
-
Good job, I built many of the WW1 planes in 1/72 when I was younger, and my eyes were better and my hands steadier! I used monofiliment sewing thread for my wires. It's not too hard. First, drill holes slightly larger than the line (around a #80 drill IIRC) where the lines attach being sure to drill at the same angle as the wire will be. Cut a piece of line a little longer than needed. Put a small amount of ACC accelerator in the hole. Put a small puddle of superglue on some scrap and dip one end of the line in it. Stick that end in the hole and it should bond instantly. Measure and cut line to length so that there is just enough to stick into the opposing hole. Same technique, accelerator and a a dab of superglue only this time you'll need a toothpick to apply to the end of the line. Insert end in hole and you now have close to scale wires. Repeat as many times as you have wires. You can also reverse the glue and curing agent, using a toothpick, put a dab of glue in the hole and dip the end of the line in the accelerator. I like the first method as I found when putting the glue on the hole it often set before I could get the line inserted. Trying to drill out cured superglue from a #80 hole is a royal PIA!

-
Big “R” Roadboss 2
Warren D replied to DRIPTROIT 71's topic in Model Trucks: Big Rigs and Heavy Equipment
Excellent work on this one, weathering is spot-on. -
Thanks Thank you Thank you Thanks Thanks Thank you
-
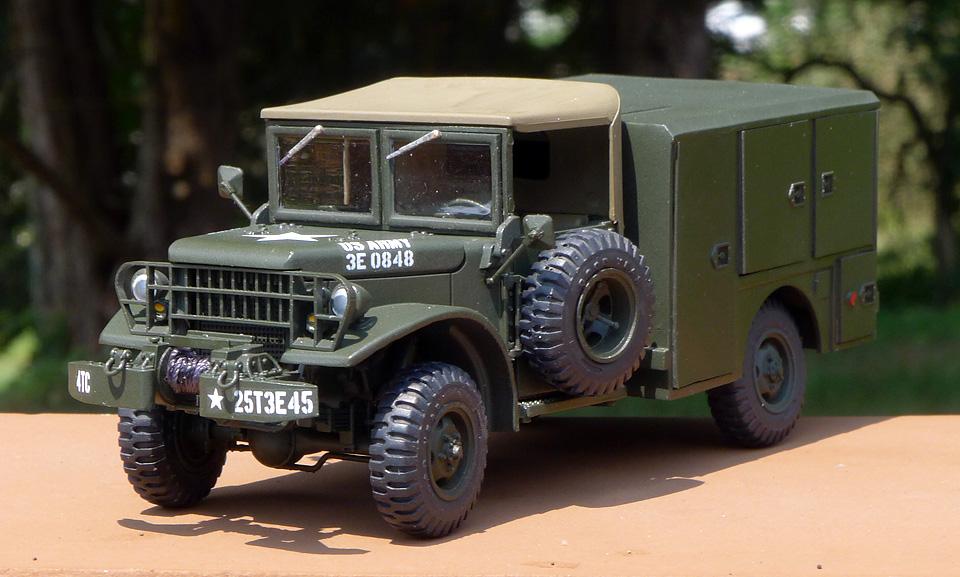
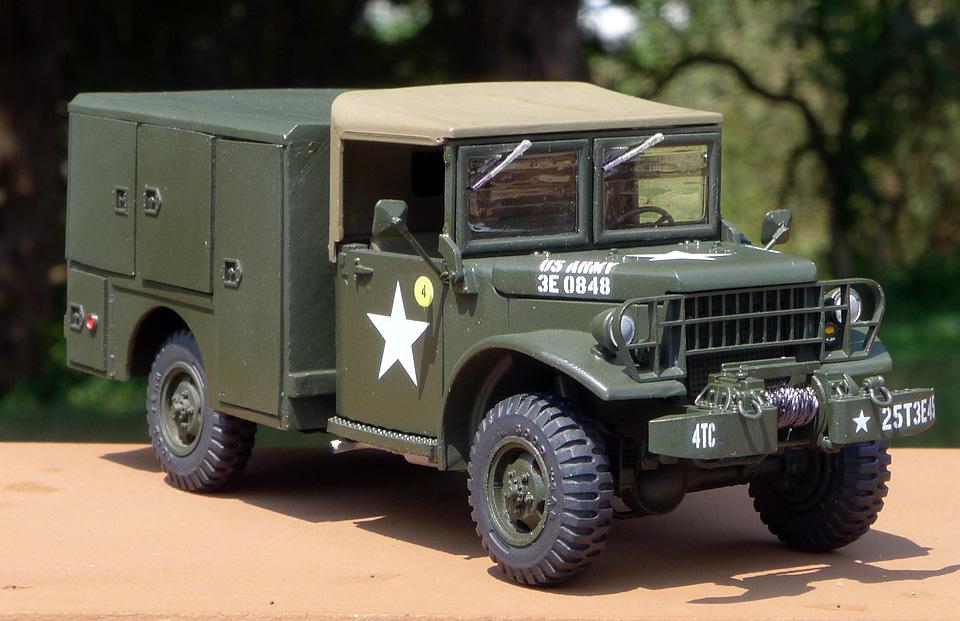
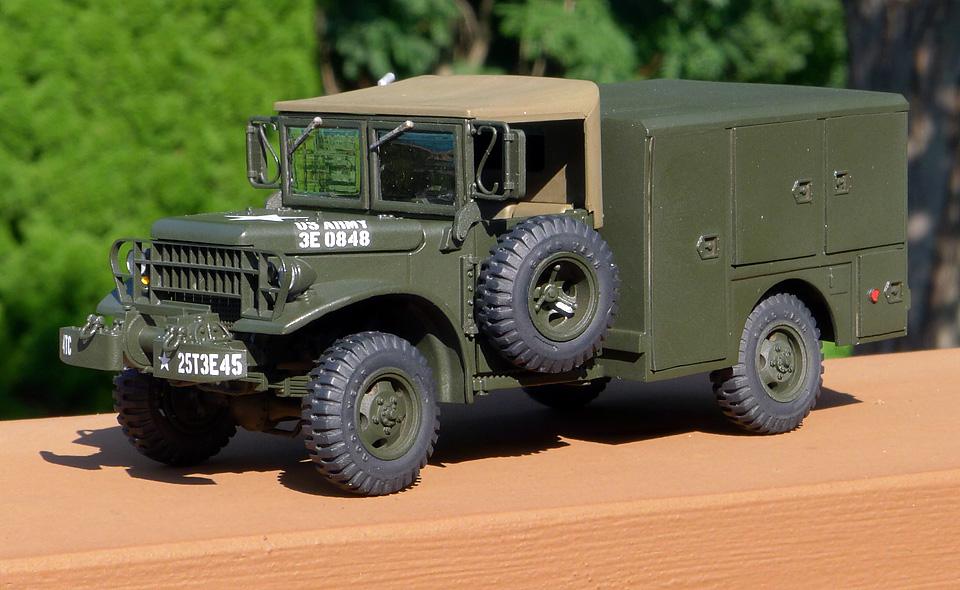
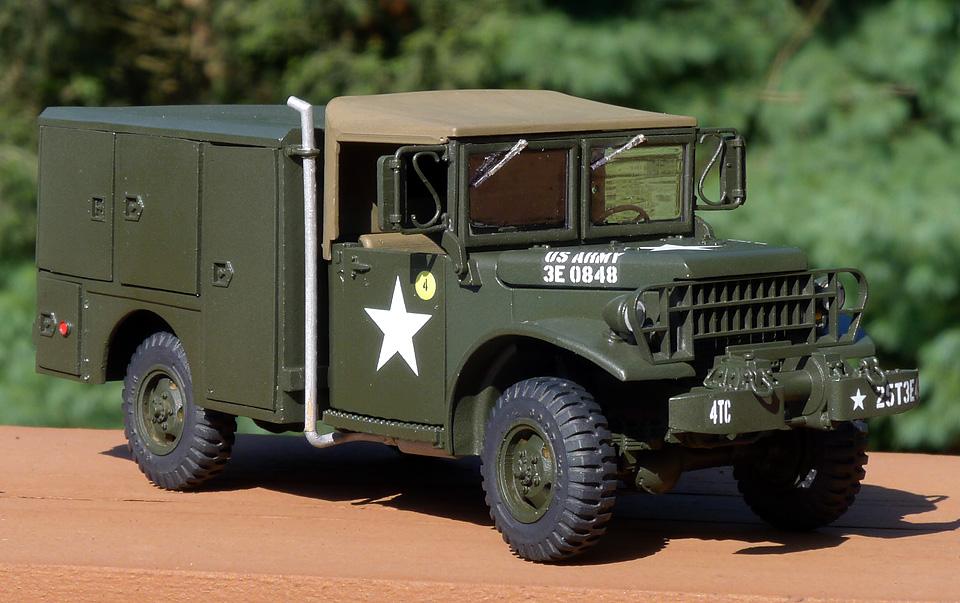
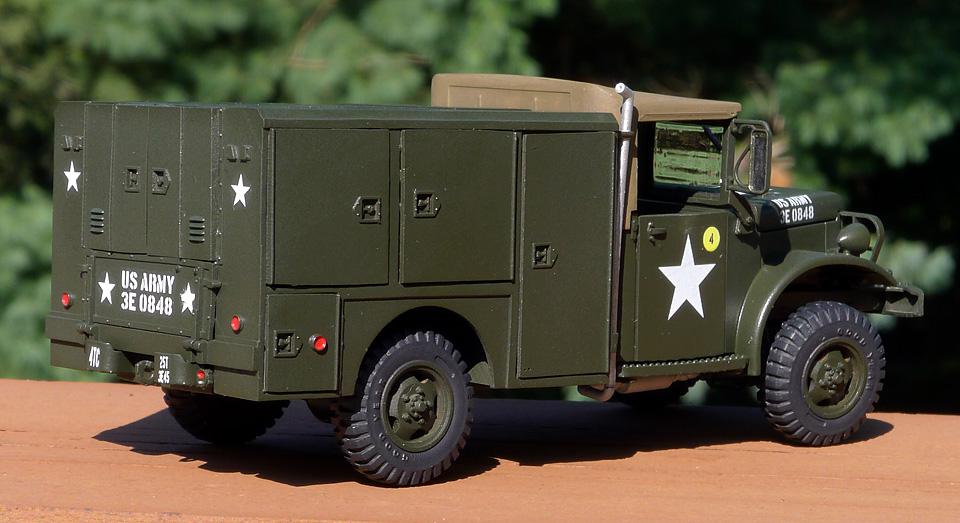
The AFV Club kit with some mods based on photos of it in Vietnam from James Lyles books. I saw a few pics of it with the soft top so I made it removable, most pics don't show it. I'm getting the hang of the AFV Club M54 kits, there are lots of little adjustments needed to get things to fit.
-
Thanks Thank you Thanks, more to come! At some point, I'll likely donate the entire collection to one of two military history museums.
-
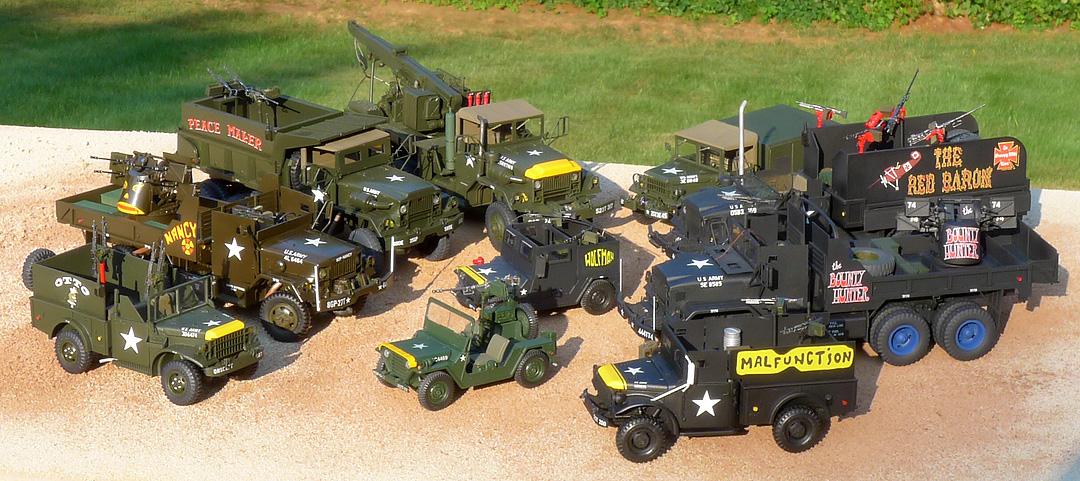
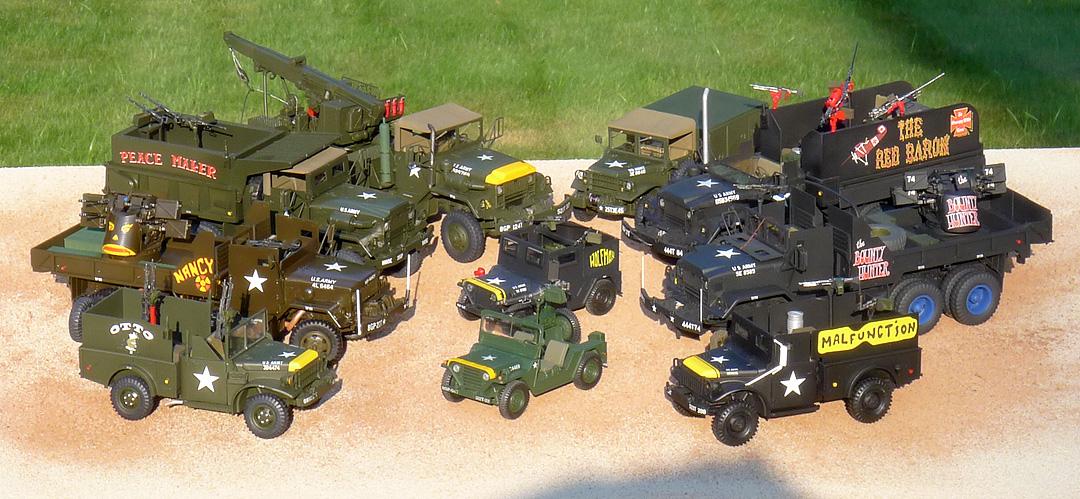
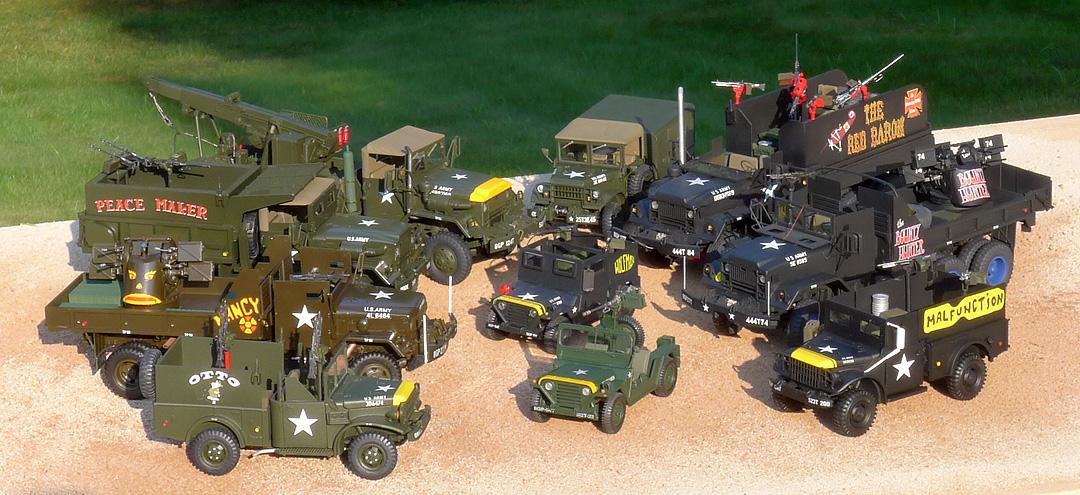
And a couple of maintenance vehicles! The collection to date, all 1/35 scale.
-
Thanks Thank you. I still have plans for several more. Thanks
-
Thanks, yes, it did have blue wheels. Thanks
-
Calling this one done:
-
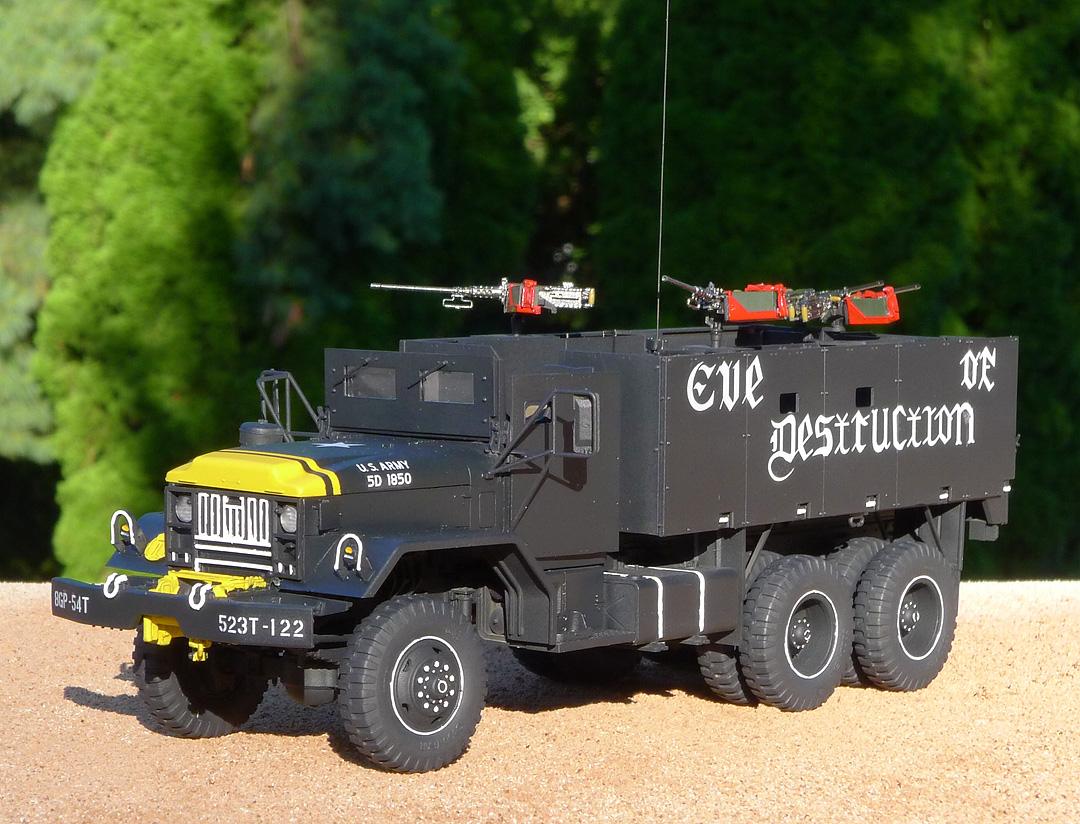
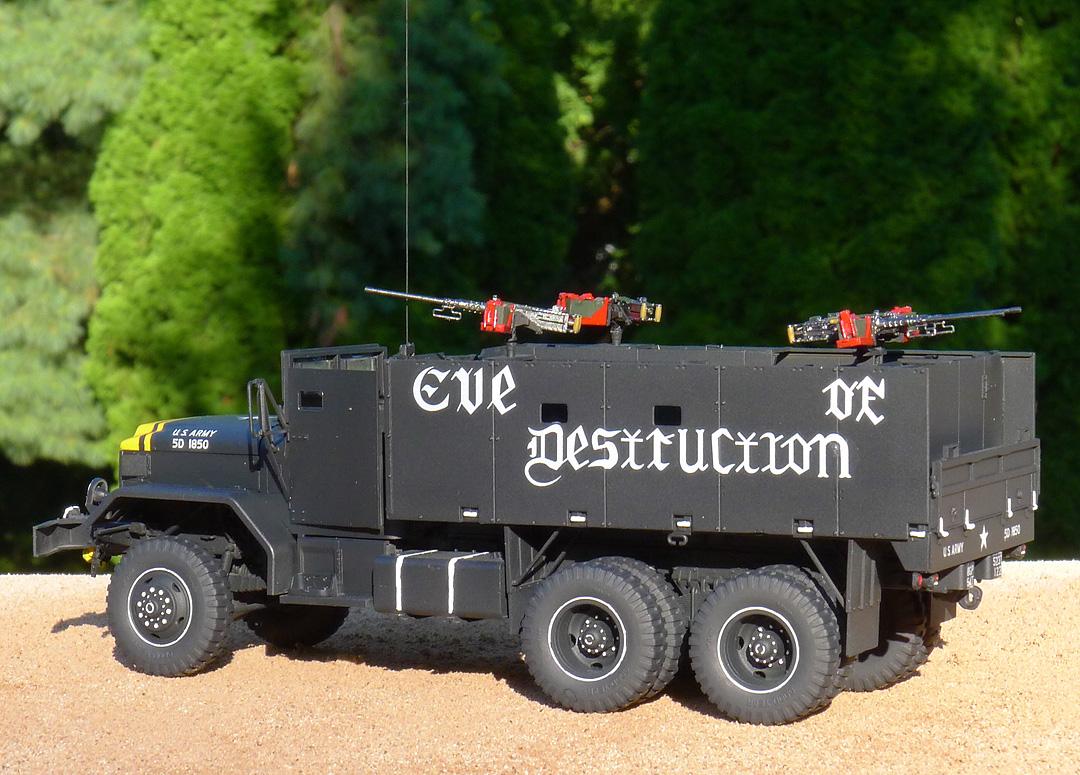
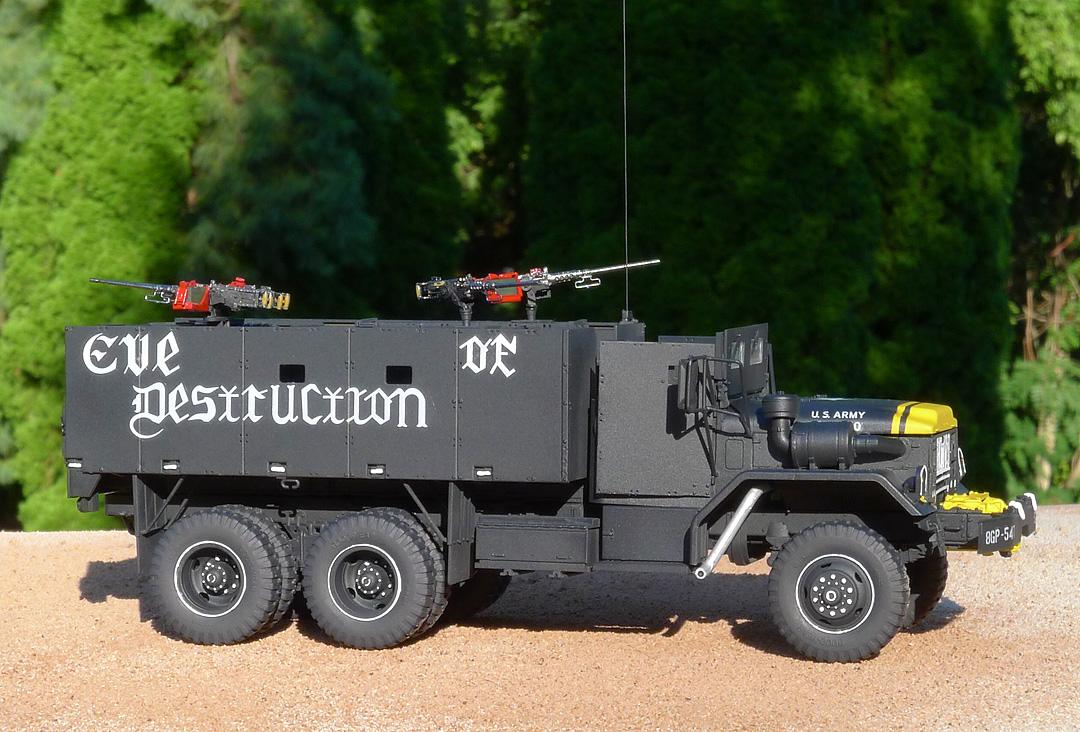
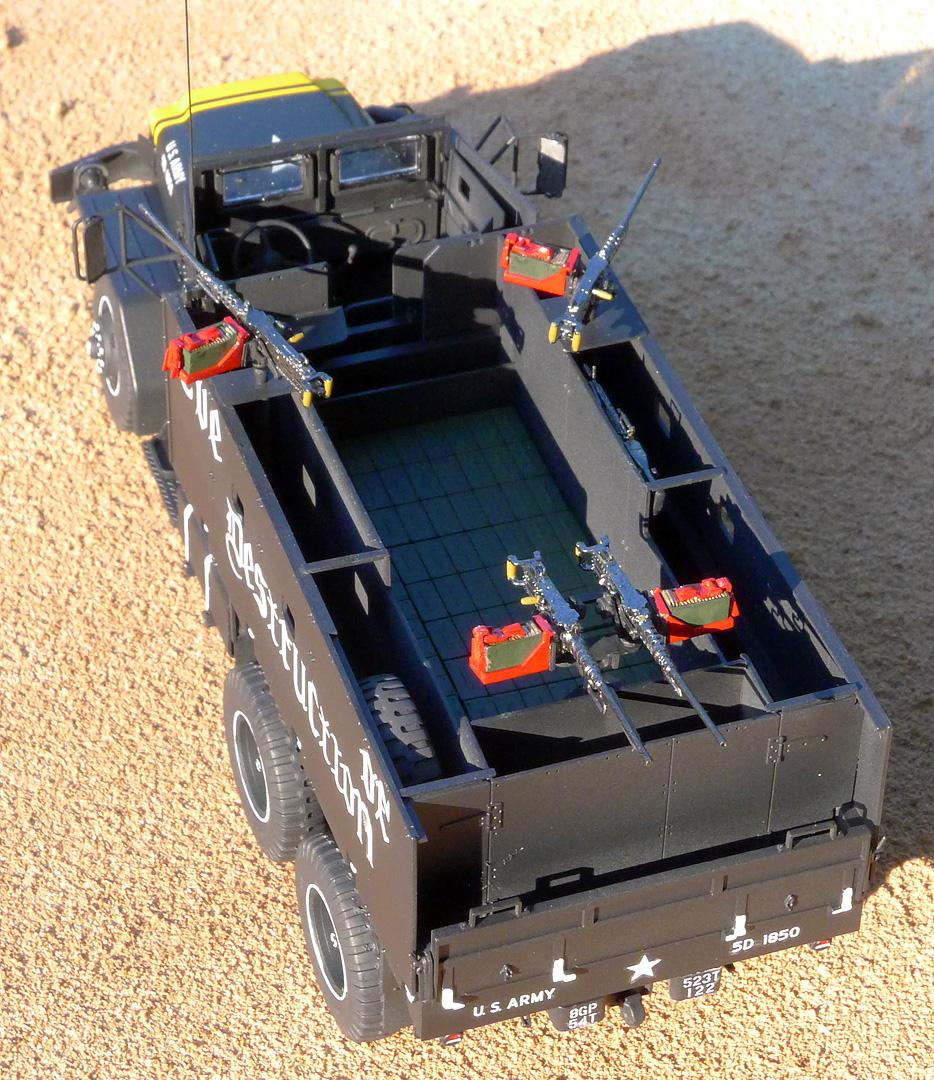
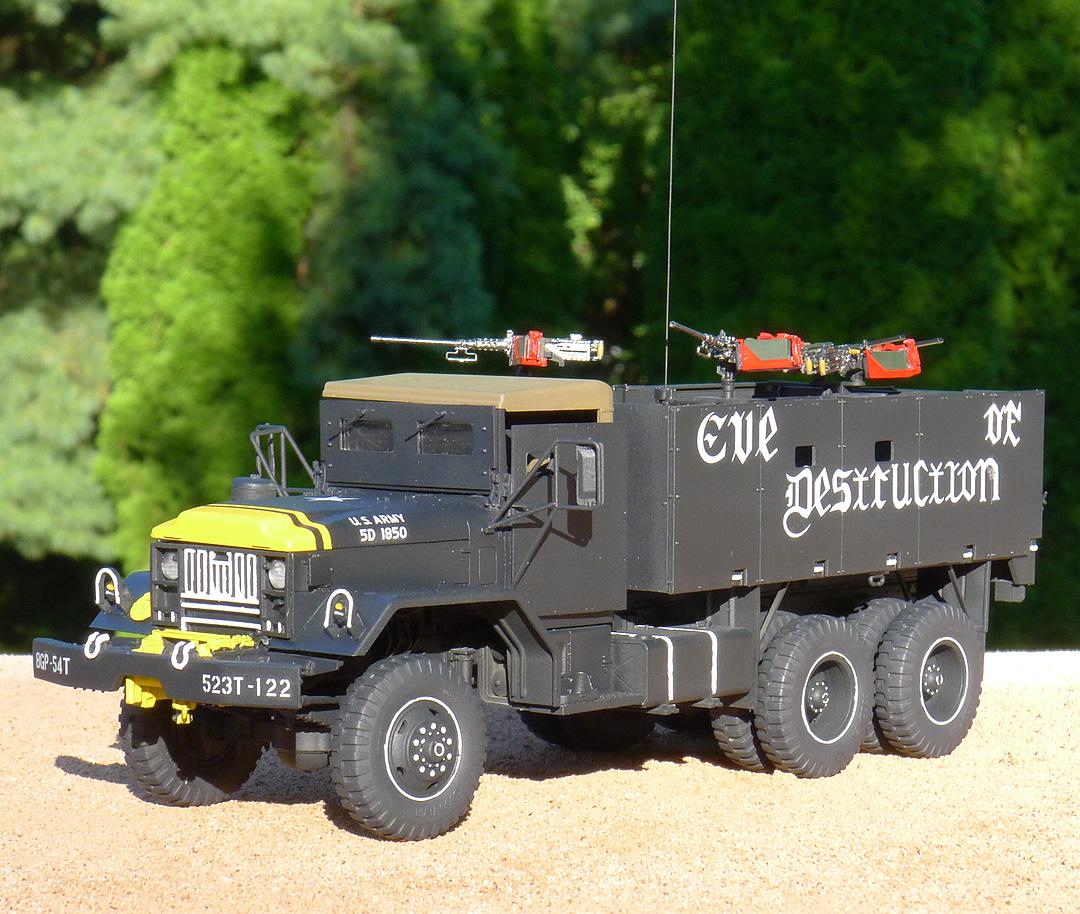
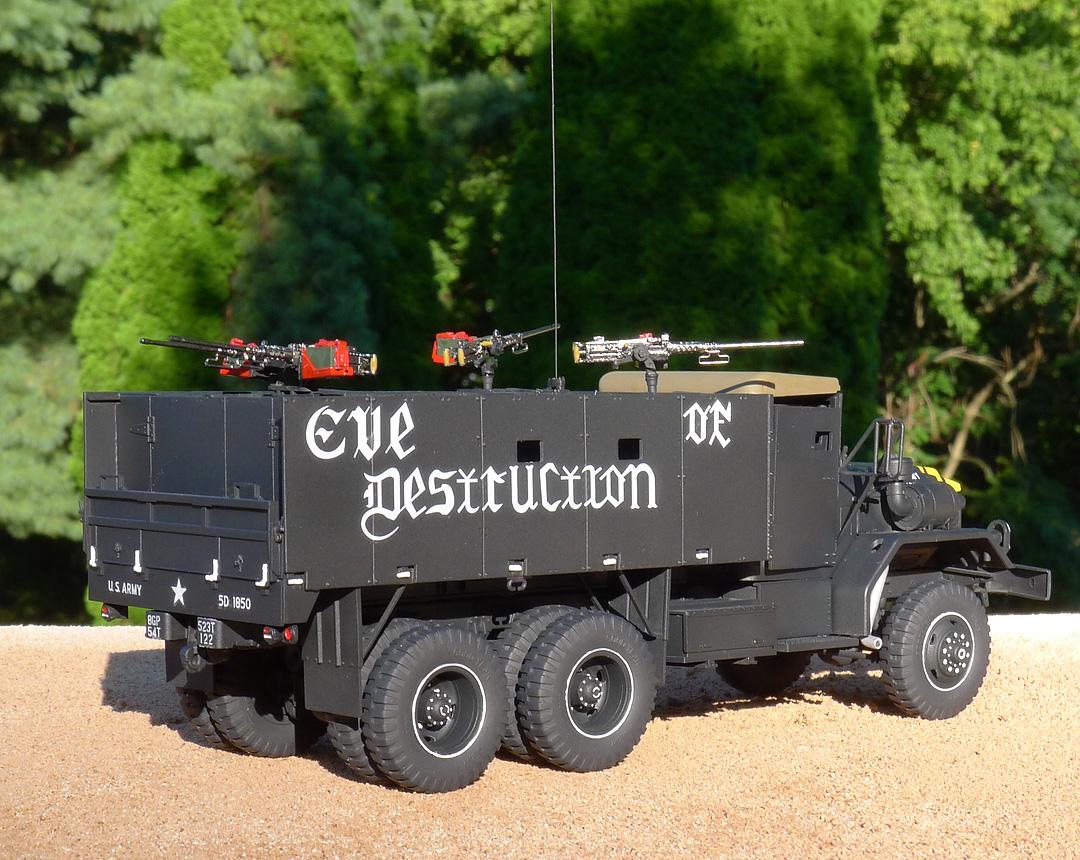
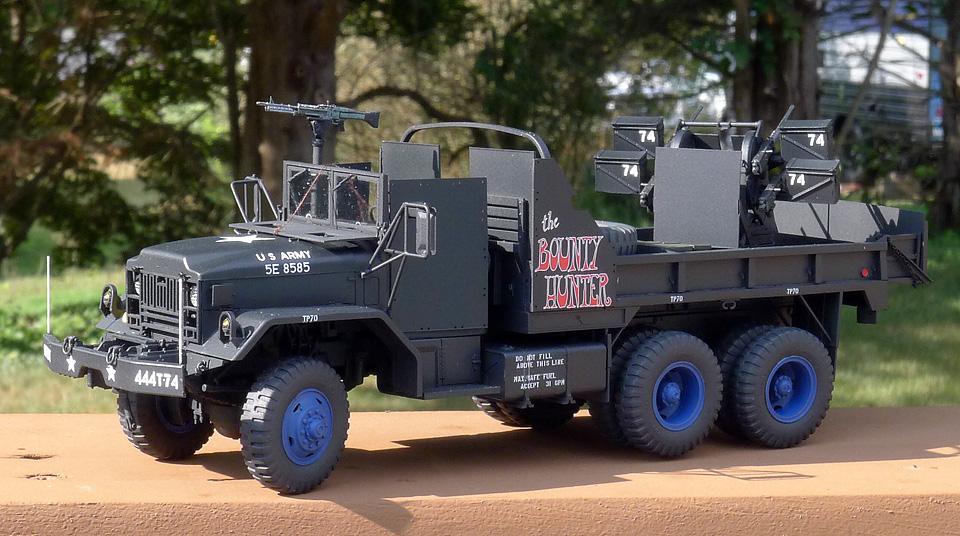
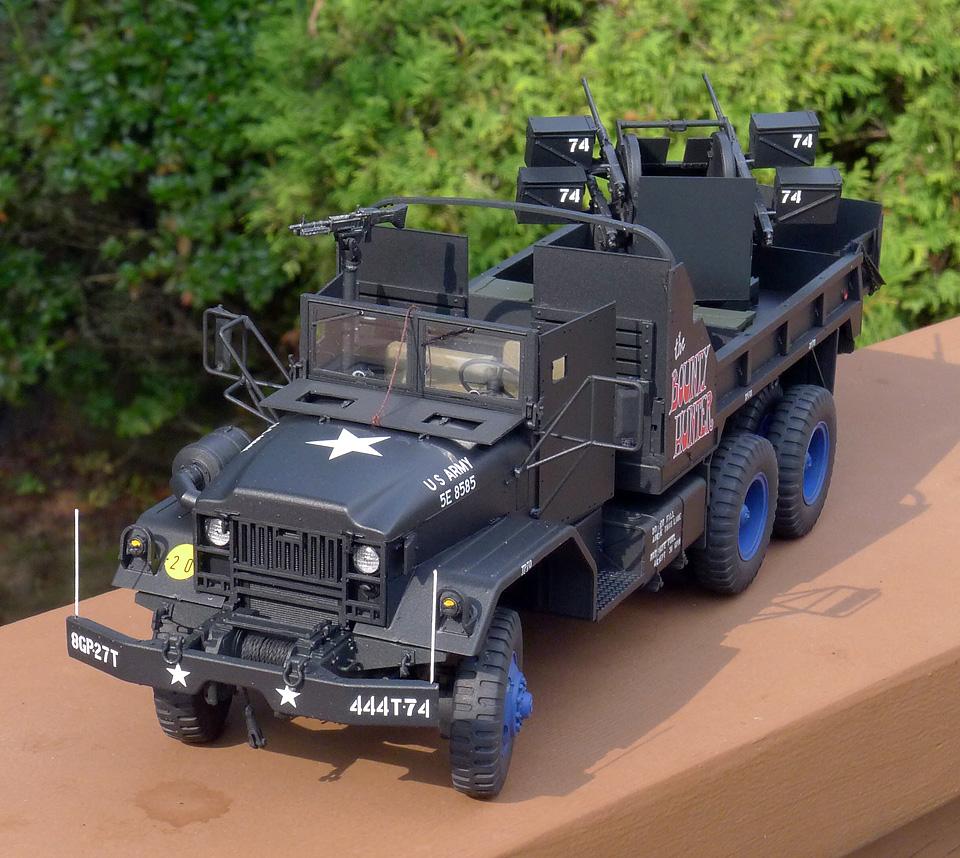
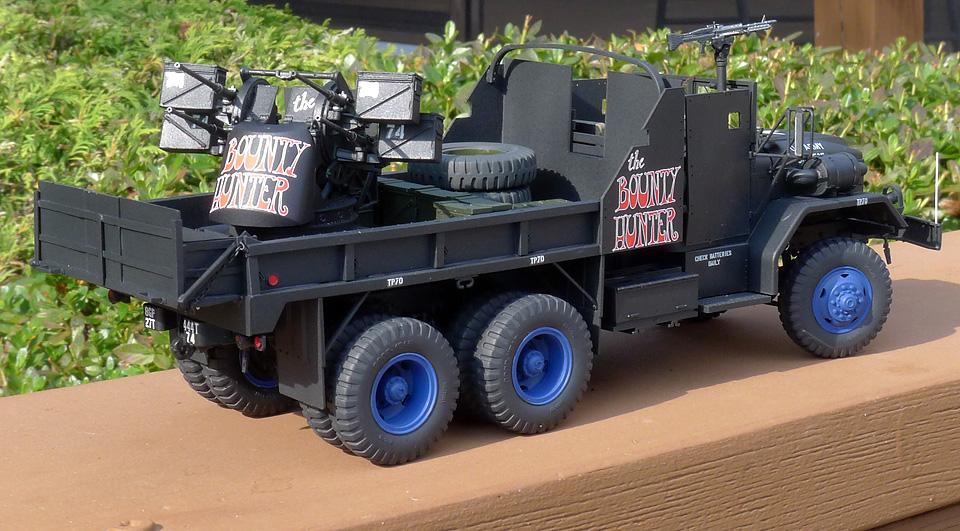
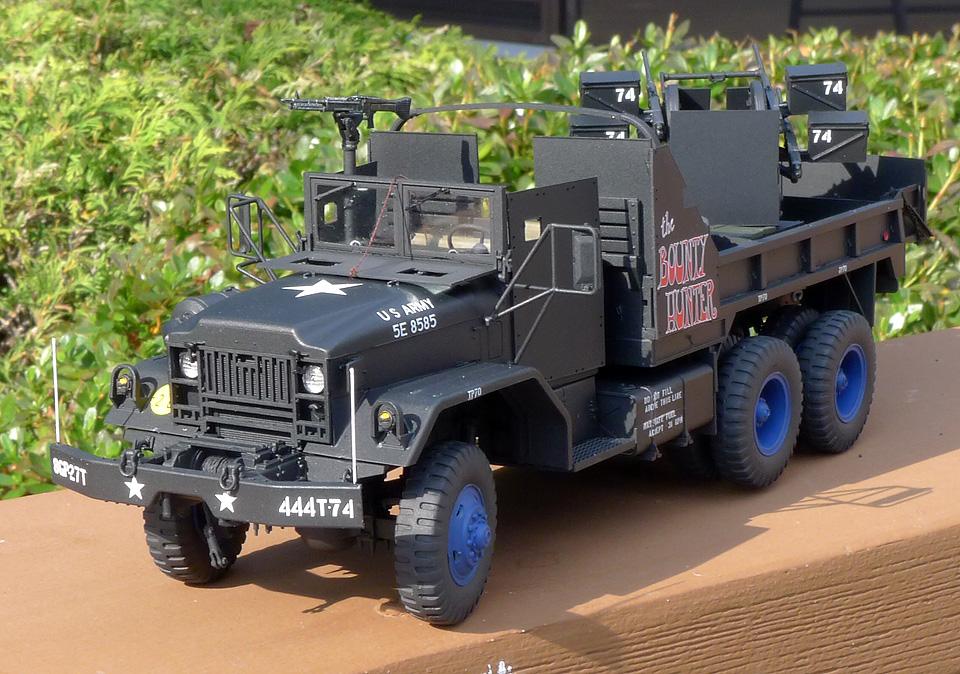
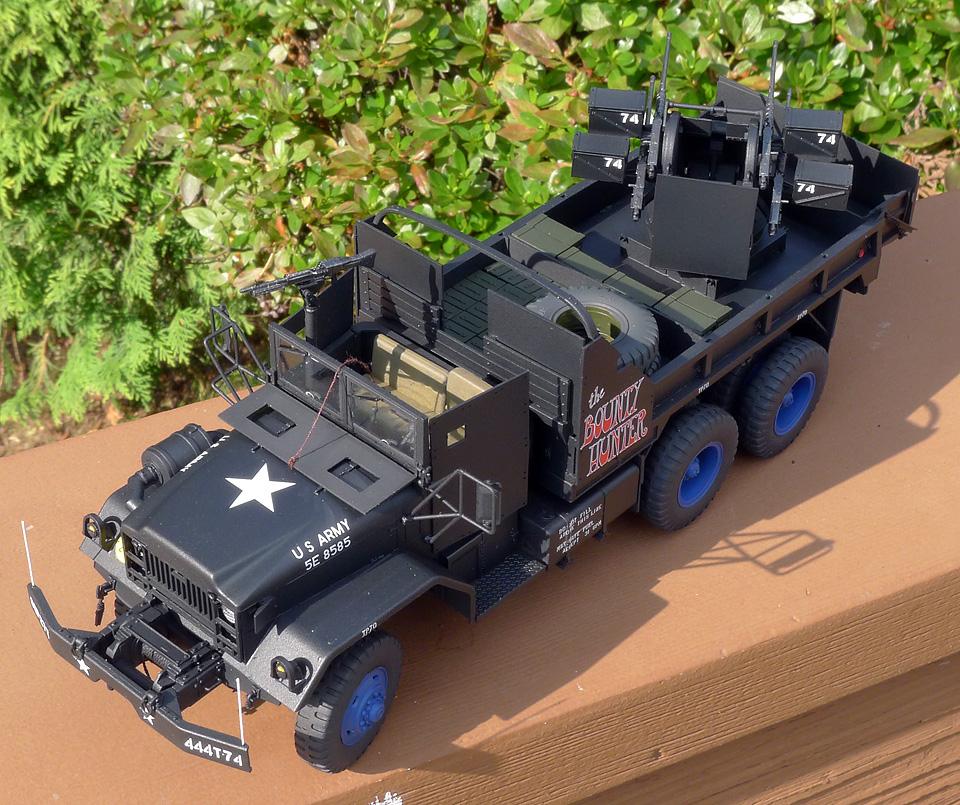
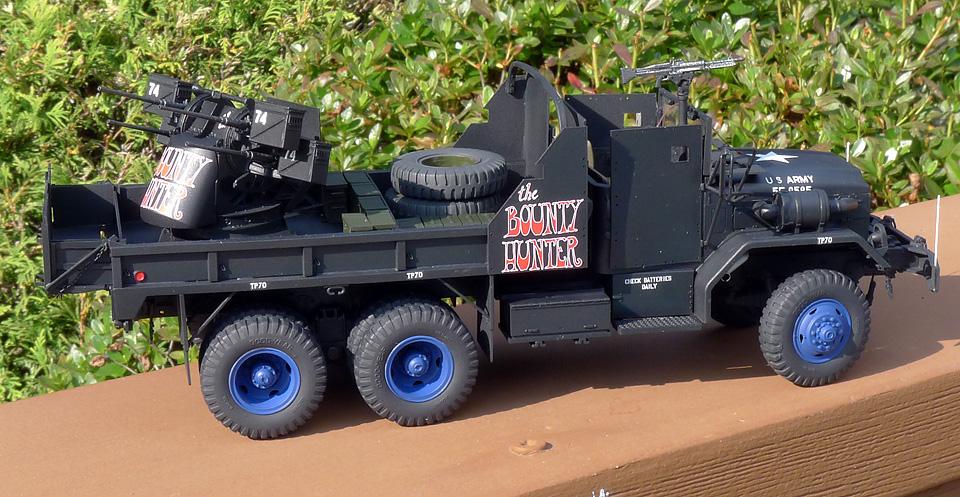
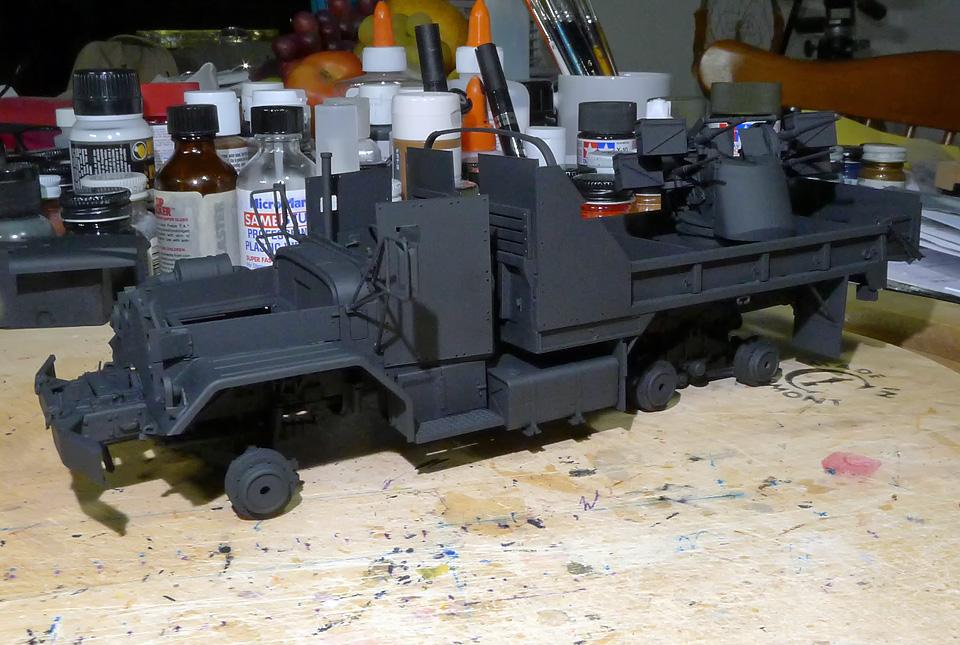
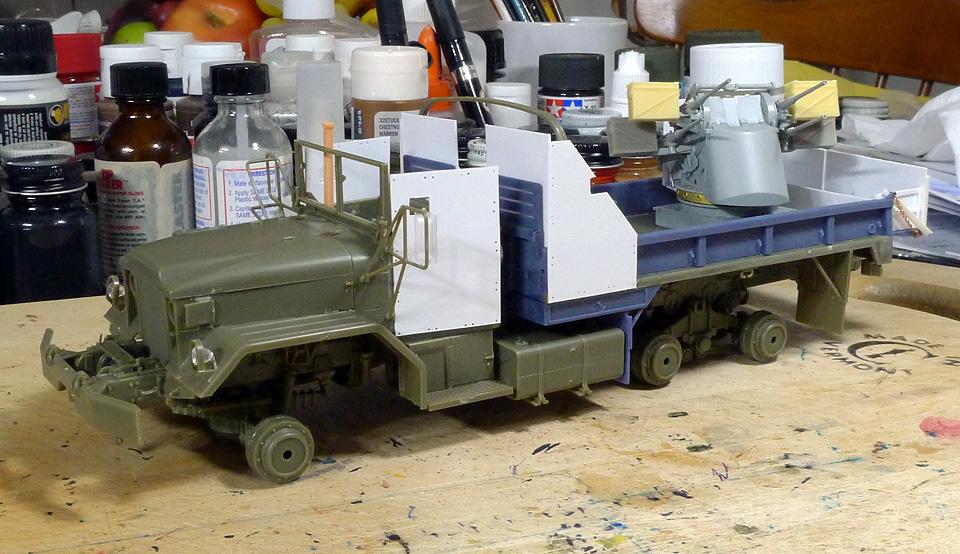
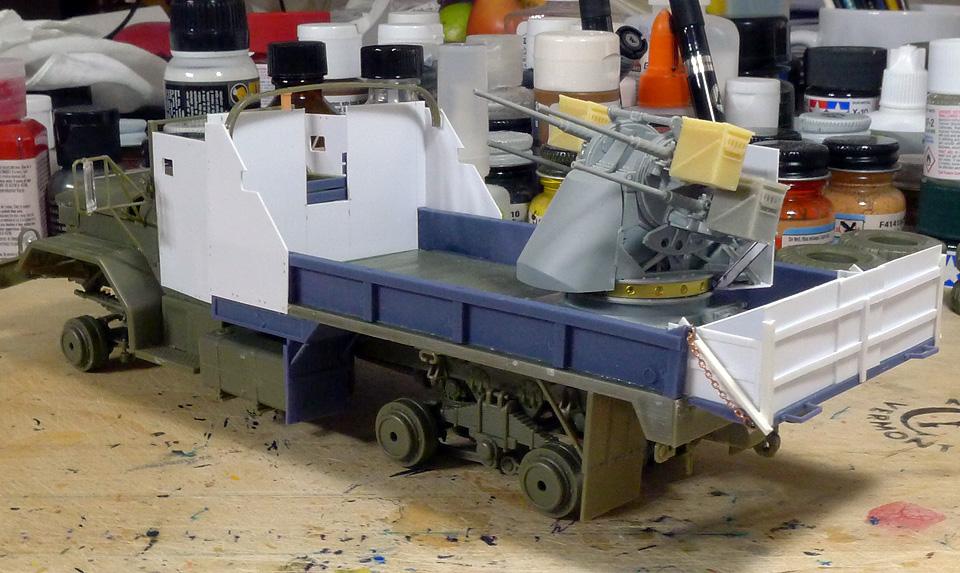
Another Vietnam gun truck, The Bounty Hunter was based on a 5 ton M54A1 truck and was in the same outfit as the M35 (deuce) Quad gun truck "Nancy". It has a quad 50 cal mounted on a trailer (minus the wheels) in the back and a single M60 in the cab. The rope to the windshield armor was to be able to raise the front armor on the fly; simply pull on the rope and the armor pivots up. This build started with the AFV Club M54A2 which was backdated to a M54A1 with 3D parts of an auction site. The Quad 50 is the Dragon kit, minus the wheels. The extra cargo storage on top of the tailgate is sheet styrene from scratch along with the dividers in the bed.
- 10 replies
-
- 10
-

-

-
It's black! Well, mostly. Custom mix, all Tamiya. Flat black with a little gloss, a touch of black-green and a few drops of blue. I also drizzled in some flat white to dull the black down (minor fading).
-
Thanks, I've got a couple more to add during final assembly. Thanks Thanks, I had color on it yesterday but didn't like the black. I re-shot it this morning with a modified black I like better. Once it sets up, I'll gloss coat prior to decals.
-
Thanks Bill. I know what you mean, I almost bought a 1974 M54 at a MV show a couple of weeks ago to convert to a GT. Had the Mack motor and lots of upgrades. Sheet metal was a little rough and it would have needed conversion back to 10 tires as it had been super-singled. I hardly have time for my M37 GT so I had to pass.
-
After some time away, I picked this build back up. It's almost ready for paint, I still need to fab the windshield armor (which will be installed in the down position). I filled the hole in the fender for the exhaust stack as the A1 variant exhaust dumped just behind the front wheel.
-
Thanks!
-
I decided I didn't like the way the mirrors looked and couldn't find any photos of them so I changed them to the stock M37 style. I also got the winch cable wrapped and removed the tall exhaust stack as I couldn't verify it's use on the M56.
-
Thank you! Thanks!
-
Thanks Jim, I'm not sure I won the good fight but the results are acceptable. Ran into a guy I know who has one at a MV show this past weekend. His doesn't have the tall exhaust stack. I may have to consult the Tech manuals and see what they are supposed to look like. The mirror brackets are a bit odd but that's what came in the kit.
-
This is another Hobby Link 1/35 scale kit. It's the last Hobby Link kit I have and I'm not likely buying any more. I decided to build it up while I had experience with these still fresh in my mind. Had the usual issues with warped parts. The soft top was warped badly at the front left corner and no amount of heating and bending would straighten it out. I dug out the other one from the Mr. Nice Guntruck kit (it was extra) but it had the same warp in the exact same place. I found a soft top from the Roden kit I used for "Malfunction" and was surprized it fit! It actually fit very well with only a small adjustment at the front corners. I realized after I took the pics that I forgot the winch cable, so that will get added sometime in the future. Paint is Tamiya over Pollyscale black primer. The color is my own mix, coming close to the Vietnam correct 24087.
-
Mack DM600/Leach Garbage Truck
Warren D replied to Scott Eriksen's topic in WIP: Model Trucks: Big Rigs and Heavy Equipment
I've bought a few Brockway cabs from him and they haven't had batt boxes nor fuel tanks. Yes, the Brockway fuel tanks are close to Mack tanks but the earlier 300 series trucks tanks look a little different than the Mack. I'm also going by the tanks and batt boxes I got from Dave at AITM which seem to look like those I see on Brocks at truck shows. -
Mack DM600/Leach Garbage Truck
Warren D replied to Scott Eriksen's topic in WIP: Model Trucks: Big Rigs and Heavy Equipment
Just curious, do you have a source for the Brockway fuel tanks and battery box/airtank? My build thread for the 361 dump: -
Mack DM600/Leach Garbage Truck
Warren D replied to Scott Eriksen's topic in WIP: Model Trucks: Big Rigs and Heavy Equipment
Just use the A-Car frame. You'll need to make mods to the 361 but it fits pretty well. I built a 361 with Montone dump for one of the annual build offs, might have been 2022.