Warren D
-
Posts
1,839 -
Joined
-
Last visited
Content Type
Profiles
Forums
Events
Gallery
Everything posted by Warren D
-
A moldelling tip for the GT crowd; GT's were kept very clean. The only time they were dirty was when they had just come back from a convoy escort. The GT crews were all volunteers from within the Transportation unit and they all took pride in their Guntruck and kept it as clean as possible. They would often wipe them down with diesel fuel, which would in turn attract more dirt/dust but you use what you can find!
-
The James Lytle series of books on the Vietnam Gun Trucks are a great reference. I have a few AFV truck kits with Real Model resin GT conversions that I'll get around to someday before I die (I better get crackin'!) I drove 5 hrs to a convention of the Gun Truckers a decade ago (maybe more) where there were several replicas in 5 ton, deuce and a half and even M151. I have each truck in it's own gallery: https://pbase.com/baywing/gun_truck_gathering I have built my own tribute GT from an M37 in 12"=1' scale....
-
Ford Levacar Mach 1
Warren D replied to bh1701's topic in All The Rest: Motorcycles, Aviation, Military, Sci-Fi, Figures
Good job, I never knew the kit nor the prototype existed. I wonder if it ever got off the ground, literally speaking -
GMC B7000/Holmes 750...
Warren D replied to Tom Hall's topic in Model Trucks: Big Rigs and Heavy Equipment
Looks great, nice job on the Holmes! -
Blue Rig Completed
Warren D replied to Chariots of Fire's topic in Model Trucks: Big Rigs and Heavy Equipment
Looks good Charles, glad to hear you're on the mend. -
Thanks! I got to run the real one last year, was good to crank the handle again, it's been many years.
-
Thanks, I did this as it was delivered, it looks a bit different today (not sure why) Thank you
-
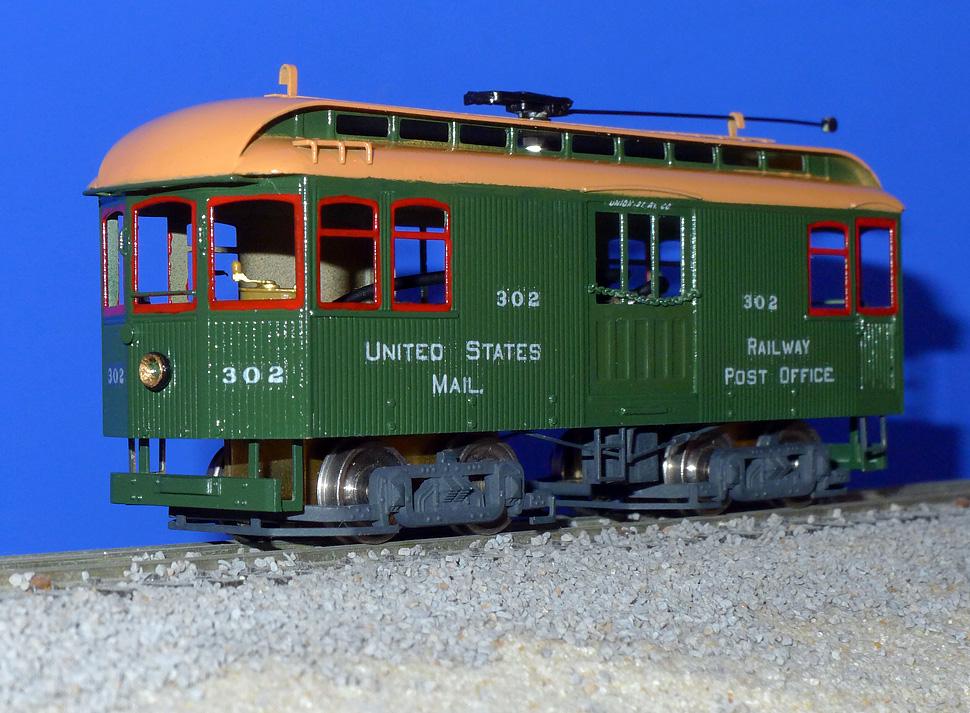
Finished painting another HO Scale brass trolley. This is the Shelburne Falls & Colrain Street Railway #10. The prototype is the only survivor of this line, built in 1896 by Wason in Springfield Ma and is on display at the Shelburne Falls Trolley Museum in MA. This brass model from Fomras dates back at least 25 years and is one of very few made (I'm thinking no more than 50, possibly 20-25). Decals were tough, the files I had access to were pixelated but did the best I could.

-
Would need to be from scratch. Thanks Thanks Thanks, I wish my hands were as steady as they were 40 years ago...... Thanks
-
This is a brass trolley made by Fomras many years ago. It is painted as the prototype (which is at the Shoreline Trolley Museum in Branford, CT) and decalled using the decals provided. Probably the most amazing thing is that the decals were still viable after over 20 years.
-
Great looking build and good photos, too!
-
Build of IH Pumper
Warren D replied to Chariots of Fire's topic in WIP: Model Trucks: Big Rigs and Heavy Equipment
Sorry to hear that Charles, hope you heal quickly. -
Chevrolet titan 90
Warren D replied to Transtar2's topic in Model Trucks: Big Rigs and Heavy Equipment
Looks good. I'm not sure if I still have my first issue build, if so, it's long overdue for a refresh. -
Build of IH Pumper
Warren D replied to Chariots of Fire's topic in WIP: Model Trucks: Big Rigs and Heavy Equipment
More great info on the foil. Do you use the regular aluminum foil or the thicker stuff? Reynolds makes both...... -
I find that resin is ok to work with, it's softer than styrene so you have to use some care not to over-do the filing/sanding. The biggest thing is to make sure any mold release is removed. A good primer also helps, since I can't get Mr. Resin primer anymore, I just use standard auto primer (Rustoleum). Light coats work best. The hardest part of resin cab builds for me is fitting to the chassis. If it's a cab without interior that adds to the build time. I'm not wild about the resin that 3D printers use, it's extremely hard and brittle. The cast resin is better, at least in MHO and YMMV.
-
Fruehauf Flatbed
Warren D replied to DRIPTROIT 71's topic in Model Trucks: Big Rigs and Heavy Equipment
Nice job with the detail on the wood deck. -
International 9670 KFS
Warren D replied to Hessel Hemstra's topic in Model Trucks: Big Rigs and Heavy Equipment
Very well executed! -
Well done. We never had pups in Southern New England when I was growing up, streets are too tight.
-
Build of IH Pumper
Warren D replied to Chariots of Fire's topic in WIP: Model Trucks: Big Rigs and Heavy Equipment
I think Charles has illustrated a great point in this last post; a thorough knowledge of your subject allows the level of detail that results in accurate models of exceptional quality! -
Nice looking rig!
-
Nice job combining the kits.
-
As far as I'm concerned, yes. However, that is based on what was used in New England in the 70's-2000's. There are still some out there but they are being replaced by newer technologies. I have some pics of the one I built for a municipal (and State DOT) plow: https://pbase.com/baywing/int2500
-
Good start. You can easily make a Tenco style sander from sheet styrene.
-
AMT Kenworth Challenge mixer 1/25
Warren D replied to truckabilly's topic in Model Trucks: Big Rigs and Heavy Equipment
Good looking mixer, the weathering is very well done. -
Looks good