.jpg.7ae93378f58257dc007f520a97a7ea39.jpg)
ReduitRetro
-
Posts
166 -
Joined
-
Last visited
Content Type
Profiles
Forums
Events
Gallery
Everything posted by ReduitRetro
-
.thumb.jpg.a5679105adee4a23d3390e3f0f3abfd0.jpg) Yes, I will be using dual air cleaners on this build, I have an old Ebay junkyard build I bought several years ago just for spare parts. From just casually looking at Vortex air cleaners, they appear to be basically the same size around as the one in the kit, but a little taller in profile, mainly because of the outer polished intake screen between the main canister and the lid. On another subject is the "baby moon" wheel hub covers, I know I want to have them on the drive hubs, but not sure on the steers. Anyway, thanks for your help, and I'll see about getting some dimensions.
Yes, I will be using dual air cleaners on this build, I have an old Ebay junkyard build I bought several years ago just for spare parts. From just casually looking at Vortex air cleaners, they appear to be basically the same size around as the one in the kit, but a little taller in profile, mainly because of the outer polished intake screen between the main canister and the lid. On another subject is the "baby moon" wheel hub covers, I know I want to have them on the drive hubs, but not sure on the steers. Anyway, thanks for your help, and I'll see about getting some dimensions. -
Thanks again Ron, I will be using the stock tires in the kit for steers, and later on for the trailer, as I plan to scratch build a food grade tanker for the completed truck. I cant remember the seller on Ebay without looking, but I purchased a set of Peterbilt "oval" holed styled wheels, and another seller had "lugged" drives that I also purchased. I don't know if I will use the stock bumper, or a Texas bumper, or the stock air cleaners or Vortex units. The bumper would be easy to make, but the Vortex air cleaners would be nice to have if you can 3D print those.
-
No, everything was scratch built with the exception the transmission, fan, oil and fuel filters, alternator, starter, and turbochargers. These parts were removed from the kit supplied Caterpillar V-8 and in some cases highly modified to work with this build.
-
Yes, I,m currently trying to determine which transmission I plan to represent on this build. I know I don't want to do an 18 speed, due to it kinda being overkill, so i'm leaning 13 speed. Once I lock down which 13 i'd like to model, and rather or not it will have an external filter and cooler, i'll get it plumbed up. Any feedback would be appreciated. I've been driving big trucks for over 25 years, and currently drive for a well known worldwide freight/shipping company, so a lot of the old school truck info I,m gathering from tech sheets and reference photos. Thanks again for your interest.
-
Hello, wasn't sure how to let members who were following this build know the engine was completed, so I just started another post topic. Please refer to the "Big Scale Big Cam Pete 359" in the WIP section for details on this build. I'm building a stretched frame, long hood version, '79 Peterbilt 359, with steerable front wheels, custom tanks, tool boxes, opening cab doors, custom Pete oval 10 hole wheels, with a fully hosed and wired engine and chassis, and scratch built smooth bore food grade tanker trailer to top things off. A big project, but with the caliber of my fellow builders here, you must step your game up from time to time. Thanks again!

-
Lol!...thank you sir, I got lucky with the hose material you mentioned. It is the elastic string that new clothing, shoes, etc, would have attaching their sales or info tags. It comes in several different sizes, and I normally use it for glad hand hoses on my 1/25 scale builds. And no, I've only used Chevron Delo 400 in this engine since new.
-
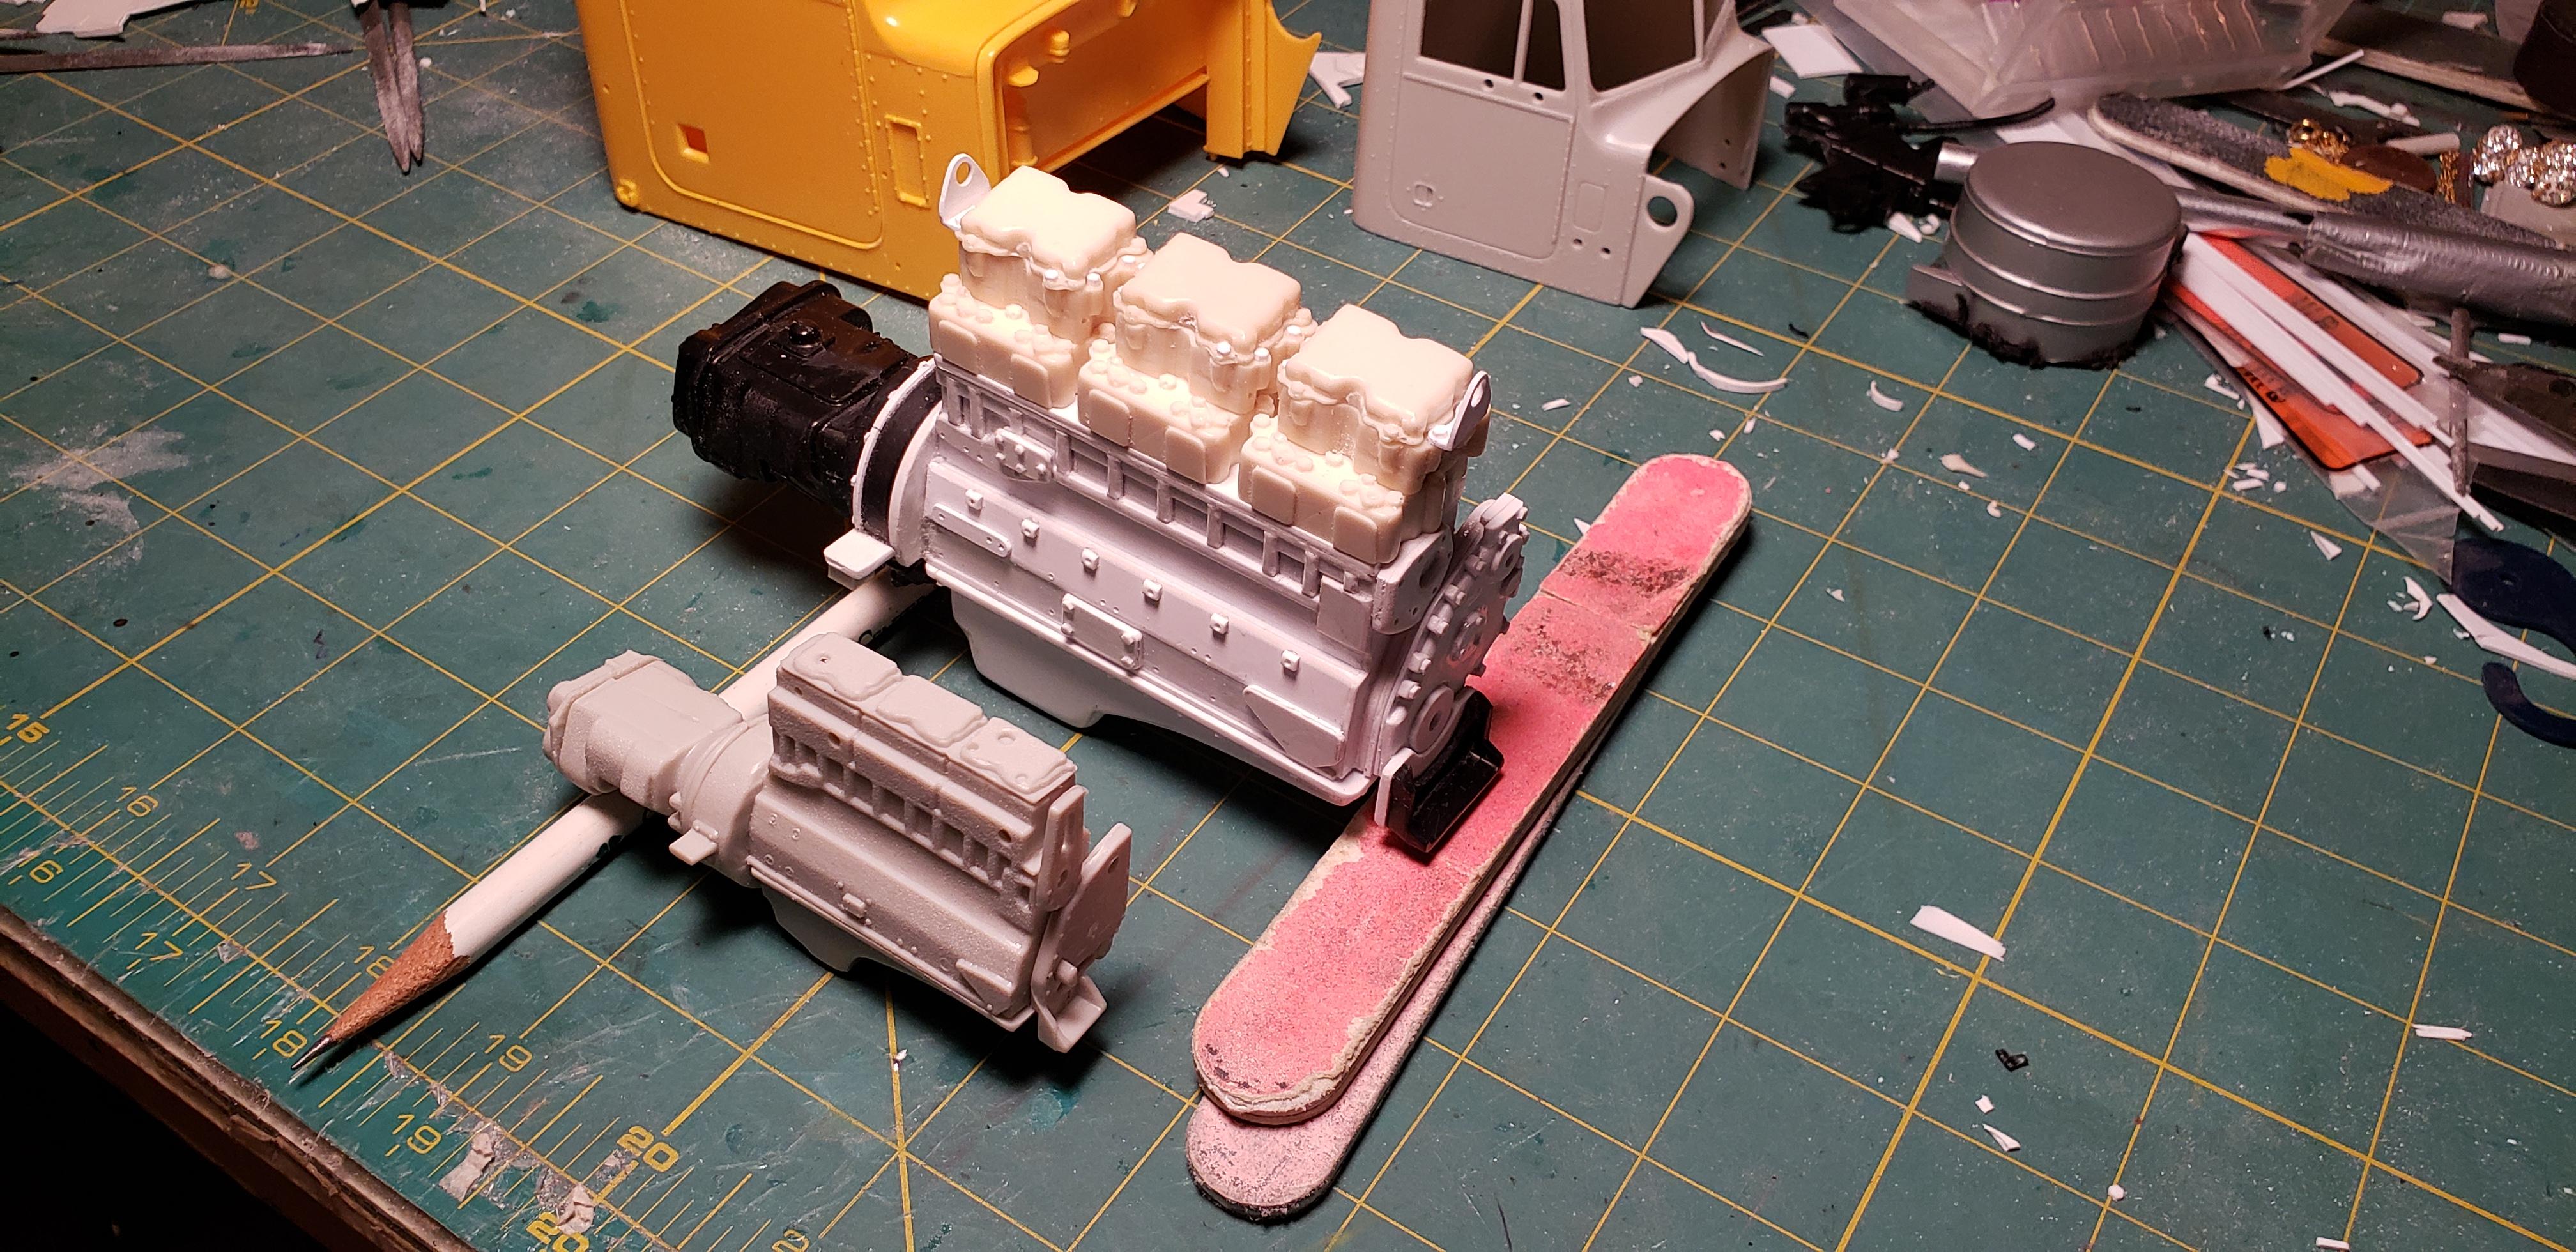
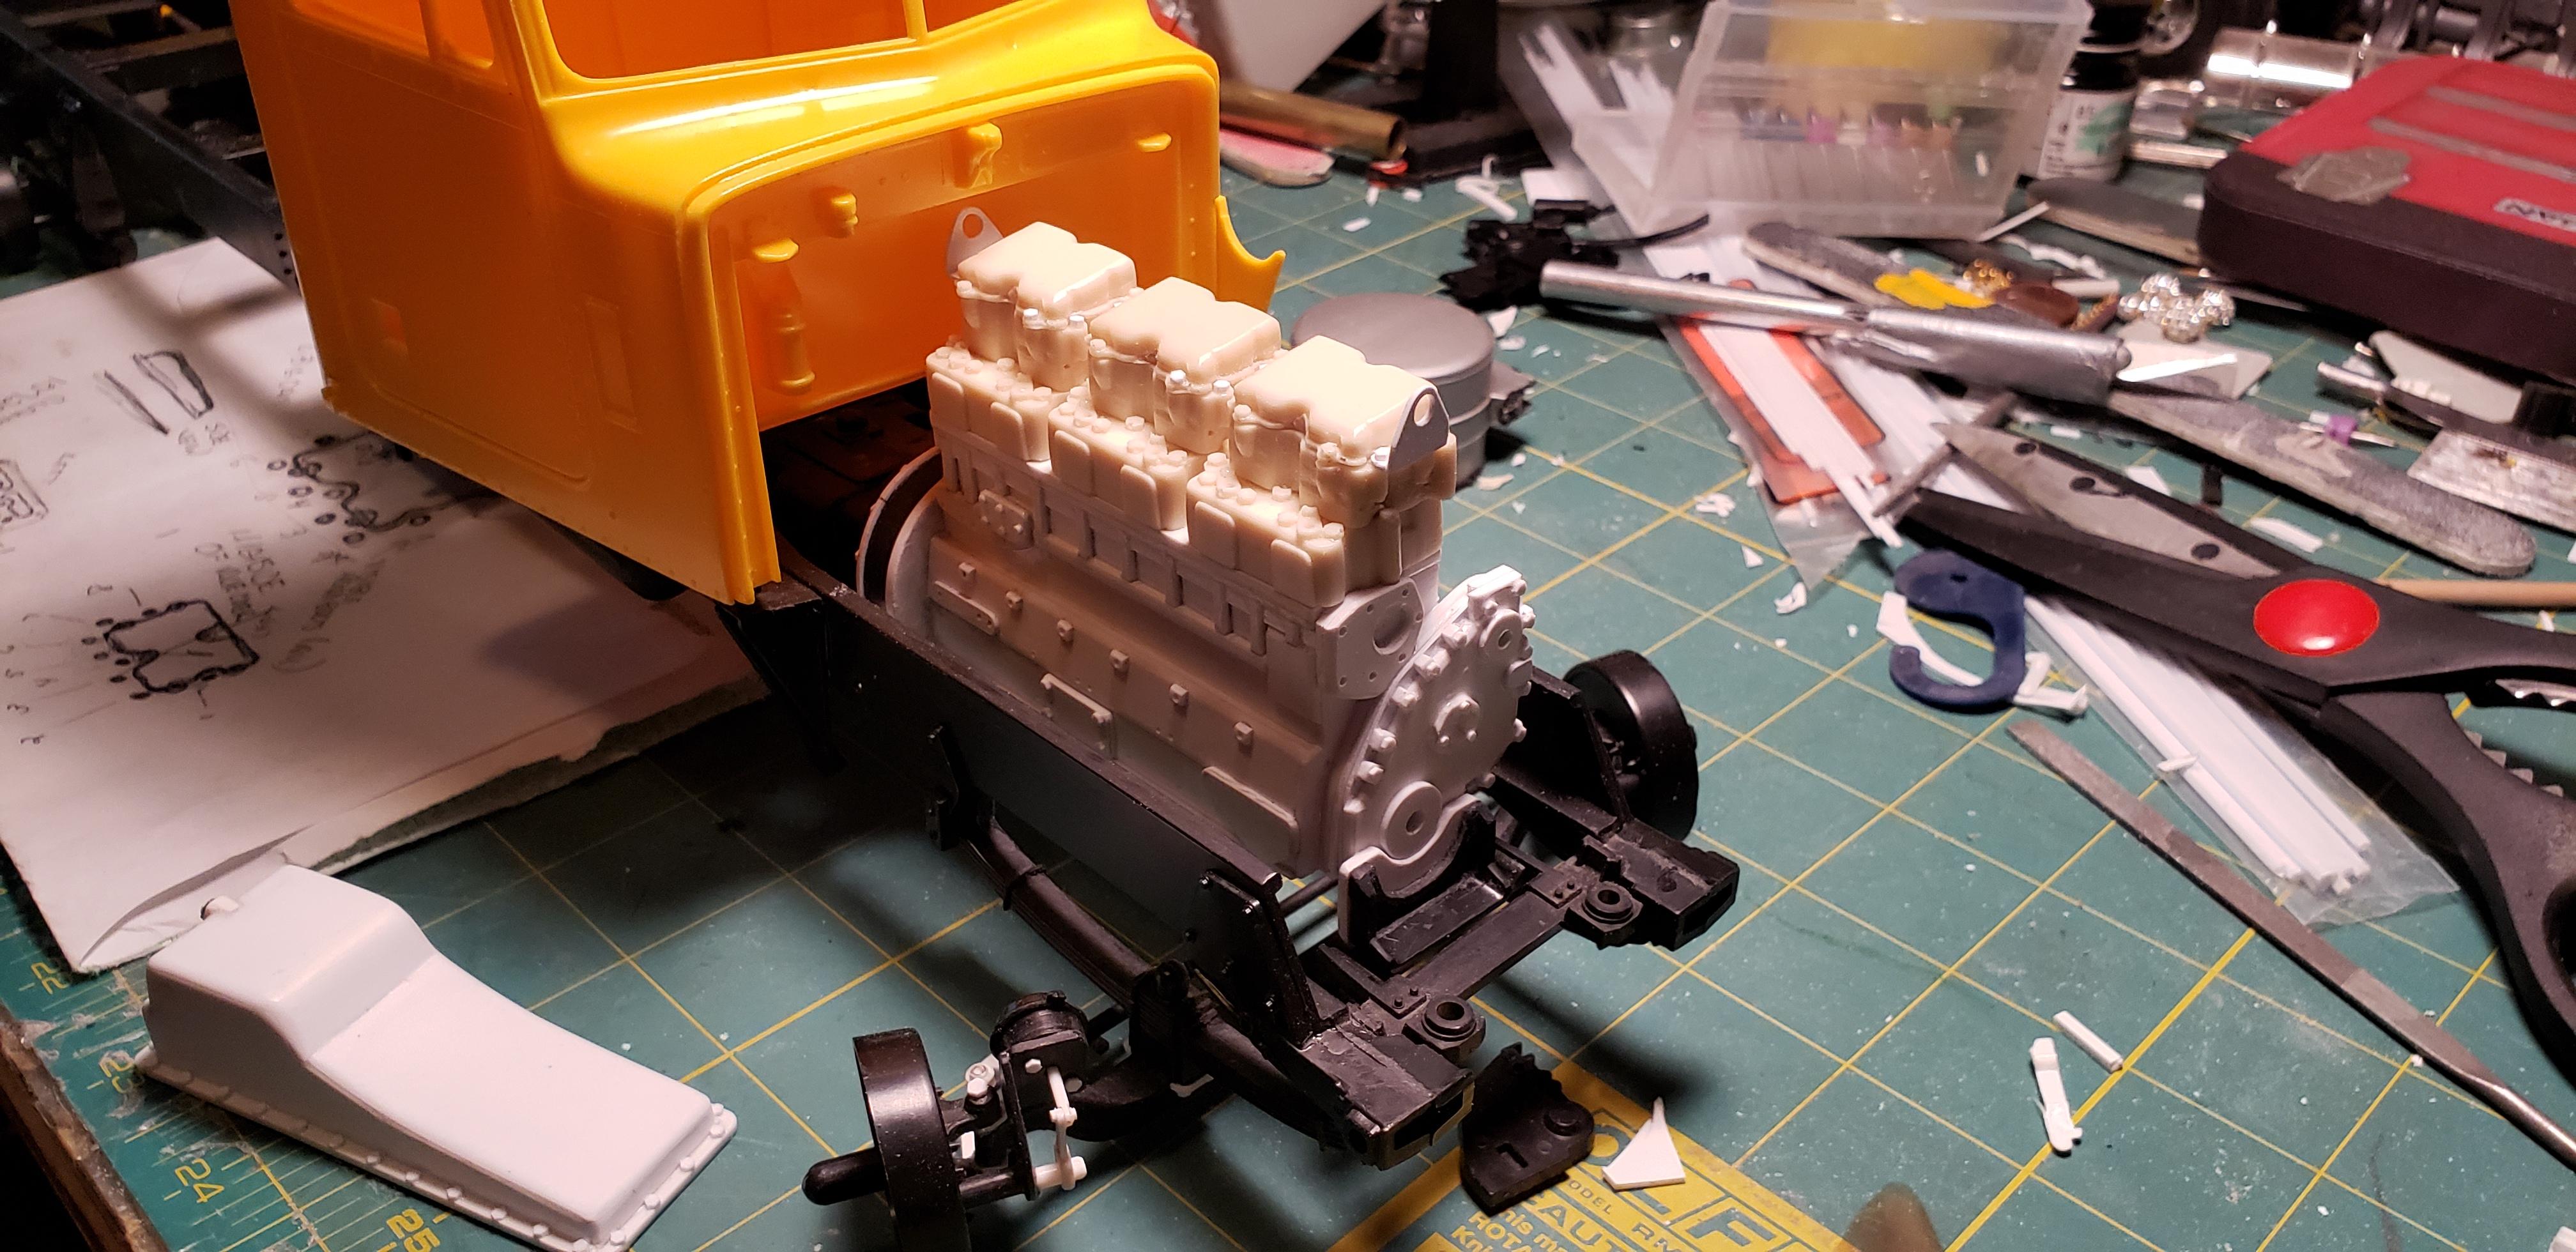
Hello again everyone, I have pretty much completed the engine at this point, and will be setting it aside to turn my attention to the rest of this truck build. As stated earlier, this engine is indeed 95% scratch built with the exception of a few modified components from the kit supplied Cat 3408 V8. This particular 1/16 scale Cummins NTC-475 Twin Turbo inline 6 features parts such as: Horton pneumatic fan clutch, Holset turbochargers, York a/c compressor, Fleetgaurd fuel and oil filters, Delco Remy alternator, and AlliedSignal air compressor to name a few. Once installed in the truck it will of course be plumbed and wired, as well as the chassis. As you can see the engine was slightly weathered, as I really wanted it to appear to have had some miles on it since its last "in frame" service. Thanks again for following along on this build, and your feedback, comments, and suggestions are greatly appreciated.
-
Cattleman's Classic Cabover
ReduitRetro replied to ReduitRetro's topic in Model Trucks: Big Rigs and Heavy Equipment
Thankyou, I myself have been building models since the mid 1970's. My late Grandfather introduced the hobby to me, as his oldest son ( my uncle) built models before he joined the military in the early 60's. Unfortunately, he was killed while serving in the Army in 1968. I guess my Grandfather thought I would enjoy models also ...and he was right. Thanks again to you and all who enjoy my builds. -
Thankyou!..you do indeed have a very good eye there noticing that tensioner pulley bolt!
-
Thanks for the feedback, yes this is 1/16 scale.
-
Yes, it appears I did forget those lines. From pictures it looks like one line goes into the water pump itself, or the block just behind it, and the other to the water manifold as you stated, at the forward coolant manifold bypass tube junction block. I will add these lines, as I need to better replicate the a/c compressor mounting brackets and the aftercooler inlet tube before I begin painting. Thanks again.
-
A "Complete Bull" Hauler
ReduitRetro replied to ReduitRetro's topic in WIP: Model Trucks: Big Rigs and Heavy Equipment
Hello fellas, Just to let everyone know I may not have linked the updates to this build correctly. I believe this was the first of a total 3 installments on this build. They are titled Complete Bull Hauler part 2, and Complete Bull Hauler 3. Please check them out for the complete W.I.P. build. For the completed Under Glass presentation, look for the posting titled Cattleman's Classic Cabover. Thanks. -
Hello again gang! Sorry for the delay in uploads, but we all know how things can go when life continues to get in the way of plans. I've basically completed the engine at this point, and with the recommendation of Ron from my earlier post, I did go ahead and decide to do a variant of the Cummins BigCam , and done the somewhat infamous NTC-475 Twin Turbo. As stated in my last post, I simply did not want to use the kit supplied Cat 3408, so feeling adventurous, I decided to scratch build a Cummins instead. Lots of work went in to this engine, with everything being made , or highly modified to represent the exterior components on the engine. Items such as the coolant manifold, oil cooler, water pump, after cooler, hydraulic steering pump, exhaust manifold, a/c compressor, belt pulleys, brackets, hoses and piping, fuel lines, etc...all hand to be hand fabricated. These pics are all of the completed work in bare plastic (in the raw). So please stay tuned for my next upload, as the engine will be painted, and somewhat weathered. Again, thanks for your continued interest.
-
Big Scale "BigCam" Pete 359
ReduitRetro replied to ReduitRetro's topic in WIP: Model Trucks: Big Rigs and Heavy Equipment
Hey Ron, I'm currently scratch building the water pump, water manifold, and the twin turbo 475 exhaust manifold...again, that was a great idea on doing that engine variation. I'm hoping to be uploading more pics within the next week, and definitely within 2 weeks. Thank you for your and others interest in this build, as it helps drive me forward this project. -
Big Scale "BigCam" Pete 359
ReduitRetro replied to ReduitRetro's topic in WIP: Model Trucks: Big Rigs and Heavy Equipment
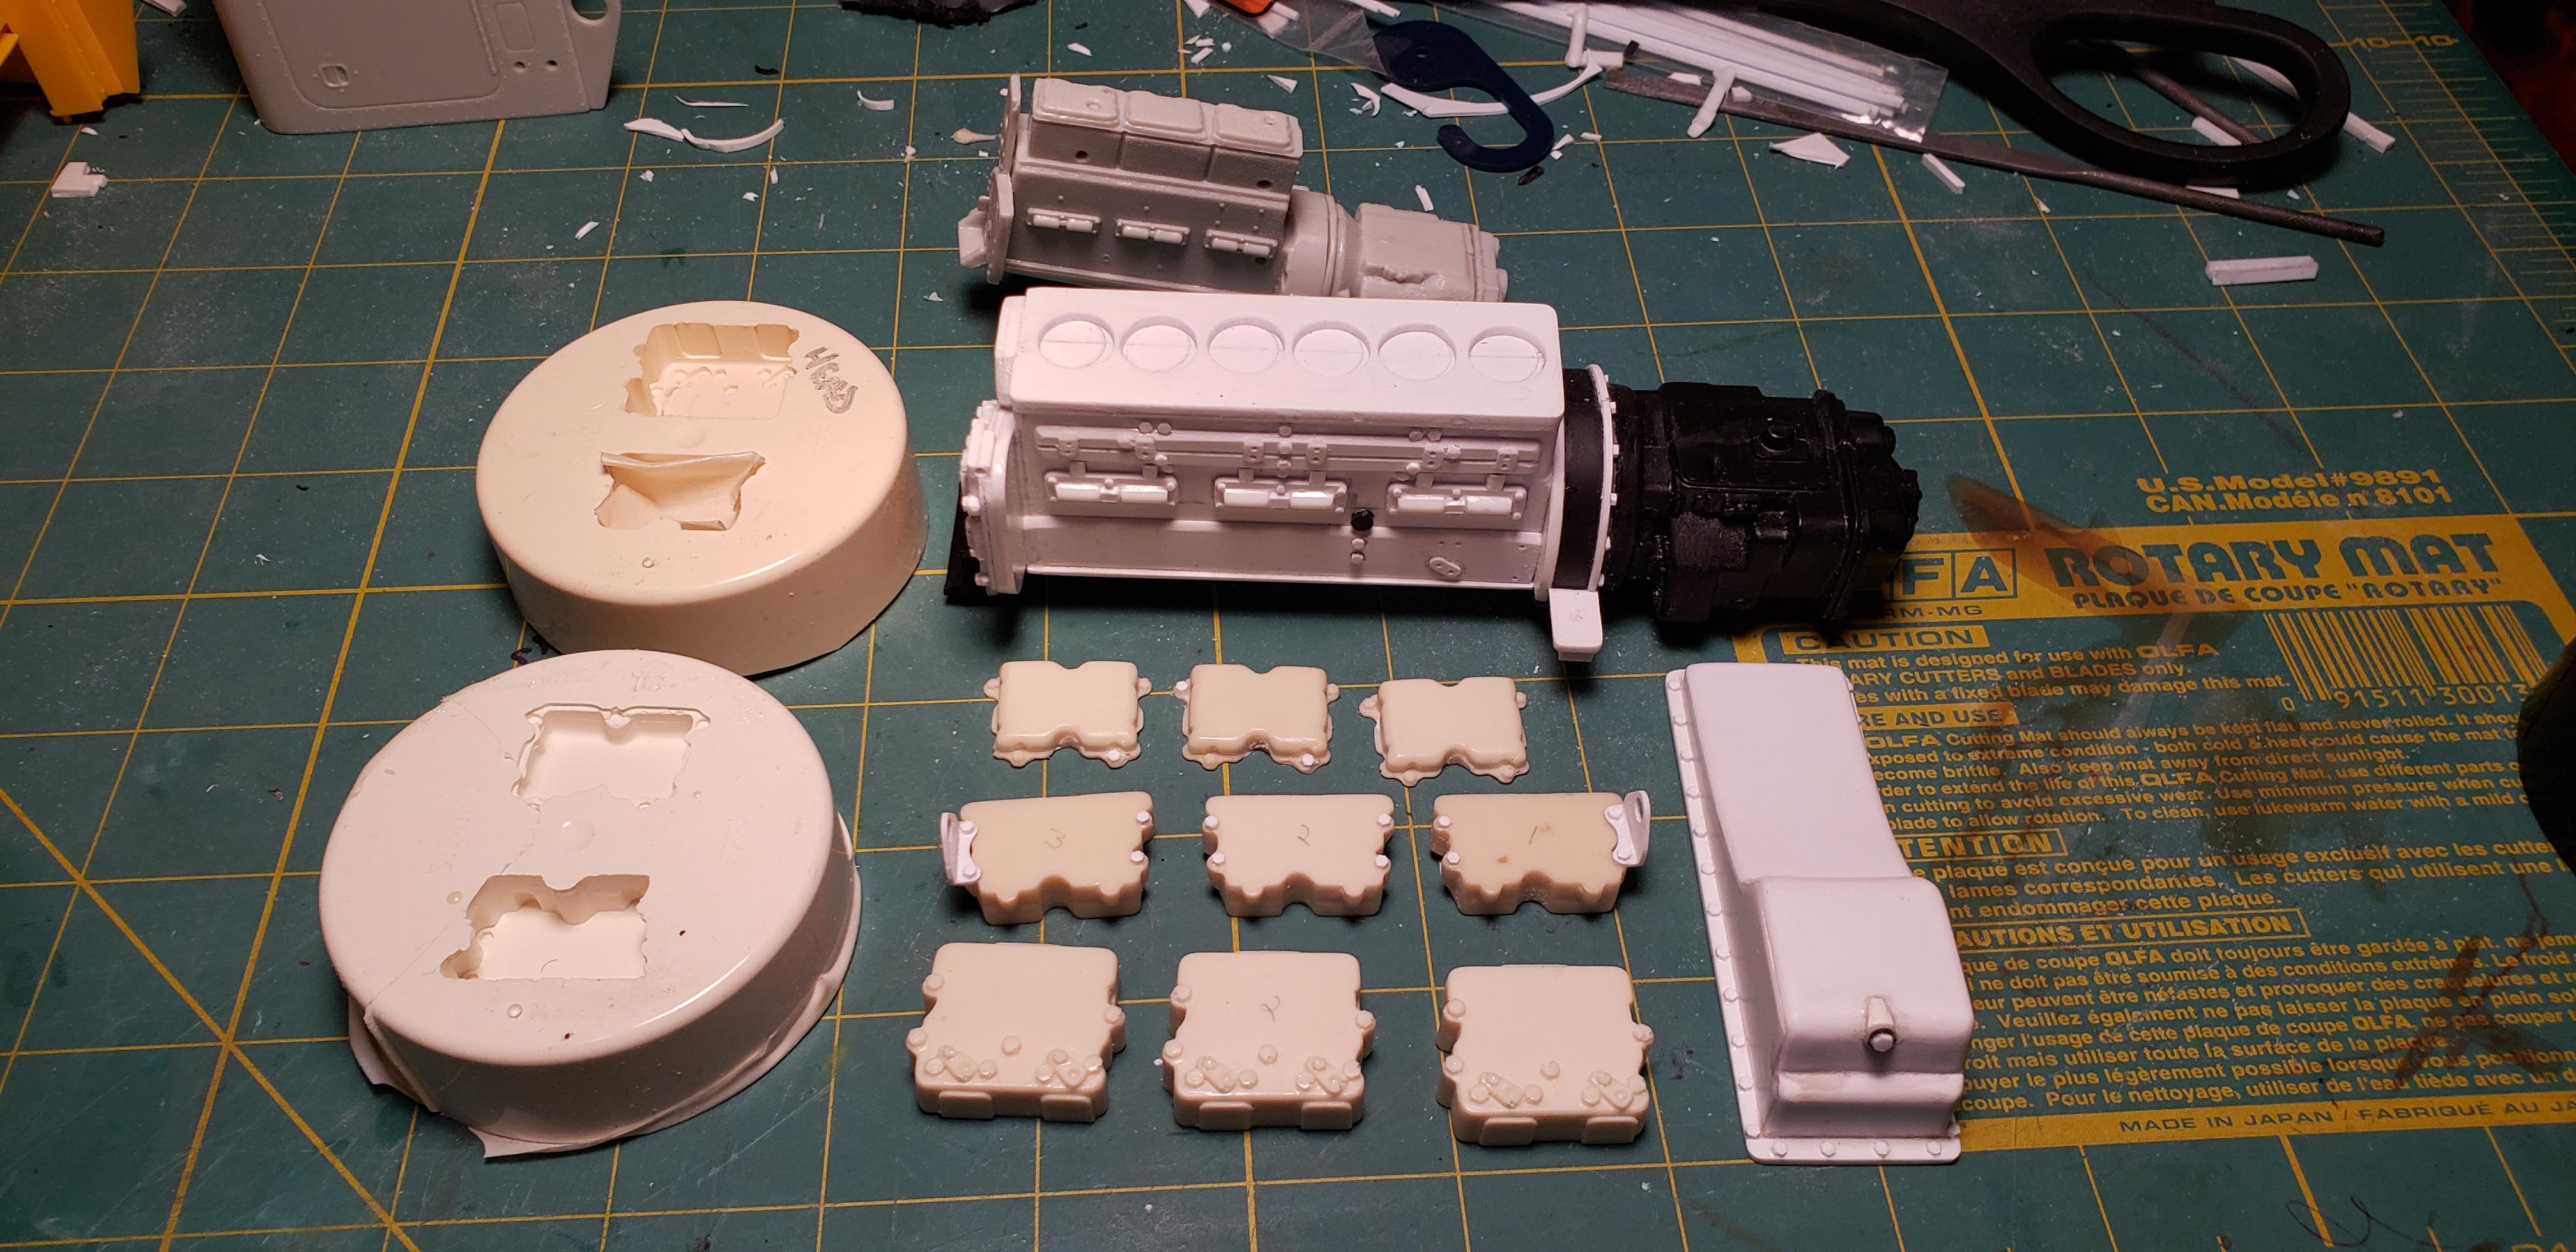
This resin engine kit definitely could have saved me a little time. Generally the casting is close, although somewhat simplified when it comes to the cylinder head(#2) which is pictured on your instructions, but I didn't see it in your parts layout. Cummins engines of this era used three separate heads dedicated to two cylinders each, but the rocker box/valve cover combinations are close enough. Still, would have loved to have gotten my hands on one though! -
Big Scale "BigCam" Pete 359
ReduitRetro replied to ReduitRetro's topic in WIP: Model Trucks: Big Rigs and Heavy Equipment
Hello Chuck, yes I remember these engines for sale on Ebay years ago, that's what put the idea in my mind on changing the engine in my Pete. I definitely remember the Detroit 8V-92 , but I couldn't remember if a Cummins was available by this seller. I did look for it on Ebay, but with no luck, so I decided to build my own. I wish I would have made a cast for the block after I scratch built it, so I could reproduce it for someone wanting to do the same thing for their build. Anyway, thanks for following, and I'll be posting more pics soon. -
Big Scale "BigCam" Pete 359
ReduitRetro replied to ReduitRetro's topic in WIP: Model Trucks: Big Rigs and Heavy Equipment
Hello Ron, That's a great idea on the twin turbo Cummins. I kind of forgot about the NTC-475, partly because you hardly see them. Since I still haven't made my mind up on exactly which engine after-cooler design I'm going with, this is definitely a possibility. I happen to have an unbuilt 1/25 Revell Pete "Can-Do" wrecker that happens to have this exact motor in it, so I'll have a good base to scale up from should I decide to go this direction. Thanks again for the suggestion, and I plan on posting more progress pics soon. And Ron, if I decide to do this engine, I'll give you all due credit sir! -
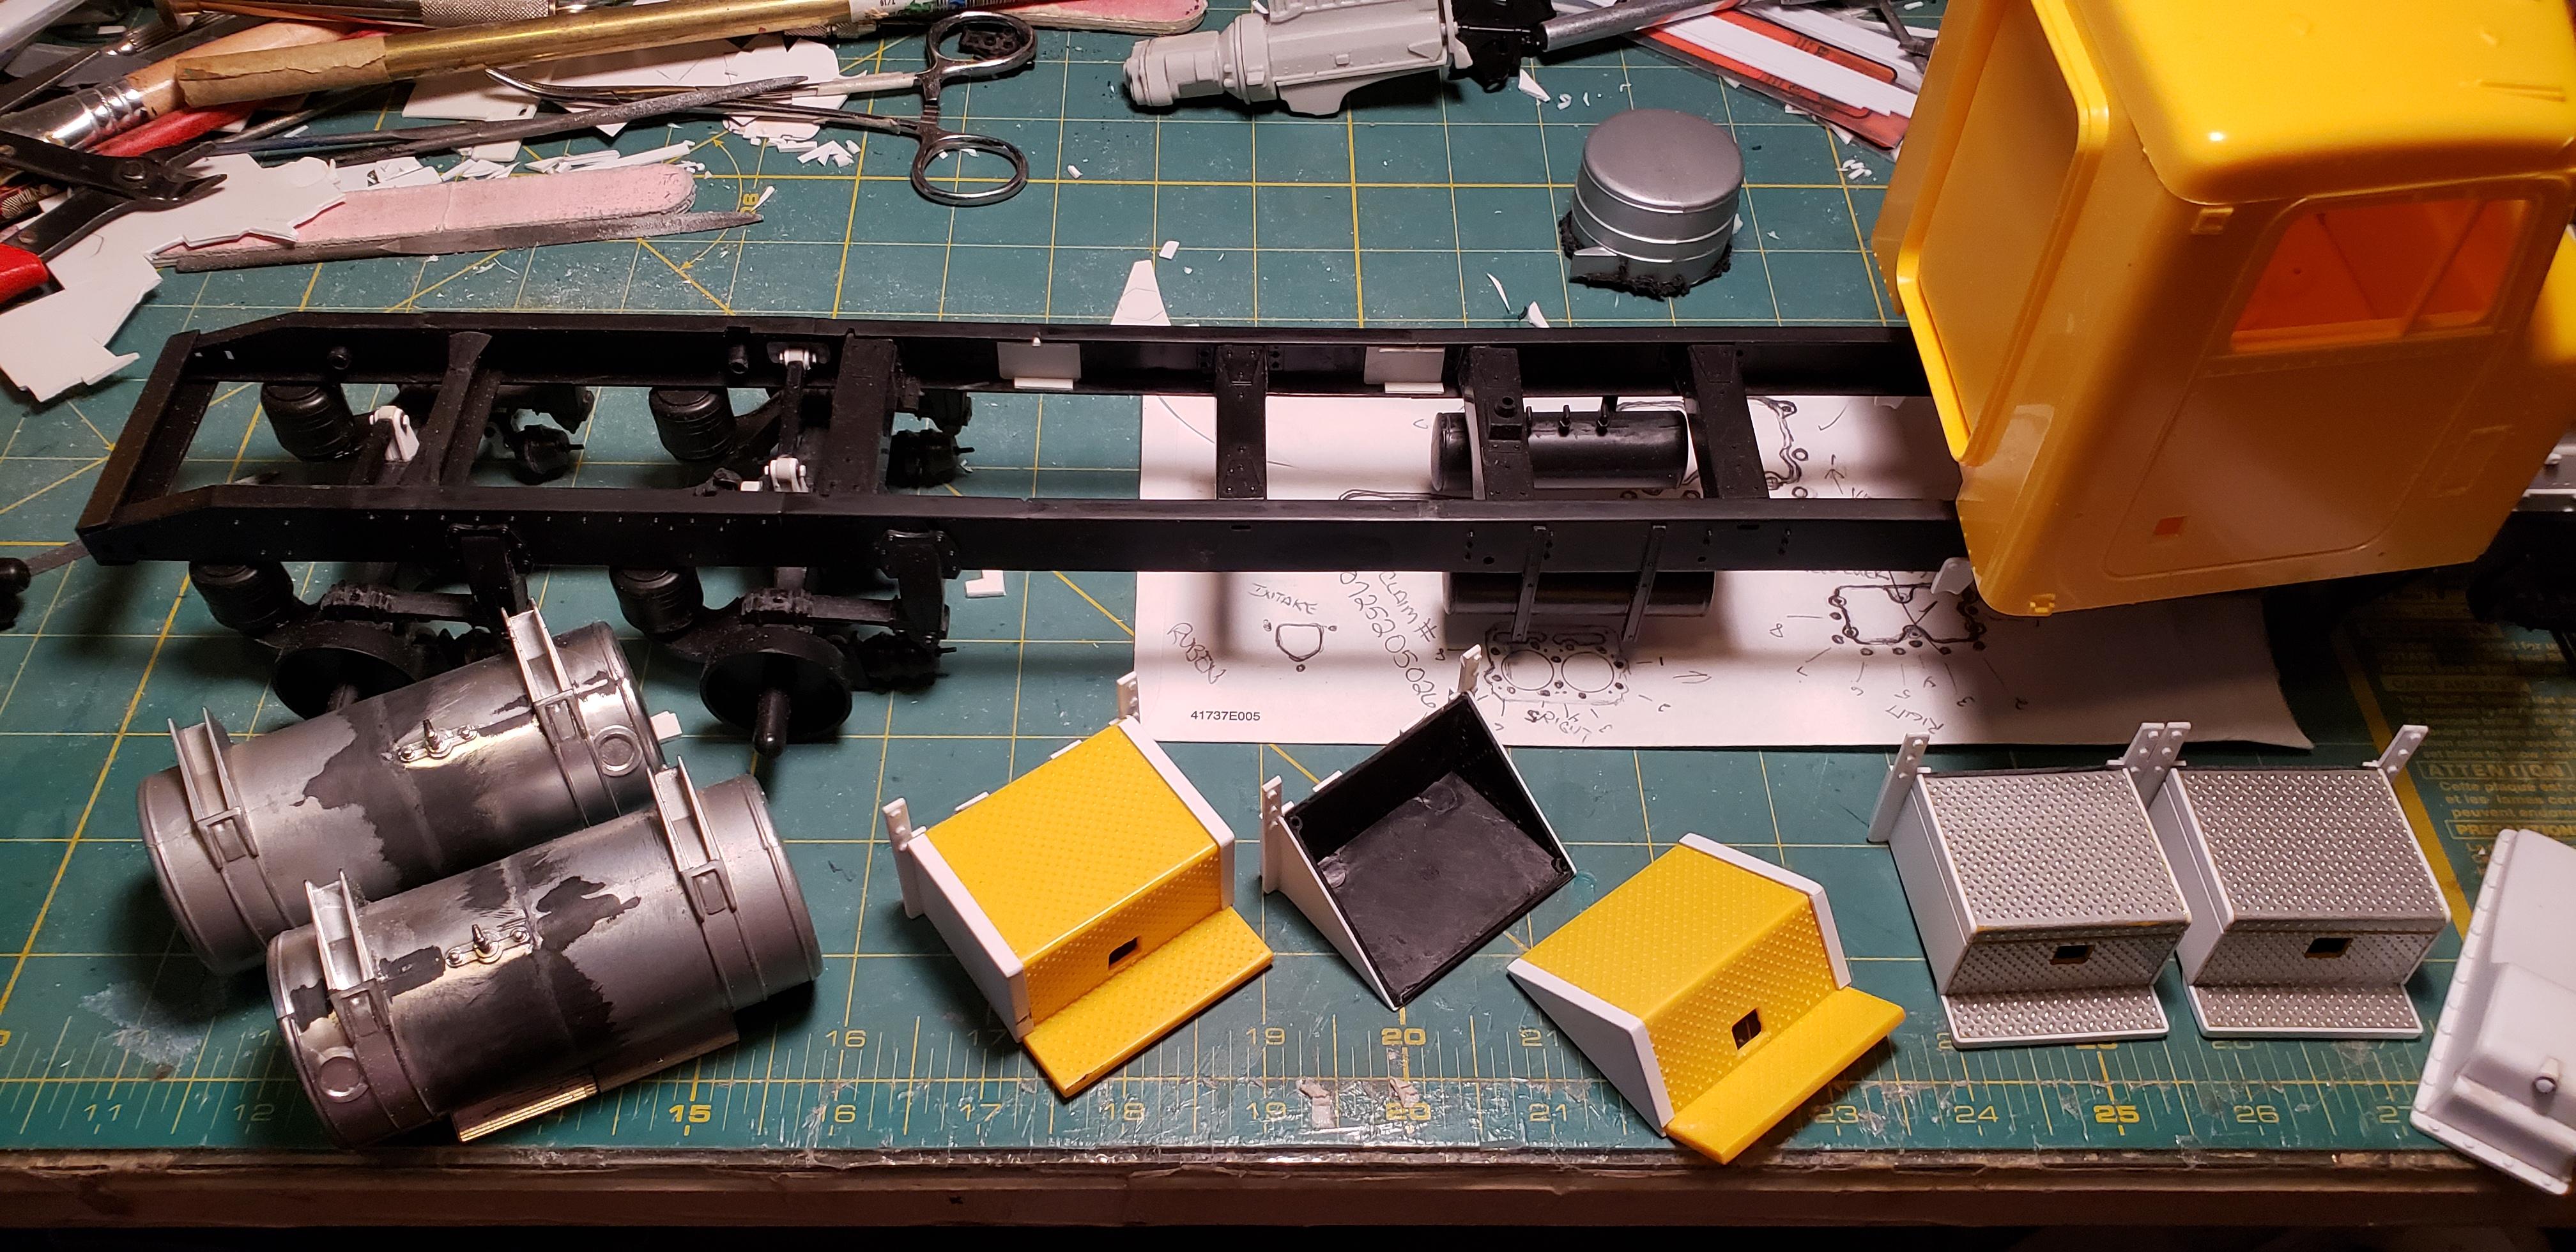
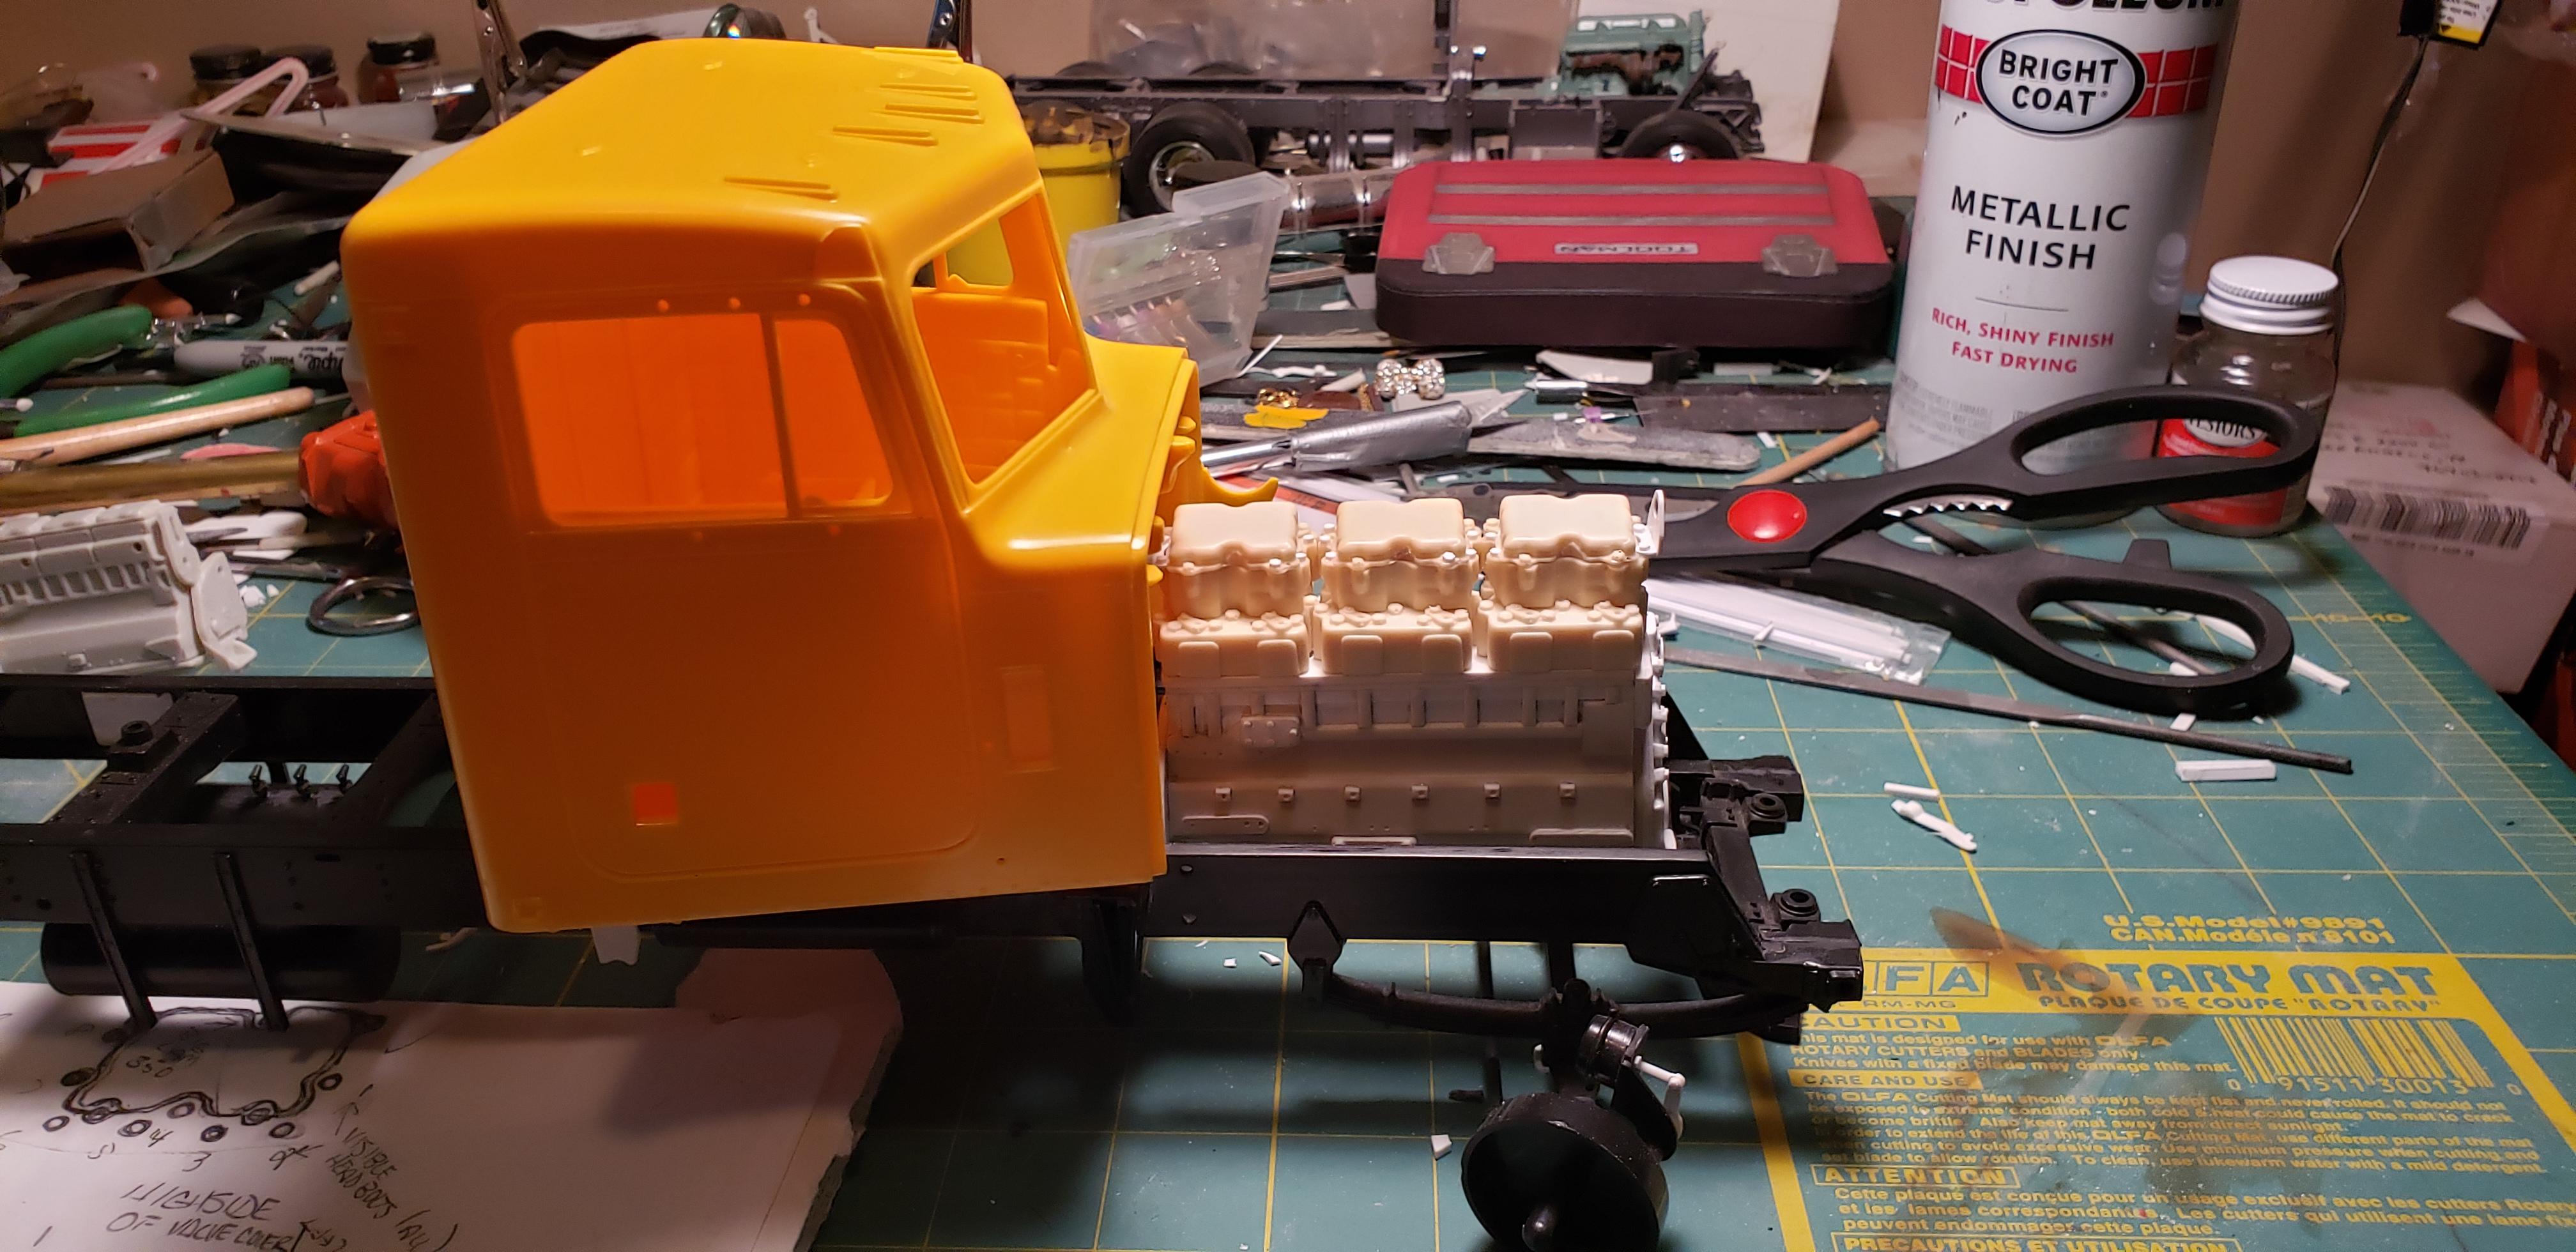
Hello again gang! First of all let me apologize for the state of my workbench, but if I clean it off I'll never be able to find anything, lol! I originally started out on this project about 3 years ago, but other projects kept leaping in front of it. As you can see, this is Monograms 1/16 scale Pete 359 I originally purchased some 20 years ago, and also in that time I acquired an Ebay junkyard built up for spare parts in preparation for the build I had in mind. I did not want to build it box stock, and I definitely didn't want to build it with the supplied CAT 3408 V8 engine. So, since I had an old 1/25 scale AMT Pete 359 with a Cummins engine, I had good parts to actually "scale up" the build. I started by cutting the transmission off the CAT motor, and begin taking measurements to scratch build the Cummins. The engine in the AMT is the Cummins 350 BigCam 1, so I had to make a few changes to better replicate the Cummins 855 BigCam 2 that I wanted to scratch build. The block was made up of several thicknesses of sheet styrene, lots of sanding, shaping, and looking at lots of photo's and spec sheet's. The cylinder heads, rocker boxes, and valve cover's, were cast from scratch built parts that were later made into molds. With the exception of major engine parts, such as the exhaust manifold, coolant manifold, and after-cooler, most of the other components can be sourced from the kit supplied engine with a little modification, but that's the easy part. Other modifications to the kit includes a scale 4' frame stretch, steerable front axle, larger fuel tanks, corrected battery boxes, and adding storage boxes. I have also lengthened the stock hood (119" bumper to back of cab) version supplied in the kit, to the 127" extended hood version available at that time (1979). If interested, please follow along with me on this build, and I'll occasionally update you as I go. Thanks for looking!
-
Nice looking ride, I built one of these ions ago, and have been thinking about doing another one....I think you've made my mind up Drip, so Ebay here I come!!!
-
A nice clean factory fresh build...great job!
-
359 / tanker combo
ReduitRetro replied to purepmd's topic in Model Trucks: Big Rigs and Heavy Equipment
Great looking rig!!10 thumbs up! -
Delivery of five of the nine D8s
ReduitRetro replied to mackd's topic in Model Trucks: Big Rigs and Heavy Equipment
Must be me too then, lol!! -
Kenworth Conventional W-925
ReduitRetro replied to James Maynard's topic in Model Trucks: Big Rigs and Heavy Equipment
Great looking build! I have two waiting on the shelf for they're turn on my workbench. Nice job indeed. -
Ford Aeromax L9000 "Far West"
ReduitRetro replied to Ben500's topic in Model Trucks: Big Rigs and Heavy Equipment
Good to see one of these featured, great execution and paint colors. Very nice job. -
Kenworth T 600 A Canepa
ReduitRetro replied to aquaflug's topic in Model Trucks: Big Rigs and Heavy Equipment
Yes, I agree with some of the others, this kit had all kinds of problems, basically it was a re-bodied original release AMT W900 kit. I built one of these back in 1990 and stretched the frame and side fairings so it wouldn't look stubby, never wanted to even attempt another one. My hats off to you on the build, yours turned out nicely.