.jpg.7ae93378f58257dc007f520a97a7ea39.jpg)
ReduitRetro
-
Posts
166 -
Joined
-
Last visited
Content Type
Profiles
Forums
Events
Gallery
Everything posted by ReduitRetro
-
This particular model was built way back in '92, and is among some of the oldest in my collection. I wired and plumbed the engine, scratch built dual sport mirrors, hand painted the tire lettering,(something not required today with all the pad printed offerings), and was my very first model I used Bare Metal foil to replicate the chrome on. This original issue kit has managed to survive all these years because it resides in a large display case to keep dust, pets, kids, and grand kids, at bay. I do have the reissued AMT kit in my stash, and plan to build it soon. As always, thanks for stopping and looking!

- 32 replies
-
- 14
-

-
Holy BLAH_BLAH_BLAH_BLAH that's NICE!!!! Great job!!
-
That looks good to me...nice! And when it comes to that hood..."It's your thang, do what you wanna do"
-
Very nice build! looks like you and I were reading from the same book when it came to this particular car for sure! Nice!
-
Holy Cow!! Now that's a lot of work ...great job!
-
Great looking Barracuda! I've been on the fence about purchasing this kit for years, I think your build has convinced me to go ahead and bite! Nice!
-
When I built this kit, I wanted it to represent something that could be seen at just about any local car show, drive in restaurant, or cruise night anywhere in America. Model features a wired and plumbed 383 Magnum 4-barrel V-8, along with a set of parts box supplied Cragar wheels, and Firestone Wide Oval tires. Otherwise, it was a straight forward build. Hope you enjoy, and as always thanks for looking.
- 44 replies
-
- 22
-
-
Thats a nice clean build there, Great job!
-
Thanks vamach1 for your kind words, and you're absolutely correct in what you said. I have noticed that these large car subscription builds have definitely become more detailed right out of the box when compared to this one, so maybe someone somewhere is indeed listening. Case in point I'm currently building the 1/8 scale Fanhome Knight Rider, and it is far more detailed for sure! It's one of the few releases that now have operational interior lights when doors are opened, as well as back lit dash gauges and remote-controlled features so you don't have to remove the model from a display case to show them.
-
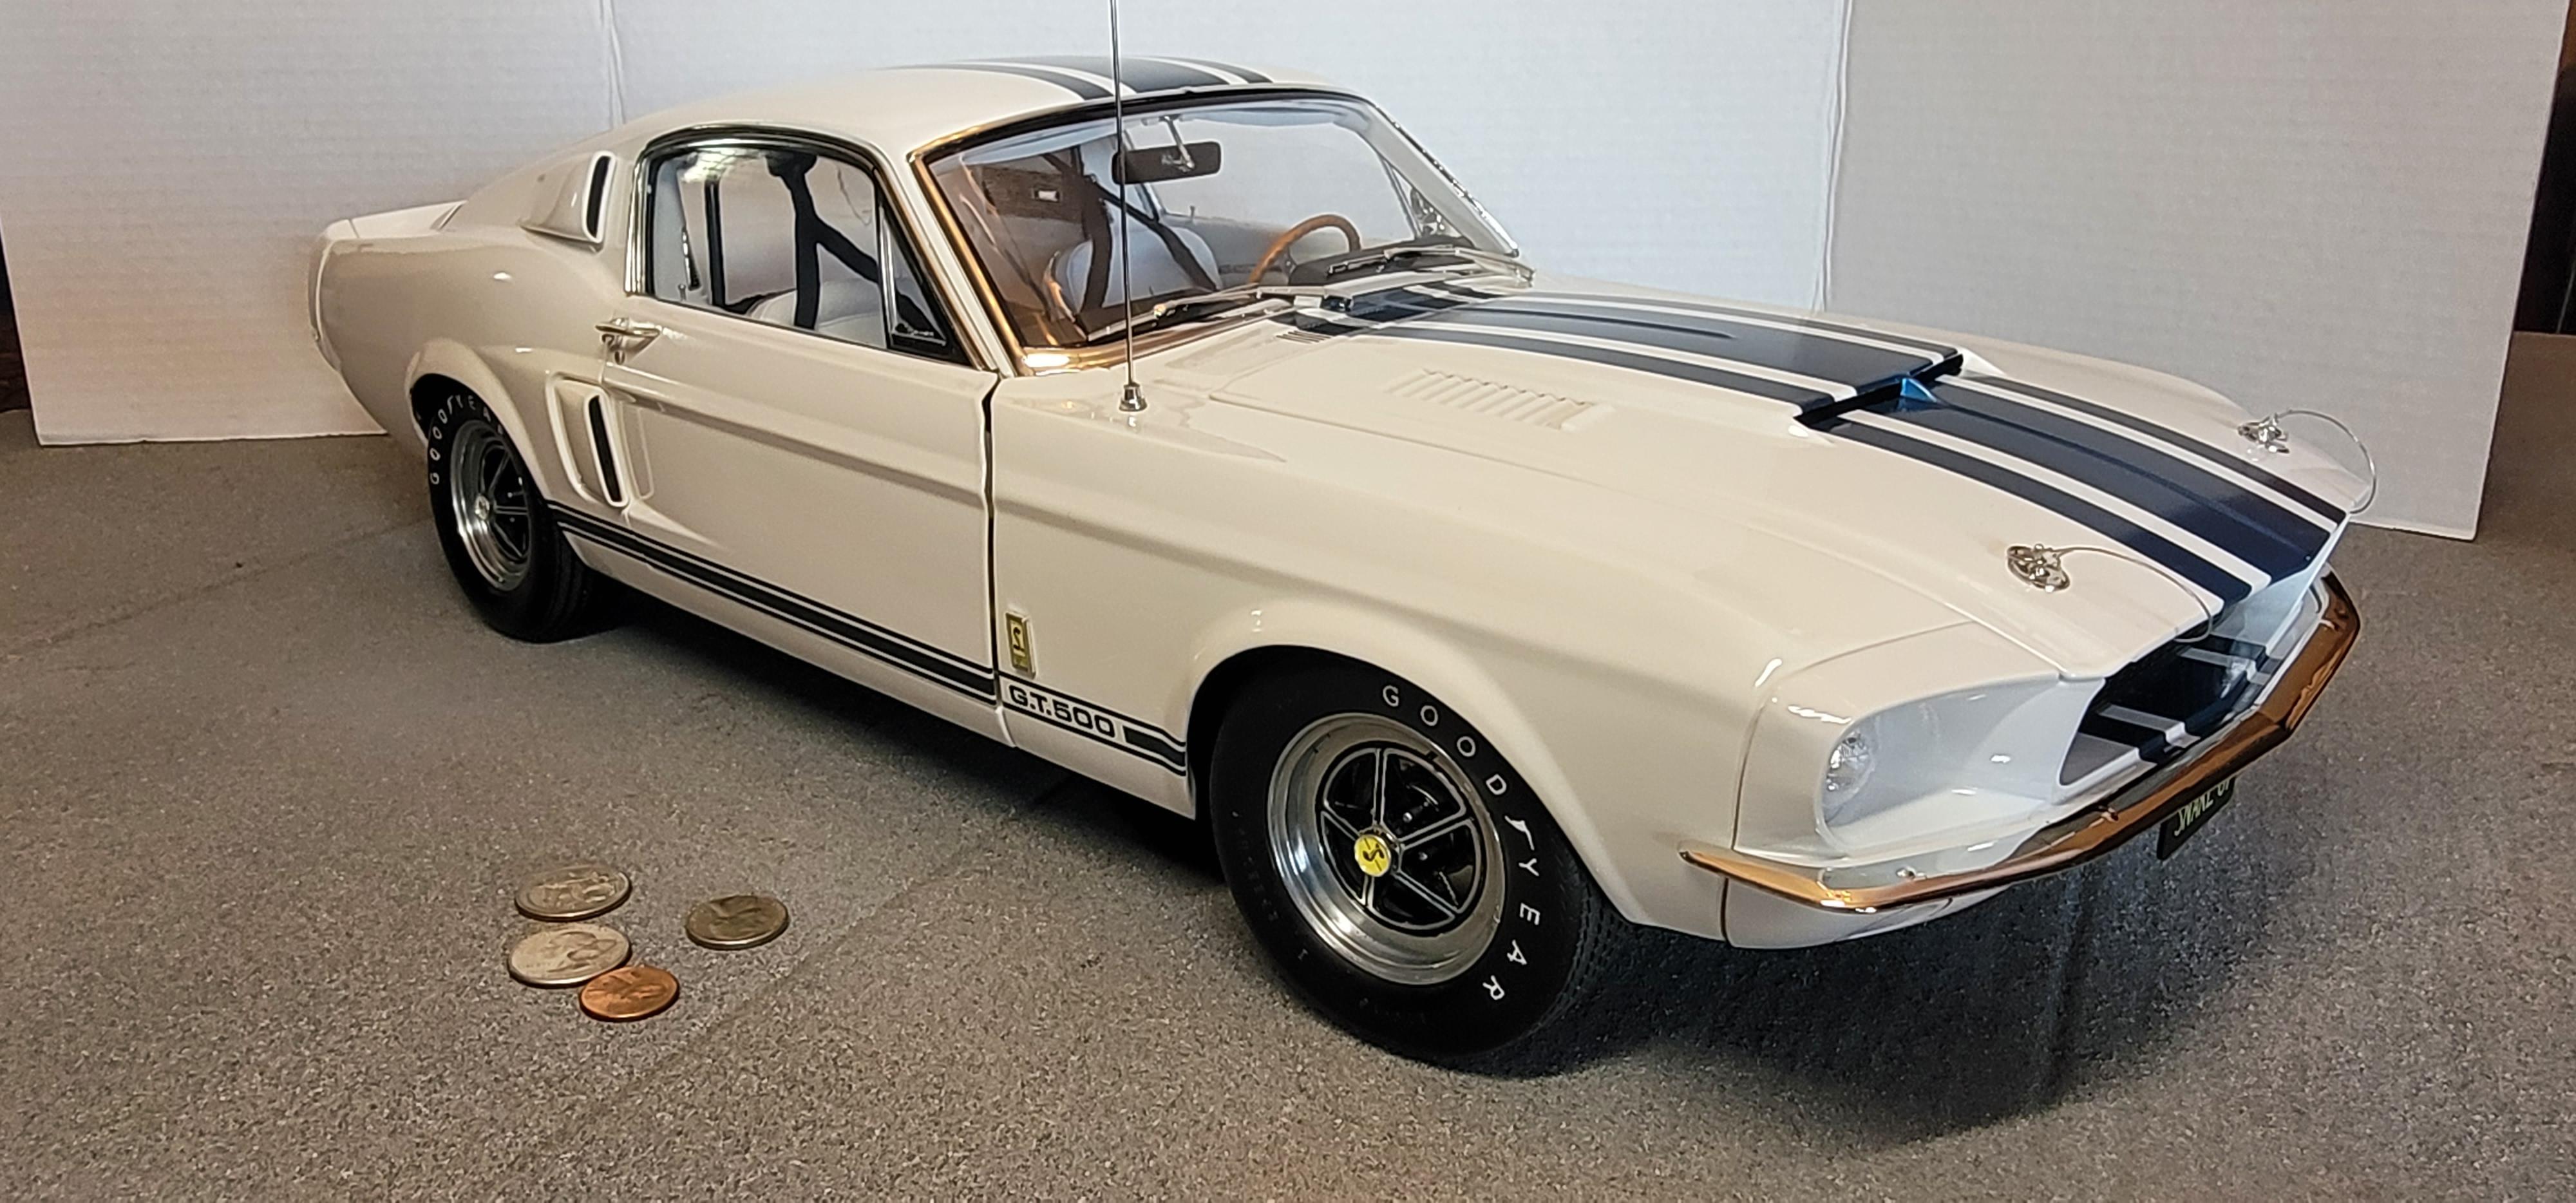
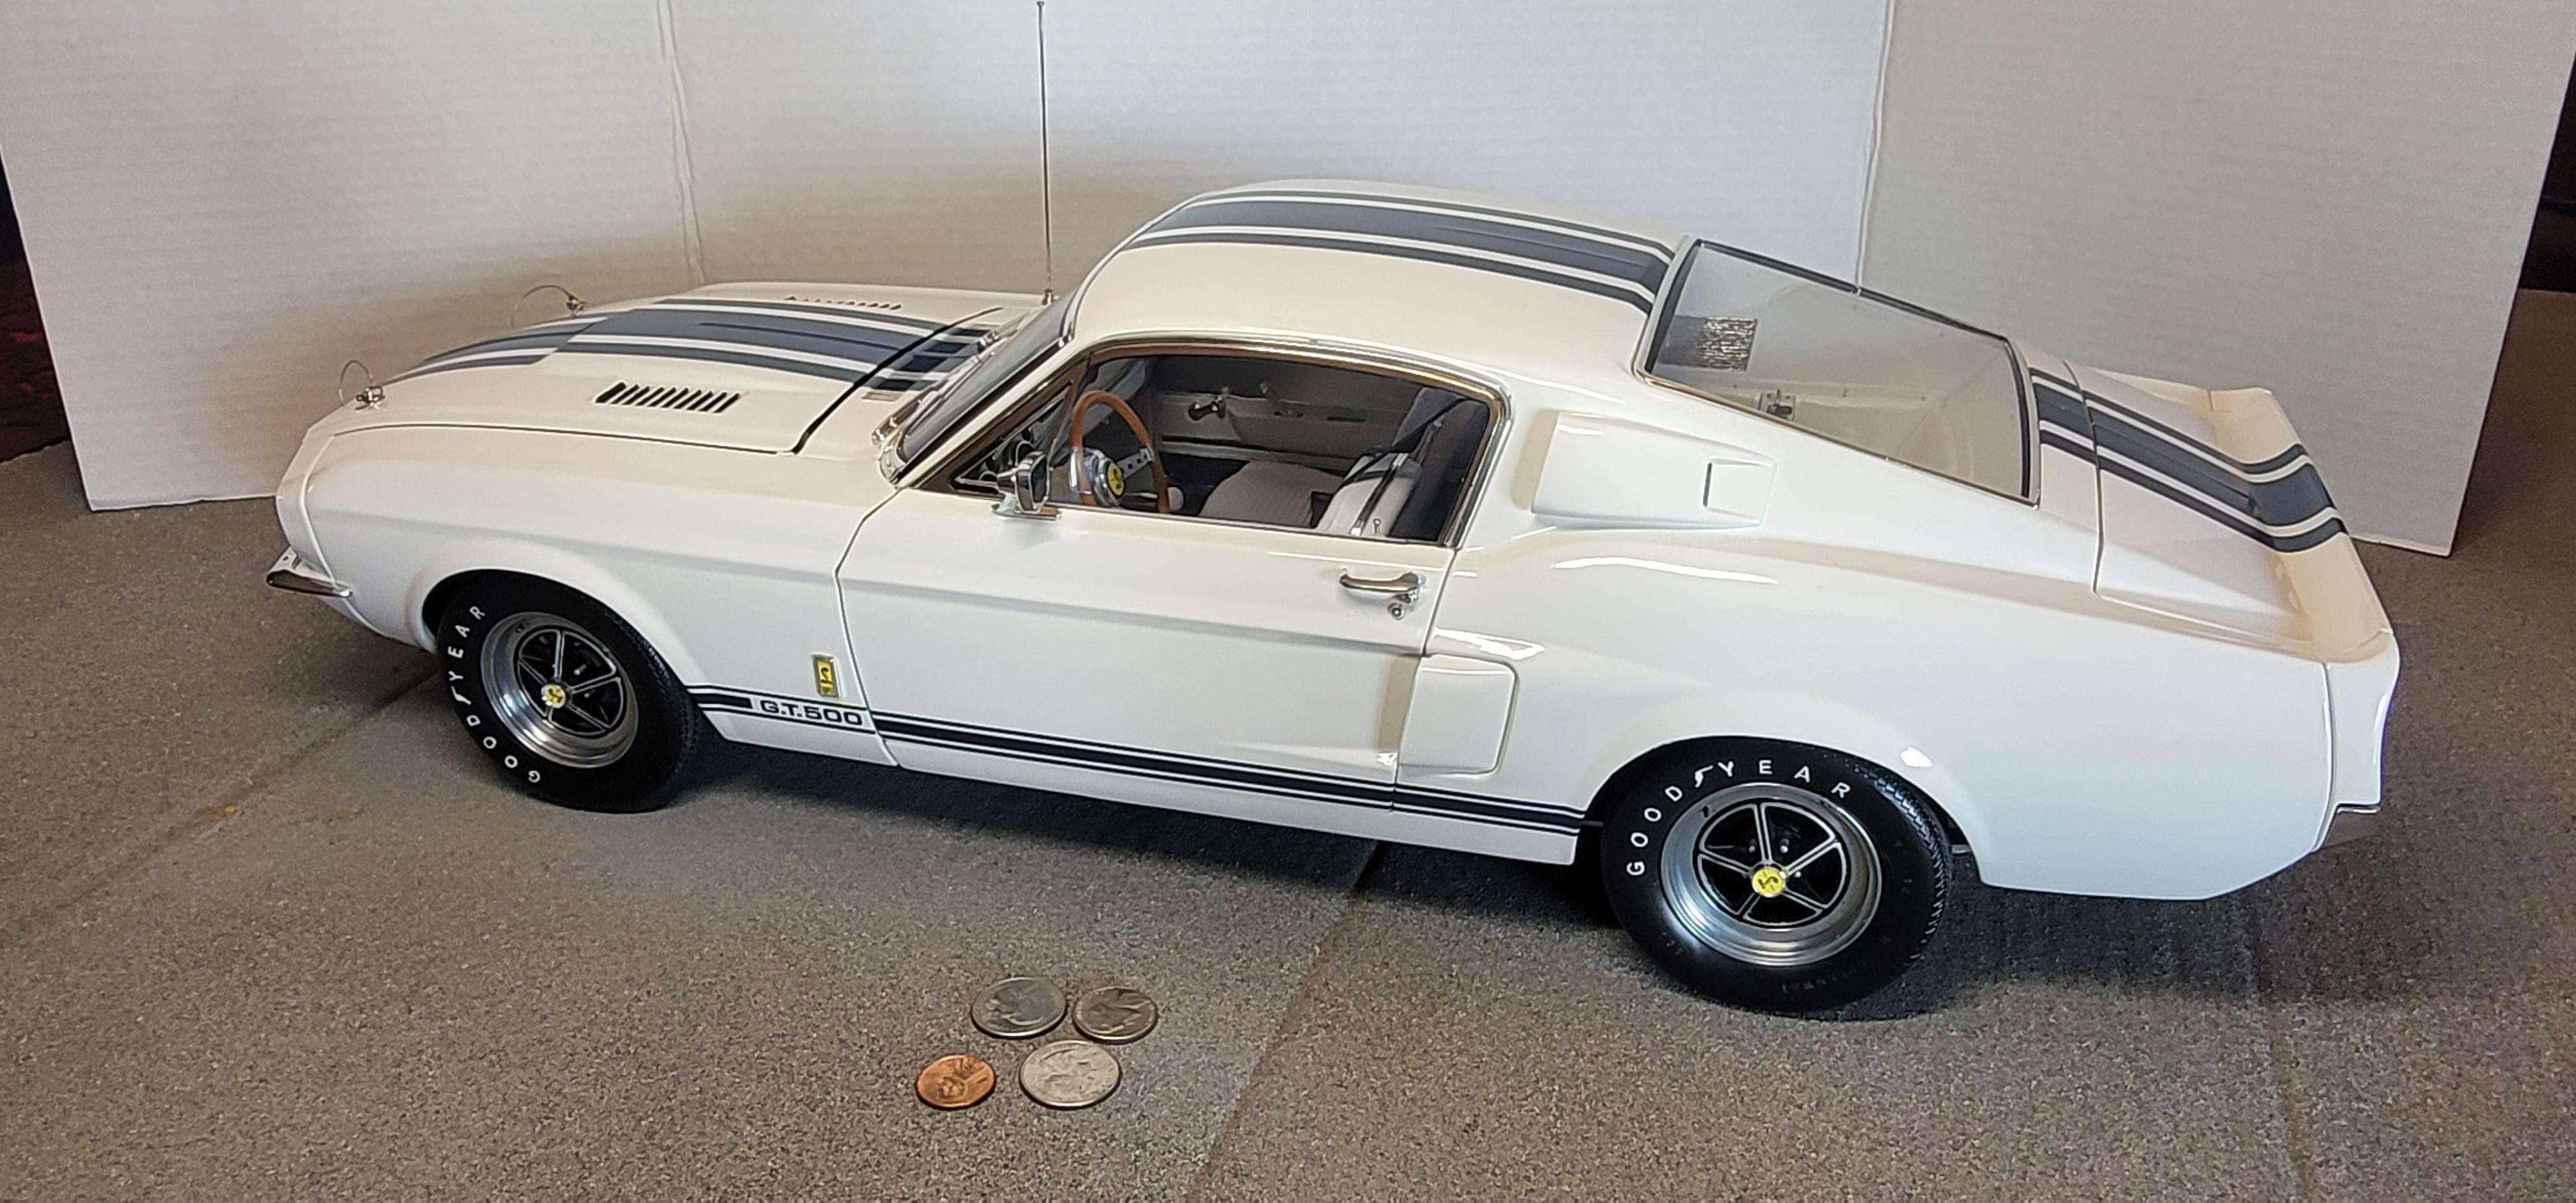
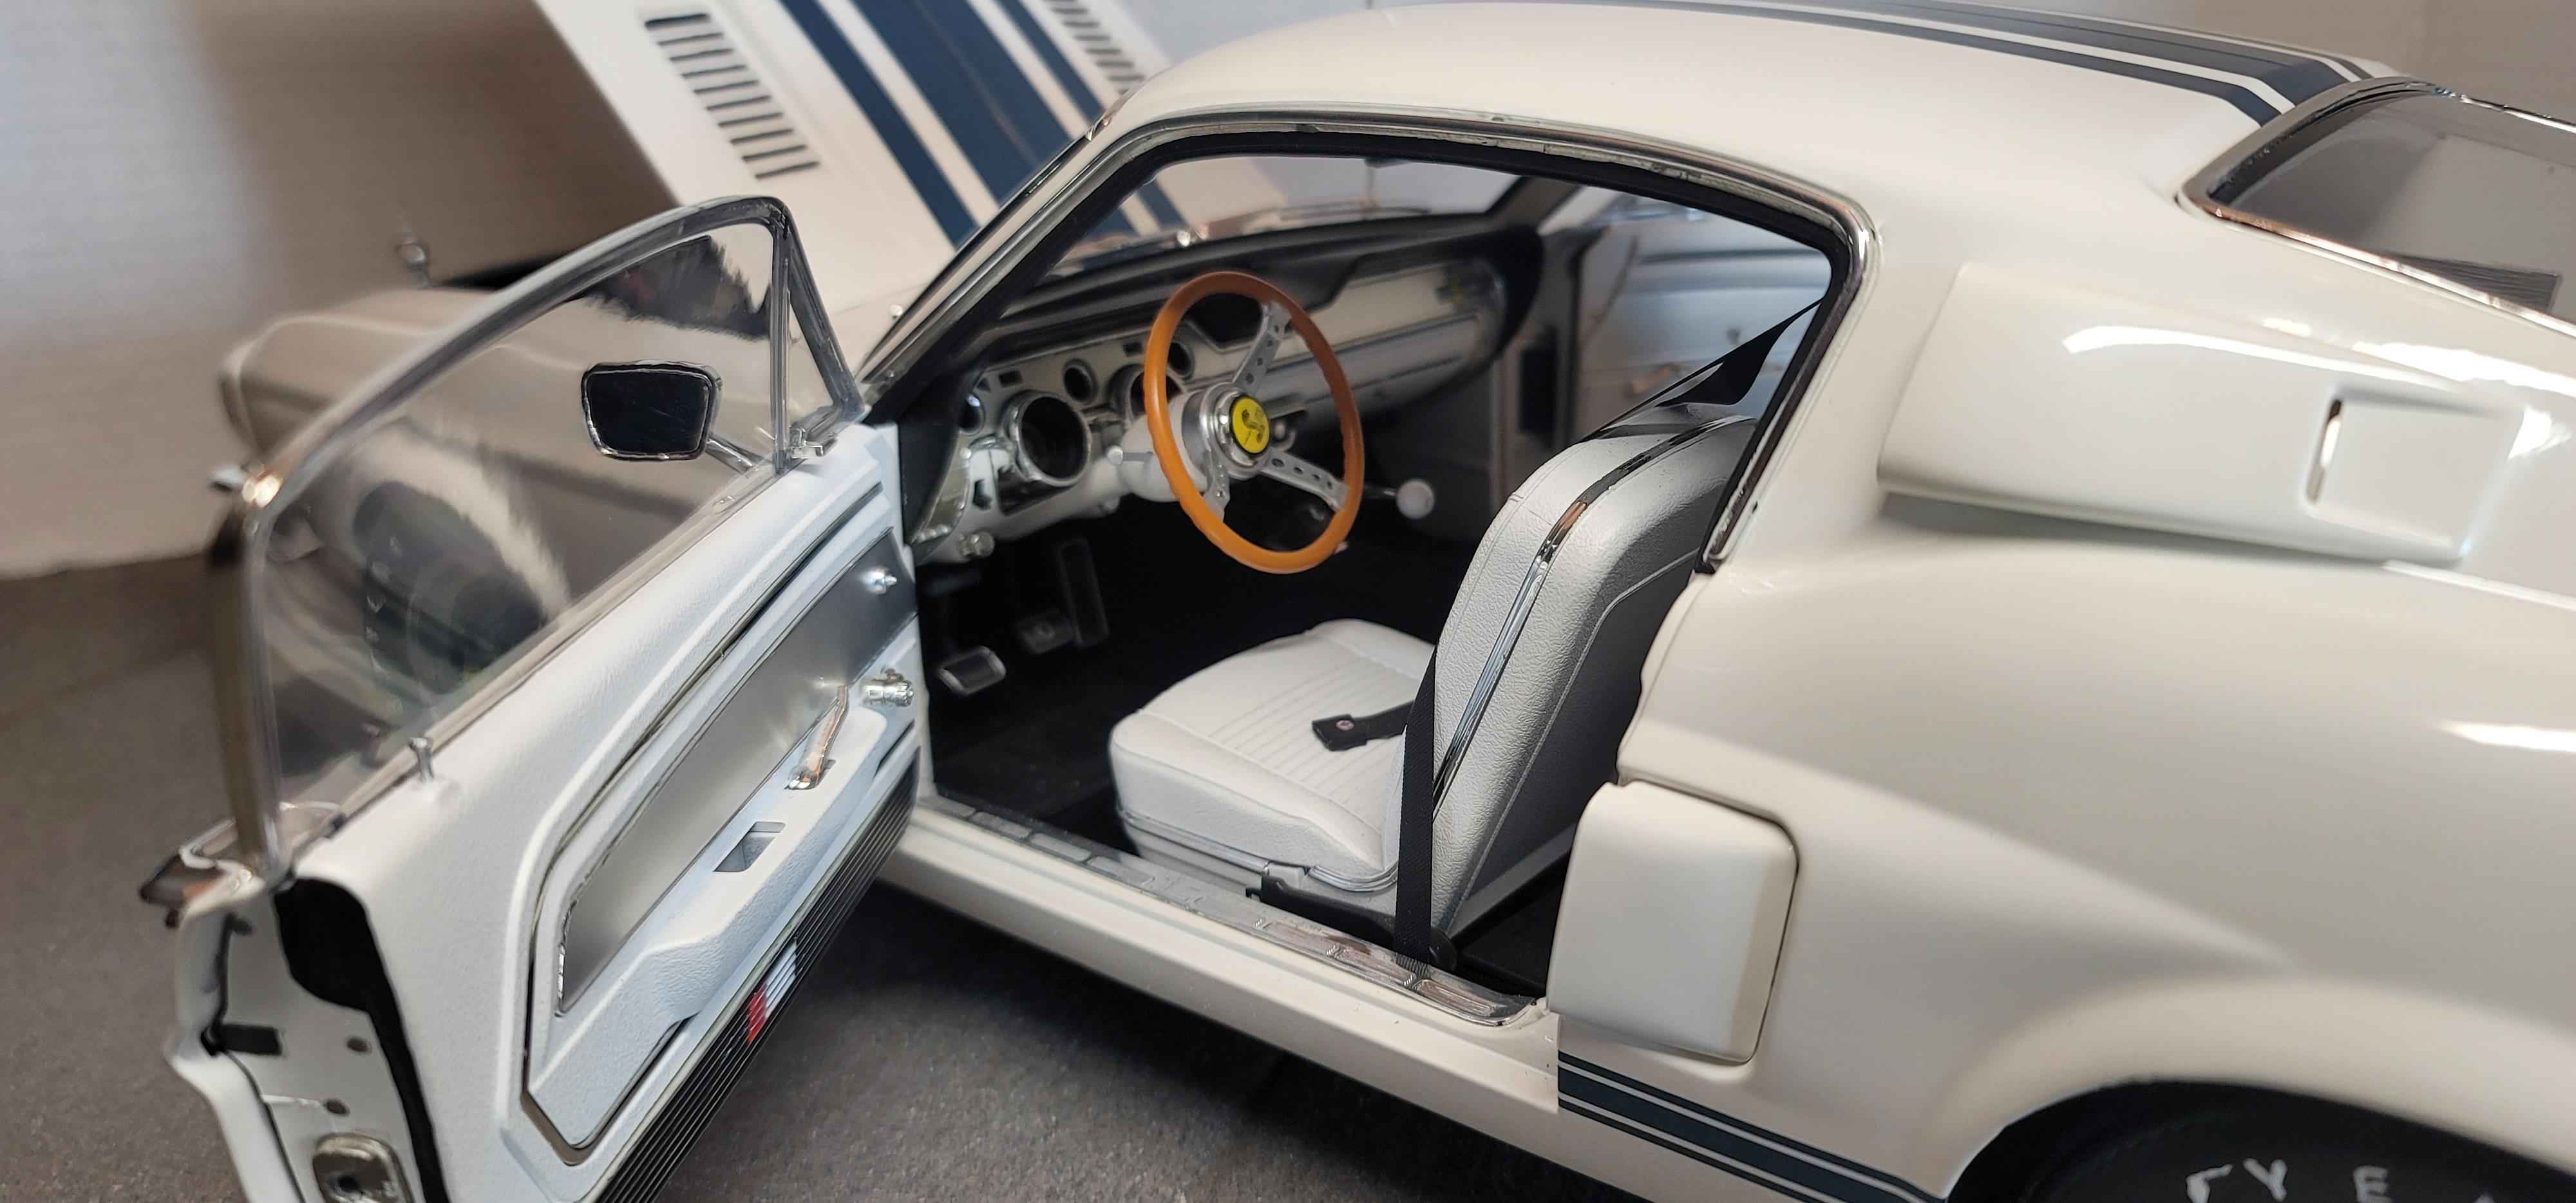
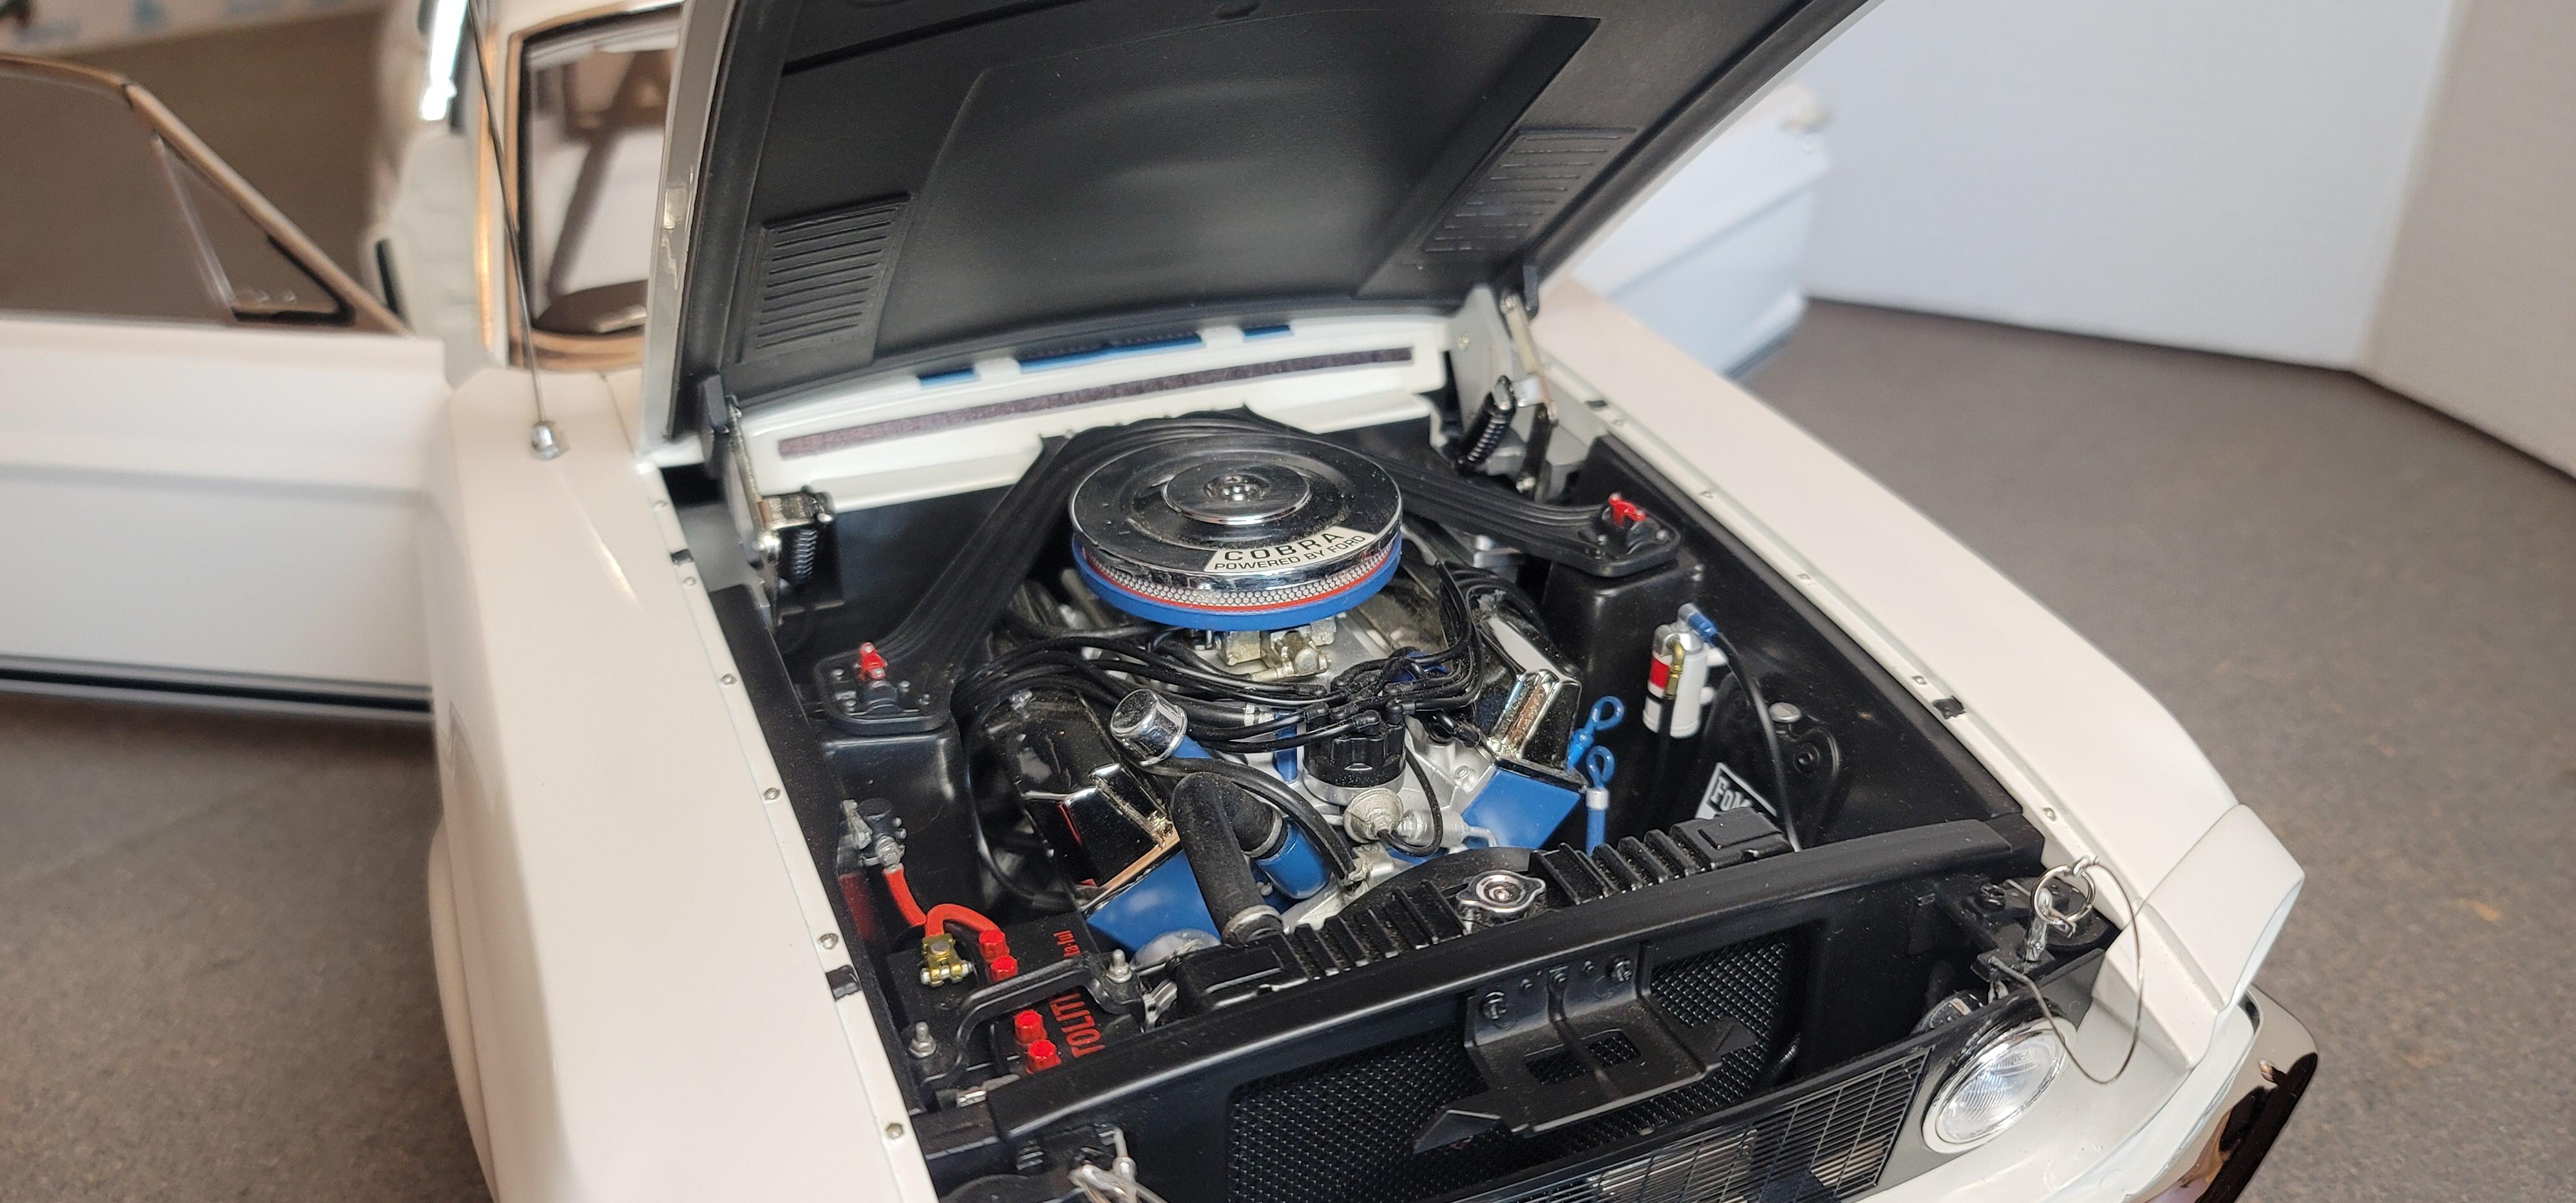
This build was completed about 2 years ago, but I never got around to uploading the pictures to the site. This is Agora Models rendition of DeAgostini Collections 1/8 scale Shelby Mustang. It indeed was nice to build, but in my opinion lacked detail in so many area's that could've easily been better represented in the kit, especially at the price point they were asking. So I set out to correct and embellish what I could to make the model better overall. Now, I know this particular model was of the actual vehicle that Carroll Shelby himself drove to test a new tire that was being offered by Goodyear at the time, at top speed right here in San Angelo, Texas back in '67 at the then new Goodyear Tire Testing facility, which is still in use today actually. I wanted the white over black interior for my car, so I used white automotive interior paint to replicate the look, I just thought it was visually more appealing. Next, the engine had basic kit detail at best, consisting of spark plug wiring, incorrect oil line routing, and one odd heater hose...nothing else! So I added spark plug boots to the wires, added wire holders to the tops of the valve covers, and used the correct 427 V8 firing order to attach them to the scratch built spark plugs. I added a fuel pump, fuel line and filter, as well as a power steering and engine oil dipsticks. Correctly ran the remote oil lines to the oil filter and cooler, and added the heater hoses. Also, ran battery cables, including the starter relay to engine starter, along with carb linkage and spring, and assorted vacuum lines. I replaced the kit supplied 'Kelsey Hayes" Shelby 10 spoke wheels and skinny tires, for the much better looking Shelby "Mag Stars" on wider Goodyear raised white letter performance tires to top off the look. Detail painting brought out the window and door seals, which really added realism to the model when displayed with doors open, as well as the black painted under hood and trunk surfaces. The kit also features an operating fold down rear seat, working head and tail lights, brake lights brighten when brake pedal is pushed, as well as an operating horn, and engine noises when accelerator pedal is pushed...a little corny to me, but oh well. Anyway, thanks for looking, and any comments would be greatly appreciated. Until next time, happy modelling!
-
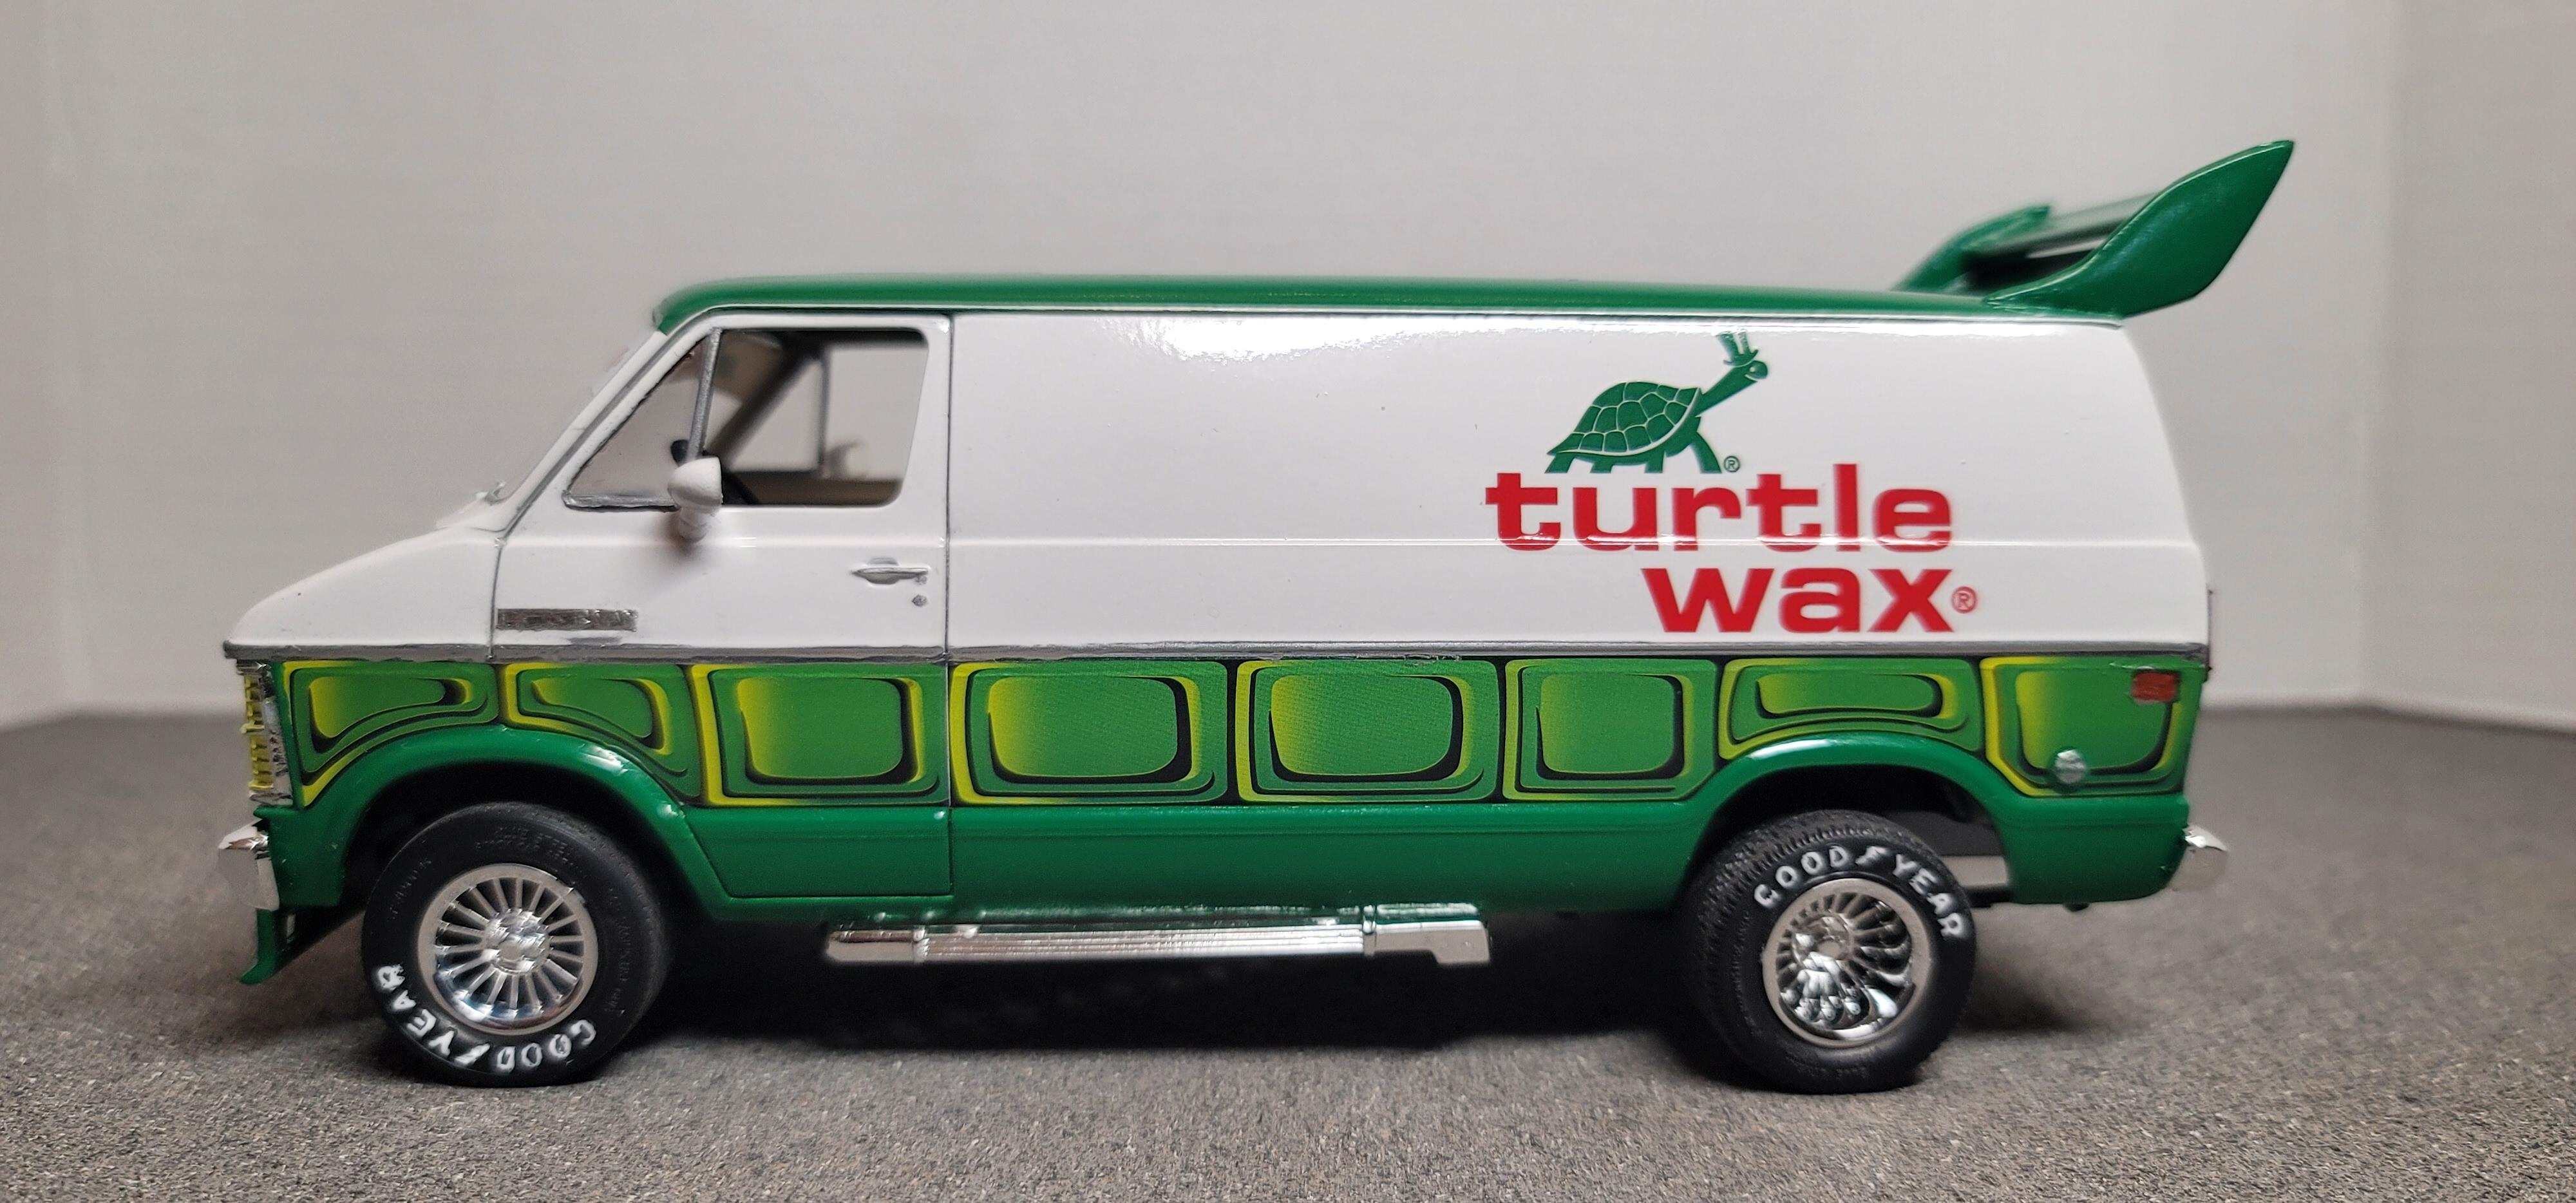
.thumb.jpg.a5679105adee4a23d3390e3f0f3abfd0.jpg) I built this kit well over 40 years ago, and boy does it bring back memories. Its getting real hard to find good examples to buy of this old kit for sure. I did manage to find a good MPC Ford Econoline 'Sunrunner" kit a few years ago, I hope to build it soon.
I built this kit well over 40 years ago, and boy does it bring back memories. Its getting real hard to find good examples to buy of this old kit for sure. I did manage to find a good MPC Ford Econoline 'Sunrunner" kit a few years ago, I hope to build it soon. -
1978 Dodge Pickup
ReduitRetro replied to Alex Flint's topic in Model Trucks: Pickups, Vans, SUVs, Light Commercial
Nothing better than a rough and rowdy old Dodge pickup! -
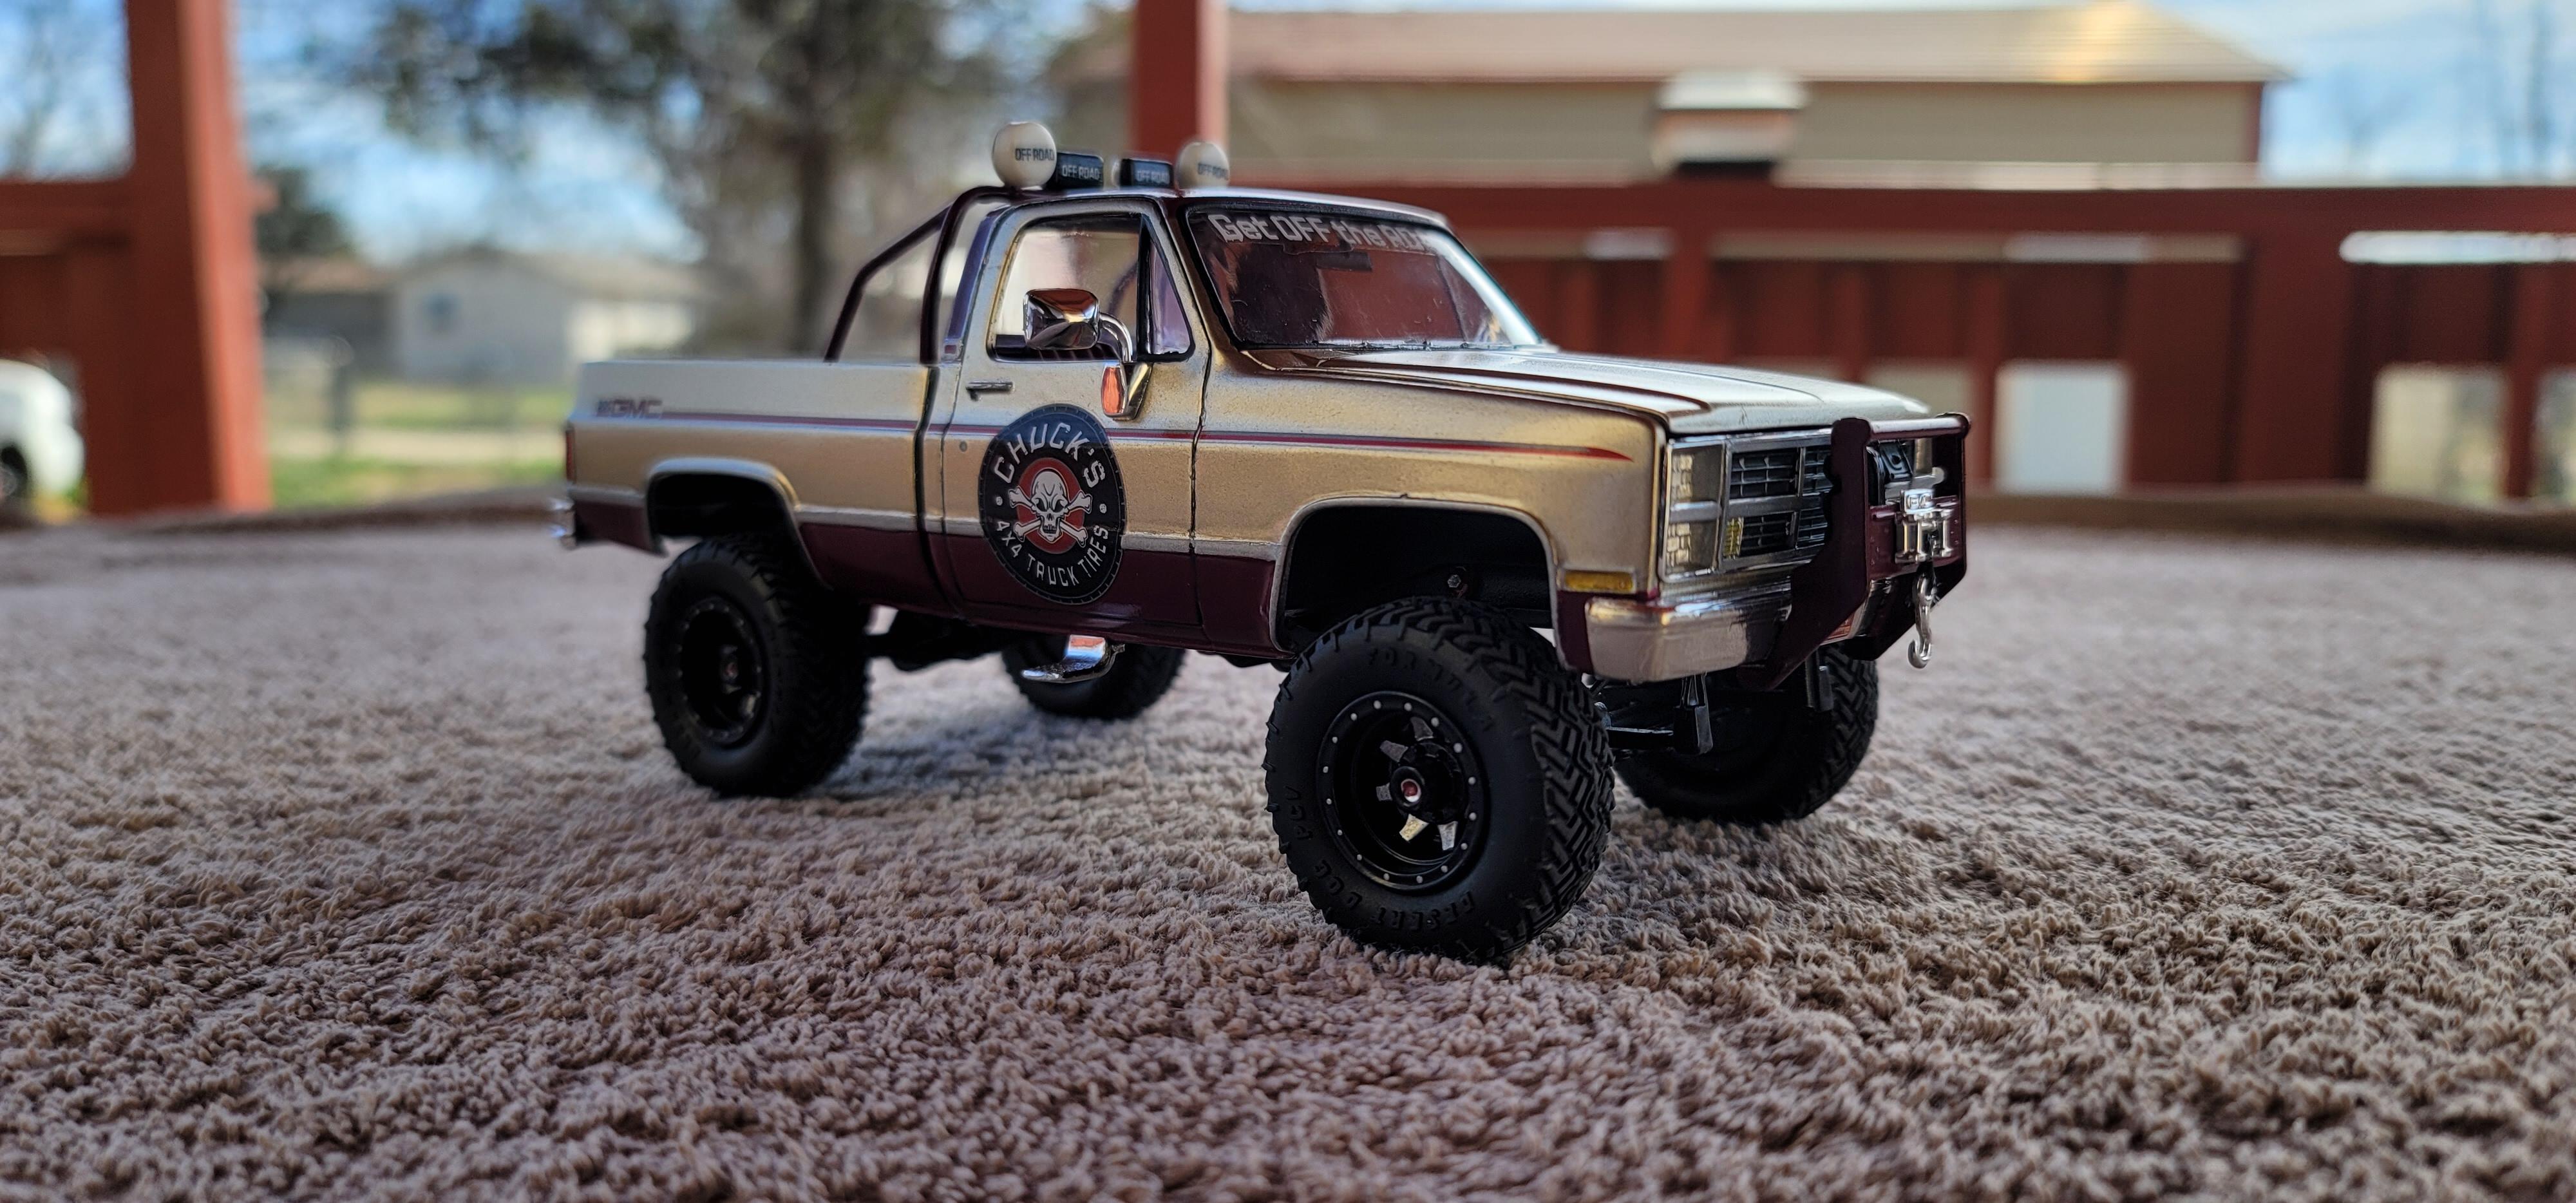
Yes, we all get in a building slump from time to time, and in my case there are several builds on my workbench that have gotten so involved, that I just had to take a break. So, I went to my extensive collection and for some reason this one peaked my interest. I originally built this MPC kit in its original form "Bad Company" some 40 years ago, and the memories of doing so helped me want to build this one. First off, those of you who are familiar with this kit know that the hood is molded closed, so as a result MPC at the time severely simplified and deleted much of the under hood detail as it wouldn't be seen due to the extremely short hood these vans had anyway. I first cut open the hood, scratch built the under hood engine bay area that was completely non-existent in the kit, went to my parts box and scavenged a battery and windshield washer container, radiator fan shroud, and 7-blade heavy duty cooling fan, scratch built an upper radiator hose and a fresh air intake tube for the air cleaner assembly, as well as adding a power steering pump and belt, along with adding painted on wiring and electrical component detail to the firewall. The interior was built straight out the box with the exception of replacing the kit supplied steering wheel with a more sporty one. Dodge van's of this era were of unibody construction, and had no actual separate frame to speak of as in offerings from Ford and Chevy, but had a welded on steel front subframe to support the engine and front suspension,(replicated in black in the underbody picture). To round out the look I was going for, I raised the rear suspension to give the van a more vintage rake and stance, and once again raided my parts box for wheel's and tires, as well as a pair of sport mirrors for the exterior to get rid of the kit supplied "west coast" style in the kit. All in all, I think it turned out okay, and will definitely help get me out of my current slump. Hope you all like it, and thanks for looking.
-
Restomod '57 Chevy Cameo pickup
ReduitRetro replied to Can-Con's topic in Model Trucks: Pickups, Vans, SUVs, Light Commercial
Wow!...an extremely nice build! great job. -
MPC Deora show truck
ReduitRetro replied to magicmustang's topic in Model Trucks: Pickups, Vans, SUVs, Light Commercial
Looks real good, a nice clean build too!! -
Orange Blossom Special II
ReduitRetro replied to spencer1984's topic in Model Trucks: Pickups, Vans, SUVs, Light Commercial
Looking Good!! -
Good looking build!
-
Yes, you are absolutely correct on the wheels, as that was exactly what I was thinking when I seen them. The only way to fix the "look" of the wheels were to indeed modernize them. Thanks!
-
This is very clean build...nice job!
-
Hello all, I've been away from the website for quite a while now, and thought I'd jump back in by sharing this quick little build I completed recently. This was a fairly straightforward build, with just a handful of modifications to suit my needs. First, the bed was stretched approximately a scale 6 inches or so, as the length of the bed in the area ahead of the wheel openings appeared to be too short when compared to a real truck. The hidden side panel storage boxes were eliminated by filling in the panel lines, and filling in the passenger side fuel door due to the kit not having duel tanks anyway. Next, the chassis was also lengthened to accommodate the bed. The front bumper in the kit also had to be modified, as it represented the '81-'82 year models that featured integrated turn signals, but were moved to the lower corners of the grille starting in '83. The interior dash pad also needed to be corrected, mainly on the passenger side because the general shape was changed to a more pronounce squared off profile starting in '81. The a/c vent panel and both door panel details were also updated as well. (Anyone familiar with these kits from back in the MPC day's knows the interiors were not upgraded from the original 70's molds, just basically the front fenders, hoods, and grille's were changed to keep kit current to newer year model's). The kits engine was treated to some basic detailing, including a parts box chrome air cleaner, a set of spark plug wires, heater hoses, and fuel line. Lastly, I added the exterior body side, cab, and fender well trim of the "High Sierra" so that I could more accurately duplicate the 1 of 2 factory two-tone paint job styles available at the time. Thanks for stopping and looking at this build, and any comments would be greatly appreciated.
-
Büssing 8000 s13
ReduitRetro replied to PierreR89's topic in Model Trucks: Big Rigs and Heavy Equipment
Great build! -
Kenworth challenge mixer
ReduitRetro replied to PierreR89's topic in Model Trucks: Big Rigs and Heavy Equipment
Wow!...you have another one built that I have in my stash of "to do" builds! I agree with you that the wide fronts look the part perfectly...another nice job! -
Autocar dumptruck
ReduitRetro replied to PierreR89's topic in Model Trucks: Big Rigs and Heavy Equipment
Good looking unit! I've had an original issue on my shelf for close to 20 years now that I have not gotten around to building...your build is inspiring me though! Nice job. -
Freightliner Cabover
ReduitRetro replied to k100's topic in WIP: Model Trucks: Big Rigs and Heavy Equipment
Looks good, I forgot about lowering the headlight buckets on my build, but at least I remembered to narrow the front axle. I have another of these old vintage kits in my collection slated to be built (as a well used and somewhat abused unit), and plan to open the doors as well. I'll be looking forward to seeing this build to completion. -
Looks like its going to be a great project for sure, definitely a fan of the spoke wheel option on this build. I'll be following this one!