

Rich Chernosky
-
Posts
2,004 -
Joined
-
Last visited
Content Type
Profiles
Forums
Events
Gallery
Posts posted by Rich Chernosky
-
-
Bruce...real nice job. Those decals are indeed tricky and you pulled it off very well. . What did you use for the silver and black, if I may ask. ??
-
Sweet job Paul, they look like winners together.
-
 1
1
-
-
Tamiya makes both a semi gloss and a flat and they are quite compatible with TS7. Go with that..the safe bet.
-
 1
1
-
-
On 11/12/2023 at 7:47 AM, PappyD340 said:
Very nice!
Thanks Larry
On 11/16/2023 at 11:04 AM, Gramps46 said:I am late posting but I really like your long tail build. You expertly capture the look.
Gary, I will take kind words from you anytime thanks for all the support.
-
Another home run from you Mario. The color really suits this Porsche and the interior sets it all off. Like it.
-
2 hours ago, atomicholiday said:
Man I wish I had read this Before I started work on my Camaro project. Now I can’t tell the left upper control arm from the right!??
This is awesome Rich. Gives me a lot of great ideas for future builds and keeping things straight.
I have been doing something similar to your process for a long time now. After I take everything off the sprues, I sort by what base color I’m planning. I’ll also shoot two or three kits at once that get the same color.
Some great information from all of you!?
You are quite welcome Jeremy...always a pleasure to share. What this forum is all about.
-
1
-
-
An addition to this post. Here is my 1/12 Meng Mclaren MP4/4 all sorted and base coated. This represents about 5 days worth of work, about 30+ hours. This is stage 2 as stage 3 will be final assembly and detailing...the fun part. A little more explanation under the picture.

There are 20 bags of assorted sizes. A lot of parts and painting. Body is all done and curing. The blue container has all the little screws, hoses and other tiny detail parts. This container came from a machine shop. The white card on the left is a color chart I made up for quick reference while sorting. The two largest bags contain the body and big chassis parts. Wheels and tires are done except for stenciling. Note all the labels on the bags with painting instructions. I have a large flat plastic box with a snap-on lid that most of the smaller parts will be dumped into during final assembly. Going through all the bags looking for small parts is tedious during final assembly and this is just an easier way to get to them. Can't wait to get to this kit but I am currently in the process of moving. Sigh!!!
-
1
-
-
Jeremy..this thread caught my attention. I do the same as you but with a slightly different twist. When I get a new kit the first thing I do is "de-sprue" all the parts and sort them into painting bags. When I cut the parts off I leave only a small portion of the sprue with the identifying number on it. This also allows me to use this small part of the sprue to hold onto while spraying. Some of the more obvious parts I don't do this. While I am sorting and marking bags I also make notes on the instructions and sometimes the bags with special painting instructions...like what has to be hand painted or other special steps. Sub assemblies and some clean-up is also done. Some of the very delicate parts will go into tiny plastic boxes and this keeps them form getting damaged or broken on the sprue and getting lost . Then its back in the box for another day when I will get into a painting mood and clean all the parts and spray them with the airbrush.
This may seem like a lot of work initially but in the end it greatly speeds up final assembly and more importantly avoids mistakes because by this time I am real familiar with kit. And if not I have left notes (some humorous) . I have some 100 kits done this way so the notes are necessary as it make take years to get at some of these. Will be glad to answer questions and I hope this helps you and others.
-
1
-
-
Cool project Justin. You are off to a great start. I knew Oscar and Tony personally. A sad day when both passed away.
-
Pierre...this project is coming along very nicely. Your engine work so far is superb. Can't wait to see the rest of this come together.
-
2 hours ago, slusher said:
Fantastic go kart!
Carl..thanks for the praise..and..btw...Happy Birthday
-
Curt...a real good build..some sharp detailing there. Well done. Probably should have put it in the Racing section though.
-
45 minutes ago, IanH said:
Nice job there Rich!
I started this a while back, but never got very far, have just pulled it out again and will be finishing it up soon.
Will continue the updates on my thread.
Thanks Ian...you were my incentive for getting the kit...I hope I am yours for finishing it.
-
On 11/7/2023 at 6:12 PM, bbowser said:
That is nice! Great stance, and your making the wheels steer just adds to the mix. Well done.
Thank you Bruce...that's my favorite modification
12 hours ago, Phildaupho said:Superbly built. I concur with all the other well deserved accolades.
Thank you Phil
12 hours ago, Dave B said:Great build Rich, you were lucky to get a "recent acquisition" Fisher kit!!
Dave B
Thanks Dave...those kits are still out there. I really think, after talking to a lot of modelers, that a lot of people buy them because they like the subject matter. But don't realize the kind of work it takes to build them. They don't build like plastic kits, which is what most of us are use to. Then they dig into the box and realize they have bit off more than they can chew and it never gets built. Eventually when it comes time to thin out the stash they are the first to go. This kit in particular was purchased from someone who said he was never going to build because he was intimidated by it. Not so for you and I. So keep an eye out for these kits.
-
1
-
-
Mario I luved this kit and yes it was very fiddly but well worth it. Yours turned out spectacular and , of course it looks dynamite with your background. Very well done.
-
A very nice job Phil. Great back story too.
-
19 hours ago, Jim B said:
Great looking Porsche. Well done.
Thanks Jim
16 hours ago, Roger U said:I agree, it’s a really nice looking build.
Thank you too.
10 hours ago, afx said:Very nice.
Thanks JC
7 hours ago, Pierre Rivard said:Stunningly beautiful Rich. Fit and finish are impeccable and the low and aggressive stance convey speed in a most impressive way. The wipers alone are a work of art.
Man this build is absolutely gorgeous!
Thank you so much Pierre. I feel like a brain surgeon after using two pair of tweezers, a tin drop of sticky glue and goggles to do those wipers.
2 hours ago, 1959scudetto said:This is how a 908 longtail should look like ! Very nice model, Rich - simply perfect: the graceful body lines, the stance, the color and your trademark steerable front wheels.
That windshield wiper would drive me nuts...
Thank you very much Helmut for the nice words. Nobody has ever called me sane...!!!
-
Rex and Bill...you guys are welcome...glad I could help. If and when I ever find a nice set of 1/16 wheels and tires I might consider taking this apart and building it the right way now that I know how.
-
A recent aquisition and completion. Fisher Model and Pattern 1968/69 Porsche 908 longtail. Paint is Tamiya TS26 white and Testor Flourescent green for the accent. Modifications include steering wheels, seatbelts, dash switches and a few others. This particular car was driven to 1rst place at the SPA 1000 by Jo Siffert and Brian Redman. Thanks for looking and comments welcome.
A fairly simple kit, as most resin are. Windscreen wipers are very delicate and took some patience.
Minimal decals but all went on perfect. Those latches didn't want to come off the carrier sheet easily...also quite delicate.
Window fit took some time but was worth during final assembly. All fit well. Wheels are painted Tamiya Dark Iron.
Don't usually take this picture but there were some detail worth seeing.
-
6
-
-
Pierre...as a side note your model has been featured on Fernando Pinto's Facebook page. A credit to your talents when the creator of the kit thinks its awesome too.
-
1
-
-
Mario...this looks great. I know for a fact that those decals were not a walk in the park. The paint and especially the engine weathering are also top notch. Never hurts to step out of your comfort zone...you did well.
-
V-E-R-Y cool. The masking on that paint job is incredible. Luv the steering wheels...is that one of your modifications...well done.
-
1
-
-
Helmut...despite all your trials and tribulations you managed to turn out a very respectable model. Well done. Helpful hint..if I may. Next time you need a thin parting line stripe lay a piece of appropriate color vinyl tape on a piece of glass. Cut it the width you want with a sharp blade and metal straight edge. Apply like tape where you want it. You can even adjust it when its on the model with a toothpick or similar. Much easier than trying to paint it although you still did a great job.
-
1
-
-
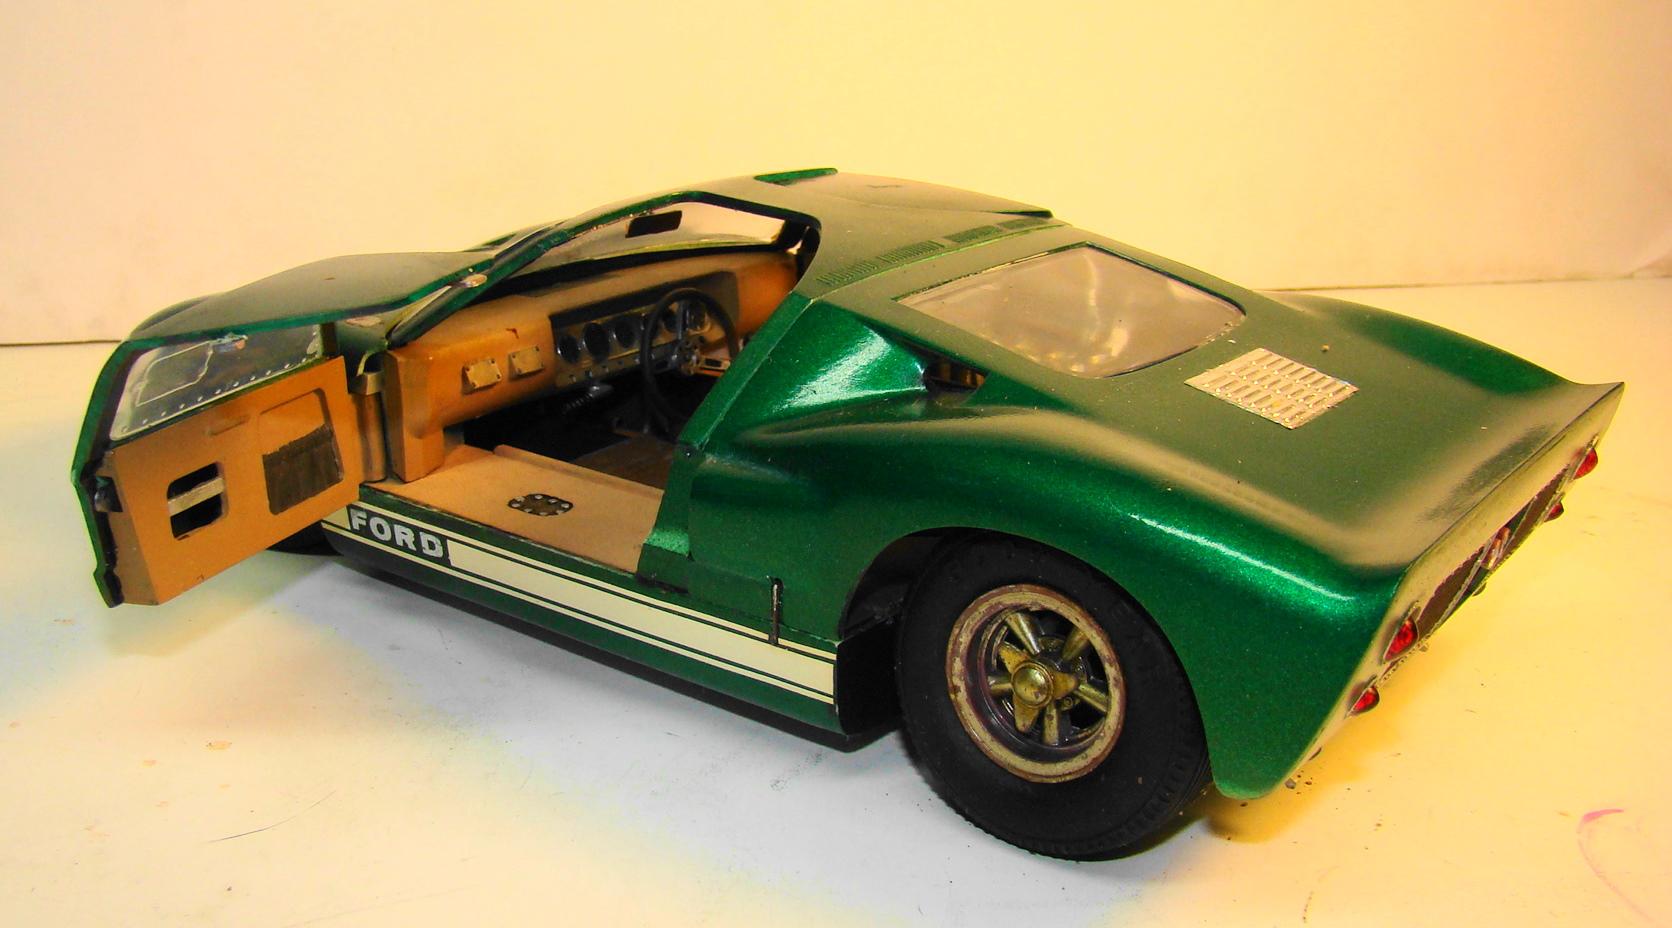
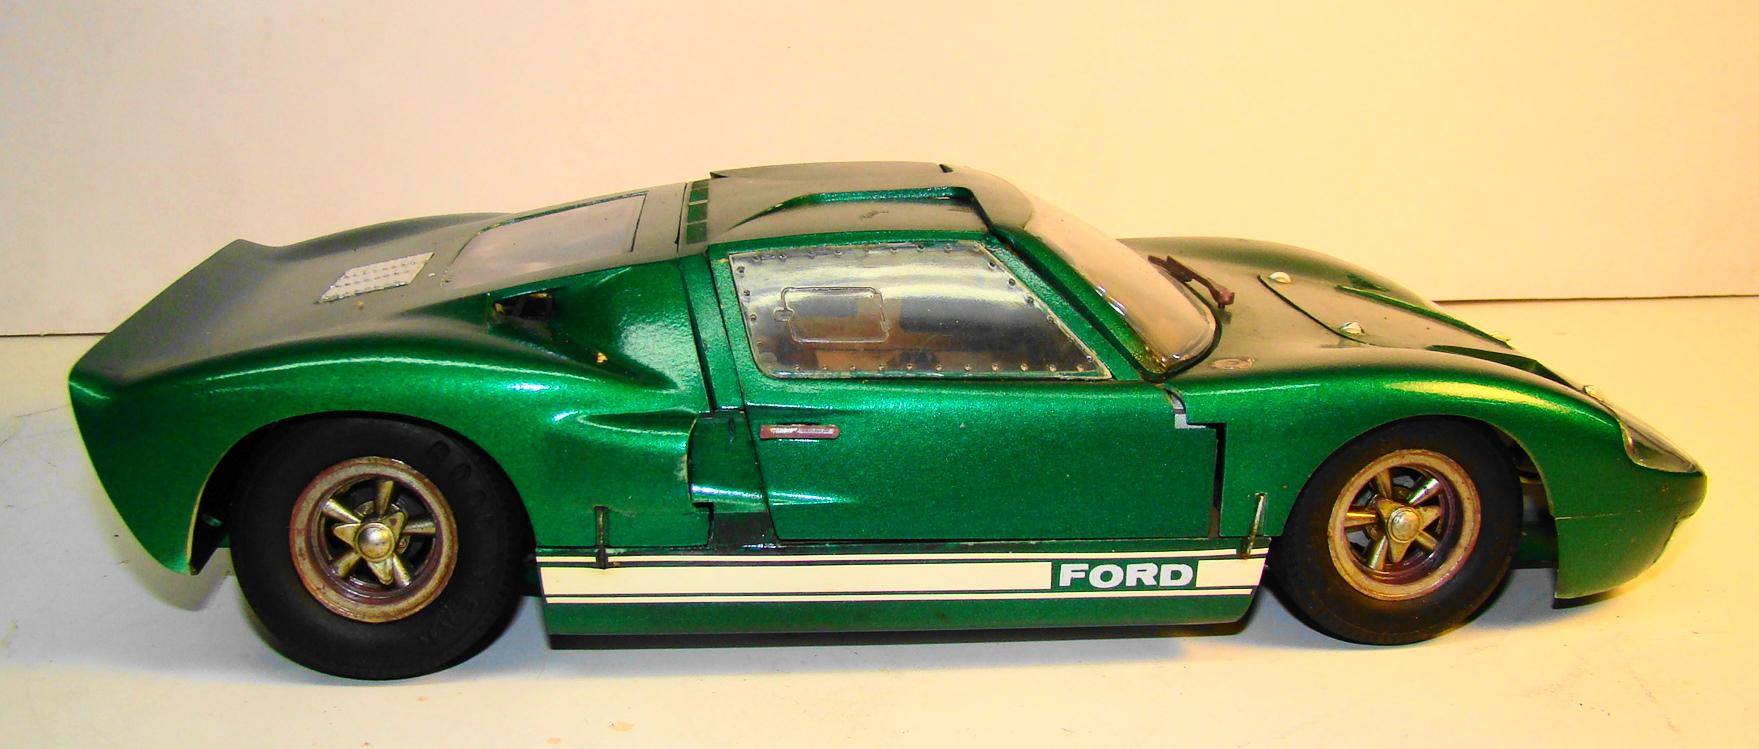
Bill...here are 4 shots of the completed model out of my collection. This kit was done sometime in the late 70's early 80's. My goal then was to do a street version of the car. My focus was on the working components of which there are many. Like the door latches really work. And yes, the wheels and tires are really horrible. This has sat at the back of my case forever as I was never really happy with the results. But because it was built mostly box stock it should give you a good idea of what you are asking for. I have left some additional comments in the picture captions. If I can be of further assistence you need only ask.
The lines on the body are not too bad however you be the judge. If I recall the box art was way better than the kit. Still have it somwhere.
Interior , particularly seats, could probably use some help. Never liked the way the steering wheel looked either.
One thing I would definetly do something about is the fit of all the body panels. Doors in particular. I made some metal clips to hold the body down, a necessity back then. Didn't want to take them out for pictures but can if you want. Everything opens on this kit.
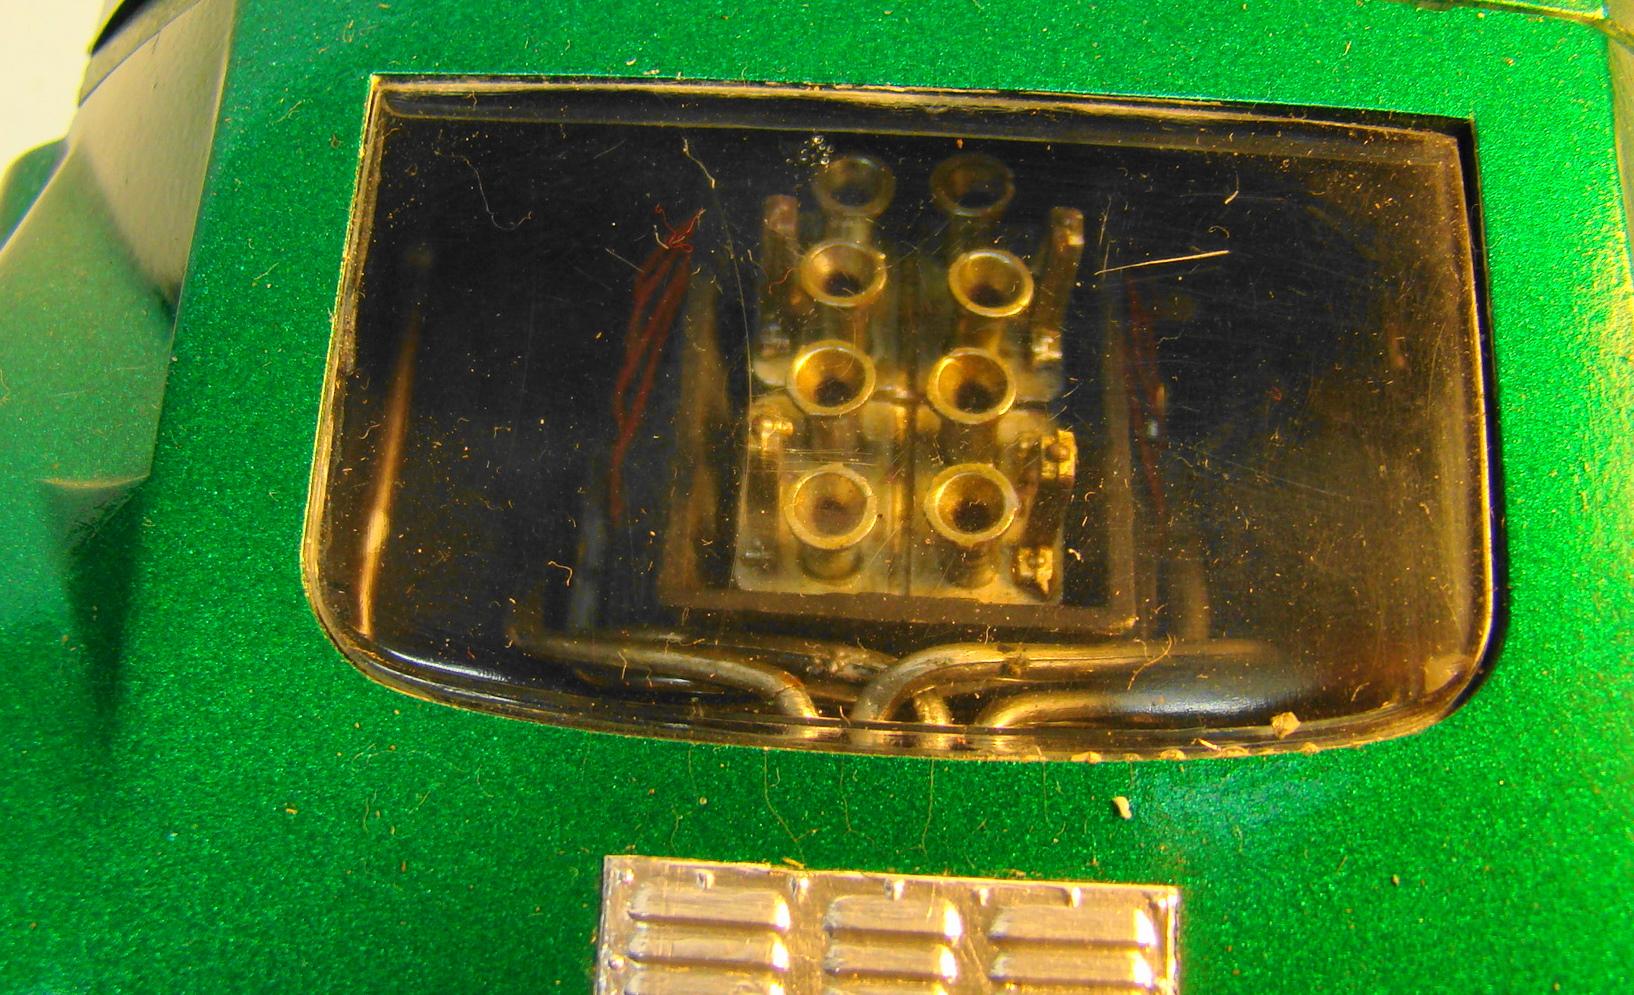
Engine from here looks OK but I think this kit was motorized as was typical of Japanese kits then. I mad the suspension work on this kit because it was what I lioked to do then. (still do to some extent now) So the car sits a little lower than normal. Tires were hollow rubber thingies and may have collapsed a little too. I have since learned to fill them with urethane foam. Hope all this helps you. Would like to see what you do with this kit.


Tamiya Lexus Zent Cerumo SC 2006
in Other Racing: Road Racing, Salt Flat Racers
Posted
Pretty cool looking Lexus. I have done this kit but in a different livery. I am wondering about the paint division between the red and silver. Is that a red decal that separates the two colors and did you have to match the paint to the decal. If so you did an outstanding job. It looks flawless.