Bill Anderson
-
Posts
154 -
Joined
-
Last visited
Content Type
Profiles
Forums
Events
Gallery
Everything posted by Bill Anderson
-
 The one I'm looking at is a '66 Revell "Muscle" series, and its a grey car on box top. Sorry, I can't get the model number.
 -
Yep, I should have been clearer....... "Best" is obviously subjective of course. What I want is a realistic, higher skill level kit, and the one I have my eye on now is Revell 14551 (Yellow sedan box cover). It seems to have the most parts, which I tend to equate with more detailed. Obviously I would prefer a hardtop (buddy had one back in the day) but if nothing else, the sedan will work.
-
I'm looking to add a 57 Chev to my collection. I see Revell has a really detailed one, but it is a sedan. Is there a hardtop out there that is worthy? Thank you all, Bill Anderson
-
Well, I want a GTO kit to add to my roster and am looking for the most detailed 64 or 65 or 66 kit out there. Revell seems to be a good choice, but which one??? Thank you all! Bill Anderson
-
WOW !!! Those are some really outstanding models! FYI, I ordered the Tamiya white primer yesterday, so it is on its way.
-
THANK YOU ALL !!! Seems pretty unanimous, so white primer it will be. No matter what my problem, you folks always come through. Thank You!
-
I've got a second 1967 Corvette to build, this one representing what my Wife drove "back when". It was yellow with a black stripe (and 4 speed). So I have the Revell kit (#2491), which is molded in white plastic. Since IMO painting with yellow can be a bit difficult, I wish to ask the question. Should I paint the yellow directly on the white body shell, or should I apply grey primer first and then the yellow? Oh, the paints are all Tamiya rattle can. Thank you!
-
Wow, you guys are good! Thank you all for the response and info. As I haven't opened the "blue glue", I will return it on my next trip to Hobby Lobby. Please, have a good day! Bill Anderson
-
I have been using the Testors squeeze bottle cement with the red label (281216) for years. Recently I picked up a replacement but got the blue label instead. It appears that the only written difference (on the container) is the "blue" is non-toxic. But it seems to me that something else must be different - i.e. drying time, adhesiveness, etc. So does anyone out there know of other differences, or have a distinct preference? Thank you all once again! Bill Anderson
-
Fine job for sure!!!
-
Hi, Well, I'm at the very end stages of building the Revell/Mongram '67 Corvette 427 Roadster (85-2968). I'm very pleased at how the motor/chassis, interior turned out, and am especially happy with the body paint job. The next step is the installation of the windshield/window "glass". Now I've done a lot of car models over the years, with some pretty decent results, but this one part is a bit "scary" to me - for want of a better word. There is no groove or pins or other features to attach the windshield to the body. I would normally scratch off some paint/chrome and use AC or a liquid cement and that has always worked in the past. But I find myself procrastinating on this one, and frankly don't want to screw up the paint - either by scratching too much off or getting adhesive in the wrong places. So who better to ask for advice than you guys...... what have you done and what do you recommend? Thank you!!!
-
Hi, I've been using Model Masters "chrome silver" and at times the Molotow Liquid Chrome pens. I consider both to be almost "okay", but really not good enough. Soooo, what do you use?
-
Painting Advice Needed !!!
Bill Anderson replied to Bill Anderson's topic in Model Building Questions and Answers
Well, it ain't show quality but it works for me!
-
Painting Advice Needed !!!
Bill Anderson replied to Bill Anderson's topic in Model Building Questions and Answers
Well, so far so good...... spent significant time sanding the faulty paint, and got it to the point it was primer ready. Did a light coat, and didn't see any obvious imperfections. So that was followed by 3 light coats of a dark red from Tamiya (name/number in not by me now), and this morning I did a light coat of Tamiya Mica Red, and later I'll do a second light coat. Have to say, the result is pretty good - not contest quality but definitely acceptable. Gotta say, some lessons were learned and/or re-emphasized during this whole process. Thanks all!!! -
Painting Advice Needed !!!
Bill Anderson replied to Bill Anderson's topic in Model Building Questions and Answers
Thank you both for the sensible advice! Like I wrote, this experience was a first for me, and I've been building models since the mid 1950s. I'm not placing blame (that belongs to me), but my nemesis was those two cans of Testors paint. Pretty sad, for I've never had a problem with them before. -
Hi, I have Revell '57 Corvette w/427 kit. I finished the chassis, motor, and interior and IMO they came out nicely. So my next step was to paint the body shell. I used a Testor's rattle can and it was faulty, throwing out blobs of paint (subject of an earlier thread). So I cleaned it up (very little paint got on it) and ordered some Tamiya Mica Red. Yesterday I started to spray the shell with the Mica Red and it just wasn't covering. So I thought, what it needs is a primer. Not having any available, I foolishly decided to use some Testor's gold, which I had used successfully months ago on another model. Well, of course the gold covered with a fairly light spray, but when I hung it to dry I noticed the paint was bubbling in places! That is another first for me. Sooo, I scraped, sanded, and used thinner to clean up the shell. Then I ordered a can of Tamiya light grey primer. I "assume" the primer will cover nicely, but will the Mica Red lacquer cover over it? I've considered buying another kit for the body shell, but I'm hoping I can save the one I have. Honestly, I've had more paint problems in the last month than in all the previous decades of model building. Your comments are more than welcome!
-
My First Can of Bad Spray Paint
Bill Anderson replied to Bill Anderson's topic in Model Building Questions and Answers
OK, both are "TS" (ts87 and ts 39) which means they are lacquer. And nowhere on the cans does it say lacquer - at least not in English. -
My First Can of Bad Spray Paint
Bill Anderson replied to Bill Anderson's topic in Model Building Questions and Answers
Got two cans of Tamiya delivered yesterday - Mica Red for the '67 Vette, and Titanium Gold for the "62 Vette. I have a question, and the answer may be staring me in the face. How can I tell if these are enamel or lacquer??? -
My First Can of Bad Spray Paint
Bill Anderson posted a topic in Model Building Questions and Answers
I went to the garage to spray a '67 Corvette, using a new rattle can of Testor's #1152 Metallic Red. I shook the can for some time (producing a solid rattle) , and gave it a test "squirt", and it seemed fine. My first pass was the underside of the hood, and suddenly the can is throwing out blobs of paint. I re-shoke the can and tried again, and the blobs continued to shoot out. I managed to clean the paint off with some thinner, and then threw the can away in disgust. I've been using spray cans (for all kinds of stuff) since the late '50s, and this never happened before. I just ordered a can of similar color from Tamiya, which should be fine. -
Thank you! That looks like the best way to go.
-
That color sure looks right, but I need a "rattle can" and that is what I prefer. So my question remains, what paint would be closest that comes in a spray can?
-
Hi, I have the kit and will be replicating a '62 Vette from my JC years. It was "gold" in color, similar (same?) as what the Pontiacs had back then. I think that was called Sahara Gold, but that is questionable. Anyway, my question is, what Testors or Tamiya rattle can paint will come closest to the color I am after? Thank you all for your input! Bill Anderson
-
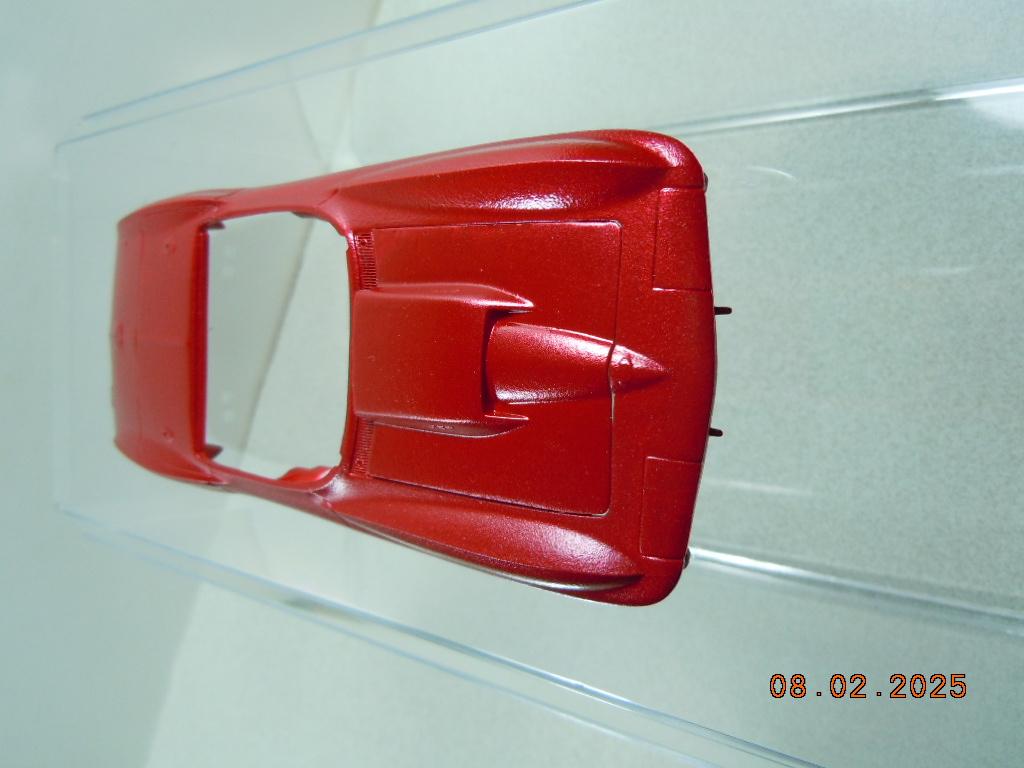
Ok, I put the Ford GT back on the shelf and started the Revell '67 Corvette 427 Roadster. It's a pretty nice kit and "normal" as model car kits go. The color will be metallic red.
-
Thanks all for the input. Yes, I've done the YouTube videos and gotten some insight. But I confess I'm just not sure I can do it justice. I think not having a one piece body is a big part of my concern, but the instructions (at this point anyway) seem a bit intimidating. Funny, the only other model kit that I've had (since the late '50s) that "scared" me was a large wooden Constitution ship model. As I recall, it frustrated the heck out of me and I scrapped it.
-
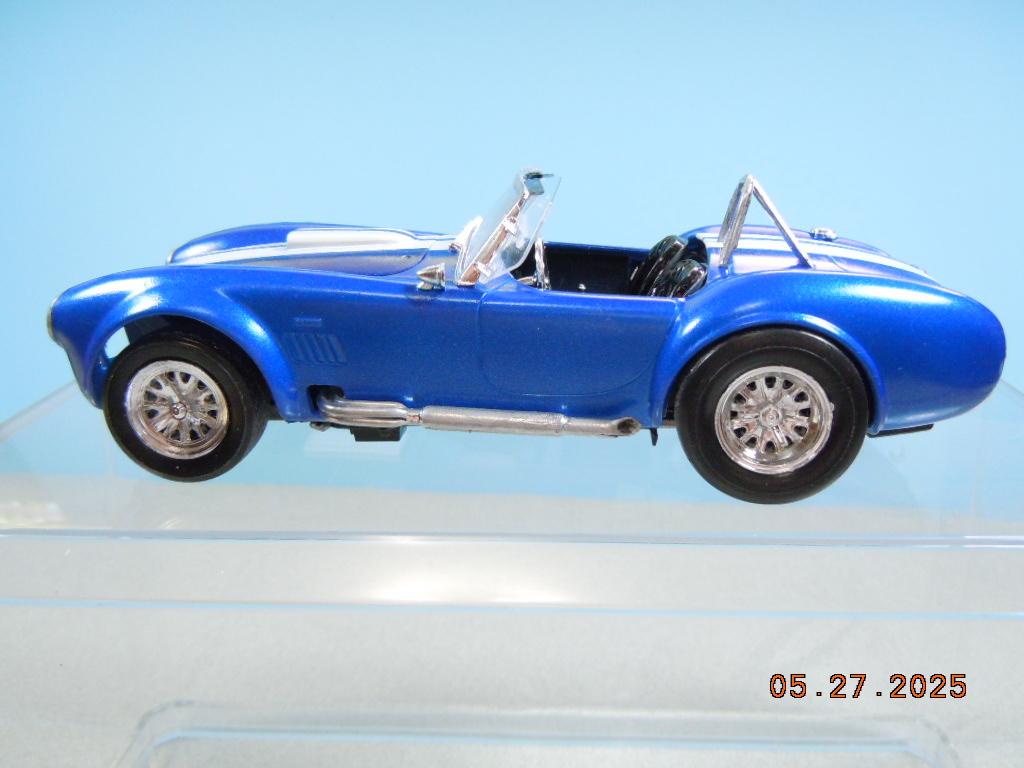
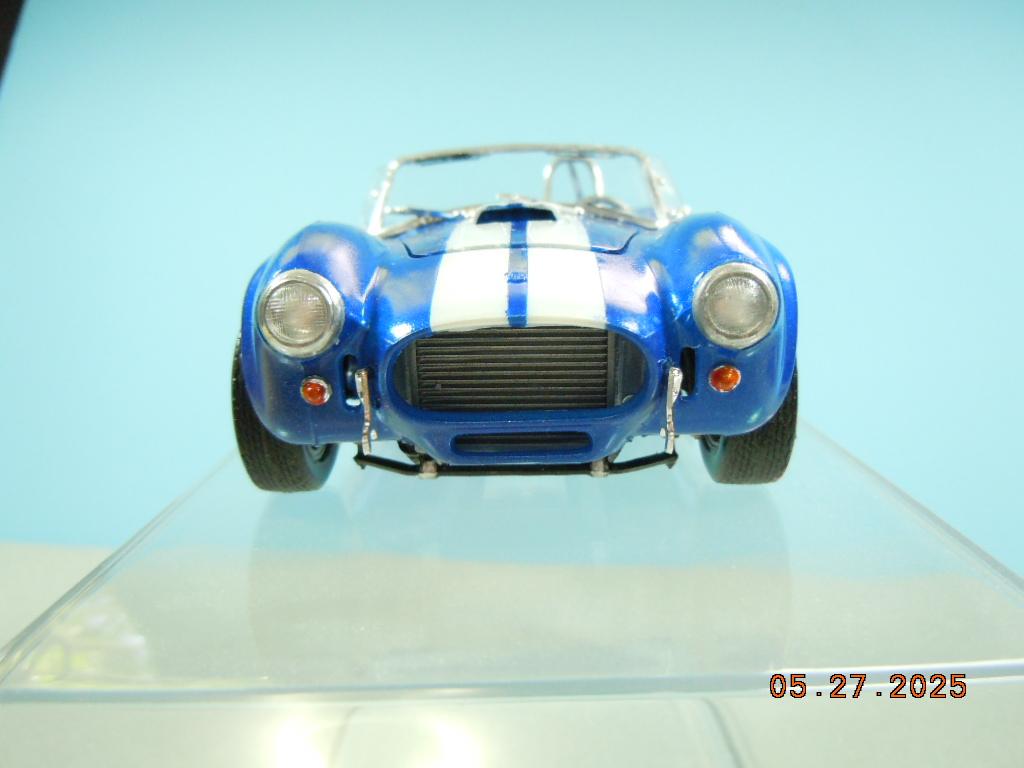
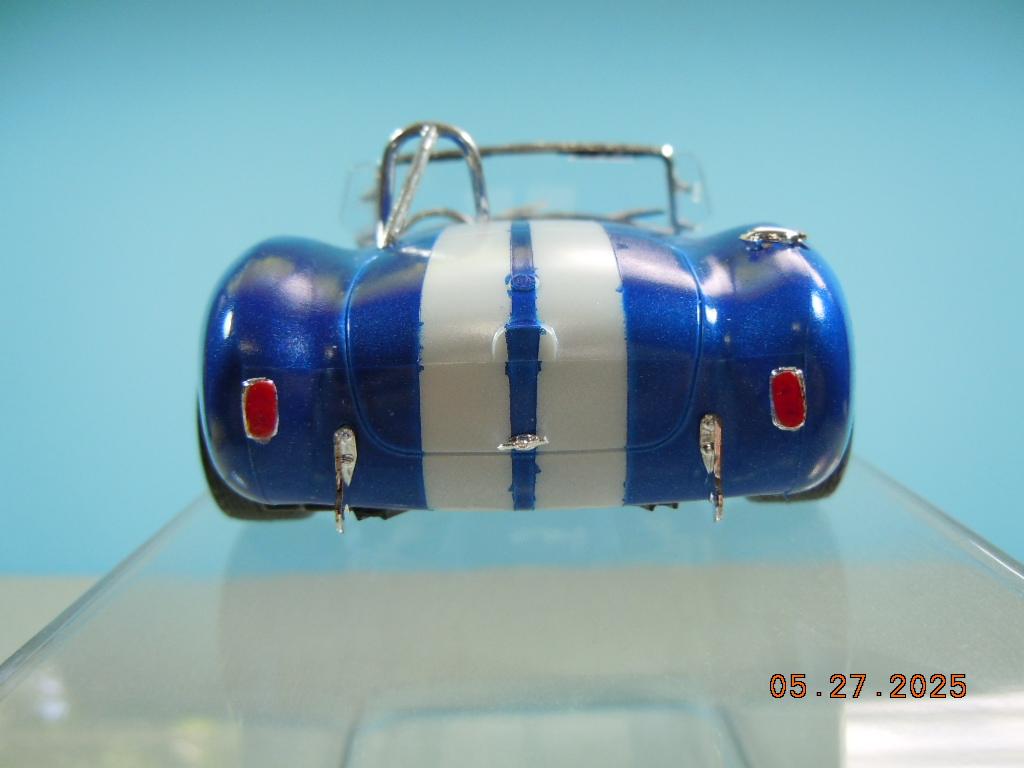
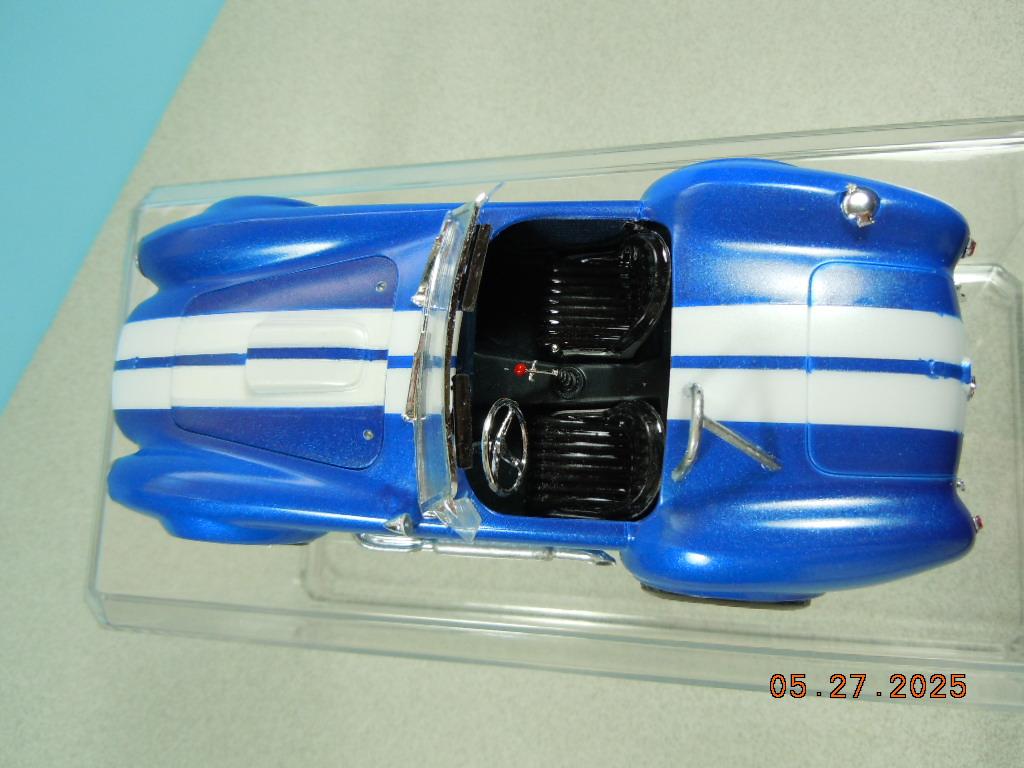
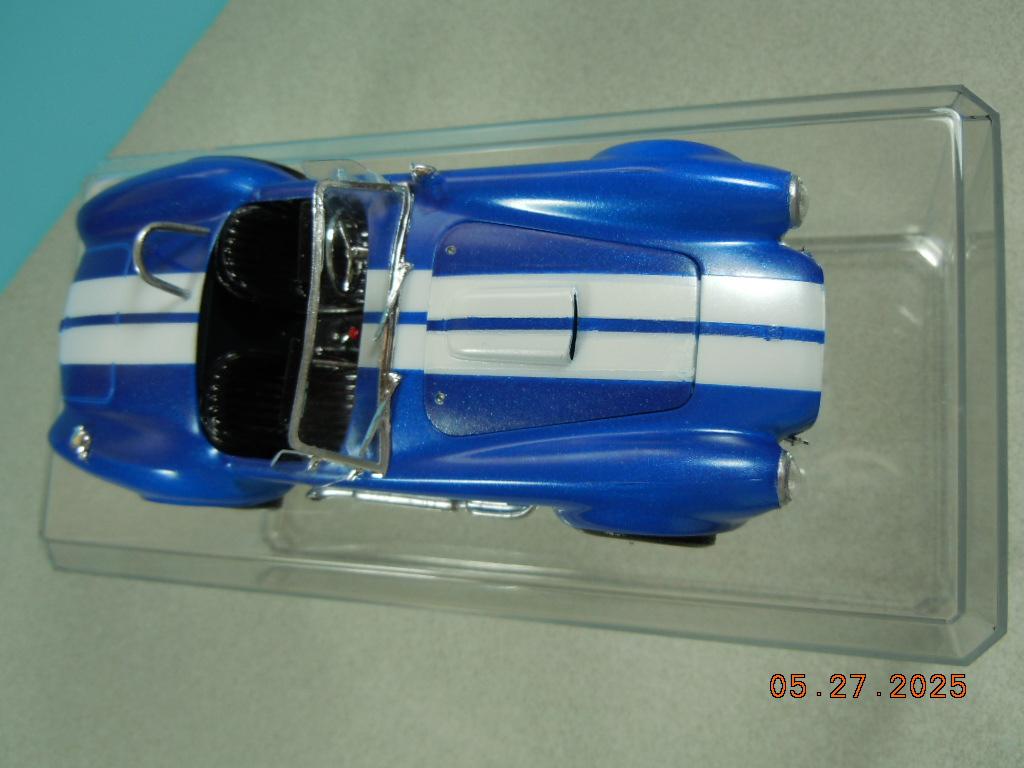
Finally finished the Revell 1965 Ford Shelby 427 cu. in. Cobra today. Ha, I was 80 when I started it and I'm now 81! Here are a handful of pics, and I continue to be amazed at how the high definition camera highlights all my goofs. Honestly, it looks better in person. I made two mistakes with the model - one is obvious and the other only an old time Ford guy would see. The center stripe came out pretty nice on both the body and the hood (done separately), but the hood stripe is a bit out of alignment with the body. The other mistake was that I put the intake manifold on backwards, thus forcing the distributor to be located at the back (rather than front) of the motor. By the time I realized my mistake, the thing was solidly glued in place. I've tuned many a pre '70s Ford, and always appreciated that the distributor was up front and easy to work with (set points, etc).
- 1 reply
-
- 1
-