
dontgobrassit
-
Posts
30 -
Joined
-
Last visited
Content Type
Profiles
Forums
Events
Gallery
Everything posted by dontgobrassit
-
Jerry Cardinal's El Matador - A tribute to Bill Cushenbury
dontgobrassit replied to Raul_Perez's topic in Model Cars
Thank you George for the Model Car awards. I would also like to Thank everyone who voted for the El Marador People's Choice Award. -
Jerry Cardinal's El Matador - A tribute to Bill Cushenbury
dontgobrassit replied to Raul_Perez's topic in Model Cars
Hey Guys, Is there anybody out there that is going to GLS in Uath this year ? I would like to see you there. -
Jerry Cardinal's El Matador - A tribute to Bill Cushenbury
dontgobrassit replied to Raul_Perez's topic in Model Cars
El Matador -
Jerry Cardinal's El Matador - A tribute to Bill Cushenbury
dontgobrassit replied to Raul_Perez's topic in Model Cars
I would like to THANK everyone for their support and encouragement during the build of the El Matador. I was shocked to my scoks when I won the awards: Adult People's Choice and the Model Cars MCM Award from NNL 2009. A special THANKS goes to Raul for his help in getting the pictures on line for all to enjoy. Next stop is Goodguys Pleasant, California April 3rd to April 5th, then on to GSL, Salt Lake City, Utah April 30 to May 3. I hope to see you there. SO once again I would like to THANK ALL of YOU. Jerry Cardinal -
Jerry Cardinal's El Matador - A tribute to Bill Cushenbury
dontgobrassit replied to Raul_Perez's topic in Model Cars
Thanks for all of your comments!! I really appreciate them!! Jerry -
60's Bare Bones Digger - Updated 8-4-08
dontgobrassit replied to Bernard Kron's topic in WIP: Model Cars
Bernard, Nice job on the old digger!! Can't wait to see it finished!! Keep up the GREAT work!! -
Here's a picture of the El Matador that I'm building from a Revell 40 Ford kit for the next GSL. Here's a picture of the body with the base coat of paint. Here's a picture of the brass front brakes for my El Matador that I'm building for the next GSL. The entire assembly is bolted together with nickel plated brass hardware from Scale Hardware. Here's a picture of the rear brake assembly that's fabricated from brass and wire. Thanks for looking,
-
Thanks for comments on may wedge.
-
Here's my wedge cut lead sled. I cut about 5/8" out of the back. The paint is Tamiya Lime Green base with Testors pearl and a 2-step automotive epoxy clear. Here you can see how much the body was cut out of the back. The taillights are made from red plastic that I machined in my lathe. I made the decals from an image that I found on the internet. I airbrushed a light coat of dirty wash thinner over the bottom to give it a slightly aged look. I added a little wire detail and carburator linkage to the stock engine. I hope that you enjoy this one as much as I did building it. Thanks,
-
Paint - nail polish 810 stop traffic .
-
Moter is henley customs model parts.
-
Moter is henley customs model parts.
-
Yes I do, but unable to load them at this time. Jerry
-
This is my reworked 57 T-Bird. Here you can see the working tail lights. Hope that you enjoy the pictures of a "modern" 57 T-Bird.
-
Here are some pictures of my 49 Merc Wedge with the homemade decals applied.
-
Model Cars Best Of
dontgobrassit replied to Gregg's topic in General Automotive Talk (Trucks and Cars)
The 55 Nomad Gasser by Raul Perez. I am just putting my two cents in, he had done a very nice job building this model. -
Color Tamiya lemon yellow x-8 . in a air brush. badger pro- xv htup 5016
-
Hope to have some engine pic soon. Thanks
-
To this point it is four steps 1. grey primer from Wal Mart, 2 Tamiya light green TS 22, 3 Testors Pearl lacquer, 4 Testors clear lacquer. There might be three additional coats to this model before its completed . Have a nice day...
-
Yes I machine my own stuff. I don't find it hard to work with brass, you do have to heat it up to make it plyable. When you start pounding on it, it gets hard, then repeat the steps of heat and pounding till you get the shapes your after. Thanks for your interest.
-
The dash and sides of the seat are gold leaf. I am not sure what year the dime is, but I should have gotten a 32 . Thanks for your interest in my models
-
The dash and sides of the seat are gold leaf. I am not sure what year the dime is, but I should have gotten a 32 . Thanks for your interest in my models
-
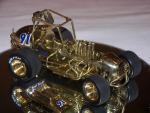
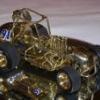
This is my 32 Brass Ford. I used the parts from the Revell 32 Ford 3 window kit as templates to make everything from brass, except for the body and the engine block. Here's a picture of the actual dime steering wheel. I did this for fun to see how many people would notice it. Here you can see the brass valve covers, air cleaner, alternator, radiator shell and headlights. + Here you can see the brass wheels and the drum brake detail. This is the all brass frame and working suspension that was made using the kit parts as templates. Stay tuned, more to come as I get better at working with the website...
-
High speed and carbon tipped tools work the best. Other than that, just try different things to see what works best for you. I also polish the parts on the lathe when I can. Good luck,
-
If you look closely you can see the rivet detail that I put in using decals that I made. The doors include working, sprung, door latches that have working handles on the inside and the outside. I also opened and hinged the trunk. I made the flame decals. Here are a few engine detail pictures that I've added: Enjoy and have a nice day...