
Marcus M. Jones
-
Posts
159 -
Joined
-
Last visited
Content Type
Profiles
Forums
Events
Gallery
Everything posted by Marcus M. Jones
-
Thank you Bryan for the compliment. if you decide to build it and have any questions send me a PM.
-
68 charger with a scratched built AM frame http://www.modelcars...opic=58199&st=0 here is a couple zip files of many reference pics. there are also pics for a independent rear end. AM Max G Frame https://hotfile.com/...hassis.rar.html AM Frames for tri 5 chevy's and corvette. 60 plus meg file https://hotfile.com/...hassis.rar.html here is a list of plastic you will need 08 X .125 strips are Evergreen that is the main frame everything else is Plastruct. with the exception of the Hex rod Evergreen can be used in place of Plastruct Round Rod for the exhaust tubes .125 (finding hollow tube would be easier and give a cleaner look than drilling it out yourself like i did.) Round Rod for rear air bag mount .04 Round Rod for the 4link set up .05 for the main and .06 for the ends. Hex Head for your jam nuts .05 or you could go slightly bigger and use .06 Sheet Plastic for brackets and flanges .01 thickness Sheet Plastic for floor and frame work .02 thickness i did not heat the plastic to bend it. i scored one side of the plastic and carefully broke the scores enough to bend but not to break it in half. the .02 sheet plastic was used to hold those bends and for strength. if you don't understand what im trying to explain on the bending let me know i will do video tutorial. if you want to make your own upper and lower control arms i think .04 or .05 round rod would be the size you want. here is a link on how i made bends in the plastic without having to heat it http://www.modelcars...showtopic=58900
-
looking good already! gonna do a Art Morrison frame too? they're not all that hard to build just time consuming
-
that is absolutely gorgeous!
-
you did a good job on both pics but that top one i can see as a salable piece. if you're interested send me a PM and i will give you a couple of links you can look into
-
 doing the same myself but i started with a original damaged kit. now who is Chuck and where can i find these progress shots?
 -
bending plastic strip without heat.
Marcus M. Jones replied to Marcus M. Jones's topic in Tips, Tricks, and Tutorials
kerfs cuts would be the better way of bending but like Harry said you have to physically remove plastic. for a builder who doesn't have loads of experience or the confidence this could become a bad experience for them. even though it is a little more work with filling and adding fishplates <= didn't know what they were called in till you said it Curt) it does simplify things for the new builders a little bit. -
WAXING & POLISHING HOW-TO
Marcus M. Jones replied to Dr. Cranky's topic in Tips, Tricks, and Tutorials
Nice tutorial Doc! with all the tuts you make you need the domain name i have to go along with your doctorcrankyslabratory name -
last week i was trying to explain to another member of this forum how i do my bending of plastic for the Art Morrison frame i built. im not always the best at just explaining things without pics so here is a quick tut with pics i did for him and anyone else who will get use out of it. List of tools and supplies you will need. - sheet of paper - this will be used to draw your template. - plastic strip of your needed size. - .02 thickness plastic sheet stock. - this is to hold your shape - flat file or rotary tool with your desired cutter. - as you can see in the pics i used a rotary too in a shaping table. highly recommended if you do a lot of scratch building. - sharp hobby knife or serrated blade - pair of small pliers - your favorite glue. - - Filler - High Build Primer (Dupli Color High-Build Primer is my favorite) - sand paper 320 & 400 grit. STEP 1) Pattern Making - i omitted the pics in this step as its pretty much self explanatory. draw you desired shape on paper to use as your template. Step 2) Shaving. - in this step you are going to shave .02 thickness from where your bend will be. Step 3) Scoring - what you are going to do in this step is score some breaking lines. when scoring lines you only need to go a 1/4 depth into the plastic. you can go more if you want but no more than 3/4 keep your score lines evenly spaced at about 1/16 or 1/8 apart and as square with the plastic as you can. Step 4) Breaking - this step can be tricky for some. you will want to break the plastic on your score lines but not to the point where you break it in half. at this point it becomes a delicate process. as you can see in the pic below there is not a lot holding the plastic together and can easily break in half so handle with care. what i found when breaking score lines is to have two pairs of small pliers. one will hold the plastic while the other does the breaking. there are other tools that can be used from tweezers to jack knife or your fingers but with less control. this step is not a hard step but it can be delicate one so practice before starting your build. Step 5) Gluing - this is where step 1 and 2 come in. i highly recommend using plastic cement over fast drying glue. lay your plastic strip down following your templates pattern and secure it to its shape with whatever you use. (small bottles, pins, cinder blocks etc). you will now need to cut a piece of plastic and glue it into the cavity from step 2 the piece of plastic you just glued in will give it strength and hold the shape. when the glue is dry do your trimming and sanding. the frame below was built using the same techniques i just mentioned above. you can see the breaks and filler pieces i used in building this frame. the remaining steps left are your filling sanding priming and painting. with primer i prefer Dupli Color High Build Primer its a very easy sand-able primer that works great as a filler of minor imperfections. in the future when time allows me to do it i will make a much better tutorial with more pics and info. Thanks for looking and im always interested in your feedback.
-
this is what i love about contests. it brings the best out of a builder. nicely done and good luck!
-
good posts Doc! loved the vid and the Guitar
-
Folk art water based acrylics
Marcus M. Jones replied to Brendan30's topic in General Automotive Talk (Trucks and Cars)
i don't know about the folk art brand but some of these other paints you really need to read any warning labels they might have before spraying. i remember back in high school one brand of acrylic paint had a warning of 'will cause cancer if inhaled' -
68 Charger Revell/Gearz contest car
Marcus M. Jones replied to Marcus M. Jones's topic in Model Cars
it may sound dumb but this means more than winning. i appreciate it bro! the frame is pretty simple to build so i don't expect any questions from a season builder but if you do have any don't be afraid to ask -
nicely done! the colors are great.
-
68 Charger Revell/Gearz contest car
Marcus M. Jones replied to Marcus M. Jones's topic in Model Cars
Cesar i forgot to mention the rod i used for the exhaust tubes is .125 i drilled them out myself but finding tube the right size would be better then drilling there are too many pics to email so uploaded them all in a zip file for you and anyone else who might want the reference pics its like a 42 meg file. AM Max G Frame https://hotfile.com/dl/155724457/fcbf6b5/AM_MaxG_Chassis.rar.html AM Frames for tri 5 chevy's and corvette. 60 plus meg file https://hotfile.com/dl/155725539/97fc3ca/AM_Tri5-Corvette_Chassis.rar.html Thanks again for the compliments -
68 Charger Revell/Gearz contest car
Marcus M. Jones replied to Marcus M. Jones's topic in Model Cars
.08 X .125 + .02 sheet plastic at the joints & Bends. Cesar i know your work and i know you always give many great pics of your build progress so im excited to see you build one. if you want more pics of real Art Morrison frames give me a shout and i will get 'em to ya -
nicely done. you put in some detail that a lot of people including myself would over look or just not do. there is one little problem though... its not a highboy but a channeled rat
-
i like it! what part of Ky are you from?
-
nice build for a 3dayer. love the color too!
-
Dads '32 Chevrolet "barn find" Update 7-23-12
Marcus M. Jones replied to The70judgeman's topic in Model Cars
i agree keep it as it is. kits like this that show wear and tear are a beautiful thing. i bought a American Le-france off feebay with yellowing decals and broken or missing parts. to me i think its the best one i have on display. -
68 Charger Revell/Gearz contest car
Marcus M. Jones replied to Marcus M. Jones's topic in Model Cars
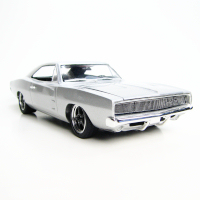
i want to thank everyone for their compliments on this build and any new future compliments i might get. unfortunately for the in progress pics i have a bad habit of not taking much if any. i do have a couple though so here they are. originally i was going to do the XV Motorsports type of suspension but i didn't like how it was turning out so i changed it to what it is now Thanks again for your replies -
this is my entry for the Revell Gearz contest.
-
I love my air brush
Marcus M. Jones replied to vintagestang's topic in General Automotive Talk (Trucks and Cars)
Patrick when you're ready to upgrade don't be afraid to ask questions in here before you make that buy. -
I love my air brush
Marcus M. Jones replied to vintagestang's topic in General Automotive Talk (Trucks and Cars)
dude if you can afford it... upgrade to a better model and stay away from that $10 plastic junk. it doesn't have to be the most expensive but $60 can buy a pretty decent one -
my recommendation... if you want to build the car in your pic get a 37 ford