Andy Oldenburg
-
Posts
250 -
Joined
-
Last visited
Andy Oldenburg's Achievements
MCM Avid Poster (5/6)
-
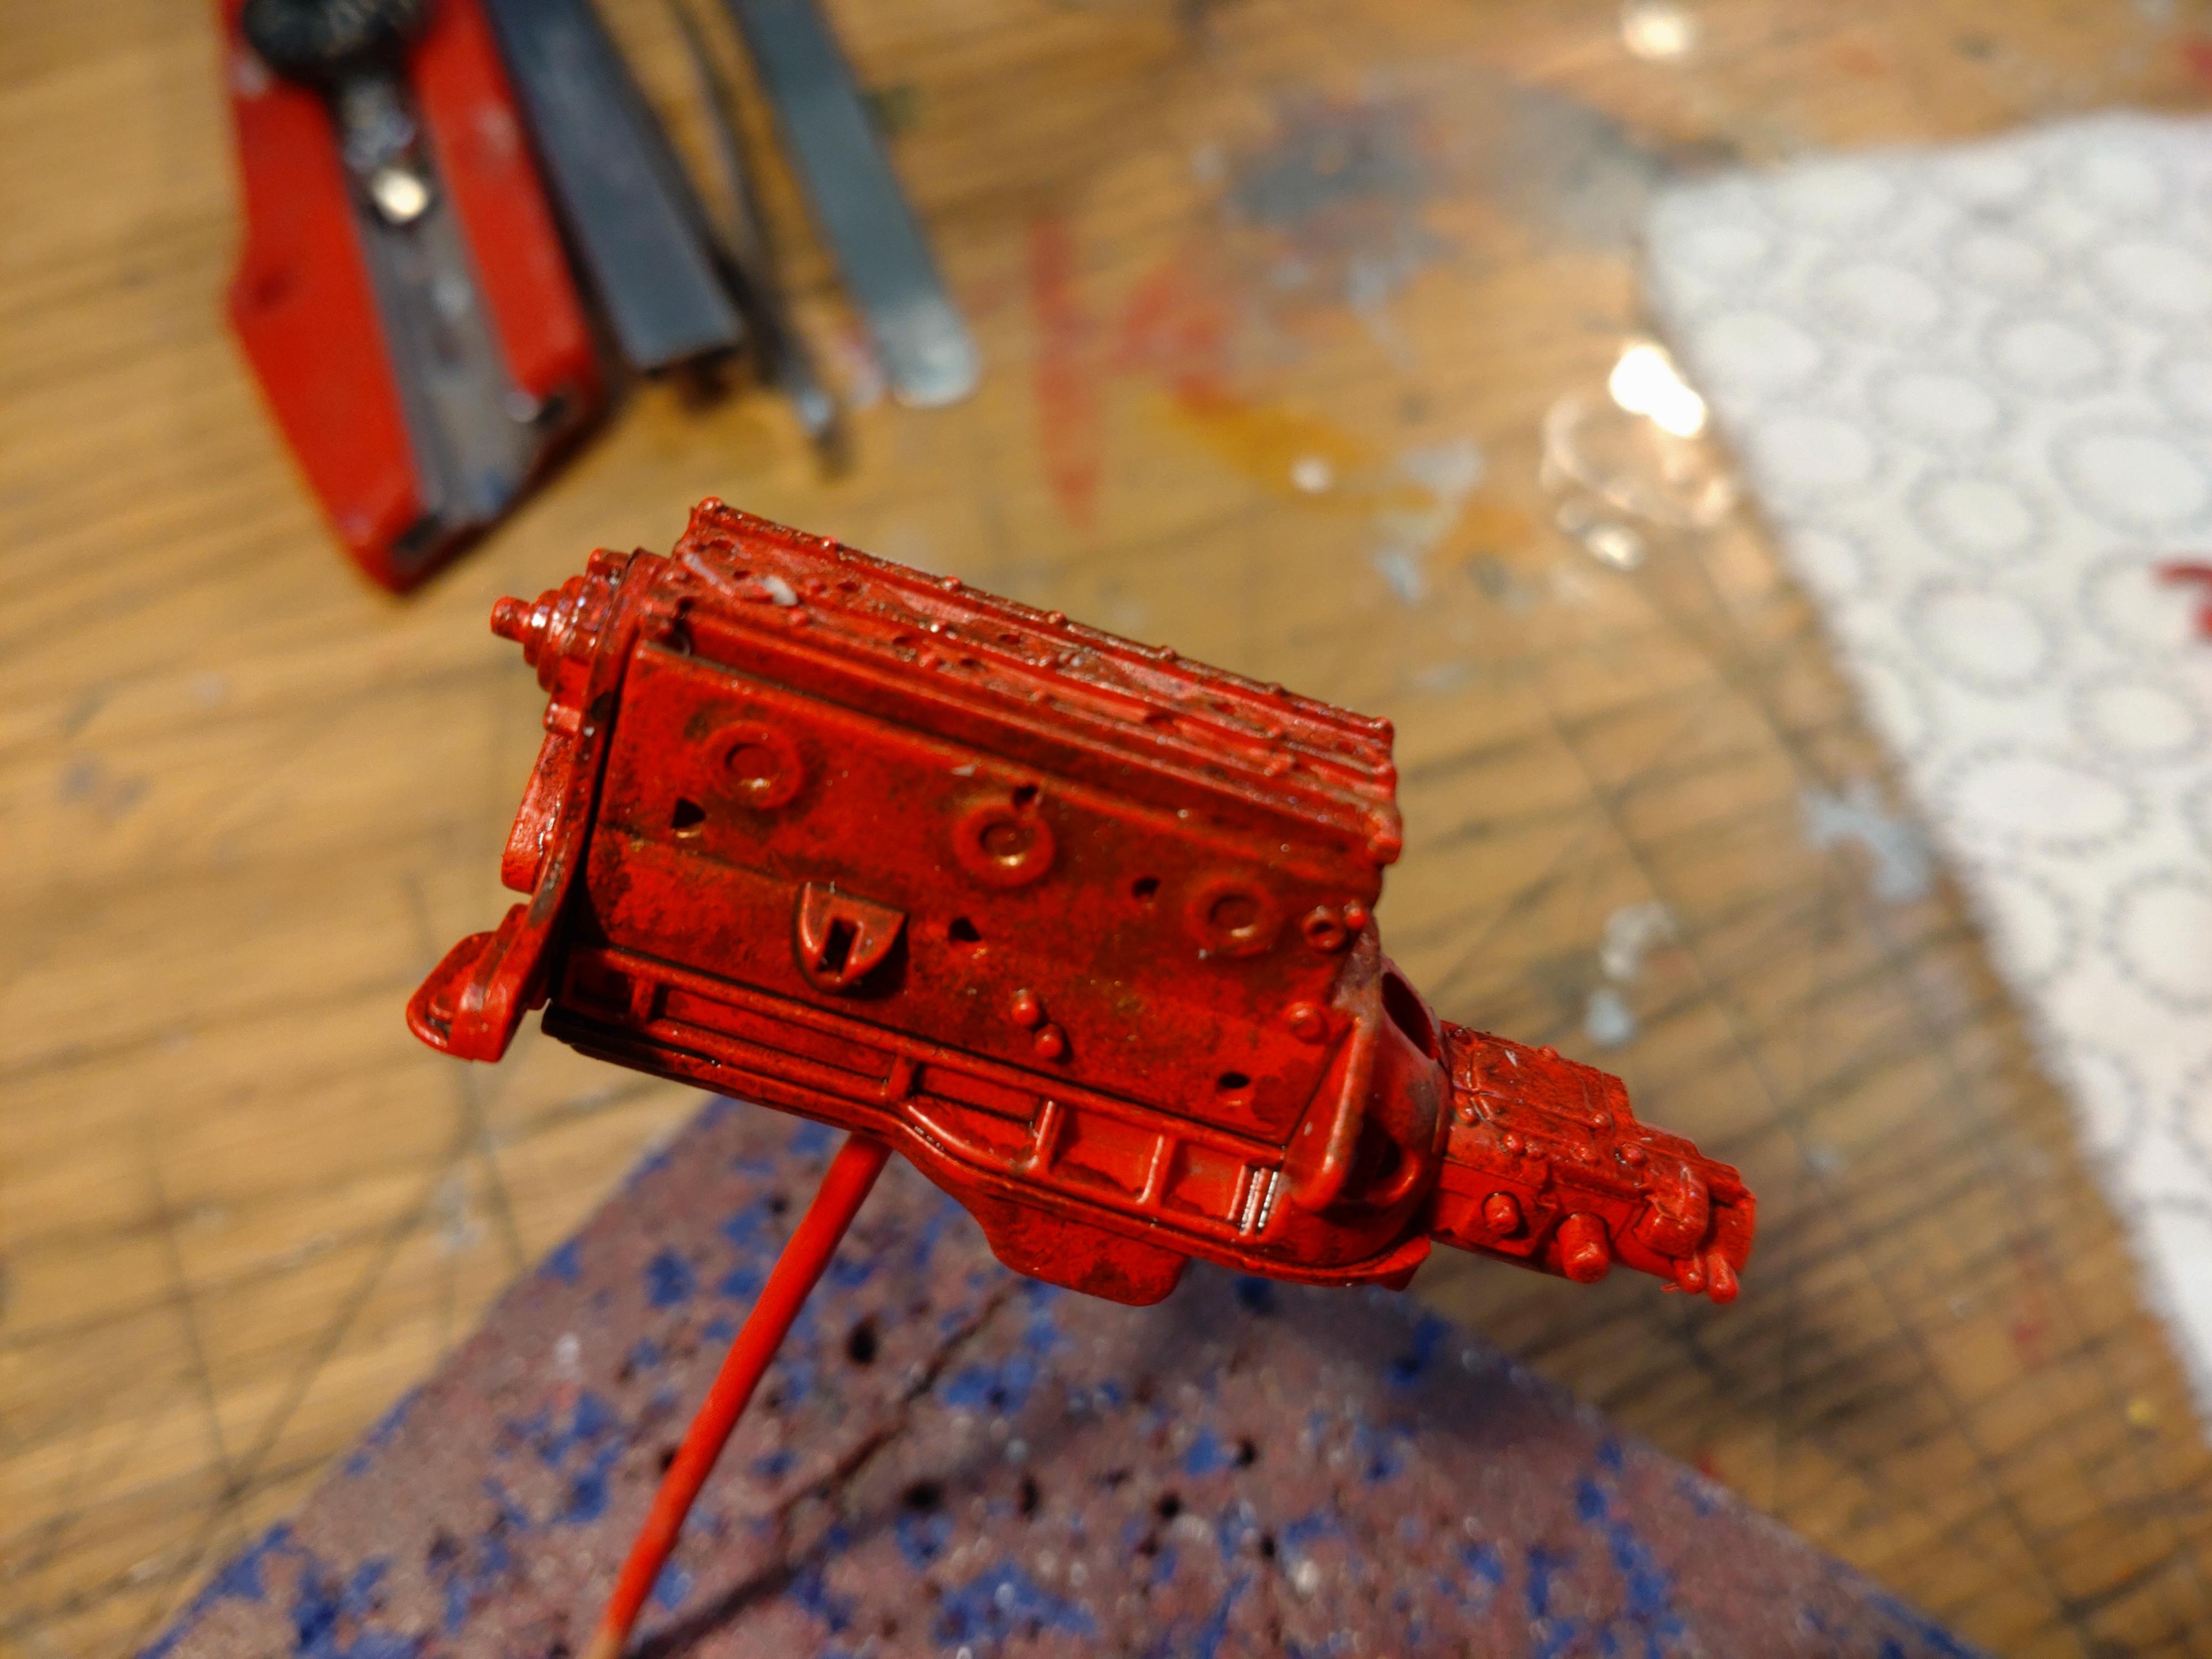
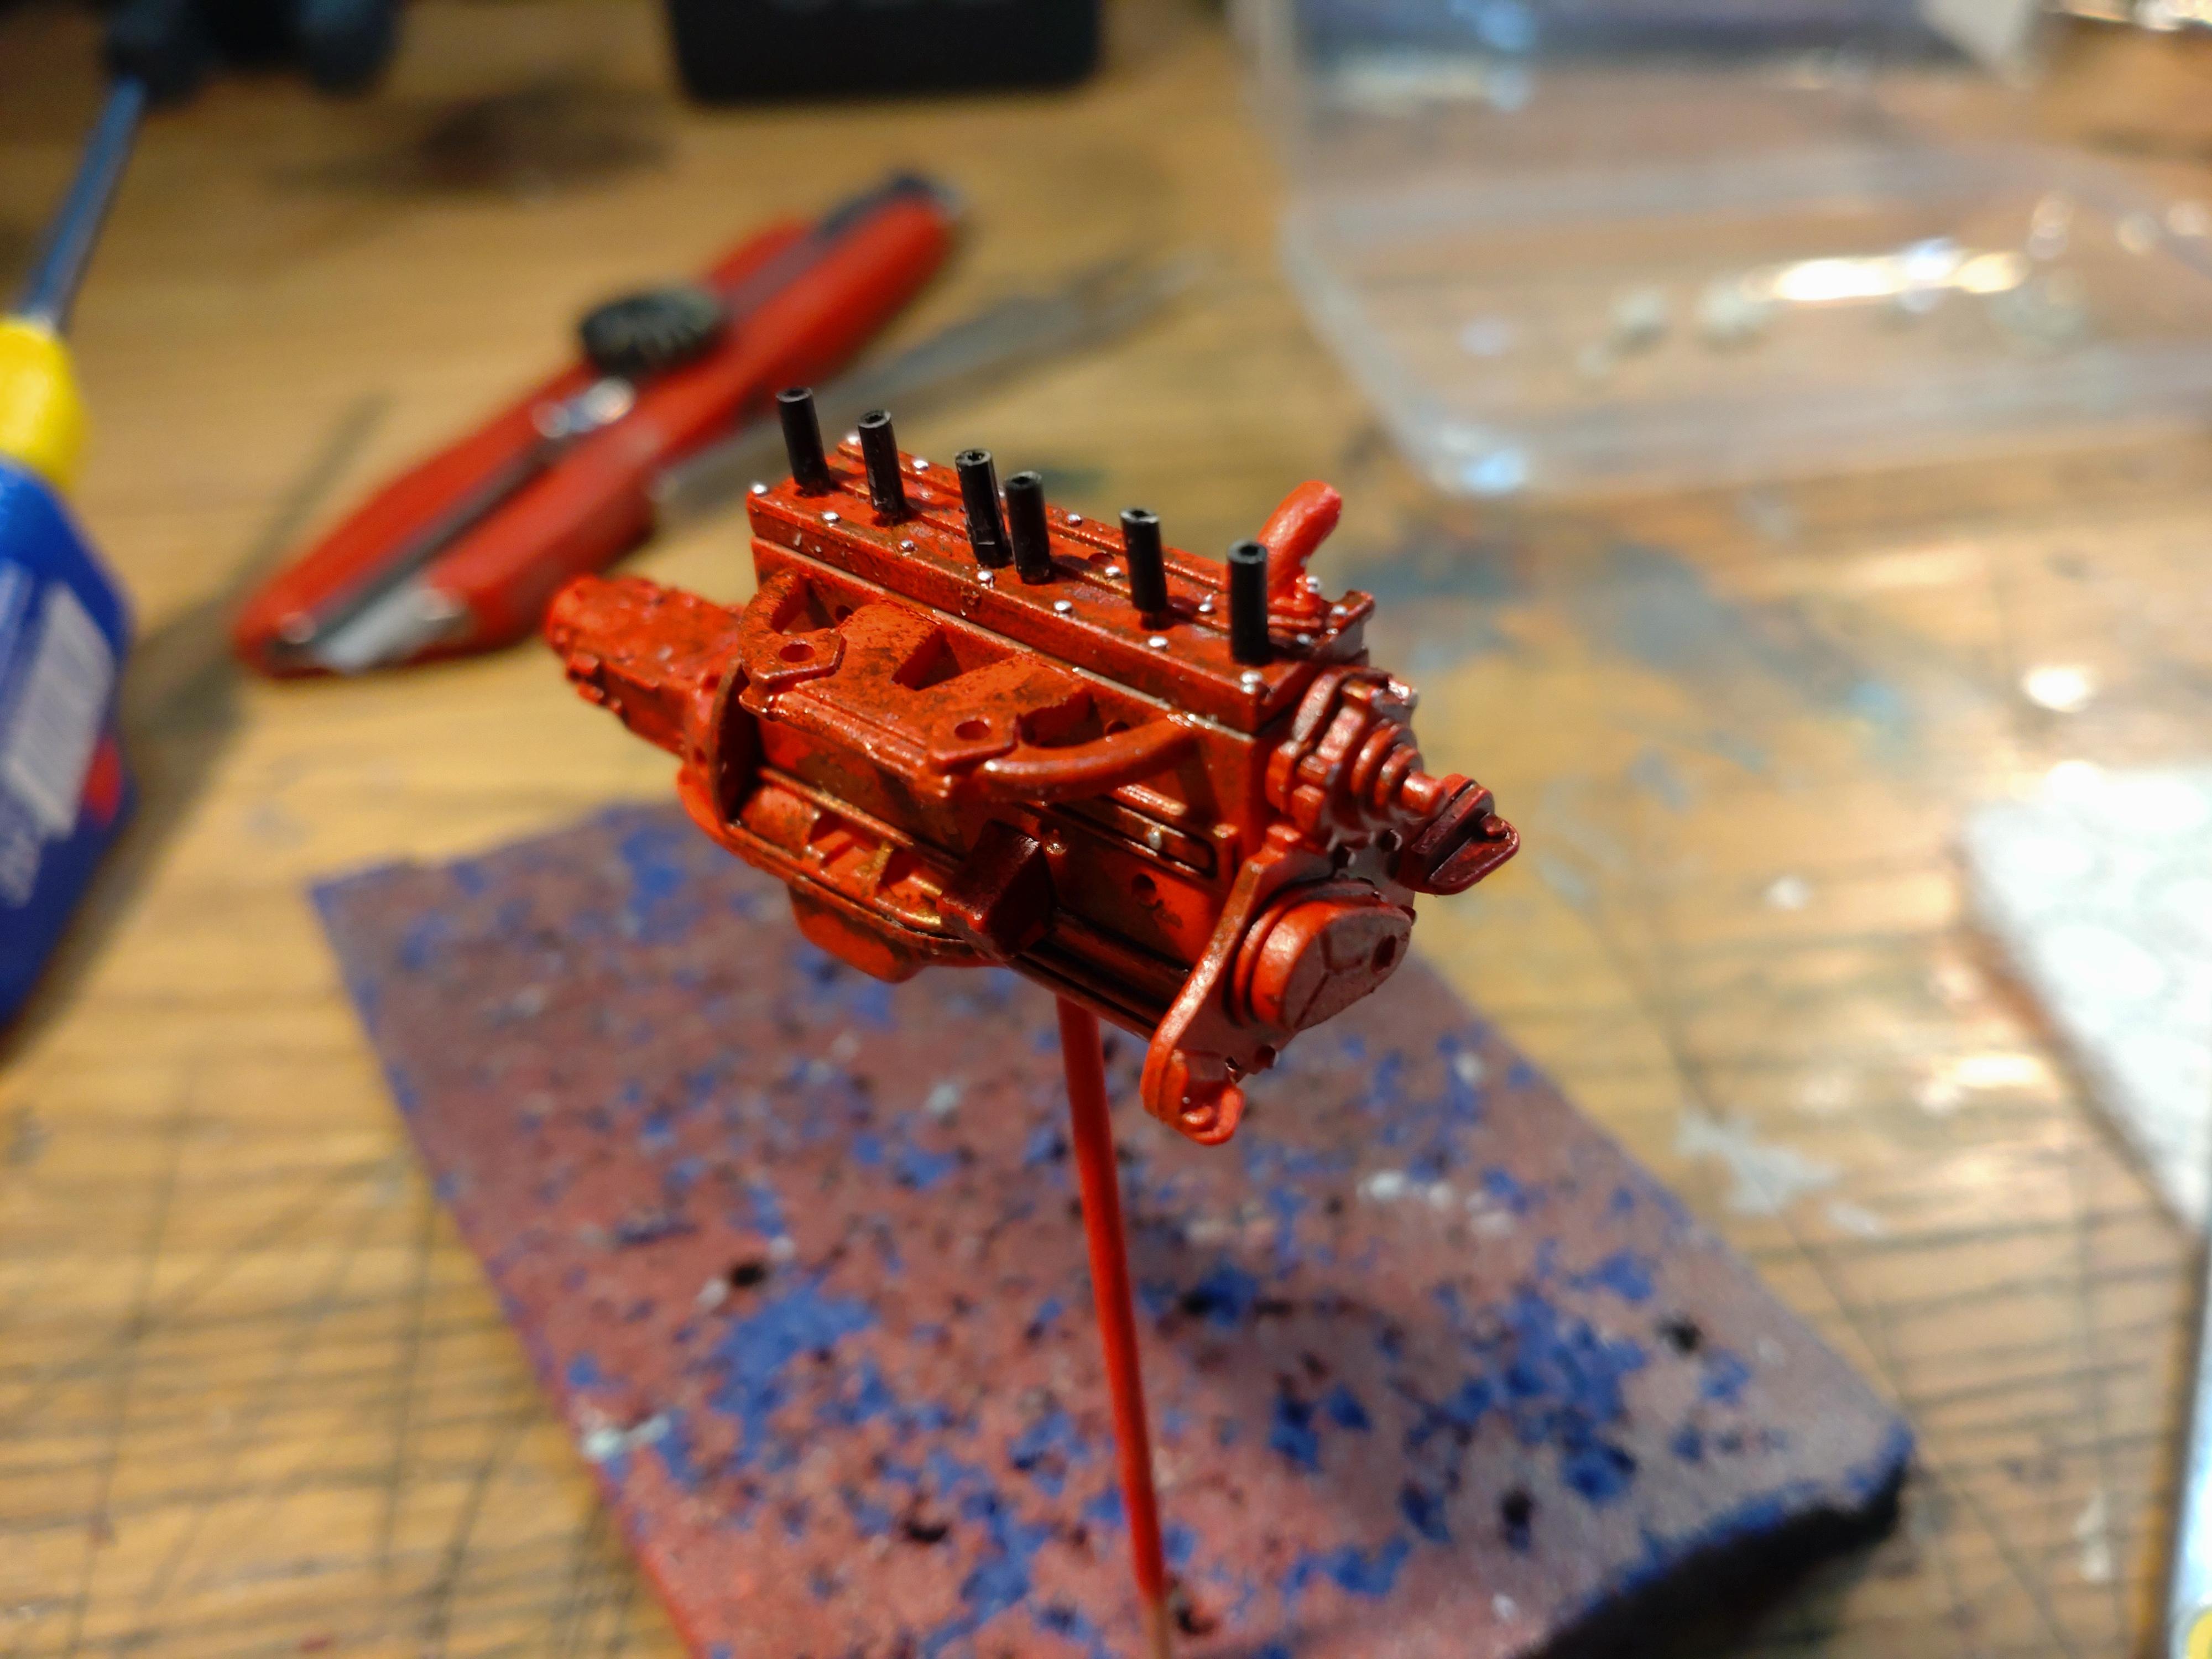
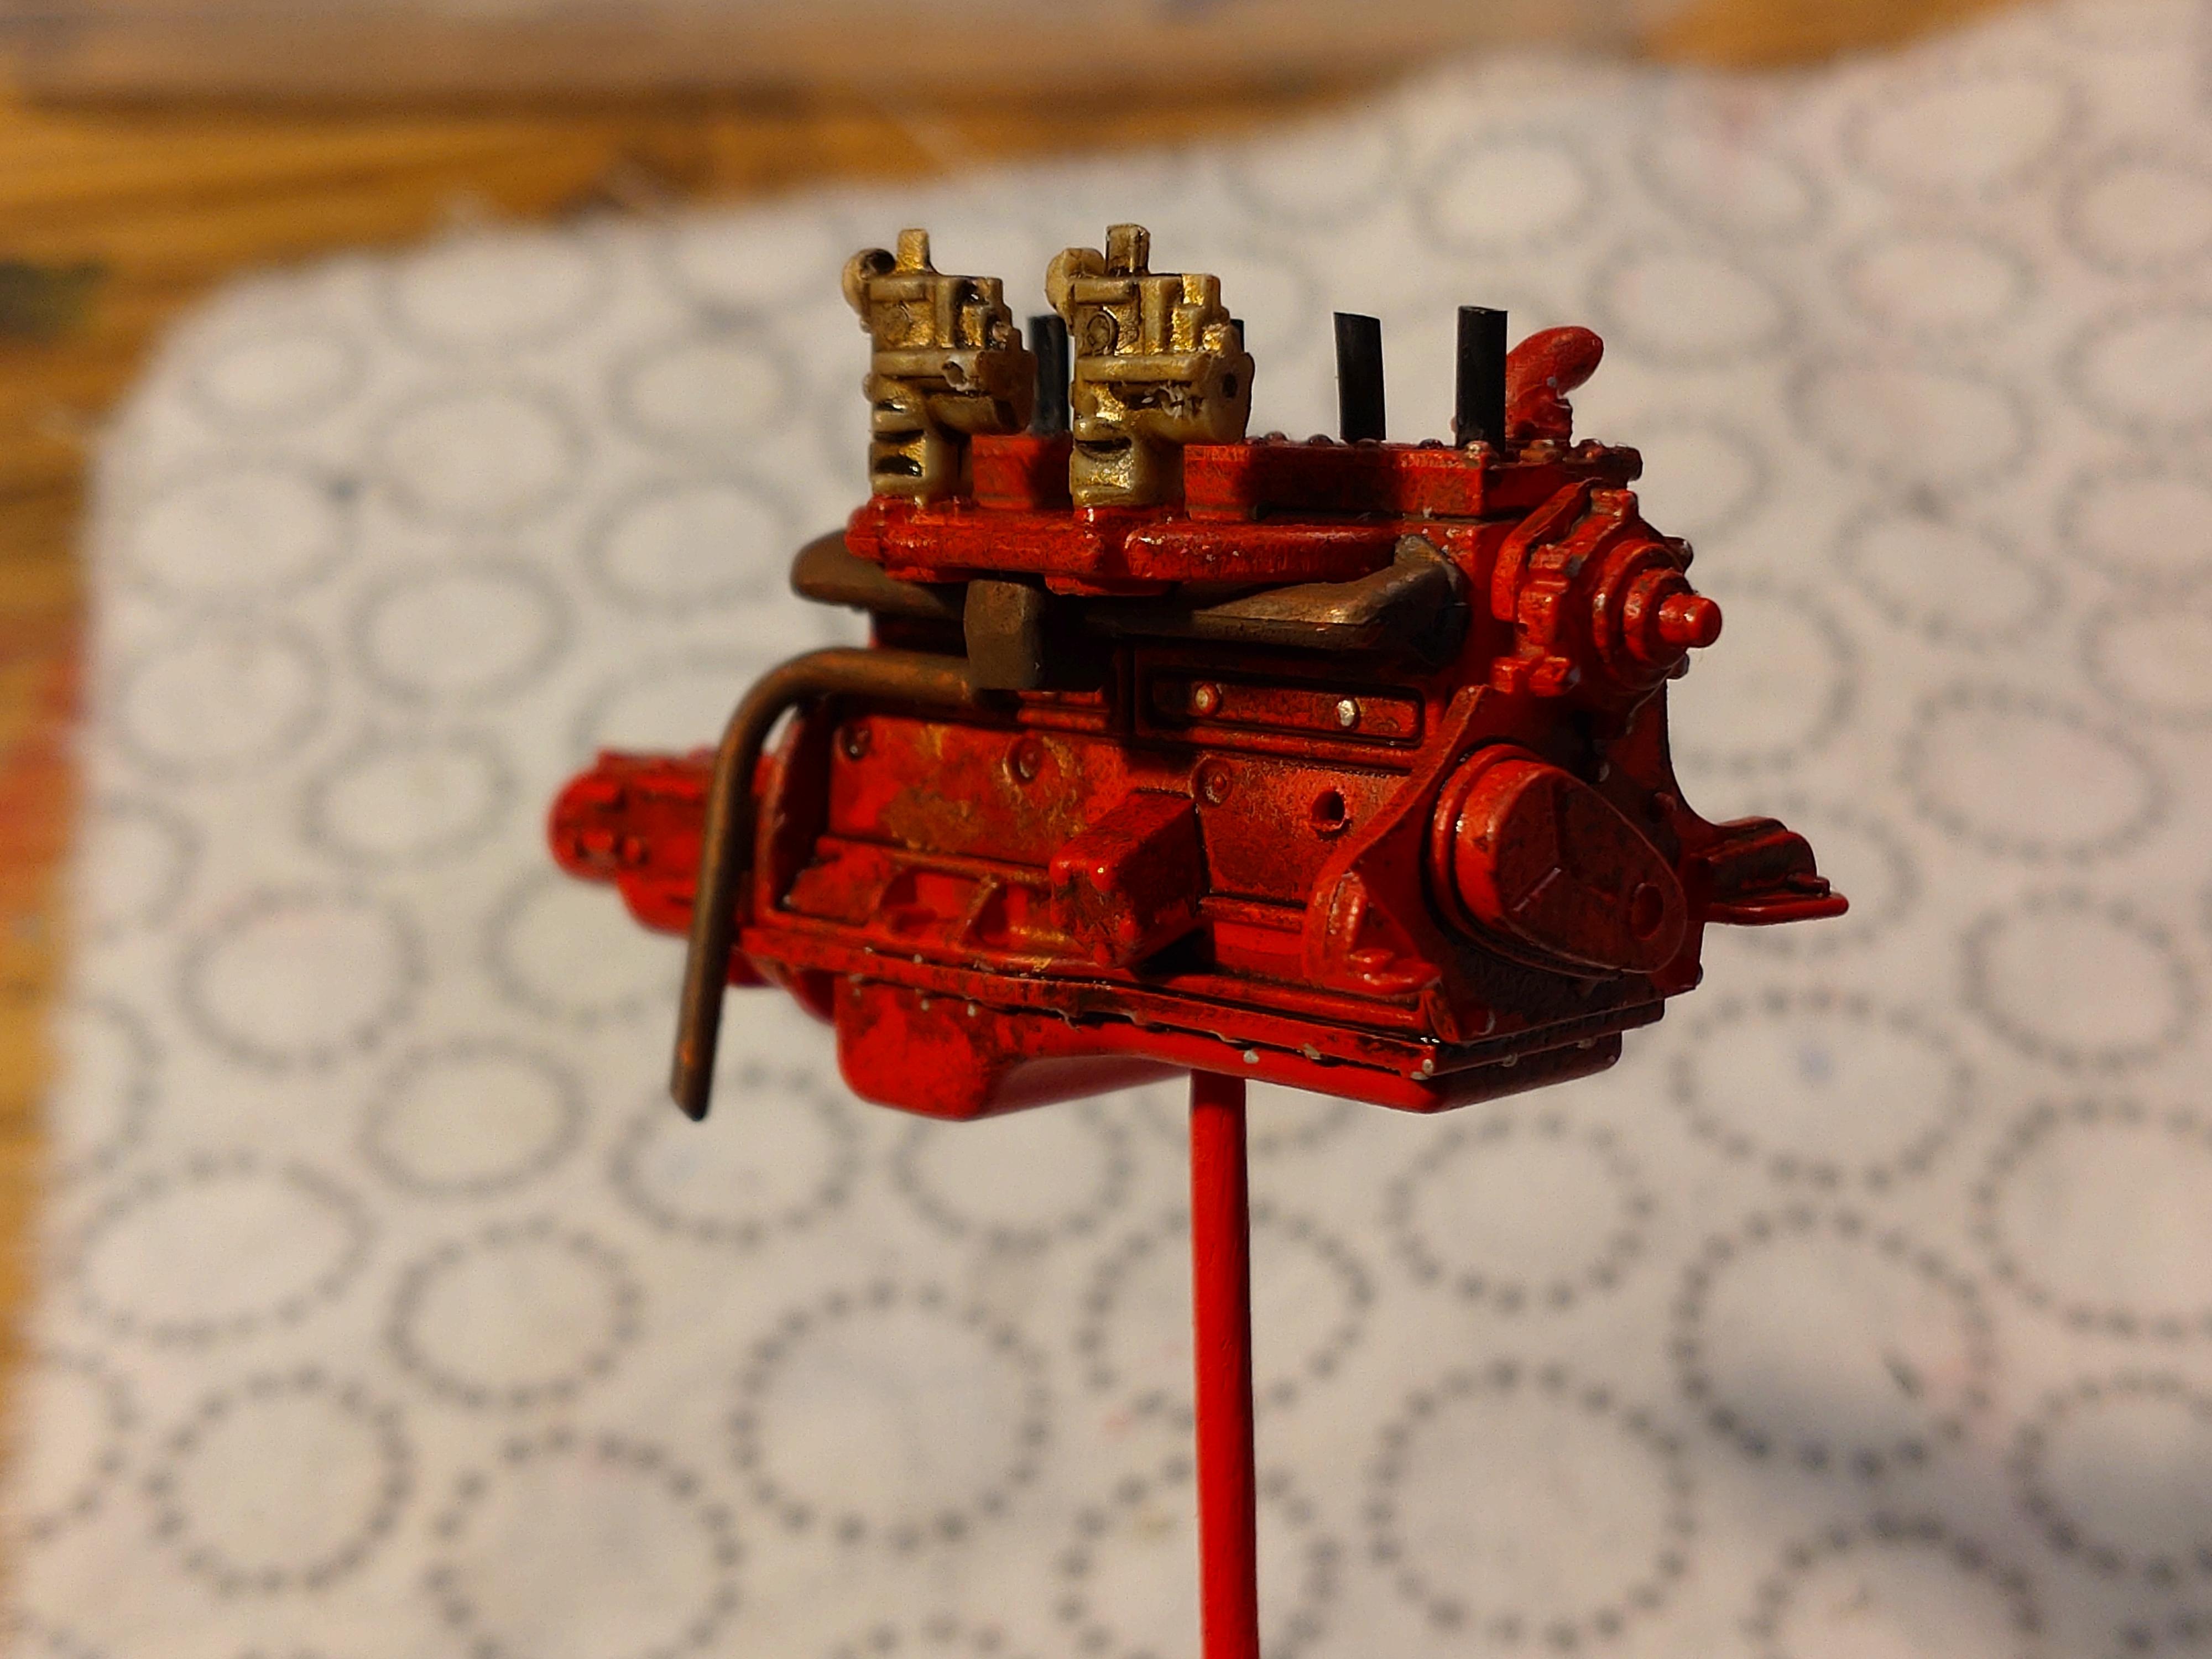
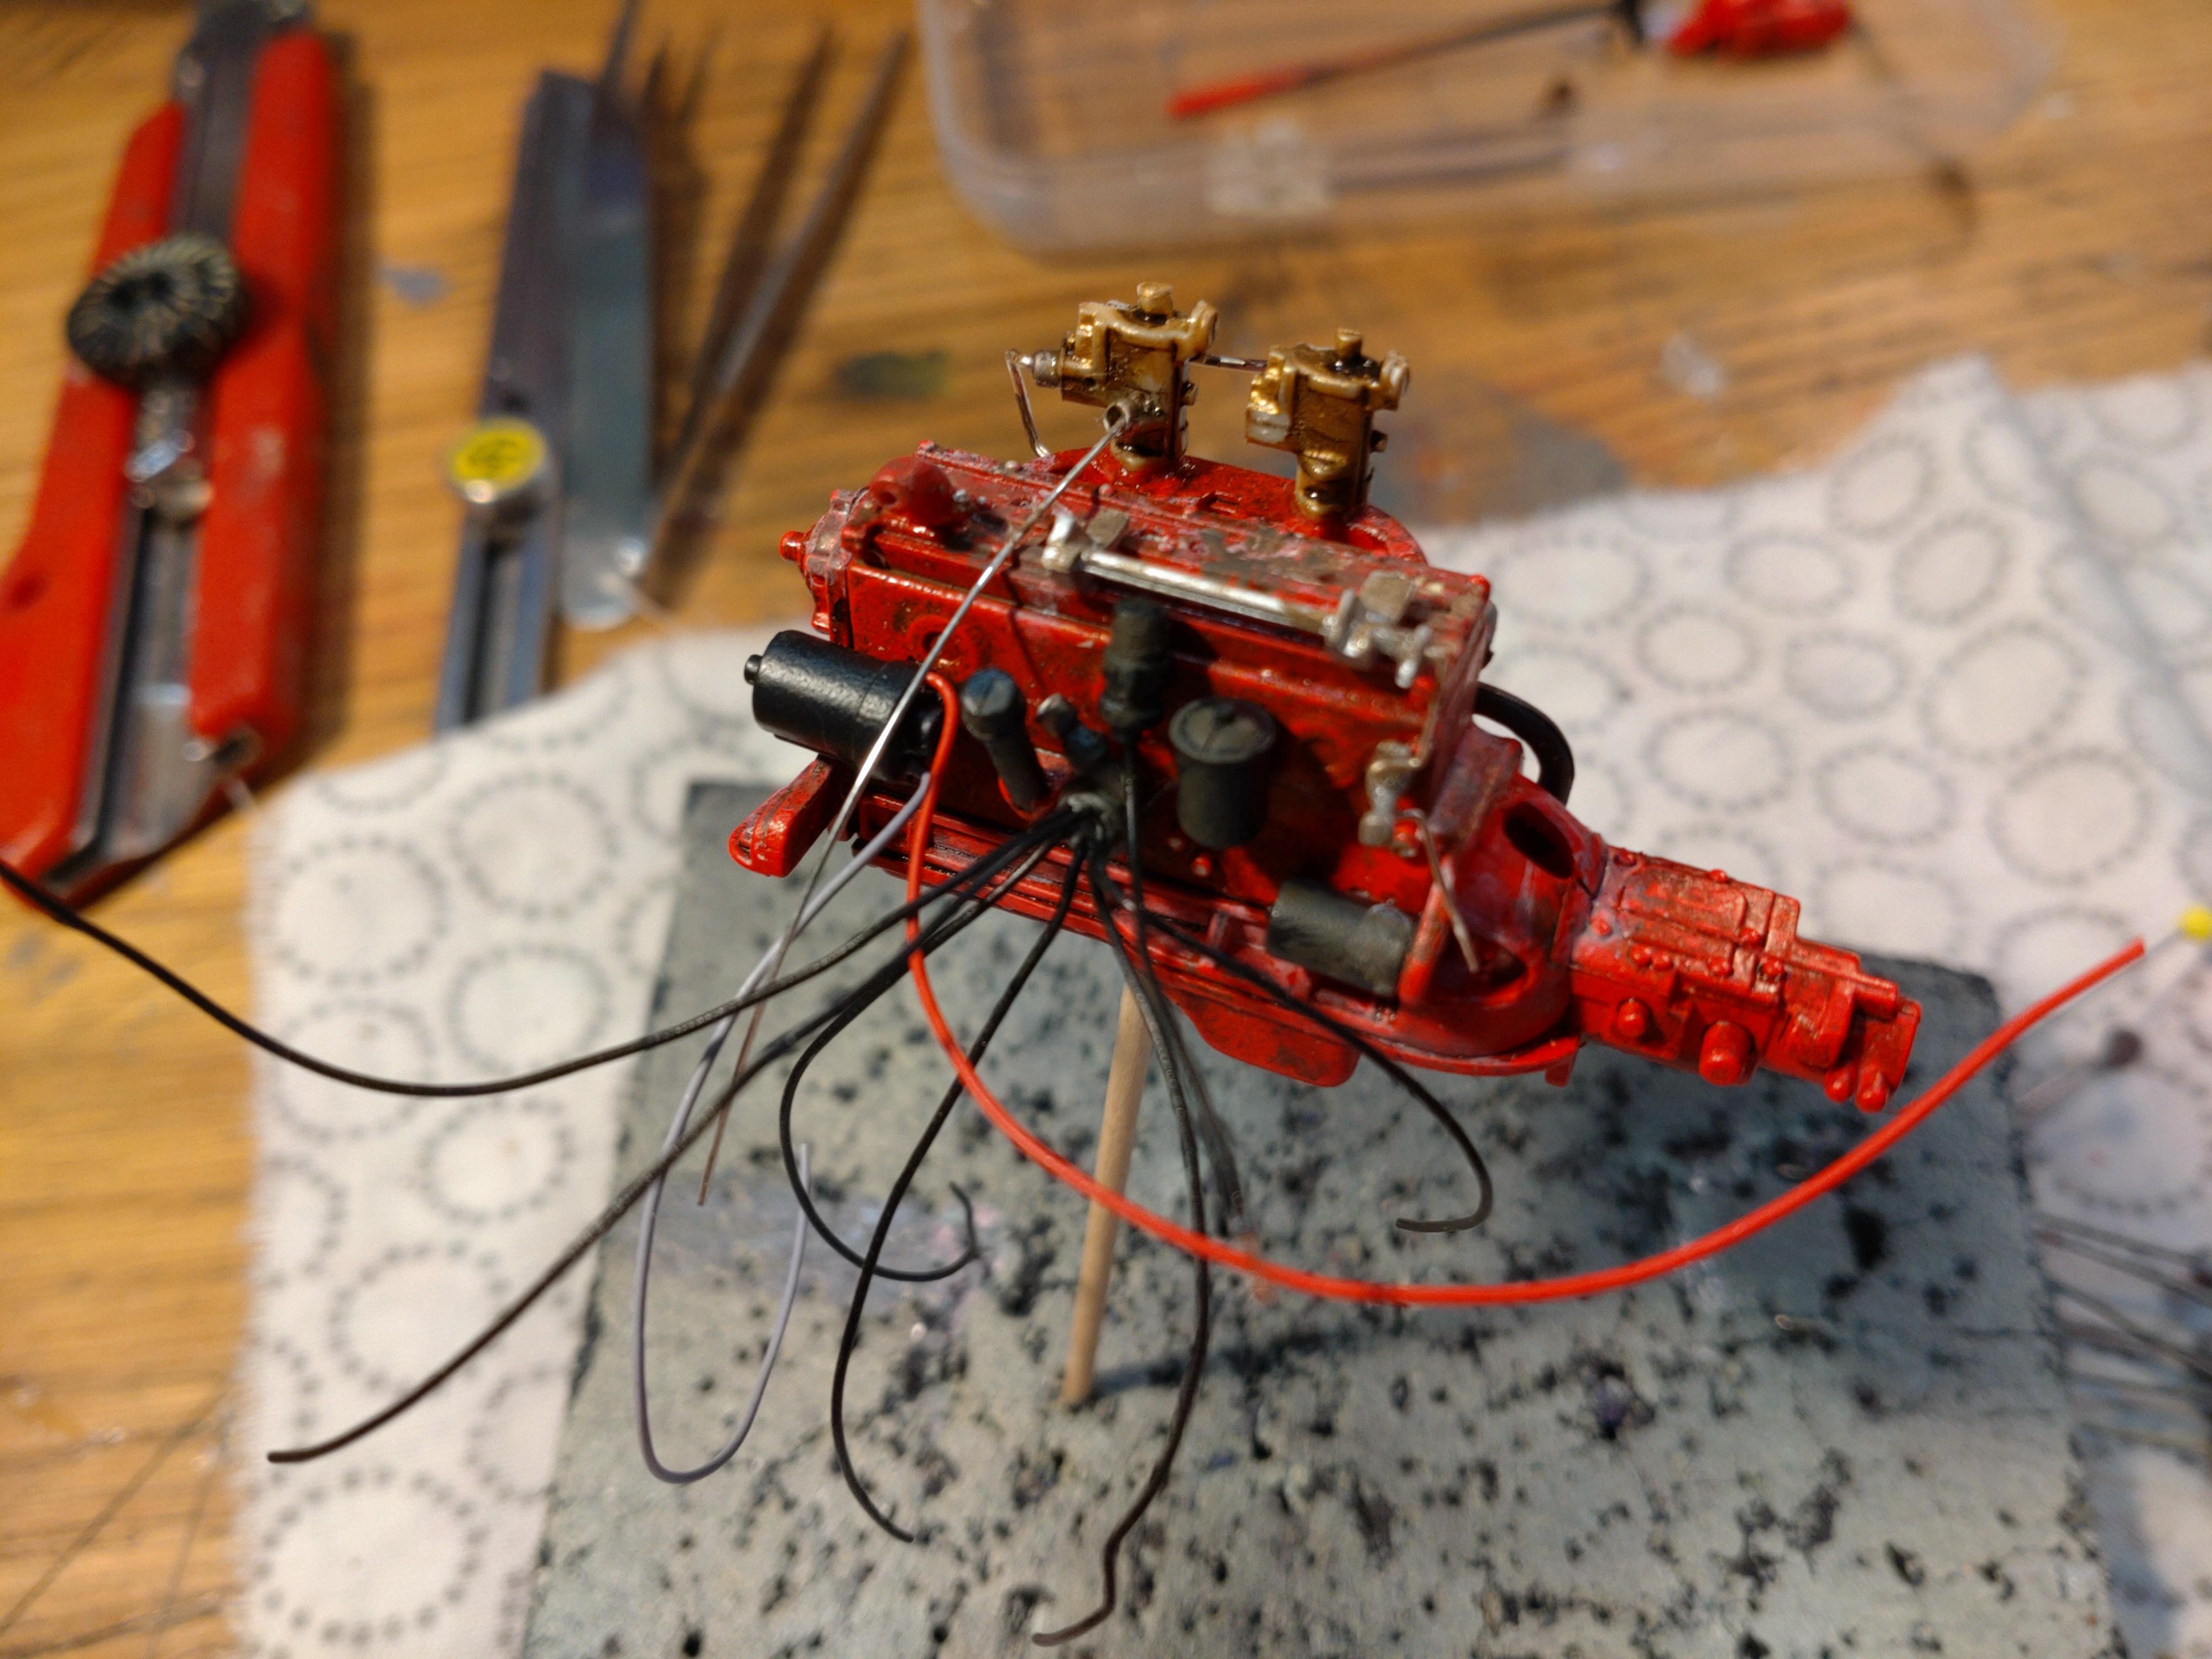
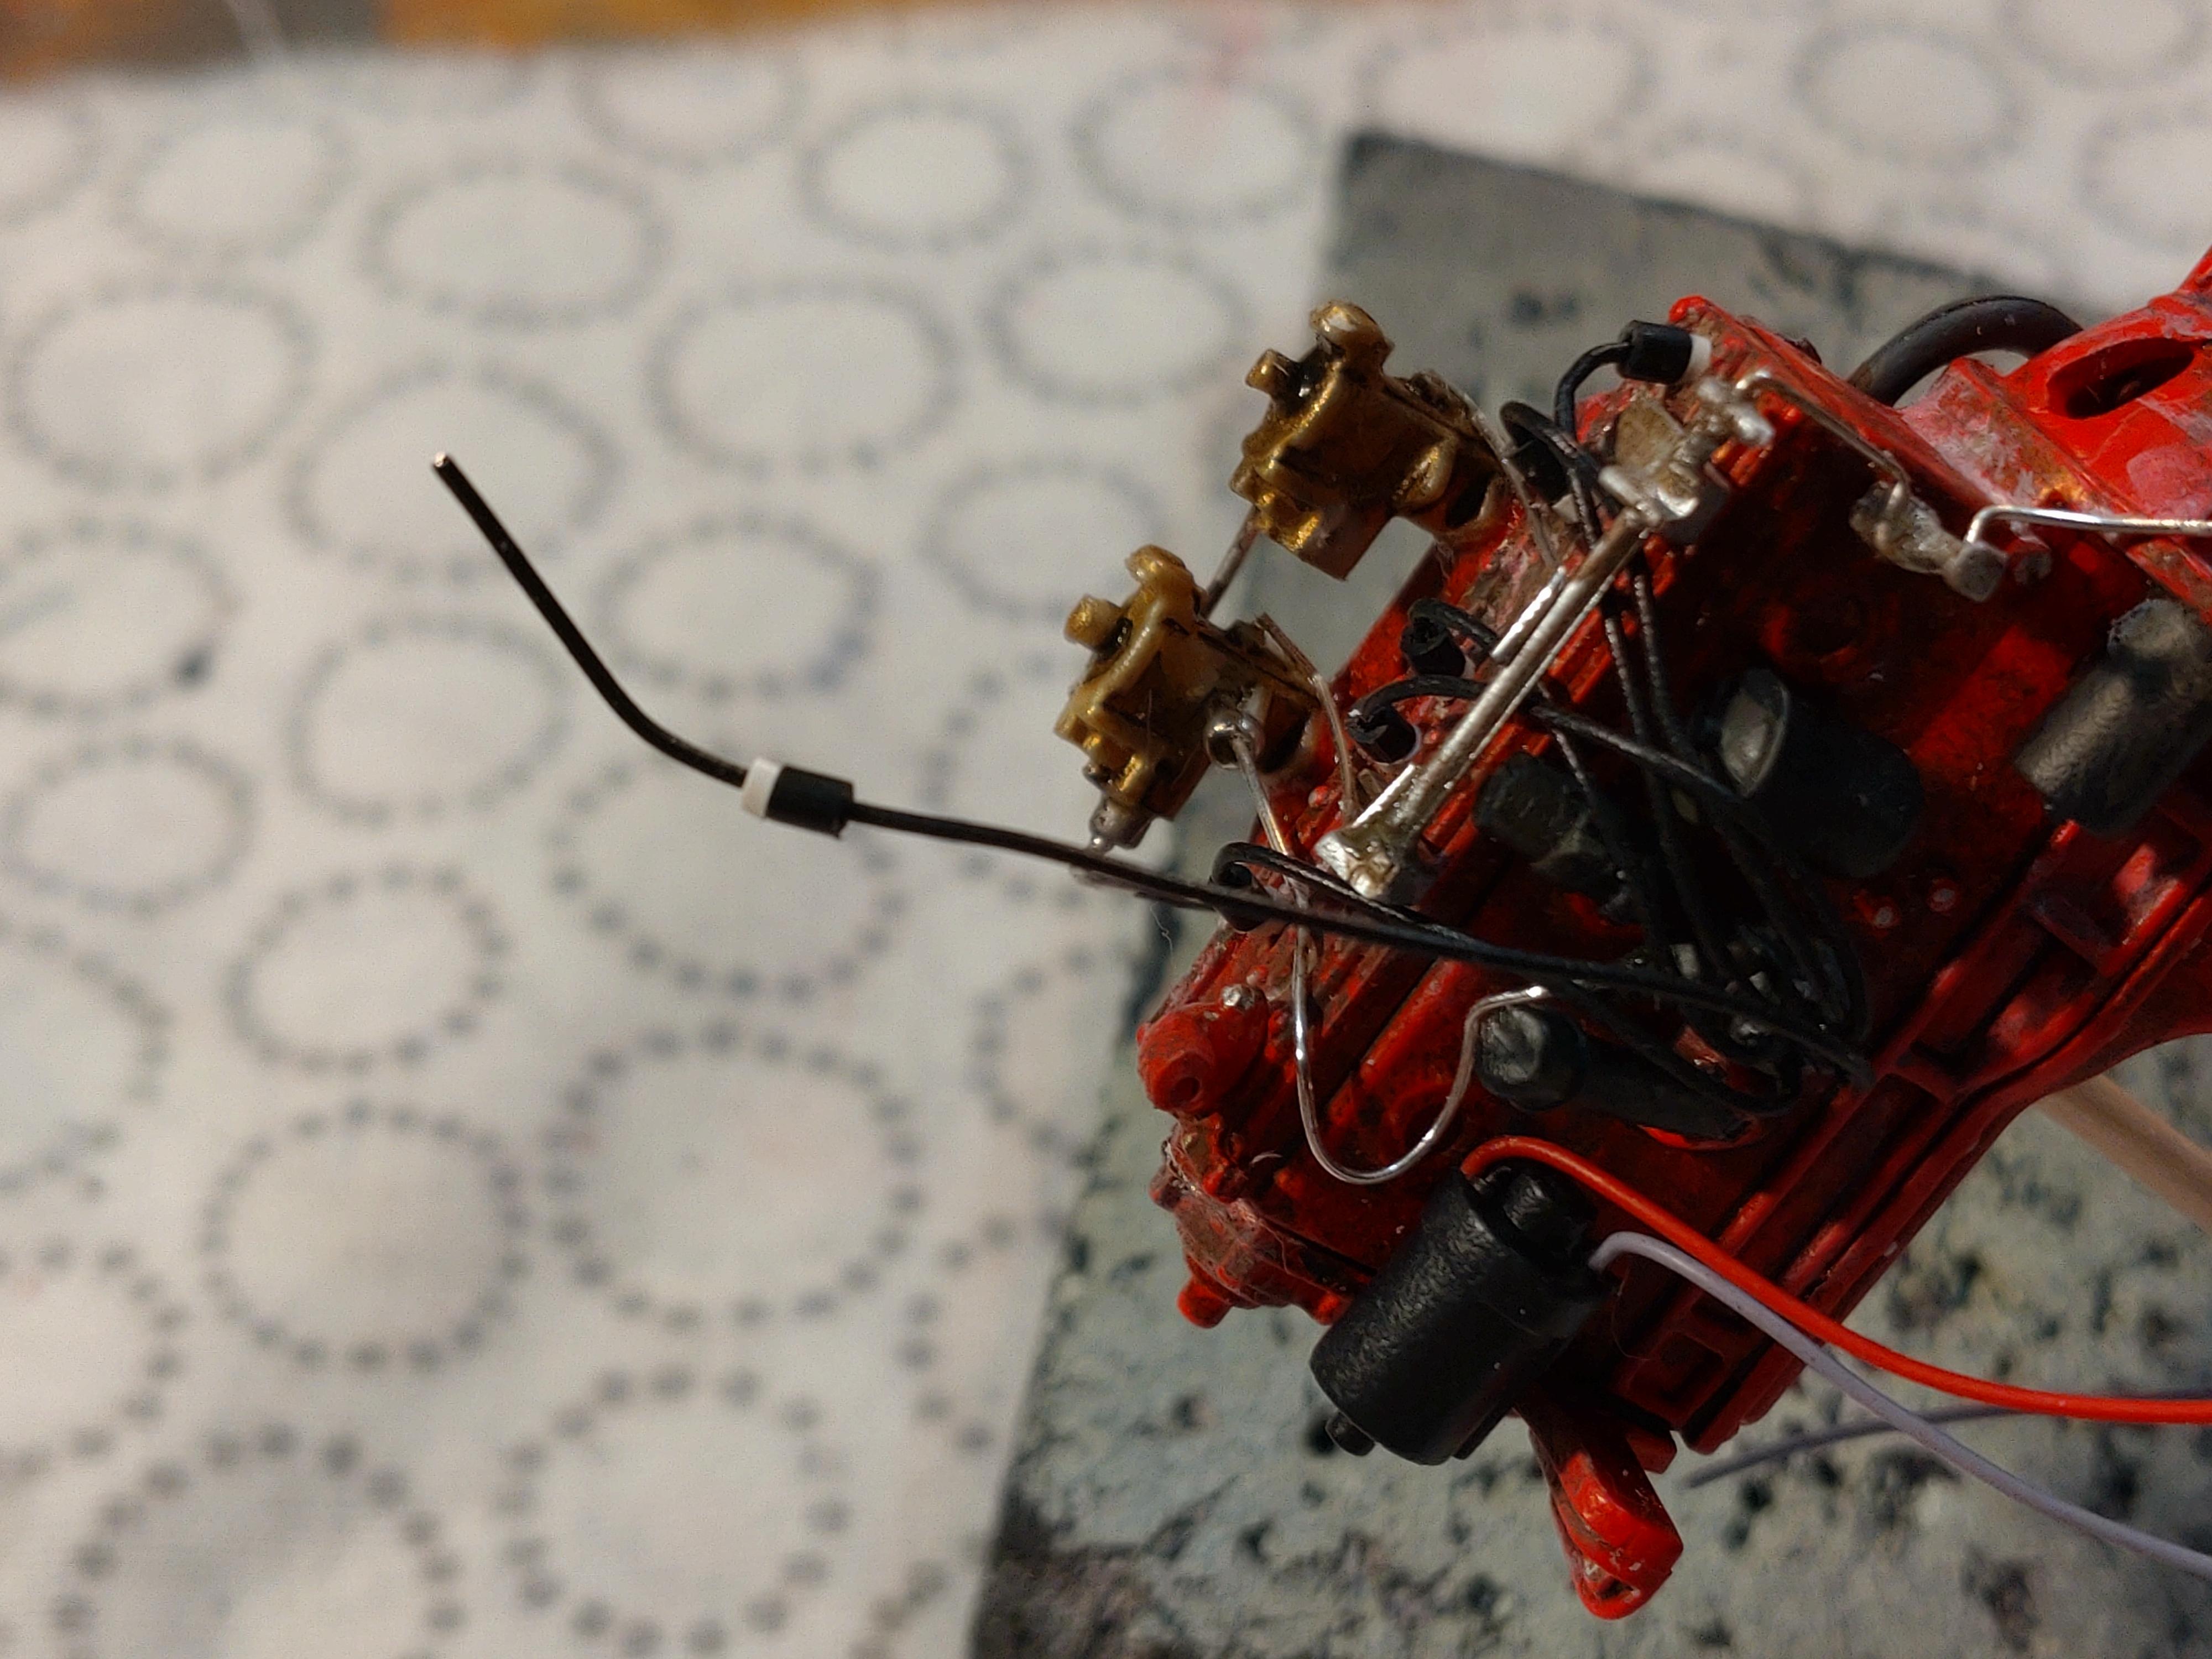
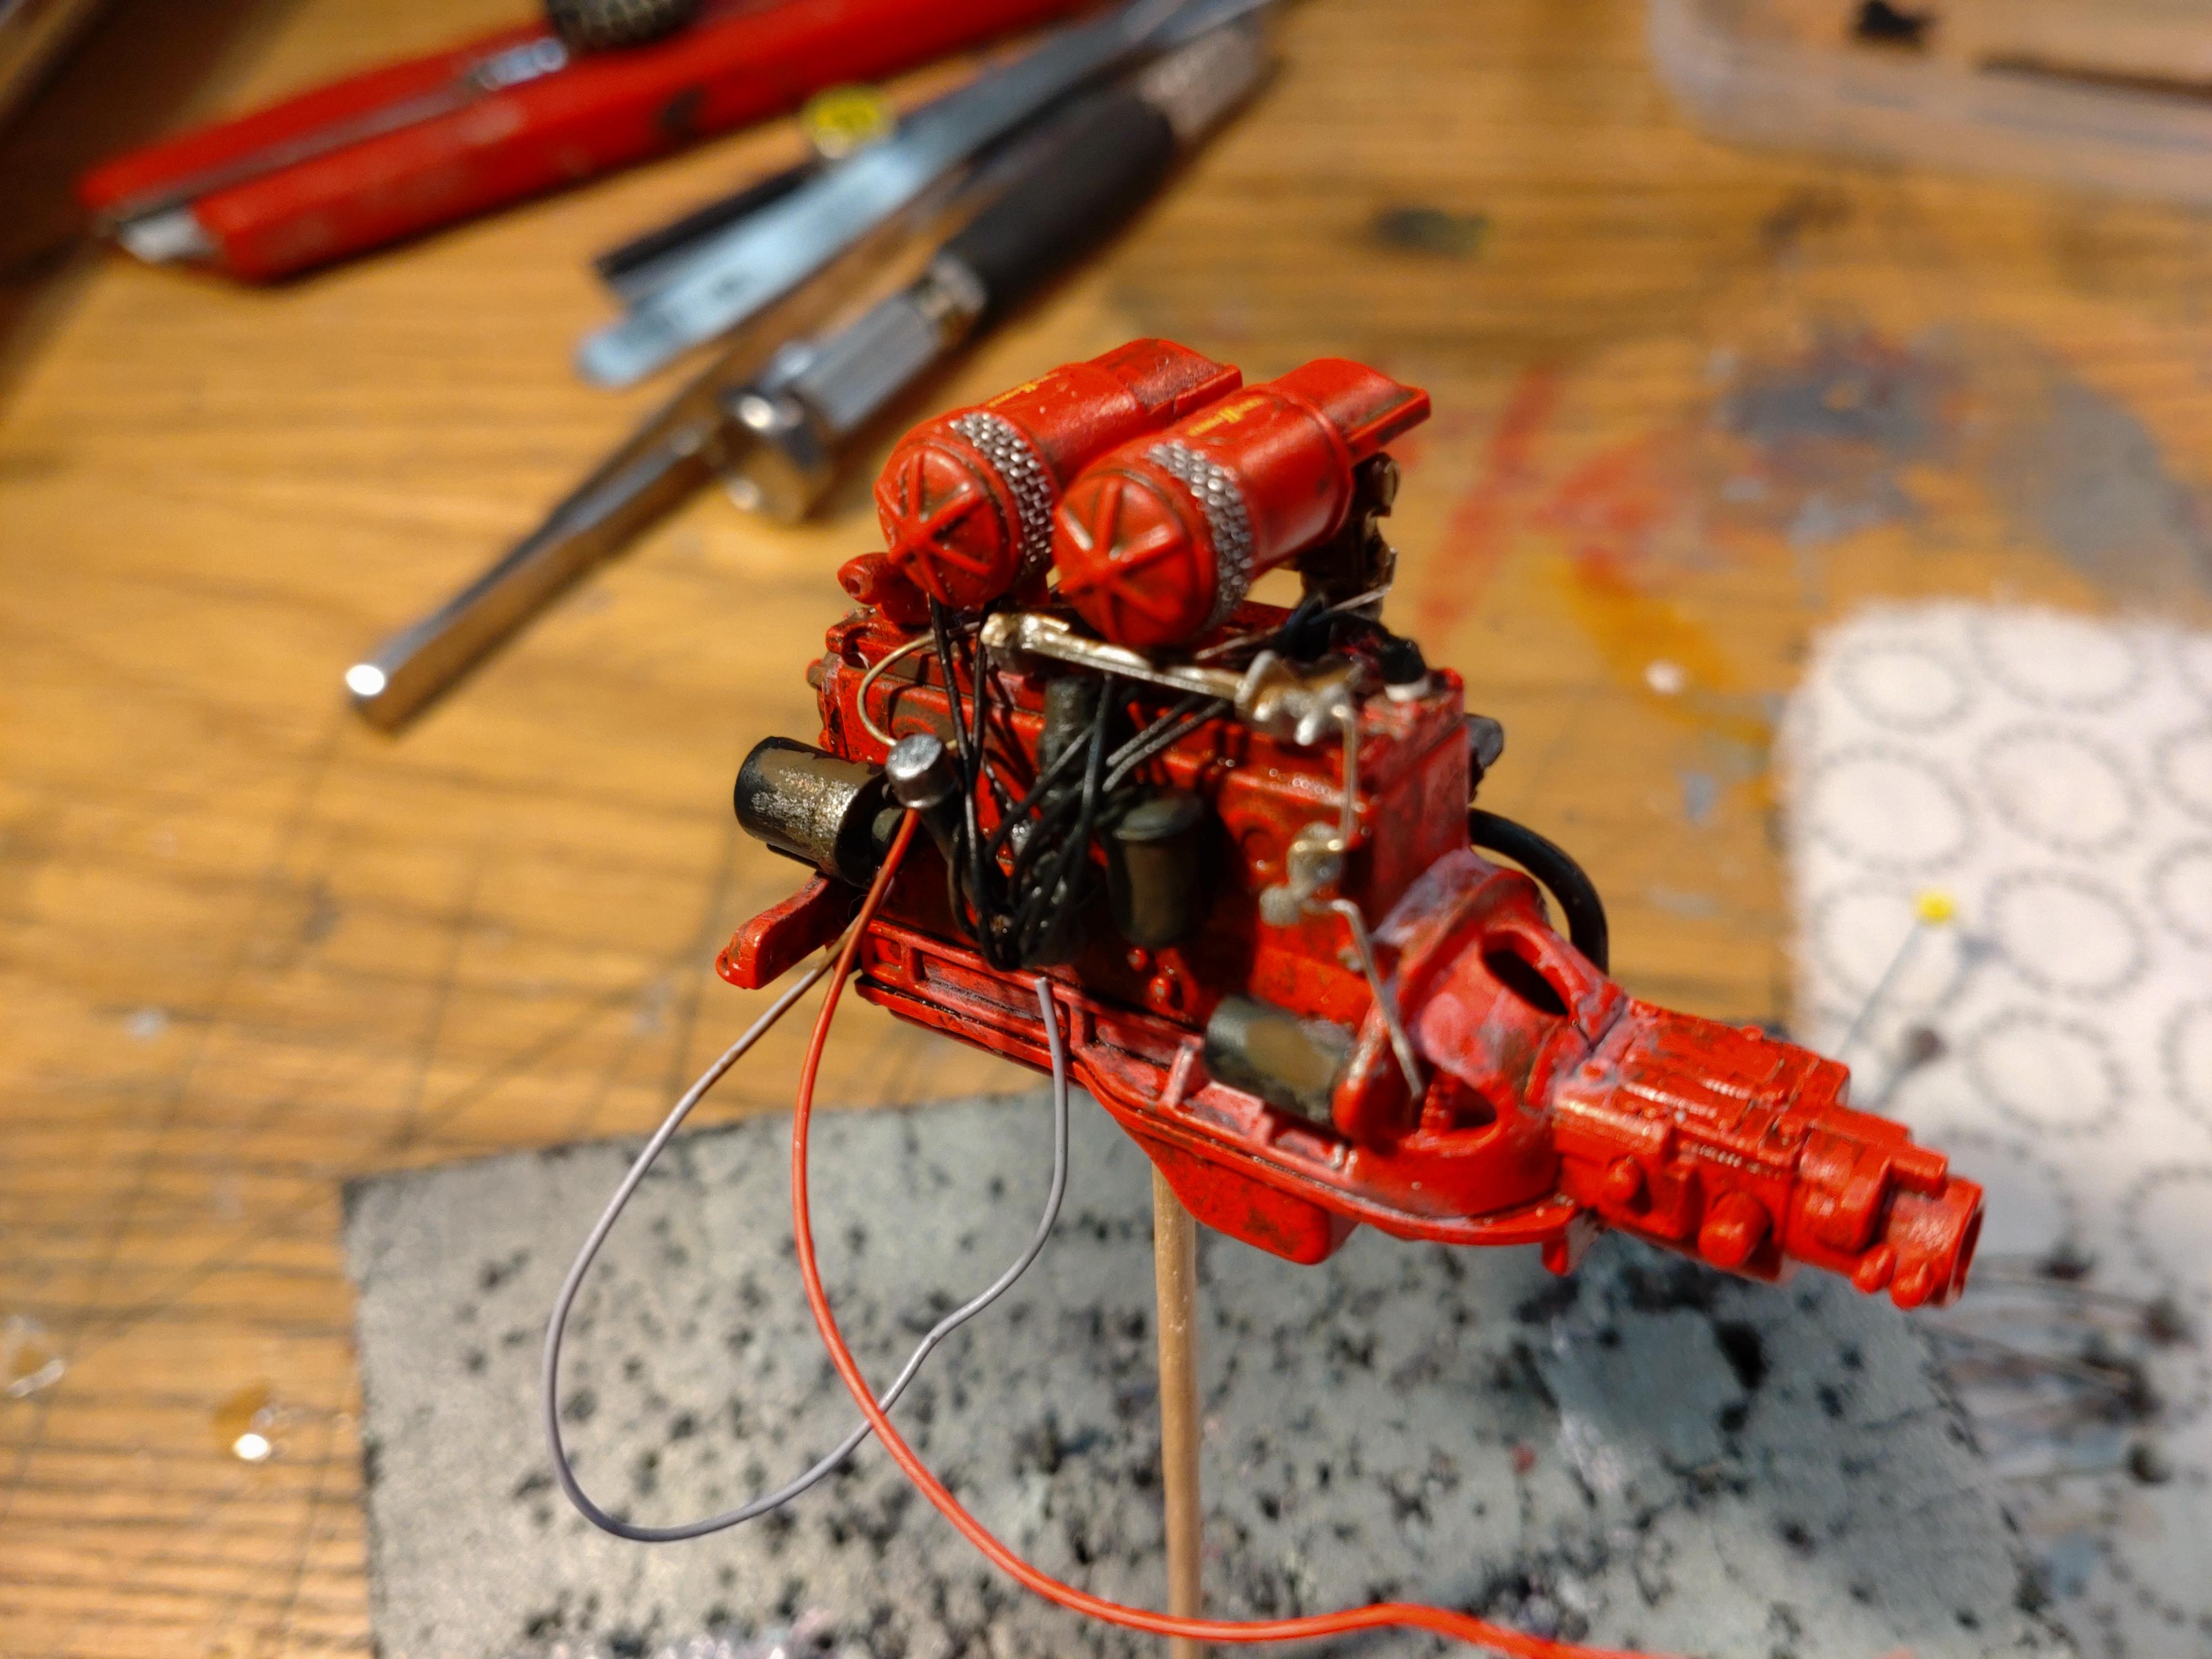
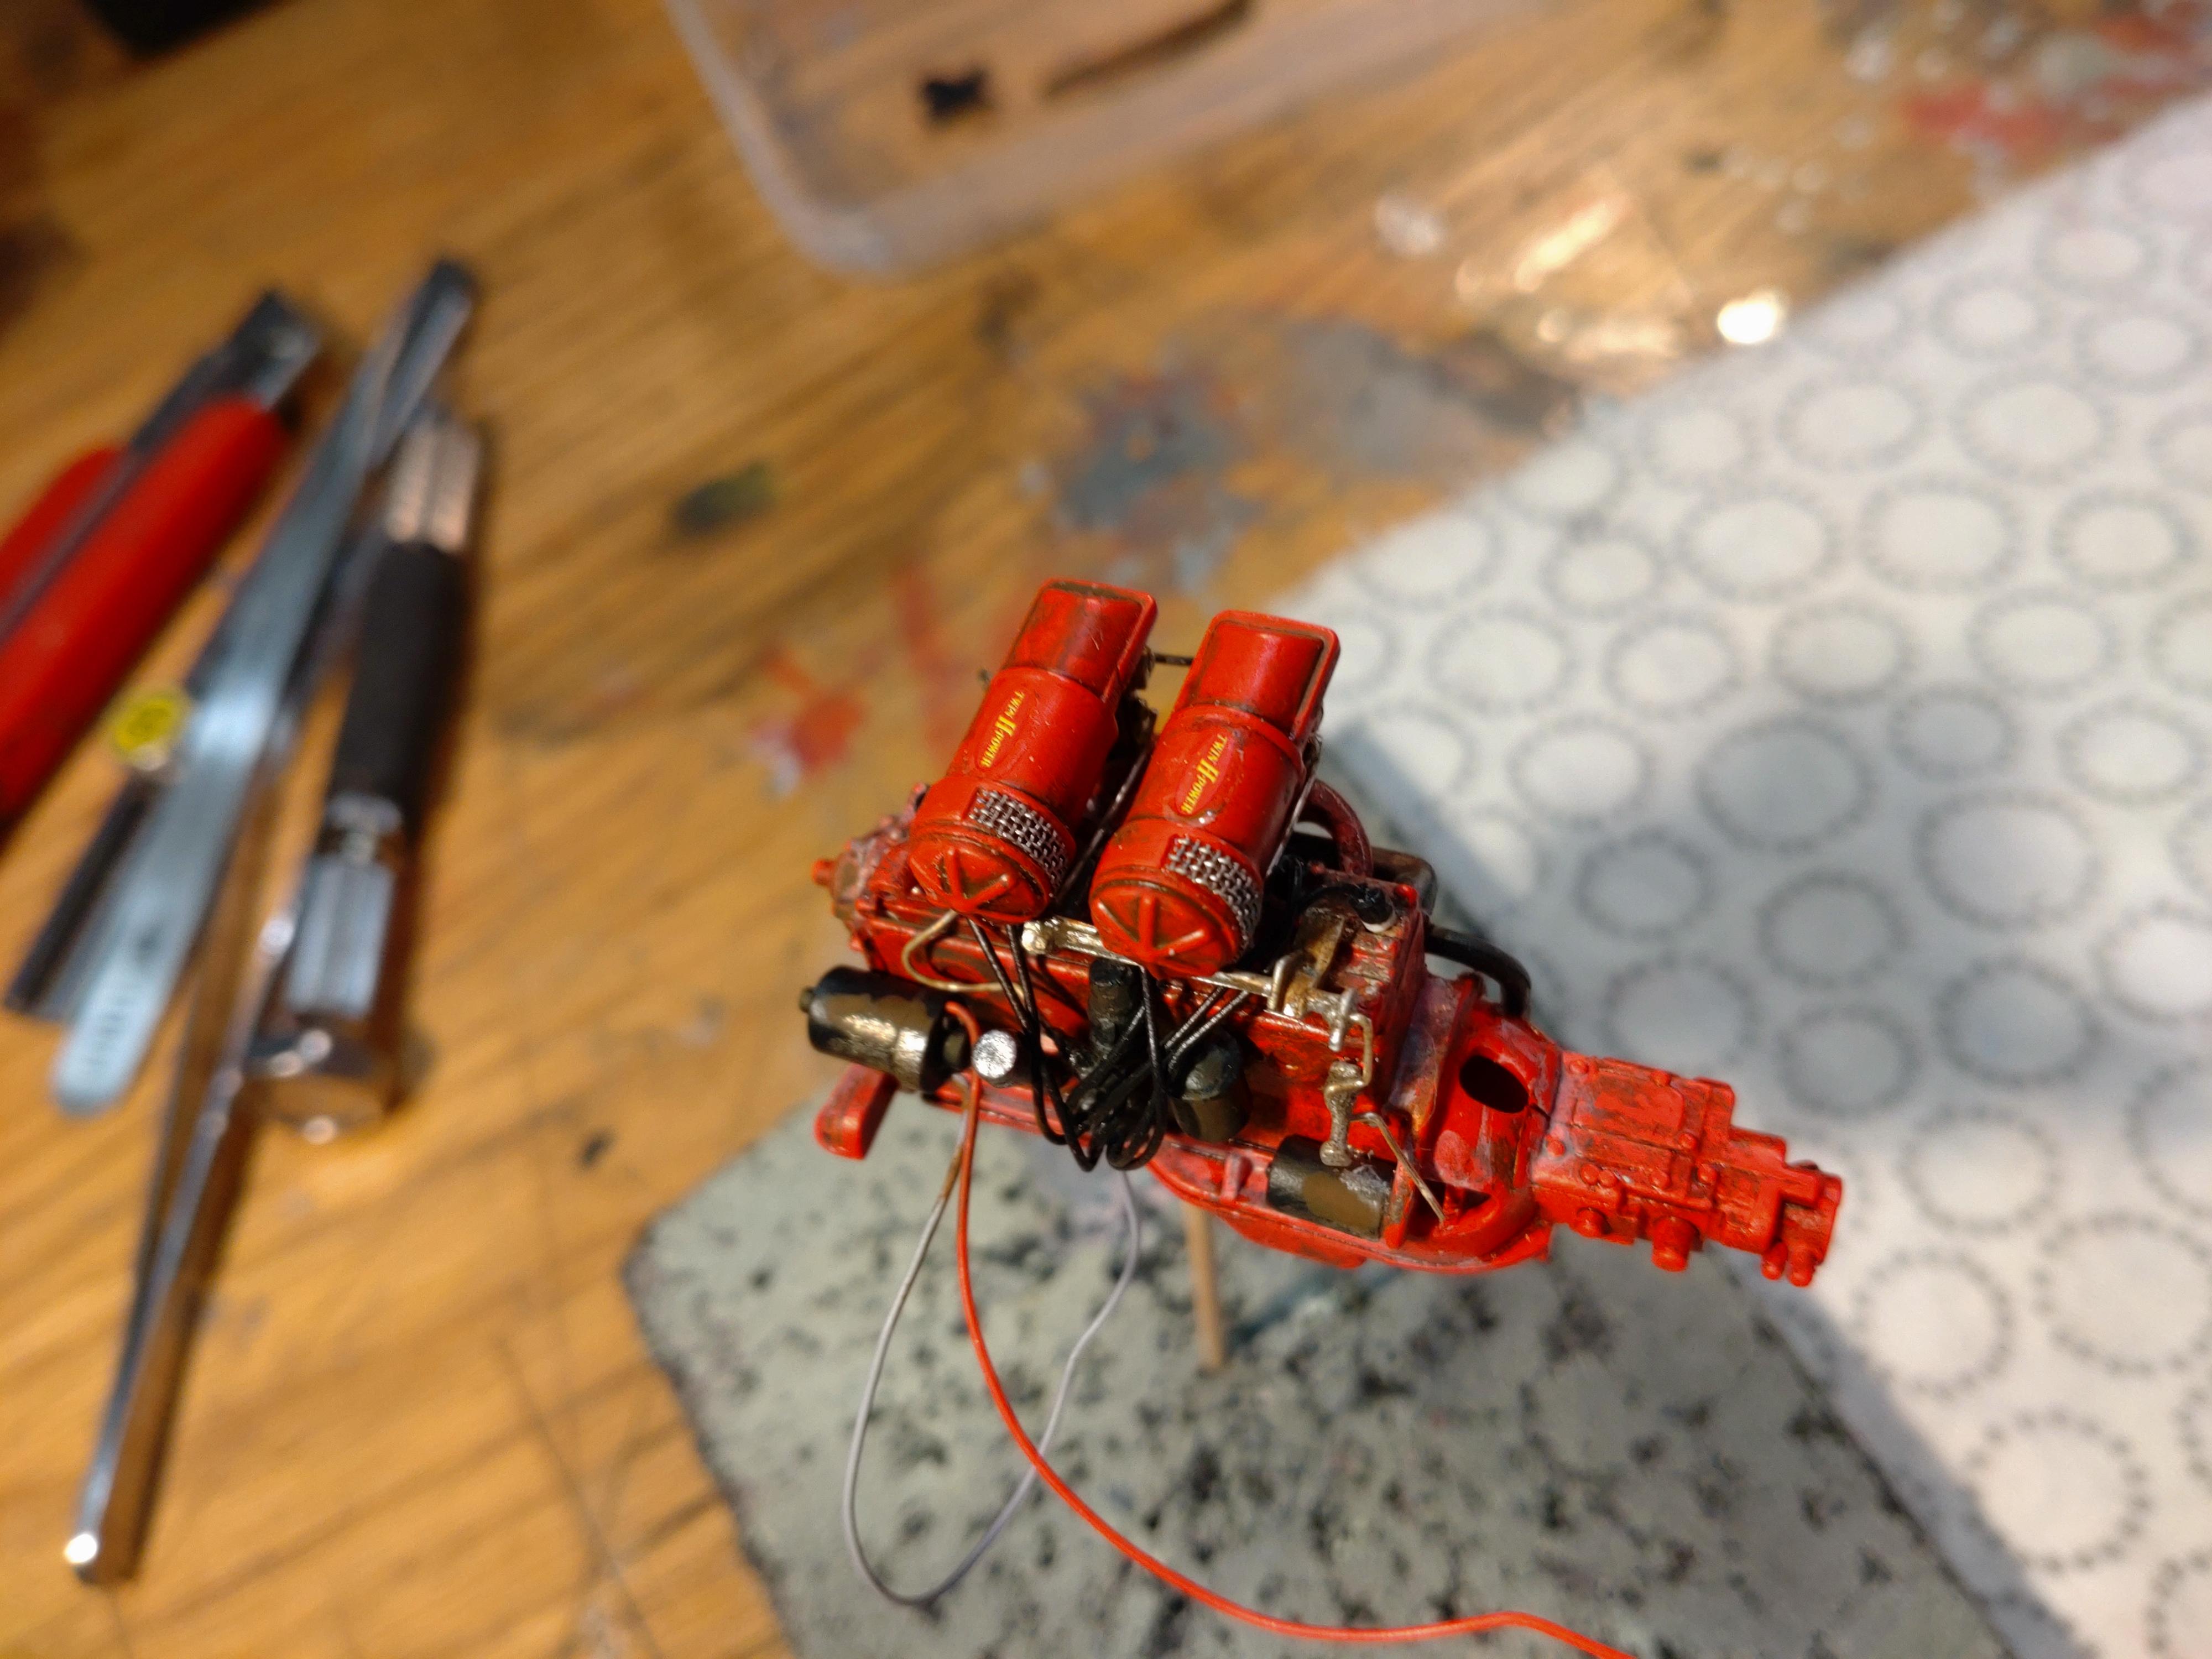
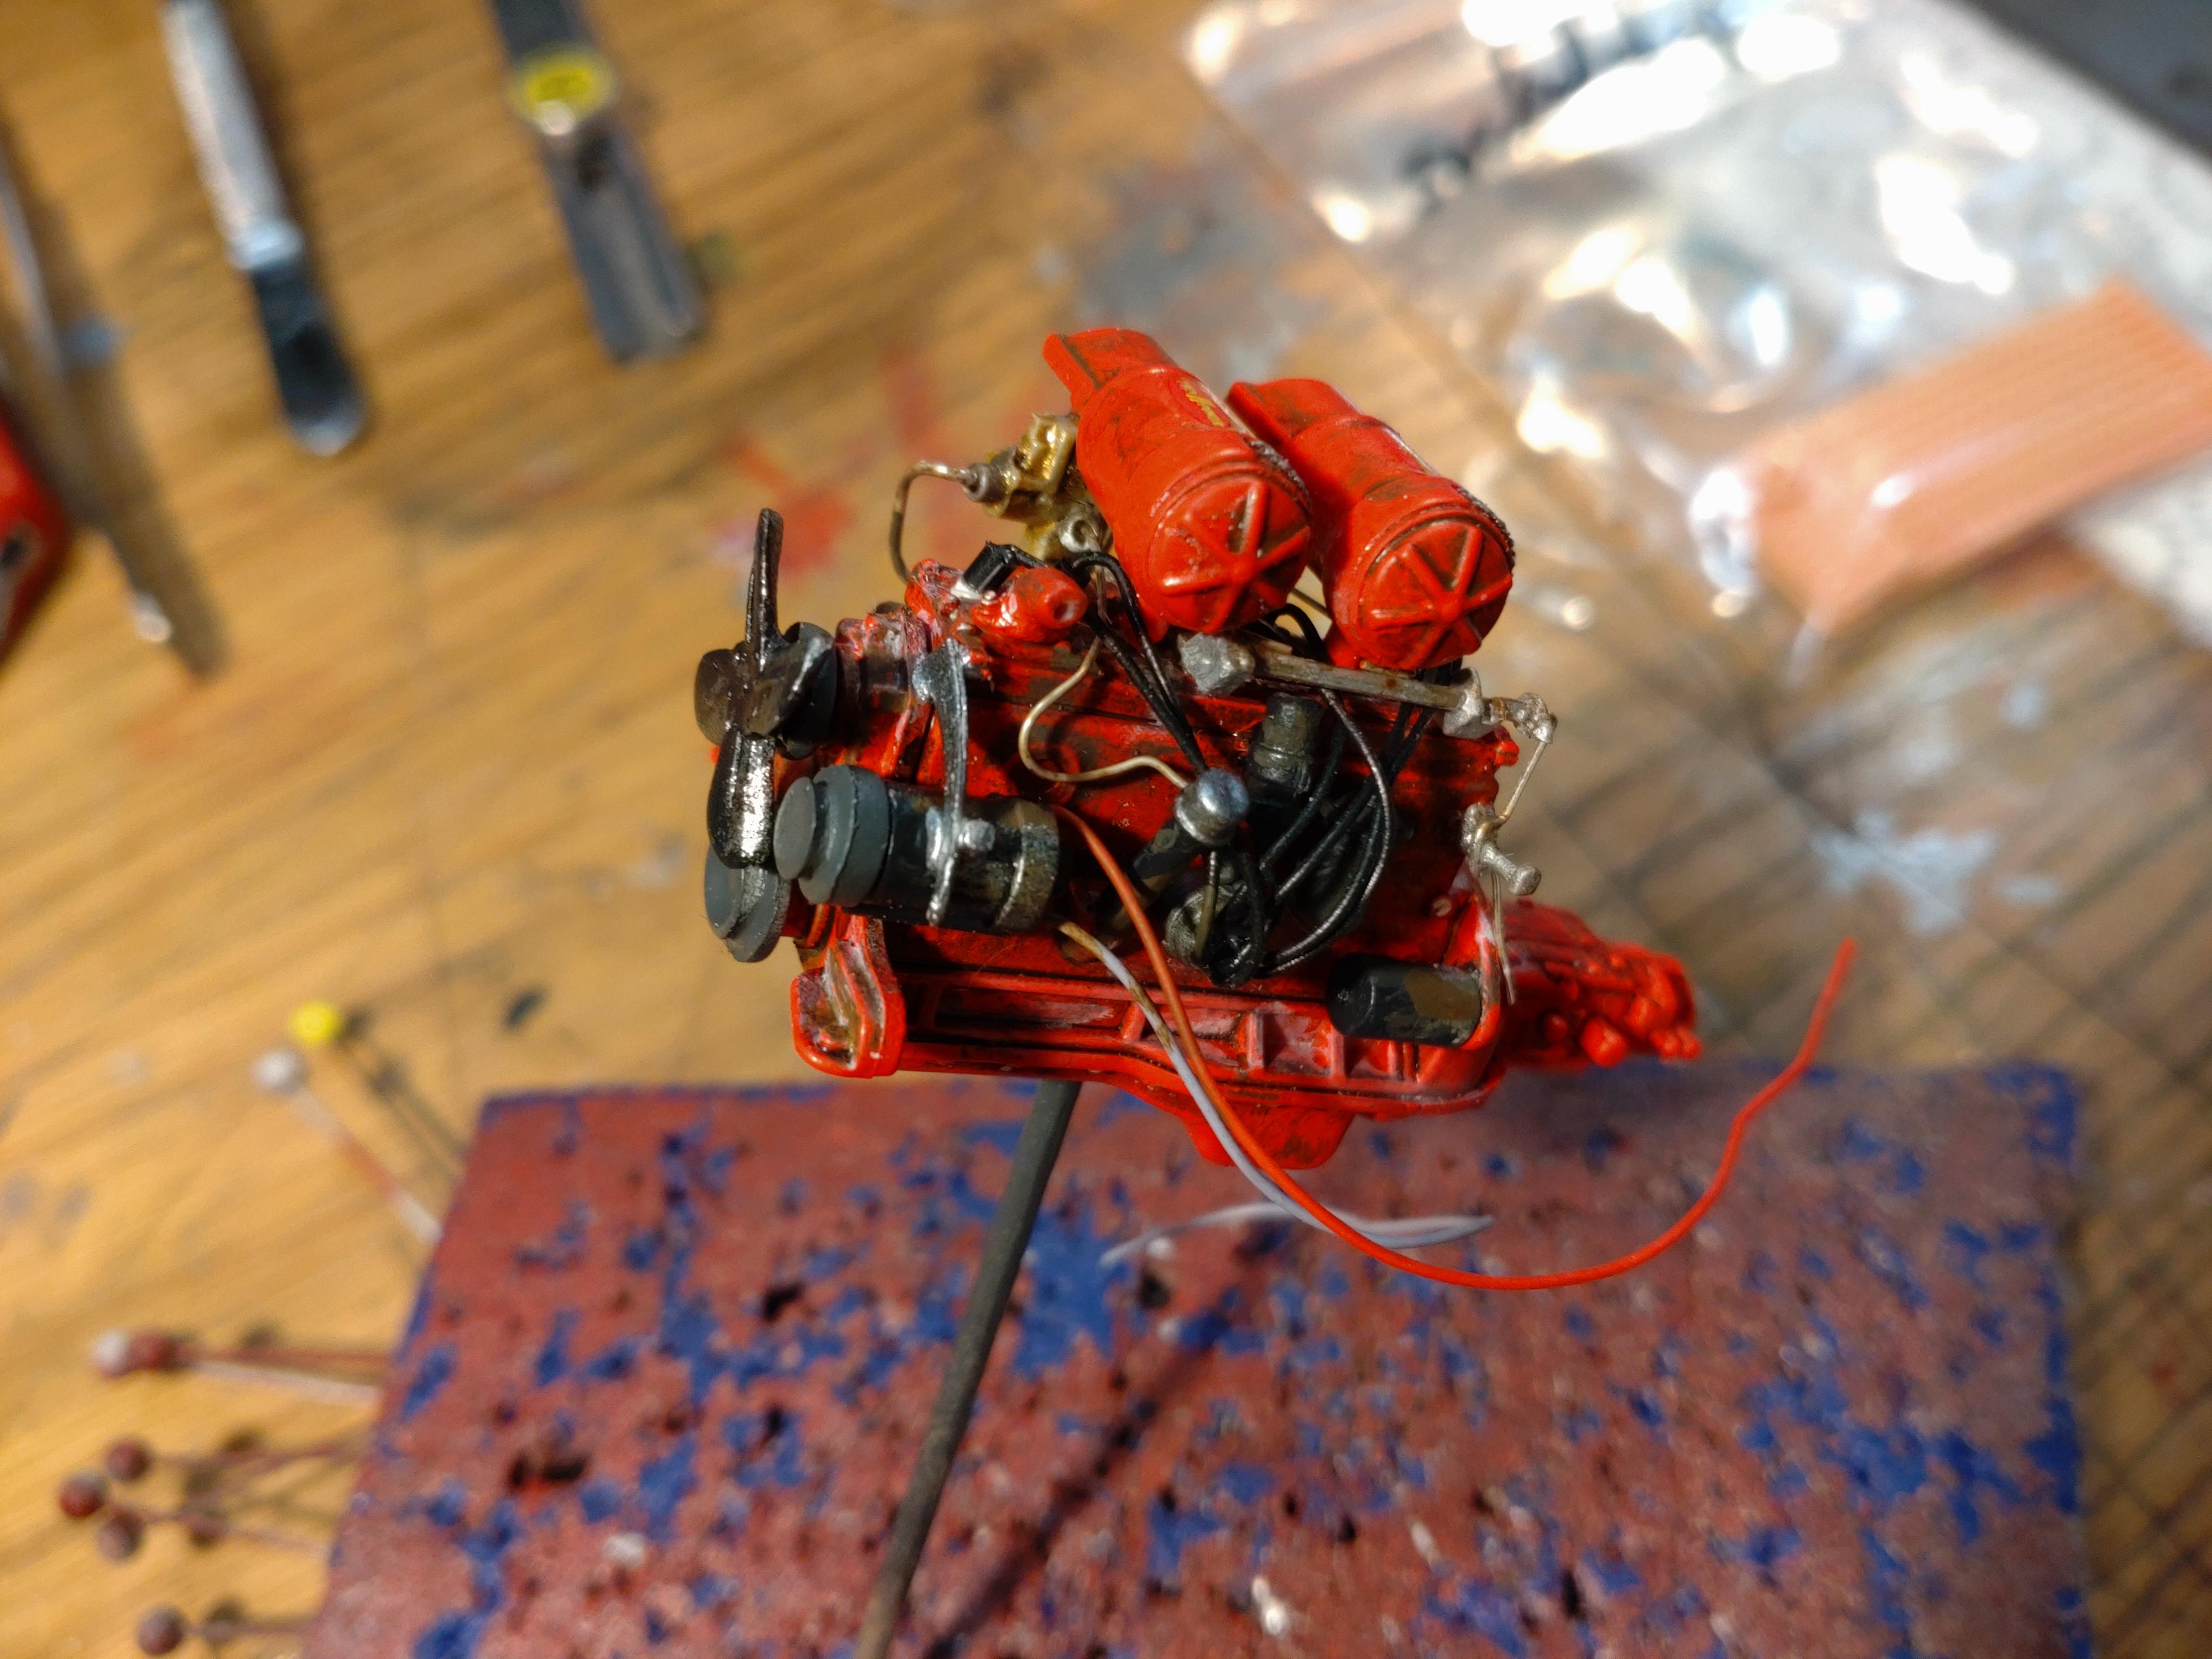
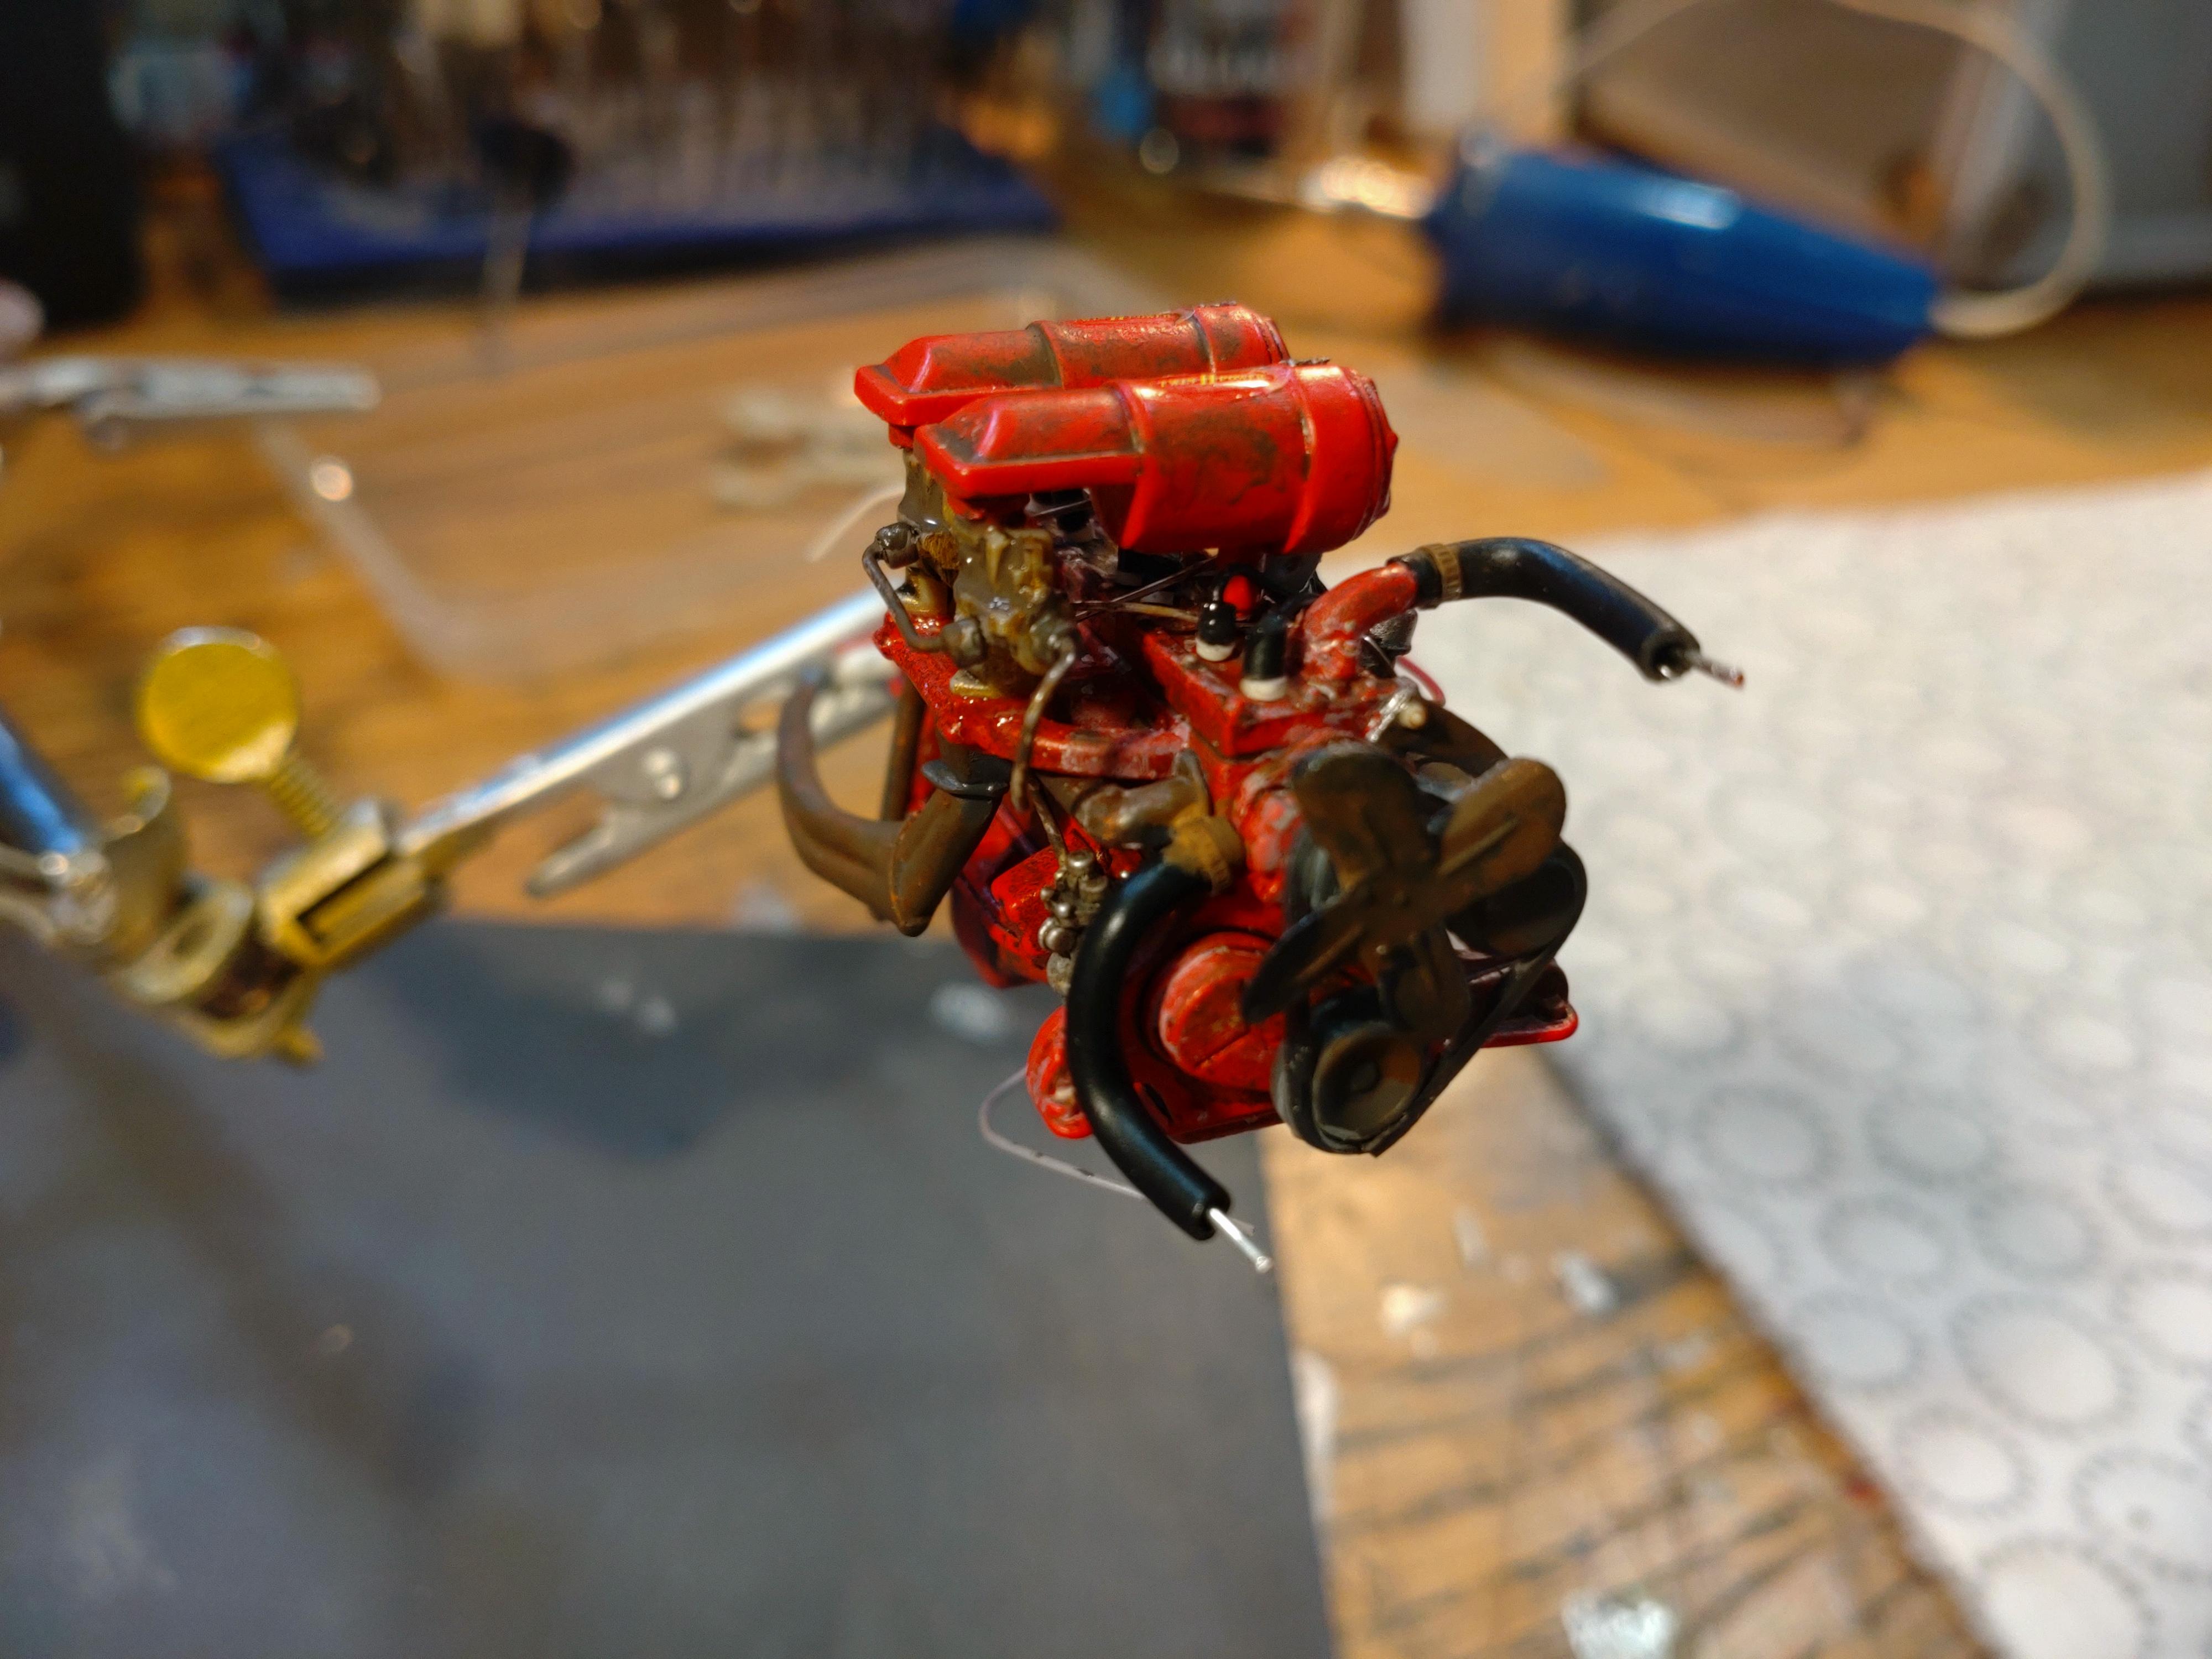
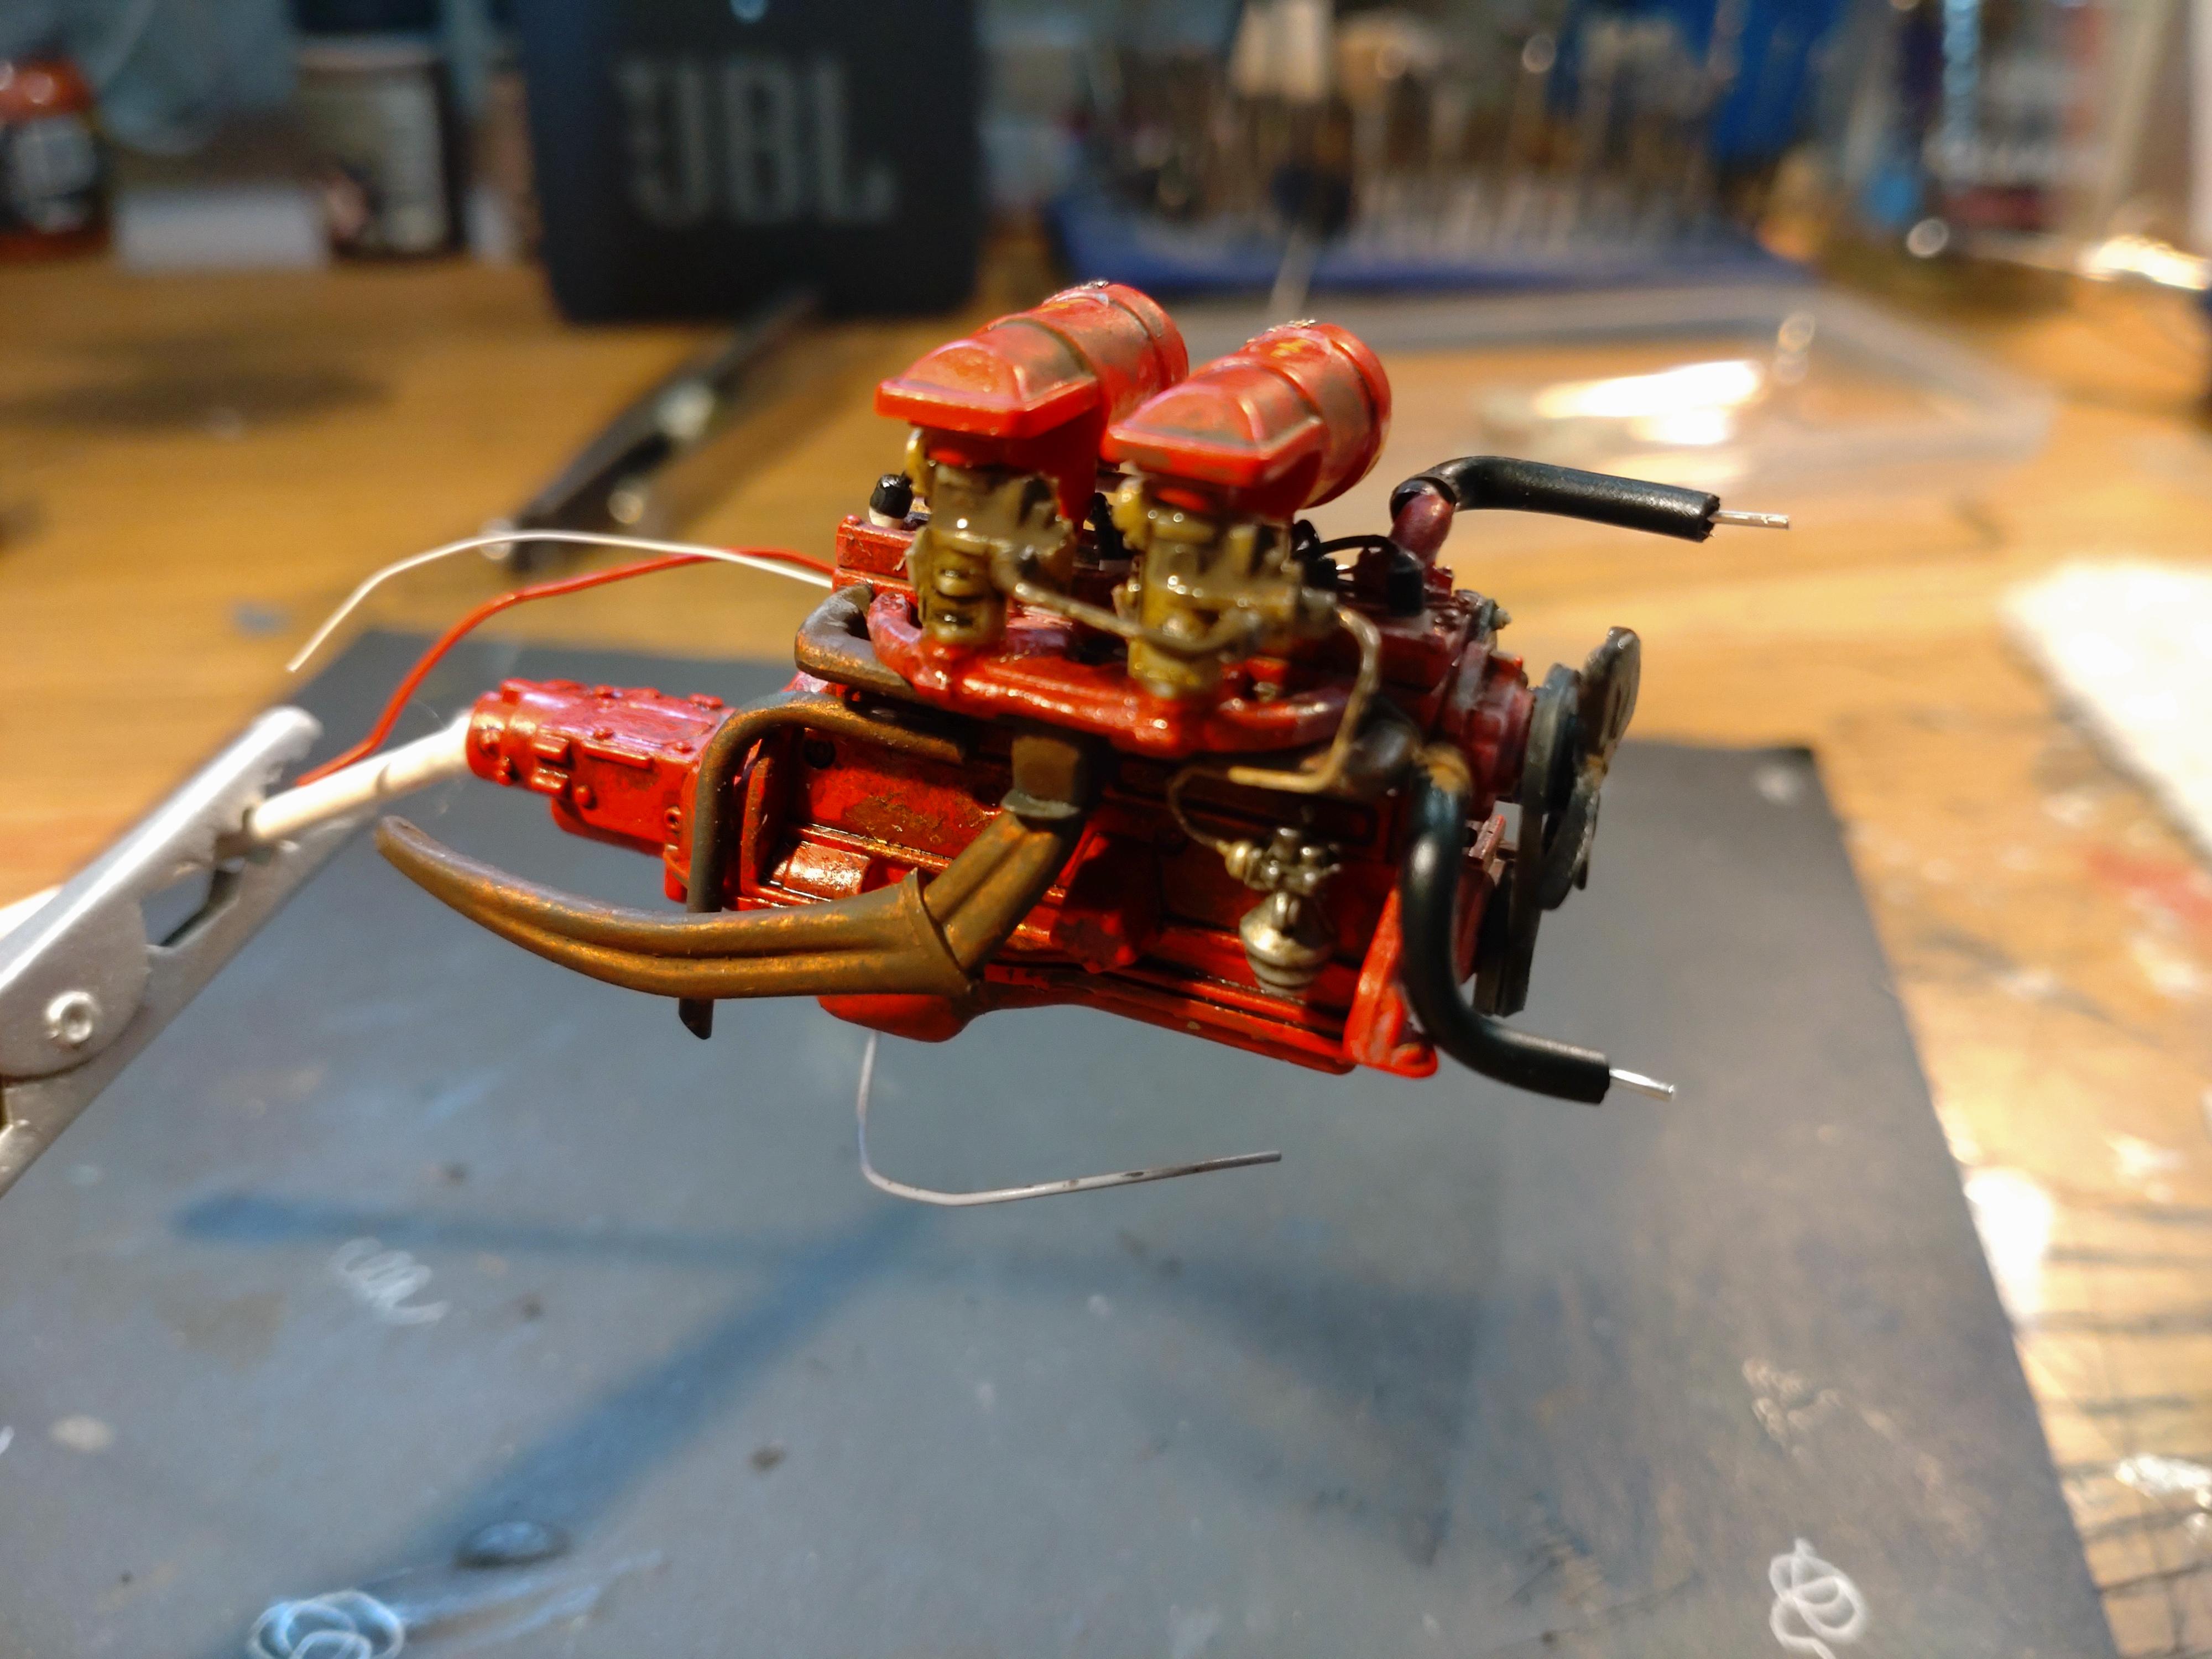
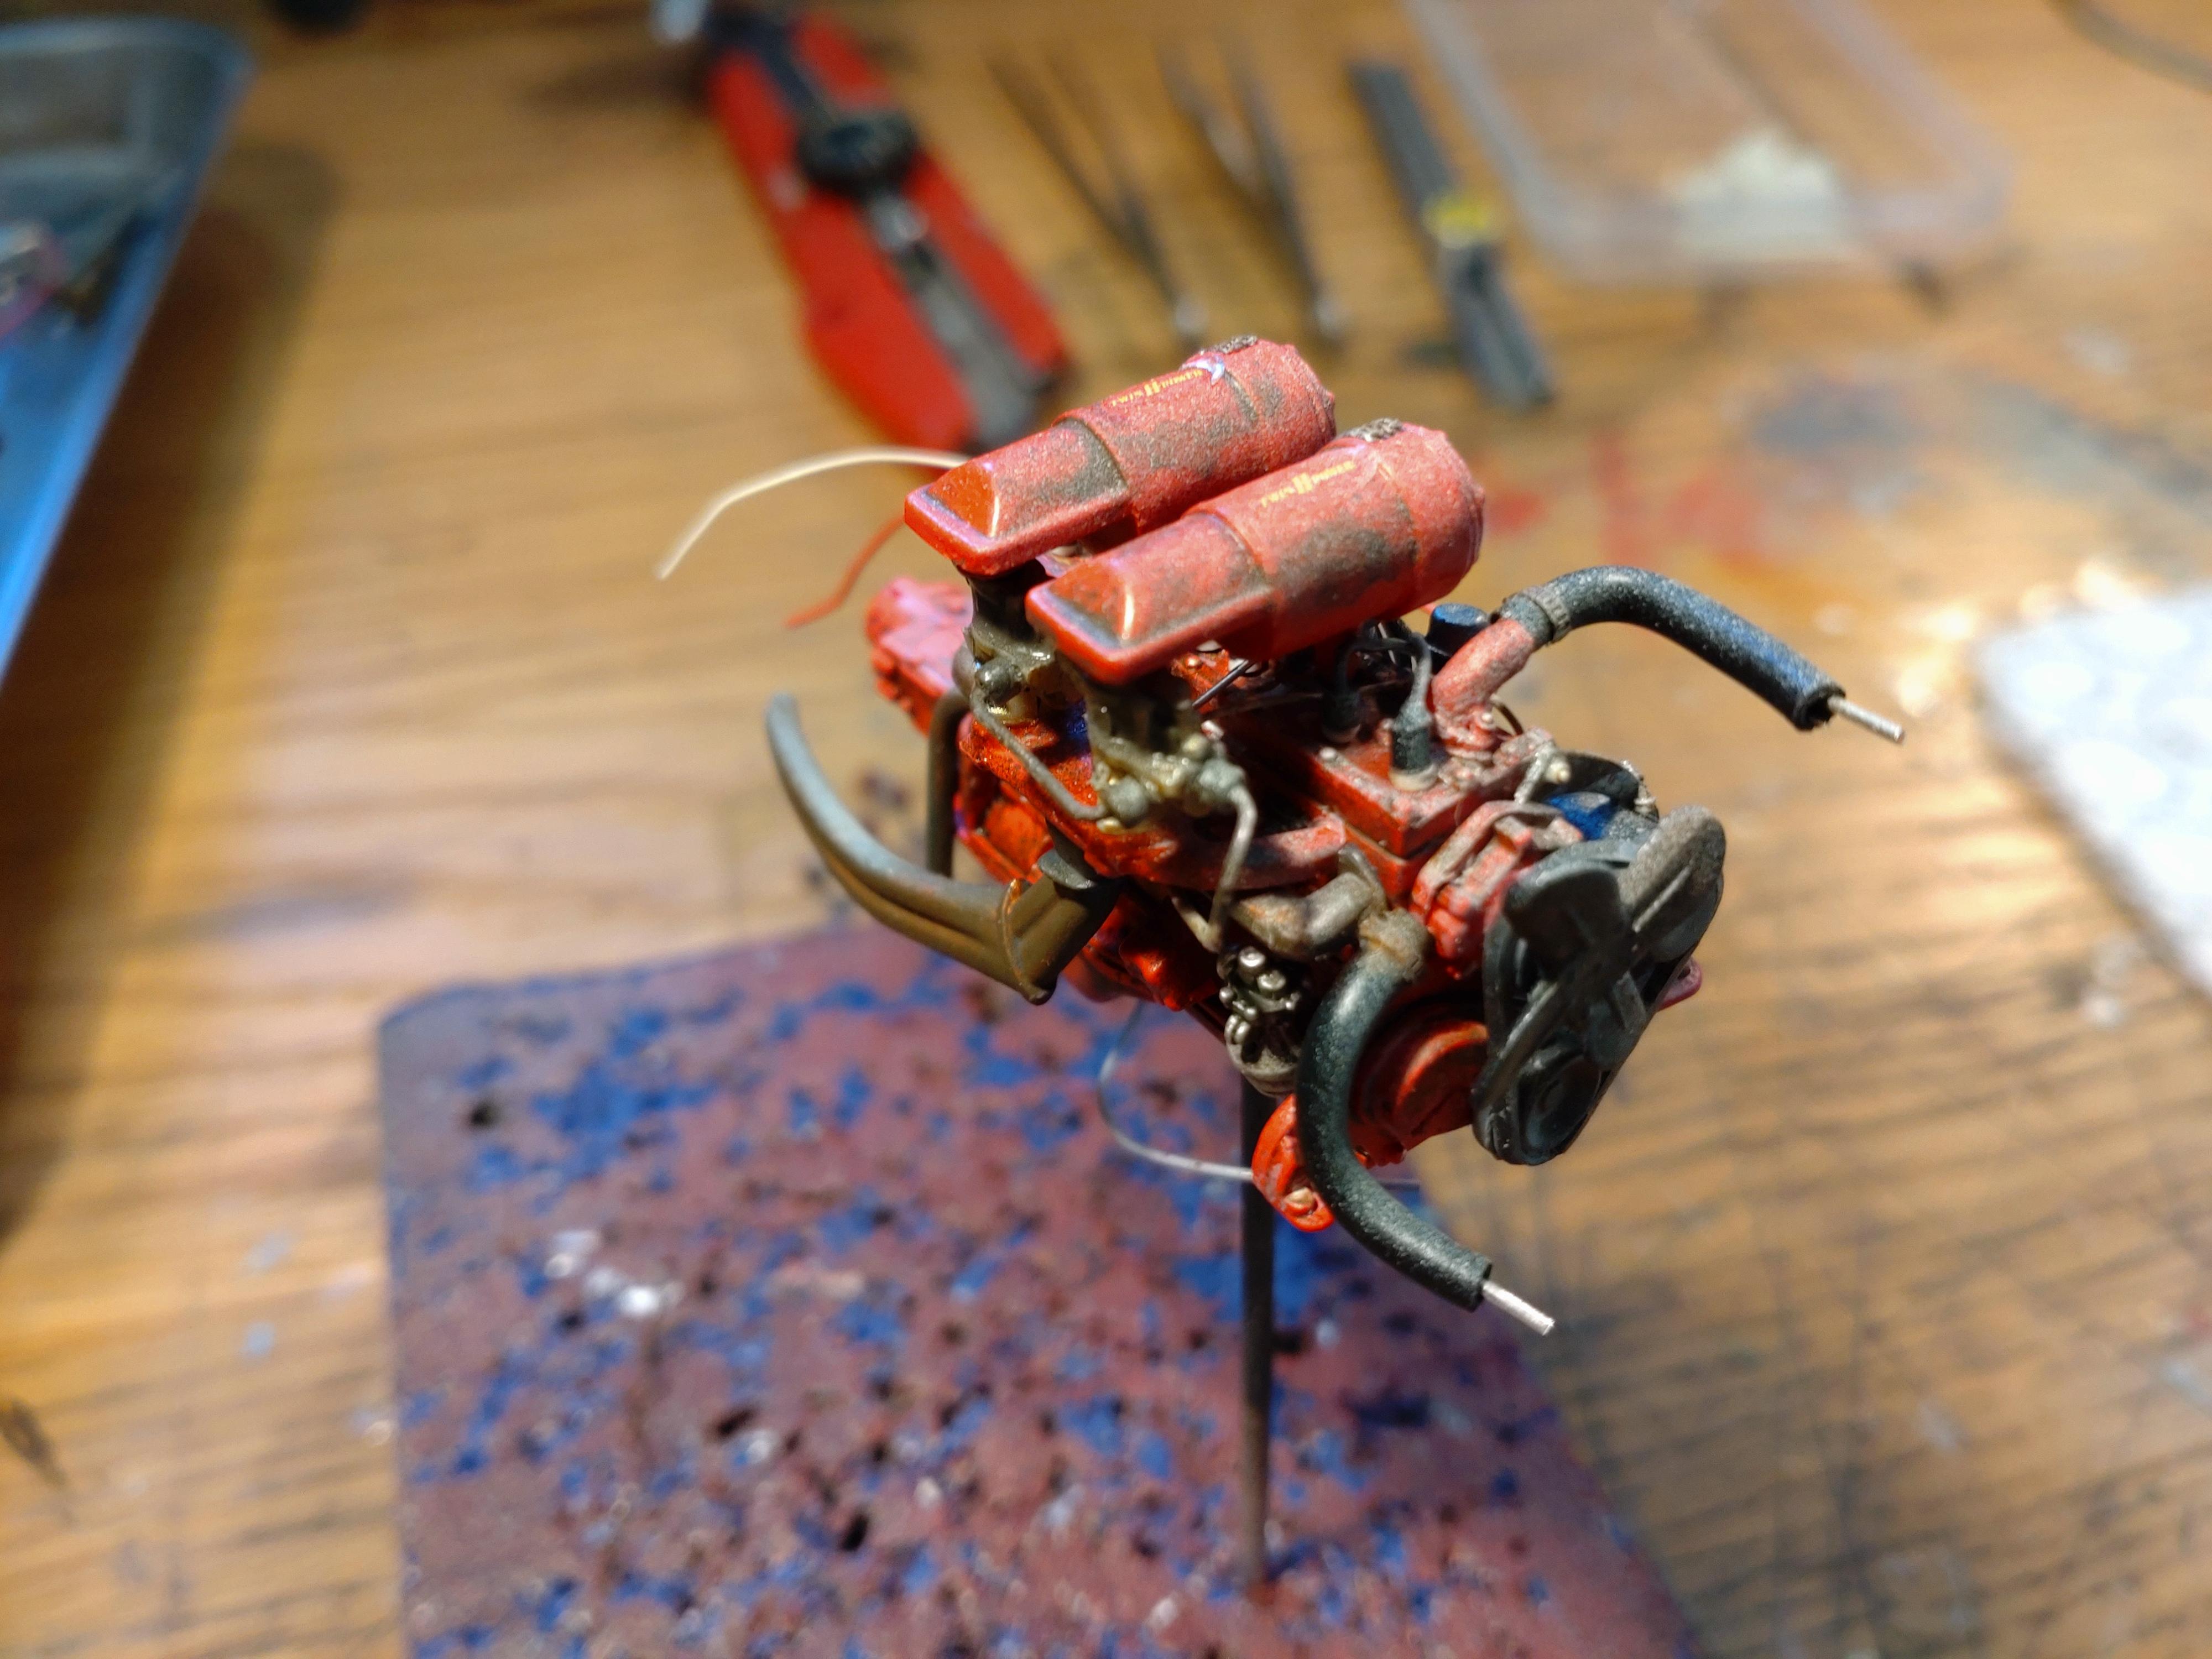
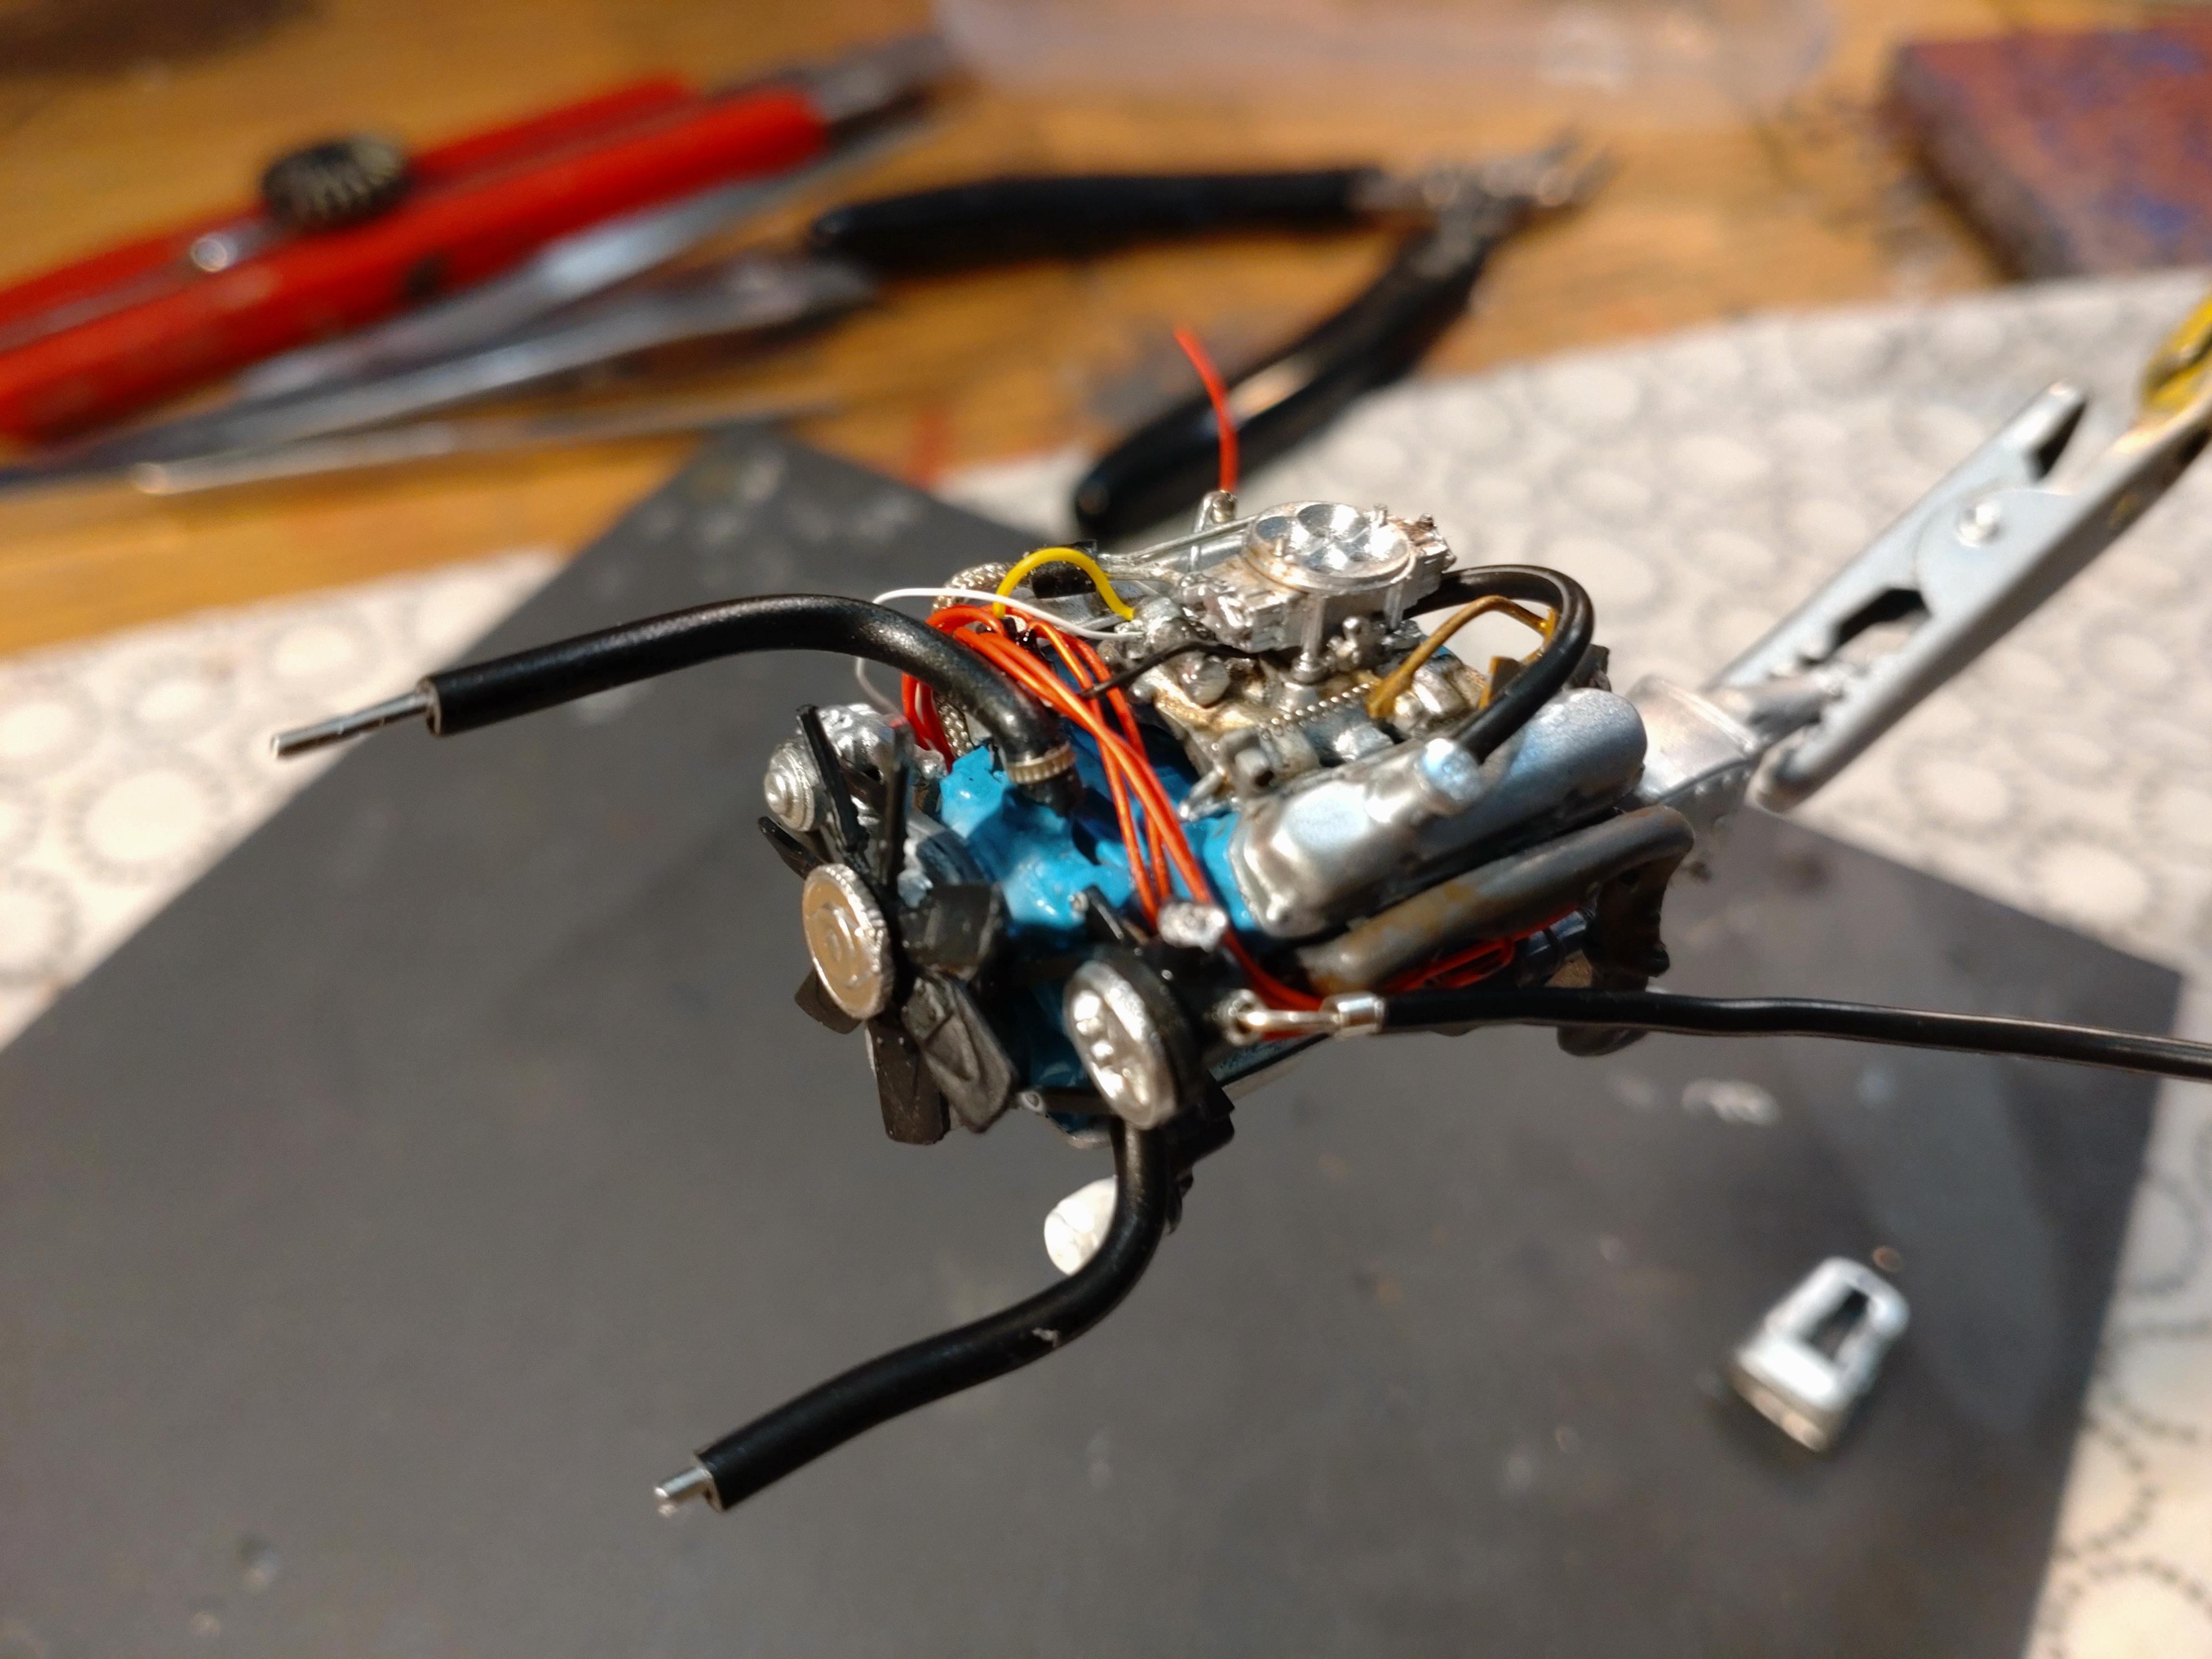
One of the things I havn't tried yet was a real dirty rust job. I was thinking of something old, but not necessarily going into the ´20s or ´30s. I discovered a ´52 Hudson Hornet convertible and the ideas came instantly, about how run down I could weather and age the open interior. I have built the Hornet before, but in shiny and clean, and the Moebius kits are a real good choice for fine mold engineering and good details. So far I have the engine finished and would like to show the building process and how I added AGE and grime. I use several patina colors when making an object look old. Dirt and rust don´t have a standard color and applying a lighter and darker color next or on top of each other comes very close to a natural aged surface. The products I used on this build are AK´s engine grime, interior streaking and rust streak. On the exhaust manifold I added a slight dab of copper under the rust streak. Next to an old hair brush I am fond of applying patina with small rough sponges. Take anything you might have in your household and rip off pieces the size of walnuts or hazels. In addition, I added fuel lines, various cables and details to the carburetors. I was not happy with my first idea of spark plug boots. I pulled out the first boots and slipped a slice of styrene tube under the vinyl hose to make it look like the spark plugs porcelain. With every new part attached I checked if some extra rust or weathering might be necessary. The air filters received strips of grid metal for the air intake. As usual, I deconstructed the belt part and prepared the pully wheels for a rubber belt. With the belt added, the engine is just about finished. The generator mount received some nuts and a last round of rust was needed for the fan and pullys. The cooling hoses are wire insulation stripped off the filament. I inserted a 0.6mm wire to bend it into place and added hose clamps. One thing is missing though: DUST! After hibernating for decades in a barn, just about everything gets dusty. With an airbrush I added a very slight layer of sand colored dust. I have started with the body today and hope to show the next steps soon. Thanks for watching!

-
@ David, Rastislav, LM, Donato, Mario and Bill: Thank you for your kind response!
-
@ Tom and Jeff, thanks for your kind replies, means a lot to me! Best wishes!
-
Hi Alan, yup, that´s the one! I bought it out of an impulse and during the next hours the ideas came flooding. Happy you like my build! Best wishes!
-
Hi everybody, thanks for your kind response! It´s always a thrill to post a new build here and see how you like it. Best wishes!
-
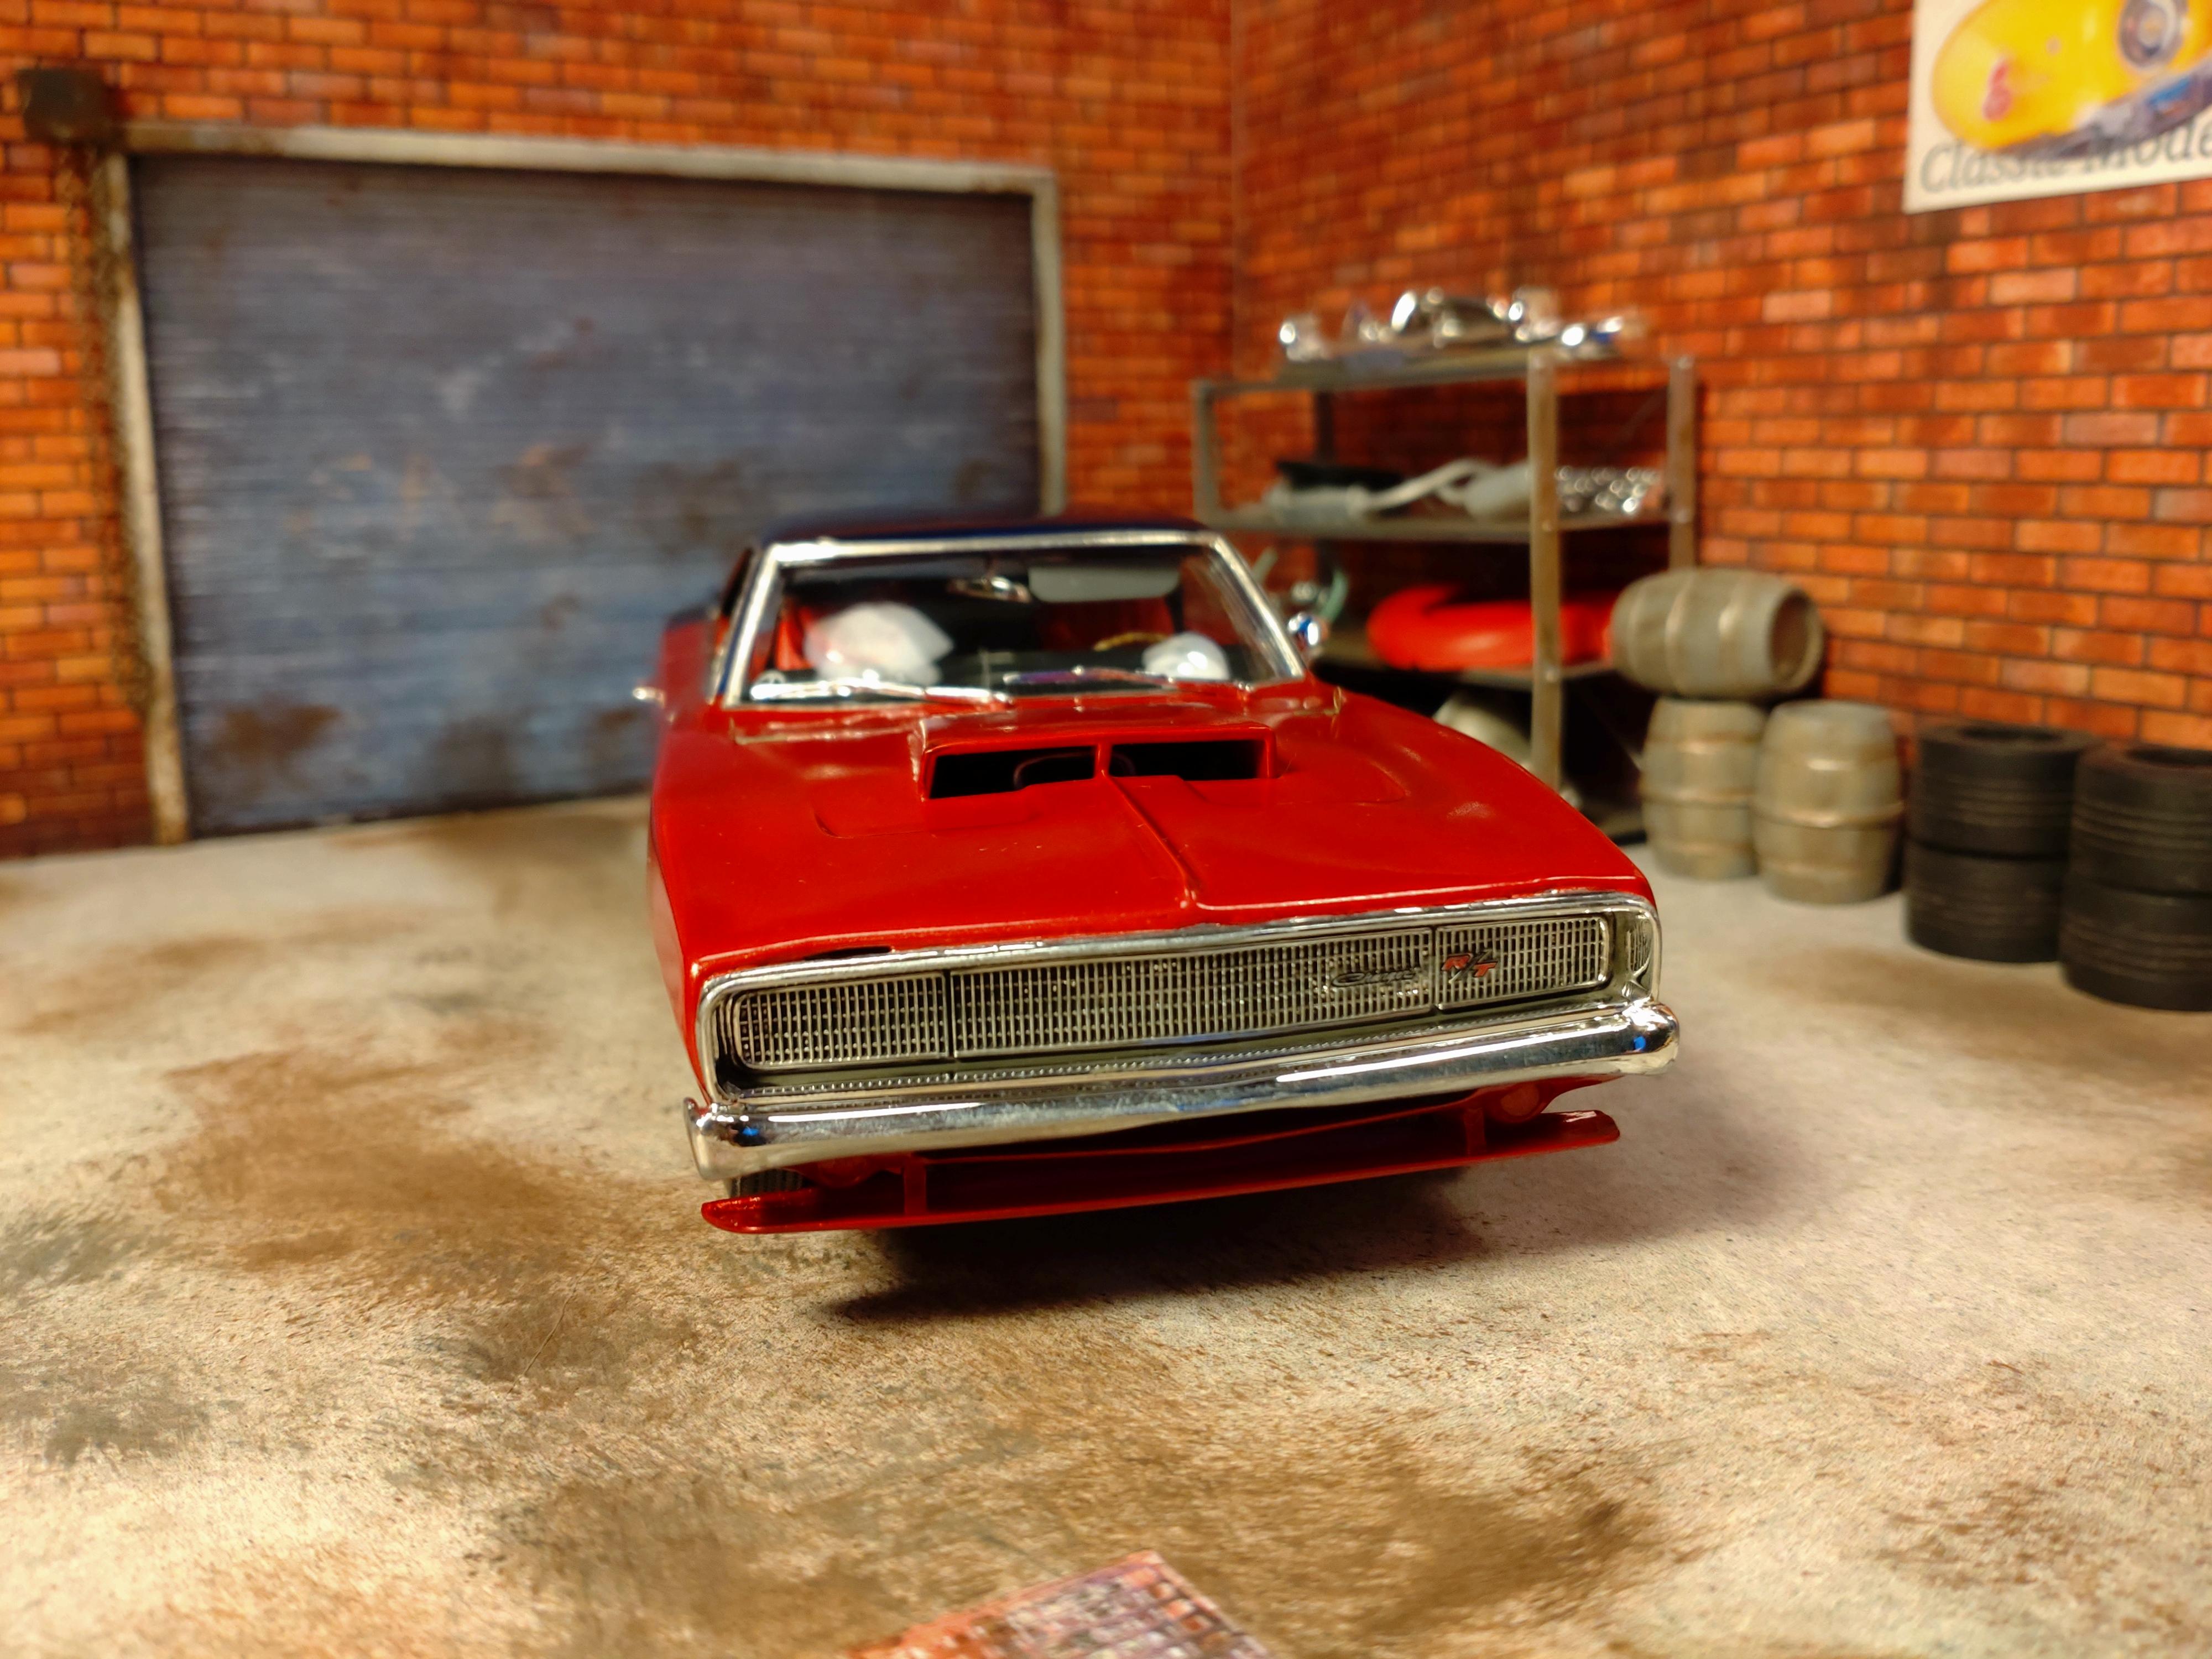
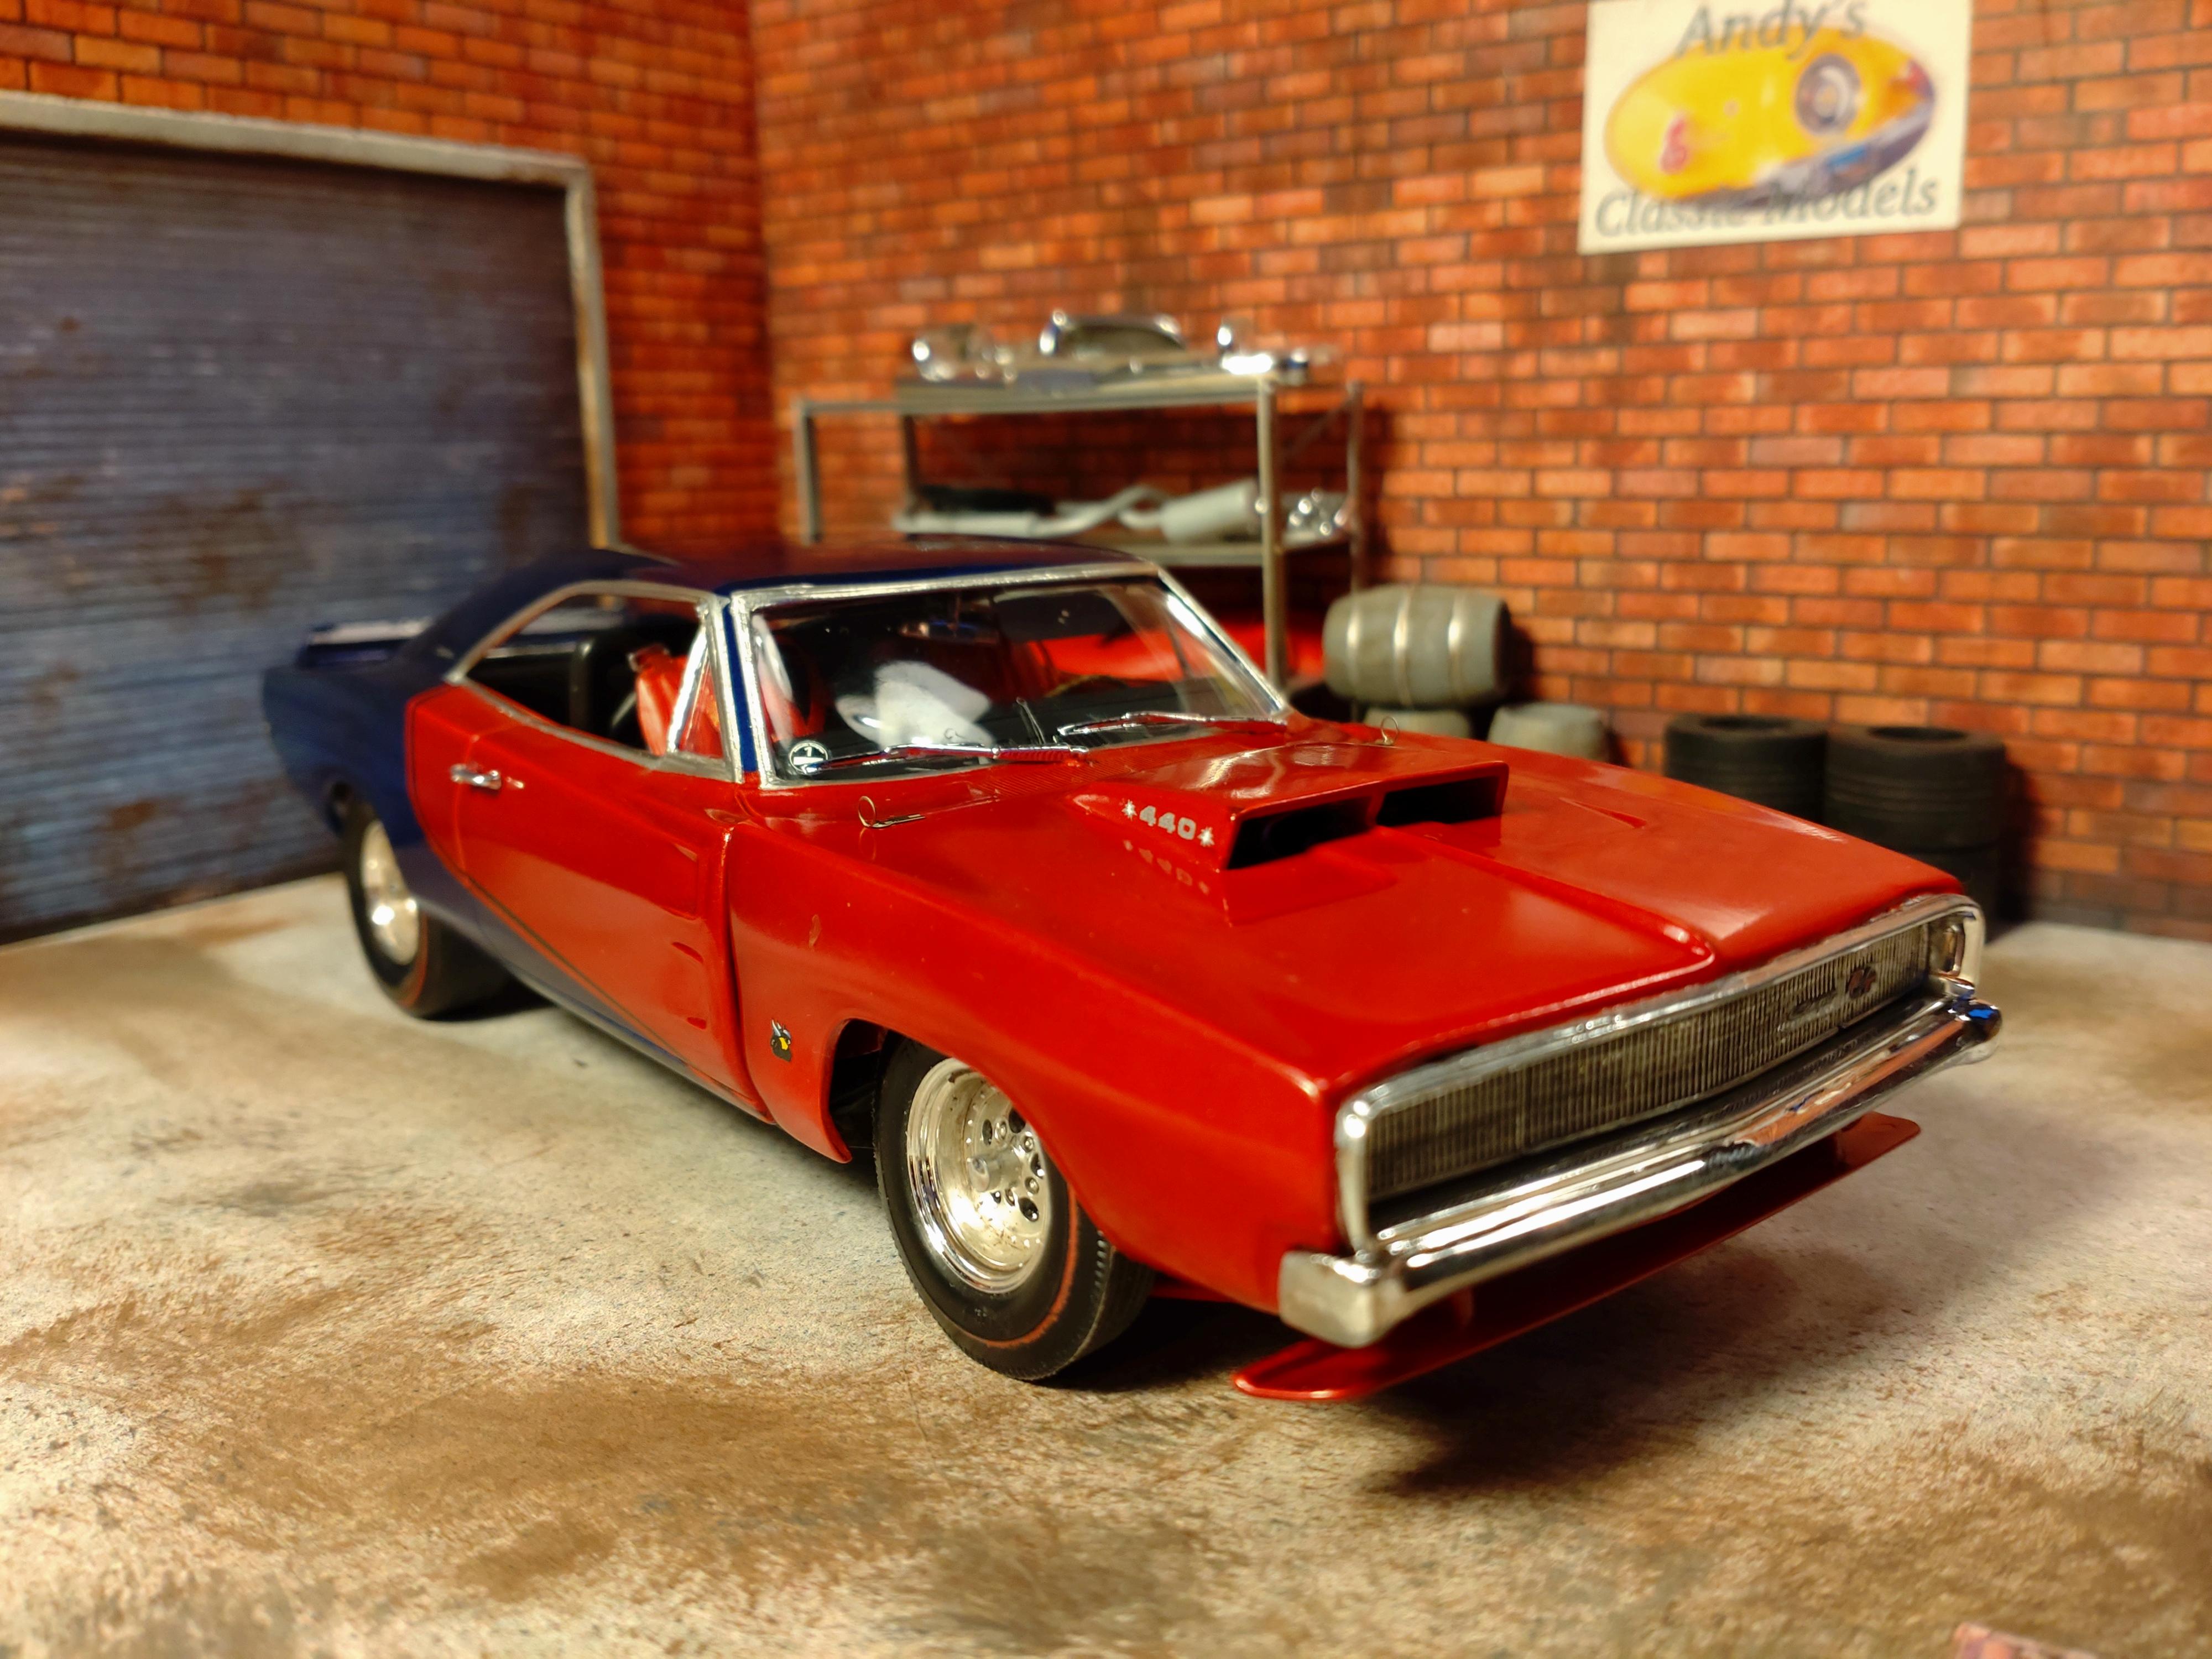
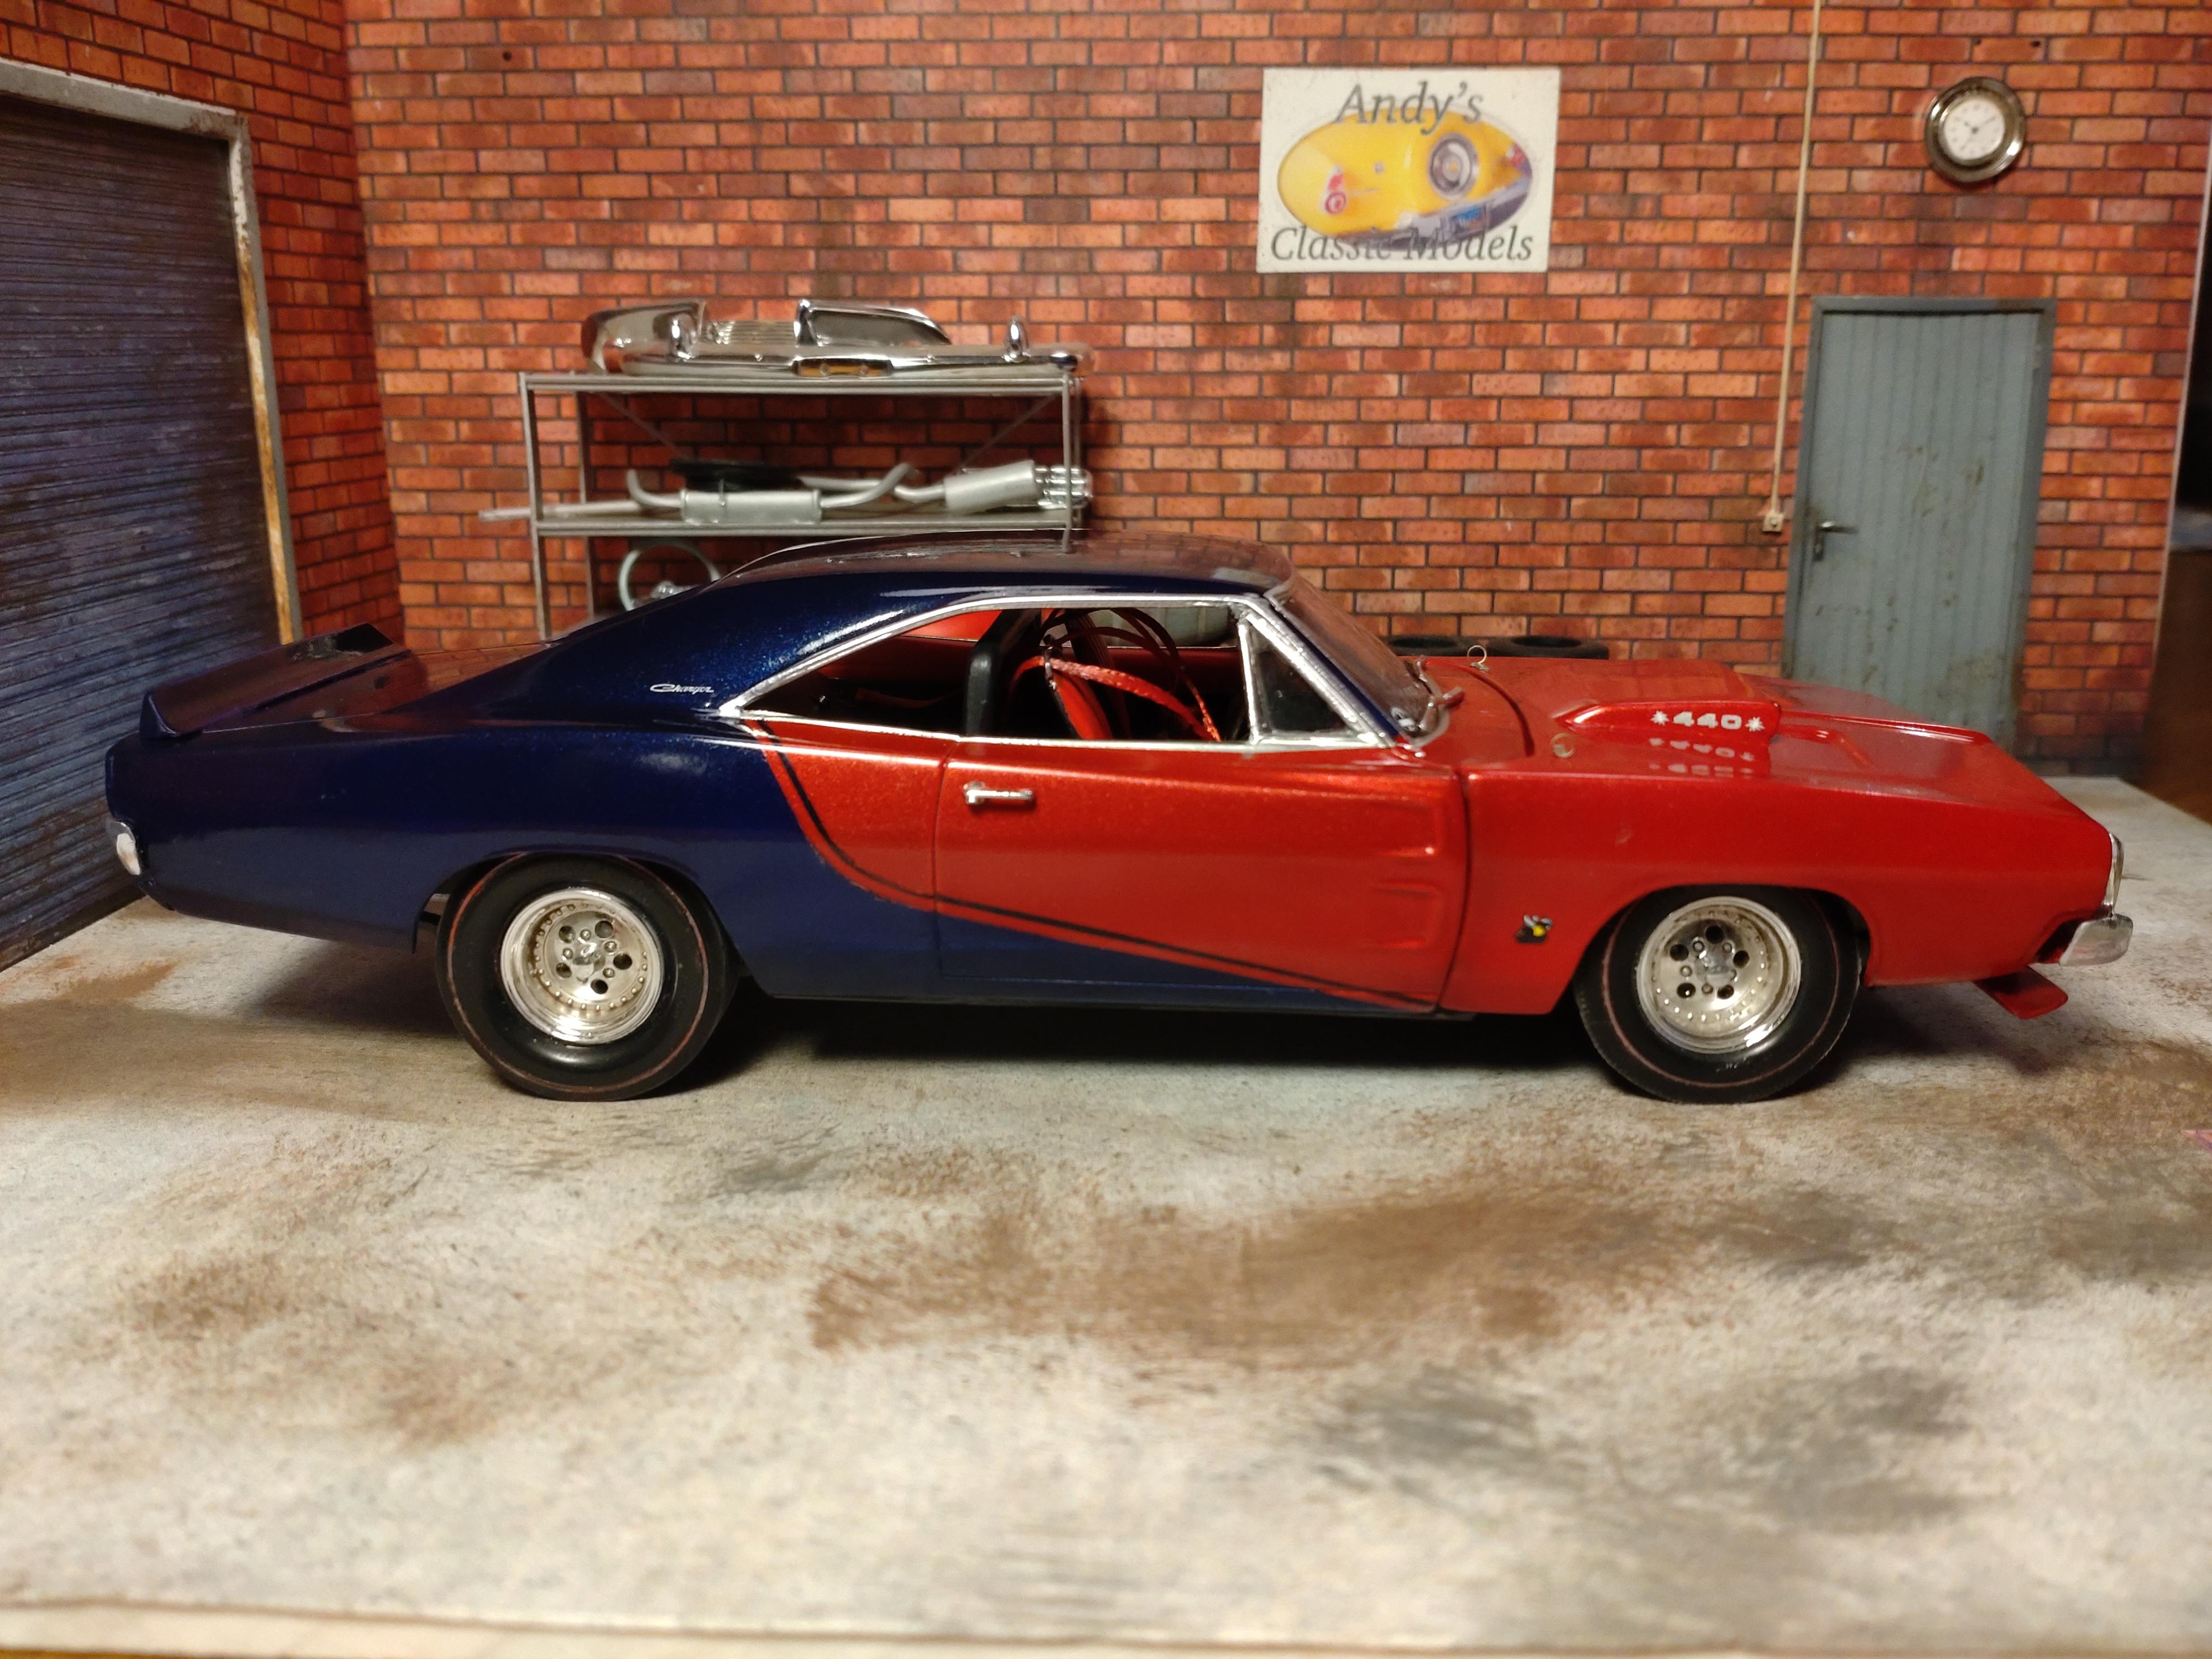
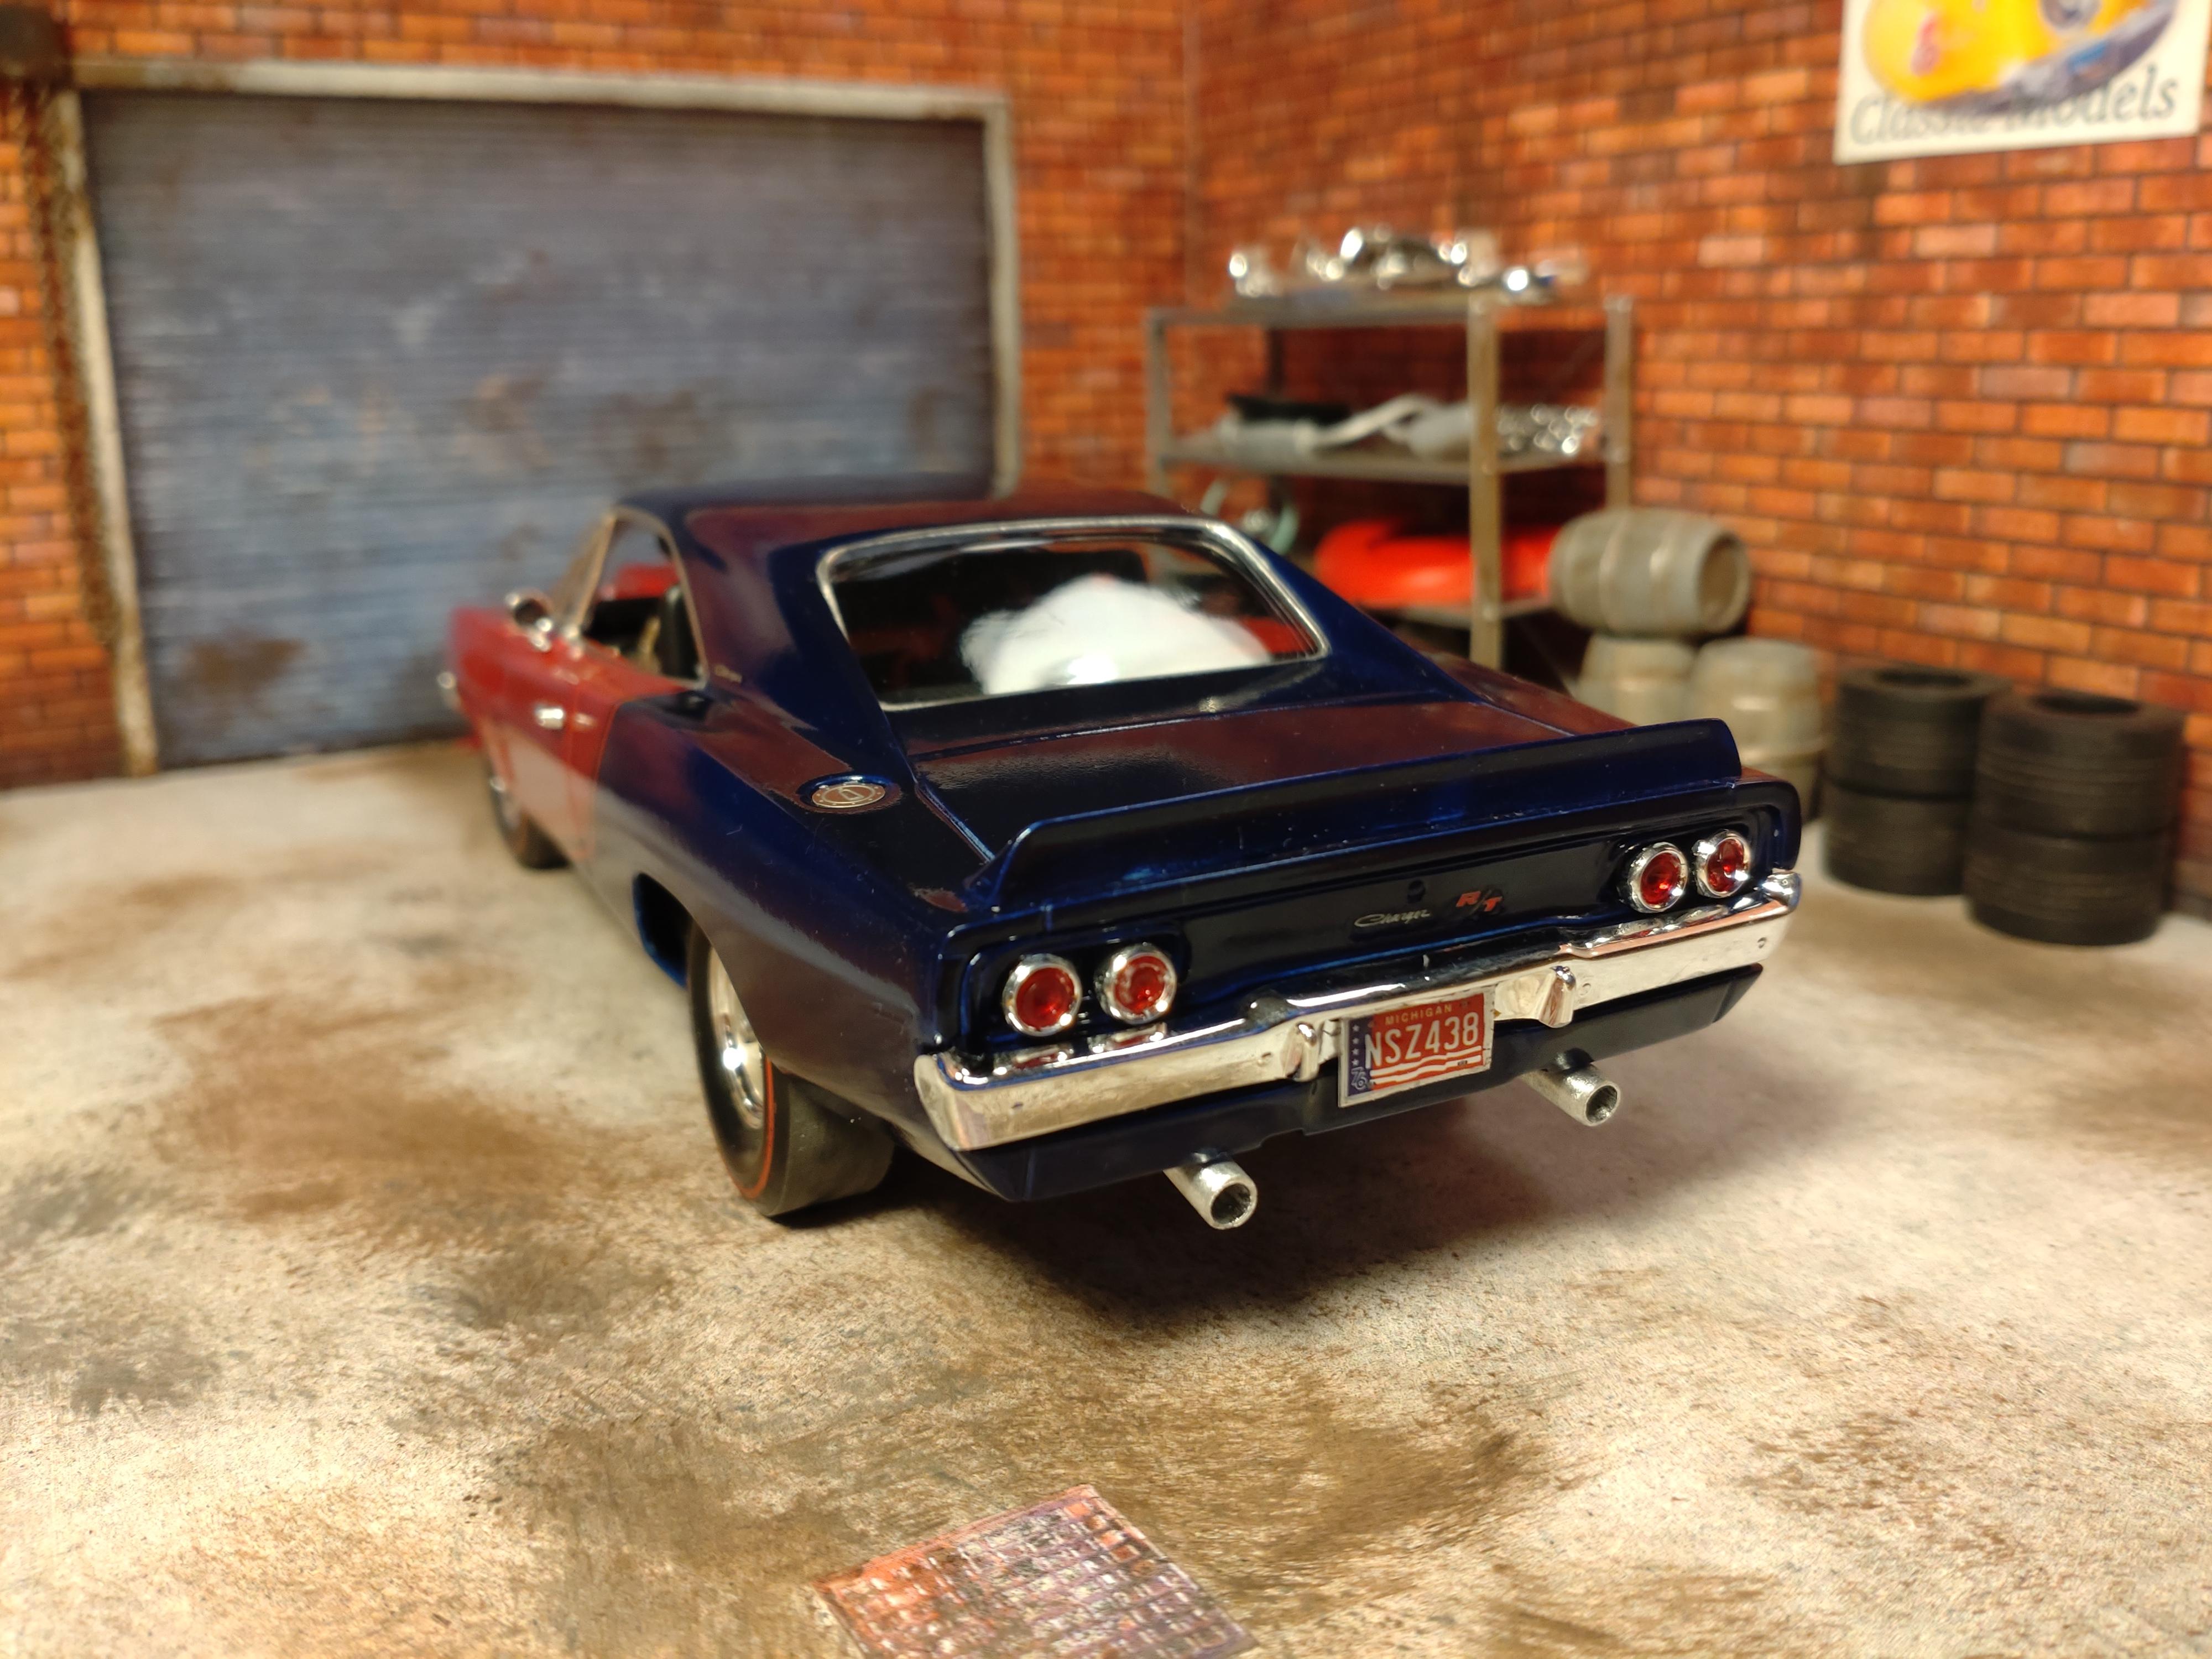
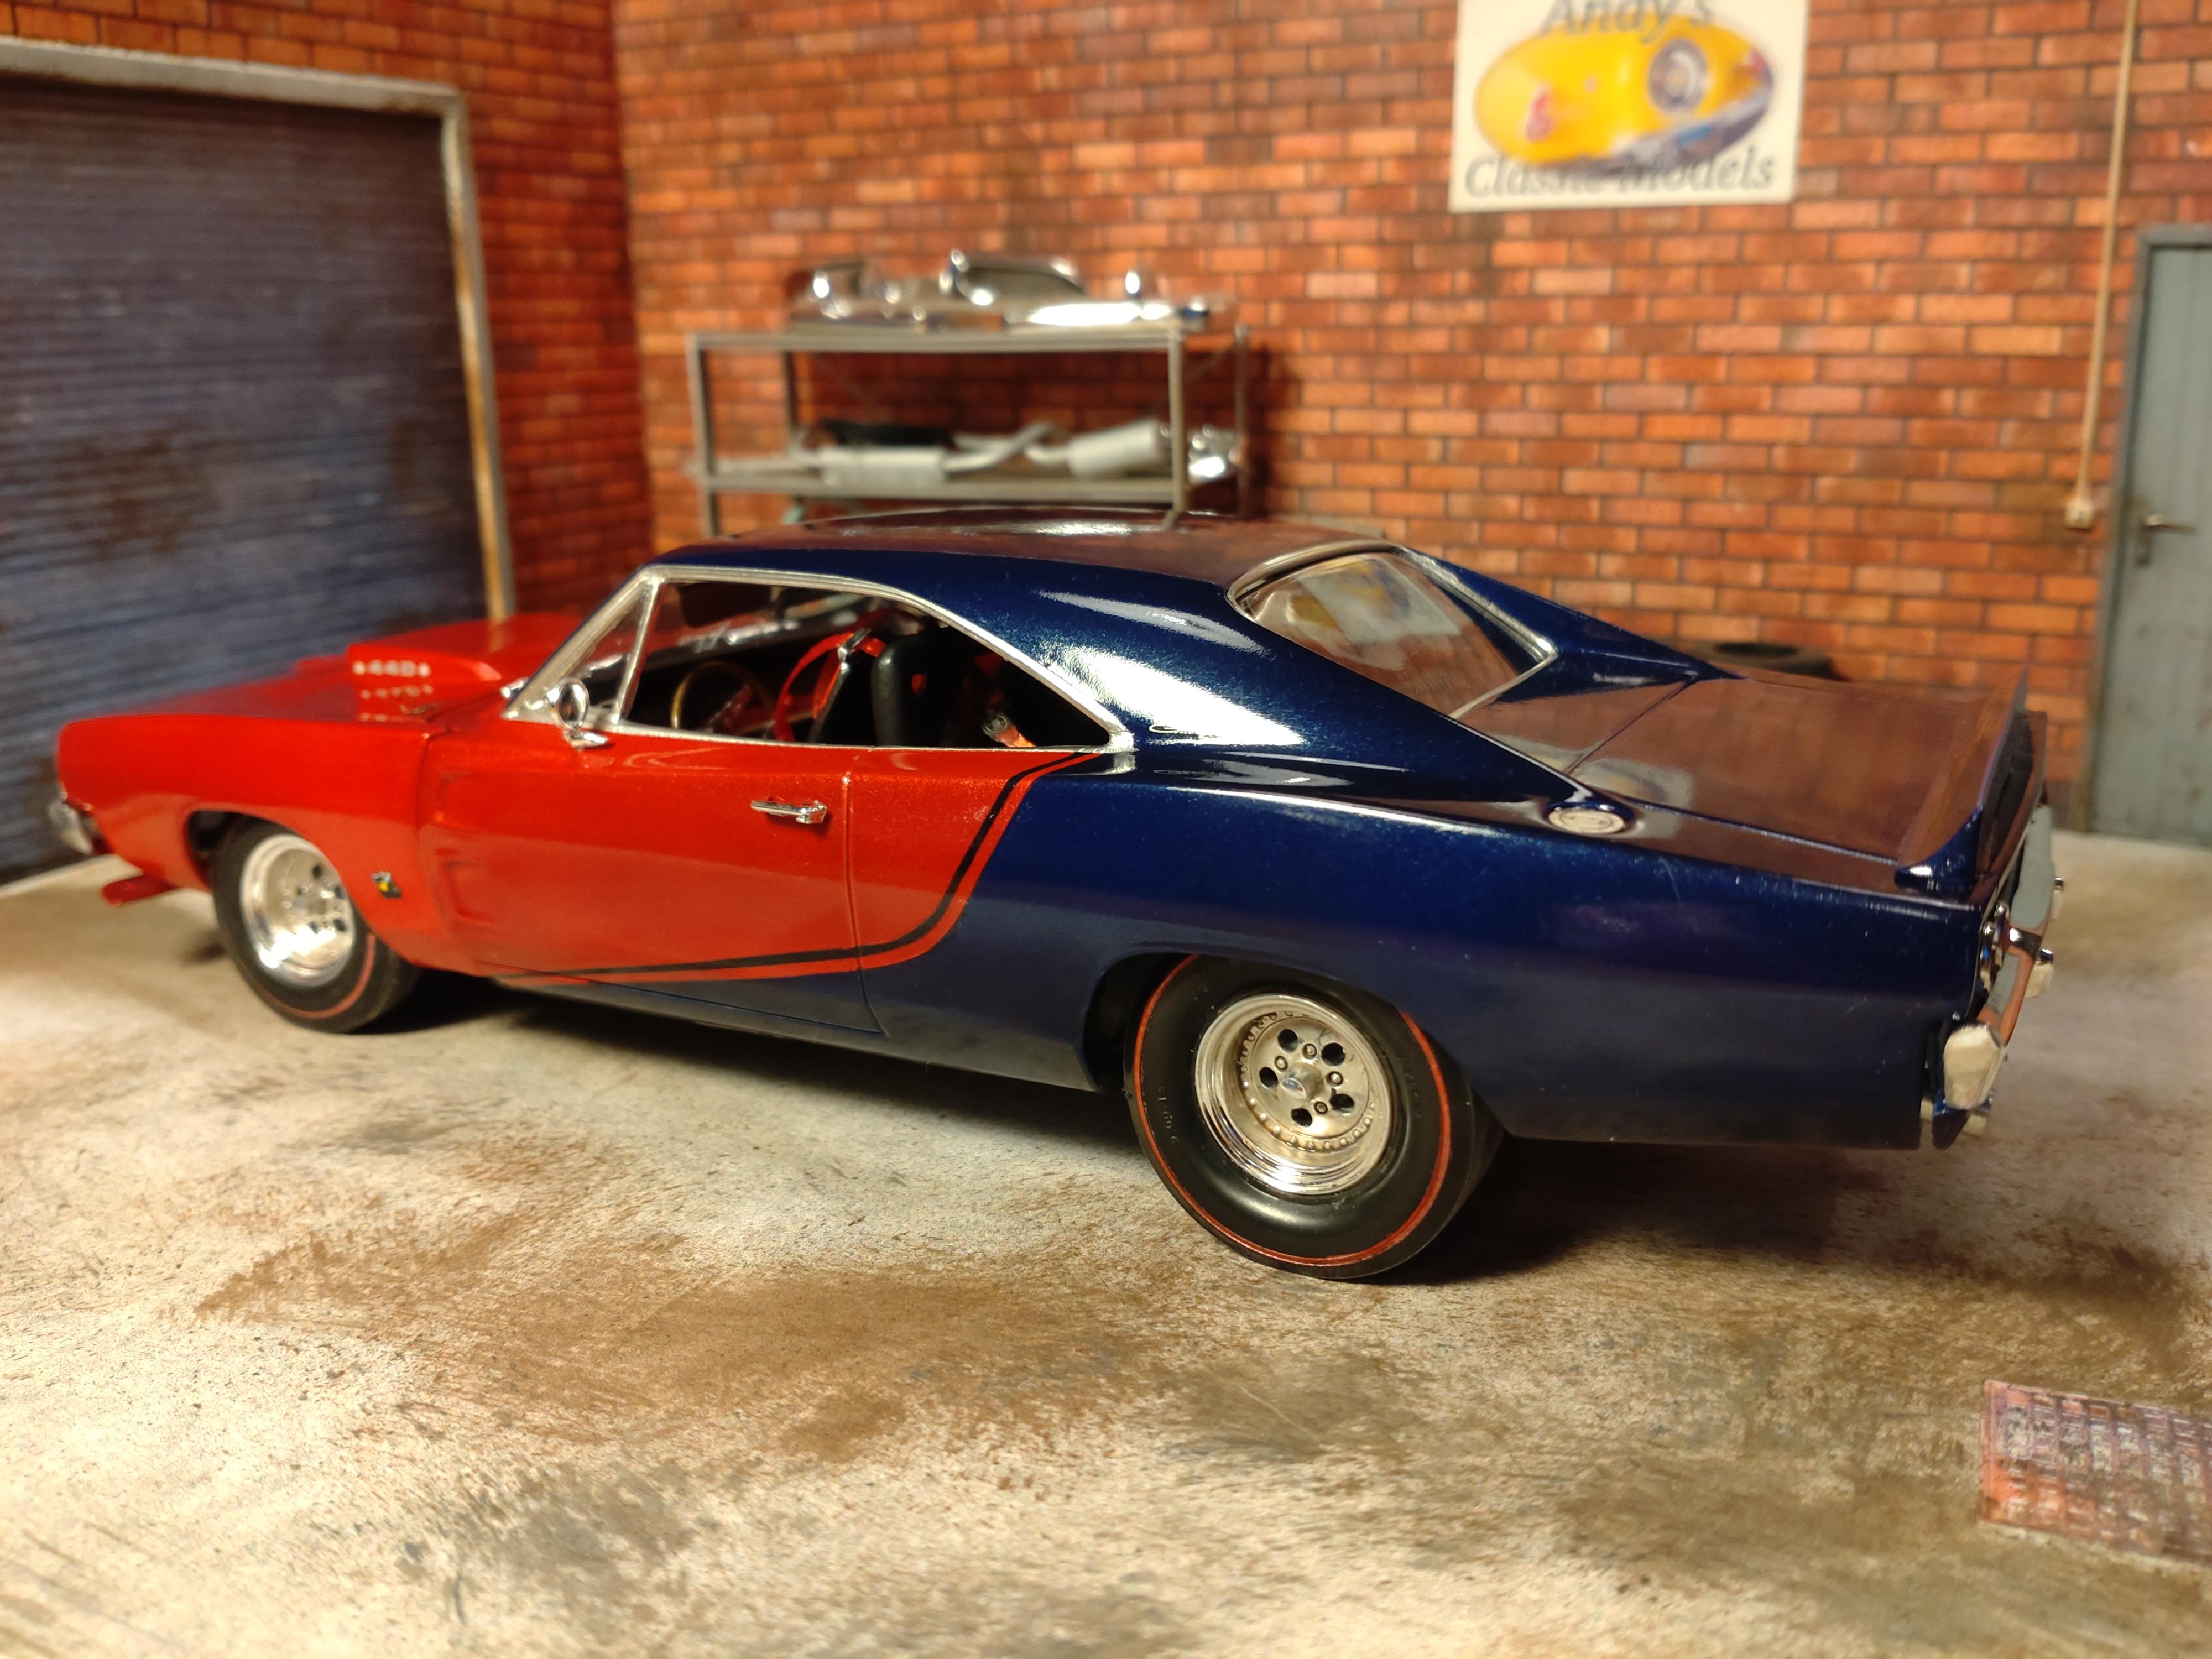
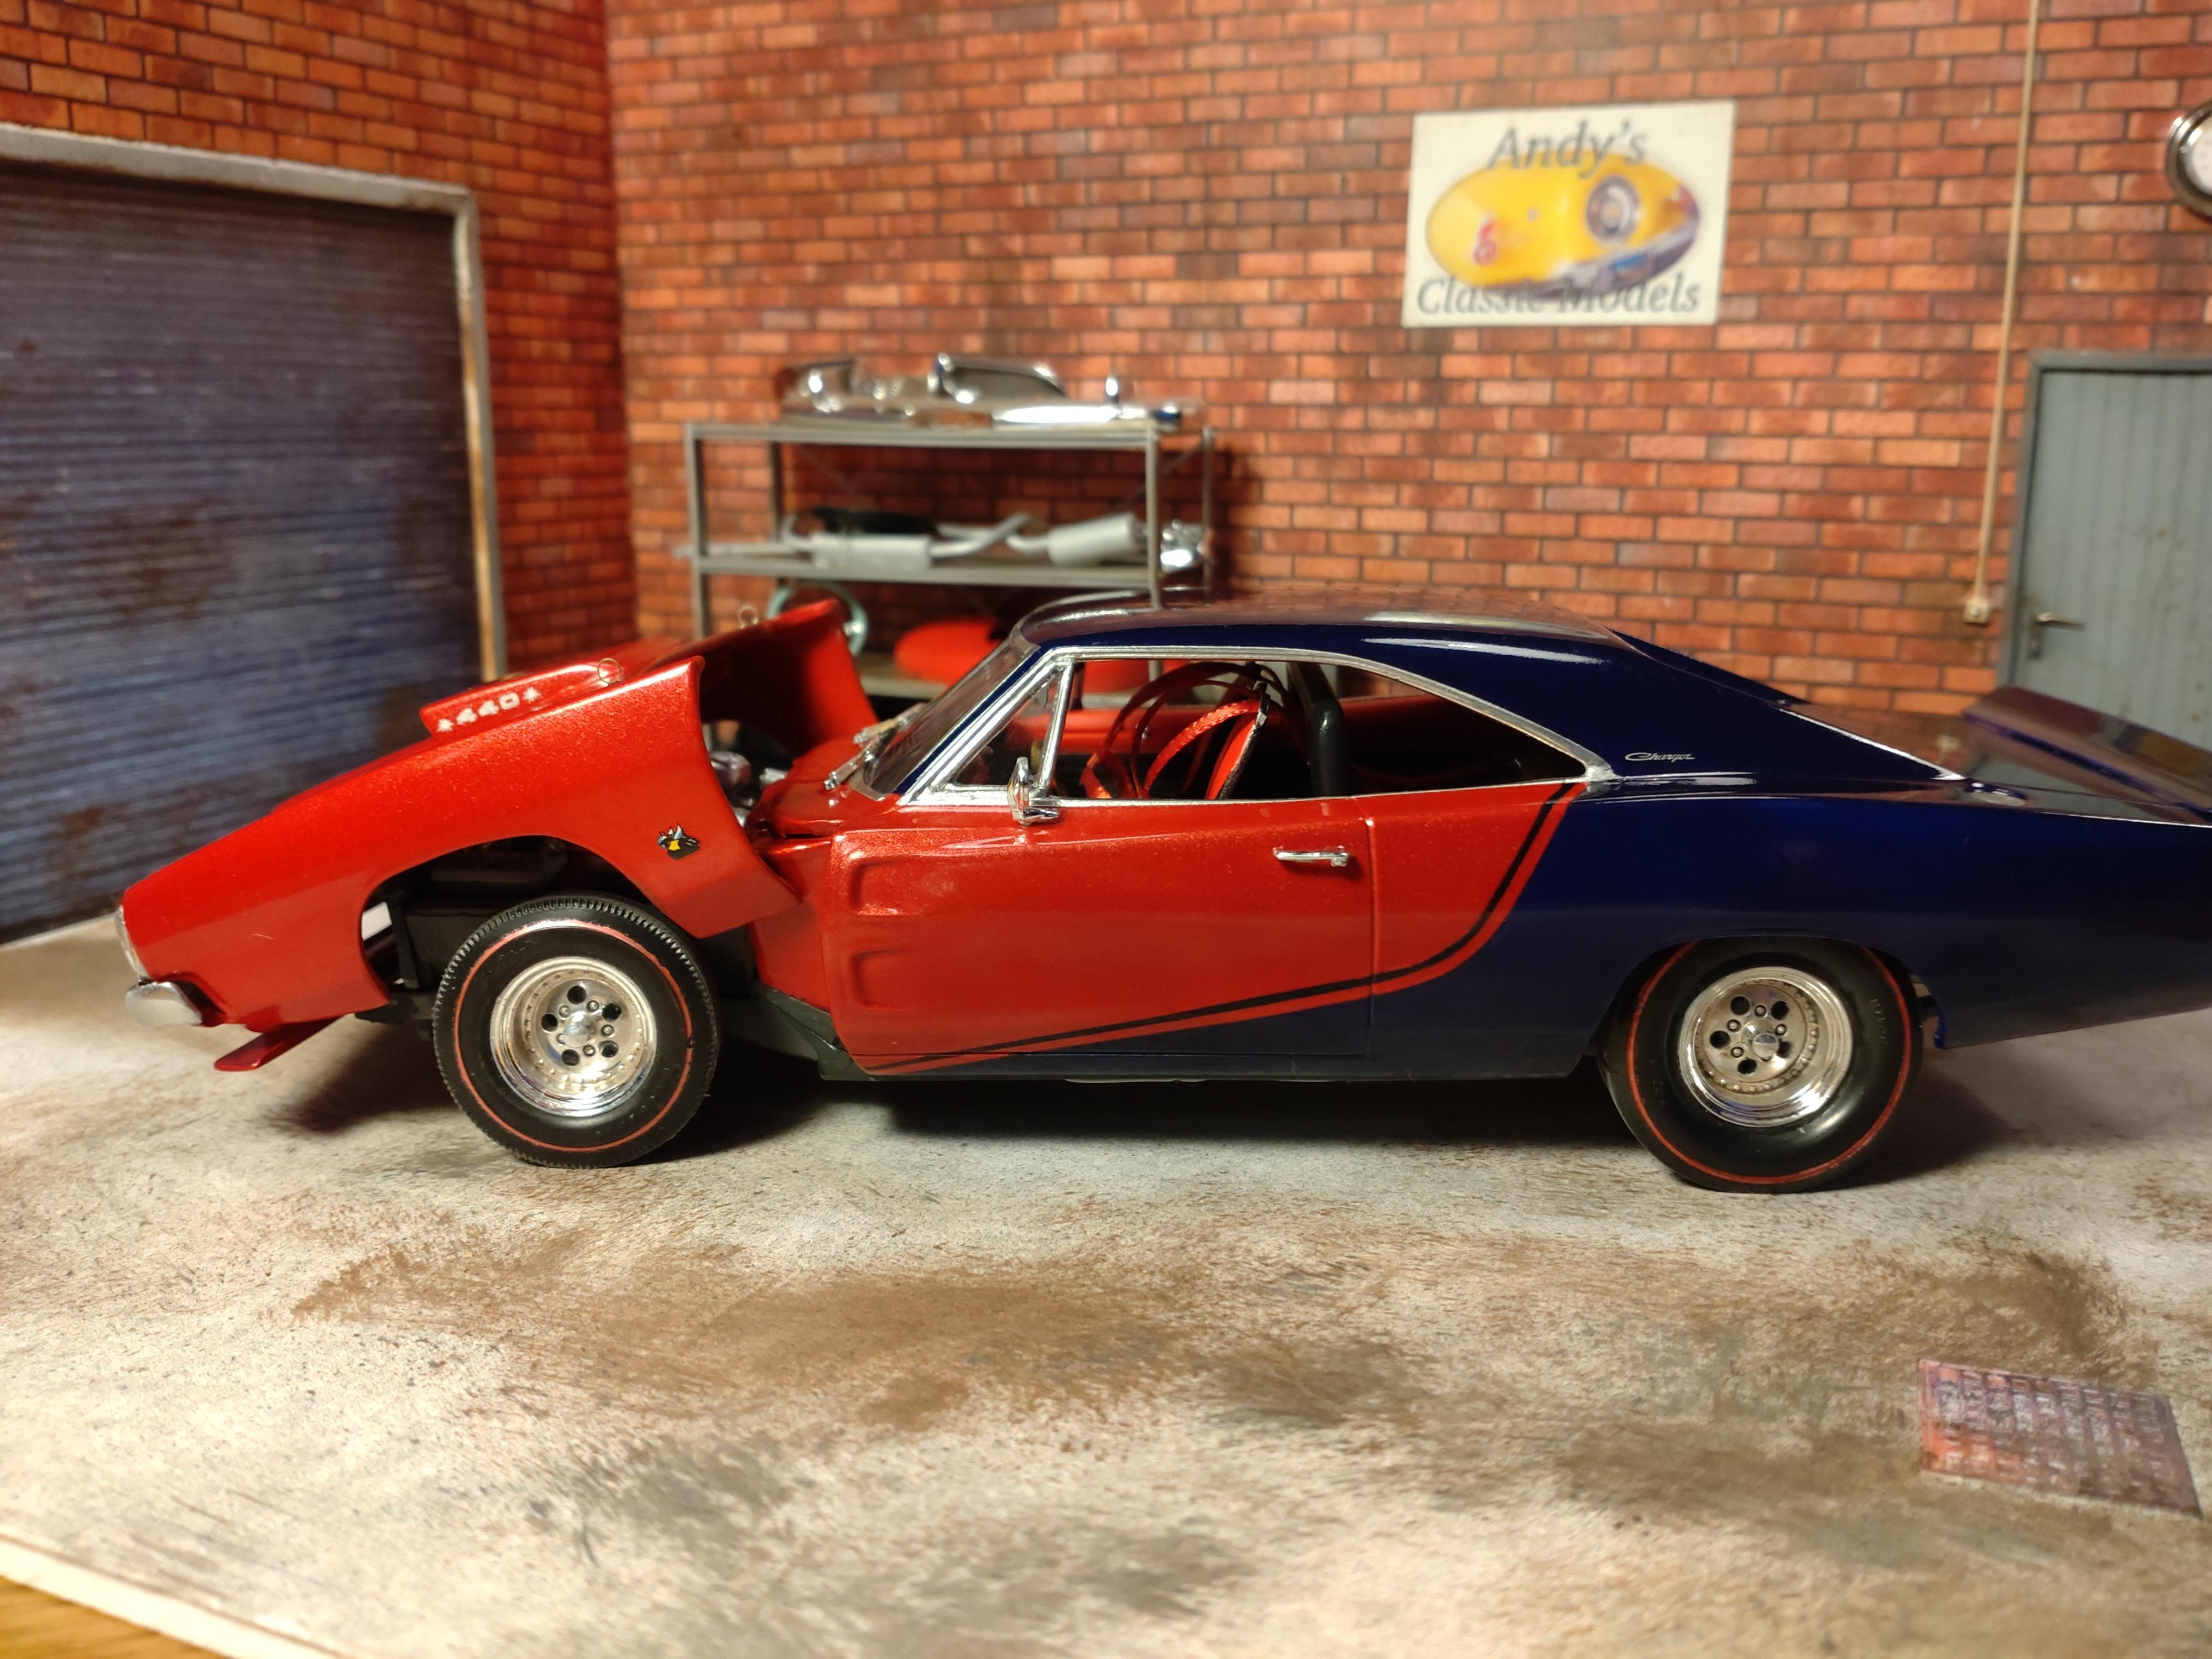
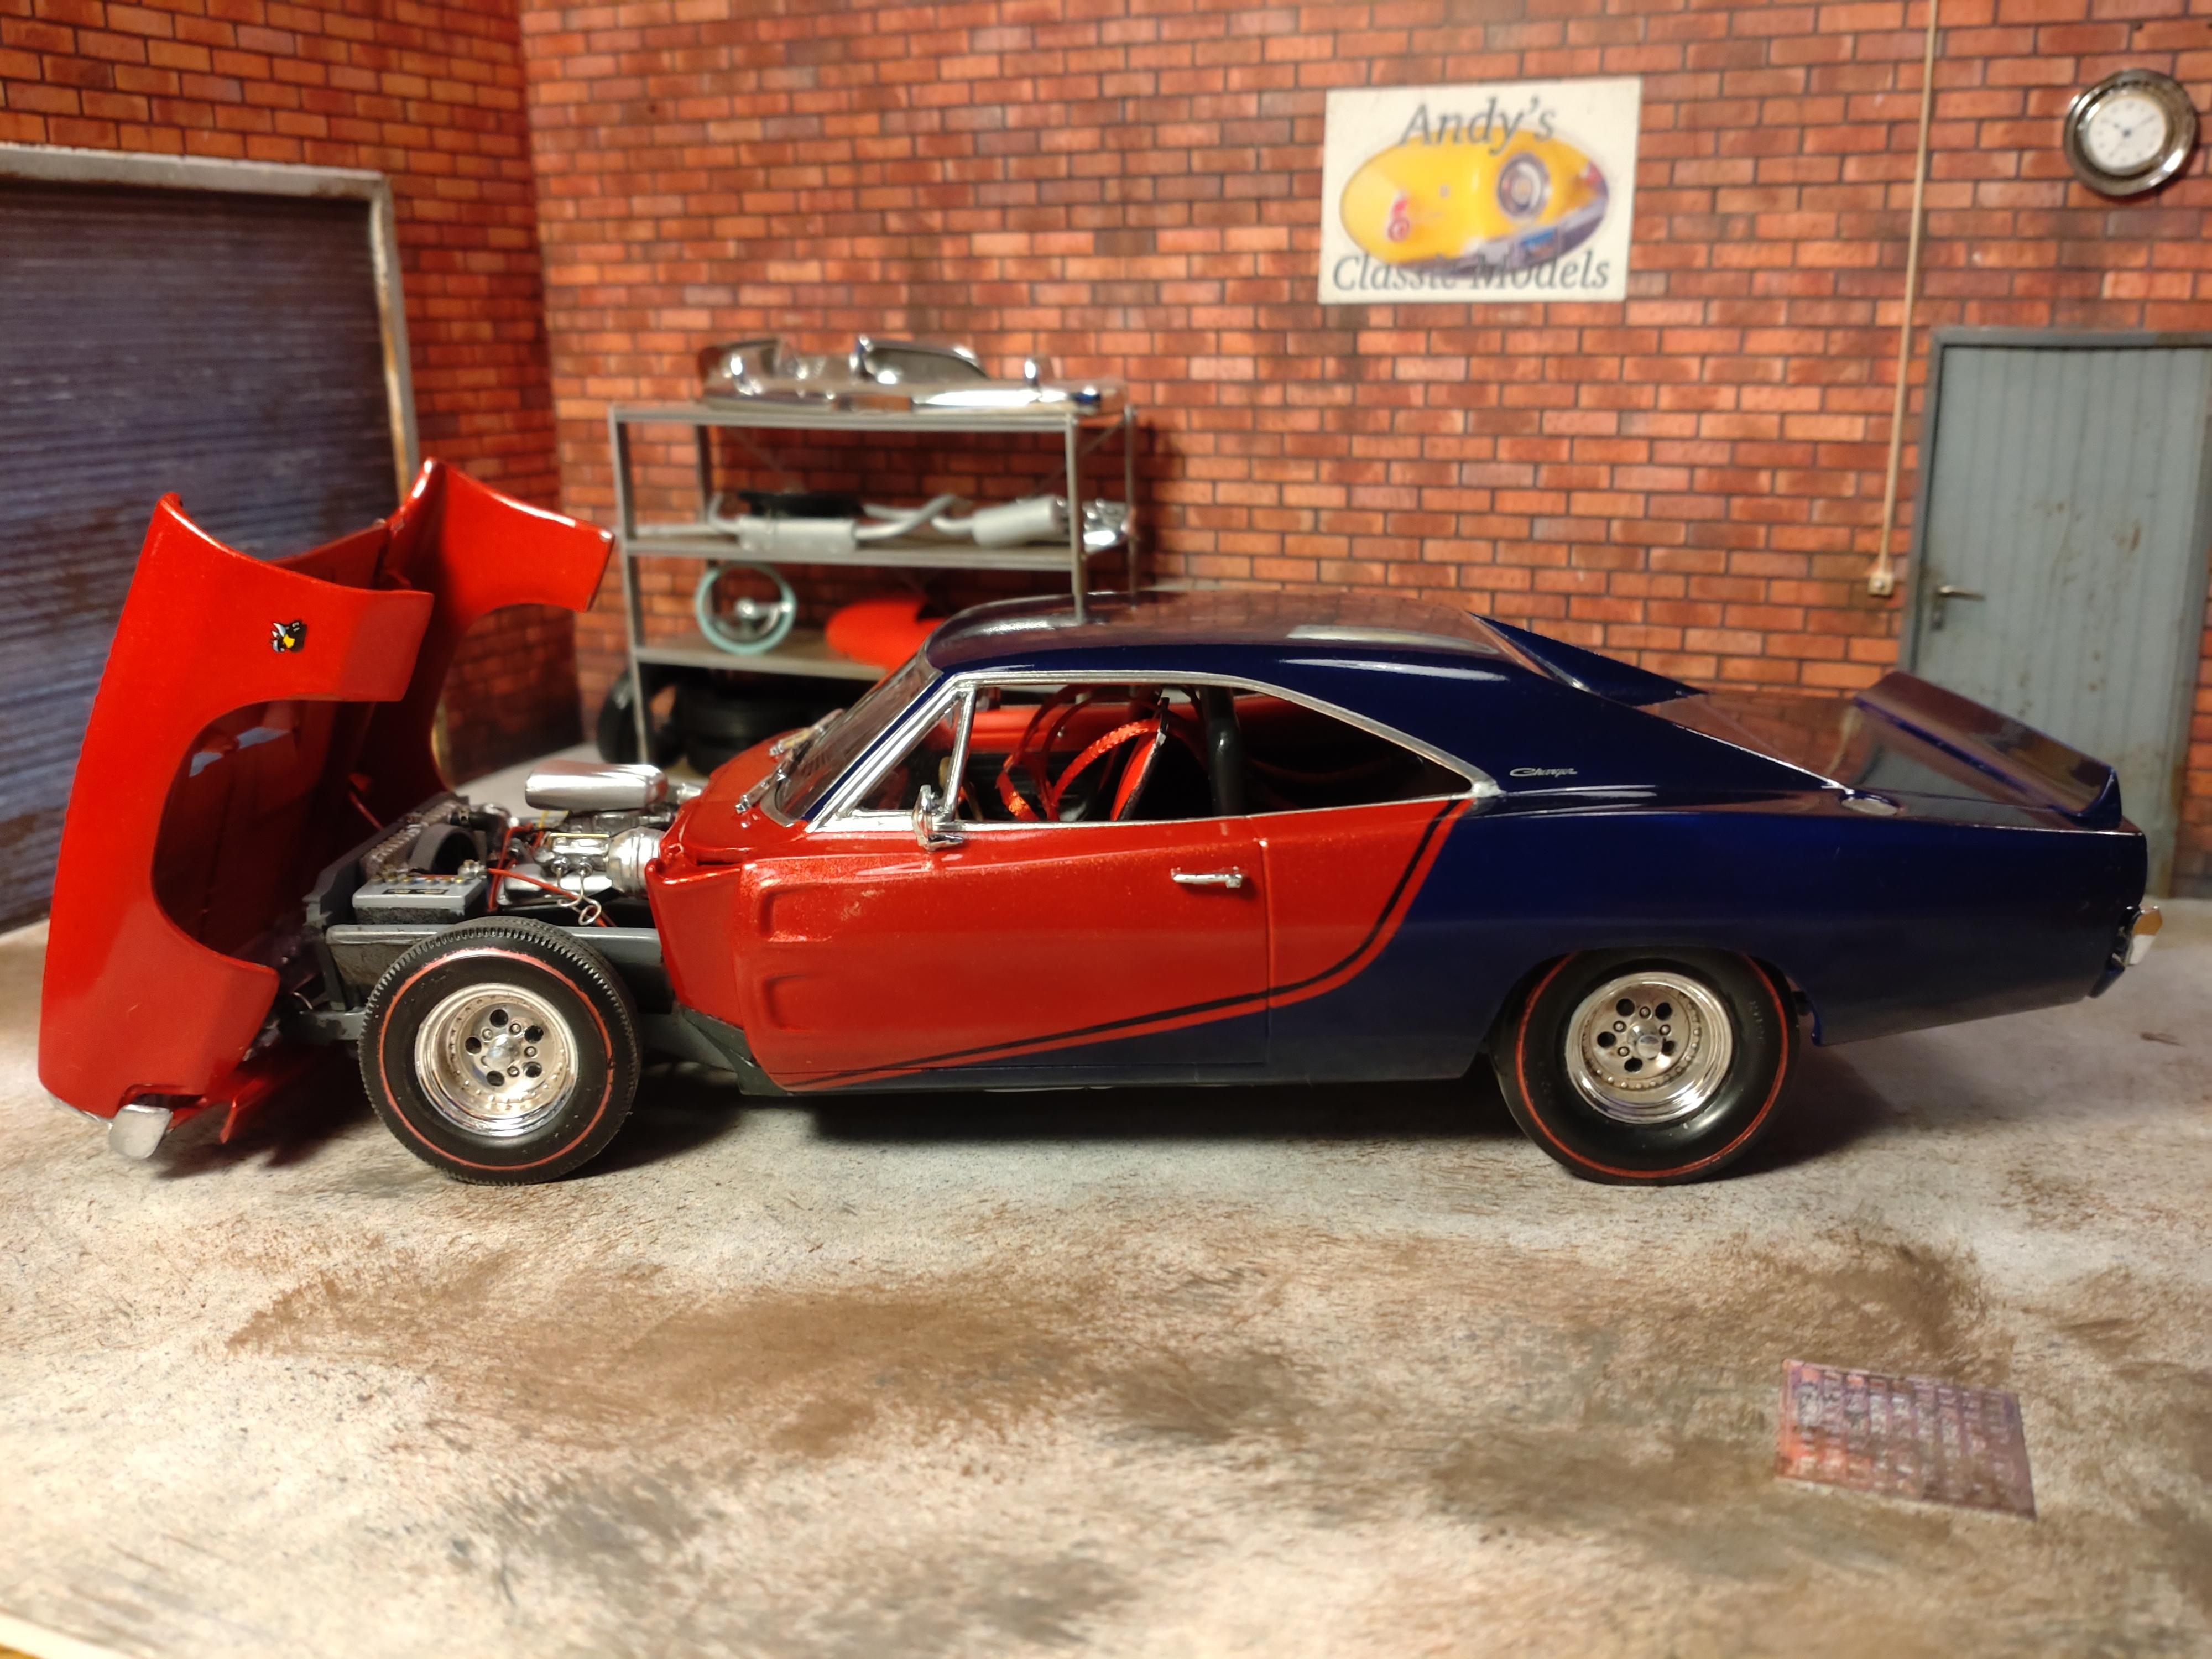
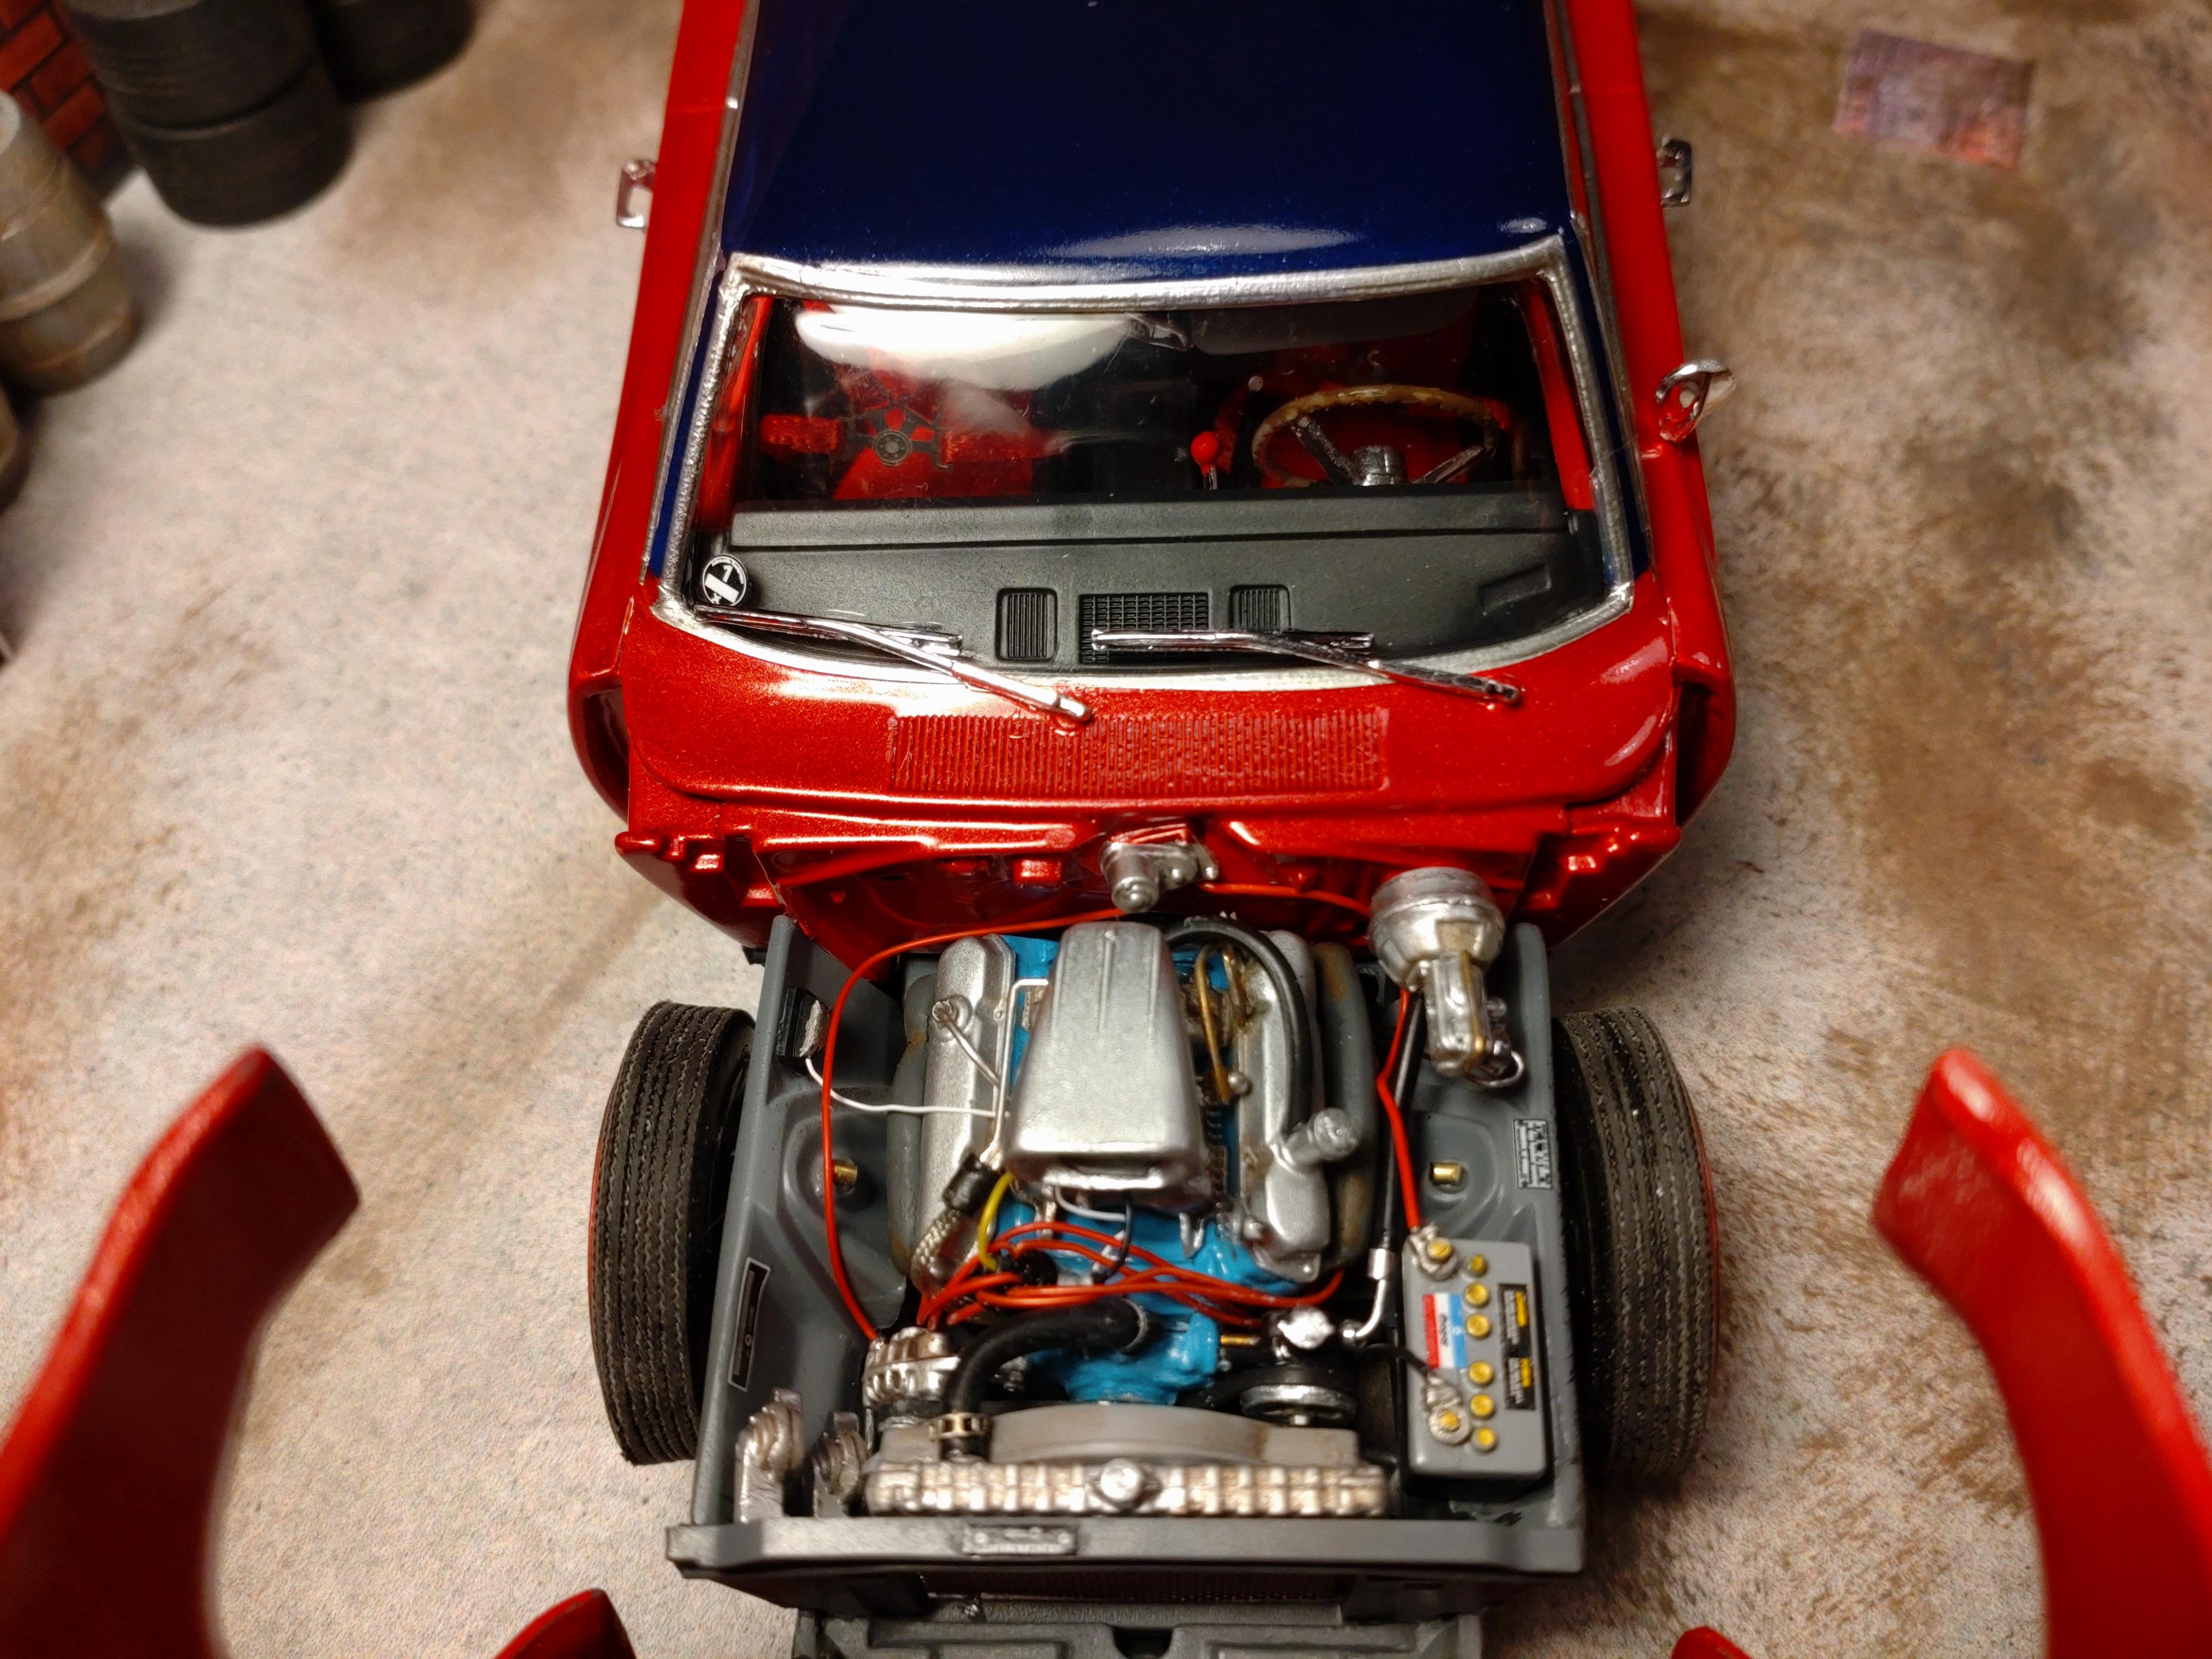
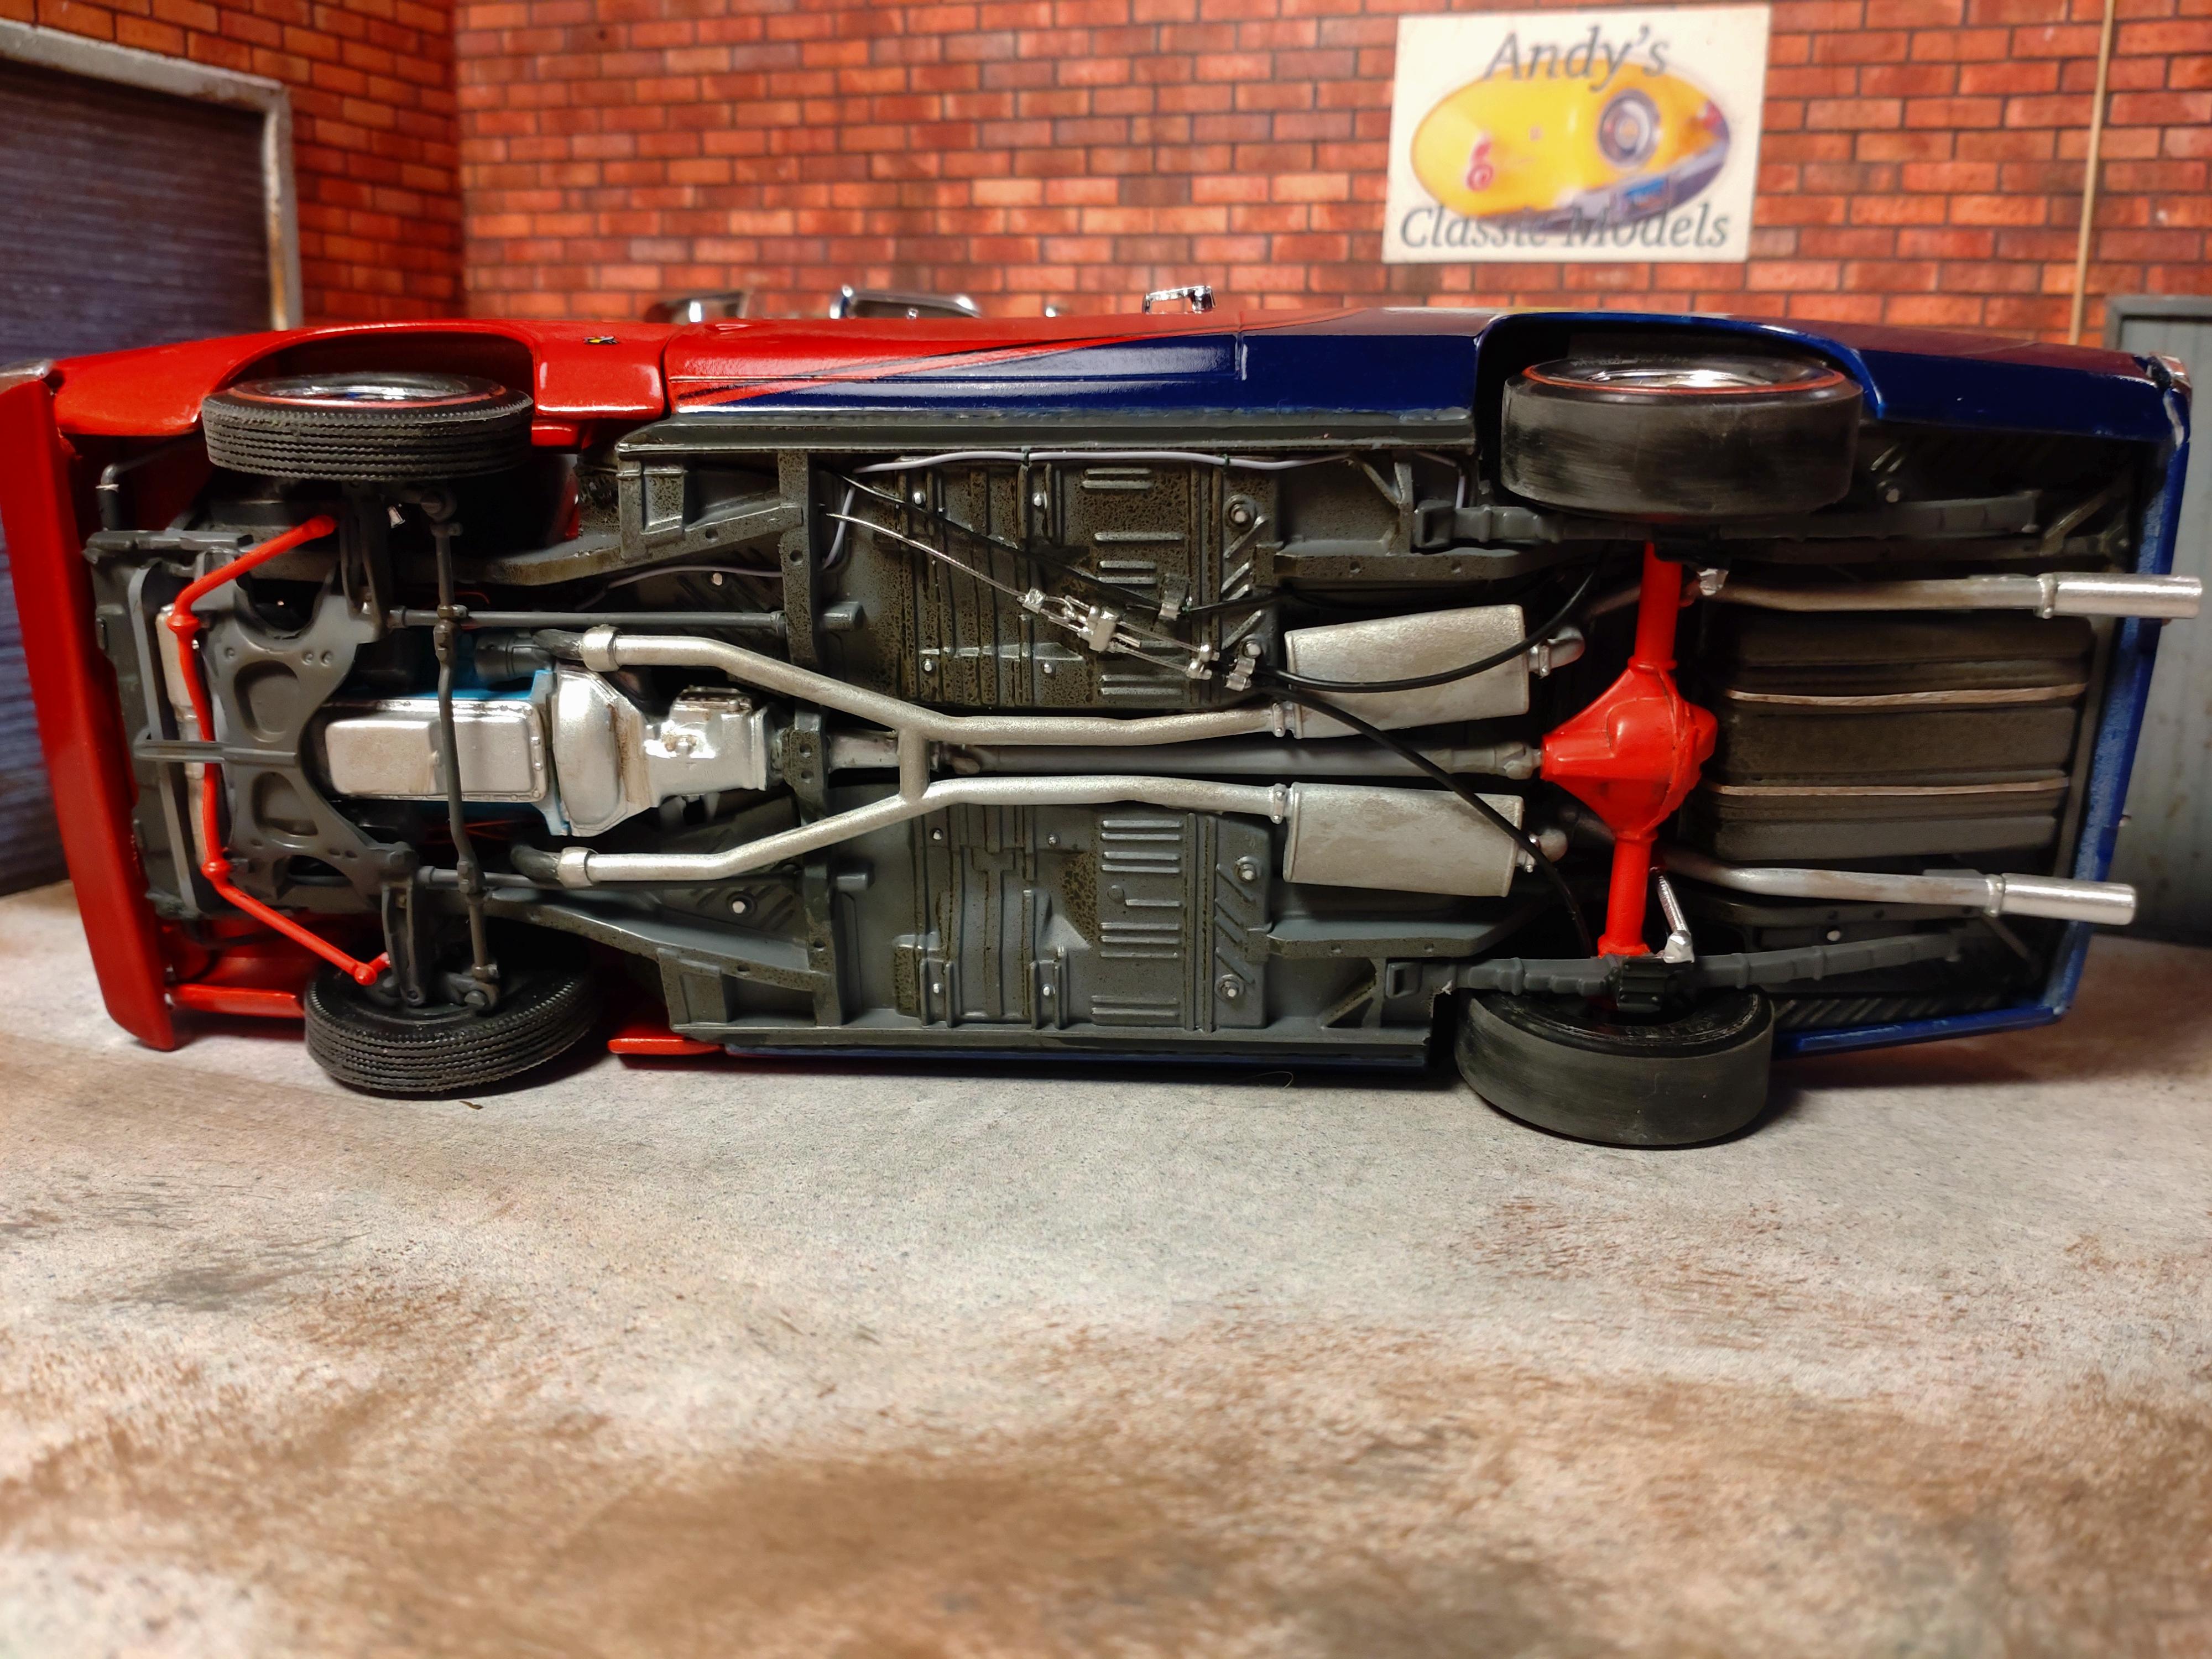
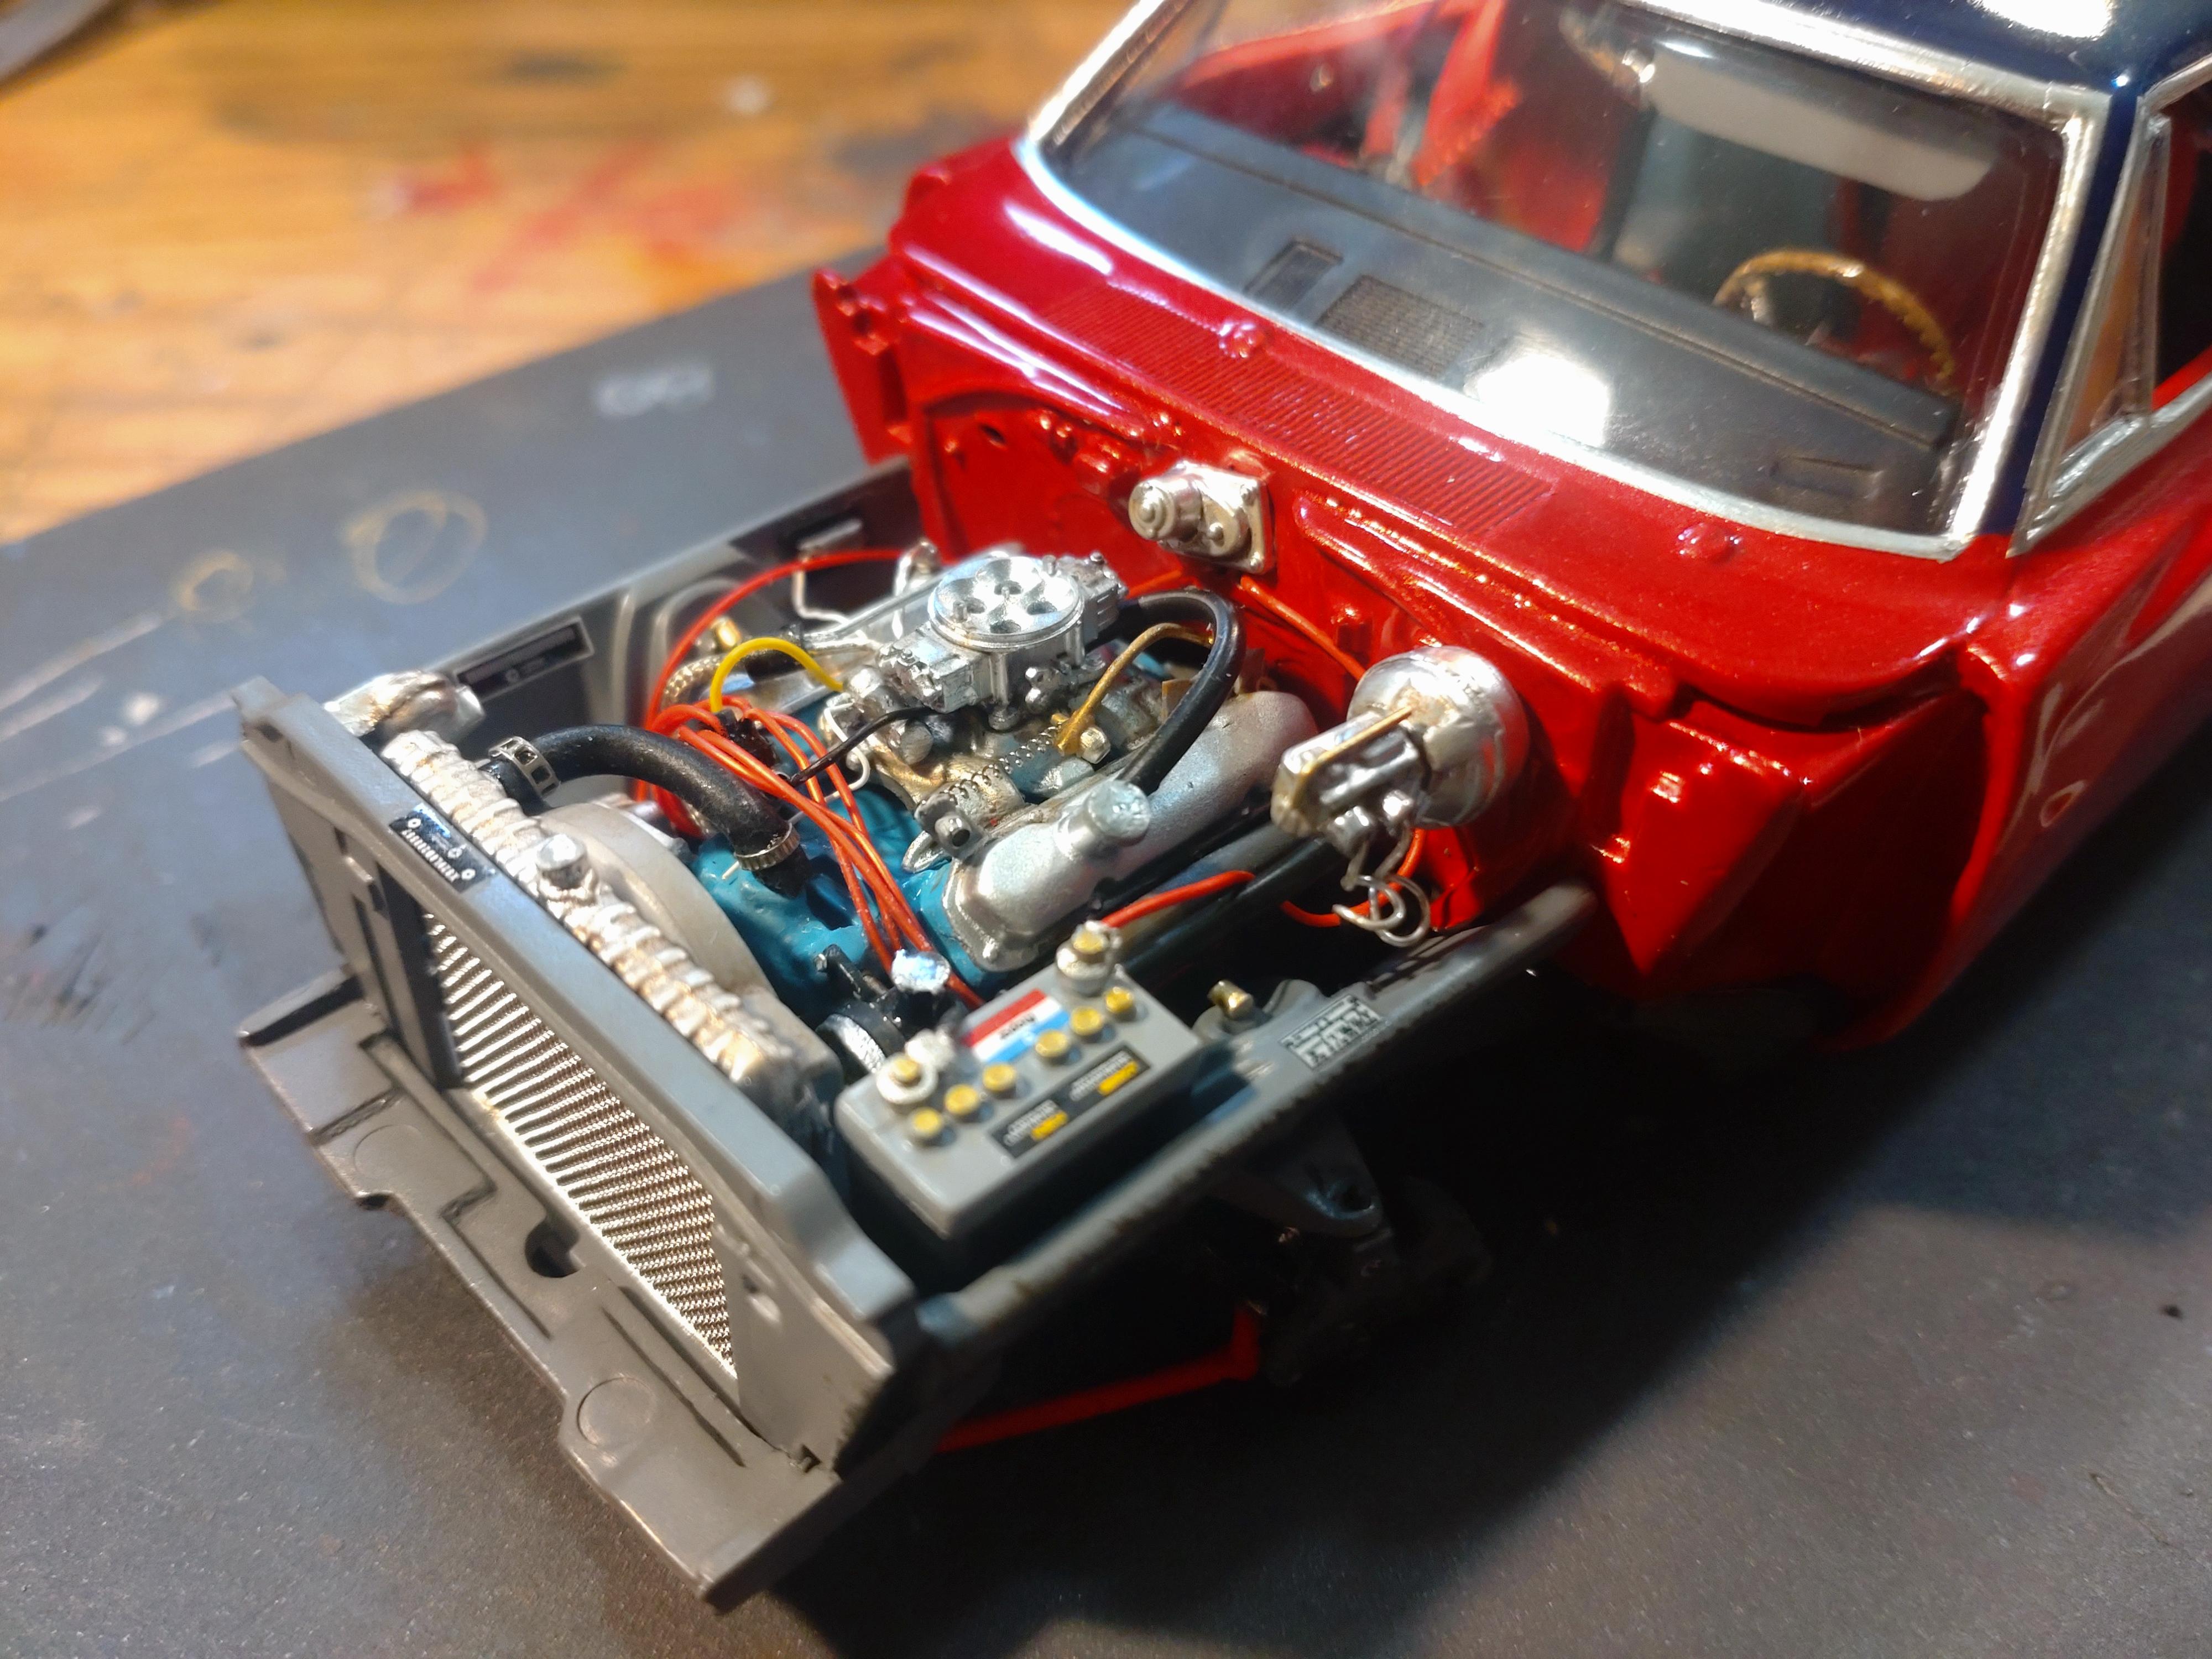
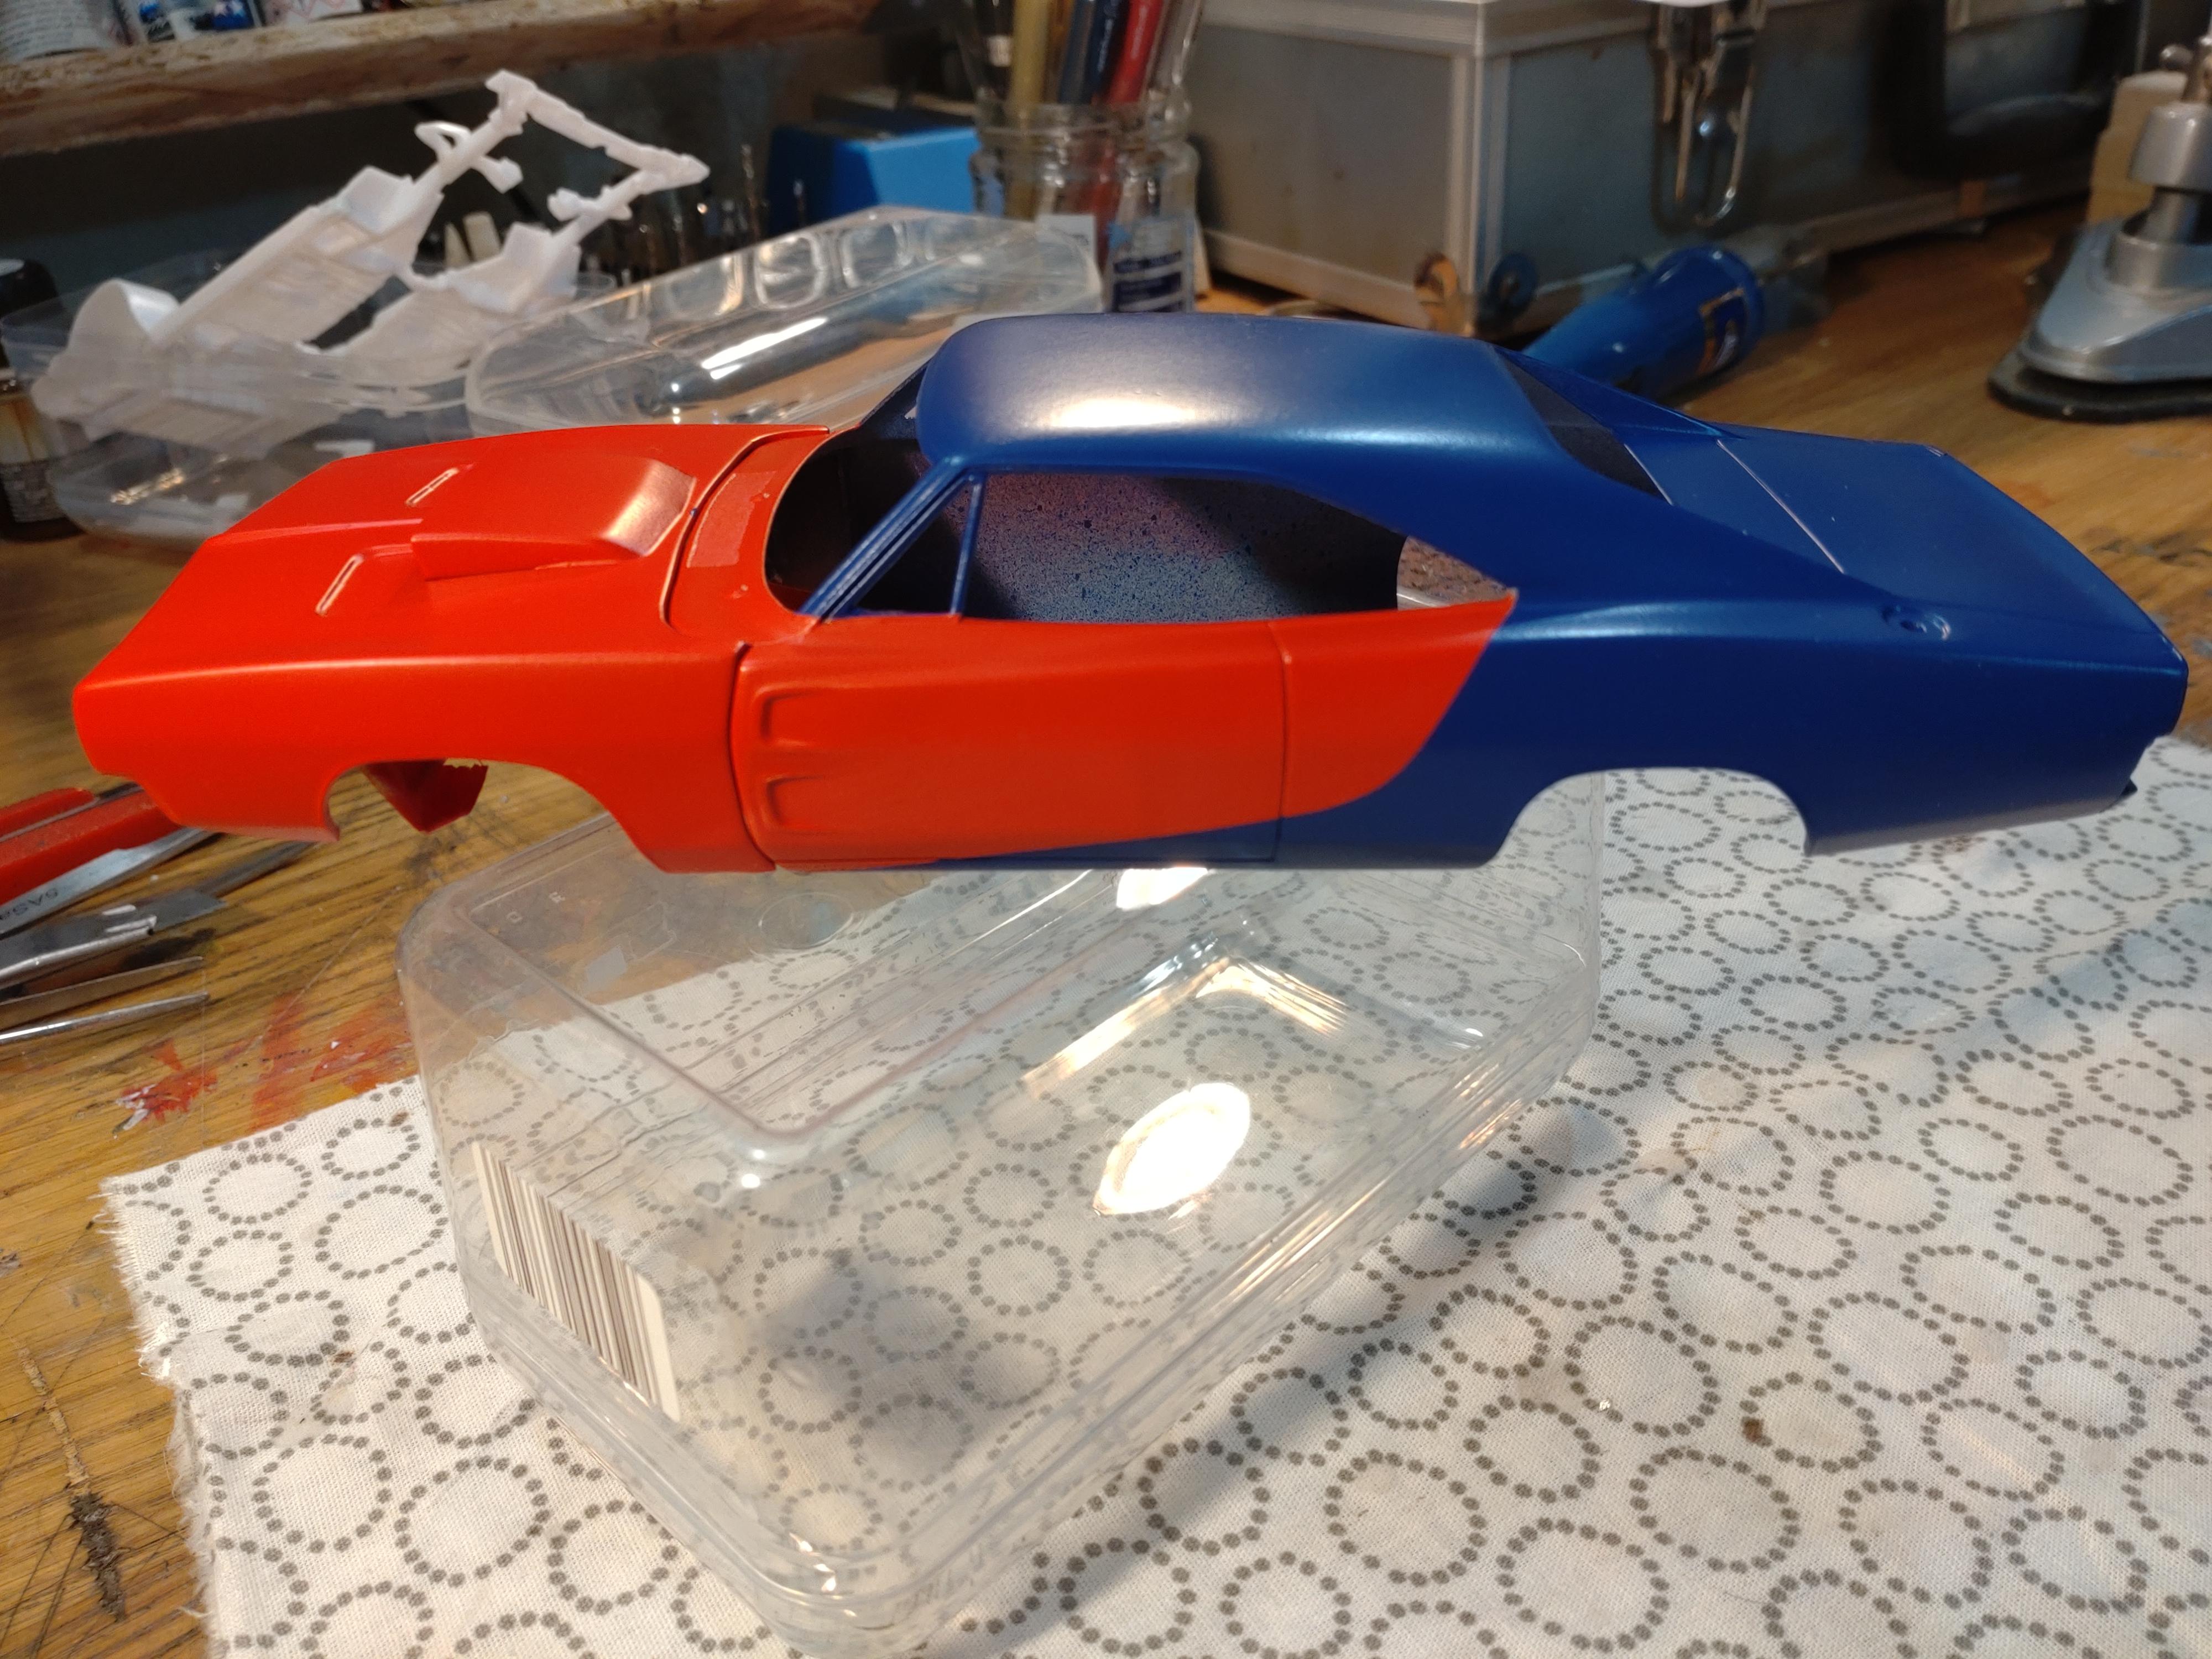
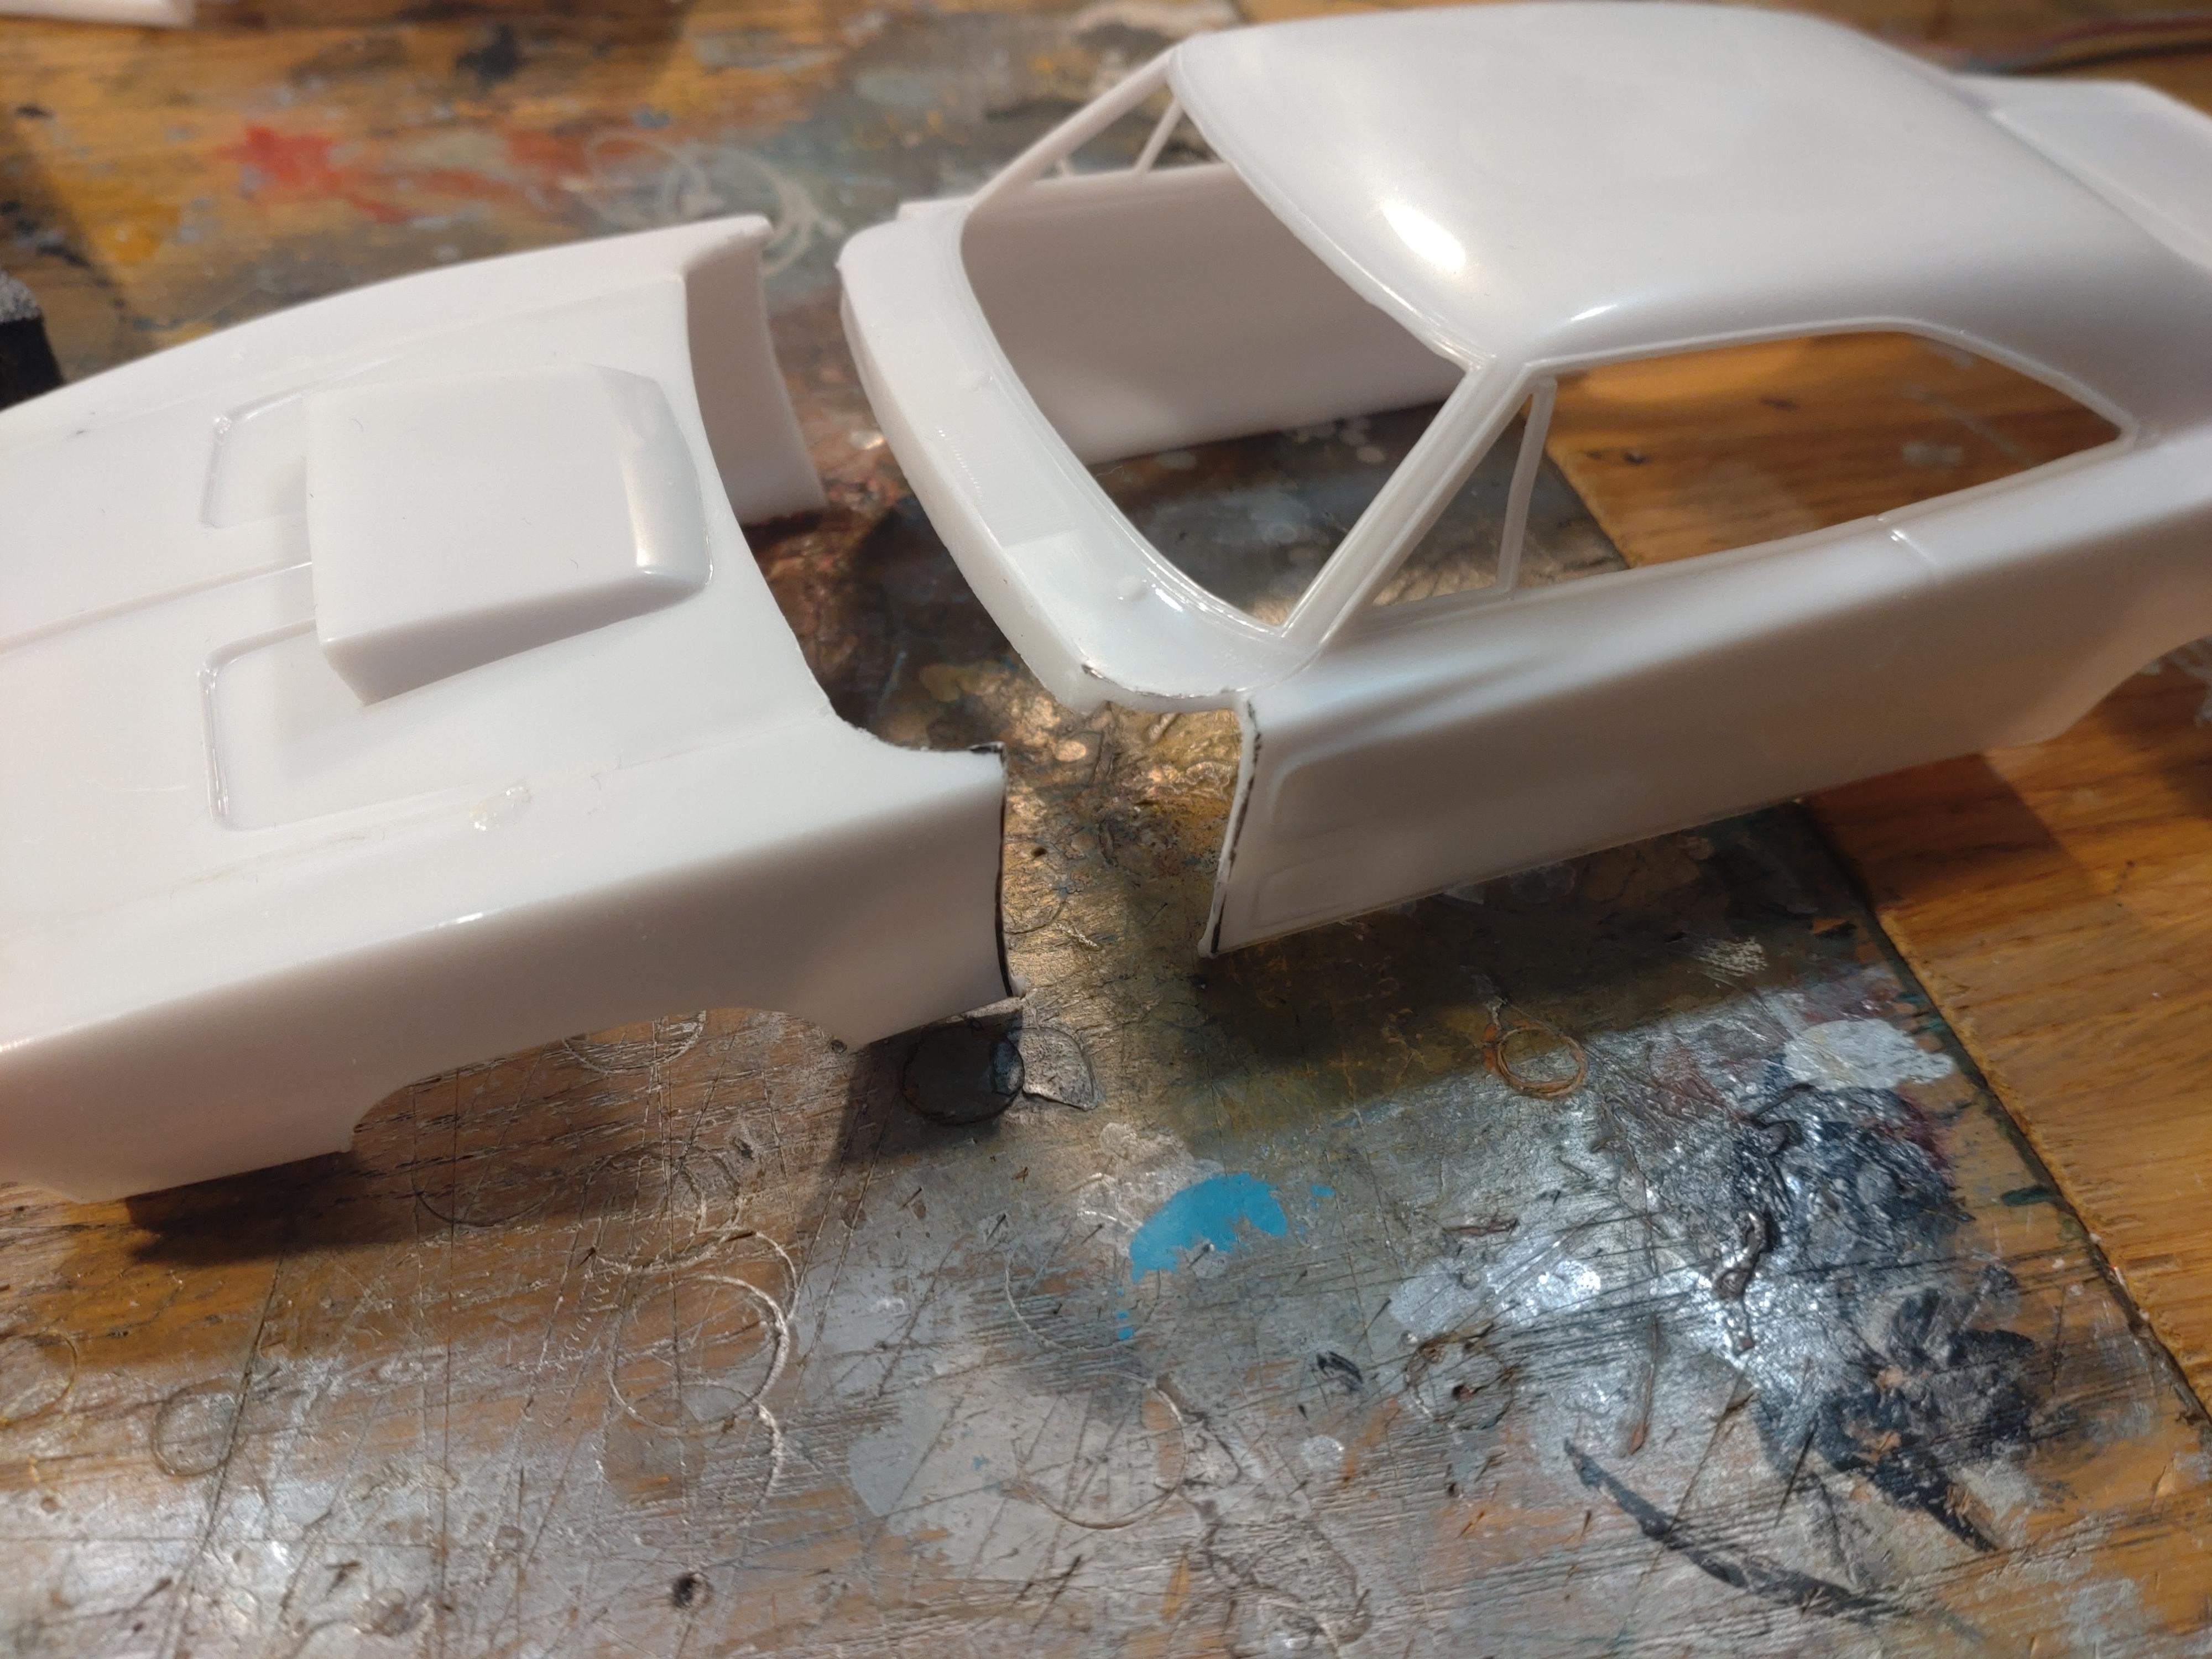
A while ago I watched some features about "private racing" on late night TV. Hot roders, tuning shop owners and speed freaks would meet on private grounds or way out of town and compete on the 1/4 mile. Everyone put the same amount in the hat and after several rounds of knock out races the winner took it all. Quite exiting, since the cars were all licensed and (barely) street legal, but the races were definitely not legal. Come to think of it, some of those cars didn´t really look legal themselves.... I could feel the tension! And that was the kind of car I wanted to build soon! I chose a REVELL ´68 Charger R/T and wanted to add a special feature, which would be a front tipping hood. The race goodies are suitable wheels and tires, a racing interior and a hot engine. The paint job should support the intention of serious business. In my case red and blue Tamiya metallic spray cans. The masking turned out easier than expected. Chrome is BMF. To the front and rear end I added modest spoilers. The rims and tires are from my parts box. I´m happy to finally have a build for those slicks. Cutting the front off the body was my first job and after that I had to always think three steps ahead to not forget something important. Attaching the firewall came very early and then I had to fill the empty spaces to the sides. The hood and the fenders are connected as if they were one part (maybe fiberglass?). The hinge ends are connected to the inside of the fenders and the middle part to the tip of the frame. You will see all the details in my WIP thread. The tipping works fine. I was very nervous to the end if it would work like in my first mock up🫣 The hood just barely slips past the firewall and wheels and stays clear from the frame. The interior is reduced to racing needs, no back bench, but a fat role bar and 4-point belts. The engine and the bay received a special treatment. The engine is mainly kit, but I replaced the carb for a more detailed after market item (scale production). The scoop is for good air intake and cool looks. The cables, line and hoses are as close as possible to the 1:1. Overall I did only a mild smudging to give the engine and also the undercarriage a slightly worn look. The bottom has fuel and brake lines and that interesting parking brake setup of the original. The weathering was done with an airbrush and small rough sponges. Thanks for taking a look. Best wishes, Andy You can see the YouTube video with this link: https://youtu.be/yhK3D6GN_hM
-
Thanks everyone for your response! I will submit my thread with the final pics on "Under Glass" today.
-
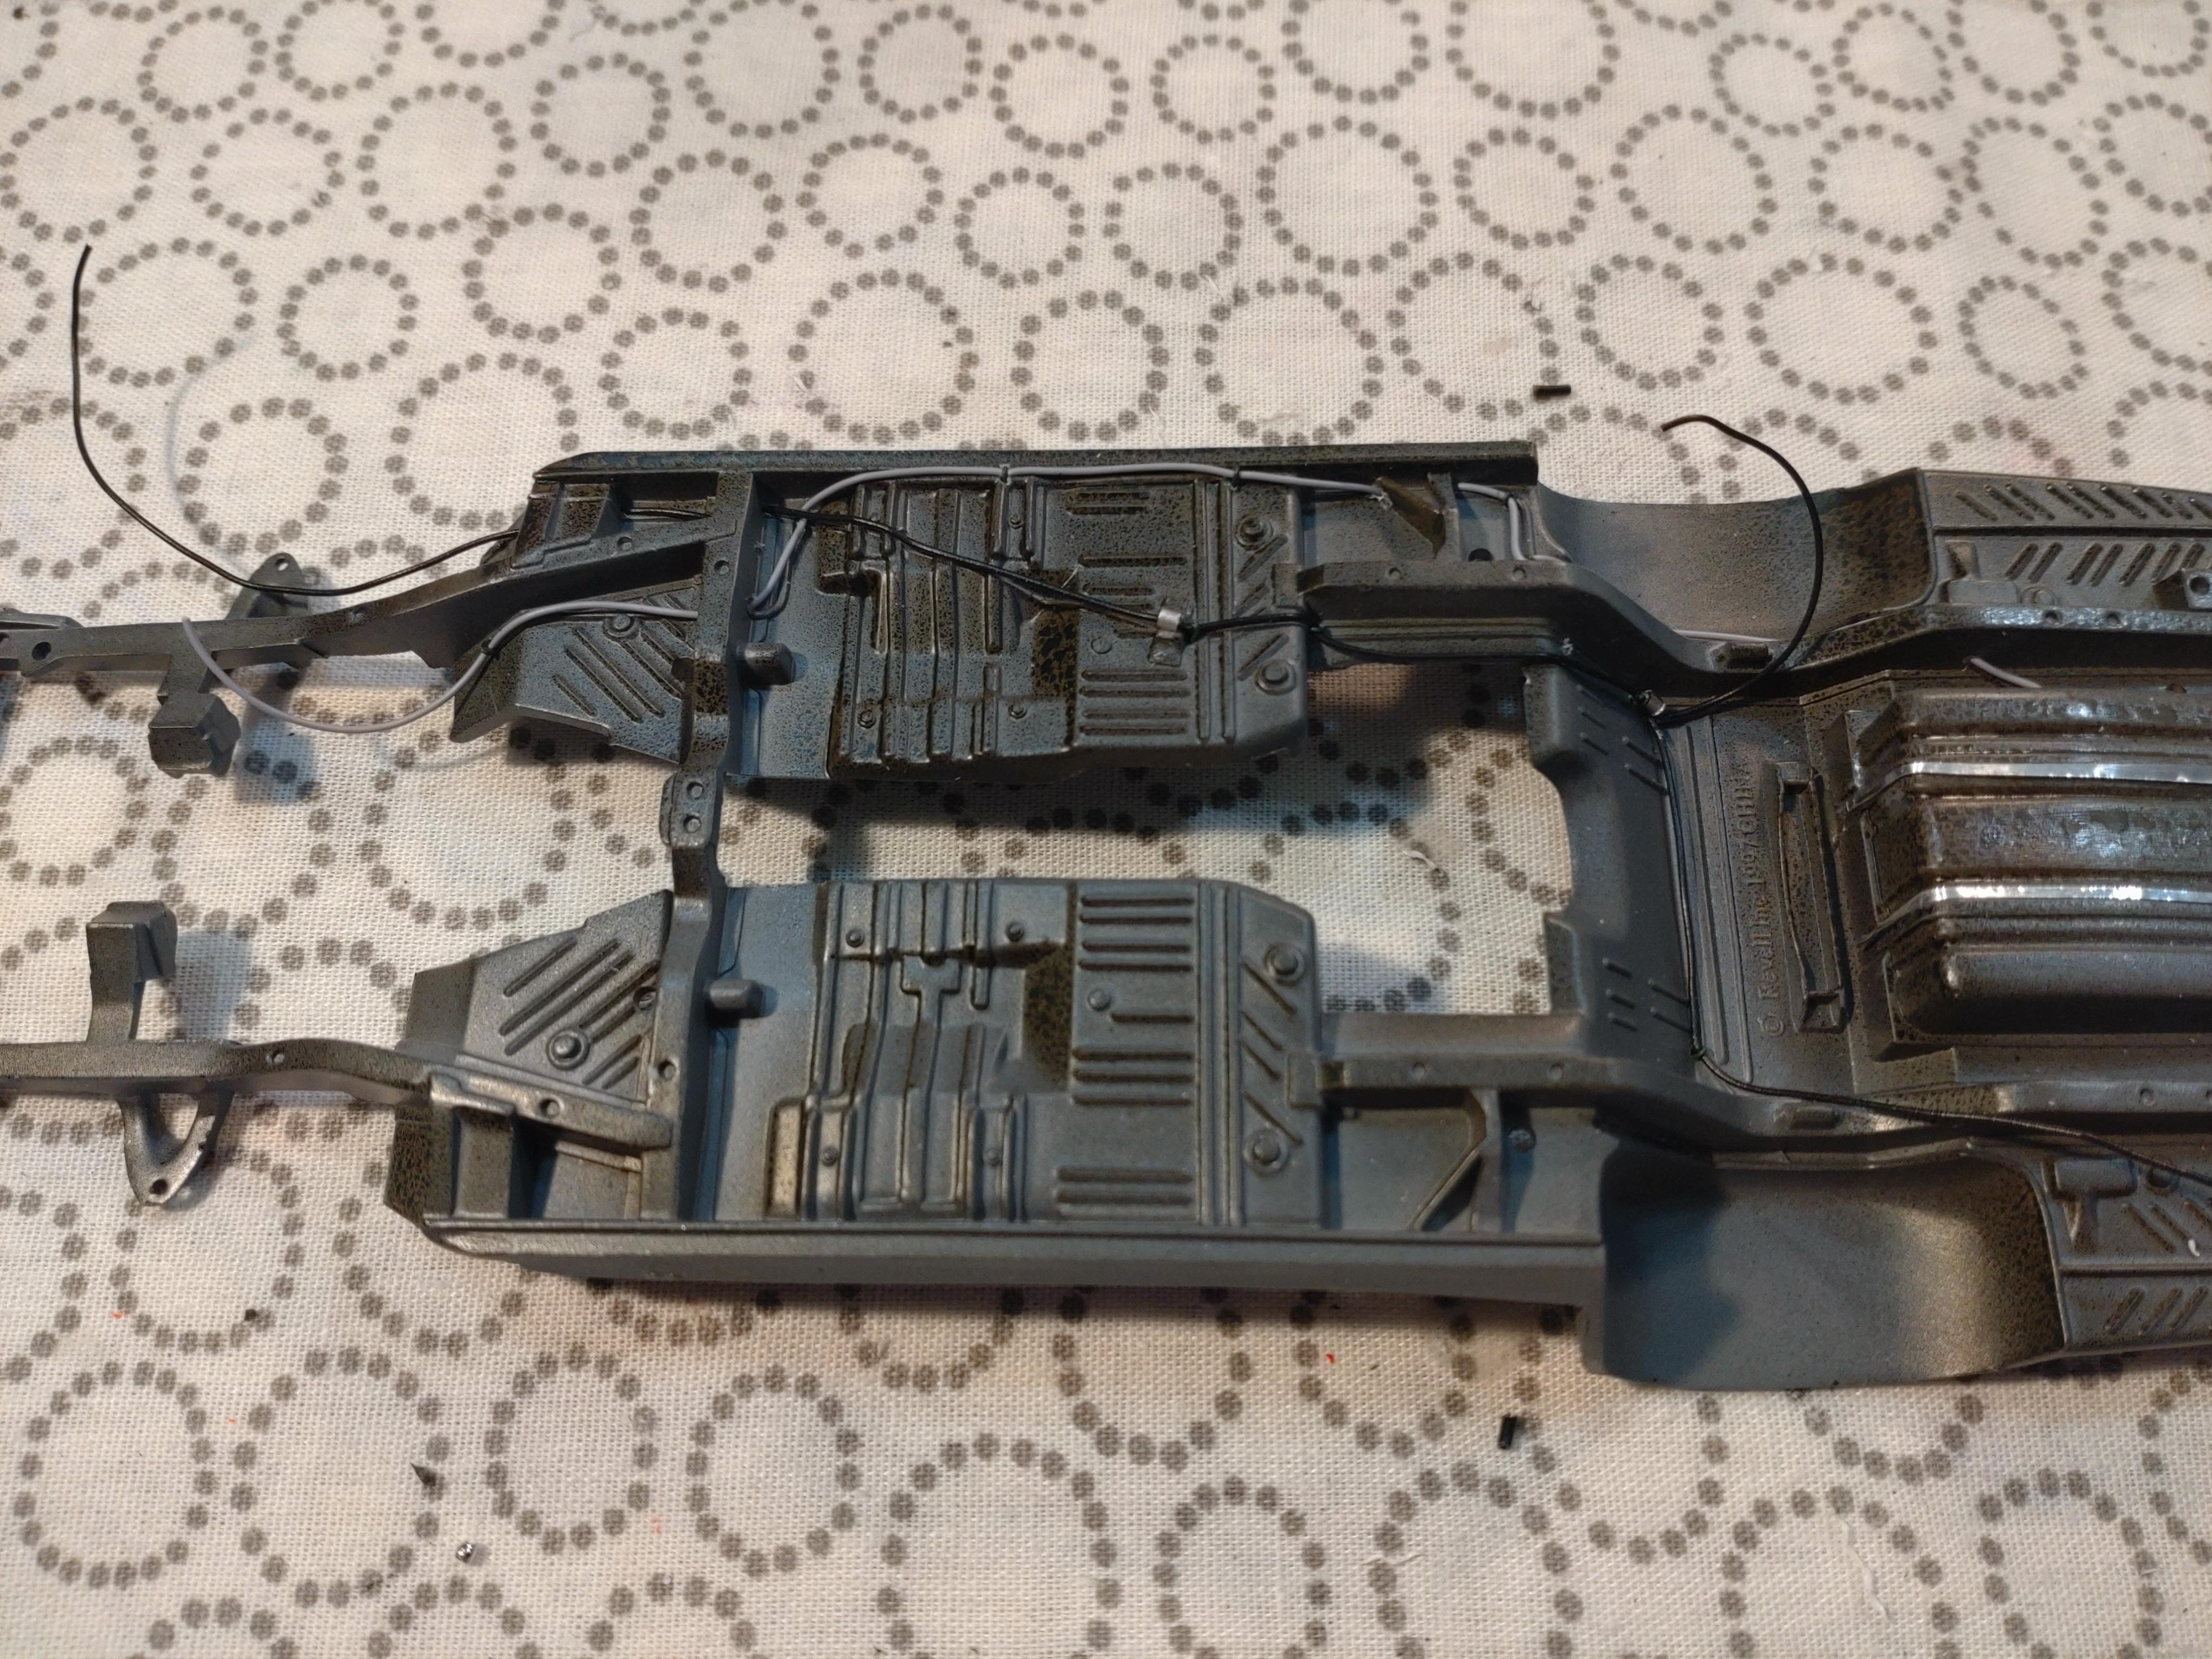
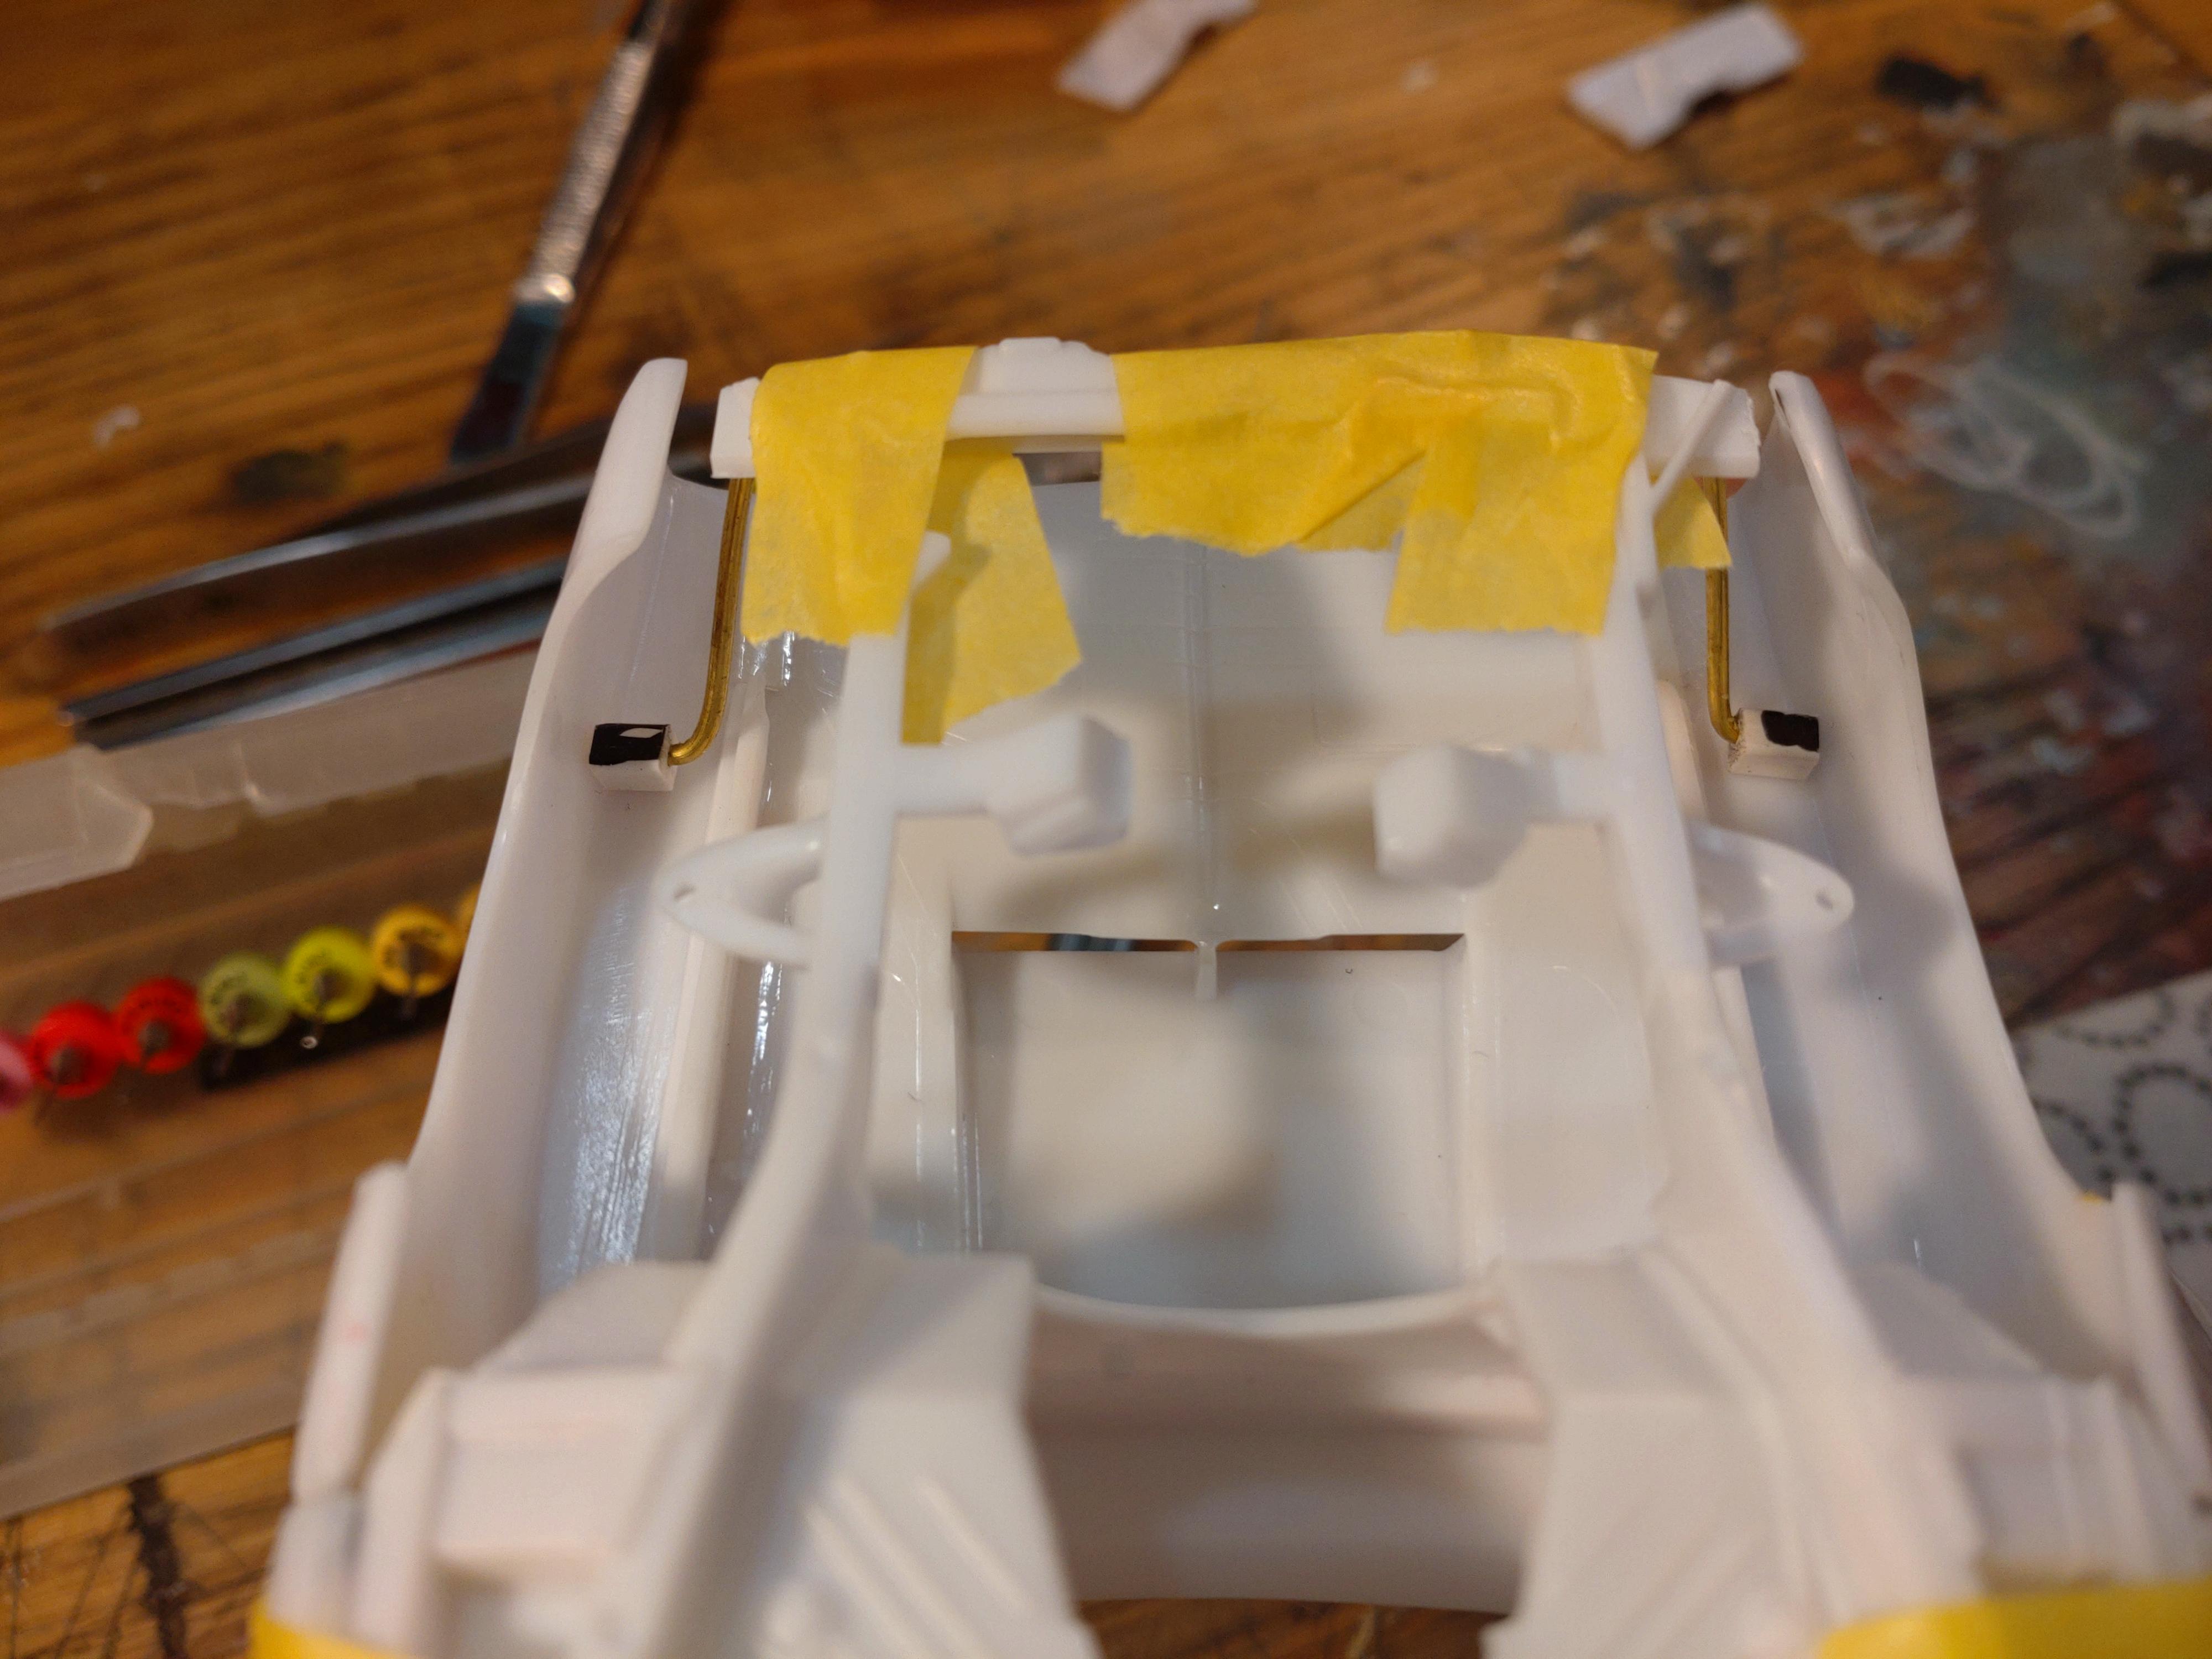
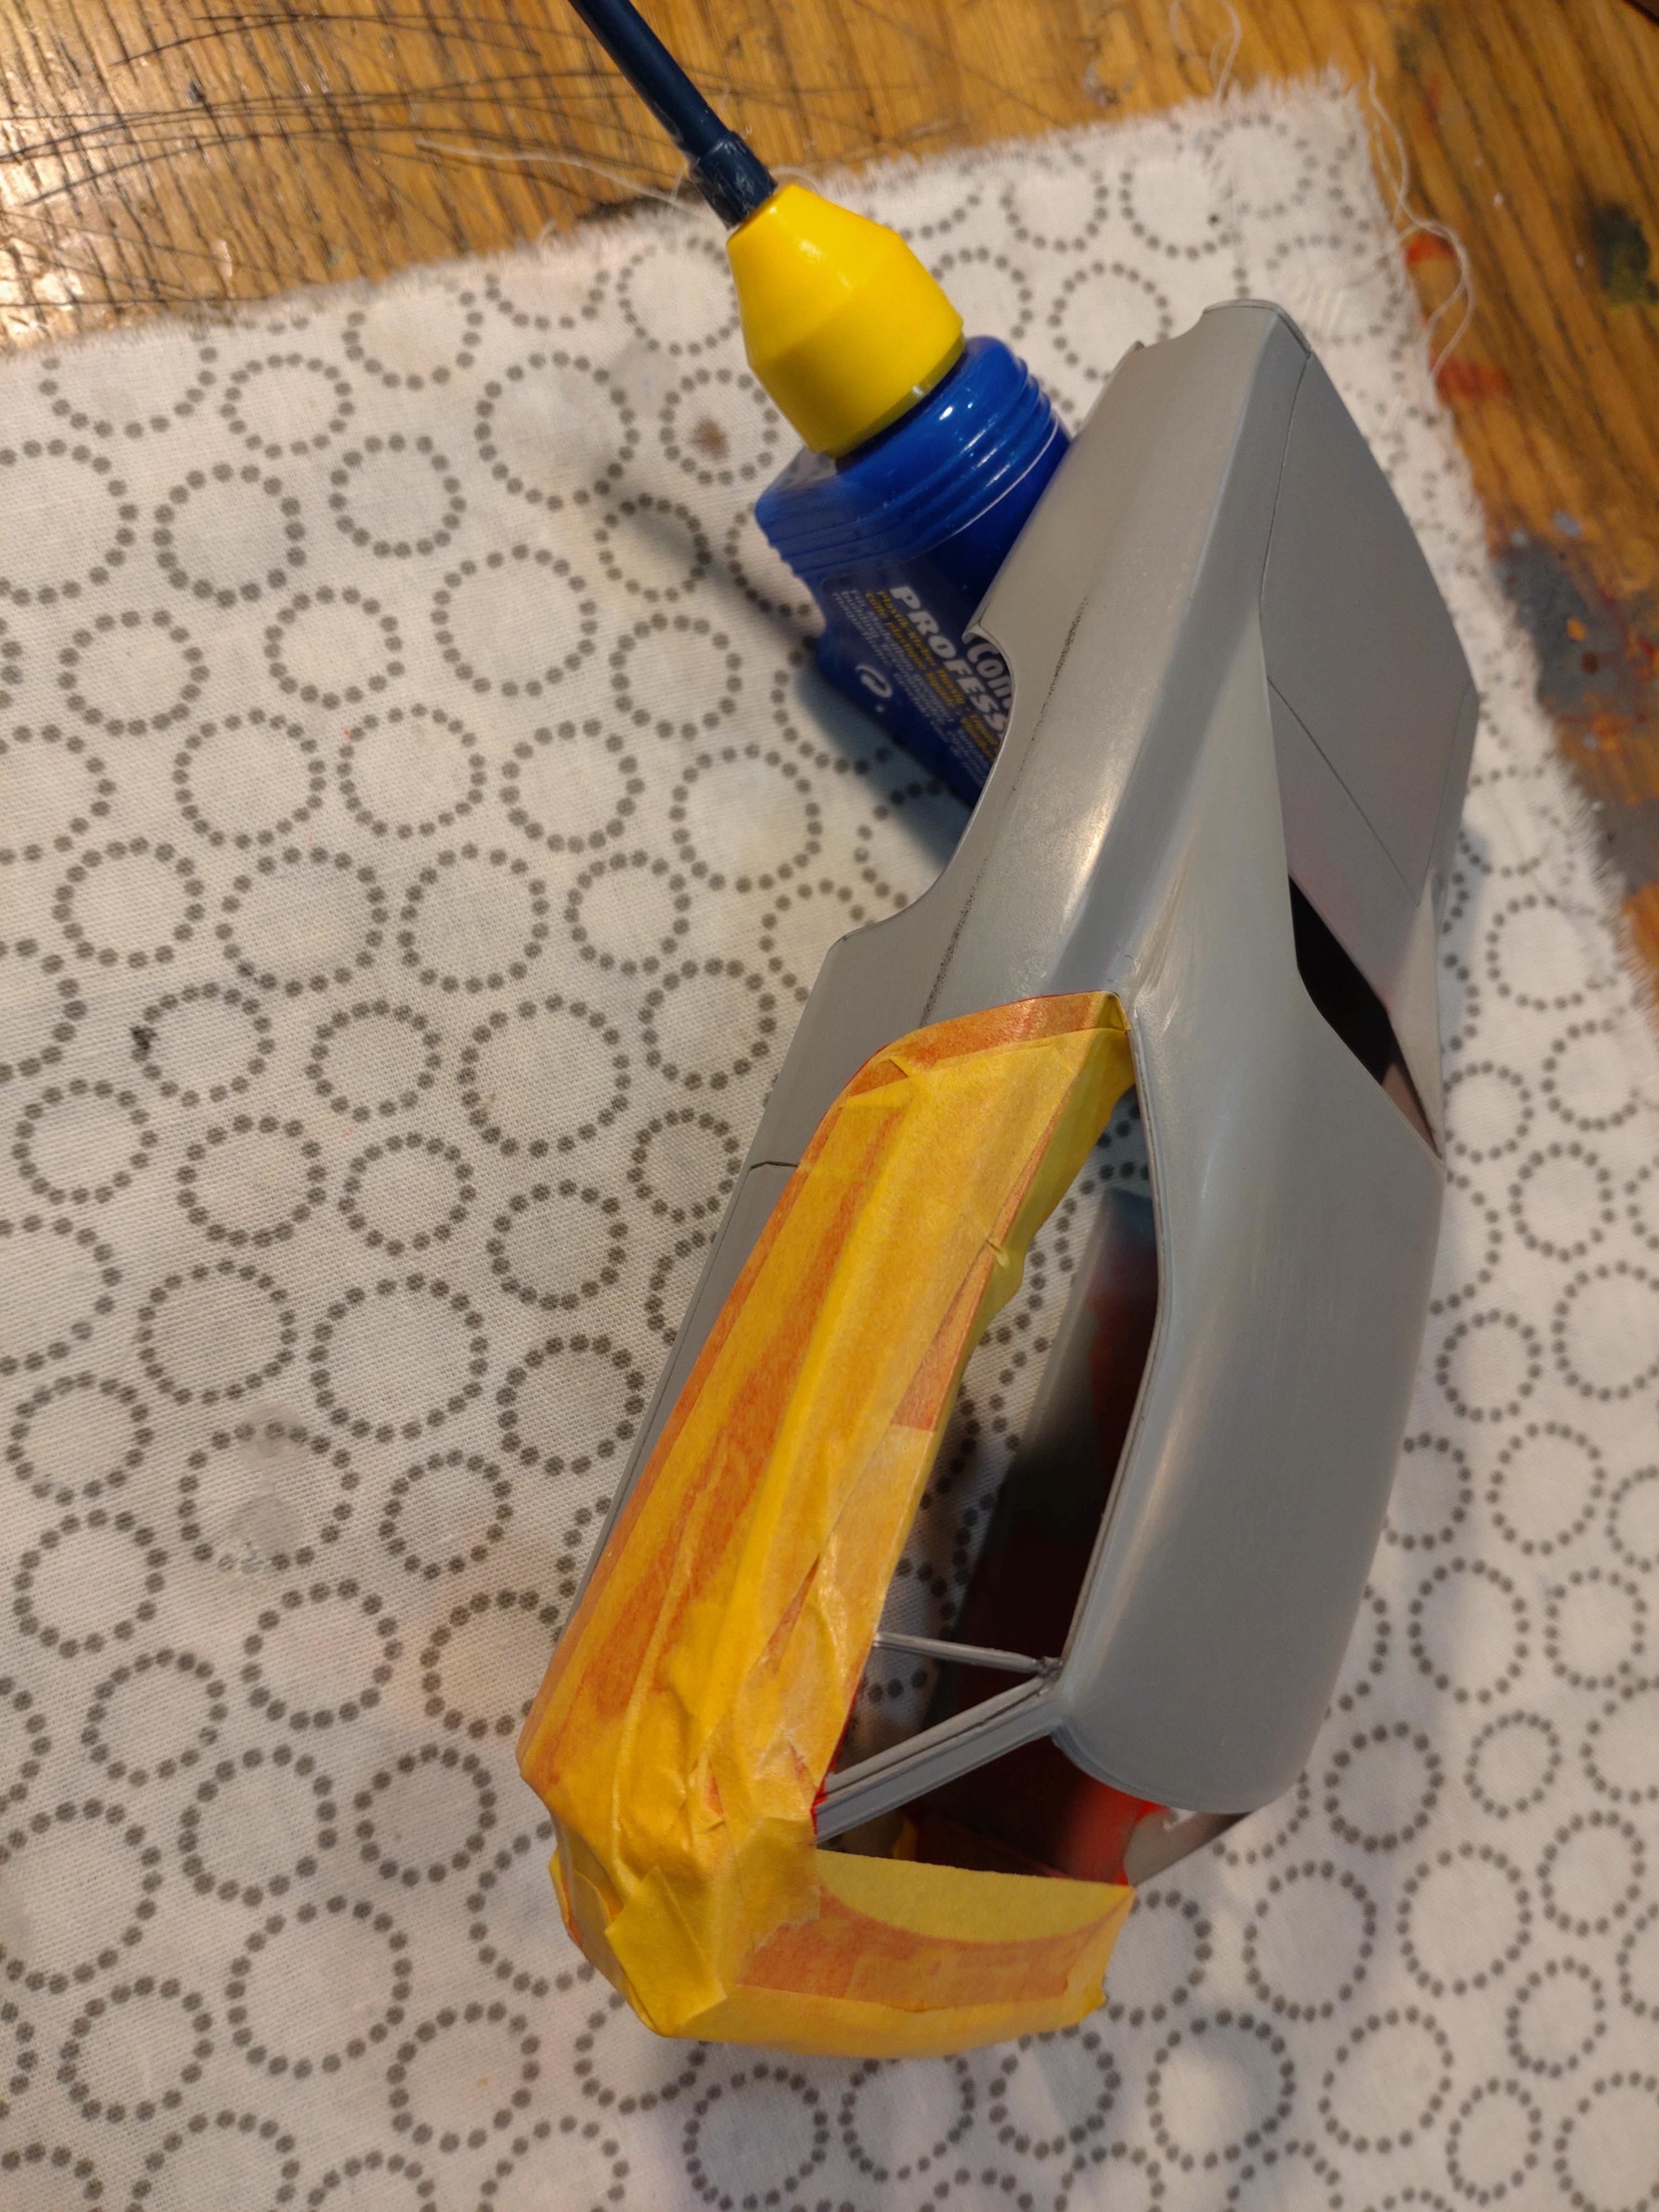
So I did just about get finished over Easter with this build. It was a kind of pinch getting the major parts together, although this kit has a high molding quality. Usually it gets tight getting the body, tub and undercarriage together without having to remove some plastic. But in the end it did work out. Preparing the engine bay I had an idea getting more detail to the water cooler. I added a fine metal mesh to both sides and didn´t need any wash for that 3D look. The molded on cap was hardly visible, so I manufactured a new one from styrene. Making this build a front tipper I had to rethink the building process way before hand. The engine bay parts were disconnected from the body and received a different treatment and paint job. I connected the engine to the undercarriage first and then went to work around the engine with the bay walls. After this fit successfully, I was finally able to connect the body to the carriage. The battery, brake booster and all the wires and lines are now in their correct places. After attaching the front wheels, it is starting to look like a driveable car. The rims are not from the kit, but out of my parts box. Same with the tires, because I really wanted to build a racer with fat slicks in the back again. Getting tired of losing door handles and mirrors I have made it a habit to pin these delicate parts to the body. It is some effort drilling tiny holes (0.4mm) and connecting the wires. But attaching them to the body is so easy now. They don´t slip while the glue is drying and I can even use white glue to avoid messing the paint with aggressive glues. The final attachment was the tipping hood. I was really nervous if the assembly would work out like in my first mock up. I didn´t want to risk that the hood might disconnect later by a clumsy handling, so I added a reinforcement by wrapping thin wires around the hinge tube and the tip of the frame. Secured it with super glue. After taking this pic I covered the hinge parts with anthracite paint. After removing the masking tape that kept the hood in place I was finally able to tip the hood and see if does open correctly..... I owe myself a drink for this. Engineering works out fine, much better than my last front tipper 2 years back. Now I only have to attach the front spoiler. I will take some higher quality images soon and show the finished build on the "Under Glass" forum. Thanks to those watching my WIP!
-
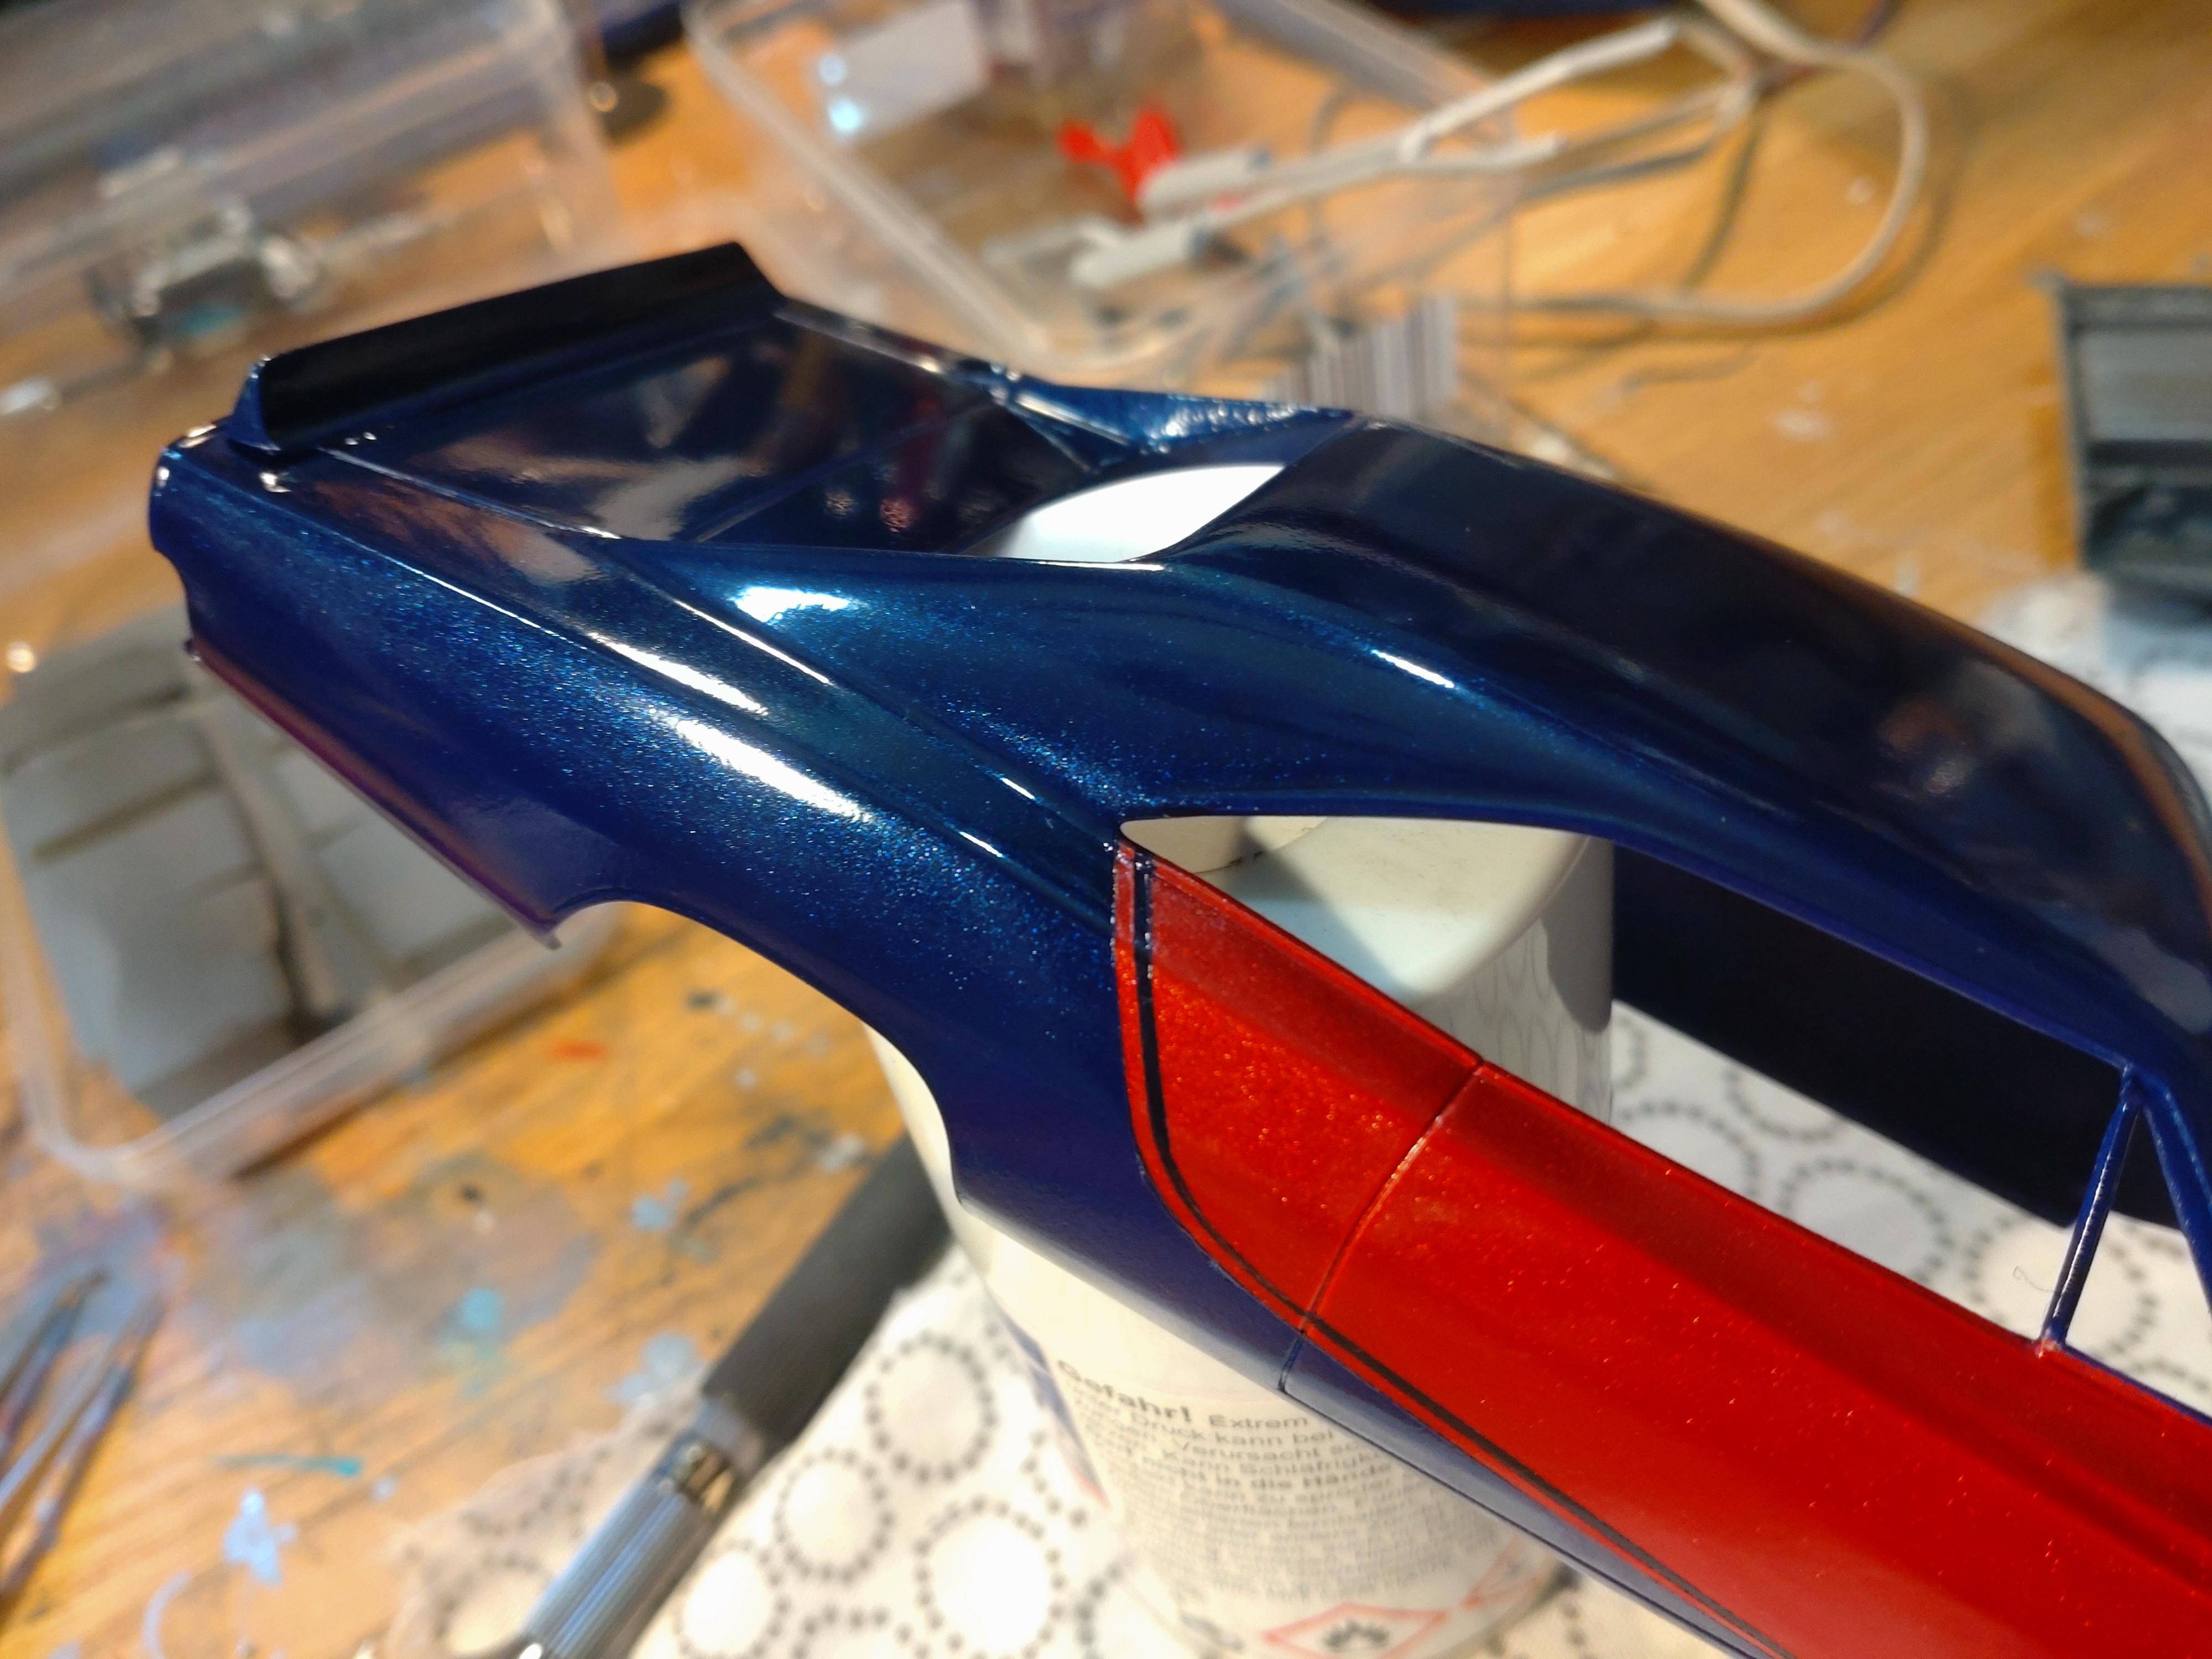
Because some of you were curious to see how the paint job would turn out, I will start now with those images. The red and blue base coat did give a rough impression, but of course the final color would be something more classy. I had a deep metallic blue and a intense metallic red on the shelf, but both cans had only about 30% content left. You know how they start sputtering once they get low or if you tip the can too much while spraying. So I only had one shot to make it right! A bit of a sweat, but it went fine😅. After wet sanding the body with grit 1000 I started with the red. I didn´t want to just let the red hit the blue, so I fine masked a thin line (1mm Tamiya) and spared another thin line on the red surface. During a first mock up I realized that the wheel opening was too tight for the big slicks. So I had to grind, file and sand them to make it fit and look fine. When finished, the open white styrene surface was then painted with a fine hair brush. Next the body got a grit 6000 wet sanding to level out the masking bumps and remove the last tiny bumps. Bare metal is applied only to the window frames. No unnecessary trim on this racer. Those few decals are put in place and left to dry. Earlier today I sprayed the body parts with a crystal clear coat and really love the look, but this image is still without the clear finish. The undercarriage is also finished in the meantime. Since this is not a show car, I gave the bottom a mild weathering to show some street dirt and wear. The gray received 2 different browns with my airbrush and a light dipping with a sponge. First I attached the brake and fuel lines. These are connected to the undercarriage with very thin floral wire (0.25mm) through small holes. The parking brake is very close to the original, but ended up a bit too big. Might get that smaller on a future build. Here tiny crimp beads and micro cables from a craft store come very handy. Adding the rear axle with the suspension. It may sound foolish, but I like to add the exhaust system last. Even though that means having to cut the pipes to make it fit. But since the cut is under the axle it does not show afterwards. Just some highlights and the undercarriage is now finished. Exhaust pipes and the axle got some weathering too. I modified the interior to create a racing feeling. The kit seats were discarded and replaced by racing buckets I had in my parts box. The back bench is out and made way for a a reinforcement wall and a roll bar. The seat belts were nerve wrecking but finally ended up in the right places. No flock on the floor. The color mix is an aggressive anthracite with some red details. The dash is enhanced with wire rings around the gauges. Chrome work is BMF and Molotow chrome pen. At this stage it feels like being "almost" finished. But I know there are still some hours to go. I might make the finish line on the coming Easter weekend. Come to think of it: Happy Easter to all of you! And thanks for watching.
-
Cool build Gerald! Great paint job and fine work on the chrome. I imagine that car rumbling at a red light and waiting for a short race 🤙
-
Well done build Jeff! The color matches very good to the era and this body type. Sorry for the missing hood ornament. Have you ever thought of making one yourself? How about taking sheet or rod styrene and carefully filing it into shape. It is a bit laborious, but not much can go wrong and the finished result would enhance your hood.
-

Curbside Pro Touring Style Yenko Chevette....
Andy Oldenburg replied to NitroMarty's topic in Model Cars
Hi Marty, you turned that ugly duckling into a cool little swan! The effort really shows and the overall look with those wheels is nasty hot. Great job! -
1970 plymouth valiant signet 2 door hardtop
Andy Oldenburg replied to michelle's topic in Model Cars
Hi Michelle, good job! Paint looks cool! I have been thinking about printing for quite a while. So did I get it right: You printed the body and most of the parts yourself? I have to dig into the printing subject much more. The most 3D printing stuff I see is with thermo plastics, which I can´t imagine being fine enough for some details. You mention resin printing. Resin must be a two component material (?). I need to do more research on printing: What printer (quality, price, size, filament...), where do I get the files? You gave me a big nudge, thanks! -
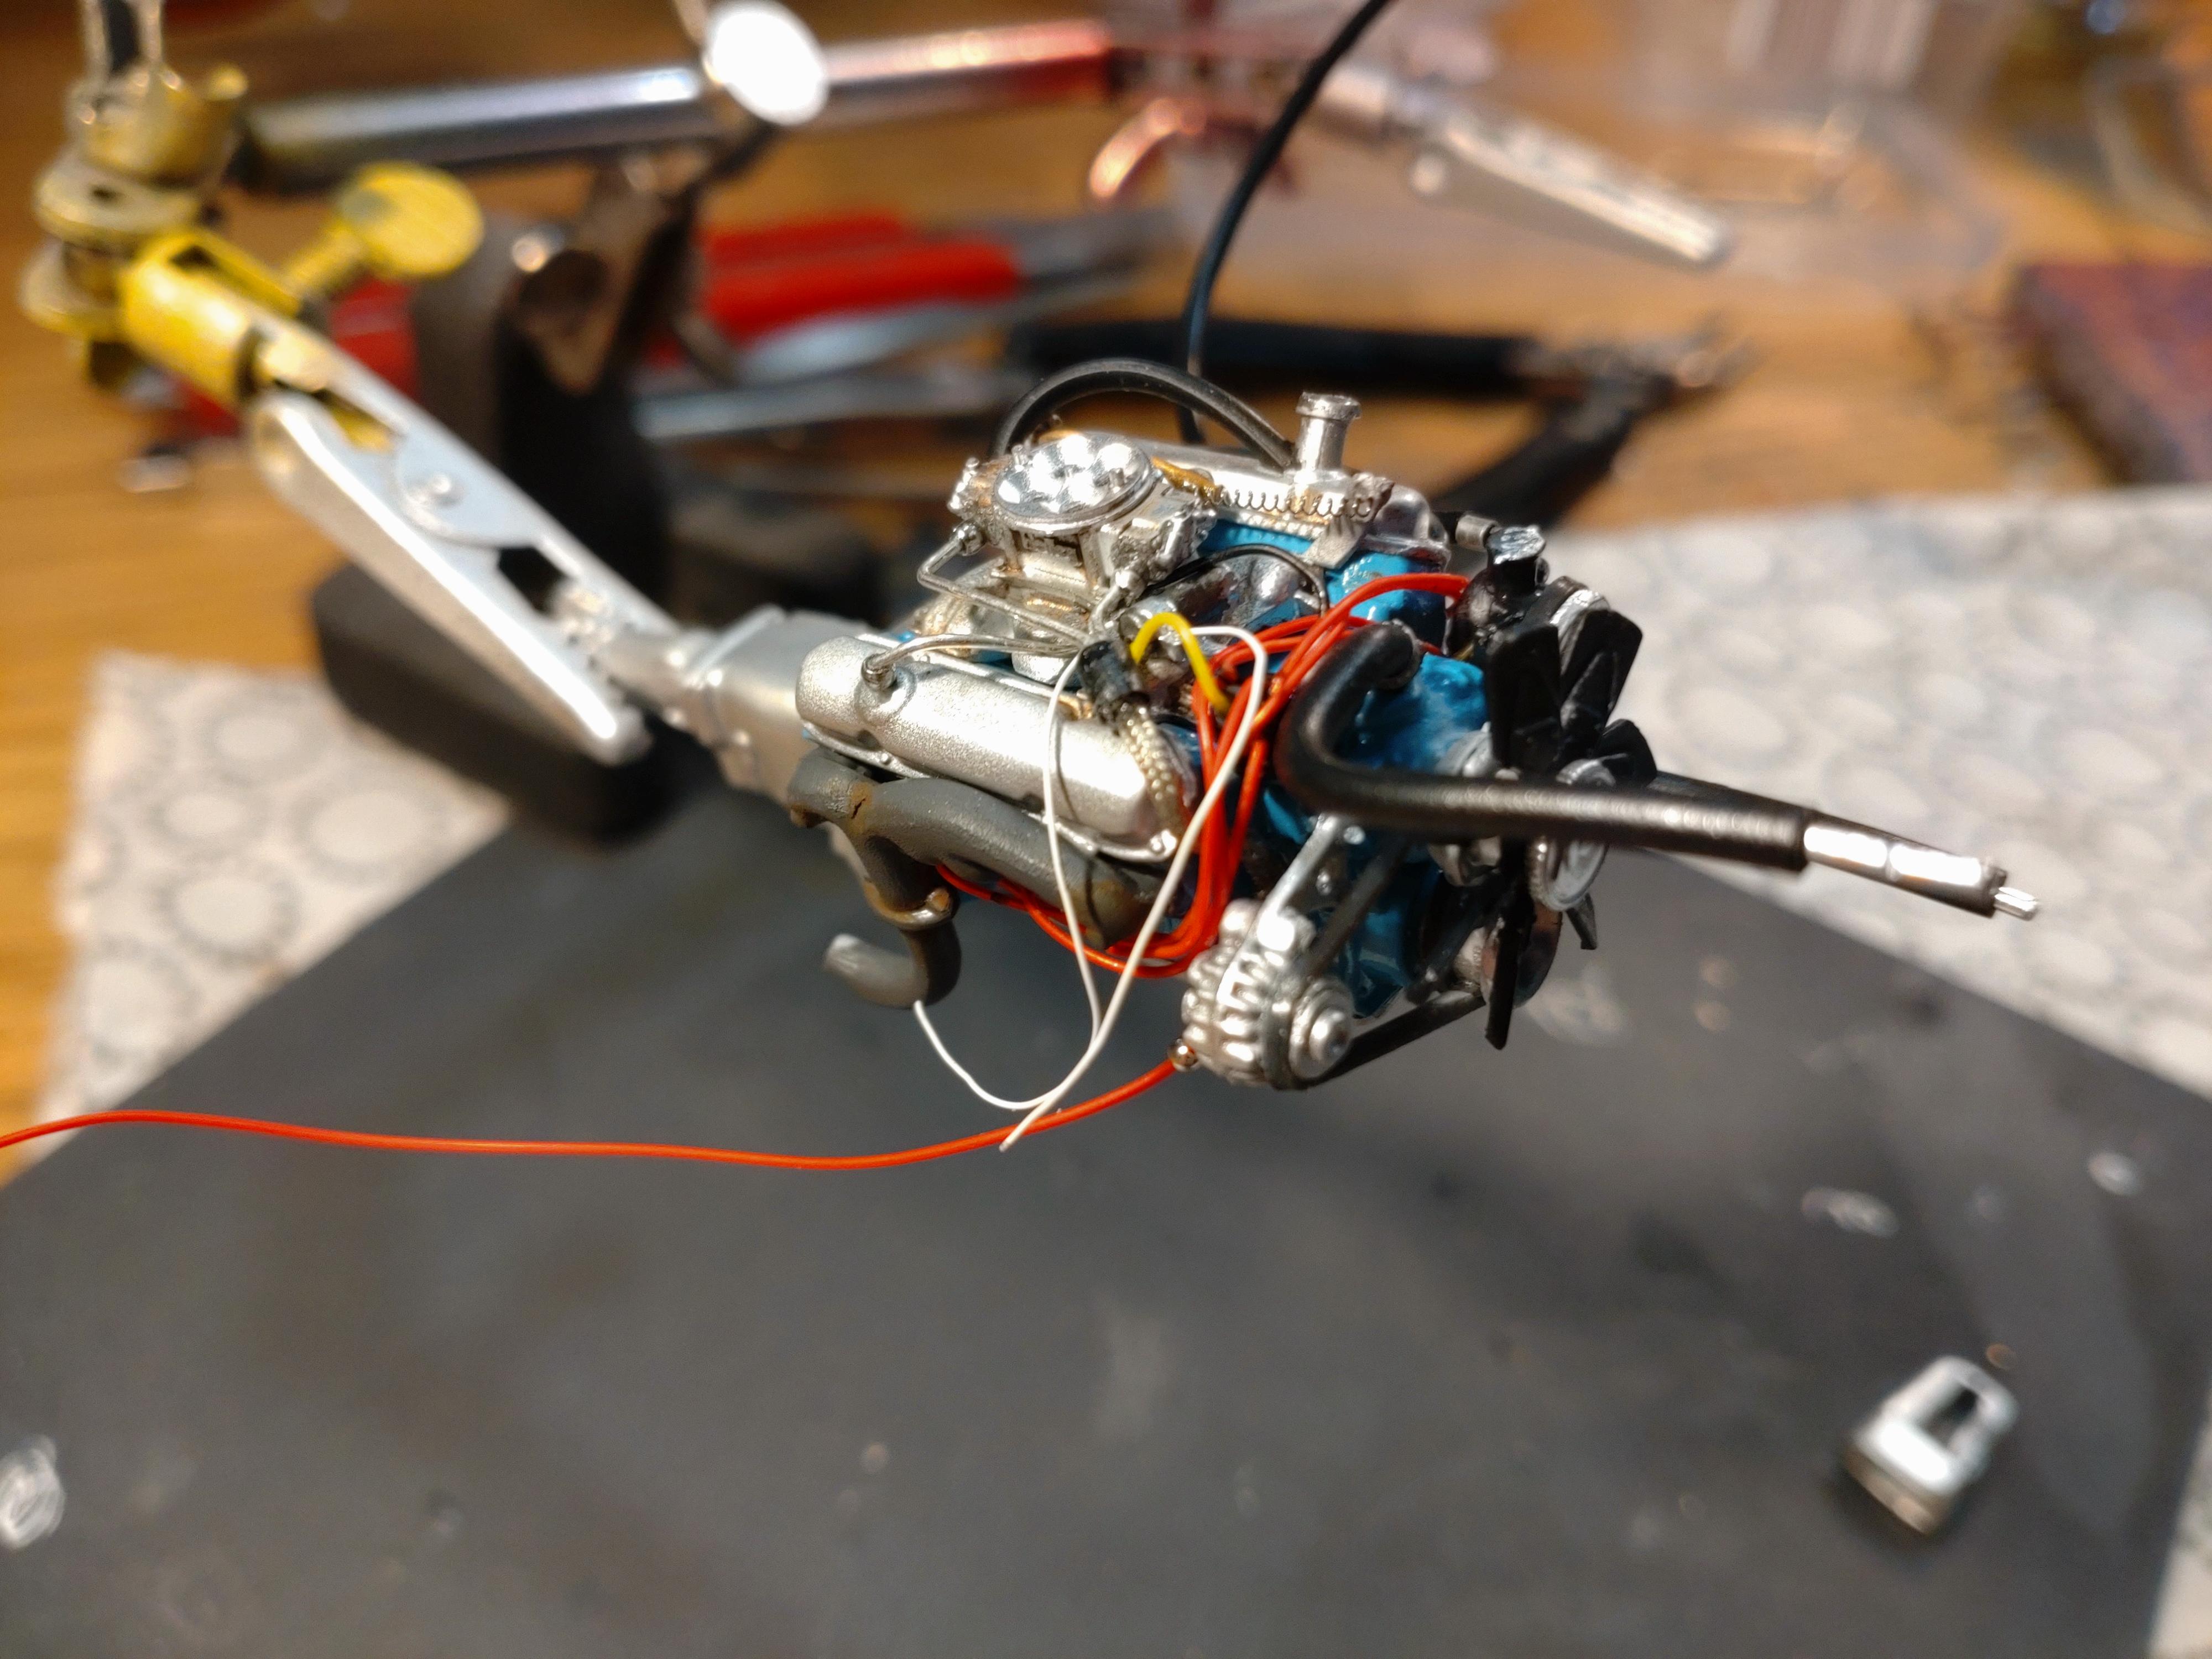
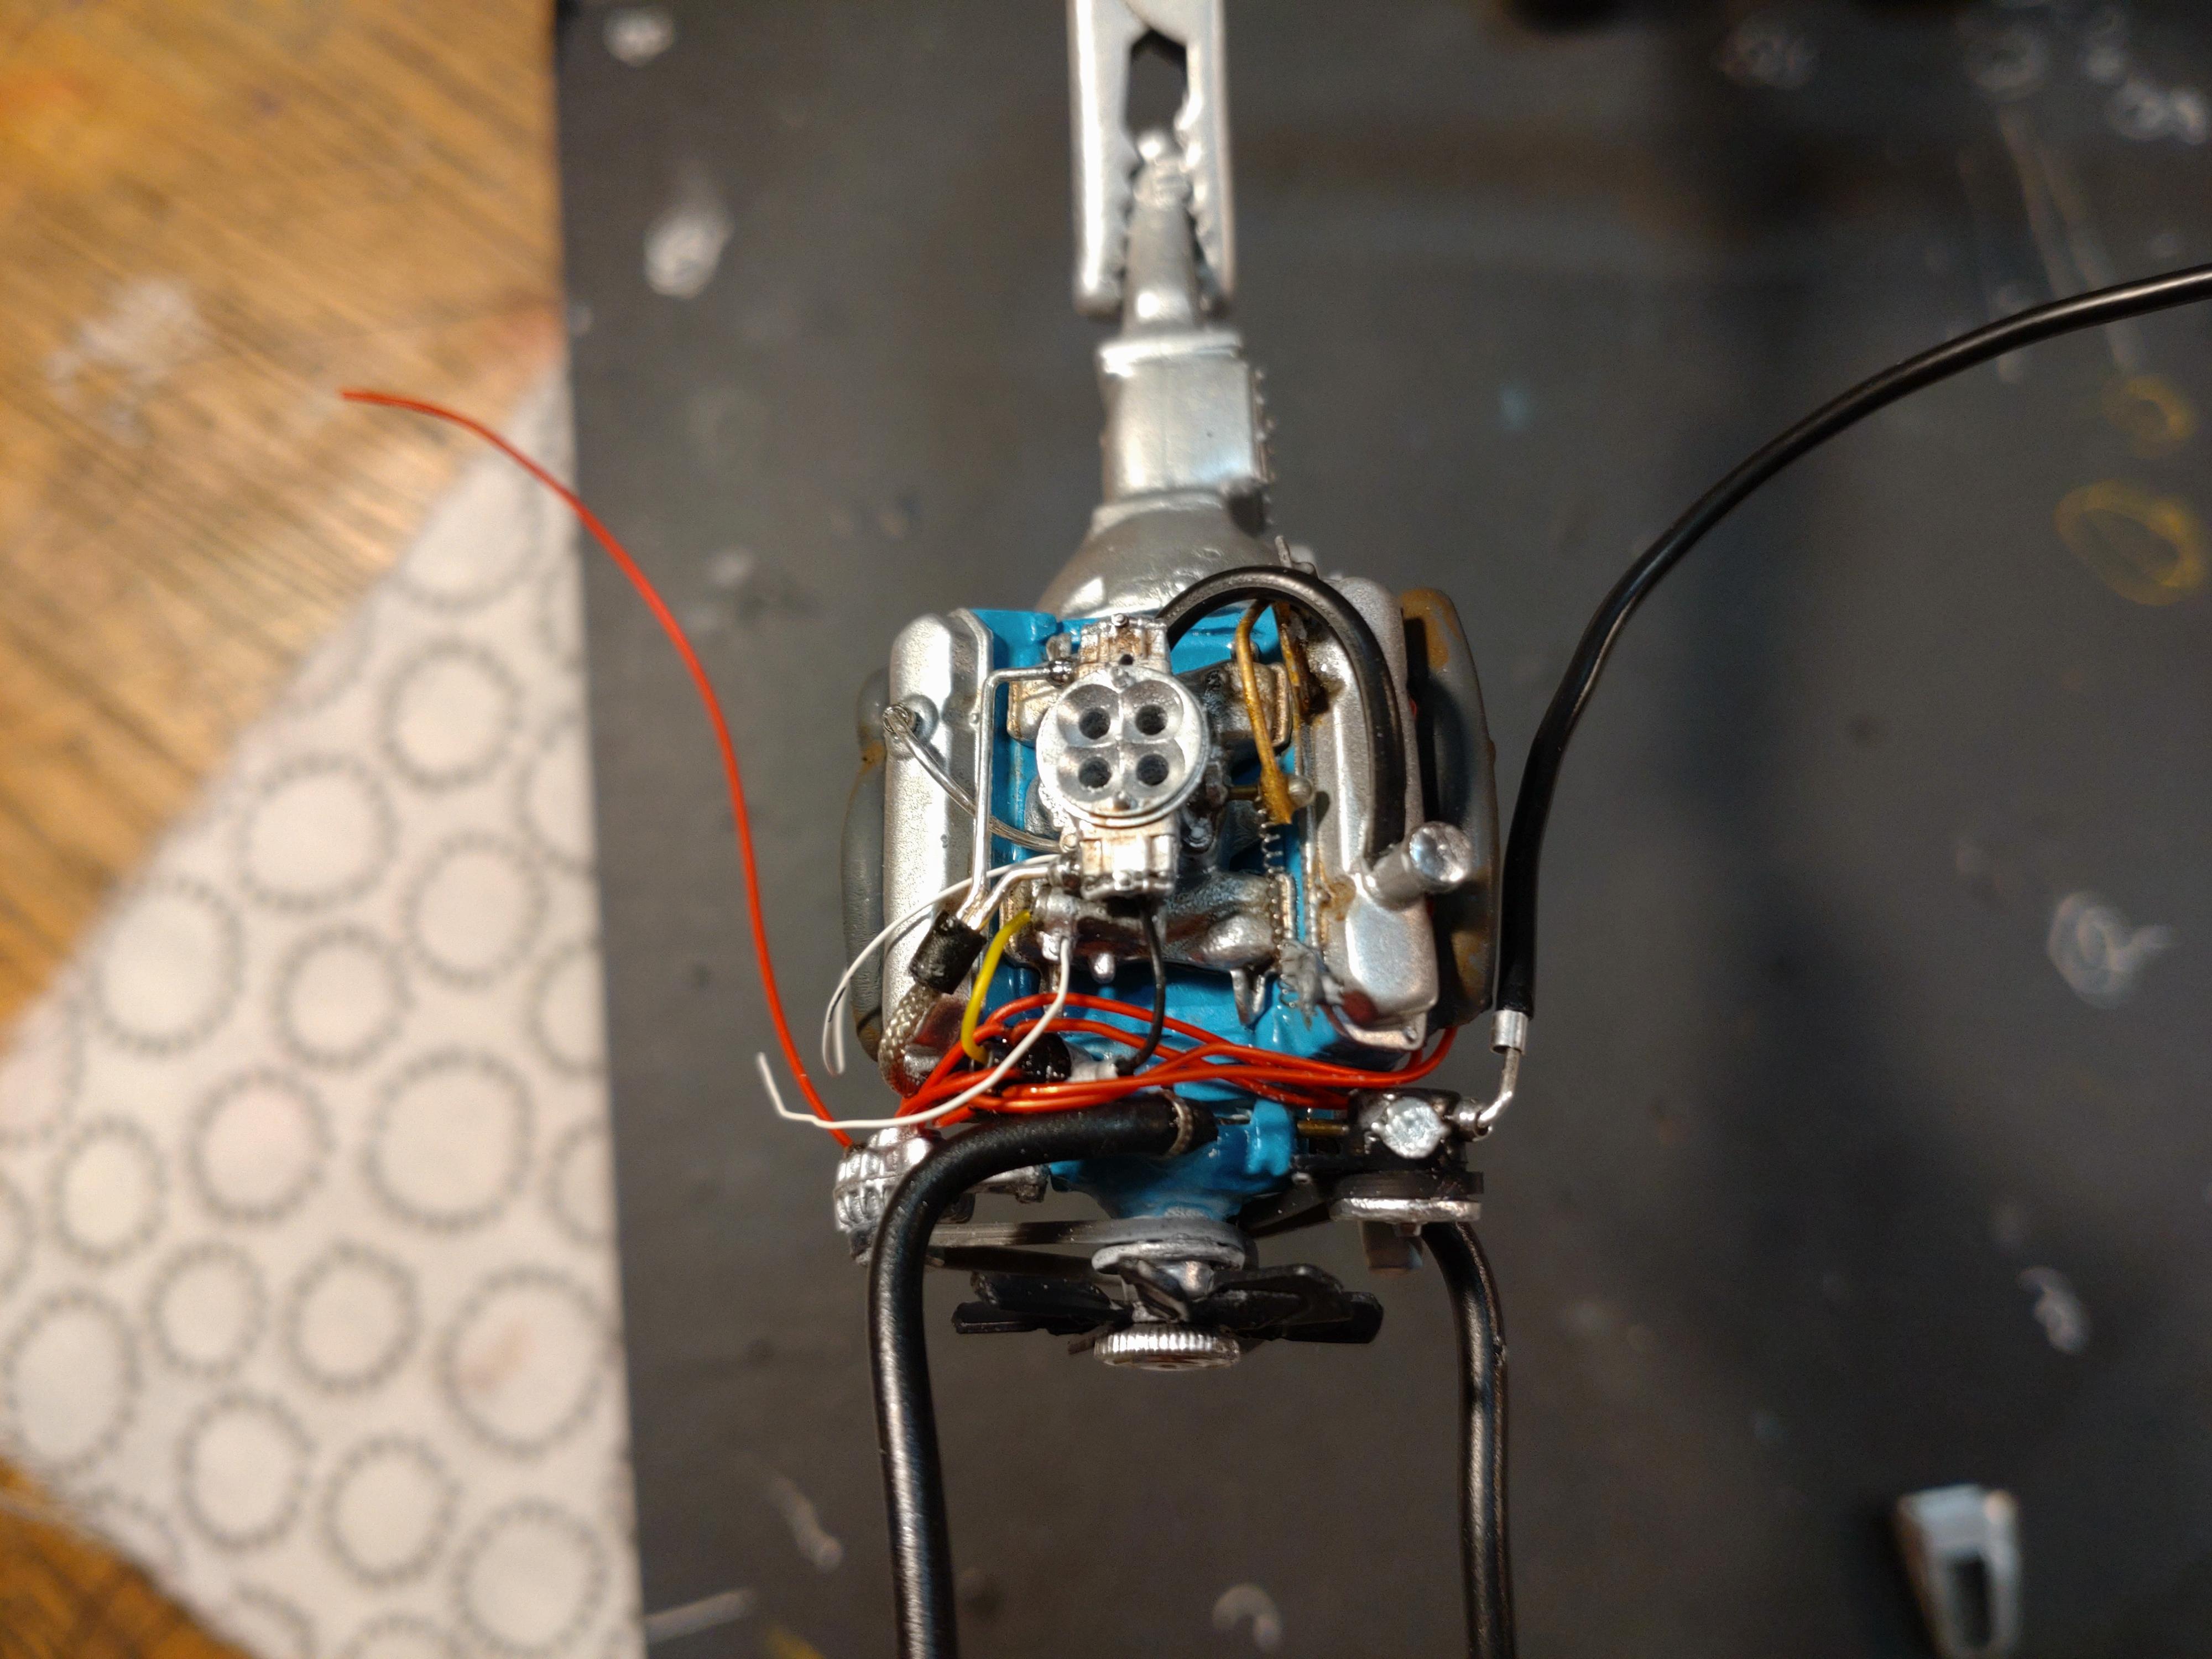
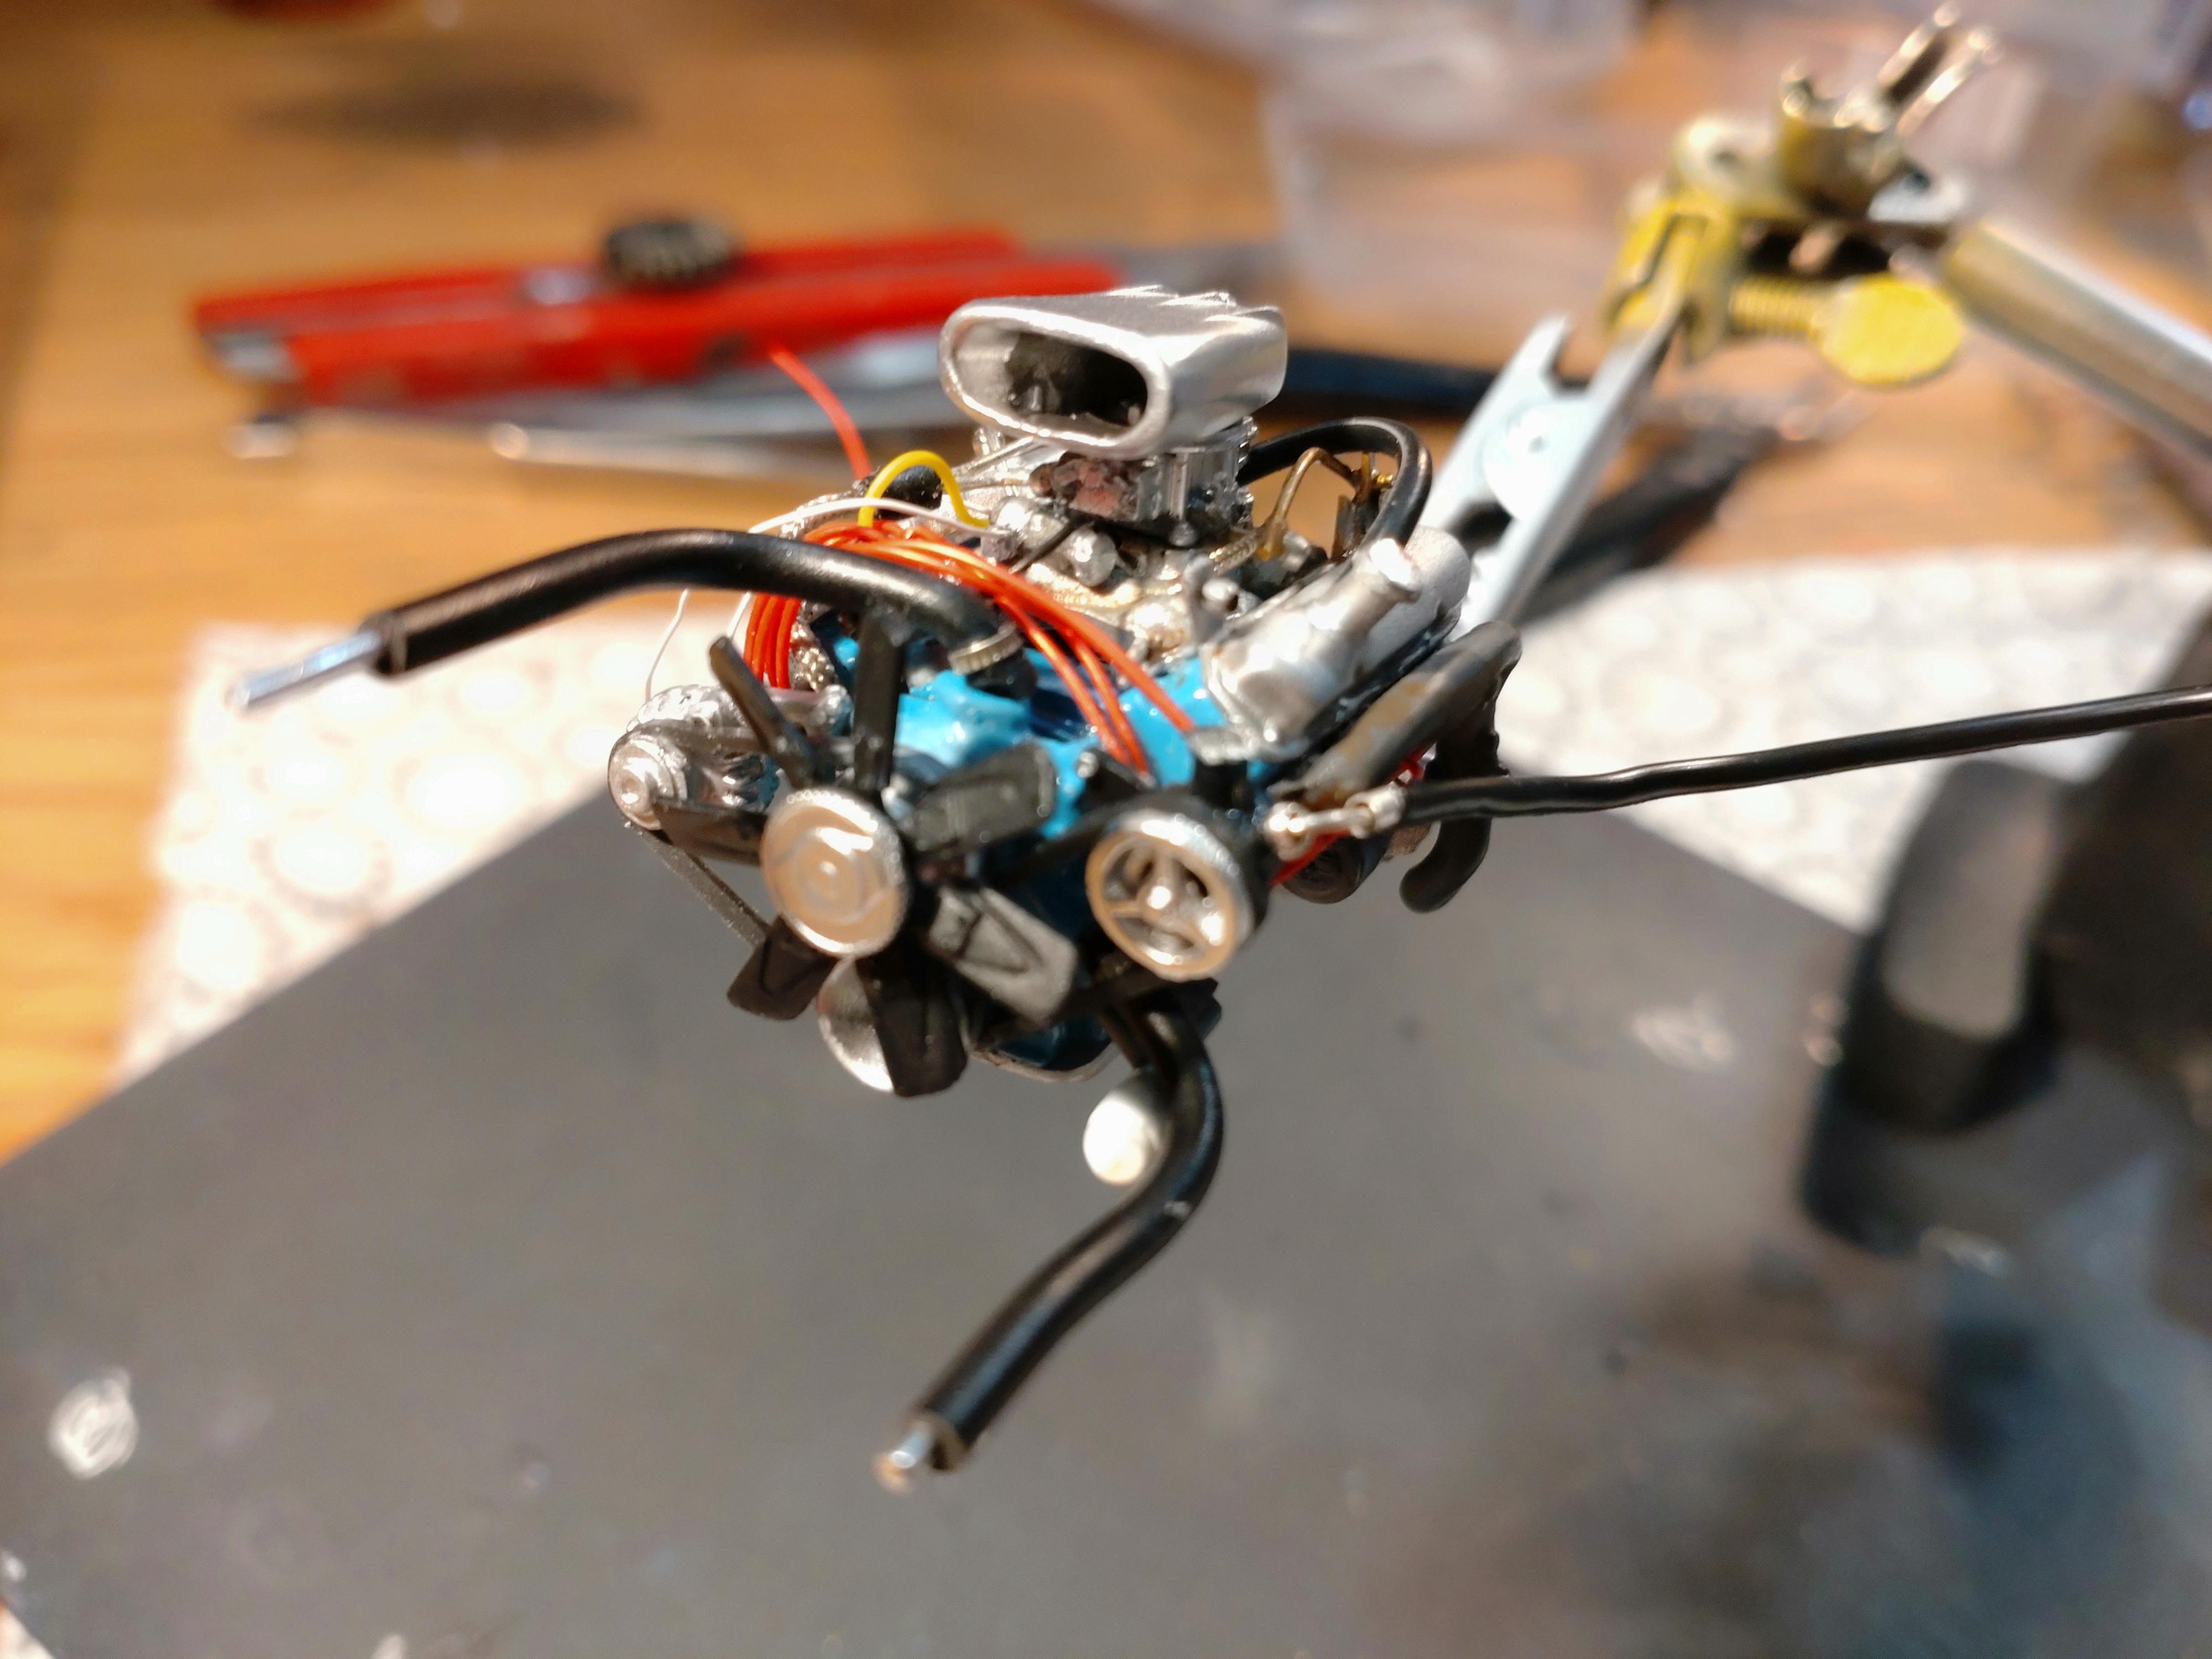
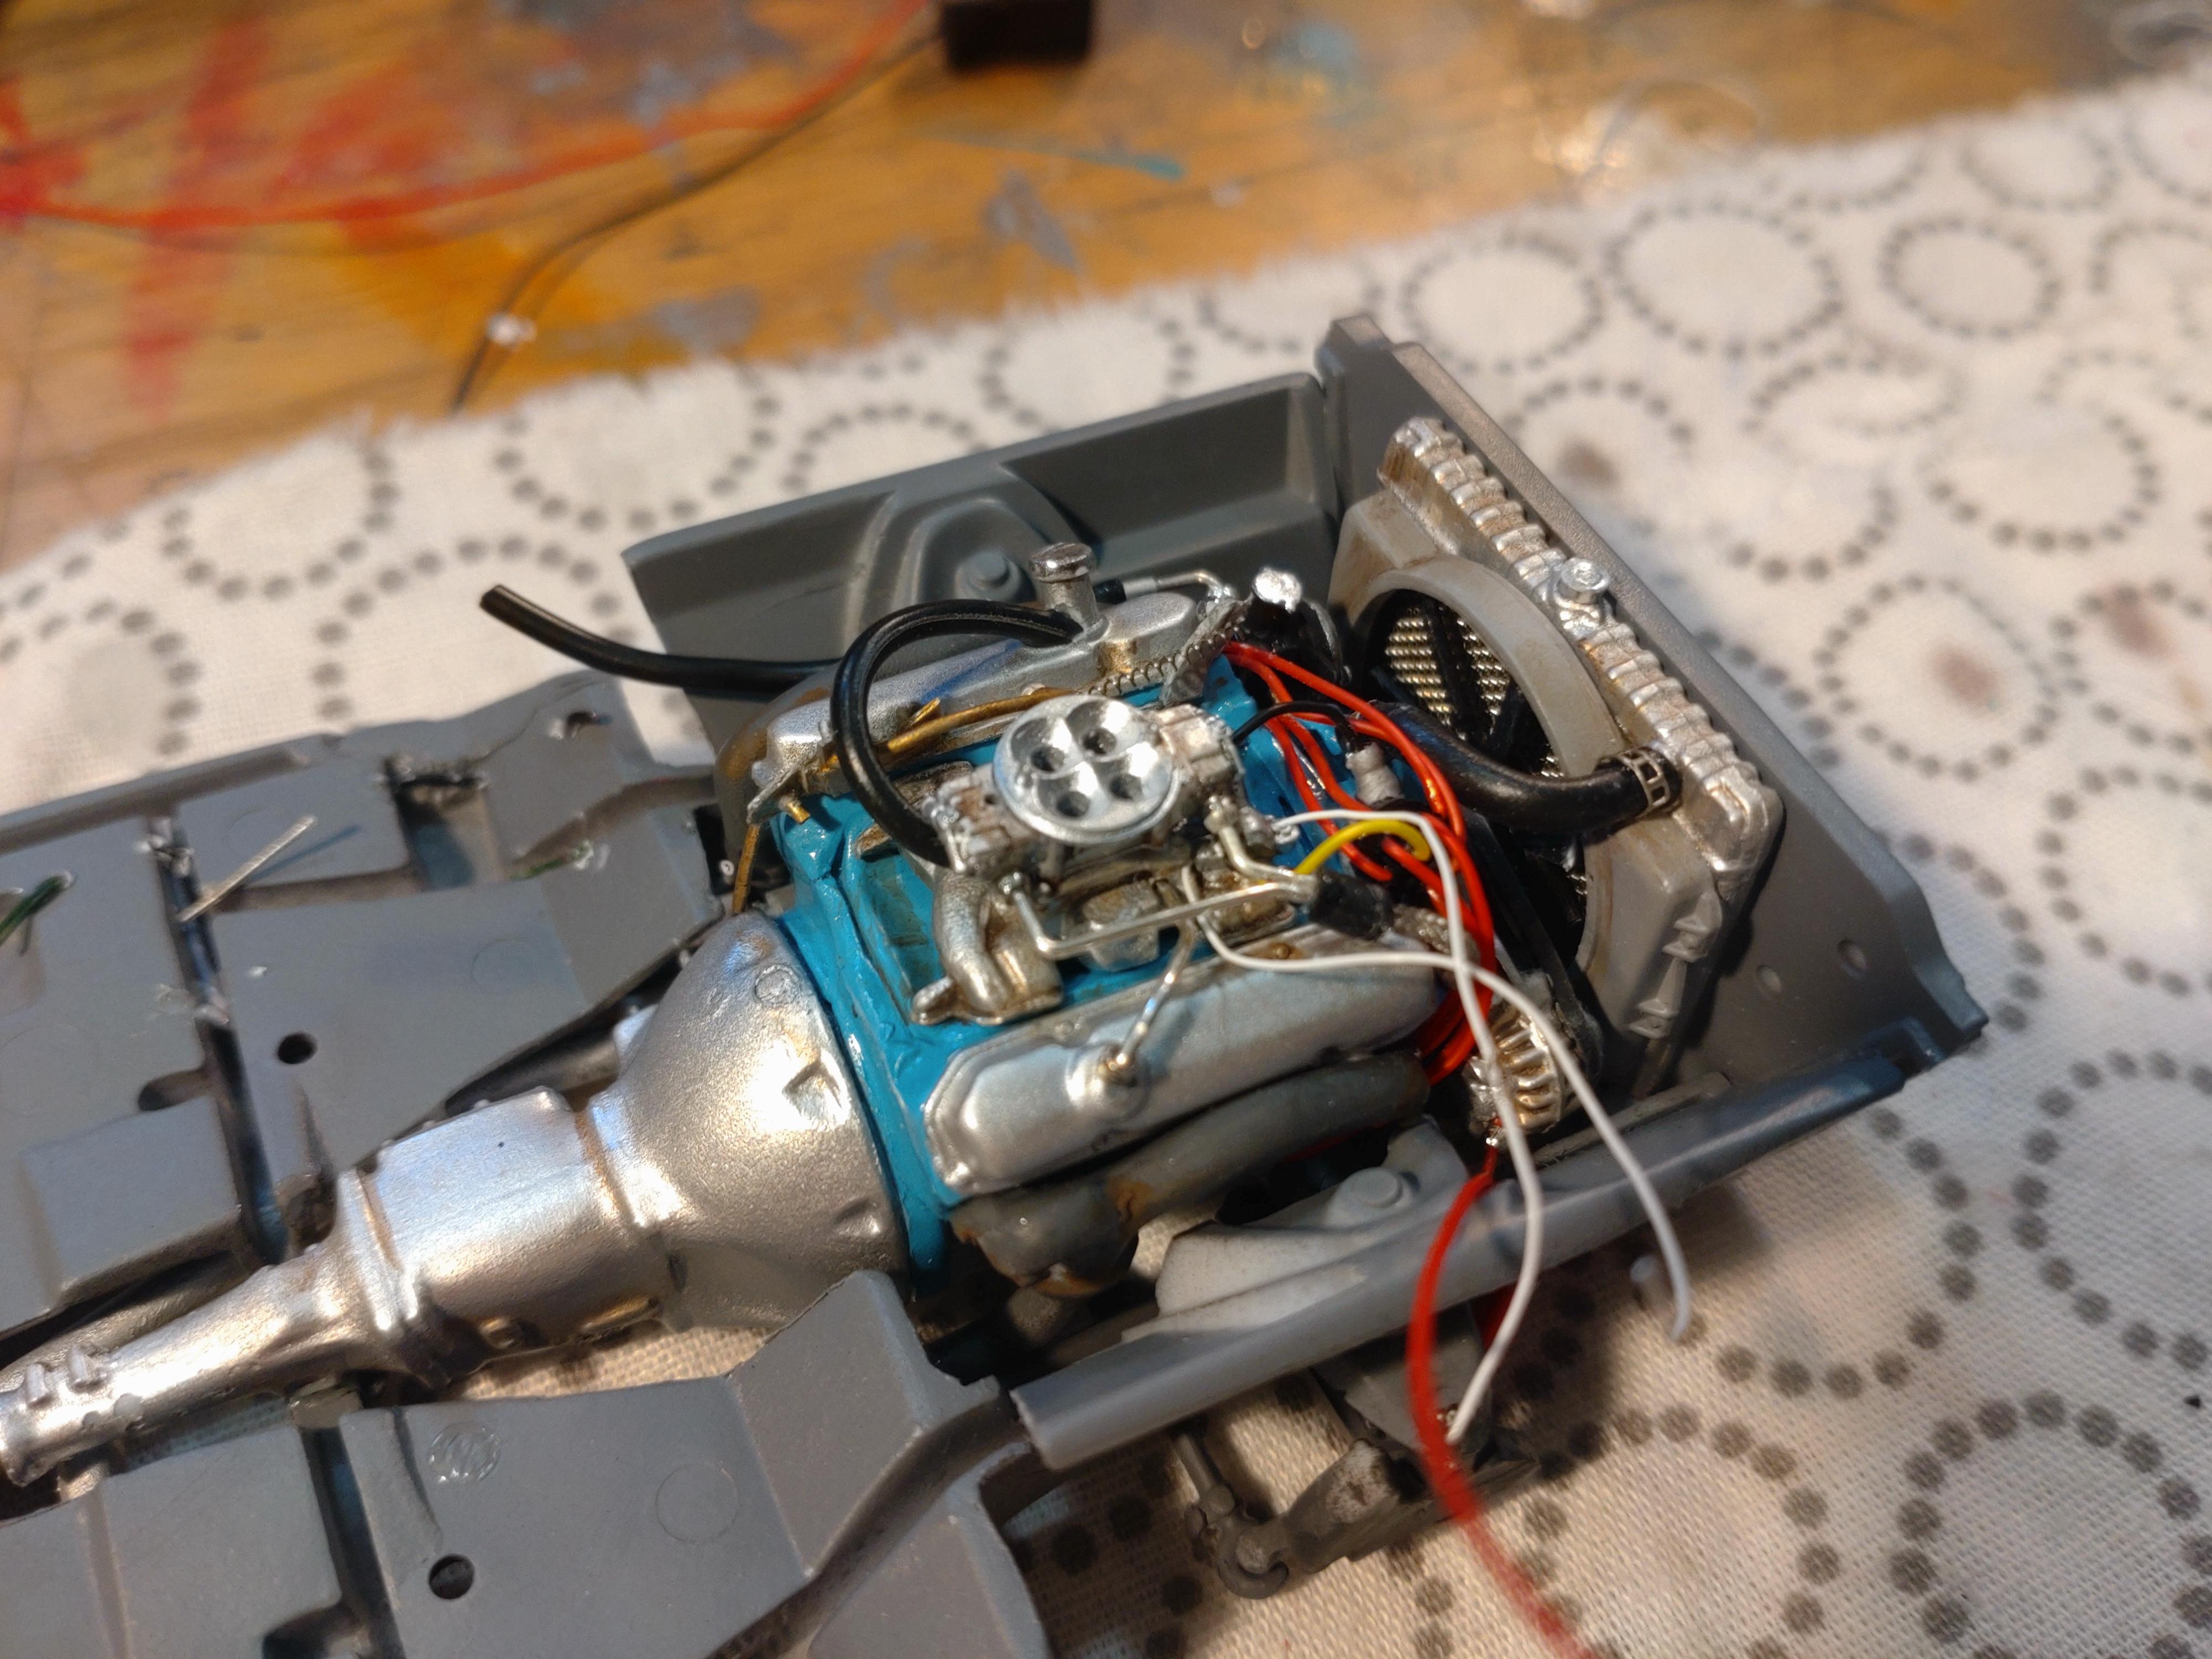
While the glue, putty and the paint coats on the body are drying, I like to work on my favorite part of each build, the engine. This REVELL kit has a very high standard and the details are sharp and all important parts included. But I will of course do a lot of extra work on the details. The block is a classic light blue now, the intake I worked a bit with diamond files to enhance the shape and added a bit of grime for a better 3D effect. The carb is after market (scale production) and has much more detail than the kit part. Before I apply the paint to the block (in this case acrylic AERO Color and a top coat of clear) I try to get all the drilling for plugs and the cooling hoses done. To beef up the looks and the intake I added a scoop from my parts box. This scoop was quite simple so I drilled holes into the front and worked it with a scalpel and files for a real looking open mouth. Later I will add a 0.5mm rod at the rear bottom to attach it to the carburetor. Here I have the distributor and the throttle lever attached. I build my distributors from 6mm aluminum tube, 2mm brass rod and push the fine wire ignition cables between the two. Glued with super glue they will never disconnect and can take a hard pull while building. The lever is 0.5mm brass and thin sheet styrene. The ignition cables are attached and the fuel lines are added to the right engine side. In this case 0.6mm silver plated wire and fine crimp beads. You should be able to get this stuff at a crafts store that sells products for fashion jewelry. The valve covers have an asymmetrical ventilation system. Next stage I added some wires to the coil and was barely able to push it under the fuel lines. Should have done this earlier... The cooling hoses are in place too. I pull the copper threads out of a 3mm wire and push a soft aluminum wire into vinyl insulation. this way I can bend the hoses into any shape and they stay where I want them. The exhaust manifolds have received only a slight bit of rust. I confess that I don´t like those one piece pulley/belt parts. After several engines with "real" belts I like taking that extra effort and, if possible, deconstruct that part for further use. I cut, sand and file the pulley wheels until I have enough surface for the belts. On this build I sanded some wheels as thin as possible and added a short piece of styrene rod for the belts. The alternator and the power steering unit would not take the pull of the rubber belts if just glued to the block. I connect these parts with brass wire pins and super glue. Same as I happened to do with the oil filter. The kit alternator is chrome plated but that just does not look real, so a shiny silver makes the difference. Now I can attach the belts. These I cut from a 1mm thin rubber mat. I´m still looking for an even thinner mat but to no success yet. I far as I can tell, my engine is finished now. Total building time about 18 hours. A bit of a shame that some details get lost in the engine bay... The body has made the next step. Don´t get fooled by the colors, this is NOT the final color code. Just the base coat for the real layers. But it does give a hint of what direction I am going. Thanks for watching !
-
My idea for this build was triggered by a feature on late night TV. Independent auto shops and hot rod builders meeting at secret places to challenge each other and win the prize money. My Charger would be an almost street legal car ready for illegal races on the outskirts at night. The body is modified as a front tipper. I glued the hood to the fenders and cut them off the body. The fire wall is attached so I could fill the empty spaces left from the doors. To enable the front to tip correctly without jamming I hat to cut back the sides of the firewall. In the end the tipped front will look something like this: The engine will be a beast and needs plenty of air to breathe, so I added the kit scoop. Bending the hinges was quite easy. After finding the ideal length for the hinges I cut the rod at the middle in two pieces. This way I was able to bend both sides to exactly the same lengths and angles. Here I got the hinge in the right place to connect the ends to the inside of the fenders. As with the firewall I had to cut of some of the frame so the front would tip without getting hooked up with the undercarriage. The middle tube will be attached as the very last building step. For now I have it taped to check if everything works how I imagined it. YO! It works! I found a messy spot at the rear fender after the first primer coat and filled it with styrene and putty. The firewall needed some putty also and mow all the cracks are filled and almost smooth. A look at the front from the inside. I keep the mechanics free form paint with masking tape. The primer coat feels alright to me and after grit 1000 ready for the color. This will be a two tone job and it will take a bit of masking to separate the front and the back end. Next time I will show the progress on the engine. Thanks for watching!