Jay Whittaker
-
Posts
170 -
Joined
-
Last visited
Content Type
Profiles
Forums
Events
Gallery
Everything posted by Jay Whittaker
-

CLIFF INMAN-INSPIRED KUSTOM.......
Jay Whittaker replied to Jay Whittaker's topic in WIP: Model Cars
Thanks SO much Edgar! I was extremely pleased at her debut, the only regret being that the engine/bay and underside were not yet done but she still displayed nicely. I'm so glad you enjoyed it, and thanks again! -
Boy that came out just splendid!! Beautiful execution on a subject we don't see nearly enough of!
-
Great start! I'll be watching with great interest.
-
VERY sharp!
-
Downright wonderful plastic hackin'!! Perfect profile on your chop and all-around great body mods! I'm SO looking forward to seeing this in color!!
-
CLIFF INMAN-INSPIRED KUSTOM.......
Jay Whittaker replied to Jay Whittaker's topic in WIP: Model Cars
We're not quite done yet... But soon. Thanks SO much for the kind words! -
CLIFF INMAN-INSPIRED KUSTOM.......
Jay Whittaker replied to Jay Whittaker's topic in WIP: Model Cars
Wrapped up the trim just in time to make it presentable for the ACME Southern Nationals this past weekend… WHATTA SHOW!!…. She did real respectable for her debut, but we’re not finished just yet…. We got a Hemi to detail out, not to mention fuel and brake lines to run on the chassis… Stay tuned!
-
CLIFF INMAN-INSPIRED KUSTOM.......
Jay Whittaker replied to Jay Whittaker's topic in WIP: Model Cars
Body is polished to perfection so the next step is to start scratching-up the side trim. I started with a strip cut from .005” Evergreen sheet for a foundation, then cut an even thinner strip of gold foil taken from an old hard pack cigarette box for the insert. The top strip of stainless is made from 21ga half-round Wizart wire, the bottom from a piece of 24ga half-round Wizart wire. I made the end piece from a piece of .060” Evergreen to tie the upper and lower together, and a front spear will be made to tie in the front end as well. the bottom curved stainless is fashioned from 18ga half-round Wizart wire
-
CLIFF INMAN-INSPIRED KUSTOM.......
Jay Whittaker replied to Jay Whittaker's topic in WIP: Model Cars
We got things done on the interior without incident, and even had the opportunity to get in some fine detail painting on the dash and steering wheel center. After two-toning the wheel in pearl White and light Turquoise I masked the rim and prepped the center and spokes for the Gin San powder and got that applied. The center features Red/White/Blue sections and a finish drop of 5-minute epoxy to seal. I also painted the non-existent “Chrysler” script next to the radio and gave that a burial in epoxy. The crowning touch was the rear view mirror, of which the kit piece desperately needed updating as it was dinky at best. Luckily I had a photo etch detail set from a Mercury Comet that still had its rear view mirror and bezel, so I polished it with my Dremel, shaped a piece of .030” Evergreen, epoxied the P/E to it, shaped a .005” clear Evergreen for the “glass effect” then installed the bezel and attached it to the pod. BIG improvement, and it reflects quite nicely!
-
CLIFF INMAN-INSPIRED KUSTOM.......
Jay Whittaker replied to Jay Whittaker's topic in WIP: Model Cars
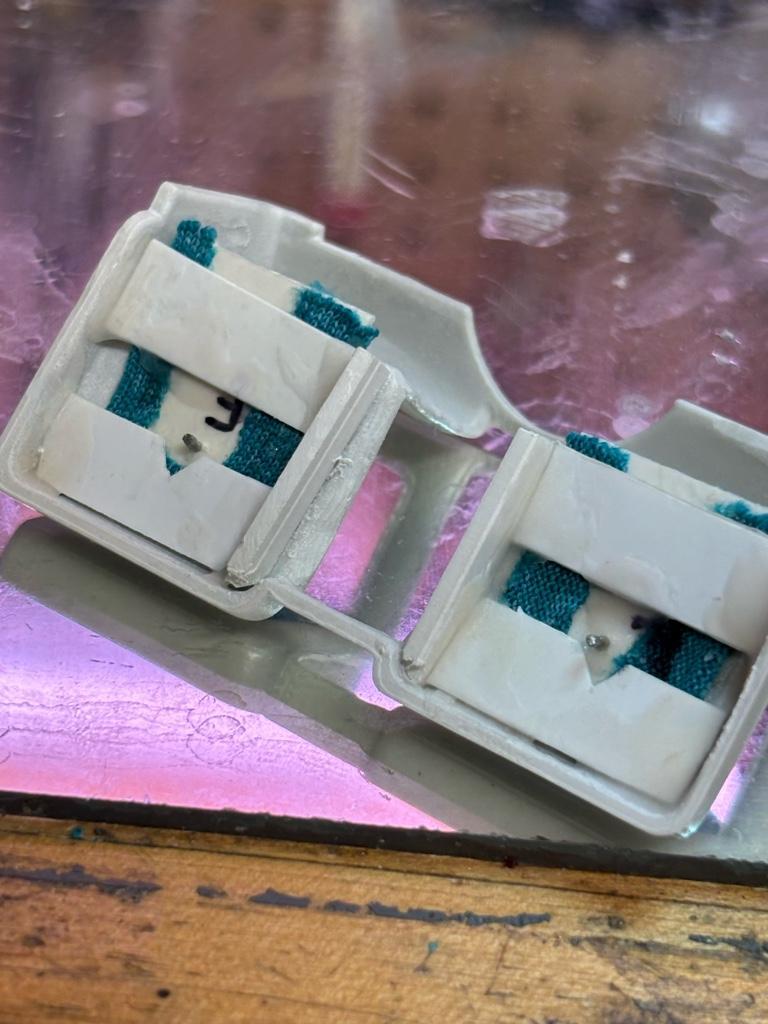
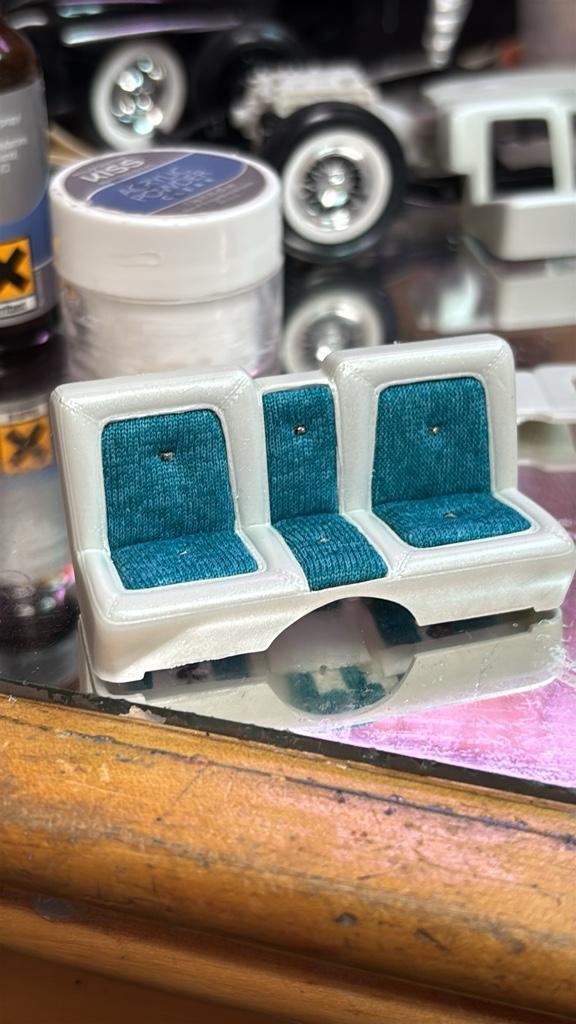
Now that the insert is completed, test-fit to be sure there are no gaps and carefully secure it to the seat. You can lightly glue it, but be careful not to soak-through the material’s edge on the front side. I chose to cut strips of Evergreen, superglue then acrylic filler them as well as the insert itself. (These puppies aren’t going anywhere!) The final result compliments the body color beautifully! -
CLIFF INMAN-INSPIRED KUSTOM.......
Jay Whittaker replied to Jay Whittaker's topic in WIP: Model Cars
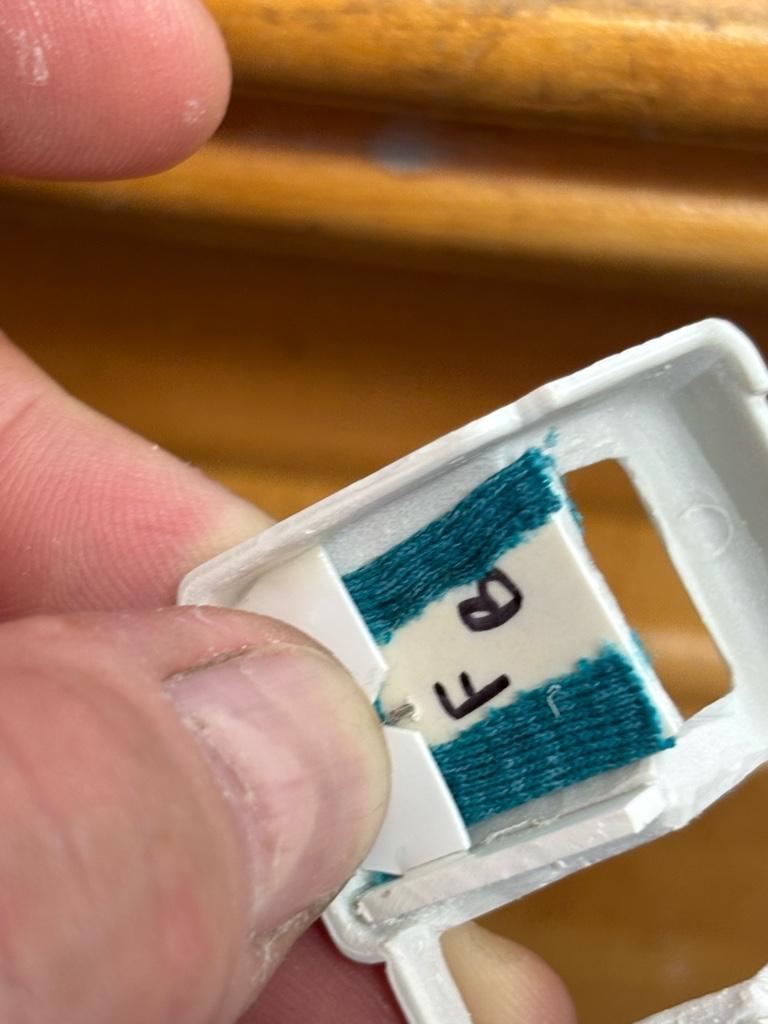
Just for that little extra, I trimmed down the head on a straight pin to a rectangle, drilled a hole in the base and inserted it for a decorative button. You can apply this in whatever design you wish, or none at all. I just did one, mainly to emphasize the cushioned aspect of the insert without going overboard. -
CLIFF INMAN-INSPIRED KUSTOM.......
Jay Whittaker replied to Jay Whittaker's topic in WIP: Model Cars
Trim a piece of the fabric with a bit extra on every side. Adjust the grain of the material and pattern so it’s straight and level, then fasten the top (or front) first. Cut a notch on each side to save the material bunching-up (saving troubles for the back side) then carefully attach one side at a time, diagonally cutting off the excess at the far end to make room for the next side. -
CLIFF INMAN-INSPIRED KUSTOM.......
Jay Whittaker replied to Jay Whittaker's topic in WIP: Model Cars
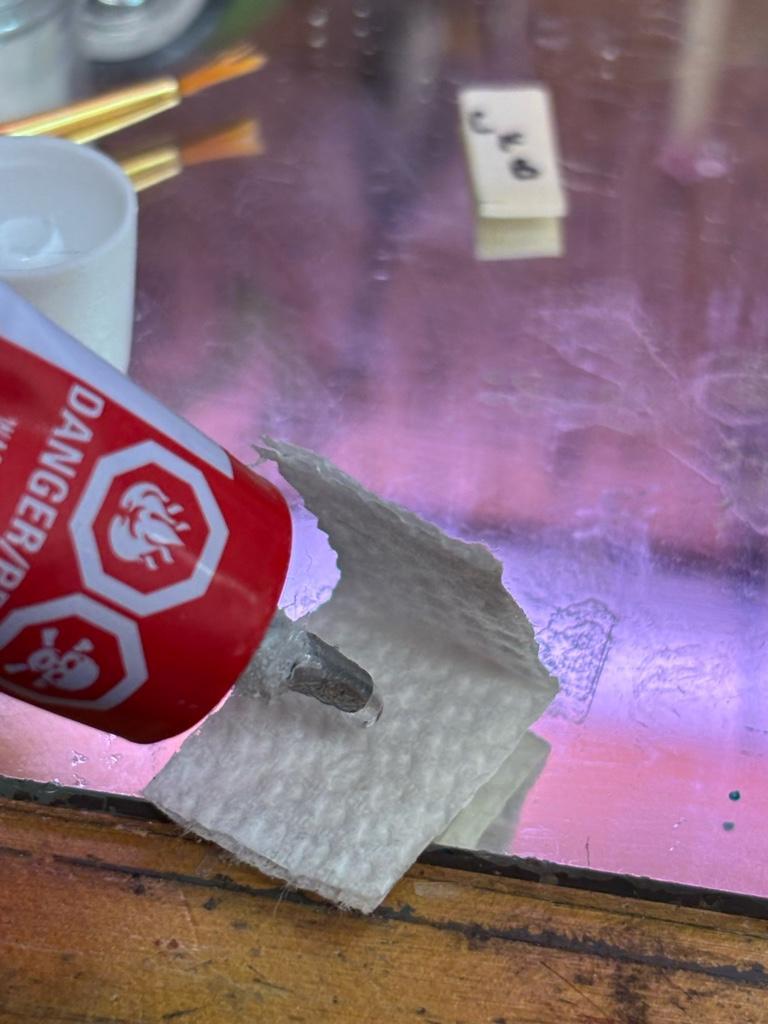
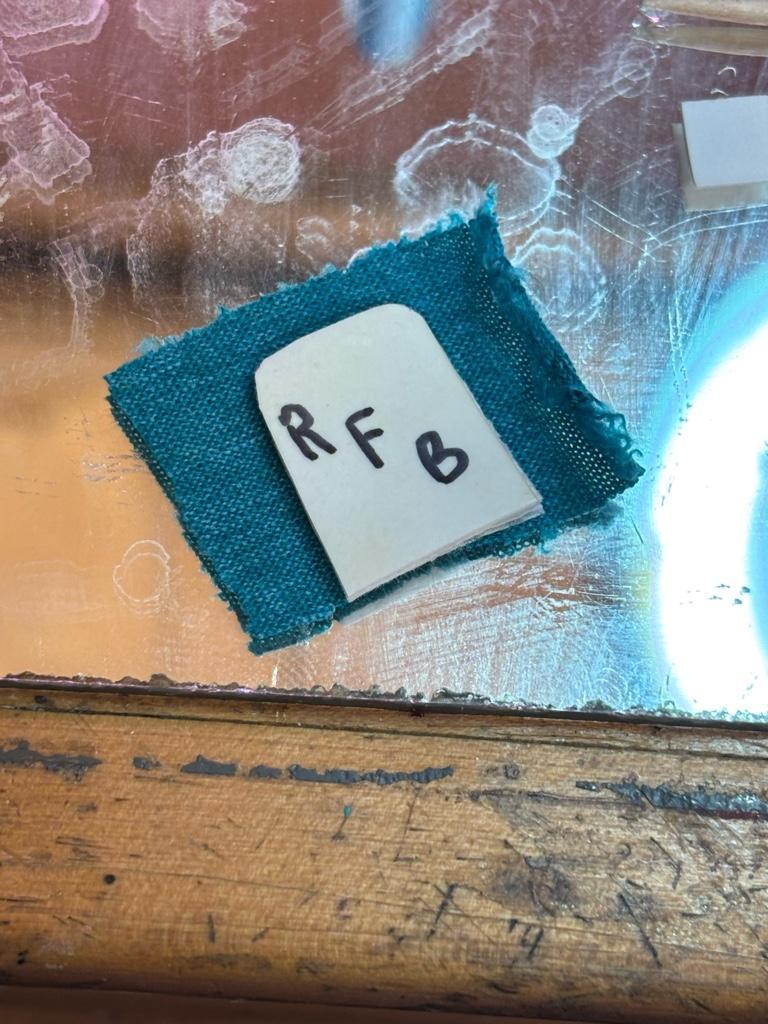
I’ve been noticing the Testors orange tube glue getting a bad rap around the hobby lately, but it has served me well for 45 years. Although it’s not by any means my main go-to, it still has a solid place on my bench for application when building, and always will as far as I’m concerned. For this particular area it is THE perfect adhesive, both for securing the paper towel to the base, adhering it to itself after fastening to the base and folding it, as well as for adhering the chosen fabric to the base. Once you have got the paper towel secured, trim to fit the base. -
CLIFF INMAN-INSPIRED KUSTOM.......
Jay Whittaker replied to Jay Whittaker's topic in WIP: Model Cars
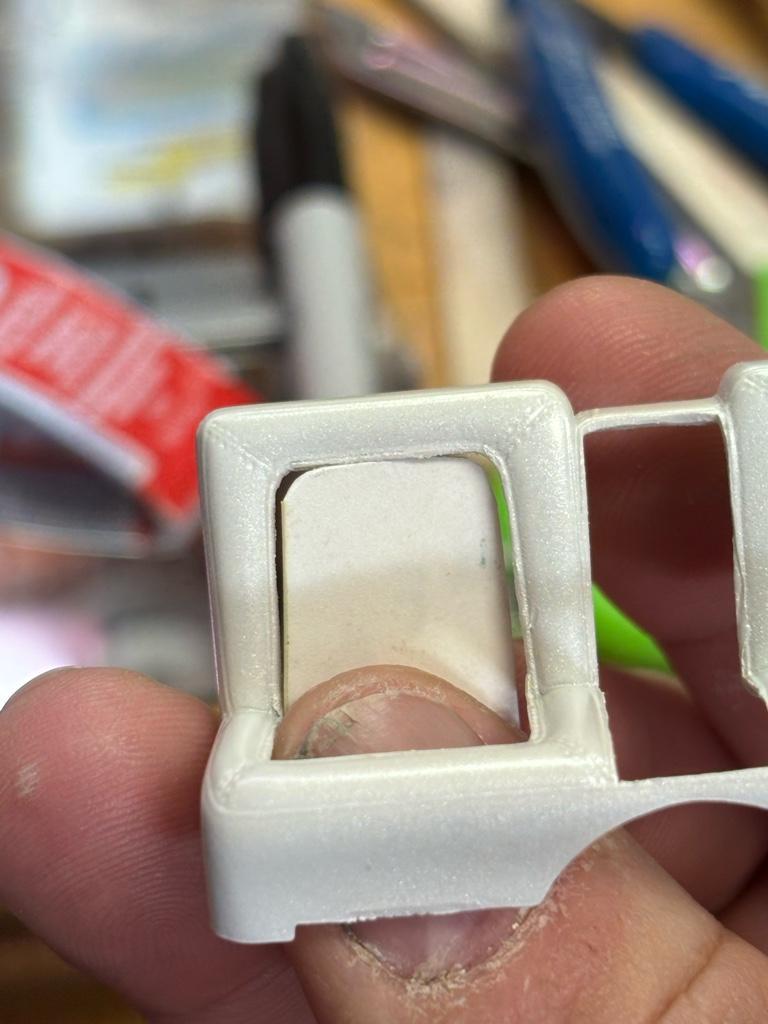
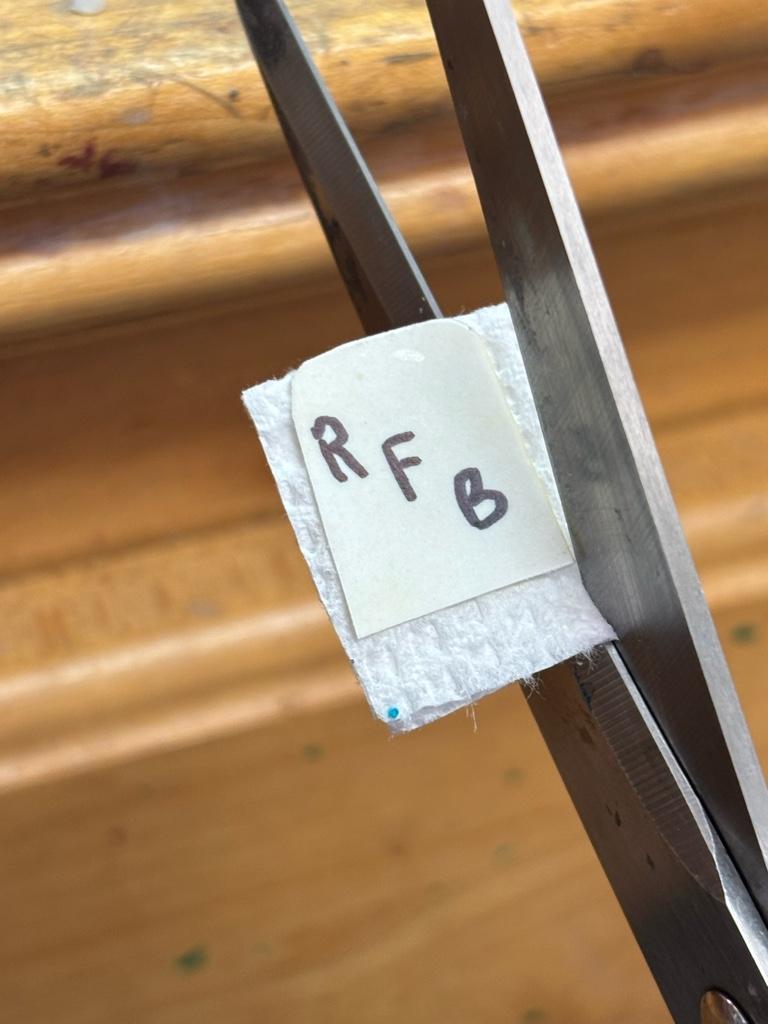
Next up comes the construction of the inserts themselves. I start with a relatively thin piece of Evergreen (.010-.015) and cut it to just under the size of the opening. You don’t want to go too small as that’ll allow gaps between the seat and the insert. Go too big and you’re going to have problems on the back side. Once you have the base cut to size, cut out a piece of paper towel twice the height of the insert and fold in half. -
CLIFF INMAN-INSPIRED KUSTOM.......
Jay Whittaker replied to Jay Whittaker's topic in WIP: Model Cars
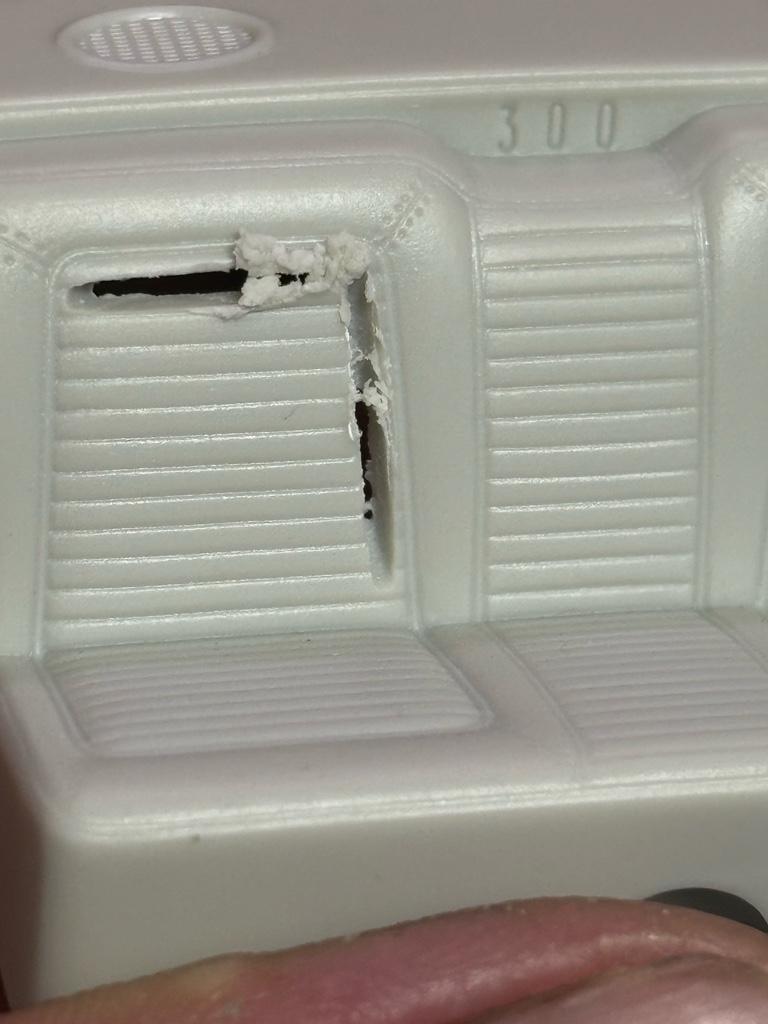
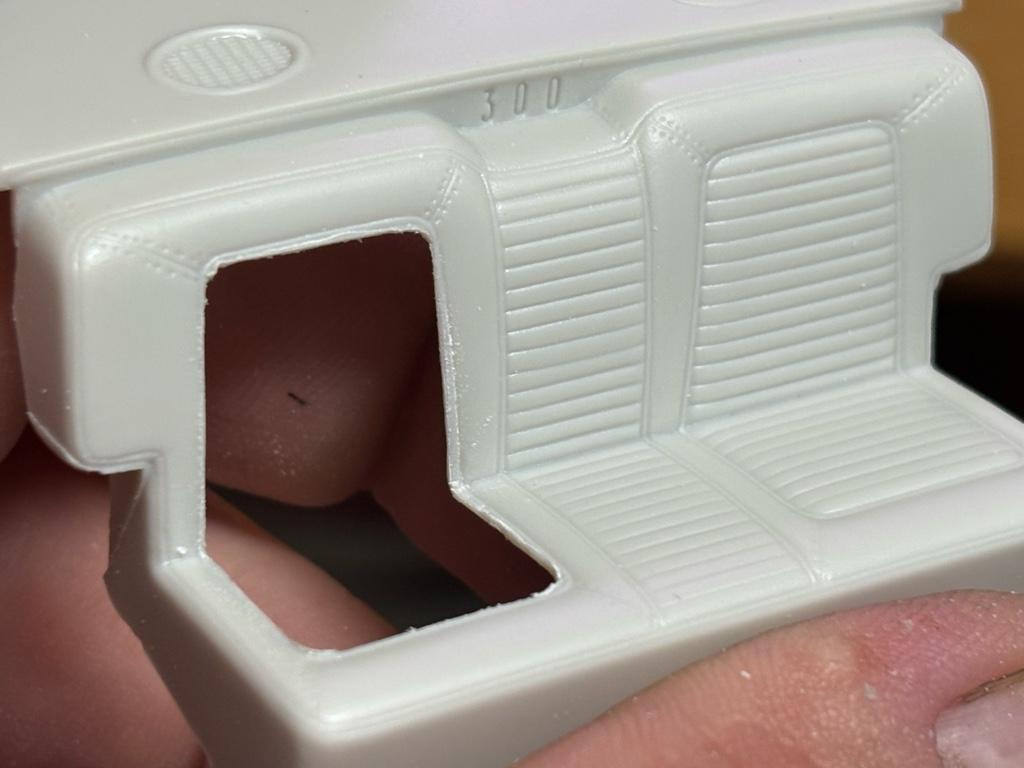
Diving a little deeper into the construction of the seat inserts as I didn’t realize it hadn’t posted it!..... Start by rough-cutting out the molded-in inserts from the kit seats then carefully trim to its edges. You can do this either with a Dremel, X-acto, or both (that’s what I did). Be mindful to thin the surrounding edges from the back side as well so the fabric isn’t sunken down into the seat, taking away from the realism. -
CLIFF INMAN-INSPIRED KUSTOM.......
Jay Whittaker replied to Jay Whittaker's topic in WIP: Model Cars
I appreciate the kind words folks! -
CLIFF INMAN-INSPIRED KUSTOM.......
Jay Whittaker replied to Jay Whittaker's topic in WIP: Model Cars
-
CLIFF INMAN-INSPIRED KUSTOM.......
Jay Whittaker replied to Jay Whittaker's topic in WIP: Model Cars
Thanks guys! -
CLIFF INMAN-INSPIRED KUSTOM.......
Jay Whittaker replied to Jay Whittaker's topic in WIP: Model Cars
hanks SO much for all the compliments folks! Sorry I haven't updated this thread lately, as I have been hammerin' hynee to get this to a "presentable" stage for the ACME Southern Nats this past weekend. I'm happy to report that it did make a VERY respectable showing, ending up in apparently what was a multi-vehicle tie for the theme class it was entered in. With the Nats now being in the history books, I wanted my first order of business to be bringing y'all up to date on this, so without further ado, here we go..... Well the inserts have been painted, car cleared, and set to bake for the evening. One more wet sand and one more clear and she’s done.
-
CLIFF INMAN-INSPIRED KUSTOM.......
Jay Whittaker replied to Jay Whittaker's topic in WIP: Model Cars
Thank You Sir! -
CLIFF INMAN-INSPIRED KUSTOM.......
Jay Whittaker replied to Jay Whittaker's topic in WIP: Model Cars
WOW!!... Well, I do thank you for the compliment!... We need to get something absolutely clear though.... You NEED to be ready for the flat spot that's about to appear on your forehead! LOL Seriously though, thanks a bunch! Here in another day or so i should have the inserts shot and final-cleared the whole thing and we're set. -
CLIFF INMAN-INSPIRED KUSTOM.......
Jay Whittaker replied to Jay Whittaker's topic in WIP: Model Cars
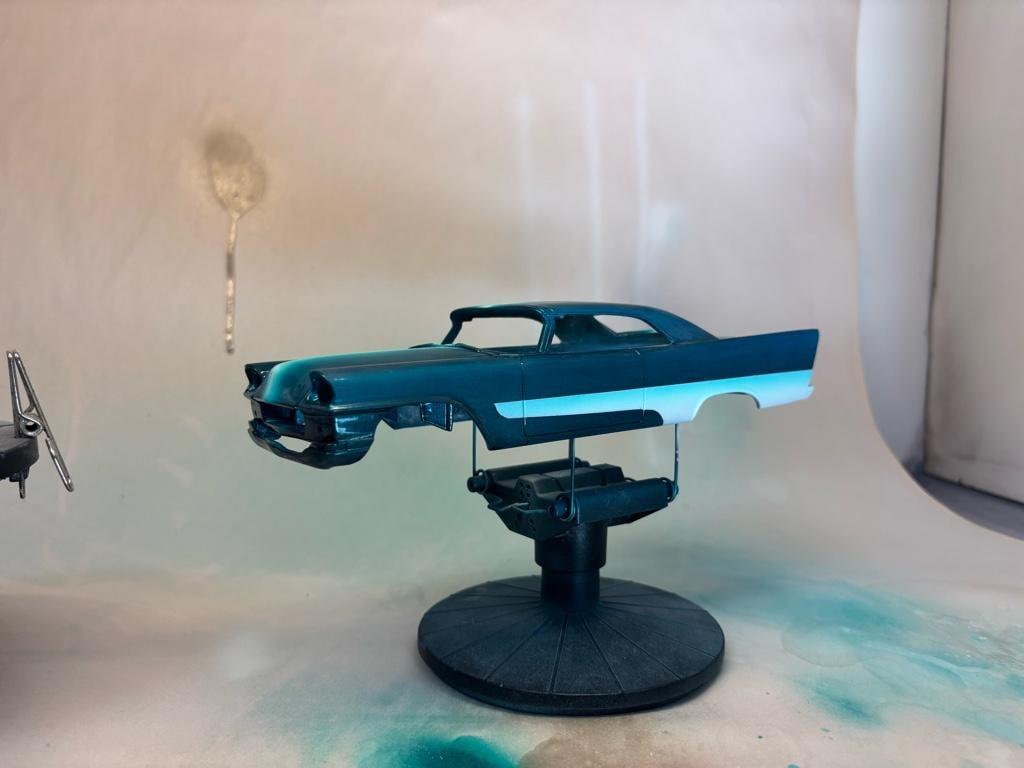
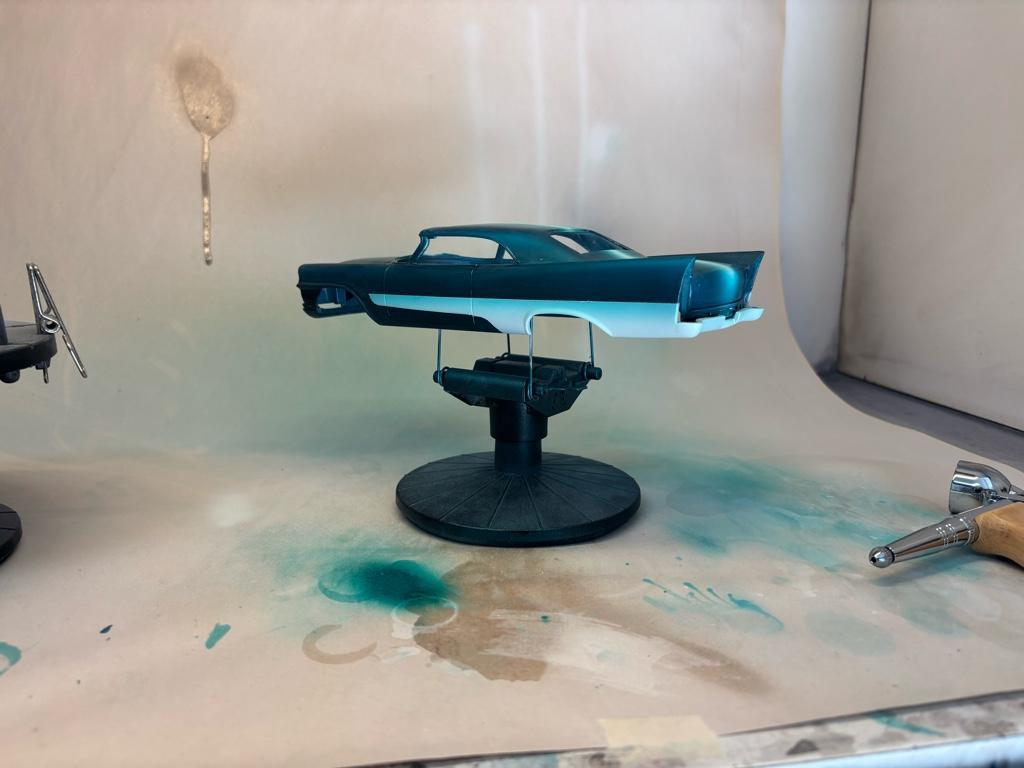
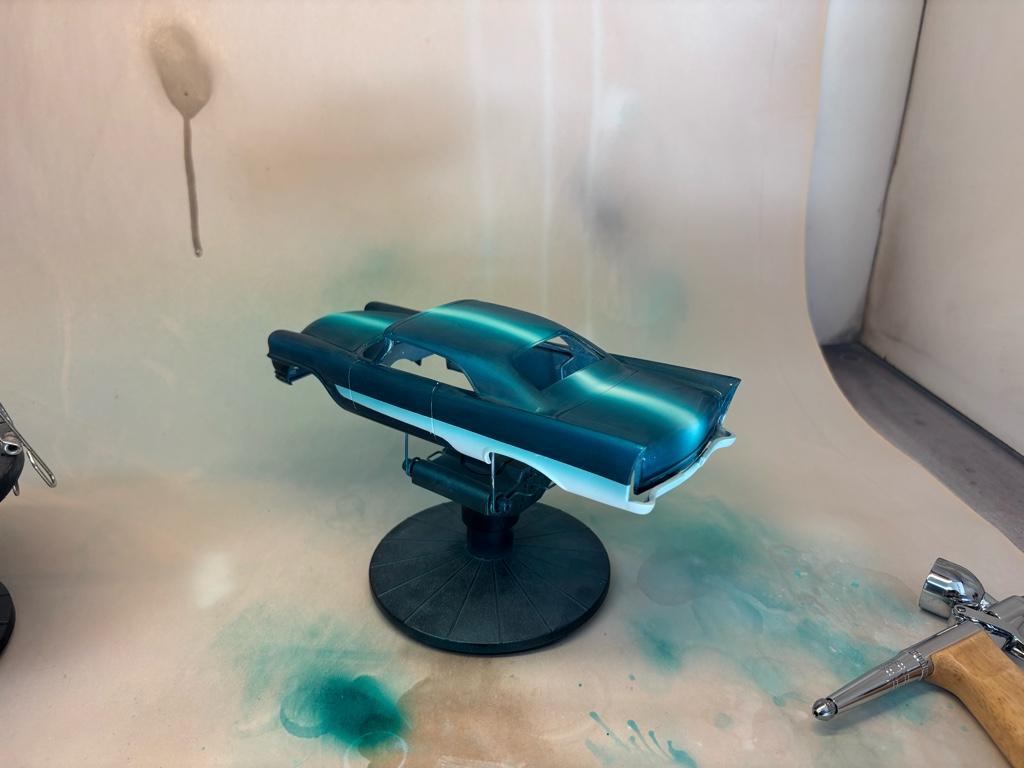
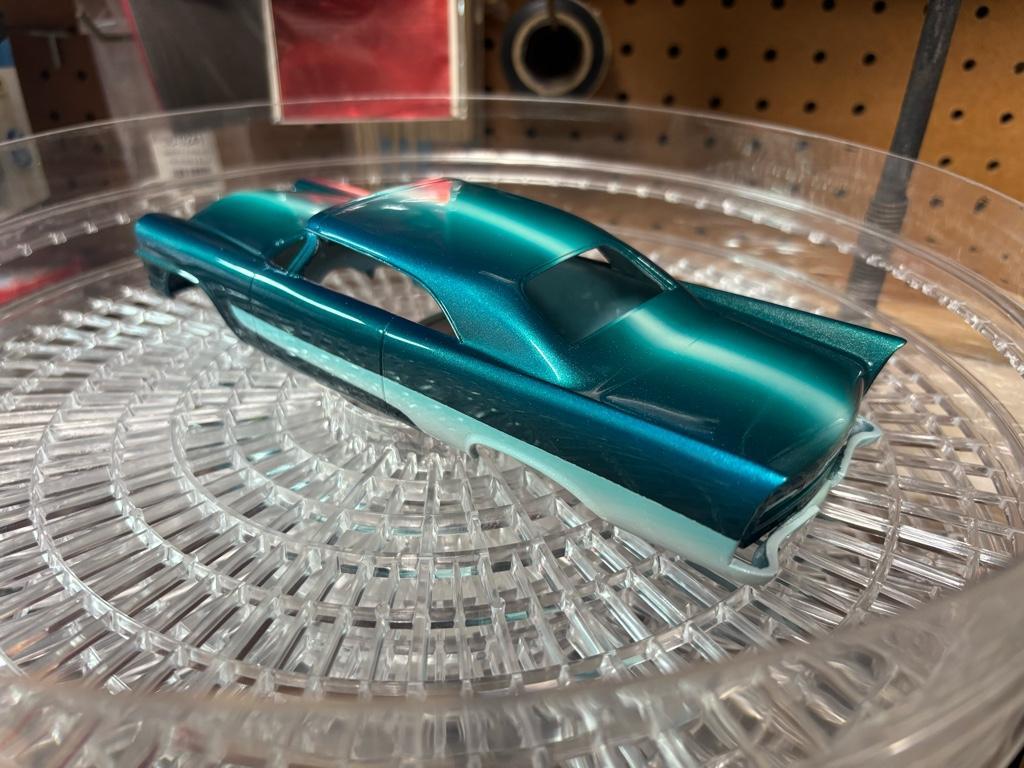
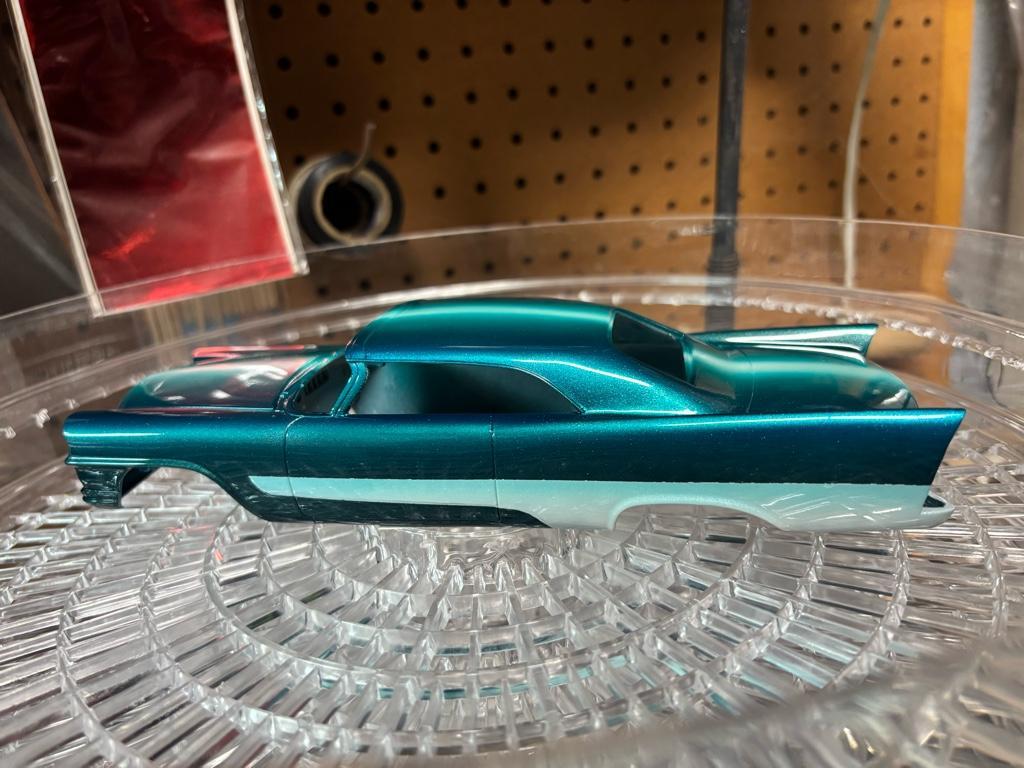
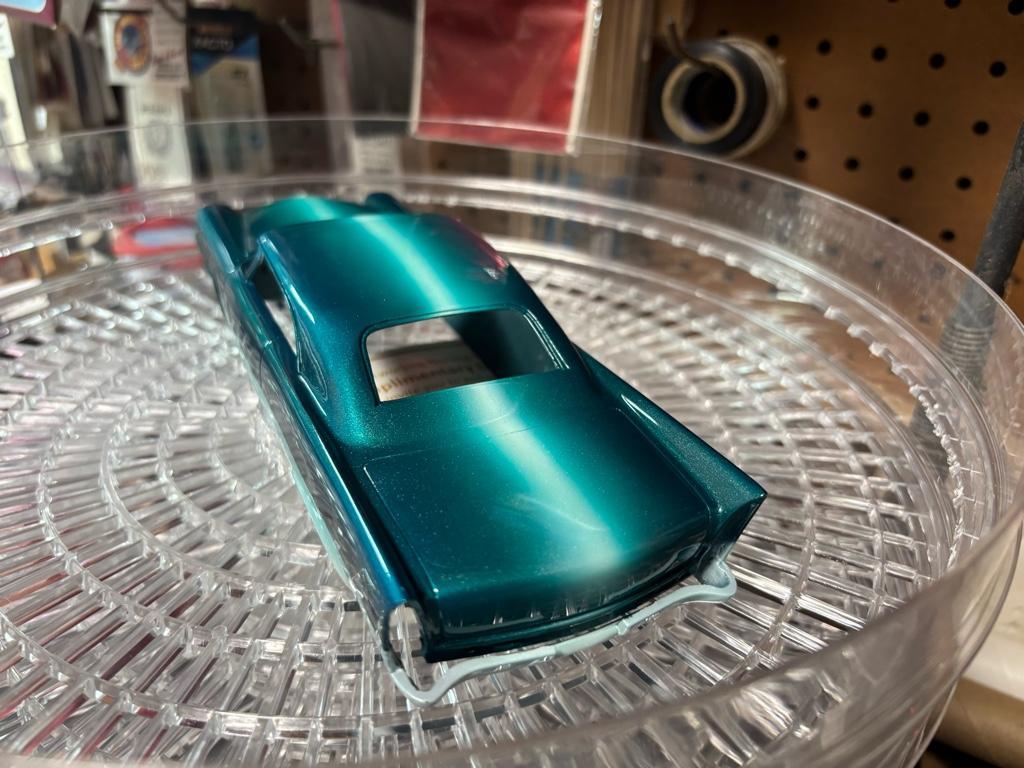
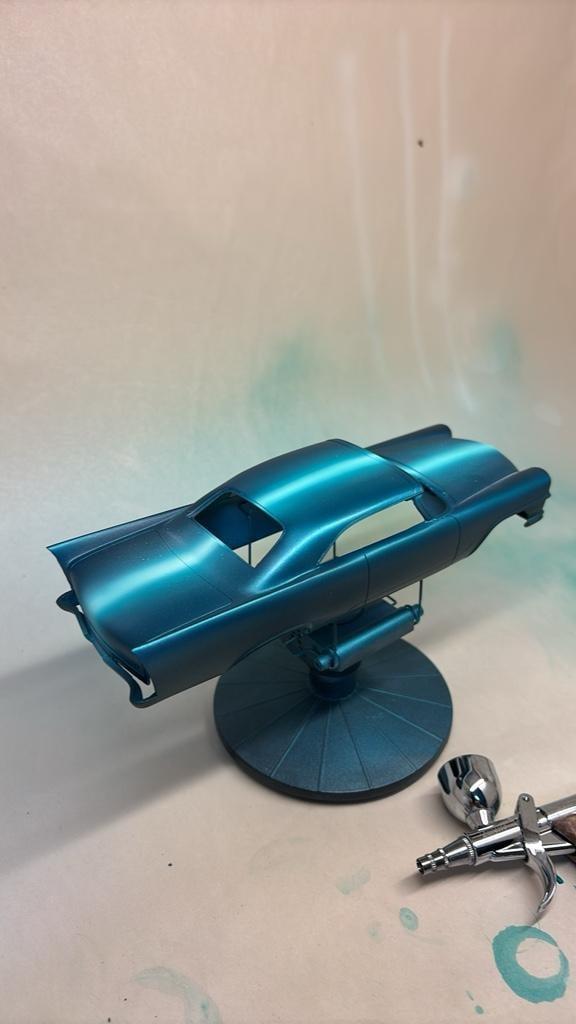
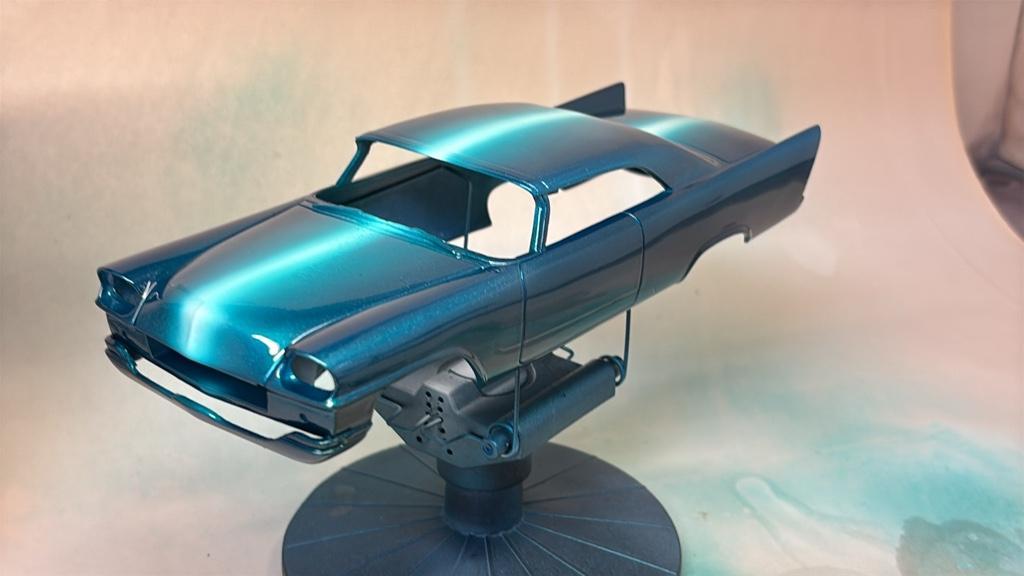
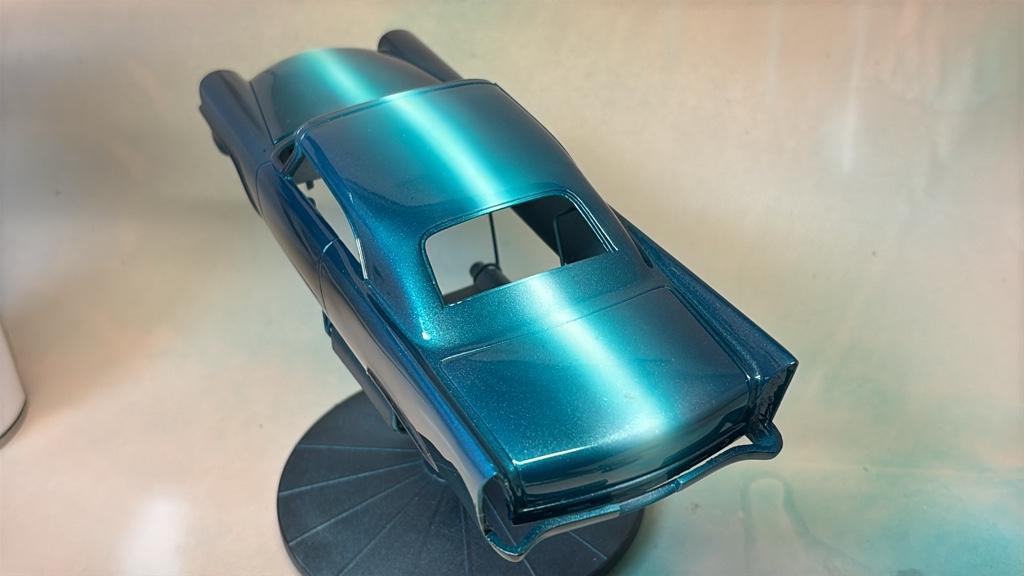
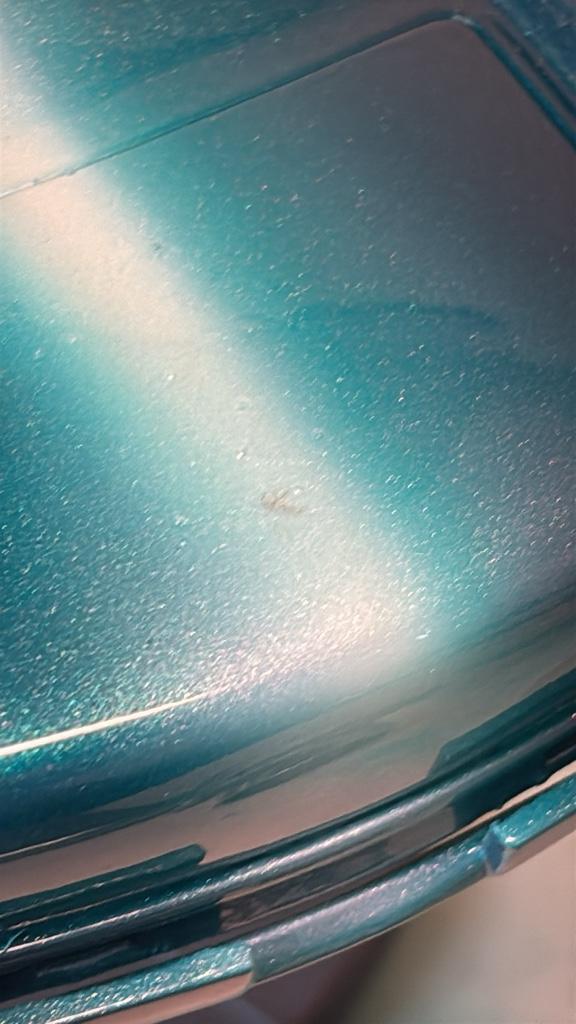
Aighty, this paint job was a sweet pain right in the petunias and gave me a whole new level of respect for Gene Winfield’s work!…. And of course, a bug had to land right square in the middle of the brightest part of the fade. He left the paint without his legs, and THEY will be sanded-out as well! But we got the fade done, cleared, and the next step will be masking off the inserts on the lower quarters wrapping around under the rear bumper, which I think at this point will be a straight light teal pearl, then the final clear, and we’re over the hurdle!!…. Now I can turn my attention to other things like the engine and interior. Enjoy!
- 129 replies
-
- 11
-

-
This one is going to be OH-so-tasty!!.... What color you going with?
-
CLIFF INMAN-INSPIRED KUSTOM.......
Jay Whittaker replied to Jay Whittaker's topic in WIP: Model Cars
Thanks so much for the kind words folks! -
THAT looks AWESOME!!