4knflyin
-
Posts
135 -
Joined
-
Last visited
Content Type
Profiles
Forums
Events
Gallery
Everything posted by 4knflyin
-
What did you use to create the collages. I'm sick of attaching single photos in series that take up as much space as they can! Thanks.
-
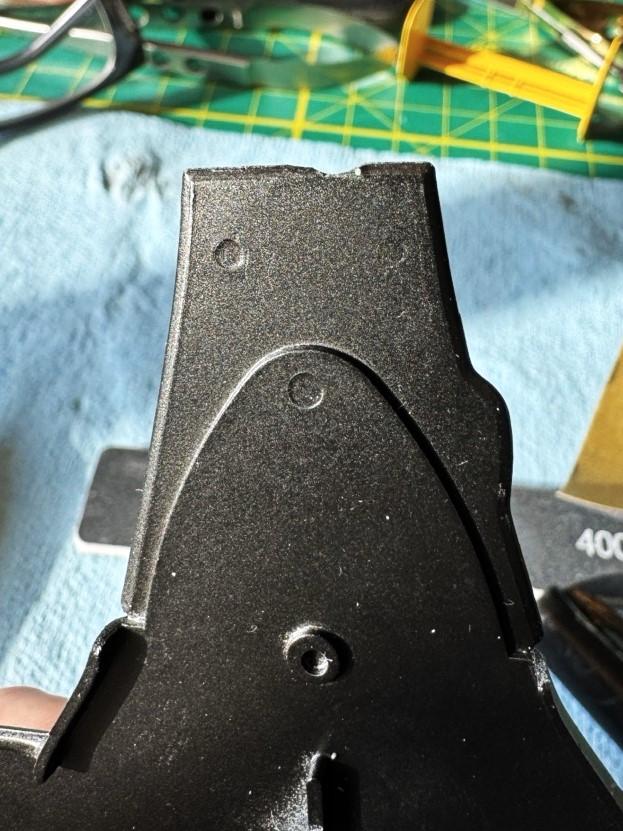
UV resin seemed so promising when I first started using it on projects around the house, less so in reality. I always kept in mind when using it for when I returned to modeling. Well, luckily, I've returned to modeling and I learned a fair amount about working within its limitations beforehand, which is what made this fix work. The main problem I've had with UVR is getting it to stick. What I found is that it likes a foundation of rough CA, rough anything really. The rough CA is accomplished by using baking soda as the CA accelerant. The soda gives it a sandpaper-like surface and makes it rock hard. The steps in this repair are: Basic cleaning Apply a thin layer of CA to only the broken edge and sprinkle it with baking soda. What you see in Pic 3 is the resin applied with the piece pressed firmly against the inside of a foil candy-wrapper (Cliff Bar in this case), just after it was irradiated to get the flat bottom. In Pic 4, you can see the excess UVR that crept between the plastic and foil, and also the bulge of UVR that was sanded into shape. The last pic is the finished product, already painted. My bad to skip photos of interim steps, but you get the idea. From start to finish in under a half hour. Important to know about this repair is that I did not have to handle the UVR gently. I sanded as usual, relying on its having a good bite on the CA+soda. Pic 1. The damage from decades ago. Pretty apparent I just tore the piece of the sprue and left part of it behind. Pic 2. After cleaning the edge, applied CA and sprinkled baking soda over it. Waiting only as long as it took me to find my can of air, I cleaned off the soda. Pic 3. Applied just enough UVR that I could sand it match its surroundings. It was kept pressed against the foil while lighted up with a small, low-power UV flashlight. Pic 4. The hardened UVR before sanding. Some crept under the piece between it and the foil, which leads me to believe it need filling in anyway. Pic 5. The finished product! Final Note: Remembering to apply a base of something rough, like CA+BS, makes UVR a whole lot more useful for a lot of fixes.

-
My first model in 45 years! Whaaa?
4knflyin replied to 4knflyin's topic in WIP: Other Racing: Road Racing, Land Speed Racers
I often read from my PC without my 'computer glasses' on. Works great for most words since I recognize them. In the case of your message, I read "Mr Flyin" as Mr Flynn. Oh well. For you, in the future I will not clear a space for whatever I'm taking a picture of. Then, "Where's Waldo" is ON! -
My first model in 45 years! Whaaa?
4knflyin replied to 4knflyin's topic in WIP: Other Racing: Road Racing, Land Speed Racers
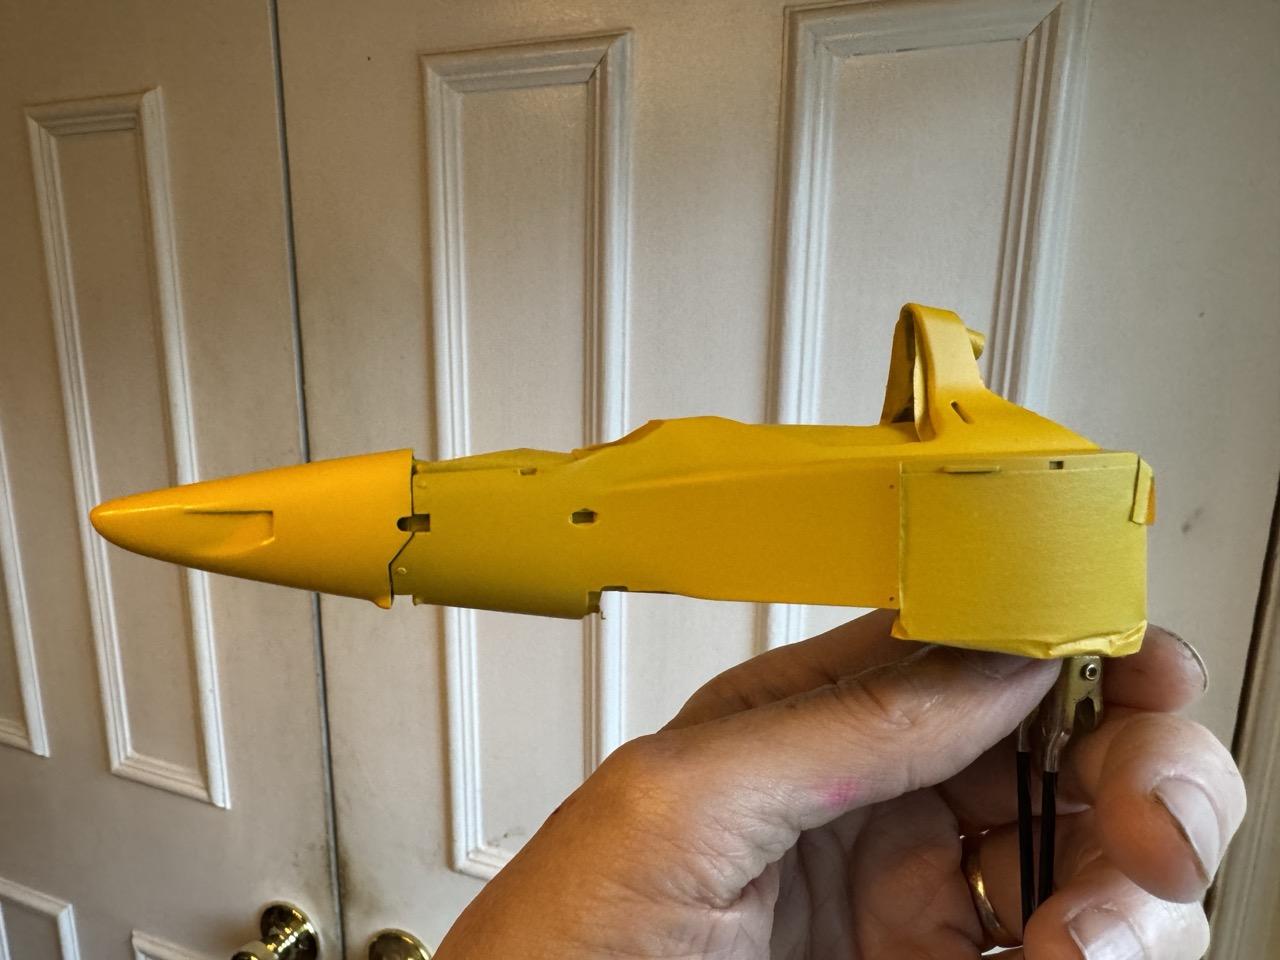
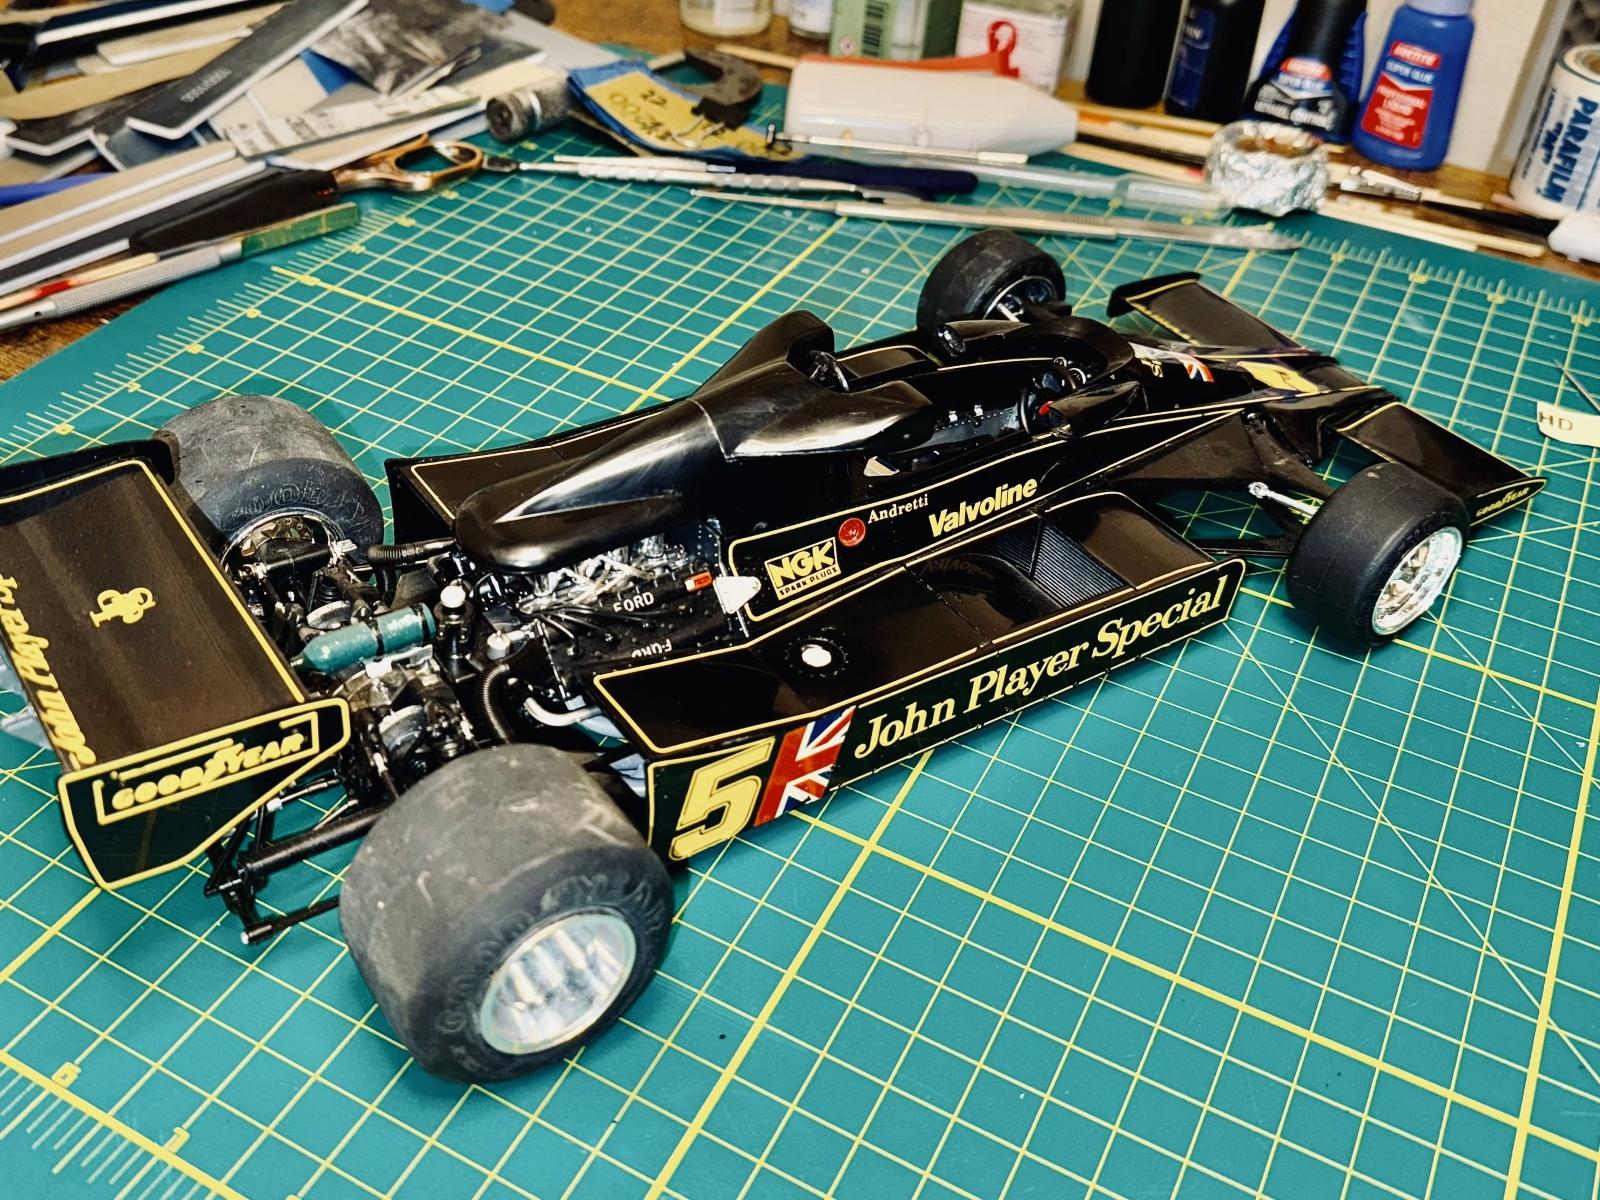
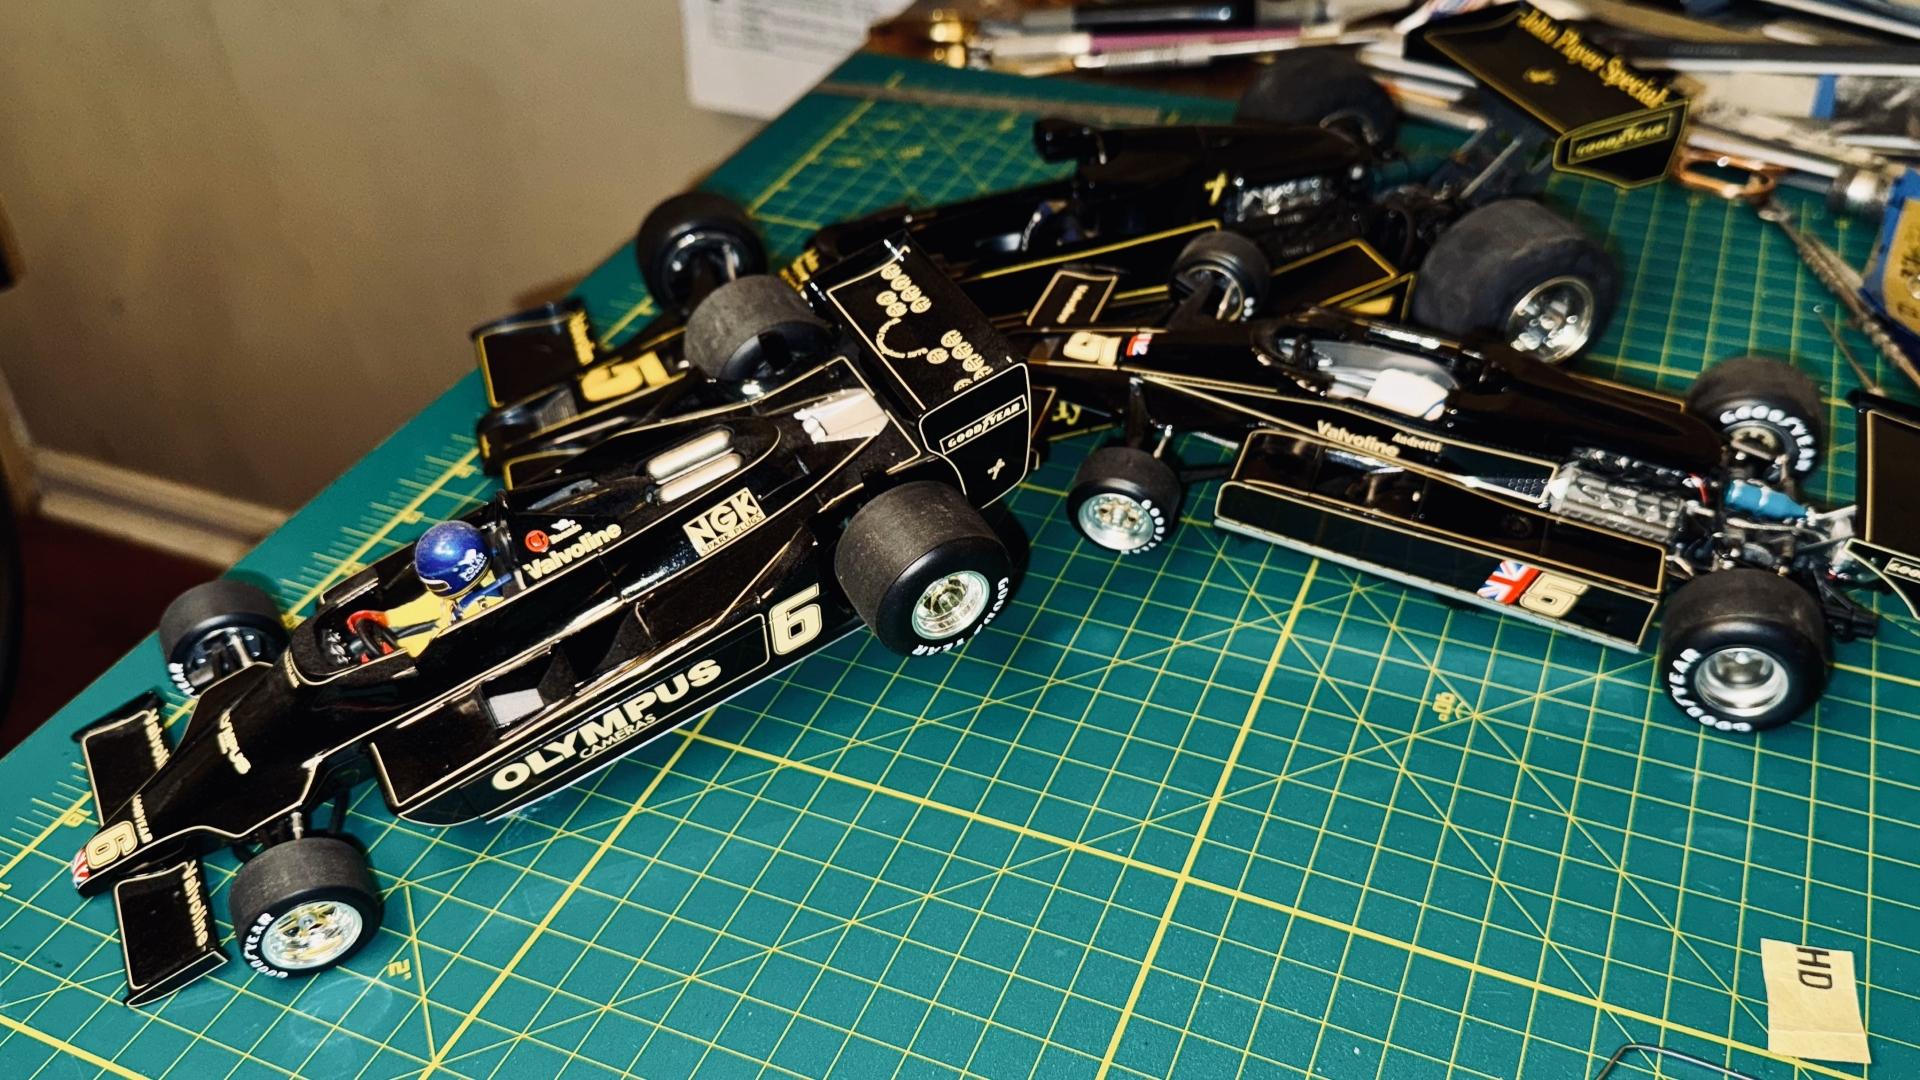
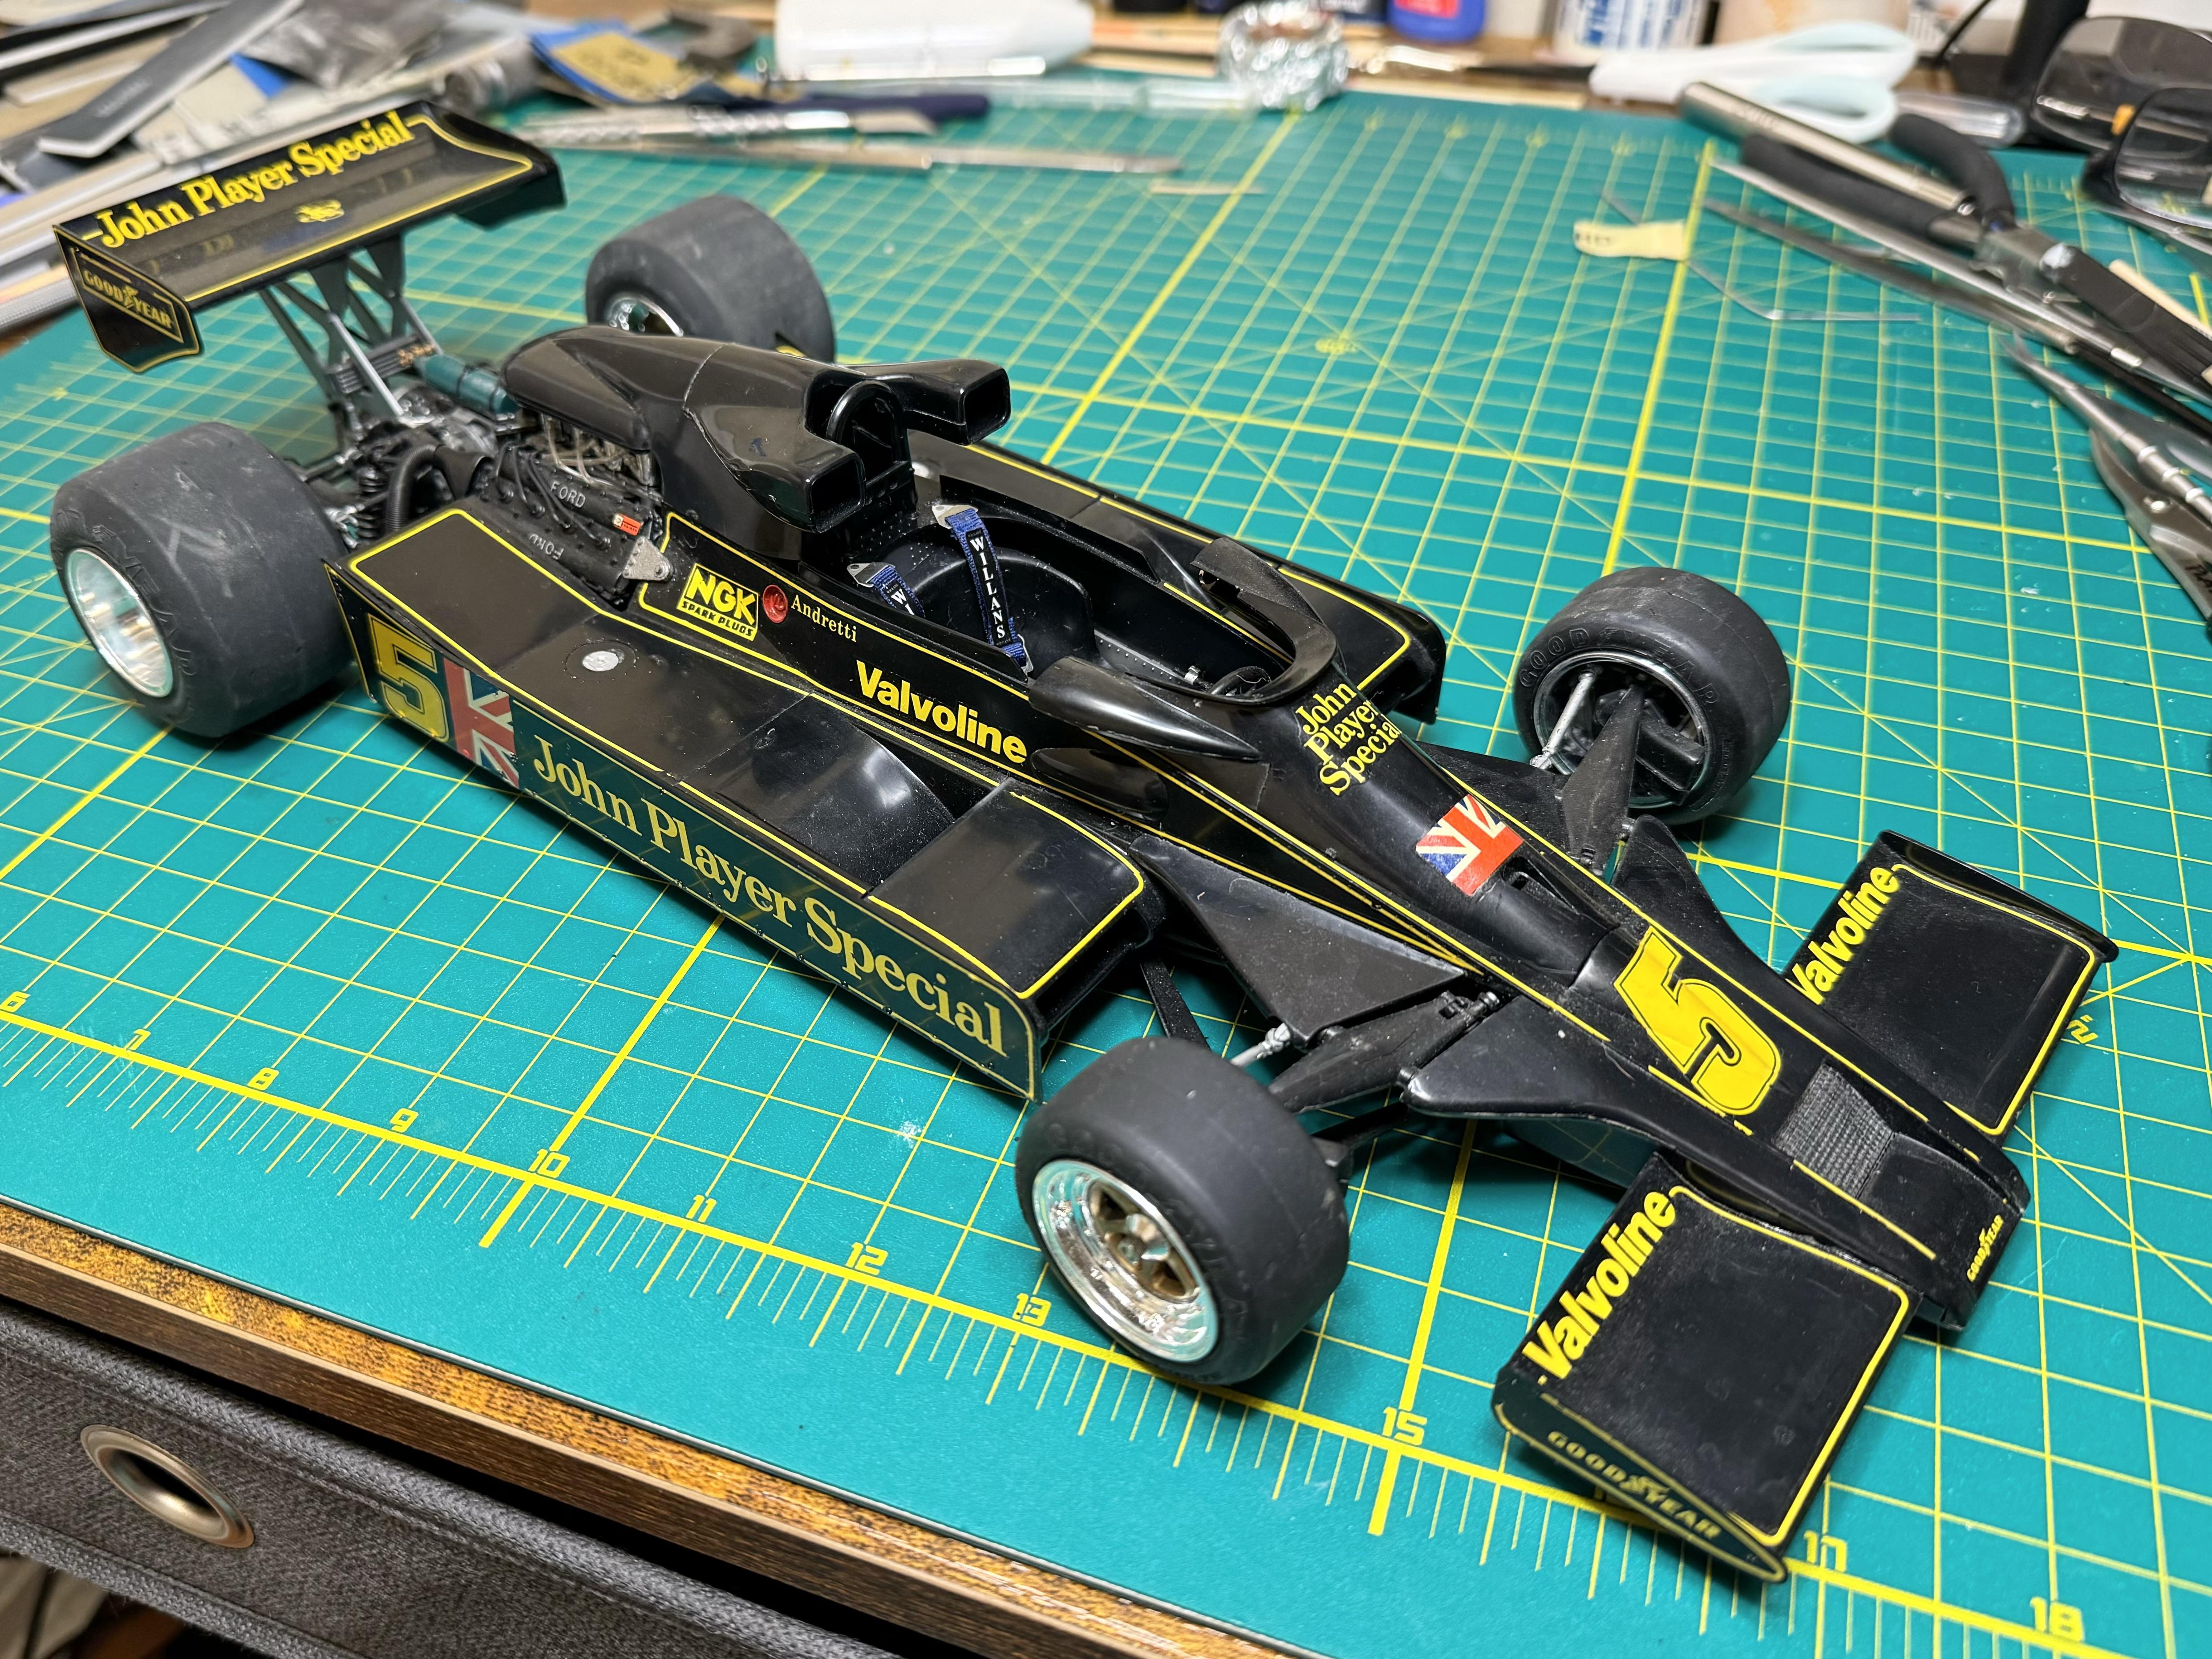
Back to our regularly scheduled program... When I shot the body with primer, first I was amazed by the atomization from the rattle can of Tamiya gray fine primer. I didn't have a spray booth yet, and didn't plan on getting one until I saw all that fine primer mist floating in the air. And, not surprisingly, as my first attempt doing this, it didn't come out well. I didn't expect to know what I was doing right from the start and get stellar results (I sorta was), but making a mistake this big was puzzling. Later on, like recently, I was using a $40 Chinese dual-action airbrush and the thing back flowed on me one afternoon upon my first test shot with my dwindling yellow paint. The loosely secured cap (because it wouldn't secure tightly) popped off and paint went up in the air was wasted making yellow polka dots on the bottom of my spray booth. l'd only had the airbrush for about 10 days and had cleaned it thoroughly the night before, disassembling it sitting at my table. I got rid of it the next day. This is what it looked like when I got back upstairs. regarding the dual-action Chinese knockoffs, there's something to say about the opportunities for 13-year old kids, like the one I was, who can now get a much superior airbrush for 1/3 and less what a bottom of the line one would have cost you back when I was dreaming about owning one. I suspect there's something I needed to know about the condition of that airbrush after I cleaned it. I must have missed something, bent the needle... something. Nonetheless, now having only played with the new H&S one, I can already tell you there's a vast difference between how the trigger works on it vs the knockoff. On the Chinese on, I could feel a prominent detent-felling hesitation every time I went to start the air on it. With the new one? Buttery smooth from top to all the way back and to the top again. WRT the blobs of paint. All I can think of is that I got my finger in the stream and it dripped from the tip. From that point on, there were successive sort-of-failures, to include one of my longish head hairs plastered to a sidepod. But in the end, after more than four trips to the spray booth (yep, 4+!), it came out nice and and even without obscuring any details. My Inexperience Showed in Many Ways: I was impressed with my work... couldn't stop admiring it. But remember, this is after more that four amateurish failures. But the real trouble wasn't apparent to me until days later, after I thought I had finished the yellow base coat. The nose caught my eye as being deeply and kind of flawlessly colored, and I didn't feel like that about any of the rest of the parts. It finally dawned on me — and I really don't know what took me so long — to mock up the parts and see how even it all looked. Not so even. Yellow is a notoriously difficult color to work with, and paint shops used to grouse about blending it with stern warnings to set expectations. So this is where the fun began and I started chasing an acceptable continuity throughout that drove me run out of that paint. As you can tell from the initial photo in this thread, a much better consistency was achieved. However, I couldn't live with it. And while all this is going on over a period of weeks, I had never fitted the cockpit to the monocoque. Why would I? Maybe because the gaping rectangular section in the bottom of the monocoque should be telling me that, whatever goes there, it better be yellow, Zero Paints B192 yellow. Hahaha... I better have learned the importance of doing mockups, dry fits, whatever. Fitting the parts early on and as often as there a significant change, is important. Later on with the addition of the green layer, not one piece of tape was laid across adjoining body parts... not even a single pair. That kills me! I did it all by eye. Please let me have leaned that lesson, if only that lesson.
-
My first model in 45 years! Whaaa?
4knflyin replied to 4knflyin's topic in WIP: Other Racing: Road Racing, Land Speed Racers
Sooo, this is a welcome addition. There are some things I'd like to try on the exhaust while I wait for the yellow paint to reshoot the whole thing. Also, I was on the Spot Model website today for I don't know what, and an item on my Wishlist came up: It's the MFH 1/20 Ford DFV detail up kit. So I may be airbrushing some white metal, which I've never done before (don't know why I say that, all that you see is all that I've airbrushed. And in the mail, I received a Top Studio Master Detail set for the 1/20 MP4/4. When I saw it in Detroit (with a pit pass I have hanging on my wall today), that was the last F1 race I've been to. What I don't know about that kit, and can't find any info on, is whether all the parts, resin, metal, and PE alike, need to be primered. I washed all the parts today since that's the sum total of the help on prepping the kit that I got from the TS FAQ. I'm guessing it outnumbers the parts total for the kit from Tamiya. It's intimidating, for sure. Anybody know if even the teeny, tiny, AN fittings need primer?
-
My first model in 45 years! Whaaa?
4knflyin replied to 4knflyin's topic in WIP: Other Racing: Road Racing, Land Speed Racers
Okay, back to the build at hand. But my ADD demands I digress just enough to say that I got my detail up master series for the MP4/4 winning car in the last F1 race I attended, '88 Detroit. That was back when F1 engines were revving to 20K and sounded like our planet's worth of angry bees. Odd to think that never again will that kind of spectacle be experienced. Getting started on the B192 was hard! I really didn't know what to do. I'd seen so many videos with various individuals applying their own stylized motions to the de-sprueing of the parts. One guy, a kit of 500 pieces, he must have gotten to 400 of them. So, of course, I took all the pieces off their hangers. When I was a kid, I think I used to pluck them as I need them. However, in this case, it was obvious I needed them free so that I could mount them for painting. And that I found can be very much a part of the creative process. I think my favorites were the pentalobe and other screws from my iPhone 5 that I deployed. Turns out I could have cut time by not using all but one of them, but it was fun. I've never seen anybody emphasize how they attach all those parts to the ends of bamboo meat skewers. When I couldn't clip them on directly, I found that I mostly used some double sided tape I had bought at Michaels no more than a month earlier in anticipation of this process. It would be interesting to here your most unusual method, successful or not! LOL. This is a before and after of just three parts. -
My first model in 45 years! Whaaa?
4knflyin replied to 4knflyin's topic in WIP: Other Racing: Road Racing, Land Speed Racers
Here you go. It's a shot after I installed the seatbelts, crooked steering wheel and all its various warts. It's amazing to see that the decals aren't all over the place (like the floor and just plain missing) and there aren't pieces falling off. Worn Out Mk. III: It's been around for some 40 years... tired. "The Camera Can Take Years off a Face": Good lighting and a filter or two, and voila! My very first experience with PE was the "Sabelt" in the next pic. For a multitude of reasons, it took over (I cringe to say it) five hours to complete. The Willans is in the model now. That one belt took about 30 minutes, and the set, plus installation, took under two for sure. Doing the Sabelt, I was Edward Scissorshands with the forcepts, tweezer, artery clamps, and more. The Willans was half or more done by hand.* I'm amazed by PE and especially the designers. I cleaned up that which came with my 1/12 Porsche 934 RSR aftermarket detail kit. It felt like it weighed a veritable ton. So I actually weighed it: 137 grams... almost 5 oz of the stuff. The kit has a lot of parts, the PE easily has twice as many. LOL. But something tells me I missed the craze that seems to have happened on either side of 2010. Even the 934 detail kit is from that era. I read about it over the years, and I understood the concept from my work, but I'd never touched it, done anything with it. Now I have about 1 kg of the stuff waiting for four models to be built after this one, LOL. (The PE available for the B192 was overpriced.) Putting together the Sabelt that I struggled with for hours, the stupid thing is, after all the times I've strapped myself into a seat with a six-point harness (but not since 2018) I let the directions throw me off instead of relying on my experience. Also, In the process I used about 1/3 the available red fabric on just that one belt. I had to learn to economize. That's somewhat of a theme here. Running out of paint is a drag. The seatbelts are from Reji, which I think is affiliated with Eduard. They do some really cool stuff! Some of those 3D airplane cockpits, amazing... First Time Using PE: This'll Blow Your Mind: If you've been around for a while, consider that the Sabelt version took me over five hours to complete! The Willans afterward, about 30 minutes. You gotta admire how cleverly they all, at one time or another, have to make it look like they included a load of detail they just couldn't afford to, whether for cost or because of manufacturing limitations. And, yes, I lazily used the 6-point "rally" configuration on the left in the diagram below because that's what I'm familiar with. It's the way all modern race harnesses are set up, even F1. But way back in 1976, the two crotch points above the seat were just wrapped around each waist belt. The were free to slide laterally. Among the things I learned: Not reading the directions and looking carefully at the photos before blasting off with the airbrush in hand would have saved me all sorts of grief. For one, there's between five and ten milliliters of paint I'd have had to do all the paint repairs that are holding me up now for lack of paint. I really shouldn't paint what isn't supposed to be that color! When you have your own life's experience with something, you don't need to rely on somebody else's instructions (this is not in conflict with above bullet... really) and struggle to see how something is configured when there's also a million photos of the part in real. That was hours of toil early, early in the morning. Grrrr. A good traffic accident to close it out. * Which brings me to something else, one I don't intend to point out again unless it explains something necessary. I didn't really notice it until building the seatbelts, that when I have to use my hands with fine motor movements, they shake. They even spaz sometimes, as in just fly off. Completely unnoticeable otherwise, even while typing and such. But when really getting down to some fine detail work, it can be a mess. I wasn't expecting this and it took many weeks to comes to some acceptance of it, especially since it's not constant. It has made what little I've done on this model three, maybe as much as five times more difficult in some situations. The Sabelt belt was my first and an extremely frustrating experience with it.
-
My first model in 45 years! Whaaa?
4knflyin replied to 4knflyin's topic in WIP: Other Racing: Road Racing, Land Speed Racers
OK, I'm going to keep a record of that statement. Ha! I need to learn what the quirks/features of the editor are. I'm sure you can do some groovy things once you learn how. One thing I've noticed, though, is that when providing a caption for a pic, it appears above the attachment. Unless, that just may be the way the guy I was reading chooses to do it — as if bringing a sense of editing conventions to the web anymore is actually pretty arrogant. I'll refrain. So, onward... -
My first model in 45 years! Whaaa?
4knflyin replied to 4knflyin's topic in WIP: Other Racing: Road Racing, Land Speed Racers
I'd been looking for an online forum to post, basically, a blog of the build. At each stage or interesting (frustrating) development, I tried to remember to take pics. My question is: Is that done here? Best to nip this in the bud if I should go elsewhere. -
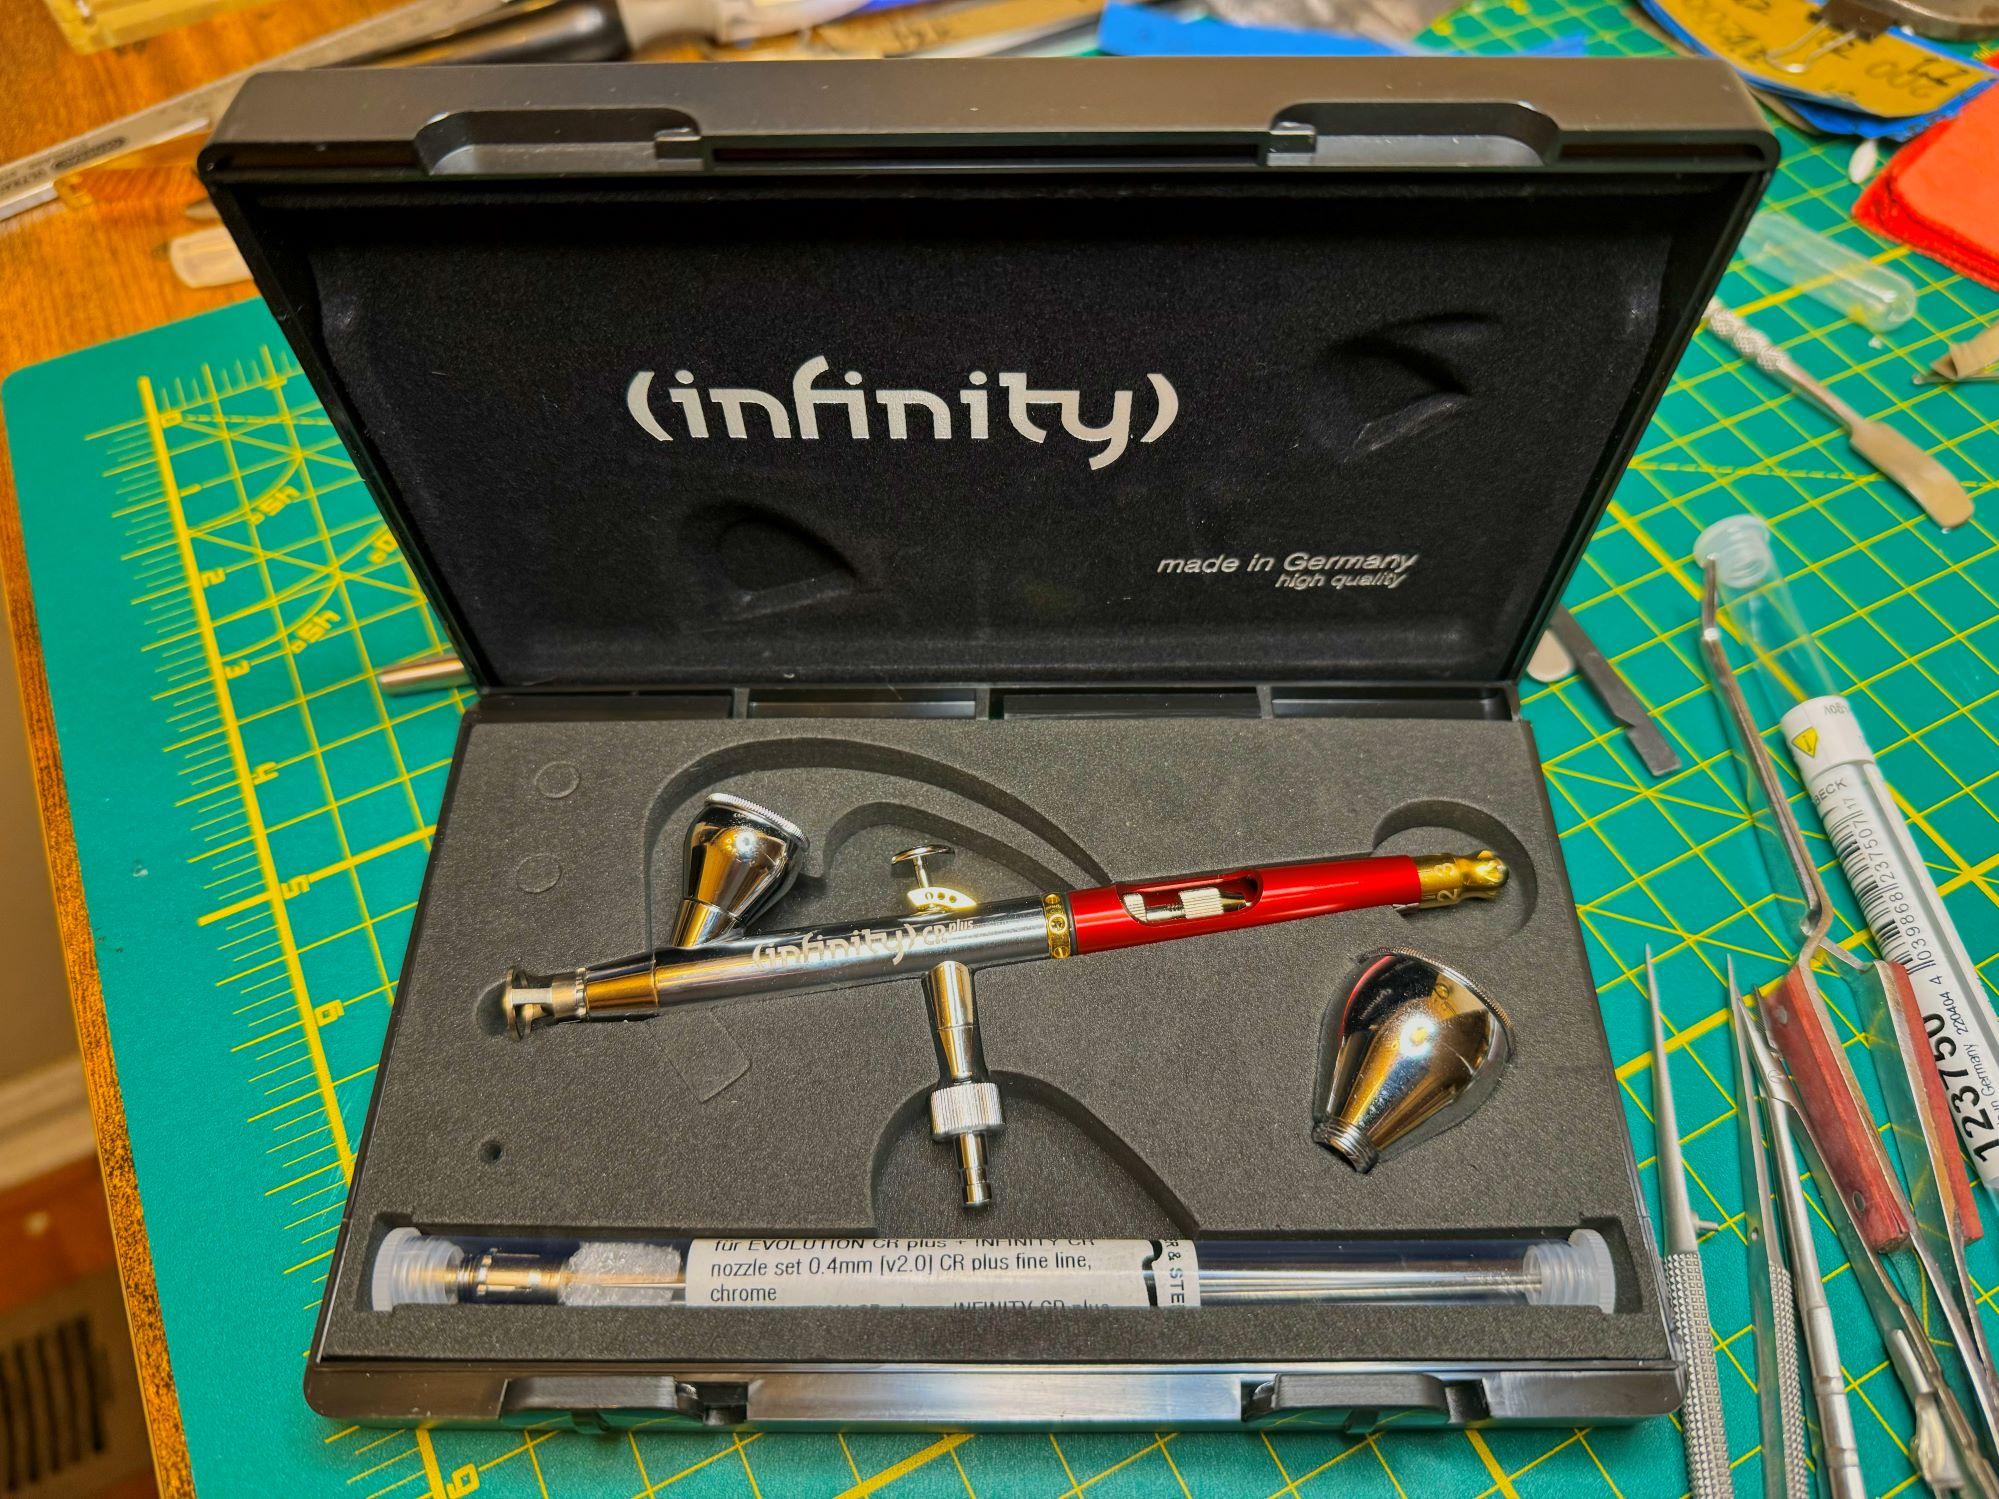
My last kit was actually in 1994 when I built a micro model (1/72 ?) of a Cessna 152 (or 172, can't remember). That was to commemorate getting my primary ticket some years earlier, with the tail number from the plane I used for my check ride. Before that, in 1980, I built a Tamiya Lotus 78 Mk III, hastily put together as a gift for my father. And a year before that I built an Entex 1/8 scale McLaren M23. And in neither of those was there even a hint of not including the tobacco sponsor's logo decals with the kit. For both kits, I hand painted all the detail stuff, but used the decals on unaltered bodies. How I wish I had that M23 kit now. And how I wish I'd had access to an airbrush. Back when I bought the Cessna kit, I also bought a 1/24 Porsche 959 and a 1/20 Benetton B192. Along with the various paints needed, and some tools, I bought a Paasche H. Well, I started building the B192 a couple of weeks ago and I'm spray painting it! I've wanted to know how to do that back when I regularly built models, mostly military aircraft, up to the ripe old age of 13. Then nary a model until the large, very large scale M23. That was 7 years later and I built it in a week.* And it was nice! And the Lotus, I still have that one, as it was preserved by my parents. LOL. Man could it have used a nice coat of gloss black and clear. Bare black plastic just doesn't cut it, even if it do have them purdy JPS decals. So here I am into my third week with the B192 that I'm using as a learning mule. I have 1/12 Jägermeister 934 and Williams FW14B, with all the PE goodies, on the deck. To get a feel for PE detail pieces, nothing I'd ever heard of or seen, I installed a 6-point harness on the Lotus. I never lost interest in building models. I thought often throughout life the past 30-40 years about building one right, which to me means fixing sprue issues, puttying in mold dimples, back scribing panels, etc., etc., and, last and absolutely most important, airbrushing! Never used one of those things until earlier this month. Too bad I'm having a hard time reminding myself that the B192 was meant to be a learning device because it would be finished by now with many lessons learned. Instead, I'm waiting on some replacement paint so I can try correcting the damage I've done with the airbrush. Some of it from simply not noticing some things, and others from ignoring what I saw until seeing the ugliness that not attending to them had wrought. So, in the meantime, I'm going to post some pictures and narrative to cover what's transpired with my humble B192. I'm hoping for some pointers where my solution was the hard way and/or the wrong way. A nice word when you think you've found something that deserves one would be appreciated, as well. First, this is where I'm at on the Benetton while I wait for the paint (about 10 days out). When I first opened the box I discovered that, back when I bought the kit, I had painted and built out rear-of-the-bulkhead and the cockpit. So this really is a painting project — an airbrush education project. * I bought the M23 to exorcise demons of my adolescence. It was literally the thought of those demons that drove me to use what little money I had those days on this very big box of plastic pieces. Those demons that had prevented me from building three 1/12 scale F1 models when I was 13/14 years old. The F1 models of my youth just sat there, in my bedroom, terrorizing me. I thought there was no way I would finish one if I started it and, if I did, I would screw it up so badly it would haunt me nonetheless. And while completion of the M23 to plaudits from all who saw it helped, it wasn't a 100% cure. As I've learned, those demons are still pestering. So now I'm going to fight them off with a gun... a paint gun... an airbrush, LOL.