4knflyin
-
Posts
135 -
Joined
-
Last visited
Content Type
Profiles
Forums
Events
Gallery
Everything posted by 4knflyin
-
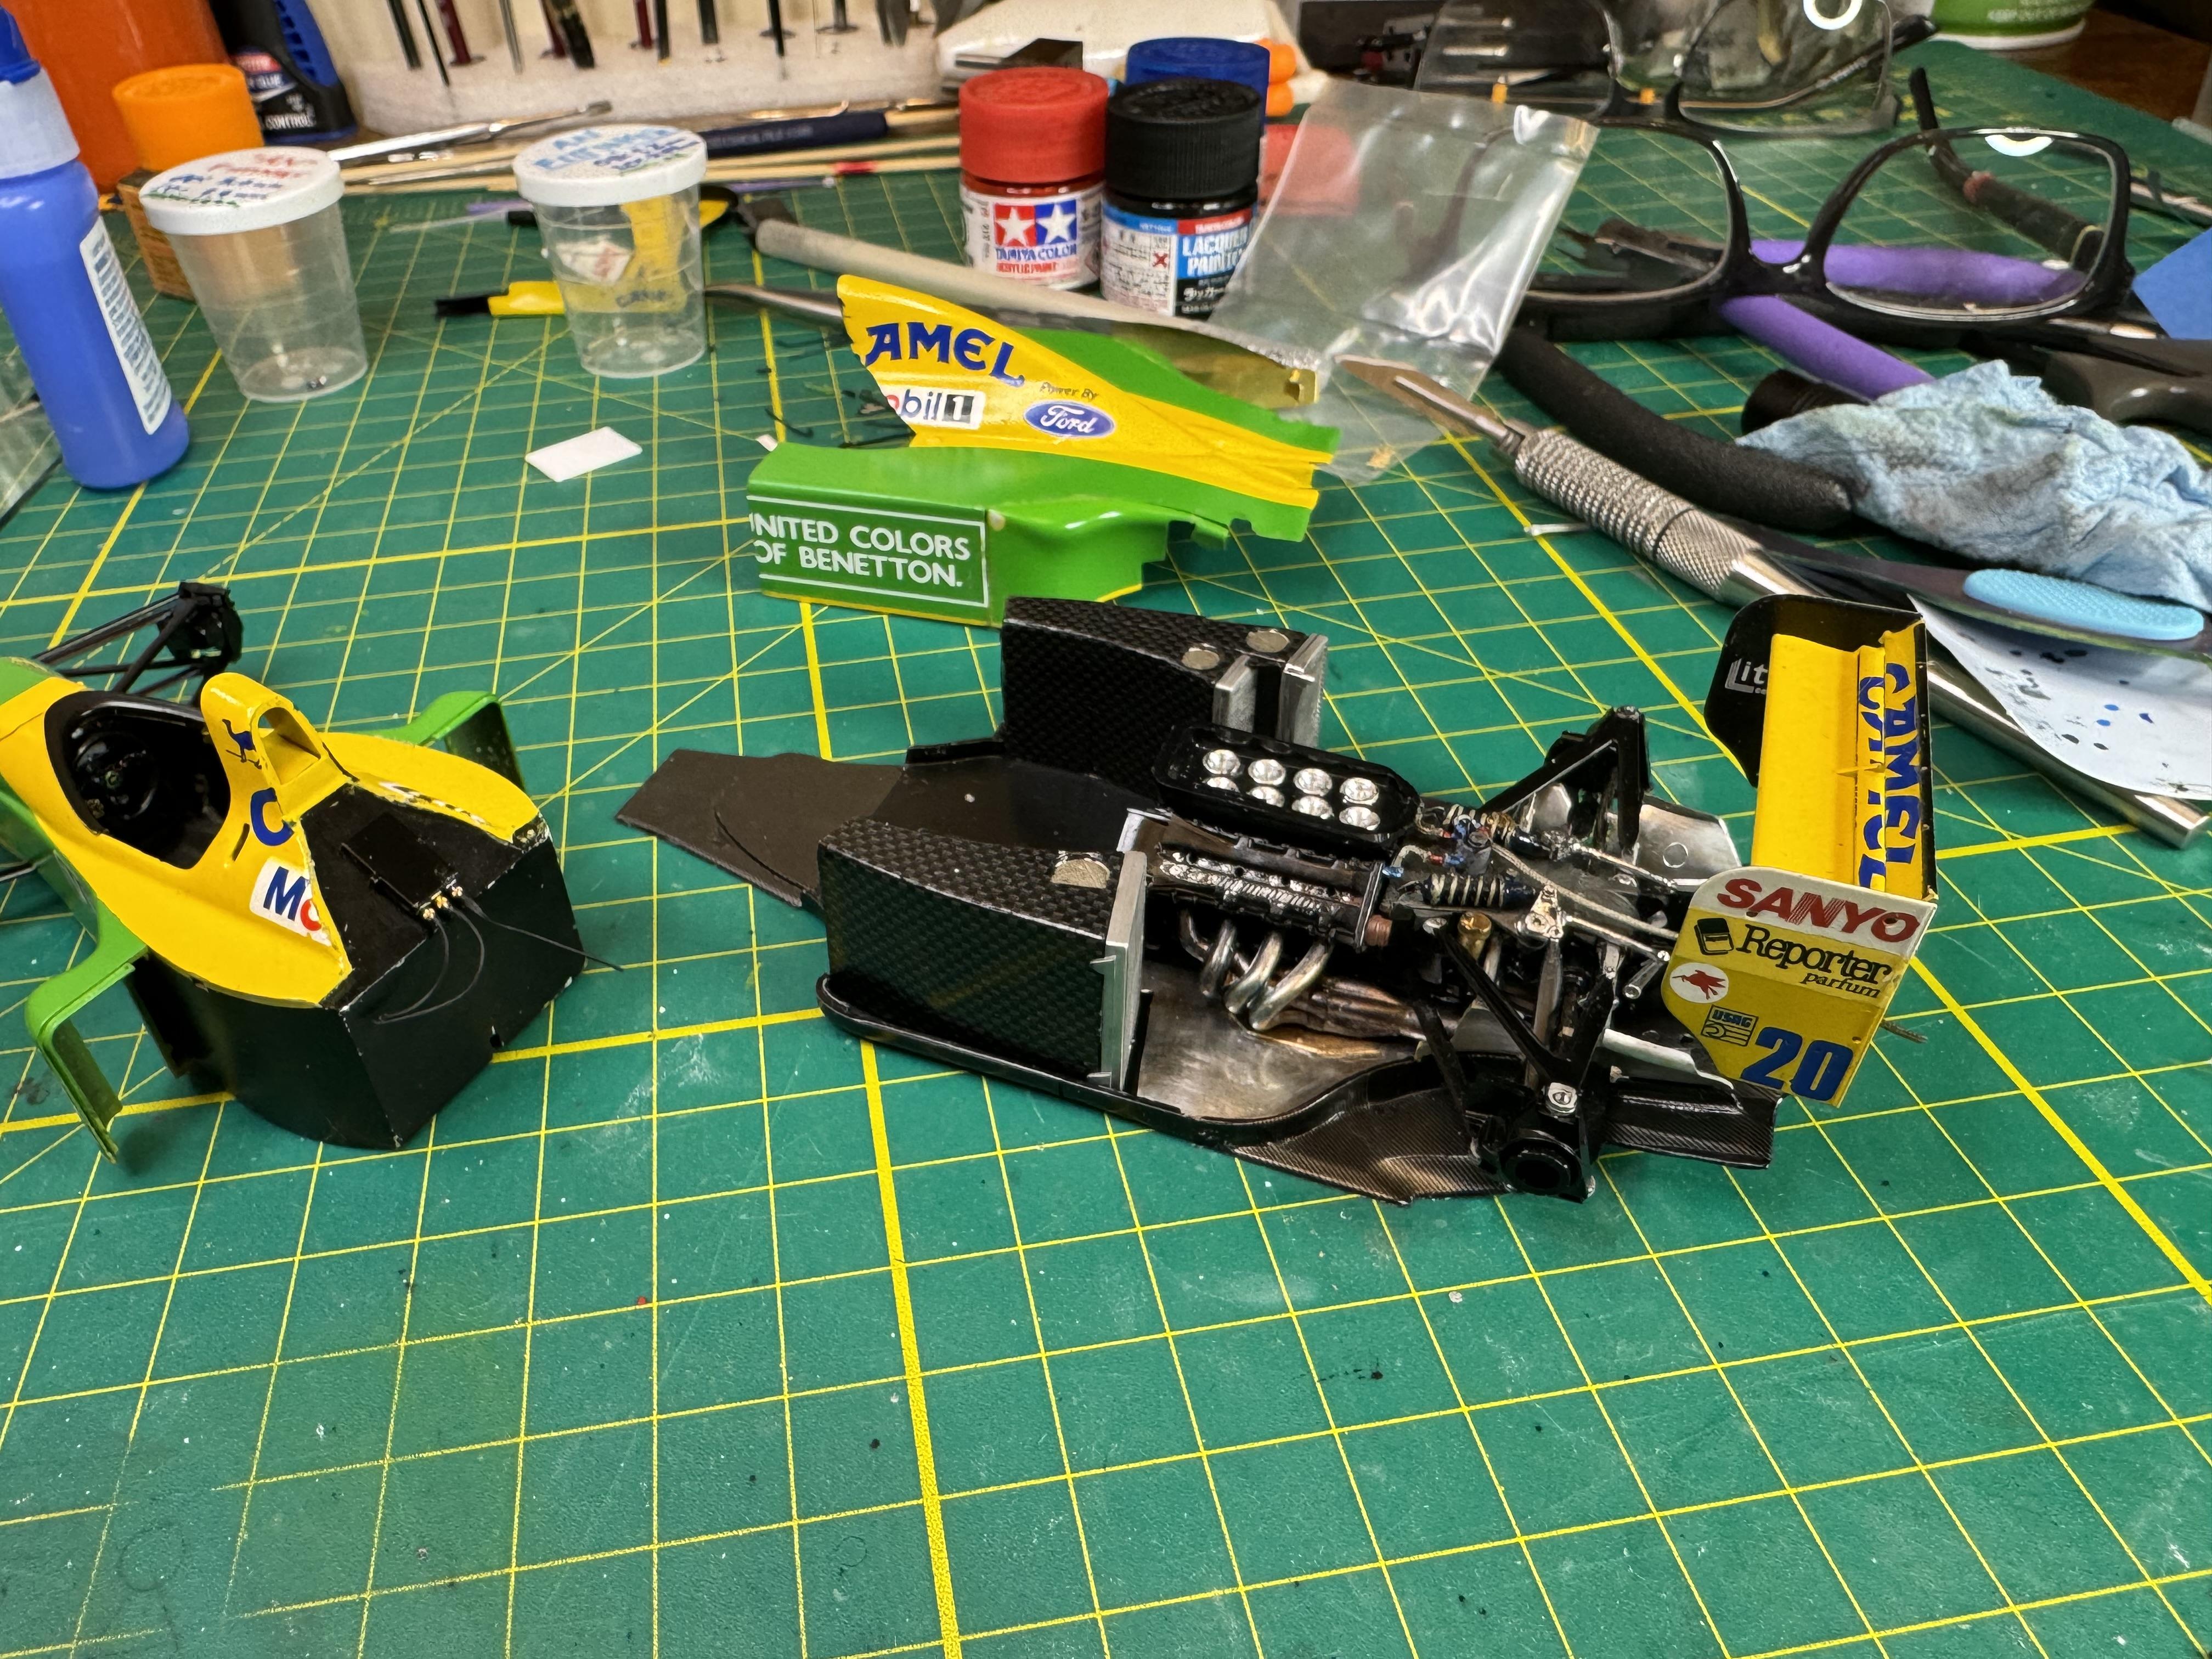
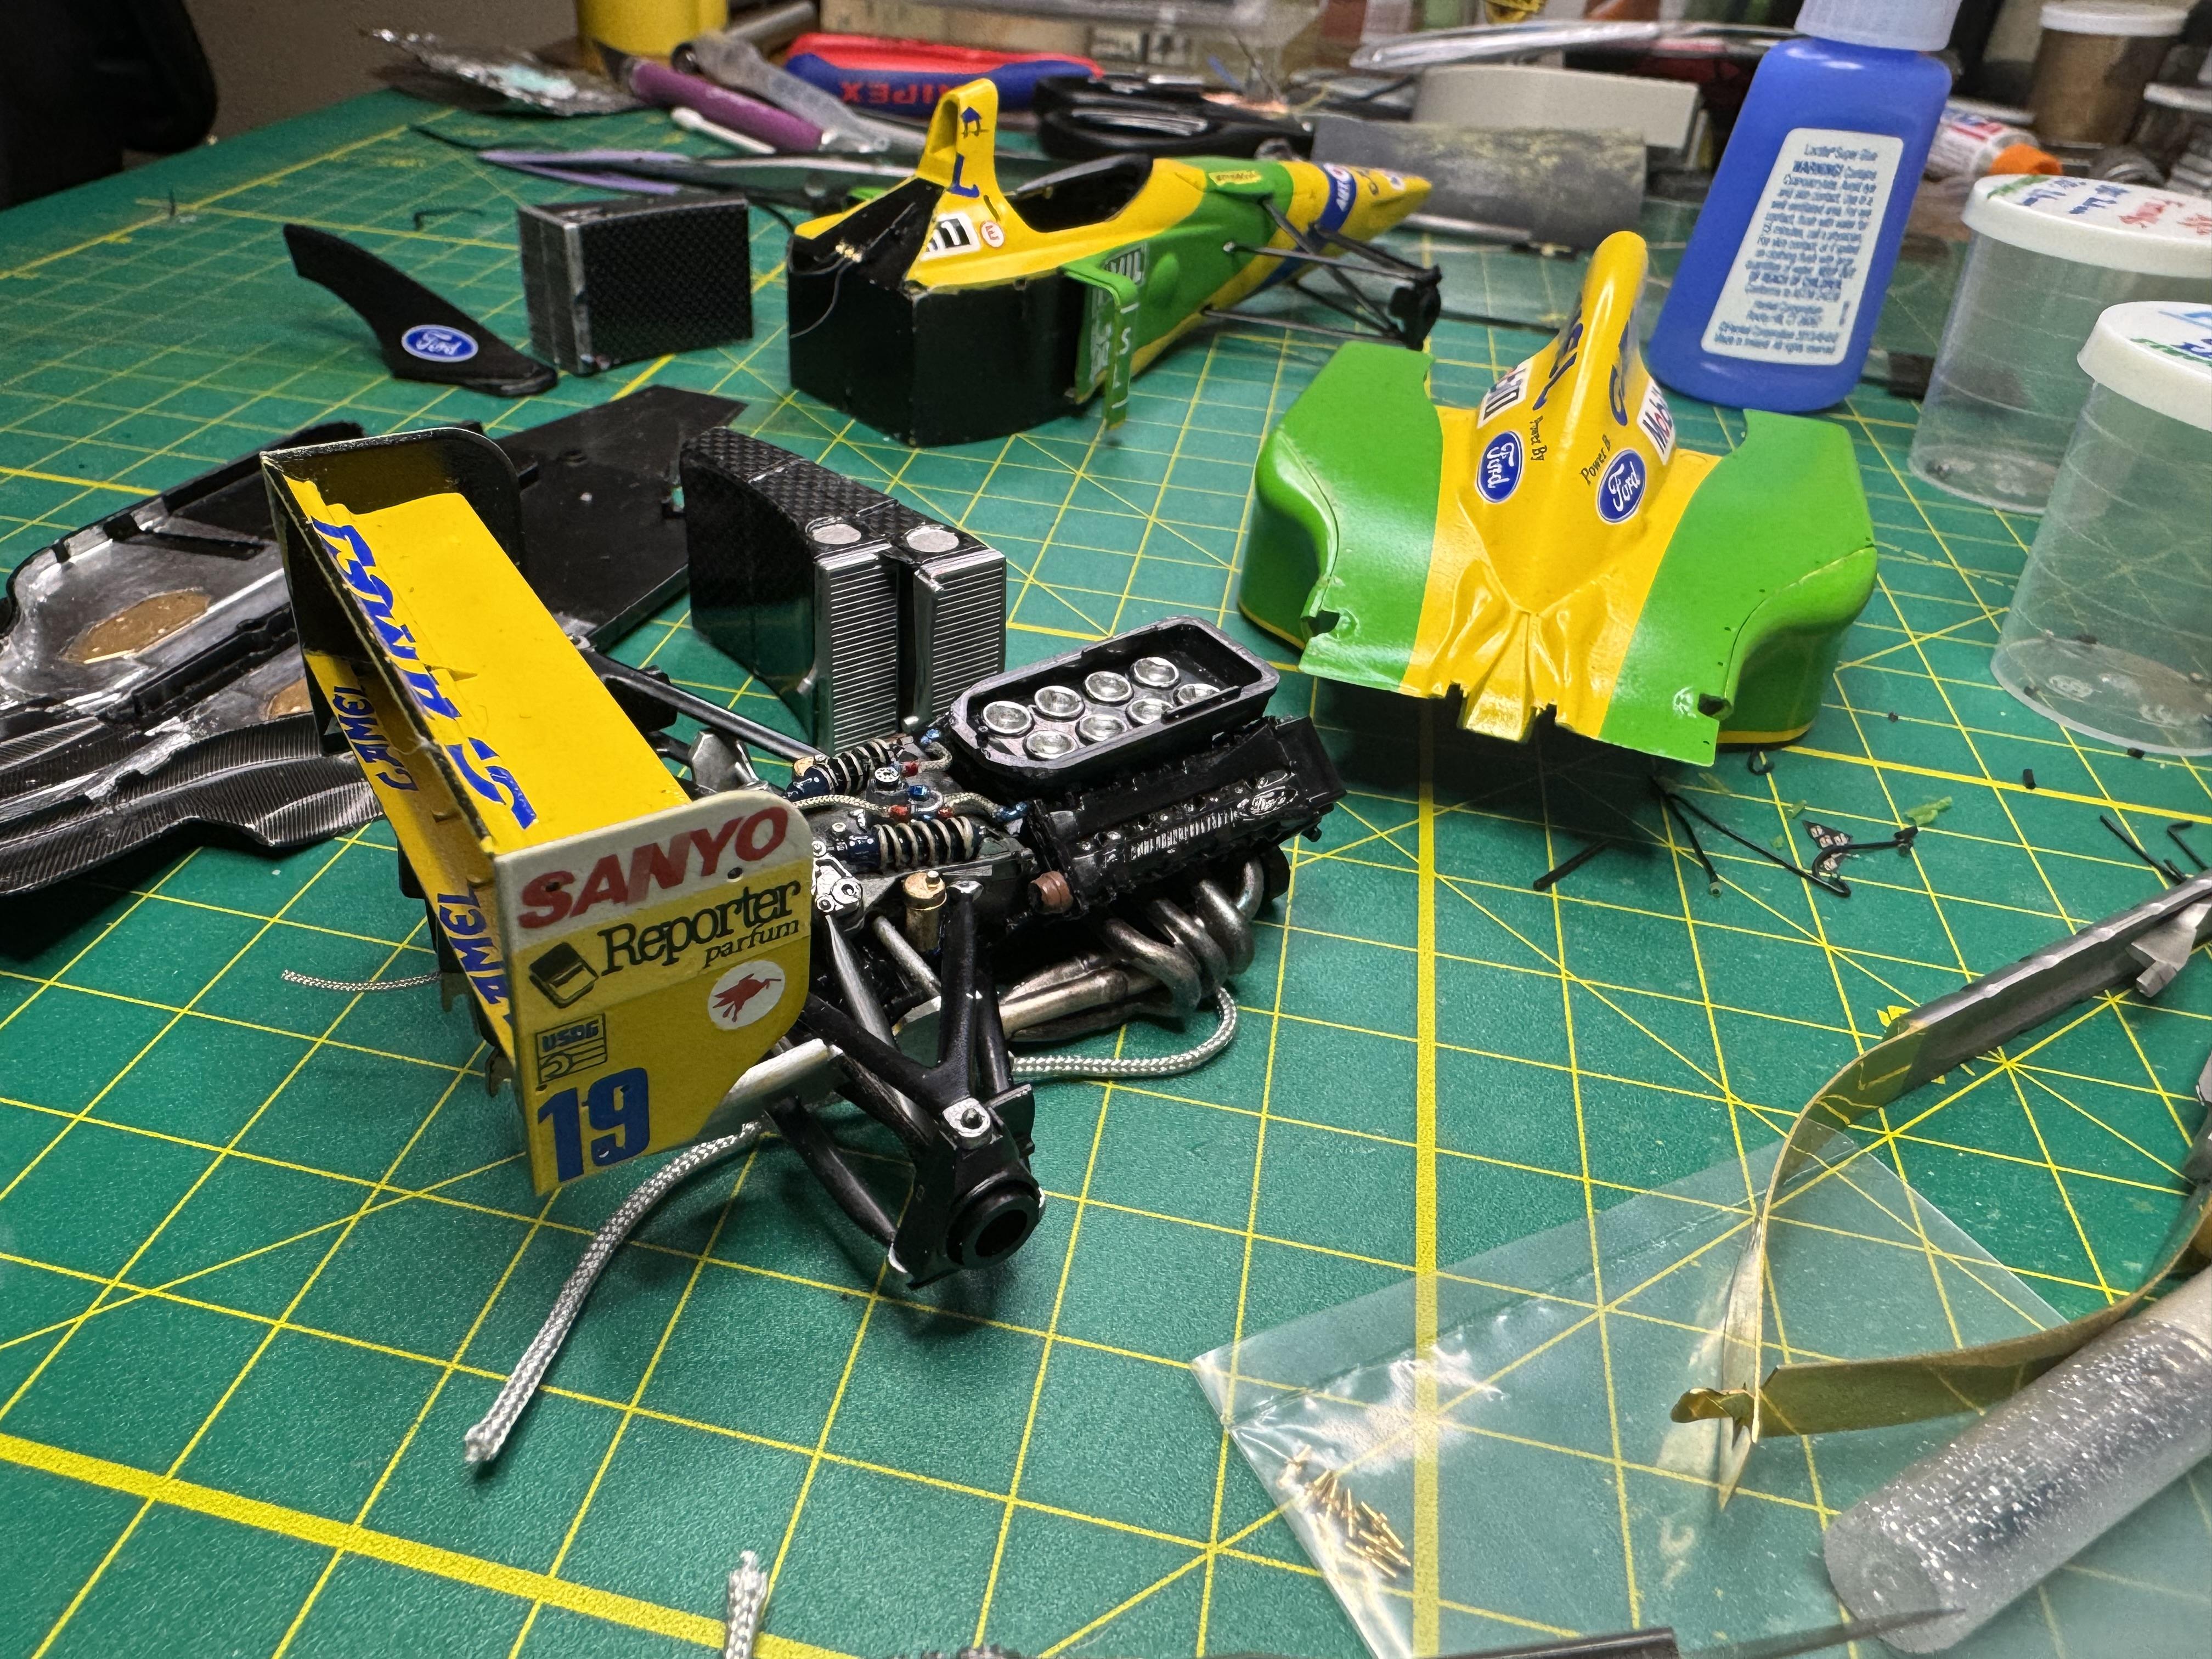
Well, this was supposed to have been posted this morning, but I think I forgot and wiped it out when I replied to Chris. My first thought was to just do the mesh intake screens. When I was looking at the Lotus, I turned it upside down and a few parts I didn't glue into place fell in my lap. One of the so called screens also fell into my lap, and that's what got the ball rolling. When I pulled the trumpets off, what was there looked okay. But I decided to wiggle one of the rails to see if I should go further. Then I got out a tool to crow bar them off... I was going further. But, honestly, the electrical end of things looked as good as the MFH, as far as I could tell, and it was stuck pretty good, so I decided to leave it. Maybe 15 minutes later I was wedging it off. Why? That part has caused me the most grief of all. From the chipping paint to the over-filed end plate, I'd say it's cost me three hours. But I ended up here: And this is the graveyard. When I saw those crimped fuel lines, I was immediately taken back all those years and remembered my disgust with the material they used as I installed them. Note the black sausages they passed off onto us as funnel screens.

-
Thanks. I'm beginning to thing I should cancel my preorder for the MFH F2003. Seriously. That's only the second time I've heard about a "magnetic tumbler." The first time was yesterday in an old magazine article on line about a Wolf W3 build. LOL. You're using the plain old "Light Gray" stuff, or their designated "metal primer?" I'm guessing you still actually do need to use extra care to keep paint from chipping off corners, etc., no? Also, do you want to give me a link to one of your builds where you may have gone into extra detail about dealing with prepping white metal parts, as in filing, sanding?, use of putty, and whatnot? Or maybe another thread that really talks to the uninitiated.
-
I first saw these parts a while ago, but they were never in stock. At first I was only interested in the mesh for the trumpets of the Ford DFV to replace the solid, horrible things that came with the kit. Sometime later, I noticed the ignition/funnels detail kit and bought them both a couple months ago. I needed a break from my headache Benetton B192 kit, so it occurred to me to just pop these in after I had reason to look at how I did something on the Lotus. Not many parts... a simple and easy quick win to pause the frustration. I've read/seen a few forum blogs about MFH kit builds, all the various pluses and minuses of the metal parts, questionable fitment, etc. It would seem from my experience with this "quick win" that I need better glasses. Surely those other MFH threads talked about the prep work required. Here's my first encounter with MFH: These particular detail kits are super simple, not much to them: The parts felt a little clunky. For all the props directed at MFH, they seemed "cheap." And the fit was way worse than I would ever expect from a heralded manufacturer like MFH. So out comes various files — sandpaper is next to useless, it seems — to fix all those fitment problems and mold leftovers on every, each and every one, of parts. What I missed in all that I've seen about MFH builds is how careful you need to be when filing. It's like an amateur haircut, a little more on this side to even it out, and then back again, until you're bald. This is all the parts to paint with a couple coats of Tamiya TS primer (and proof of life for the B192). It says on the can of primer that it's good for plastic and metal. I've always thought that a dubious claim that they make a metal primer. It's that, or they're just gouging us by selling a metal primer. I'm going with the dubious claim theory. This is what one part looked like after two coats of Tamiya primer, two coats of Tamiya semi-gloss black lacquer, and the handling required to append the addon styrene (more about that later). Even after repainting and almost no handling, paint has come off corners and whatnot. The fact that little of all this will be visible (and still we put in the hours!) makes it less frustrating, but I can't help thinking I got something wrong. I washed the parts with dishwashing liquid and even took a brass brush to some of them. As for the brass brush, I must have misunderstood a modeler when I read that he used a Dremel with a brass wire brush. I did that and regretted it. I had to go back over the parts I used it on to return some of the detail that the wire brush muted. It left the surfaces looking pitted. Shiny bolt heads were now dull and the like. Lesson learned, but I'd like to know the correct procedure for prepping and painting metal parts.
-
My first model in 45 years! Whaaa?
4knflyin replied to 4knflyin's topic in WIP: Other Racing: Road Racing, Land Speed Racers
I didn't die. I didn't give up. And I'm still not finished with this "practice kit." And, believe it or not, I didn't even stop. No "took a couple weeks off" or anything. Some days I barely got started before disaster struck and demoralized me too much to continue. Every day I thought about this thread and that I owe it to myself to be documenting the experience, and then just said I'll get to it tomorrow. So, this is just me checking in. I'm determined to fill in the high and low points soon. When I do, some may wonder how the kit didn't end up in the trash. For now, here's where I'm at in pictures. I think I probably have another week to go. It does not hold up to close inspection, but I'm determined to do as many different modeling skills as possible before moving on to my next project... where making the same mistakes as I have on this car will be much, much more costly. Oops, I forgot to include the front wing. In these pics, there are decals from five sources : Shunko, Tamiya, MFH, Scale Motorsport, and, I think, Tabu. The carbon composite patterns alone are from three of them. Zoom at your own risk. Que the striptease music...
-
Ebbro/Tamiya 1:12 1968 Matra MS11 F1
4knflyin replied to Nacho Z's topic in WIP: Other Racing: Road Racing, Land Speed Racers
Update! Just a glimpse of what you're sharing on FB, those losers (kidding). There are a two other builds I'm watching, one a Tamiya 1:12 MP4/6 over in jolly old England, the other an SDB that's actually already finished, but the detail makes me take it slow. What all three of you have in common is well practice skill, creativity, patience, and something that, whatever it is, I am lacking (one step forward, two back, and I'm running out of room... another bad day of model building). I know from personal experience now that documenting and building is hard. So how about a couple of cut and paste from FB posts? (I'd love to see that bajo fitting, lol. Last night I saw that Top Studio has those break caliper banjo bolts again and ordered a couple of sets from Spot. And I got my 1:12 MP4/6 TS Master Detail-Up kit — one day short of three months after ordering it! 92 days, but who's counting.) -
My first model in 45 years! Whaaa?
4knflyin replied to 4knflyin's topic in WIP: Other Racing: Road Racing, Land Speed Racers
I just went to order some. Did you mean Mr. Finishing Surfacer? EDIT: Further research shows you meant what you wrote. Didn't mean to interrupt. -
My first model in 45 years! Whaaa?
4knflyin replied to 4knflyin's topic in WIP: Other Racing: Road Racing, Land Speed Racers
Well, that was a nice surprise and a perfect time to receive it... "Posted just now." LOL. Out of suspended animation. YAY! -
My first model in 45 years! Whaaa?
4knflyin replied to 4knflyin's topic in WIP: Other Racing: Road Racing, Land Speed Racers
Yes! To all of it. I intentionally put down a light layer incase... incase you know what. lol. I've been wondering about sanding each layer — know I feel comfortable in my understanding! And you nailed it, I thought I was being clever by dusting it from afar, at least a foot, but I your explanation of the negative effects of that were something else I was actively wondering about. Thanks. Yes! God how I've wondered about that stuff. Keep seeing in mentioned (remember, I've read a ton of stuff over the past 6 mos.) but not fully understanding it's use. And "spot-apply with a brush," I didn't expect that. Again, thanks. And another, Yes! Just this single post, not to mention your and others' prior posts, illuminated (and that's a carefully chosen word, not always my strength, lol) for me tools and techniques I was unsure or didn't know even to ask. It's one thing to have read a lot about others doing their work, but so much more impactful, as in making an impression on my mind, when it's in relation to what I'm doing. It's the best learning method for me. Finally, another thanks for your gratuitous kind words! Until your next post... -
My first model in 45 years! Whaaa?
4knflyin replied to 4knflyin's topic in WIP: Other Racing: Road Racing, Land Speed Racers
Yeah, I hear you. I only worry because there are so many bad decisions you all would not make that I would, unaided. That's my one and only, sole concern. It's also nice getting to become a member of the community, but right now I'm hyper focused on getting going with some confidence. That's where you guys are irreplaceable. -
My first model in 45 years! Whaaa?
4knflyin replied to 4knflyin's topic in WIP: Other Racing: Road Racing, Land Speed Racers
OK, I've never said no to an oxy, but that stuff I'm going to have to look up. 10 minutes?! No sanding?! I'm all in. Thanks for the info. PS: South Africa... very cool. I'd make a wisecrack about Pastorius, but no. -
My first model in 45 years! Whaaa?
4knflyin replied to 4knflyin's topic in WIP: Other Racing: Road Racing, Land Speed Racers
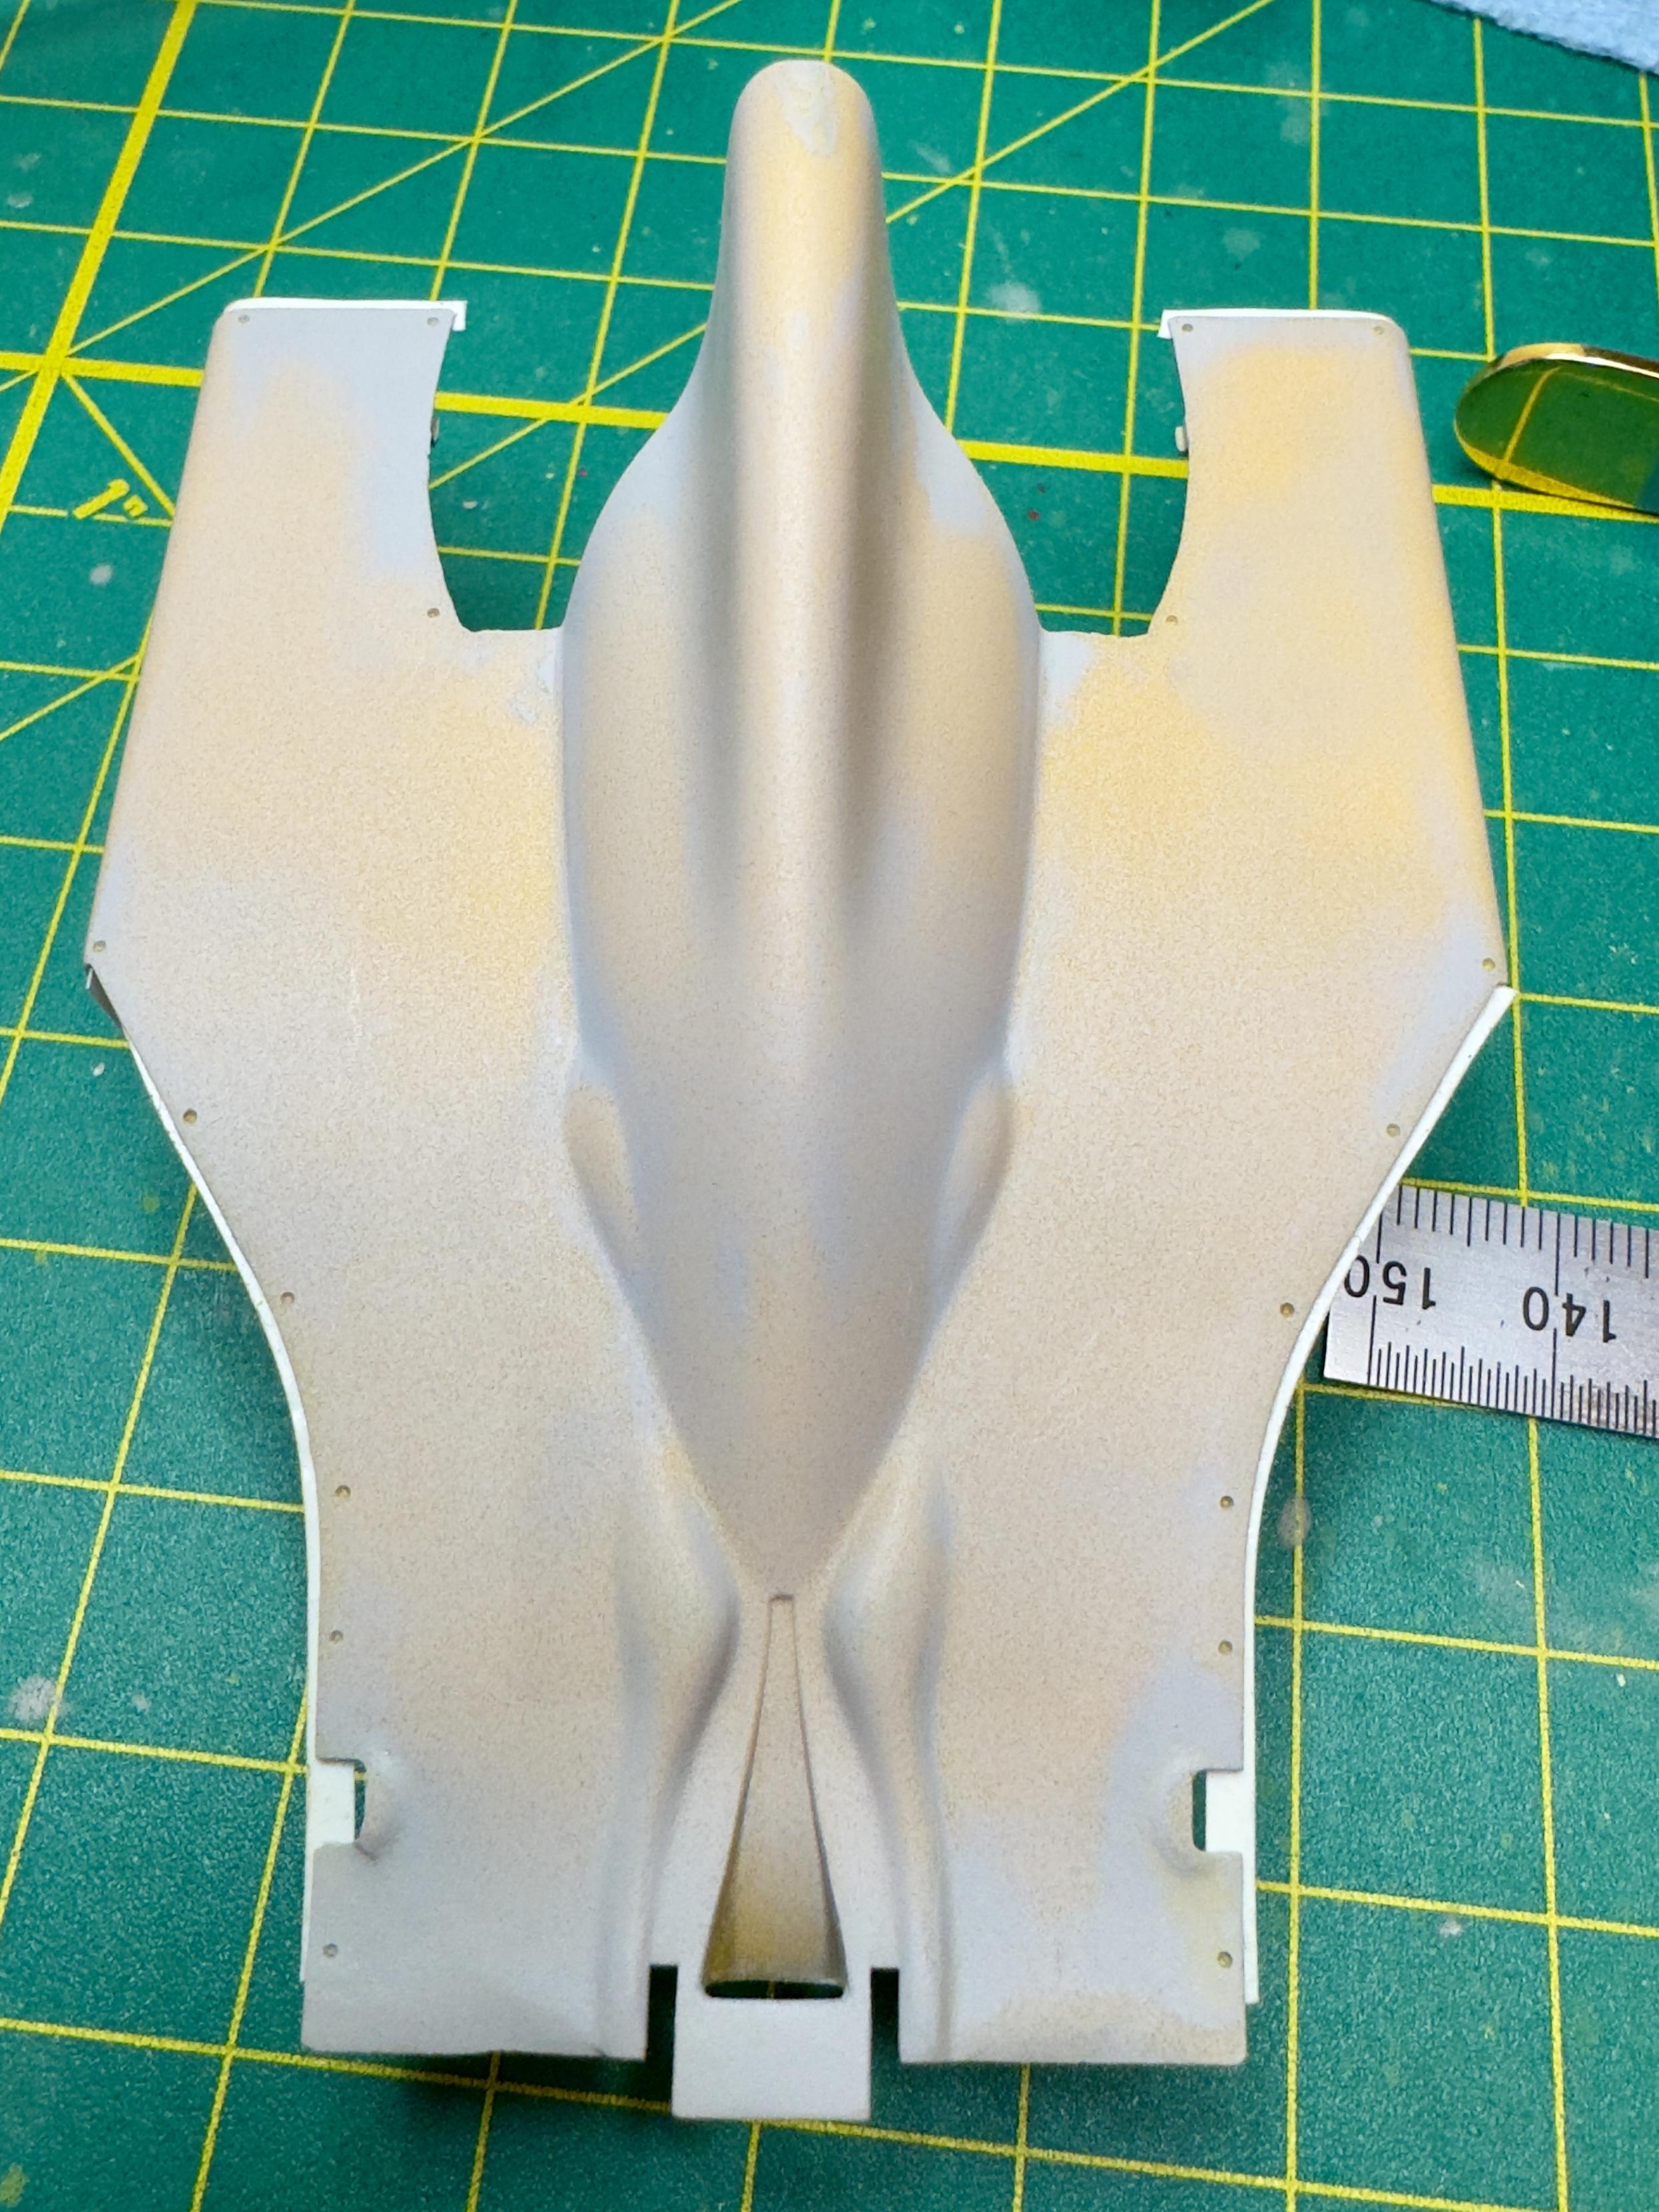
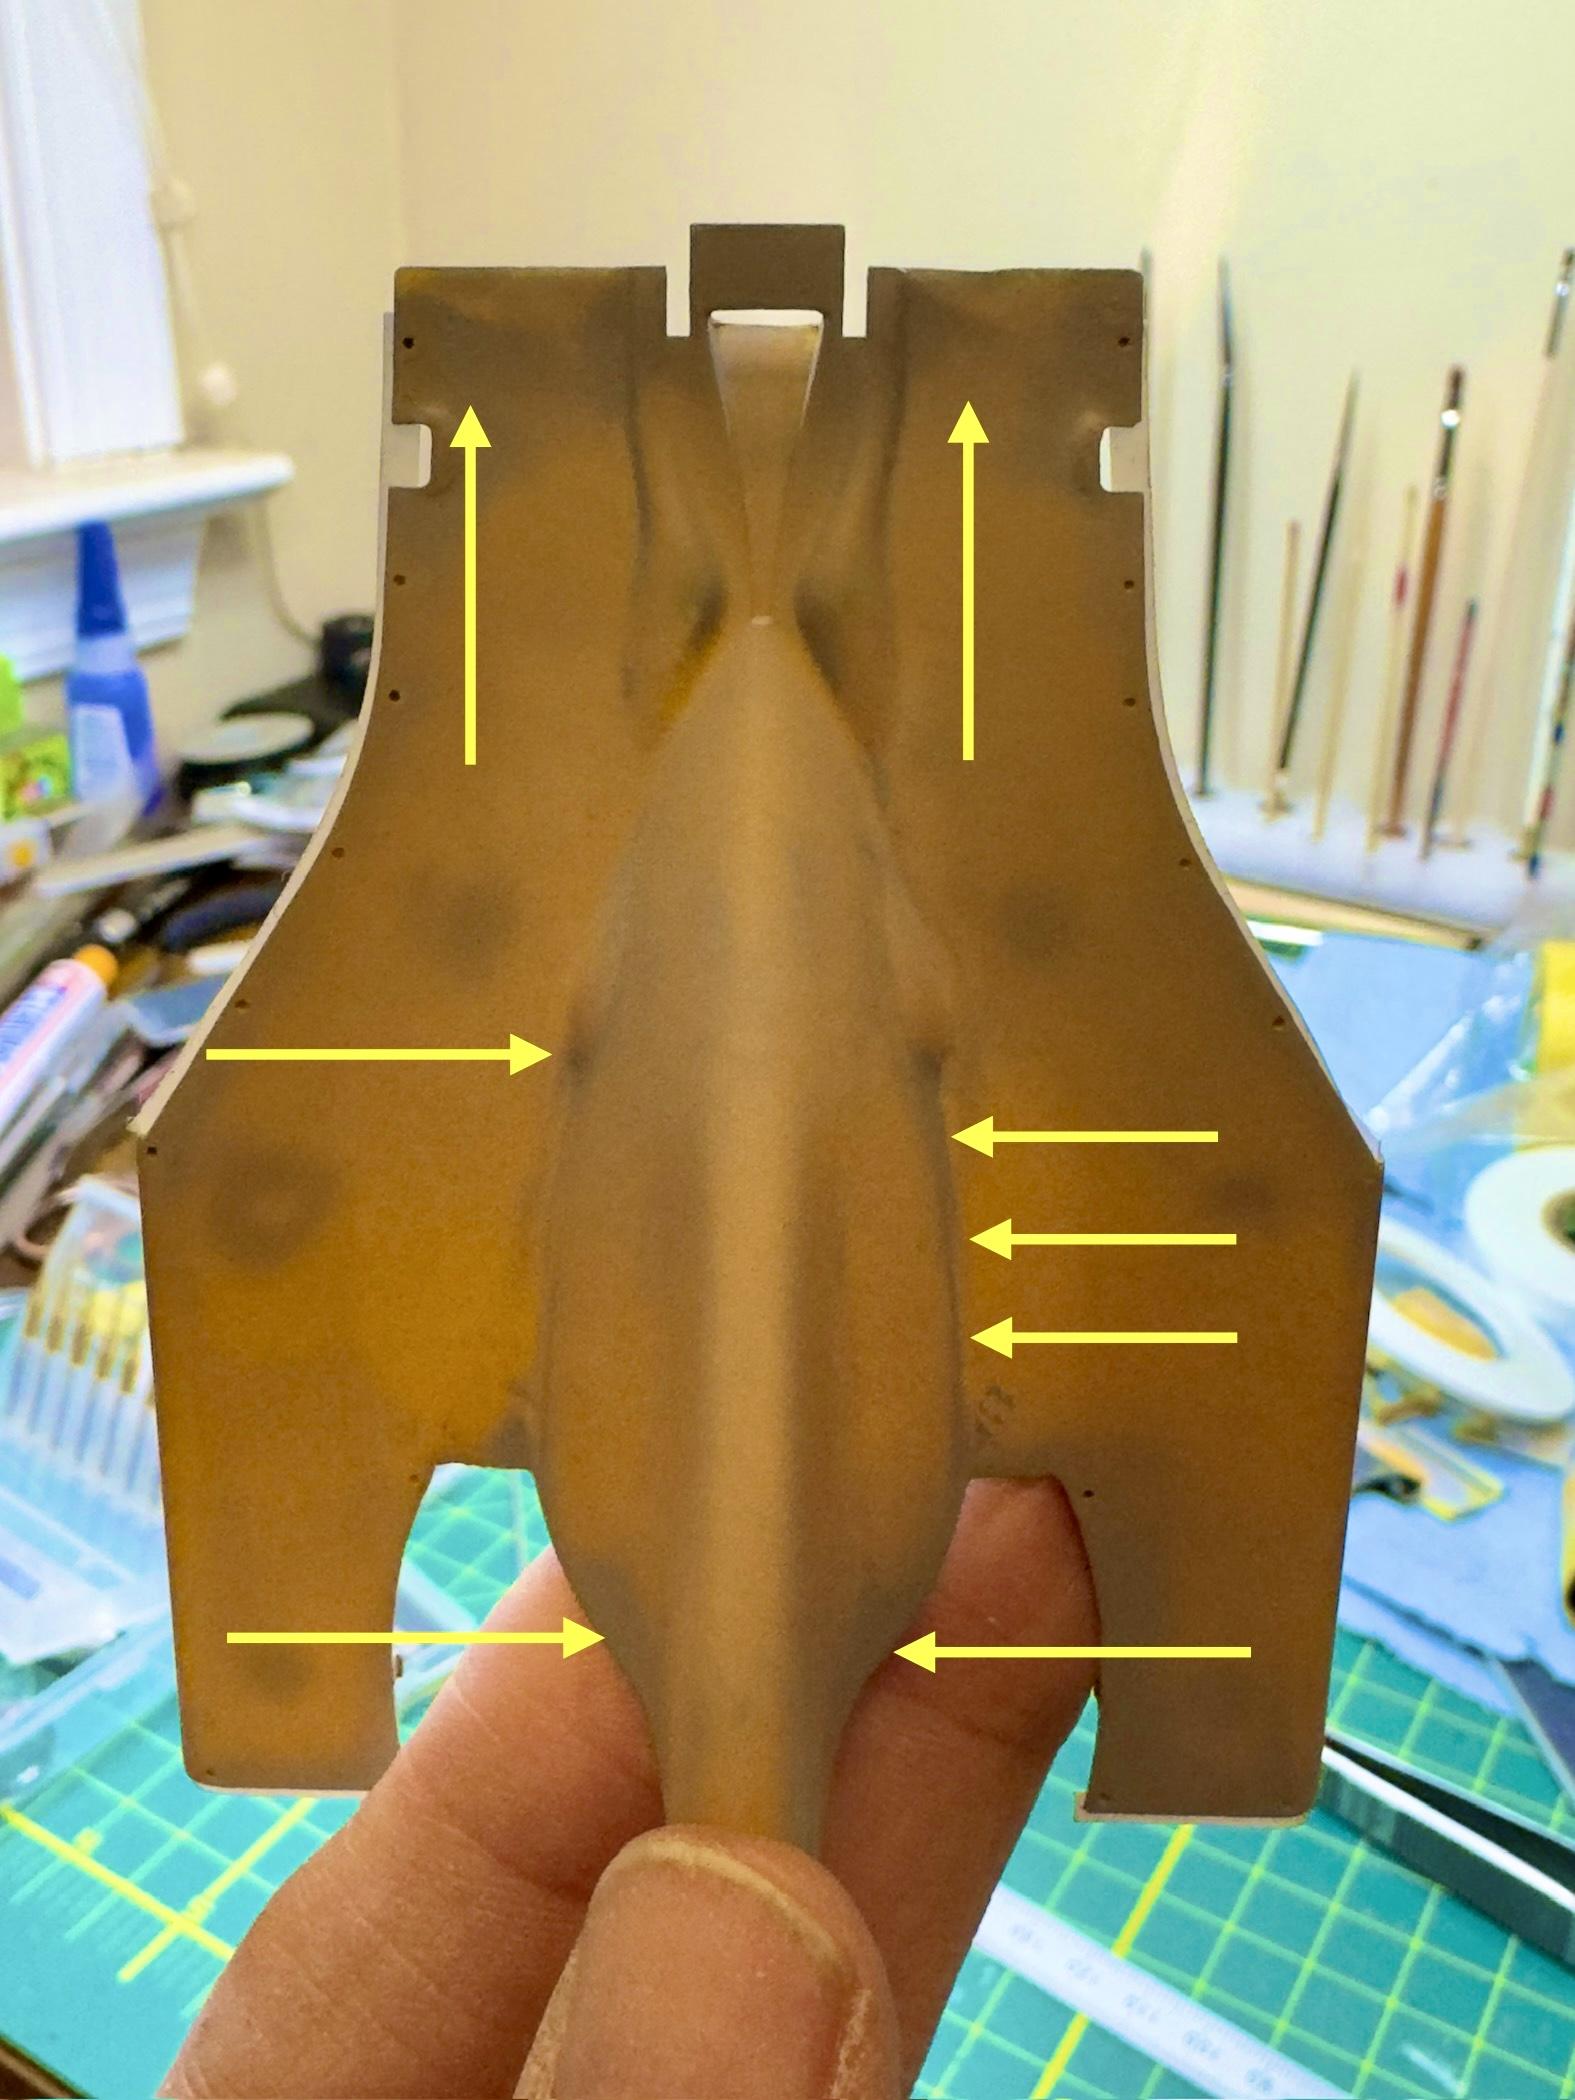
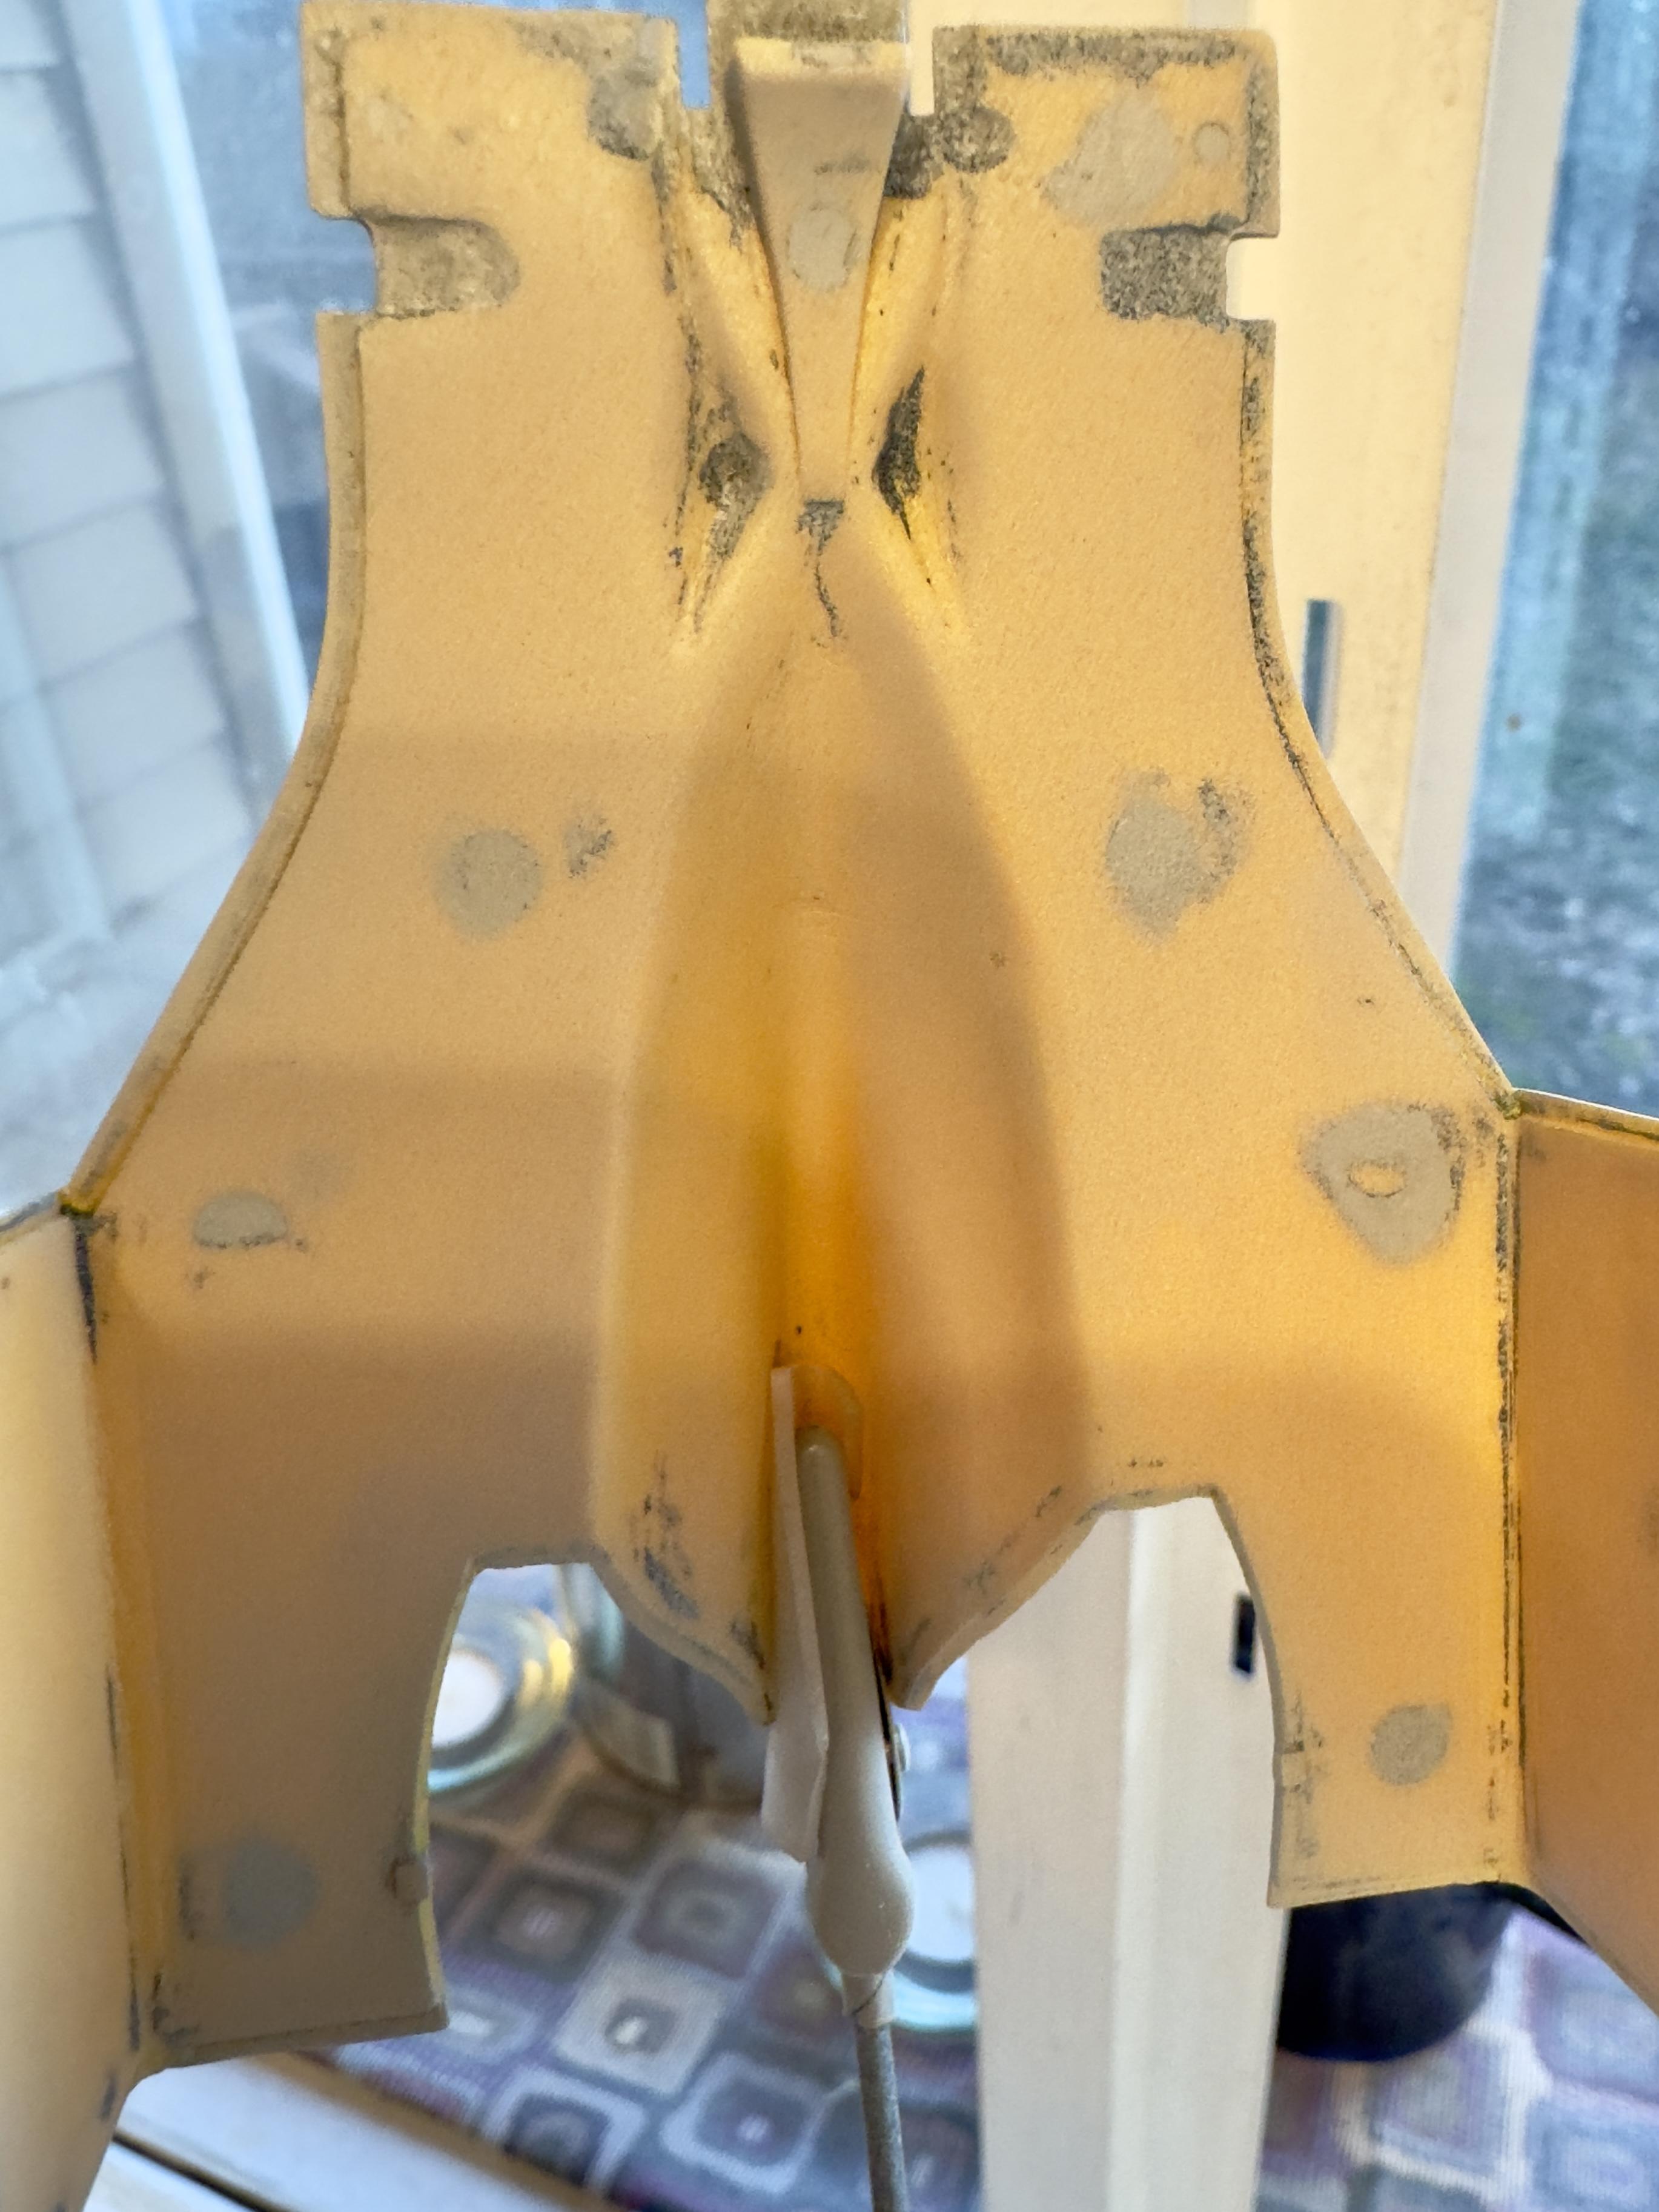
Thanks for ALL of that. I appreciate it. My only concern re: the lack of feedback, is the lack of feedback. After this build, I should feel a lot more comfortable about my choices. However, right now, more has changed in the model world than I forget about building models in my youth. Not only that, but the whole airbrushing angle: the paints, thinners, manufacturers, etc., and last but not least, airbrushing technique!! So I don't trust myself at junctures like this. Maybe one of the only things I've got right about all this. Attached is a photo of the first coat of primer on the engine cowl. Right after I wrote the post you replied to, the sun came out and my work did not survive that. I was immediately clear that I had some serious work to do. For the inside of the cowl, for the black paint, I simply sanded it. And that's what I'll do for the monocoque. If I could ask you for a quick reaction to the photo, in particular whether seeing the effects of the previous primer making those spots darker, will it cause me problems getting the color coats to be even? Thanks again. Like I said, what I'm learning on this build should stand me in good stead from the next build on. I've read a ton, I've done tons of research, and I've spent a small fortune on the things needed to do it right. I'm just still lacking some of the bare basics, the kinds of things where the judgment of somebody like you and the other guys who have responded only comes from experience. There's no substitute for seat time! This is what it looked like after I recovered from seeing it in the sunlight: And this is what the first light coat of primer brought to the fore: To me, the inside is the most interesting. I filled the "sprue holes" with putty, only to realize that was already insufficient. So I did what all you guys do, and at which I just can't get the hang of, I filled over the putty with accelerated CA. Then I sanded, and sanded, and more sanding. This is the interesting part to me: when it wasn't going so well, I picked up a little "chisel" and used it as a planer. Unbelievable! Chiseling off the excess CA is so much easier for me. Nary a mark from an errant chisel stroke. Awesome find. The taped off edges was my lame attempt at keeping the mating point clean after having spent 30 minutes with the chisel cleaning them out. And this is the cowl backlit. I'm not too concerned about the fixes. In fact, even the highlighted areas where there was leftover primer, I think it's going to take a huge portion of the yellow paint to get even depth no matter what I do. So really, if you have an observation or two, that'd be great. Otherwise, I'll assume I'm actually in a pretty good place now. I'm tellin' ya, I would NOT have stripped the parts if not for you guys... and it was absolutely, no doubt about it, the right thing to do.
-
My first model in 45 years! Whaaa?
4knflyin replied to 4knflyin's topic in WIP: Other Racing: Road Racing, Land Speed Racers
Good to know! Thanks. I see much paint stripping in my future, so the gallon jug of IAP won't go to waste.? -
My first model in 45 years! Whaaa?
4knflyin replied to 4knflyin's topic in WIP: Other Racing: Road Racing, Land Speed Racers
I know I need to strip the black enamel from the interior. I've ordered some Testors enamel thinner (should have just gotten some mineral sprits, I suppose) because the IPA isn't cutting it. In any case, I used all the 99% I had in the first dipping and the gallon I ordered won't get to me until Wed. My question at this point is, am I deluding myself by thinking that the parts aside from the black are good to go? The stripping with a towel, and using an electric toothbrush for the tight spots, took a while. Add the time I spent sanding those parts, and it's been a pretty solid eight hours of work. That Tamiya gray primer is stubborn stuff! Wow, it's nice to know that, when you don't have to strip a project, your paint has the support of that primer underneath it. Trust me, the surfaces are smooth as a baby's bottom. However, I have no idea if the new coat of primer will blend with the old or just highlight that I left some behind. lol. There's a part of me that doesn't care about the insides, that all I need to do is sand with some 80 grit paper (kidding), apply some black over that, and call it done. Agree? I left the pictures large so you can zoom in on them (it's amazing those decals in the cockpit are still there... I may try to preserve them just becasue):
-
My first model in 45 years! Whaaa?
4knflyin replied to 4knflyin's topic in WIP: Other Racing: Road Racing, Land Speed Racers
Driving a Lotus is a Triumph. Well said, Sir Sterling. Well said. On to more serious matters, your avatar is excellent. Thanks for the input. So few observations, tips, critiques from others, it makes each seem like a momentous occasion. And they are. It's great to get feedback from others who share an interest and who have vastly more experience. Those guys encouraging me to strip the paint were really helpful for this project. I didn't benefit from you having read my most recent post before your comment... because I'm still in posting quarantine and it wasn't yet posted. In fact, as of this writing, it's still not posted. Oh well. Re: the paint stripping: until you've stripped a model you spent 20 hours painting and repainting — I kid you not — you just have no idea that it's a rational decision to undo all of that instead of try to work with it. Much of what is going to change is that it won't take me 20 hrs to get to the point I was at before throwing it in reverse. Or at least, it better change! Again, thanks. Stop in every now and then, would you. I'm starving for input. -
My first model in 45 years! Whaaa?
4knflyin replied to 4knflyin's topic in WIP: Other Racing: Road Racing, Land Speed Racers
Is there something I need to be aware of to do differently when repainting? I just went to start in with the toothbrush, and I didn't expect what I found: It's been, what, 4 or 5 hours that it's been stewing. That the green flaked off while the yellow stayed attached to the primer doesn't right away concern me. However, I am curious about what it means. Can I get your opinions about whether it's indicative of a problem, or even just a concern, about which I need to take into account when I start repainting? If it all looks good to you so far, please, please let me know. Or, if I did or didn't do something between coats that I need to correct in my technique, please help me with that: Primer: Tamiya Fine Gray from a can sprayed multiple times over multiple days, as I kept needing to sand or repair things. Paint: Zero Paints lacquer; it came as a set: The yellow was done over a couple of days. Some wet coats and some dry. No method at all. Besides the primer, it was the first time ever that I'd sprayed a model. I just went with the circumstances and tried to keep up. The initial layer was done spraying each part multiple times after about a 5-10 minute delay (as I went around spraying the rest of the parts). The next day: I got the shock of seeing the body dry-fitted, and seeing the uneven depth of the color (pic posted 28 Dec), I started what I can only say looking back was an undisciplined, anxious type of spraying the large parts. Those were definitely wet coats. On some areas, I needed to spray more paint just to get the thinner to dissolve some of the "waives" of paint (too much, too close, too high pressure – 35 psi). That worked, btw. The green went on calmly. I sprayed a thin layer of clear from a can to seal the masking, and then just painted each piece, the waiting time based on how long it took to do a full rotation — again, about 5-10 minutes. I took about four coats, and I felt good about it in the end. The black paint is Humbrol enamel, applied with a brush almost exactly 30 years ago. And I still have the tin, lol. So, that's where I'm at. I'm going to go do some toothbrushing. Hopefully I can get some guidance, if any is needed, before I pass the point it would have been needed. Thanks all.
-
My first model in 45 years! Whaaa?
4knflyin replied to 4knflyin's topic in WIP: Other Racing: Road Racing, Land Speed Racers
Upon further thought... All of what I already said still applies, however there is one more reason that almost, but only almost, trumps the rest: In the end, it's the easiest! -
My first model in 45 years! Whaaa?
4knflyin replied to 4knflyin's topic in WIP: Other Racing: Road Racing, Land Speed Racers
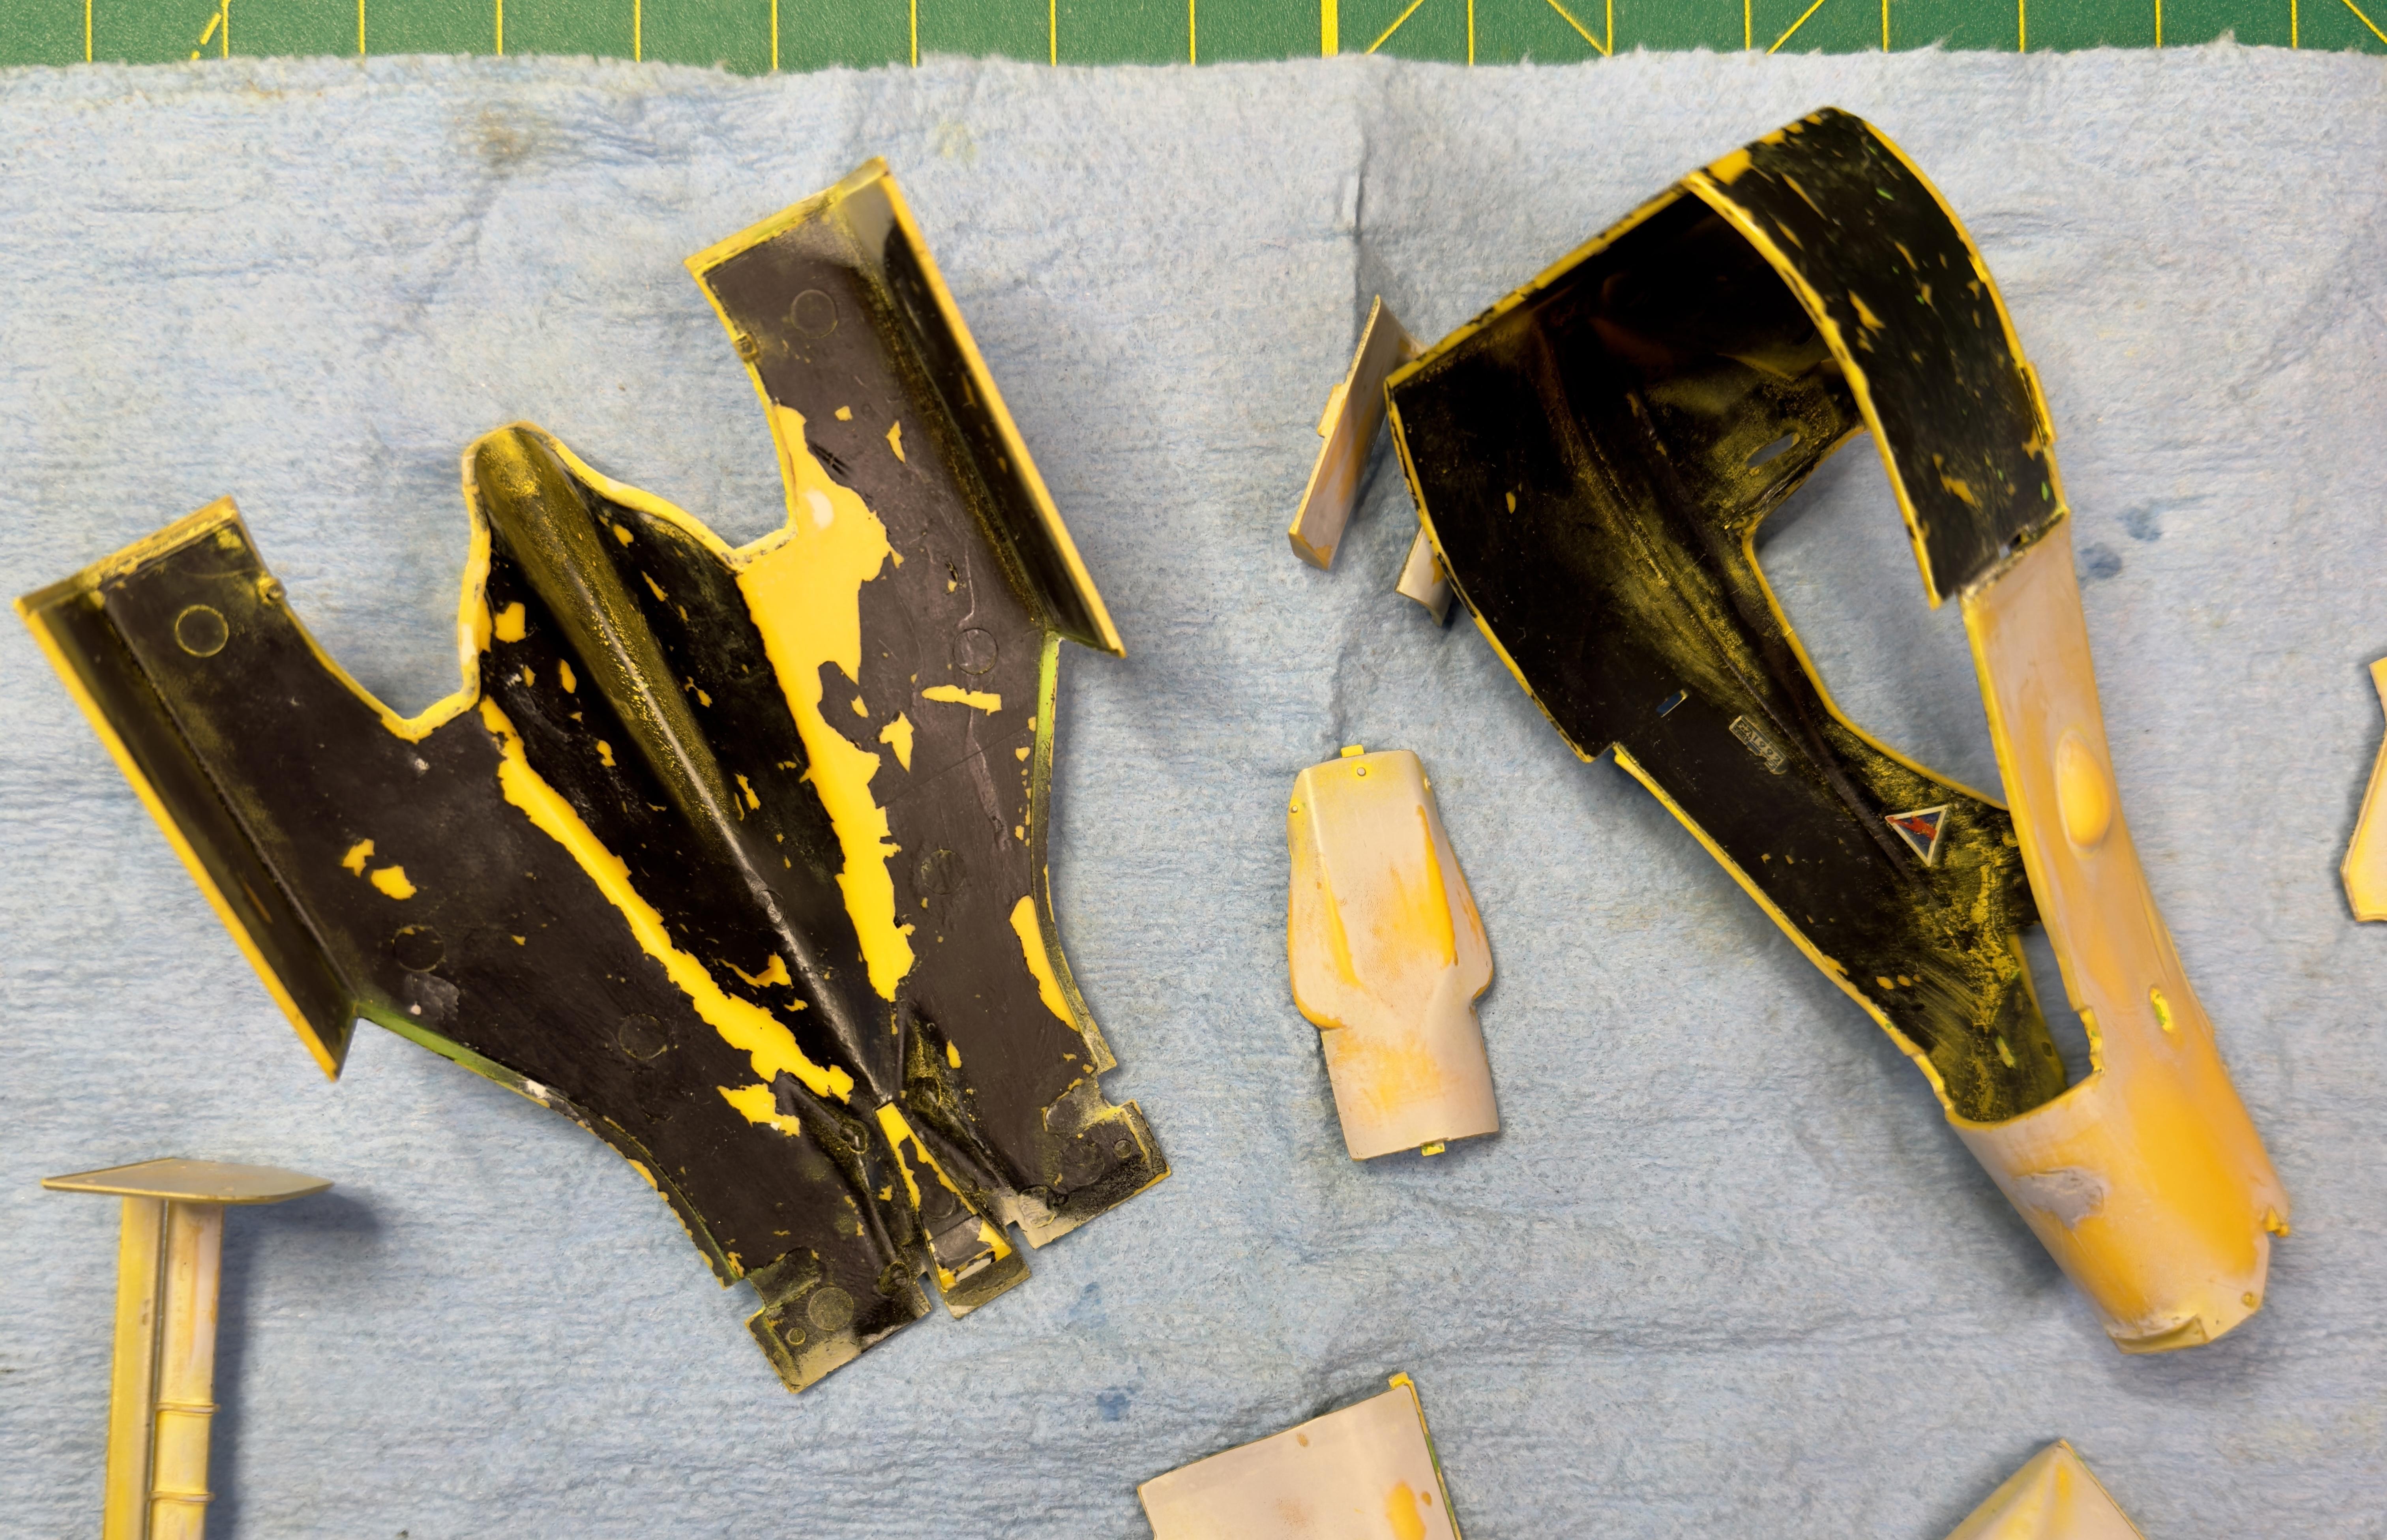
An IPA bath it is! Thank you, both... sort of. JK. I am grateful to you. I feared that would be the best course., but I wasn't going to start there. What convinces me (aside from your experience), and what I had only in passing thought about, is the next step — shooting it with primer to validate the fixes I've done so far. It definitely needs that. Primer is amazing stuff. I was surprised after only the first coat what all it revealed. My only hesiancy is the monocoque. I spent a lot of time while masking the first time to maintain the monocoque interior because of the decals inside it. I hand painted and decaled it circa 1994. I have replacement decals, though, so it's on with a bath of 99% IPA. Ugh. Can't thank you both enough. .
-
My first model in 45 years! Whaaa?
4knflyin replied to 4knflyin's topic in WIP: Other Racing: Road Racing, Land Speed Racers
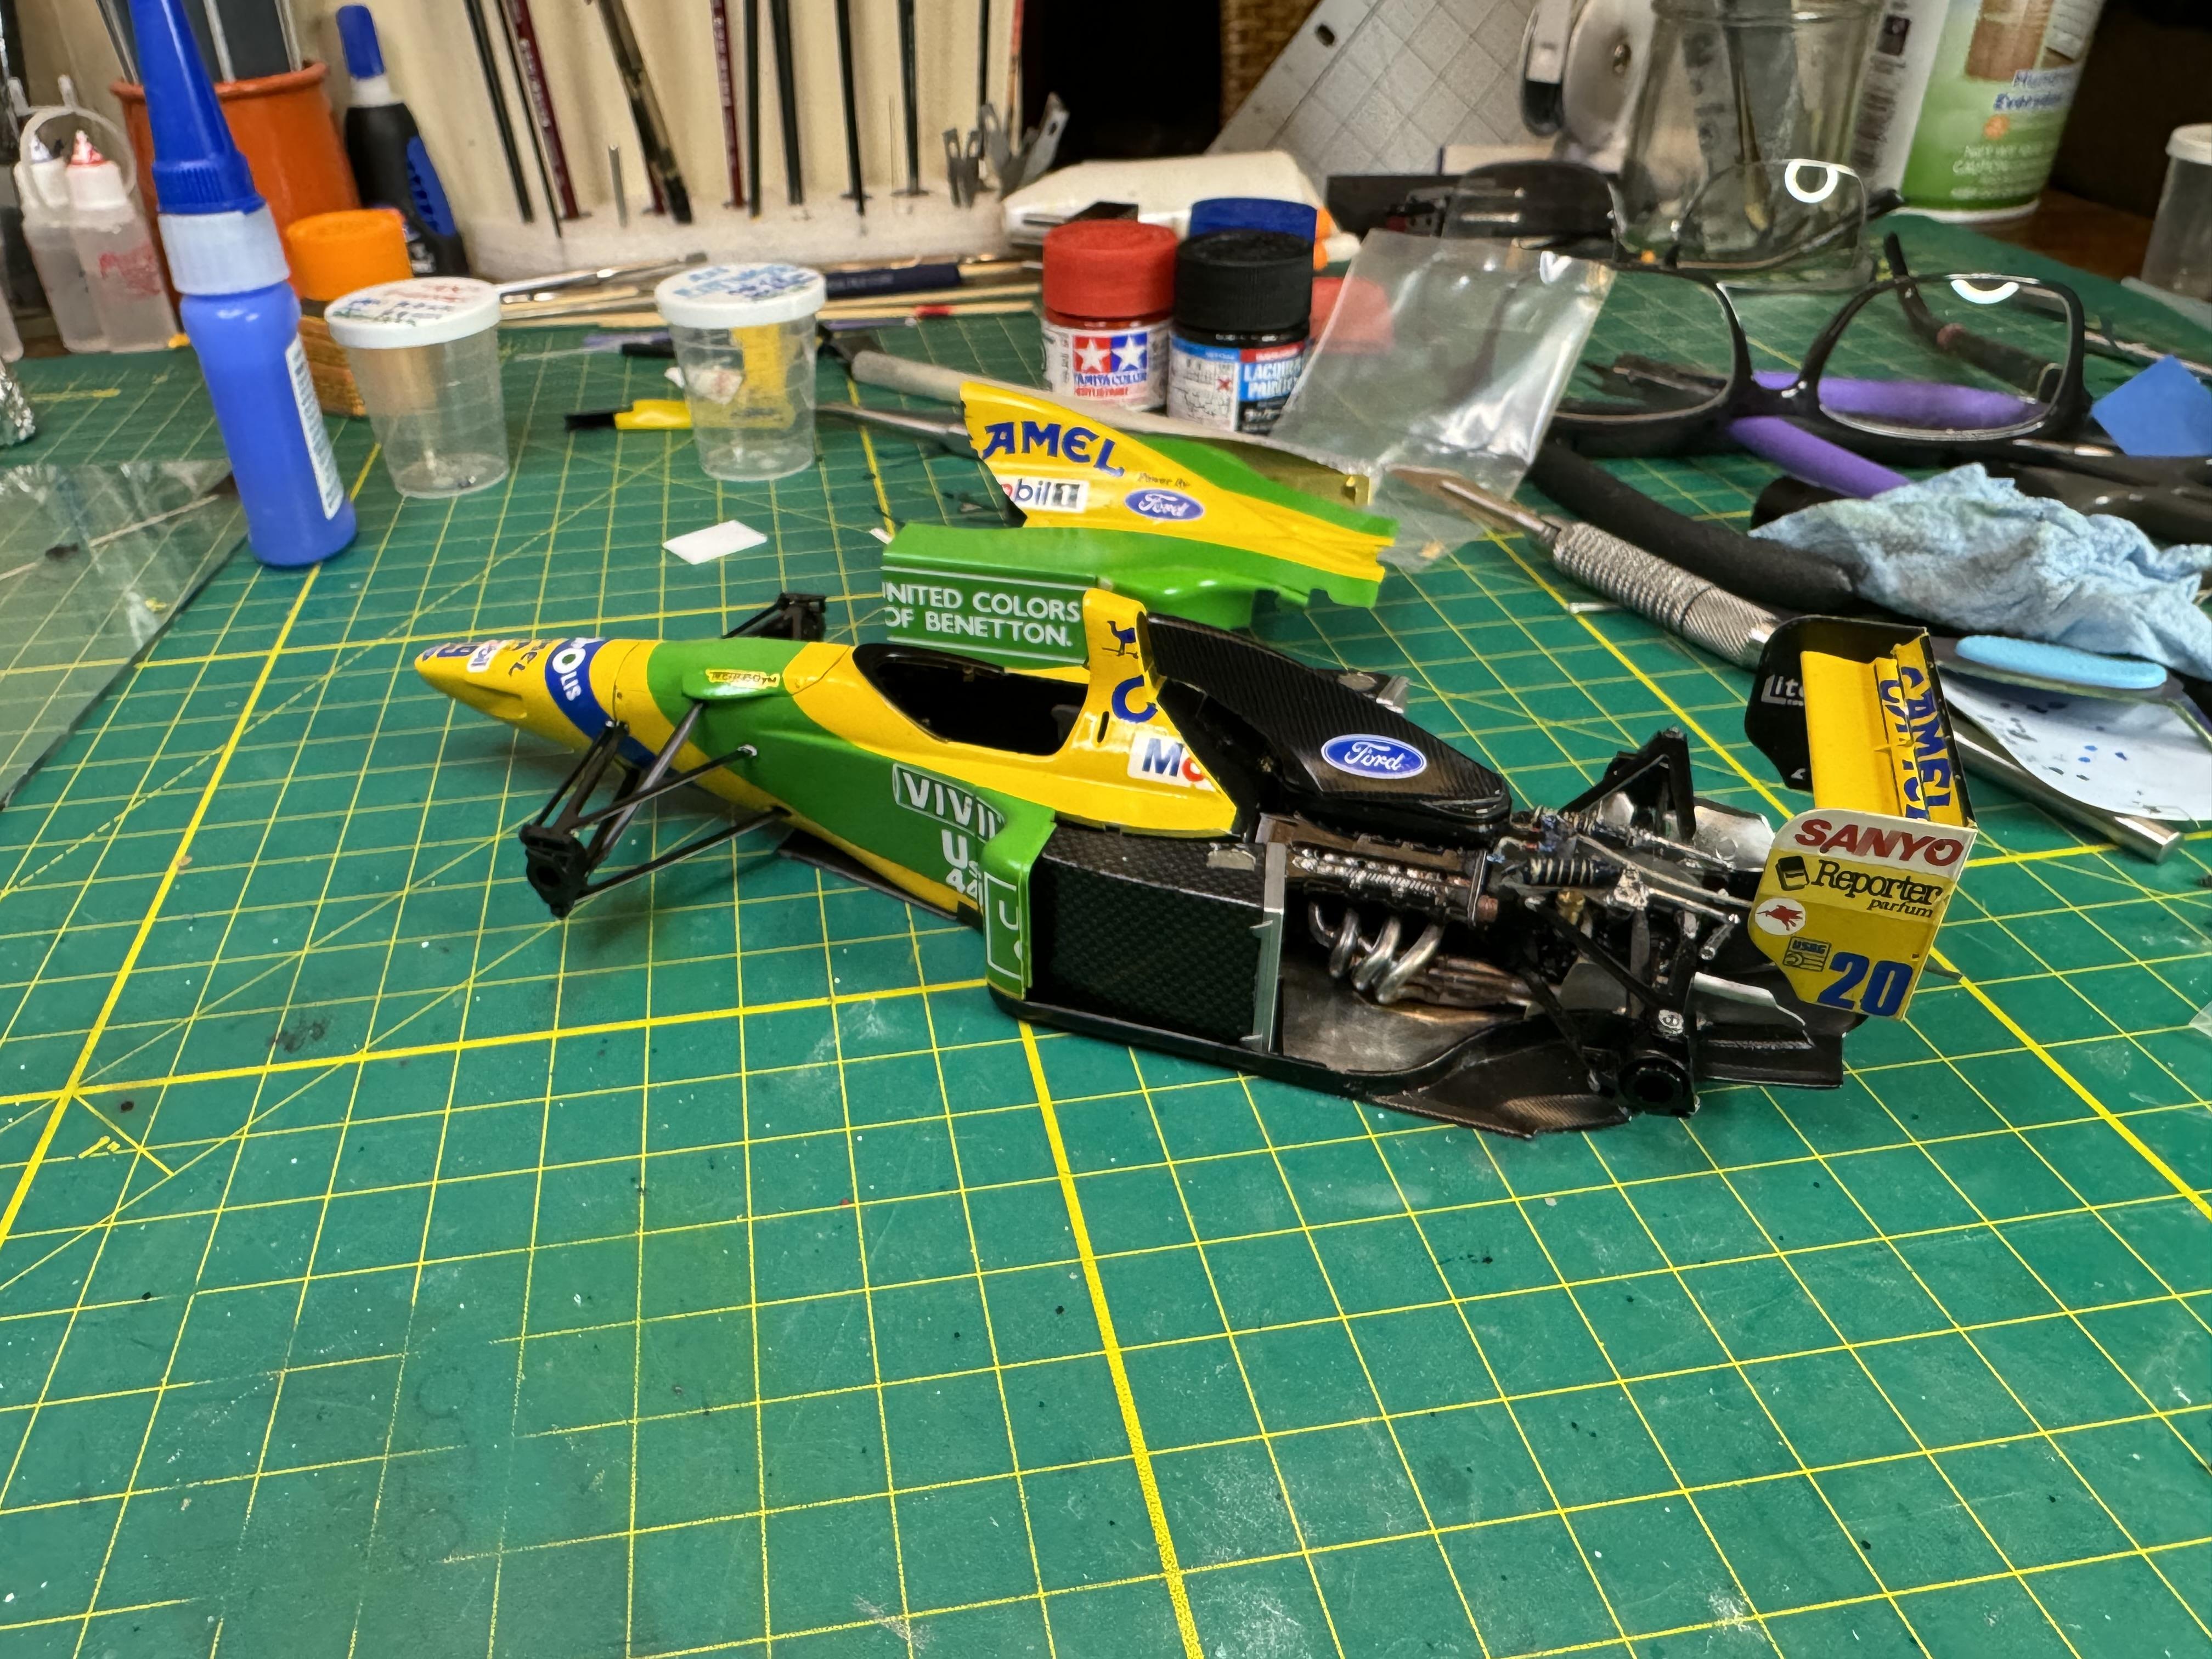
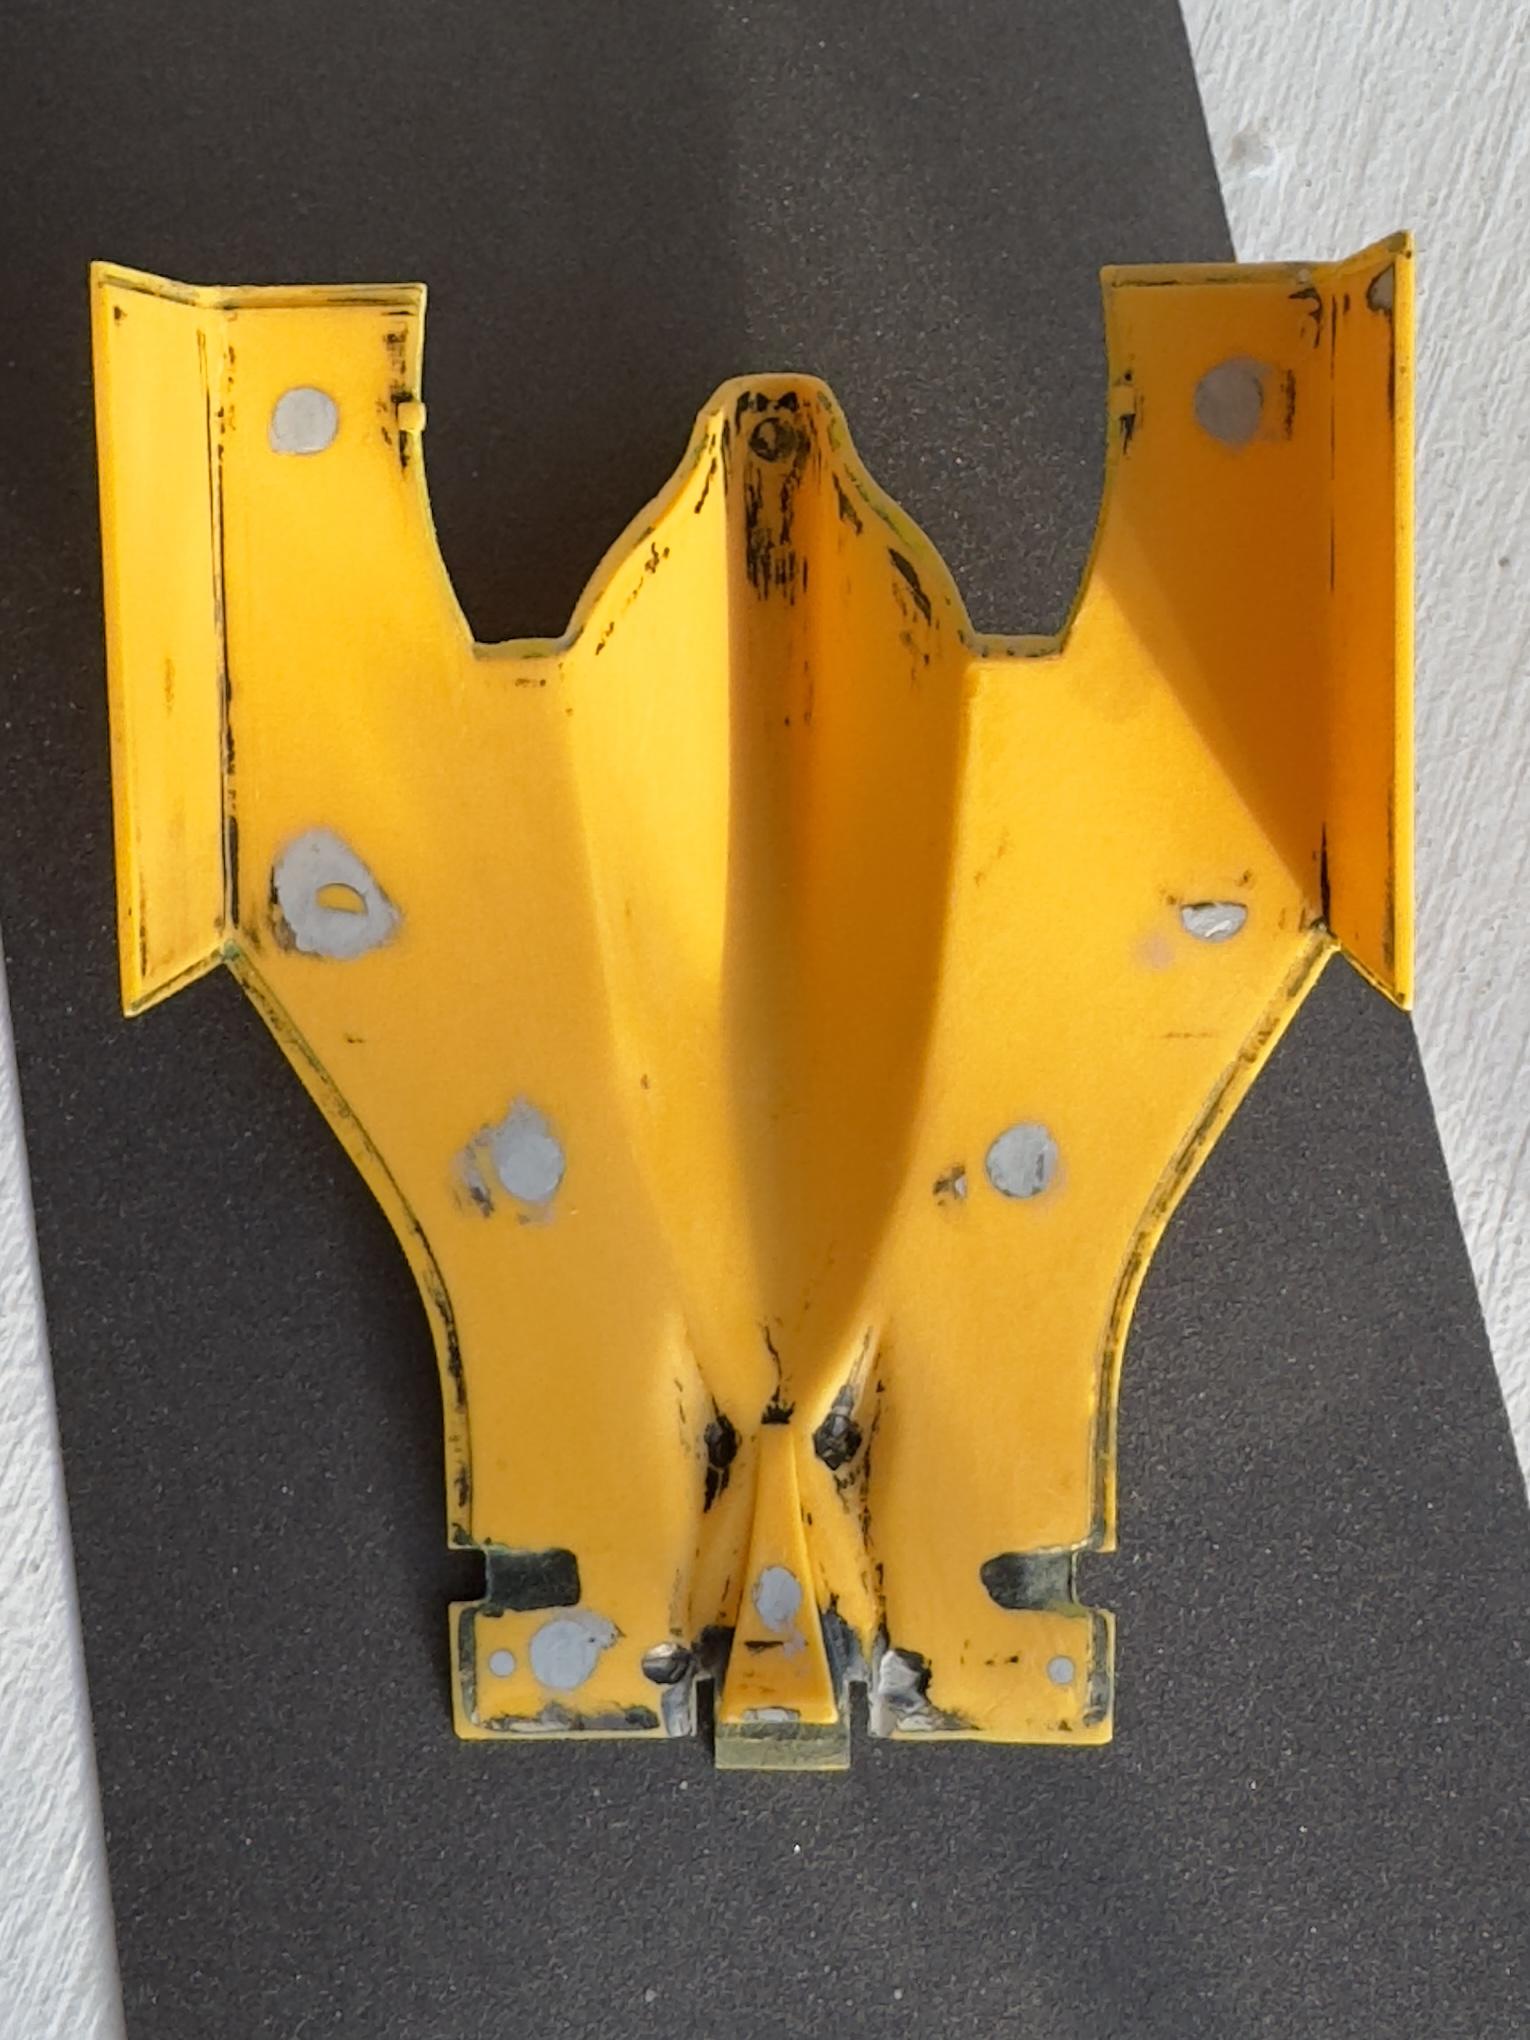
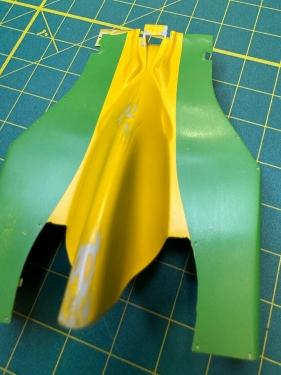
What to do? I could use some suggestions. I have, of course, decided to go for a grand prix, win or go home, type fix. But how to do it is still open, although I have a plan. I just don't know if it's the best plan. This is where I'm at now: Some of the detail of how I got to this place. I had noticed there was a problem with the fit of the air intake. I finally — and I mean I have no idea why it took so long — took a closer look and noticed that the rear cowl had a flat spot on the top of its portion of the intake. I fixed it with, first, some CA hardened with baking soda, and then with some UV activated resin (UVR) on top of that, followed by one of the longest sanding sessions ever... maybe 90 minutes or more. When I realized I needed more material on top of the CA, I went with what I'm comfortable with. I held the intake against a steel block covered with aluminum foil and dripped on some UVR such that the steel block formed a straight edge (picture was taken in haste and through my magnifying lamp... sorry). You can just make out how the UVR spread into a thin layer I snipped off. The flat edge is what I was worried about and wasn't sure the CA wouldn't stick, at least in part, to the foil. On the other hand, I knew the UVR wouldn't. Then I notice the bulge on the left side of the intake and decided to take care of that: I ended up with this as the current state of the intake. Note that the little flap at the rear got bent during the process — I have no idea how it lasted this long! — and I have yet to sand the putty: When I say I'm not sure of how to do the repainting, I mean I don't know whether to strip all the parts and start over, or piecemeal shoot the yellow and then the green, and in some cases vice versa. It's all on the table. I hate to go forward without input from hobbyists with experience, but I'm afraid that's how it's gonna go, given that's how it's gone. I'll probably start painting late afternoon / early evening today. If you have anything to say, and I mean anything, even if you're not sure it would be helpful, please do. Remember that at the top of this post are larger pics to help get an idea of what I'm working with. Oh, and lest I leave out the protagonist in waiting of the past 10 days or so, ta da. It's about to take center stage:
-
My first model in 45 years! Whaaa?
4knflyin replied to 4knflyin's topic in WIP: Other Racing: Road Racing, Land Speed Racers
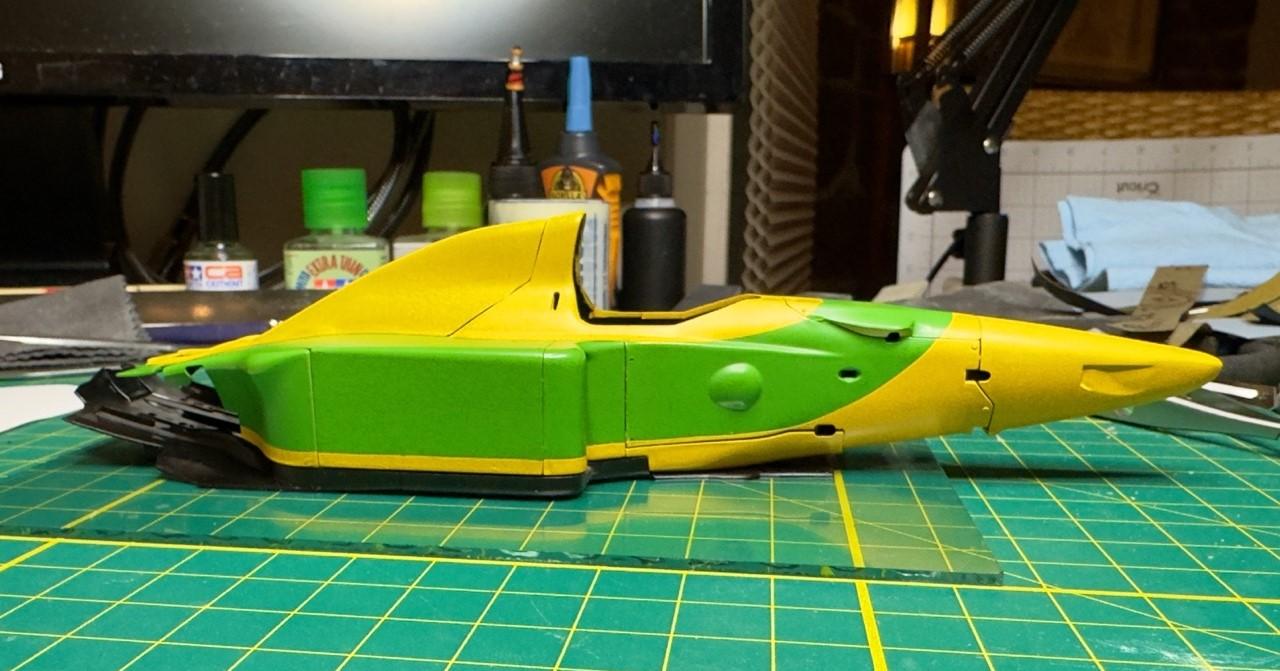
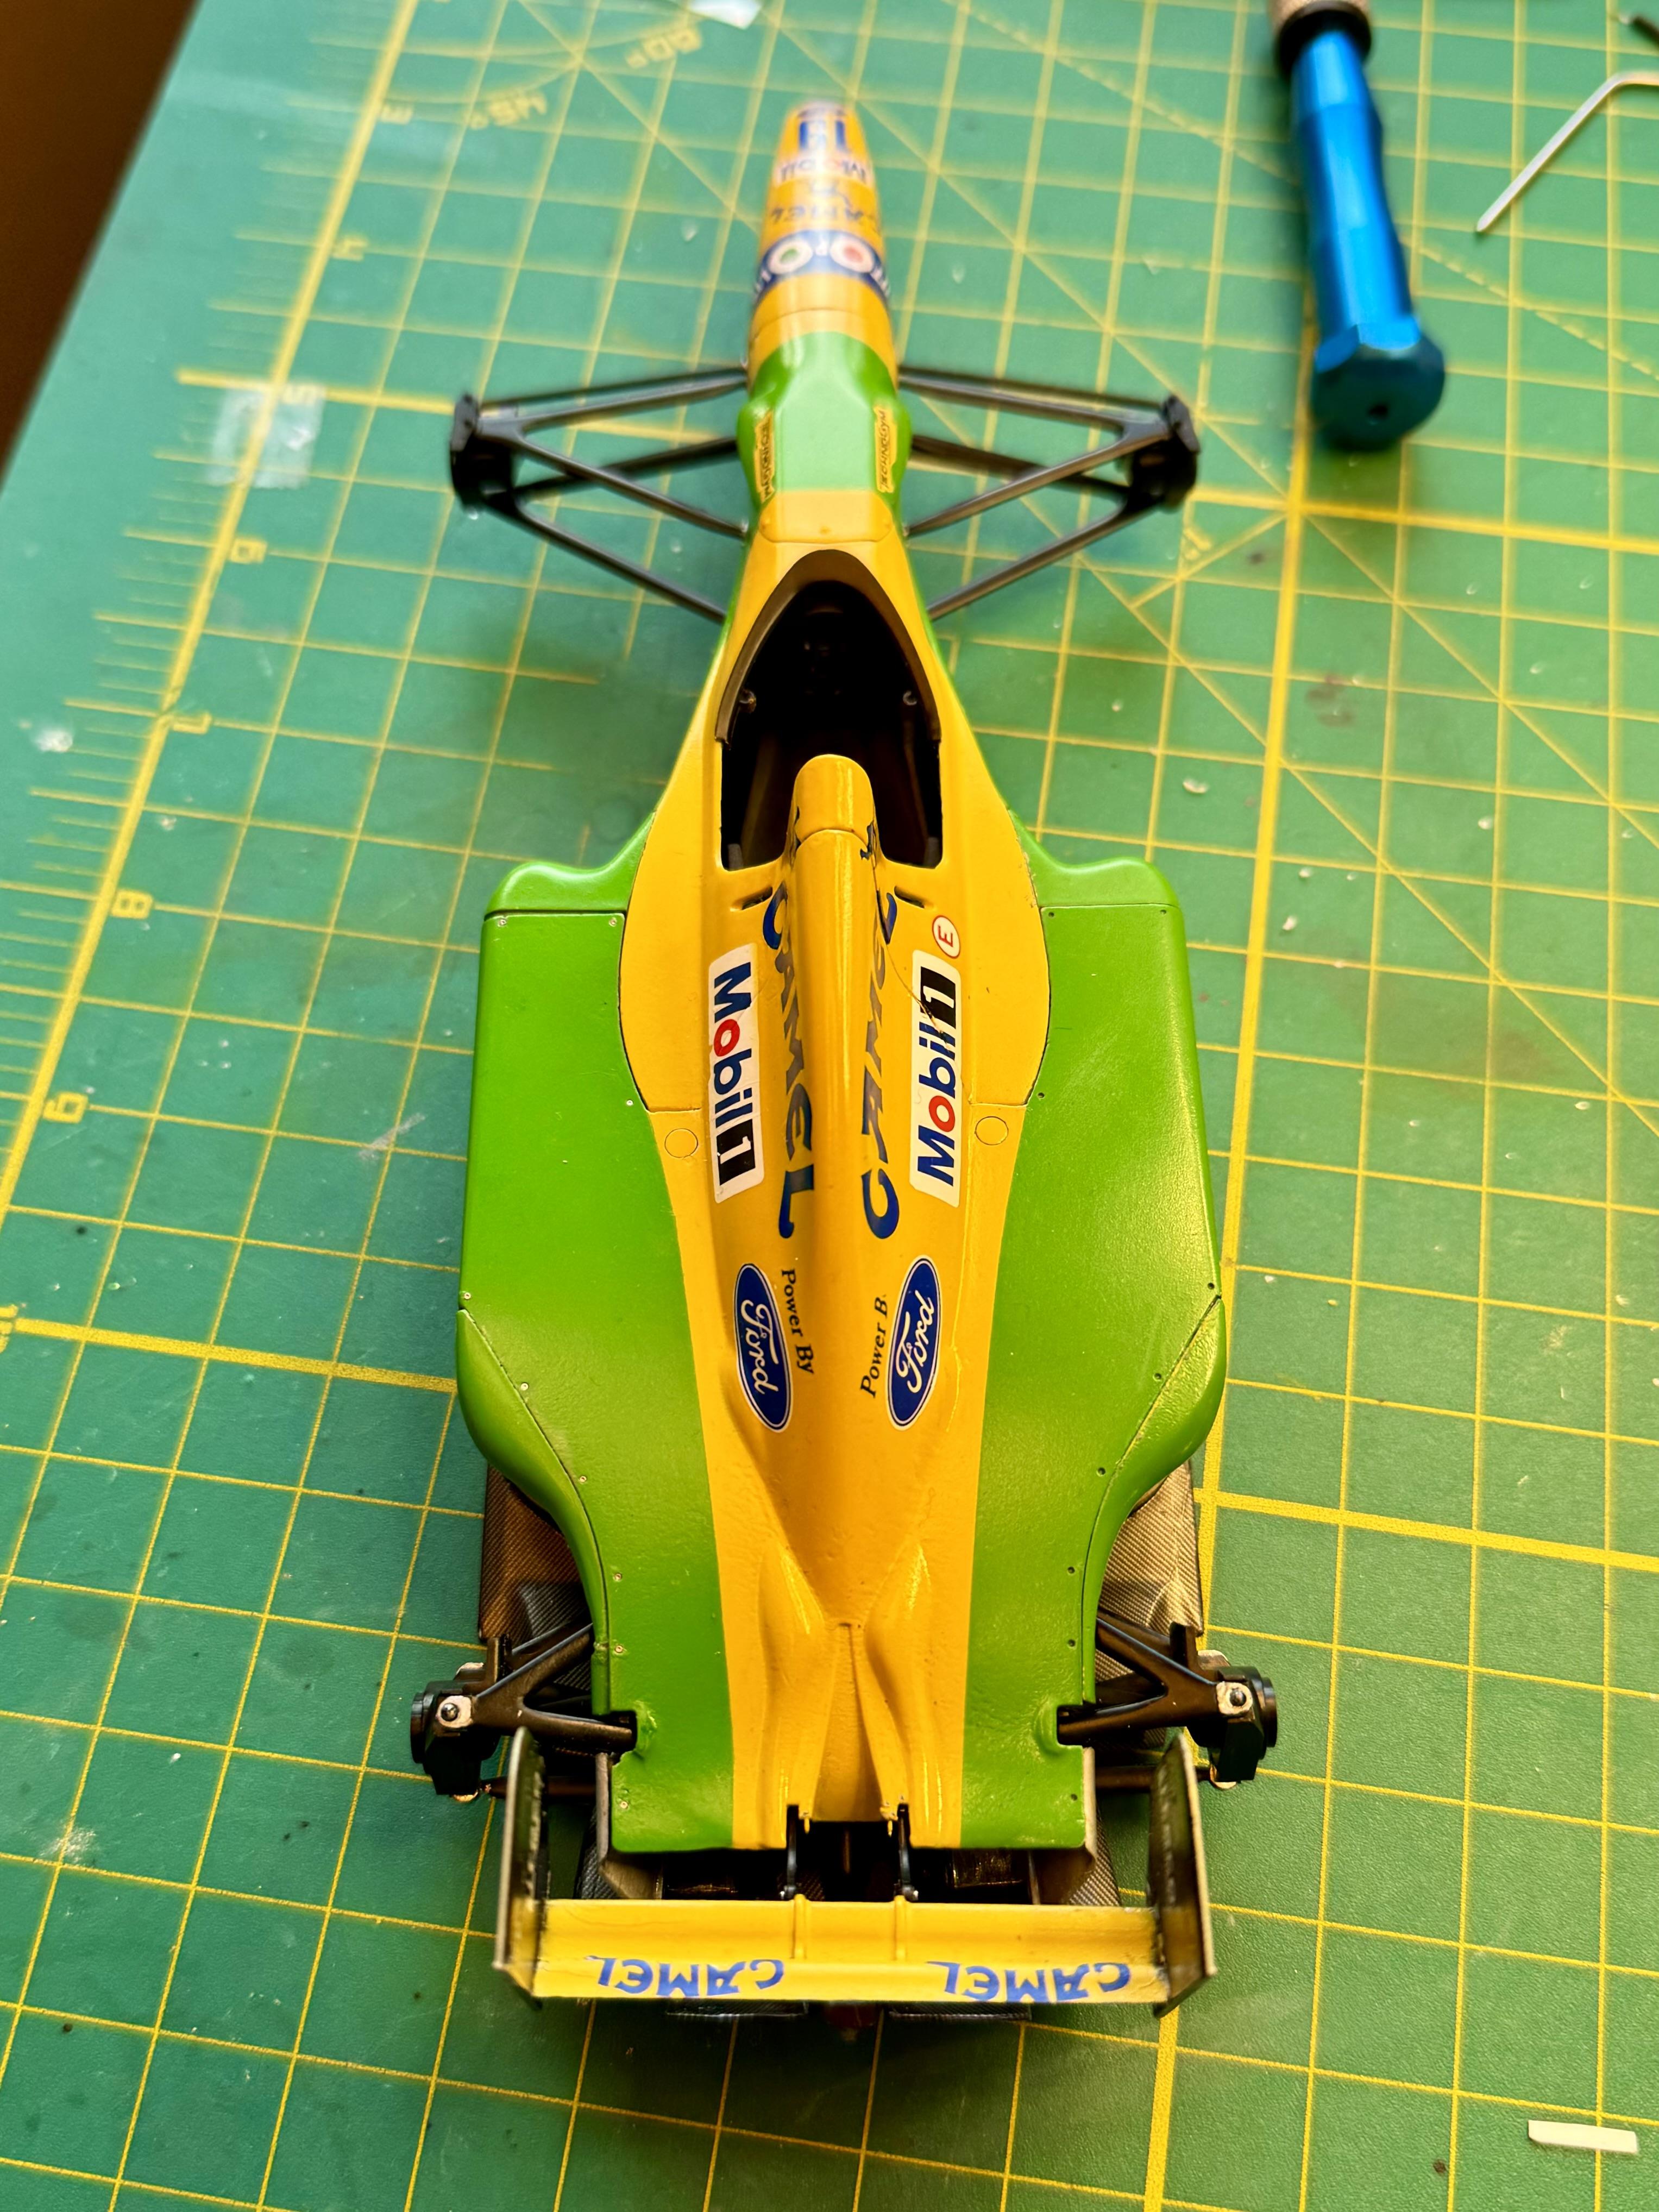
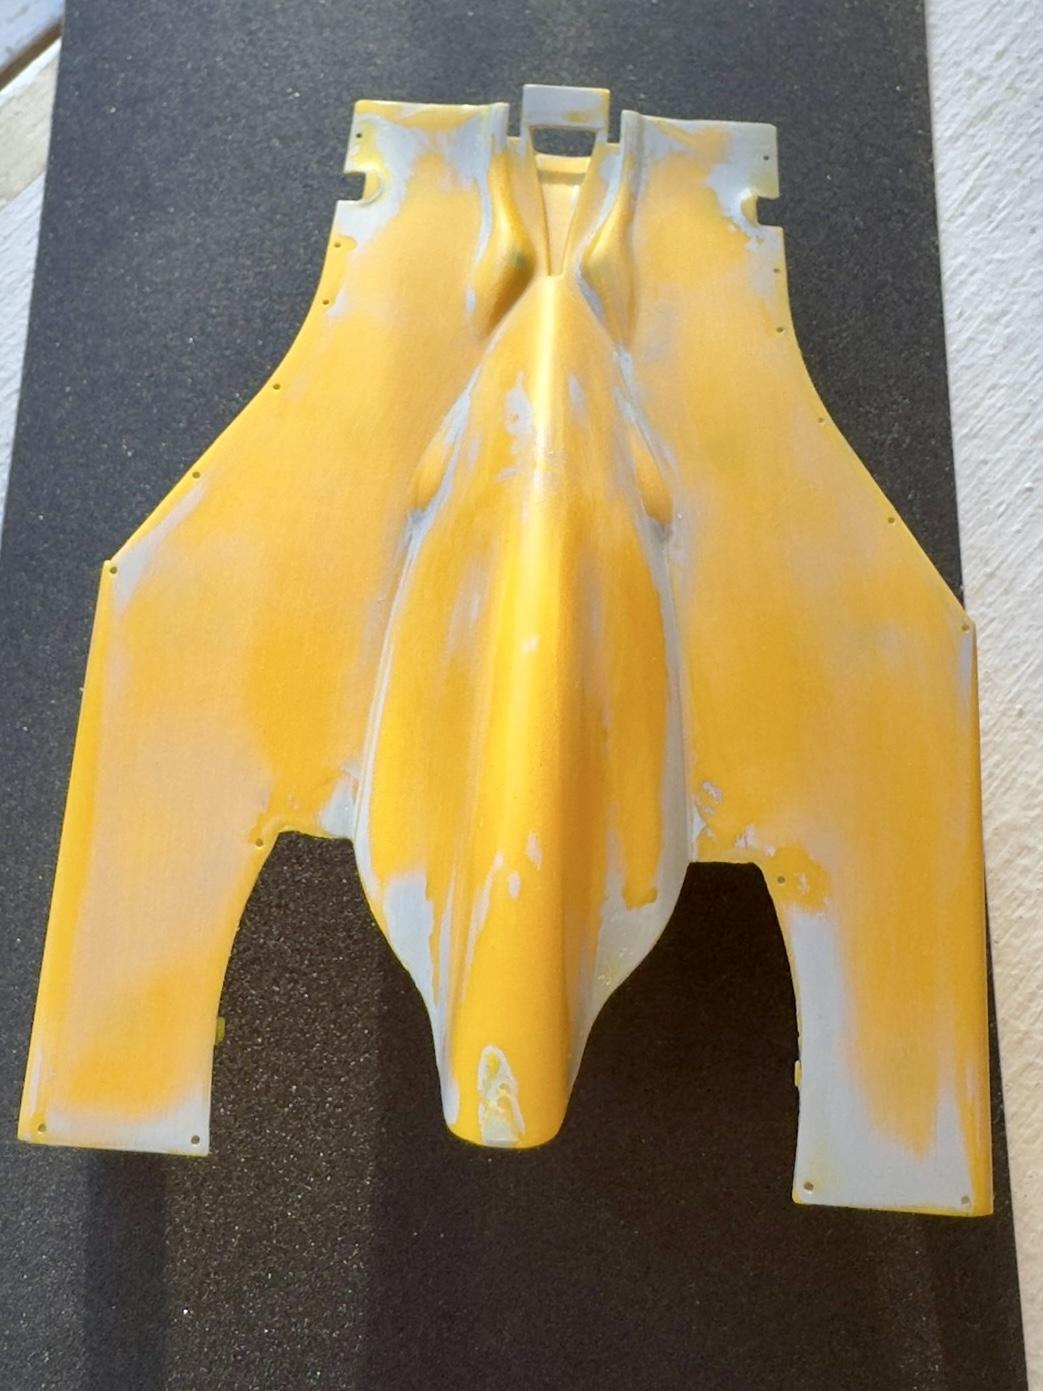
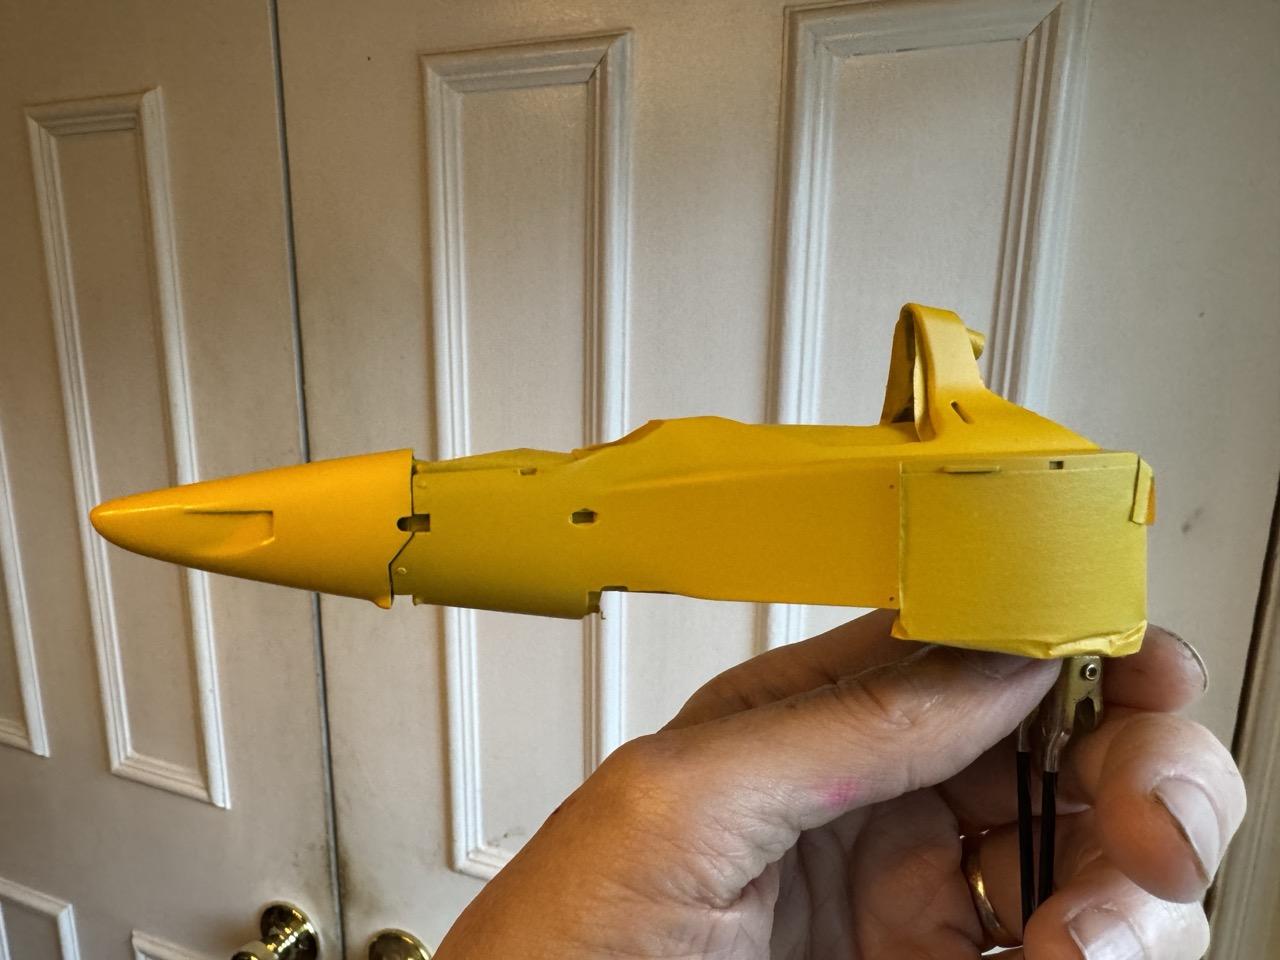
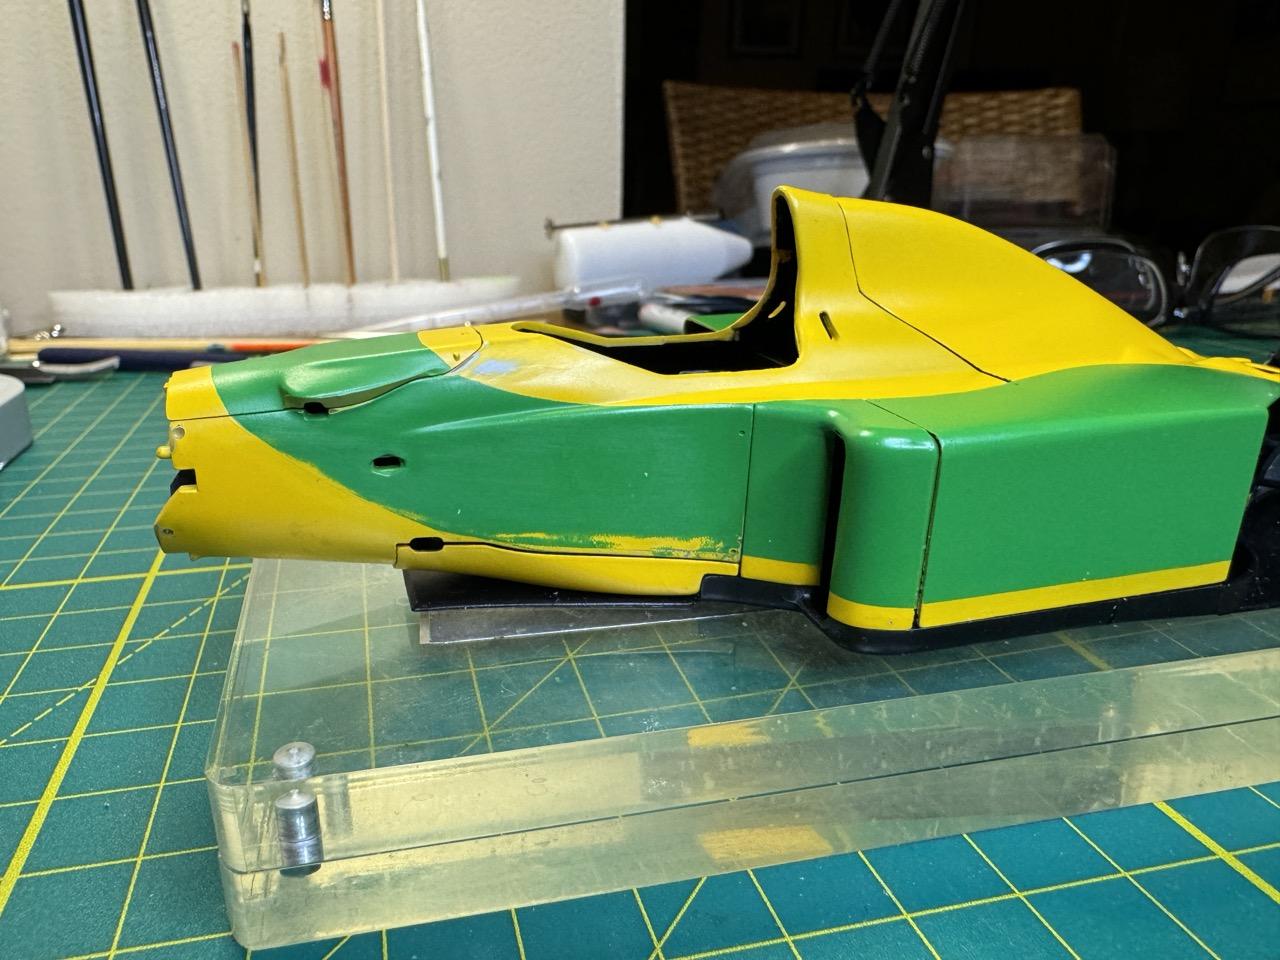
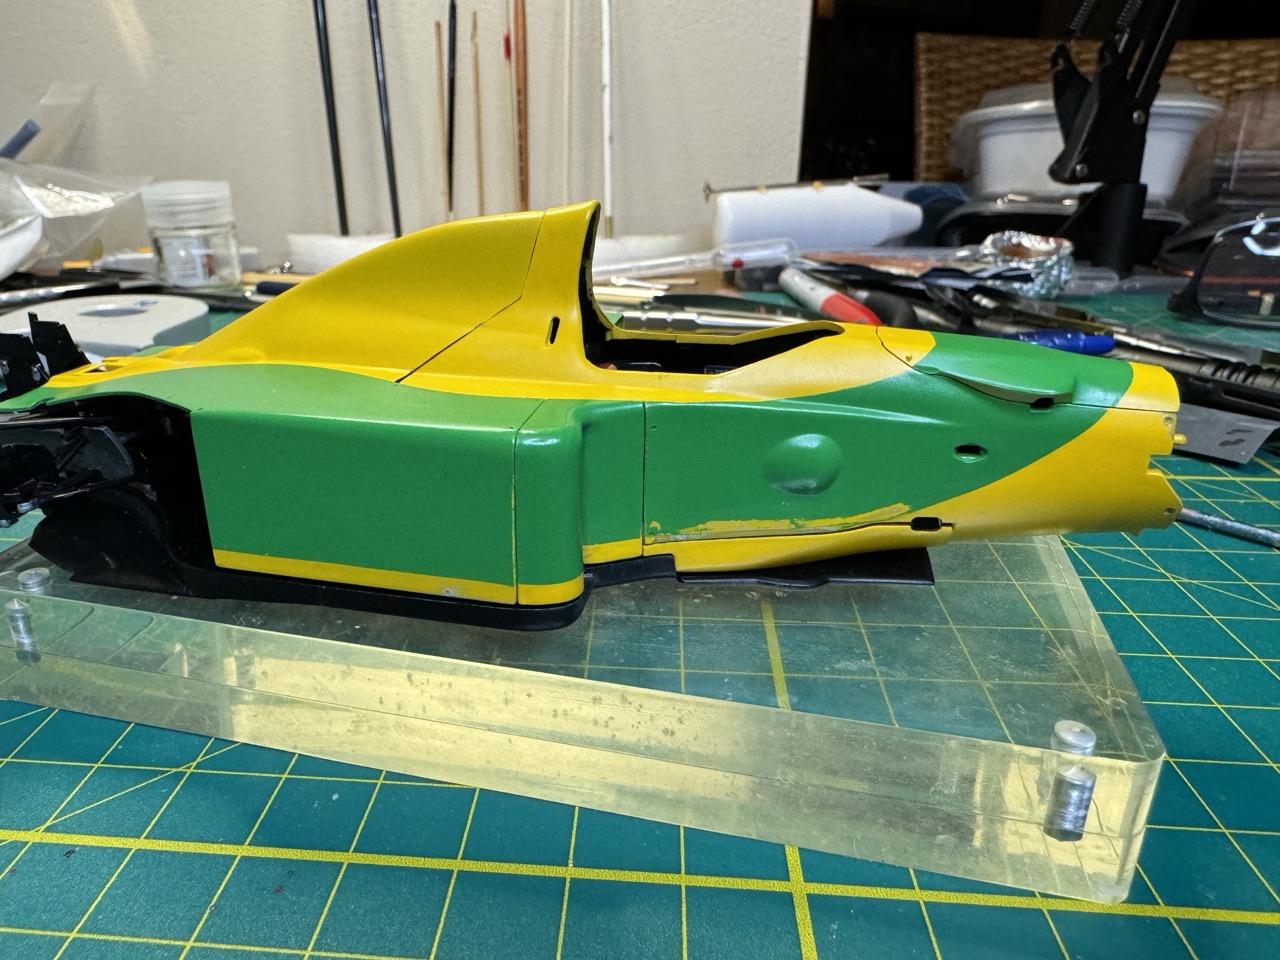
The two-tone paint repaint. O. M. G.!! I got the new bottle of Zero Paints "Camel Yellow" that I need to deepen some areas and, wickedly, to repaint most of the line that separates the green and yellow colors. The yellow border at the bottom of the body is too wide. If I'd dry fitted the model even once before painting the green over the yellow base coat, I would have noticed the problems (with an 's'). As I mentioned, I had completed the cockpit and engine decades ago when I bought the kit. And that's where it stayed. For some reason I read the instructions to say to paint the bottom-exterior of the cockpit silver (I still have the little tin with the '11' stamped in it). Anyway, as the picture shows, that part is shown to the world and makes up part of the body work. If I had dry fitted earlier, I'd have noticed this! In another life, I had hand painted the bottom of the cockpit silver: As a result of not pre-fitting, I got to do this as an after-the-fact, instead of being able to plan around it: Which got me to here, which presented some obvious decisions that needed making: My options were 1. to align the yellow stripe at the bottom of the cockpit only, instead of 2. doing the rest of the body to match the cockpit line. Mind you, except for a slight deviation in the line, the green on the monocoque area was correct, running right to the mating of the cockpit bottom. Instead of just fixing that small error, I go for option 1, moving the line (double entendre absolutely intended!): And this is what I get for not paying attention, and again, for not pre fitting days ago when I first masked for the green top coat. The obvious problem here is that I should have opted to extend the green top coat down instead of applying my precariously depleted yellow to go up. No, not to save the yellow! Cripes, that would have been a side benefit, and a big one at that. Instead: The reason I should have gone down and not up is: That would have placed the color switchover line where it was supposed to be in the first place, and I would not have been building up a huge ridge by having primer + lots of yellow + green + more yellow. I could have just added green... end of story. The obvious misguided driver in my decision making was (besides lack of experience), that I'd have had to do all the panels with option 2. Now, I get to do even more to correct this and some other problems... if I want to go that route, and I think I do. BTW, all of what I state, I do so in large part to explain my decision making and the technique and process I used based on the options as I saw them. All of this is begging for feedback. Begging. Did I understand the problem? Did I make the right choice. Was there an option I didn't identify (besides chucking it and starting a new one or giving up the hobby before I get hurt). What about technique? Where could I have improved on that? Please help with suggestions and observations. Thanks.
-
Ebbro/Tamiya 1:12 1968 Matra MS11 F1
4knflyin replied to Nacho Z's topic in WIP: Other Racing: Road Racing, Land Speed Racers
I wrote RB a couple of times asking him to tell me the correct size for 1/12 brake calipers. I can't remember now, but I think it was AP who used a banjo fitting on their brakes. Anyway, crickets... I can pretty much say by looking at them that they are water and engine oil banjo fittings, none of them delicate enough for what I'm remembering. As for the FS14B decals, I decided to stick with the Cartograph. If you think I may be making a mistake, please let me know. If I get a kit with Tamiya-made decals, I run to Shunko. LOL. Really, please tell me if you think Cartograph are not top tier. I have a couple other models where I've decided, if I get to them!, I'll use the Cartograph. Curious, though, is that I have in 1/12 scale the: Williams, MP4/6, Tyrrell 003 (bull nose for sentimental reasons), and even an MP42C, yet the most beautiful of the 80s/90s cars that comes in a kit is the 641/2... and I don't own it. I really wonder about how well I'm aging. (How can we lobby MFH or Italiana or whomever to produce a kit of the short-lived Lamborghini 291? That, I think, was the most beautiful of the greatest era.) Thank you for your note about TVF1. I saw the contents of their kit when I was decided between them and TS. I went with TS because of their dominance, not knowing any of the backstory on TVF1. However, looking at the TVF1 parts, I was blown away. This was about 6 mos. ago and it was an ebay sale, not direct from TVF1. I'm glad I found the TS Master Detail set for a "reasonable" price, seeing as they now go for upwards of $500 and more. They can still be had for less than four bills, but it takes looking. Lastly, I don't have a FB acct., and don't really want one, but I'll get one for the privilege of seeing some of the behind-the-scenes work. Will searching your name do the trick? It's weird how Meta cut off anybody who doesn't have an account from seeing content. EDIT: I almost forgot! I bought those cheezie CF decals for the Williams and decided they may be good as templates for descent ones. It hadn't occurred to me, but I think you are absolutely correct that they are blow-ups of another makers product. They look so bad. -
Ebbro/Tamiya 1:12 1968 Matra MS11 F1
4knflyin replied to Nacho Z's topic in WIP: Other Racing: Road Racing, Land Speed Racers
For whatever reason, I can't see some of the attached photos, such as the one you labeled as a pic of the real car. It doesn't usually matter, especially when I get fooled by pics of your work that look like real, solid, turned and formed steel. I'm particularly fascinated by the fitting at the junction of the hard and soft brake lines. That looks way realistic. Do you go into your choice of PE, paints, and rod materials somewhere else and I missed it? My only nit, and I only include it because you asked for critique: why on the upper and lower control arms did you not scrape off the mold plastic? However, it actually could pass as welding, you can tell them that's what it is and you added it! ____ Okay, I've got to get back to my kit. I've had the paint for a couple days now and just can't get motivated to take a chance on the two-tone rework making it all even worse and more irreversible. That's my fear. I should have asked guys here for advice, but in my newbie status, the feedback loop is too painful (but probably not as painful as screwing it up will be). -
Ebbro/Tamiya 1:12 1968 Matra MS11 F1
4knflyin replied to Nacho Z's topic in WIP: Other Racing: Road Racing, Land Speed Racers
Have you looked at the rbmotion.shop banjo fittings? They're the most precise banjo fitting reproductions I've seen. As a bonus, he sells (and I bought) an "FW14B A/N Fitting KIt (1/12 scale)" for your future build. He claims to have covered them all. Sorry if it's obvious, but I'm still back on page 6 for the most part. -
Ebbro/Tamiya 1:12 1968 Matra MS11 F1
4knflyin replied to Nacho Z's topic in WIP: Other Racing: Road Racing, Land Speed Racers
1) What an excellent idea! Thanks for that. 2) The last time I was at anything like a fishing store was when I was asked to wait for somebody at the Bass shop. Went in to grab a candy bar. I'll have to venture farther in the next time 3) Thanks for all the alt sources for detailing. John, as for this build: What you're doing with this is simply 1st Class. That engine and its history deserve all the love you're showing it. It was poor timing with the regs and the DFV that I recall were its undoing. And thanks for spelling out for me what you're doing with each step. I've stocked up with some models and I'm still stymied by what I don't know or, perhaps more accurately, by my lack of imagination. You're providing an excellent tutorial and encouragement for me. You certainly don't lack imagination. Your remark about F1 is prbably true, but I grew up on the stuff. I lived within a 2 hr radius of Nürburgring (not F1 at the time, but only 45 minutes), Spa, Zandvoort, and, farthest, Hockenheim. It's great to see the US so enthusiastic about F1. I don't have to explain to people what it is anymore! Lastly, your Matra Simca, and the Tamiya Matra Ford and Honda RA301 sat in my adolescent bedroom terrorizing me every day until I was 14, when they were finally replaced by a set of real life drums. I kept building jet and helicopter models, but I mean it when I say those F1 kits terrorized me. I so wanted to build them, but was afraid I'd mess them up or never finish. So now I have a few boxes of kits that I plan on building in my old age no matter how inferior they may turn out. Thanks to input from others, they'll turn out better than I first expected, I'm sure. -
I have to say, the fit and finish of the model is better the that of the real thing.
-
Niiice. Say thanks to the missus.?
.jpeg.0ee72bc2e696a7a2d9e9623bbbfece80.jpeg)
.jpeg.26a363d3a267a8bfd83e0ab982a14b4c.jpeg)
.jpeg.c86d27a52fa3b7596fbfac0cb2222671.jpeg)
.jpeg.64f6a2c05ed3645ffd18fcf50ee4dcea.jpeg)
.jpeg.a956cb84e25b9c94458ba8c0b4a72f5b.jpeg)
.jpeg.771b4186f4e2fb6b5e02687846ad2817.jpeg)
.jpeg.3d7a9cd3072906d79085985fc7ea7631.jpeg)
(1).jpg.9cf5b6476e4b2bfdb4e3d5ee16006e91.jpg)


.jpg.0d67abd6021e69deb712019e0aaf1e54.jpg)
.jpg.12e74521521b29b4a2e9a1db308c22bc.jpg)
.jpeg.a279ecfbaaeec55e0f40dc96b3bb0603.jpeg)
.jpeg.858386bb2704196b41fc11a22e640e67.jpeg)
.jpeg.110273713325973068abeab6aab2f77c.jpeg)
.jpeg.f60b35c51350bce27246aab1658df78c.jpeg)
.jpeg.e0b6a6c86f6c591a5dfae080e5c3c19f.jpeg)
.jpeg.49d92a86f4c8bdf1cd621cbd6b81948c.jpeg)
.jpeg.07abbccb6ba61ec4b3bd49b9632e2654.jpeg)

.jpeg.e2f93b67dad3af6b92ac76f84111a6db.jpeg)
.jpg.f70b27ac51582d0cc79abdd2fedca733.jpg)
(1).png.d86919e48339c667e1a8f5935e6a79af.png)
(1).png.c30296058de67ddf4f89af631342f821.png)
(1).png.091a103b3aaec31eba176b7e6087bc52.png)
(1).png.35dcfe0aae47571c8a870e8dcf747796.png)
(1).png.9d30a7abd8dcd68789db35c8b43d7909.png)
(1).png.234956335d2e05fcf443018abb45f4a3.png)