4knflyin
-
Posts
135 -
Joined
-
Last visited
Content Type
Profiles
Forums
Events
Gallery
Everything posted by 4knflyin
-
Alfa 33 Stradale restoration
4knflyin replied to Dave B's topic in WIP: Other Racing: Road Racing, Land Speed Racers
I think this must be one of those questions that is actually stupid... because everybody else seems to be in the know: what make and scale is this kit. That paint job is striking. But, what happened to the window? UV rays? I already get the strong feeling that this restoration is going to be far more successful than mine. Unfortunately, all you have to do to succeed at that is keep it serviceable. I failed at that, much less did I improve it. Oh brother. Should be interesting. -
Paint Strippers - What to Use?
4knflyin replied to pbj59's topic in Model Building Questions and Answers
I’m glad you found something that works. From your first post, I was under the impression that you were at wits end after trying all the usual solutions. Then I saw your reply that mentioned you hadn’t even yet tried IPA and realized you were just at the beginning. The mention of using Easy Off was to me a sign of desperation… I would never have thought that came at the start. Lol. My impression was likely heavily skewed by my personal my first experience stripping paint from a plastic model. Oh, the memories.? In the future, you now know that you can use paint thinner as long as you are careful not to soak the plastic in it. But may I suggest that, if you’re not in a hurry, soaking it — yes, soaking — future pieces in 99% IPA for a few hours or overnight (has to be the 99% variety). The IPA definitely will never harm any of your pieces and the paint usually comes off in layers. I have found that it sometimes leaves bits of Tamiya fine gray primer, which is then easily removed with either a rag or paper towel soaked in the IPA and very little elbow grease. As an experiment, I’m going to soak some sprue in Mr. leveler thinner and see if indeed it doesn’t harm the plastic. BTW, I use the stuff to thin every type of paint, even Duplicolor, annd even once by mistake with Alclad. No problems. Acrylic, lacquer, decanted Tamiya, the Mr. Thinner is great stuff. All that being said, this has been a useful thread to me. And by the length of it, lots of others, too! Well done. Post a couple pics, won’t you. -
Paint Strippers - What to Use?
4knflyin replied to pbj59's topic in Model Building Questions and Answers
Maybe not your specific products, but difficult to strip coatings, absolutely. Might I suggest using some DOT3 brake fluid. Do an area at a time — no soaking! — and when it starts to bubble and lift the coating, use a toothbrush or whatever with detergent to clean it off. In my experience, it rips right through any outer coat, decals, color coat, or base with little issue. if you work on your own car, you remember being warned numerous times about how caustic brake fluid is… to almost everything, but especially to your car’s finish. But it also can change the consistency and elasticity of plastic if left too long, thus the no-soaking admonition. GL. Of course, there’s always brake cleaner, but I’m not sure there would be anything left of anything if you tried that ???? ? -
Thanks. Of course, you wanted the wheels most. Do you recall if the mirrors were unnoticeably different from the originals? They’re my focus.
-
Hey there. I'm building this kit right now and have looked for the right side mirror to no avail. Thanks! Can anybody attest to whether it's worth printing these mirrors?
-
1/12 Tamiya Williams FW14B
4knflyin replied to okazaki0511's topic in WIP: Other Racing: Road Racing, Land Speed Racers
Thanks. How did you create the dotted lines on the steering wheel and front wing? Until I saw this post, it never registered with me that those lines on the wing exist. So, thanks for that too! ?. -
1/12 Tamiya Williams FW14B
4knflyin replied to okazaki0511's topic in WIP: Other Racing: Road Racing, Land Speed Racers
And yet you did. And well. -
Paint Strippers - What to Use?
4knflyin replied to pbj59's topic in Model Building Questions and Answers
You know, I think you’re right. I’m so used to using brake fluid that smells awful, bike racing blue. But I recently used DOT3 fluid I had around from when I worked on a friends car, and it had no odor at all and had the same consistency as the ELO. Brillient deduction, Watson. -
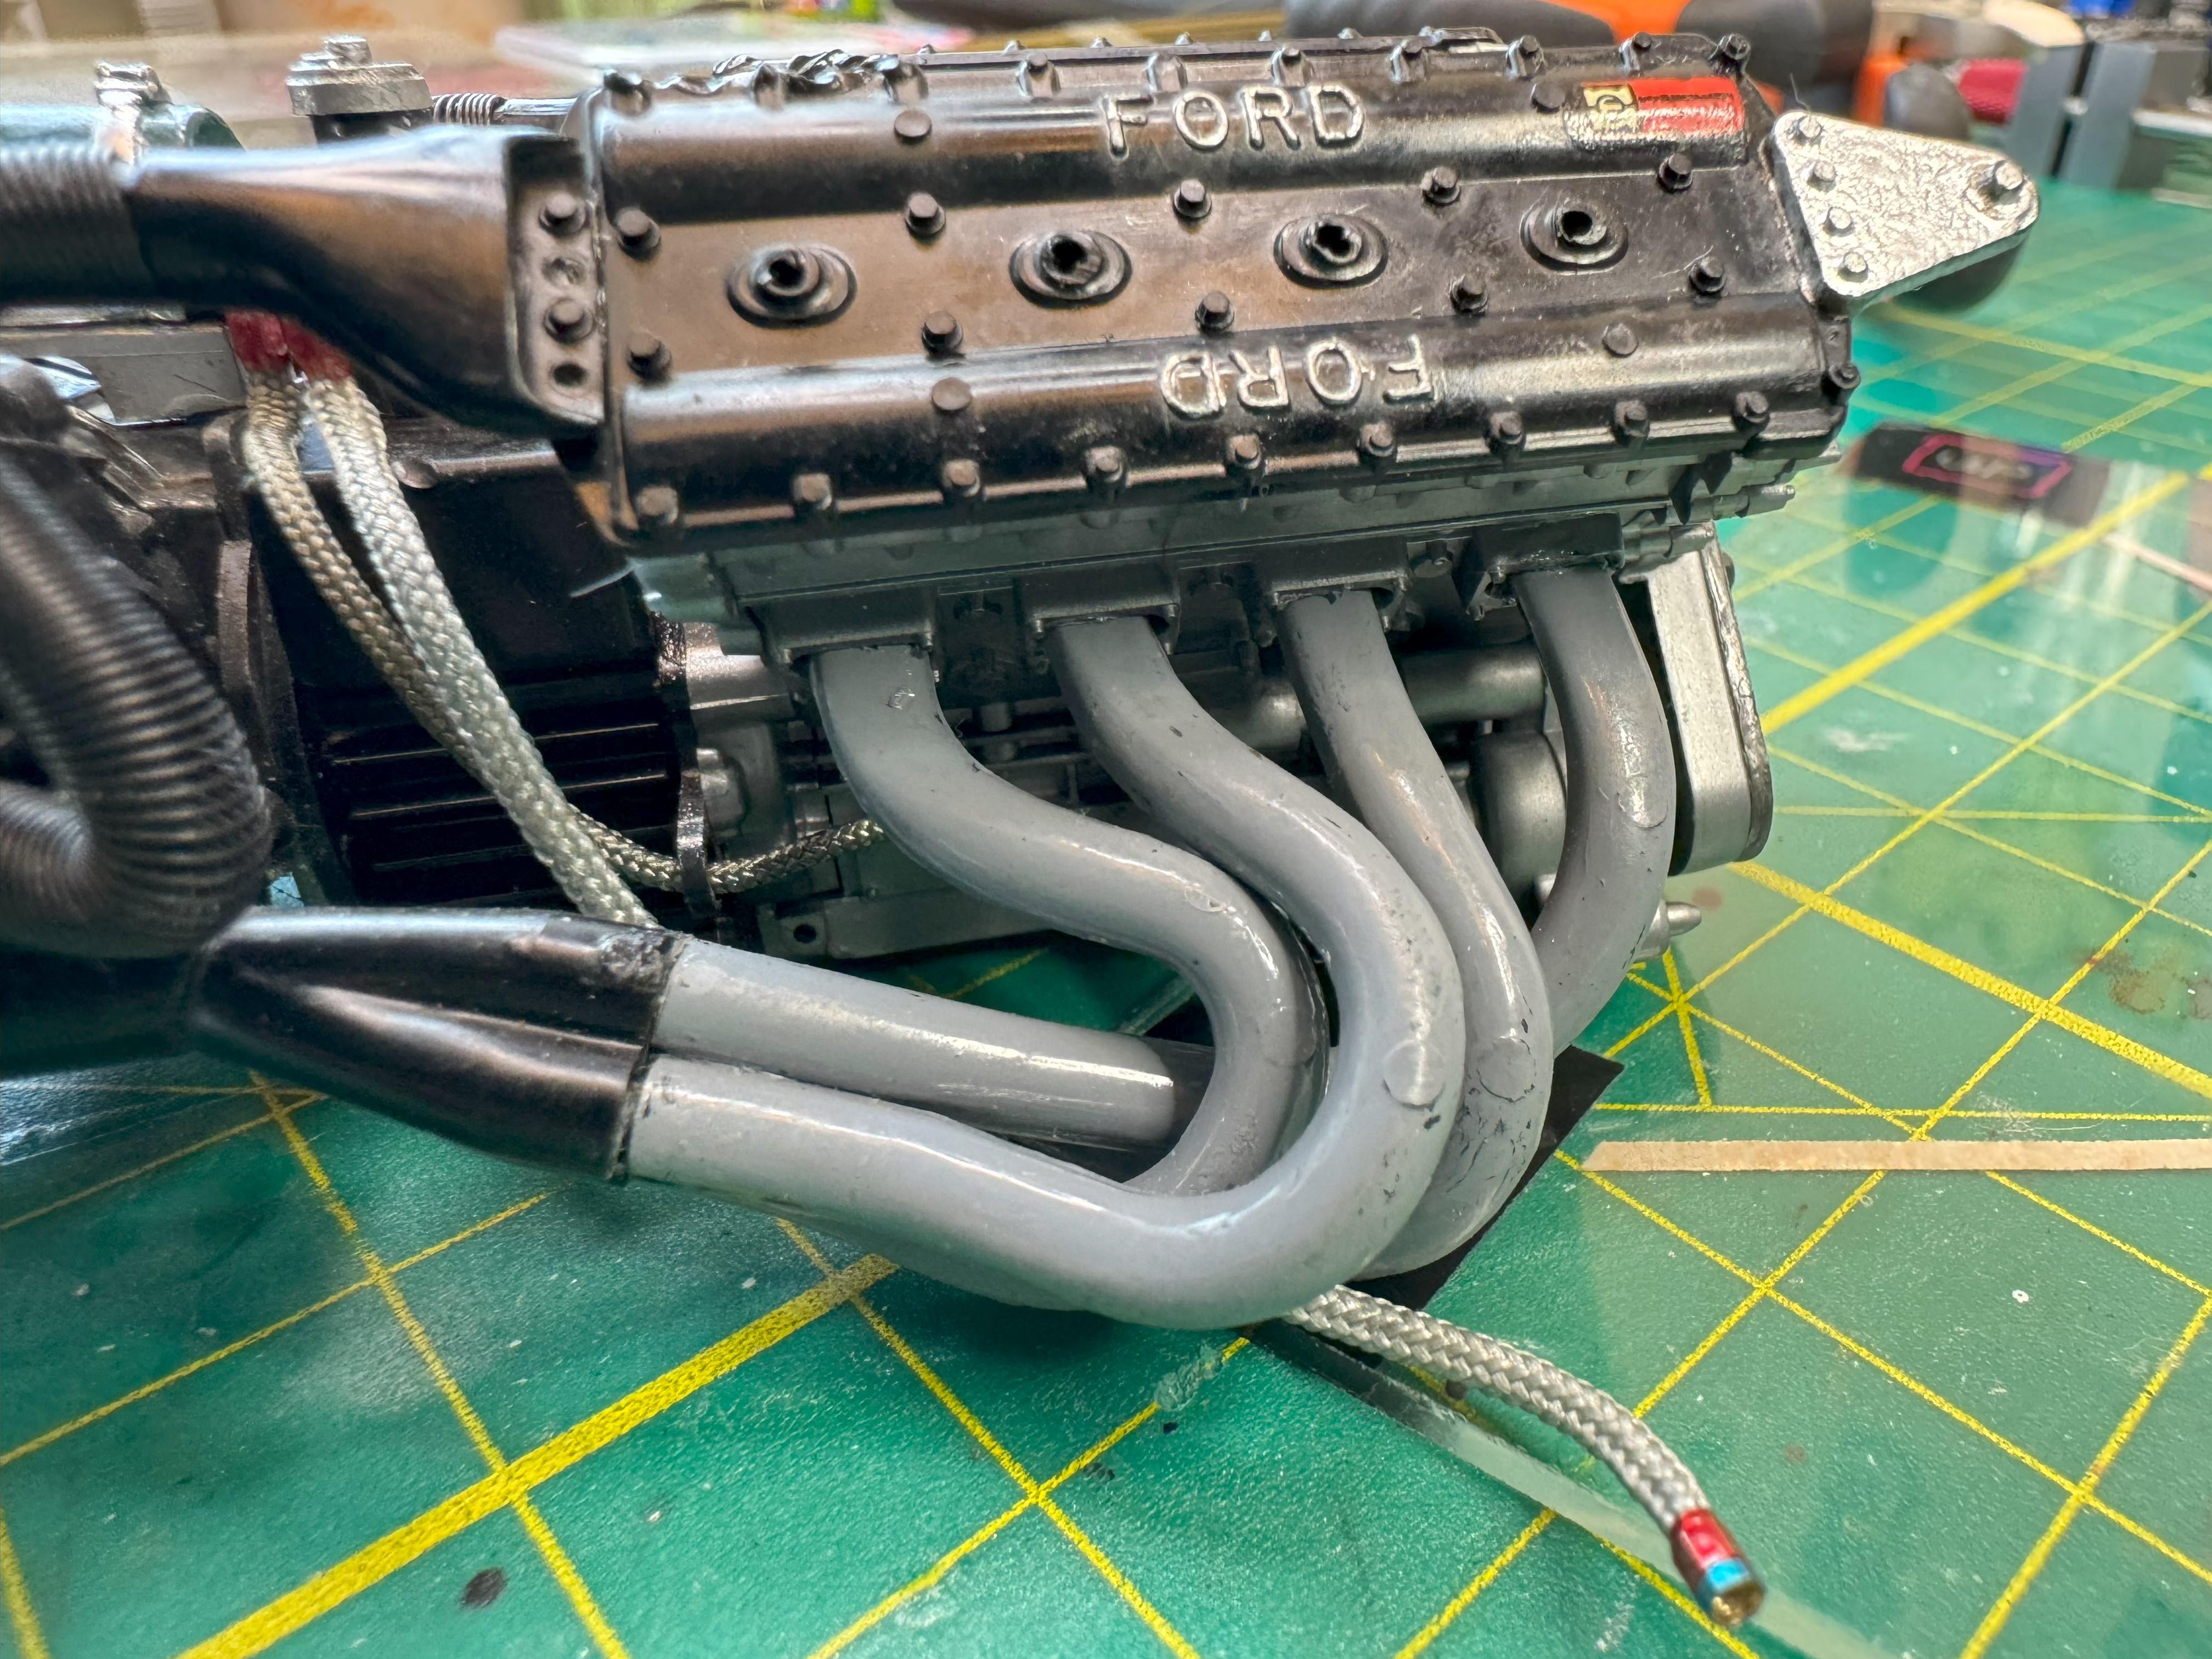
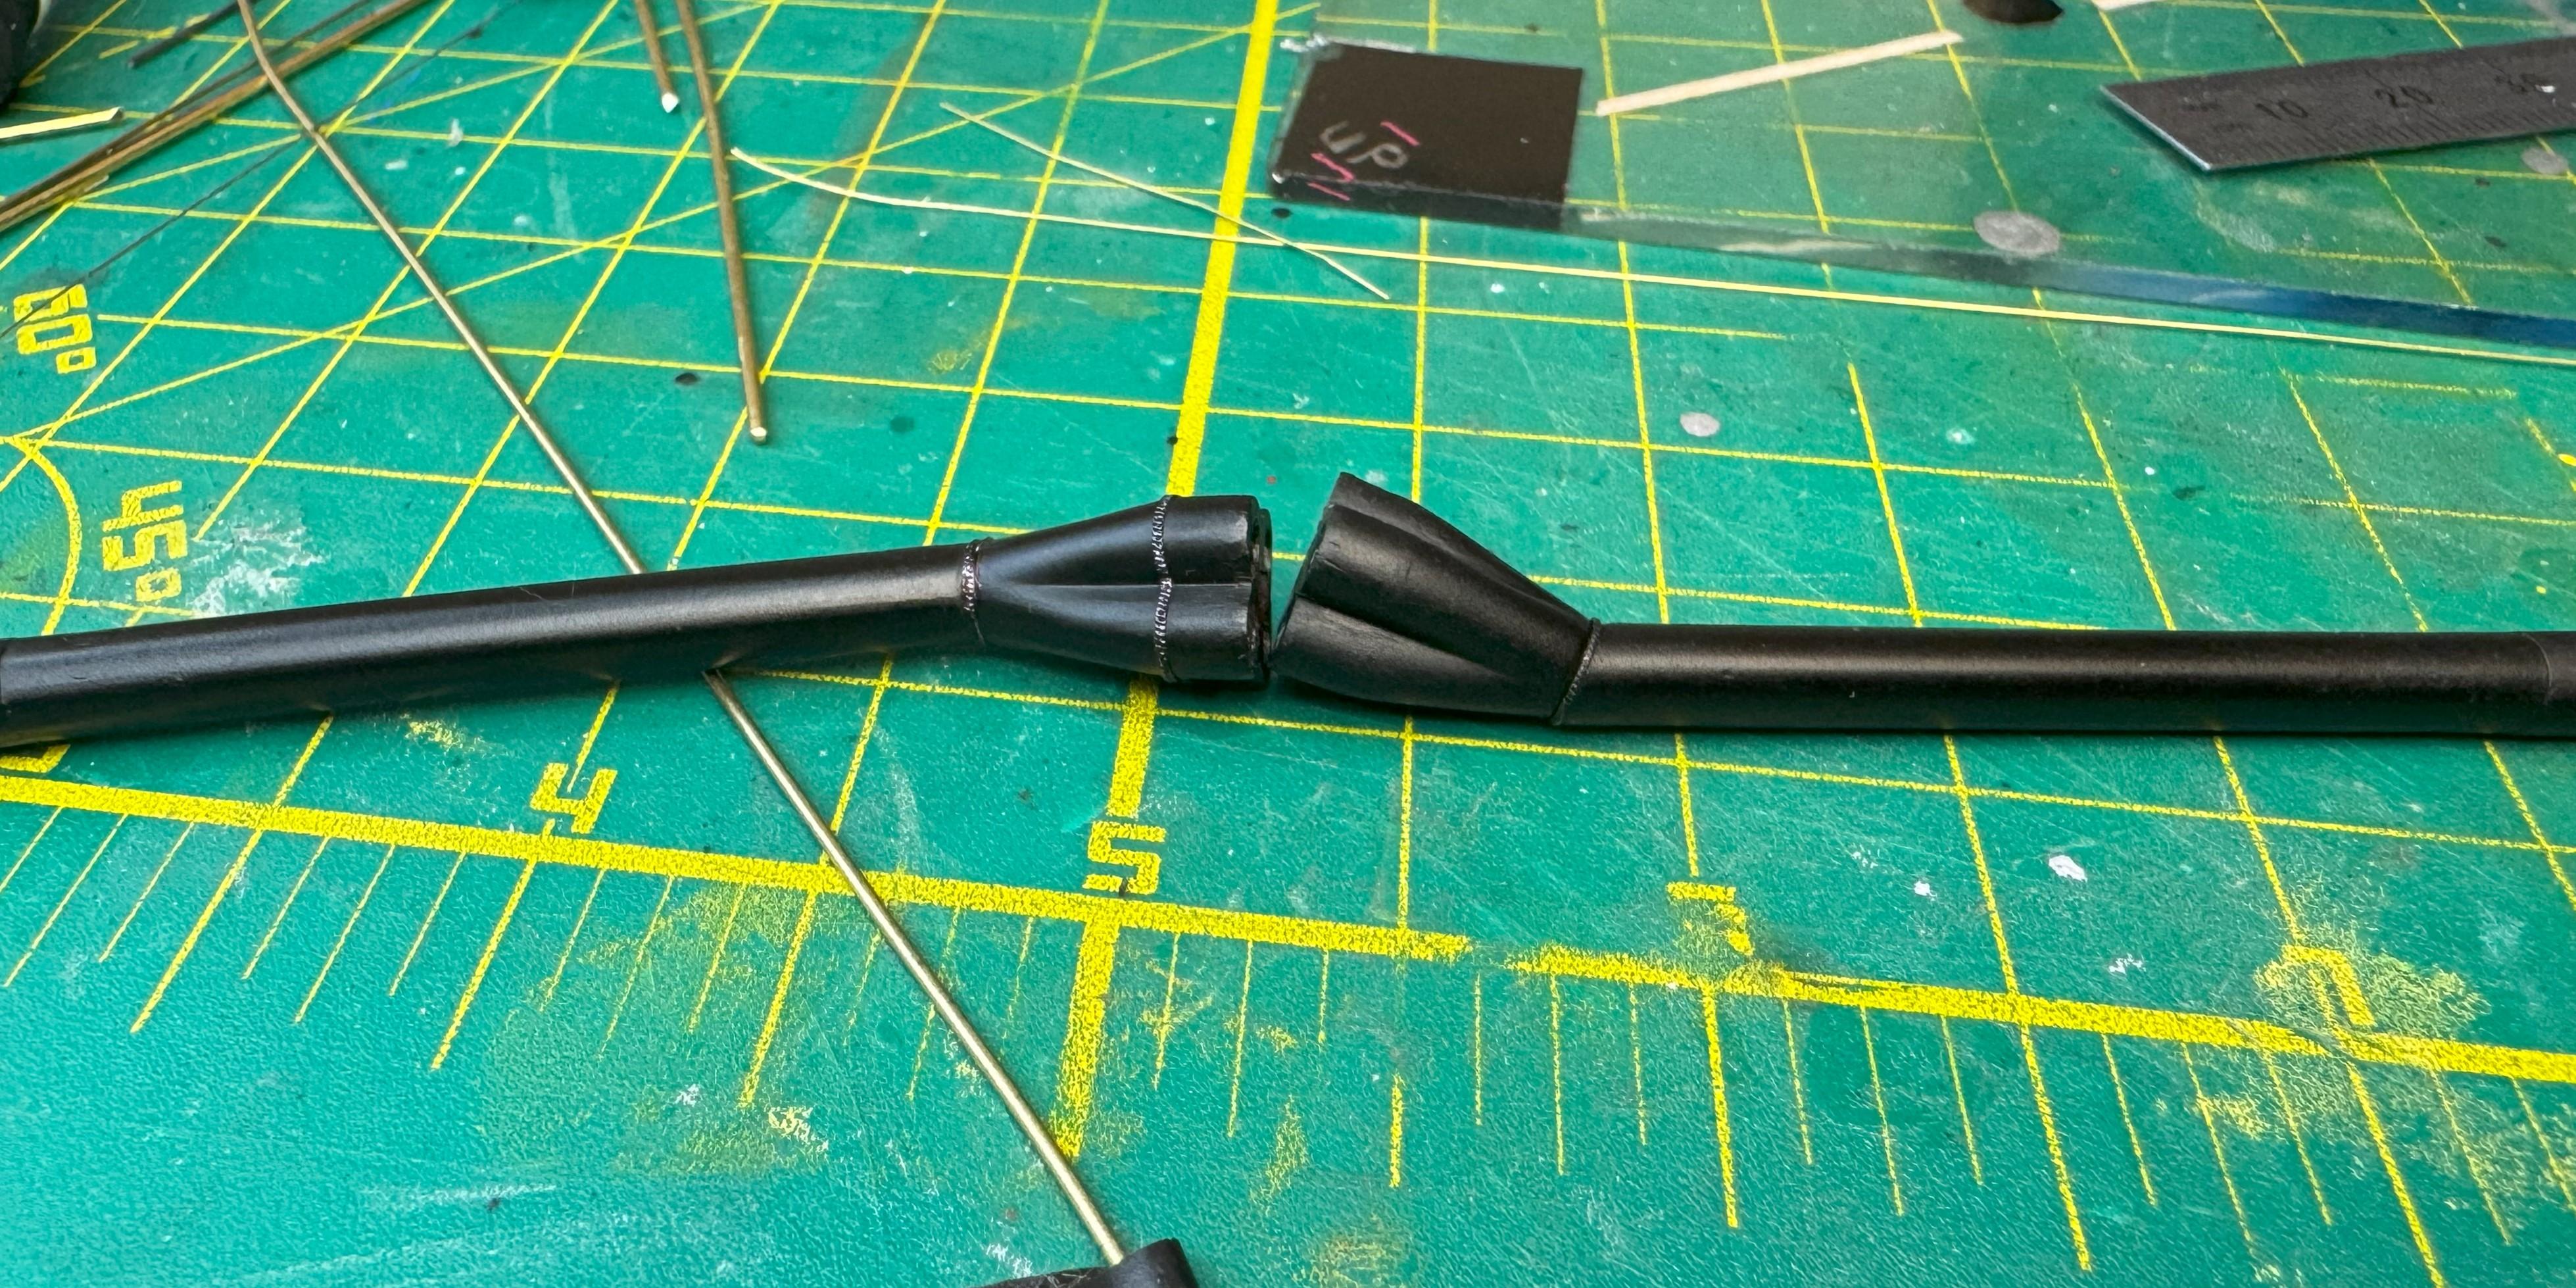
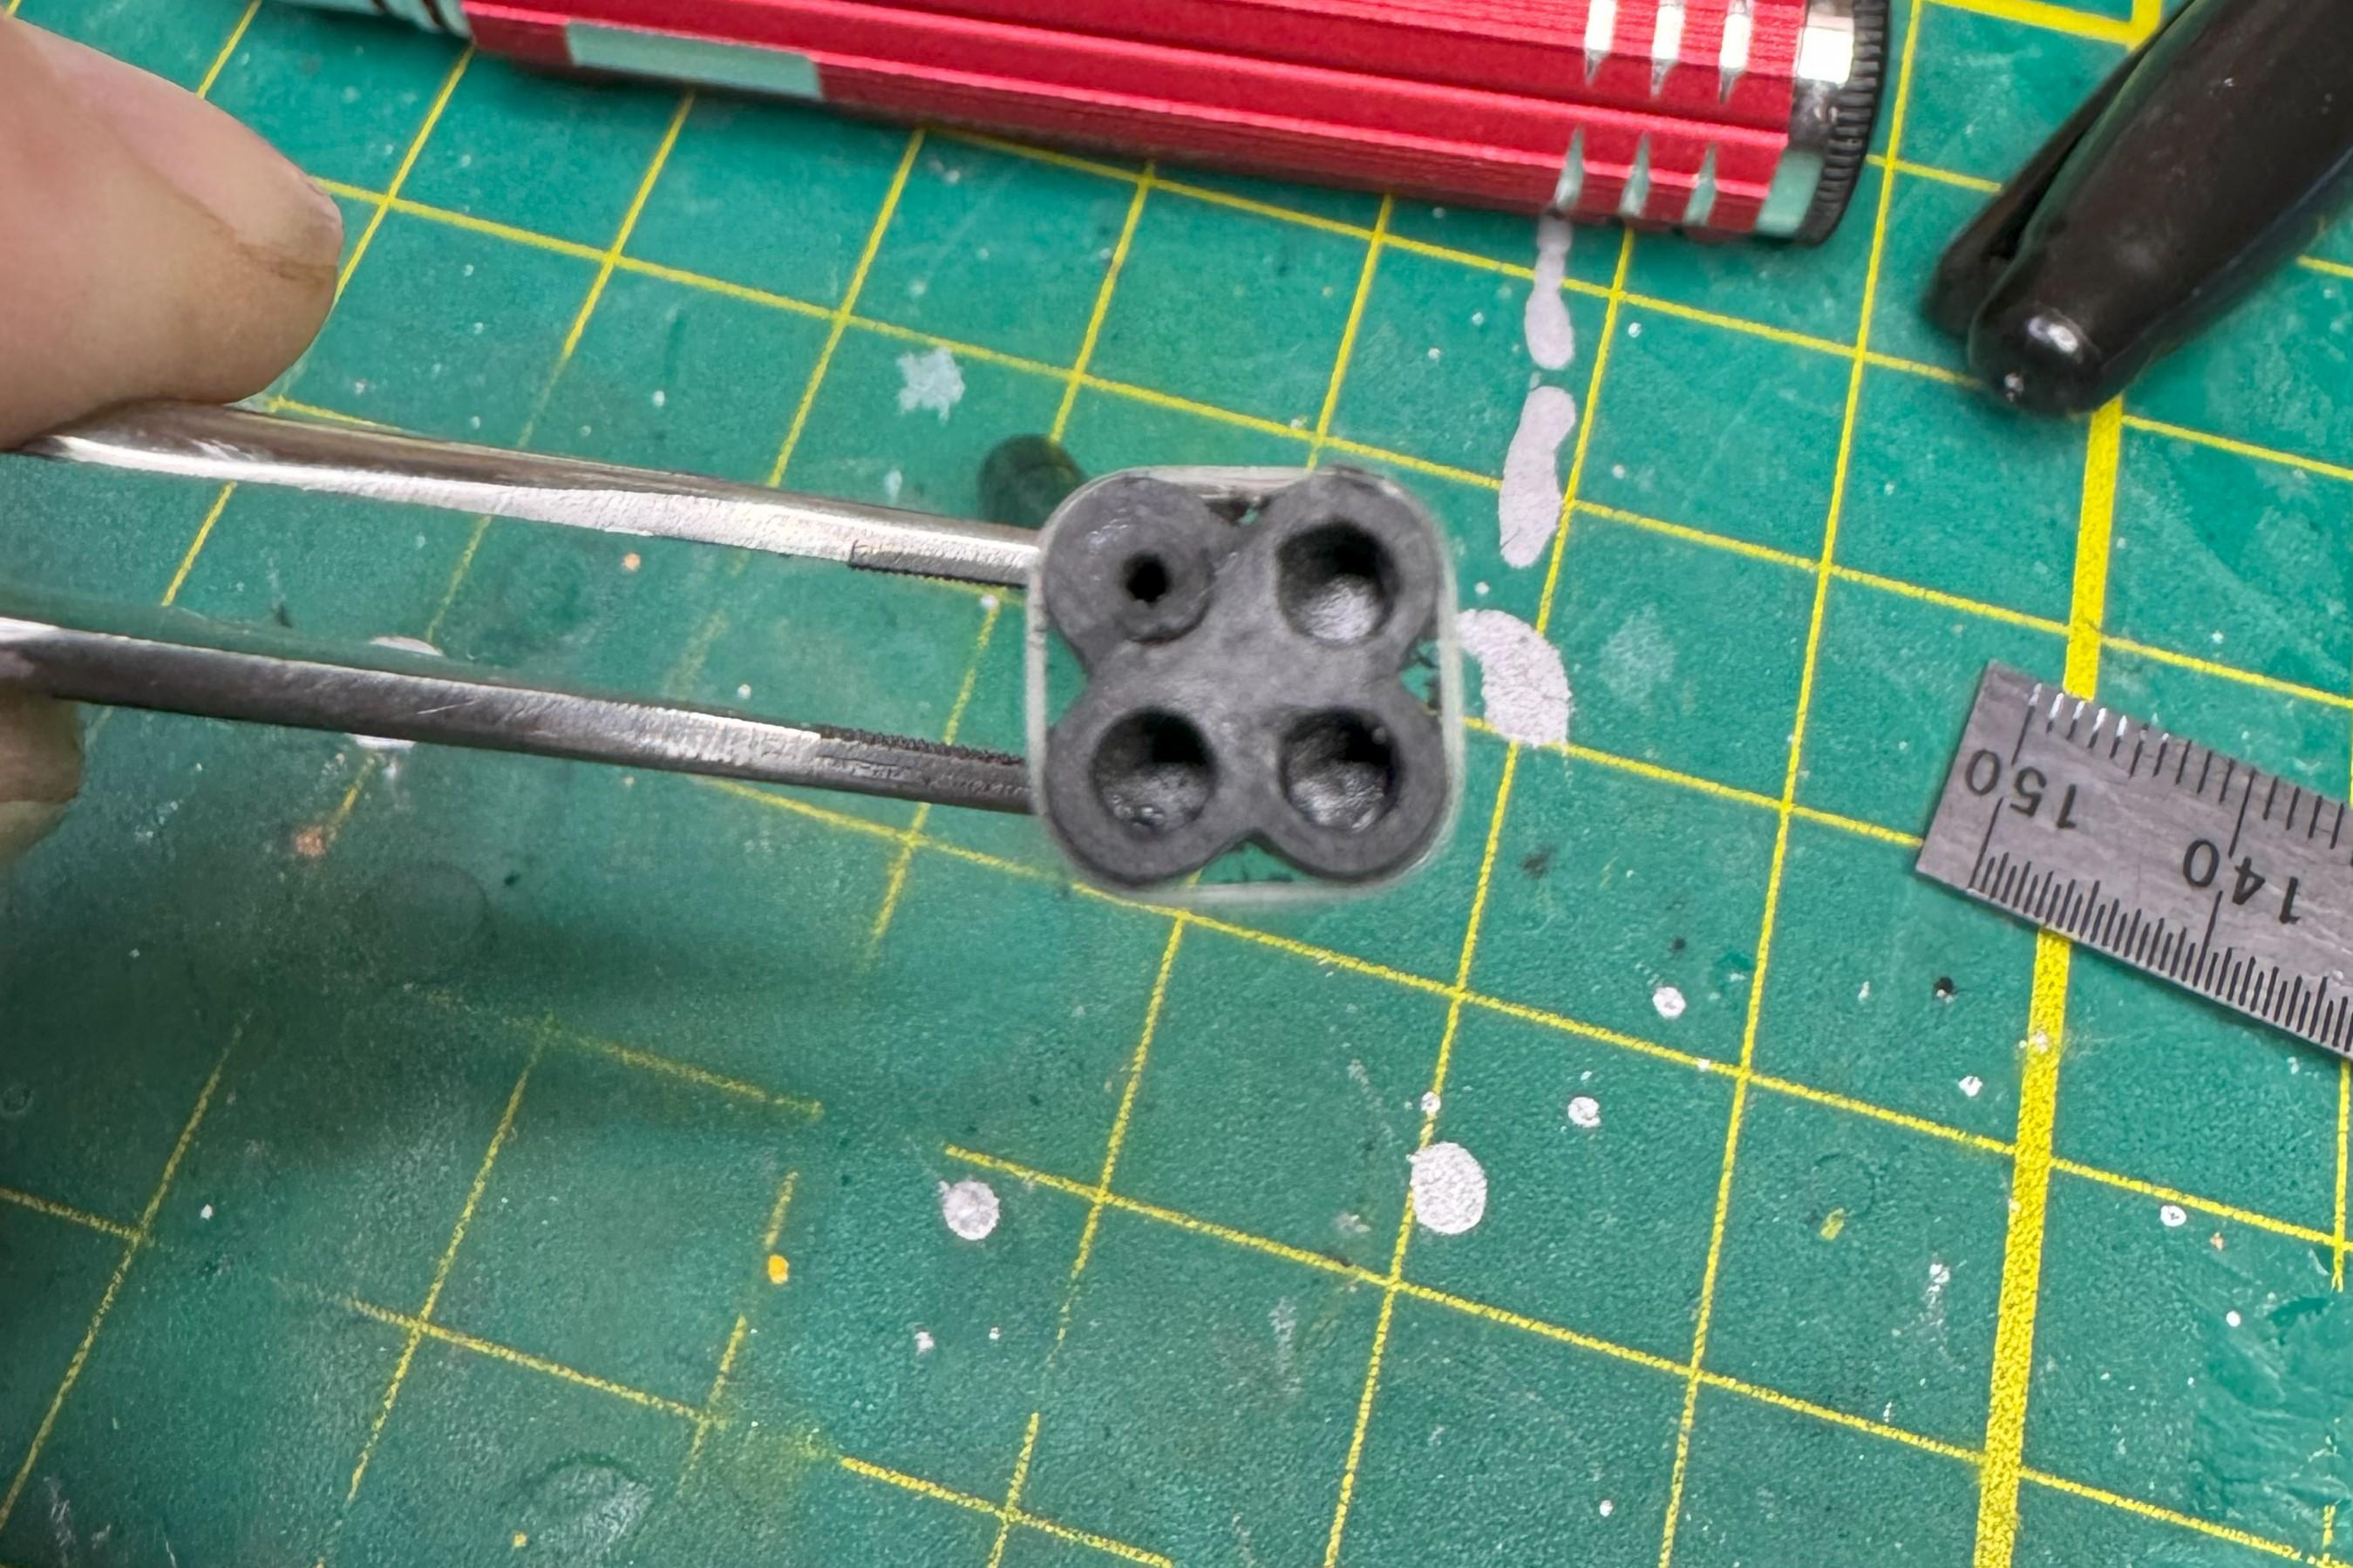
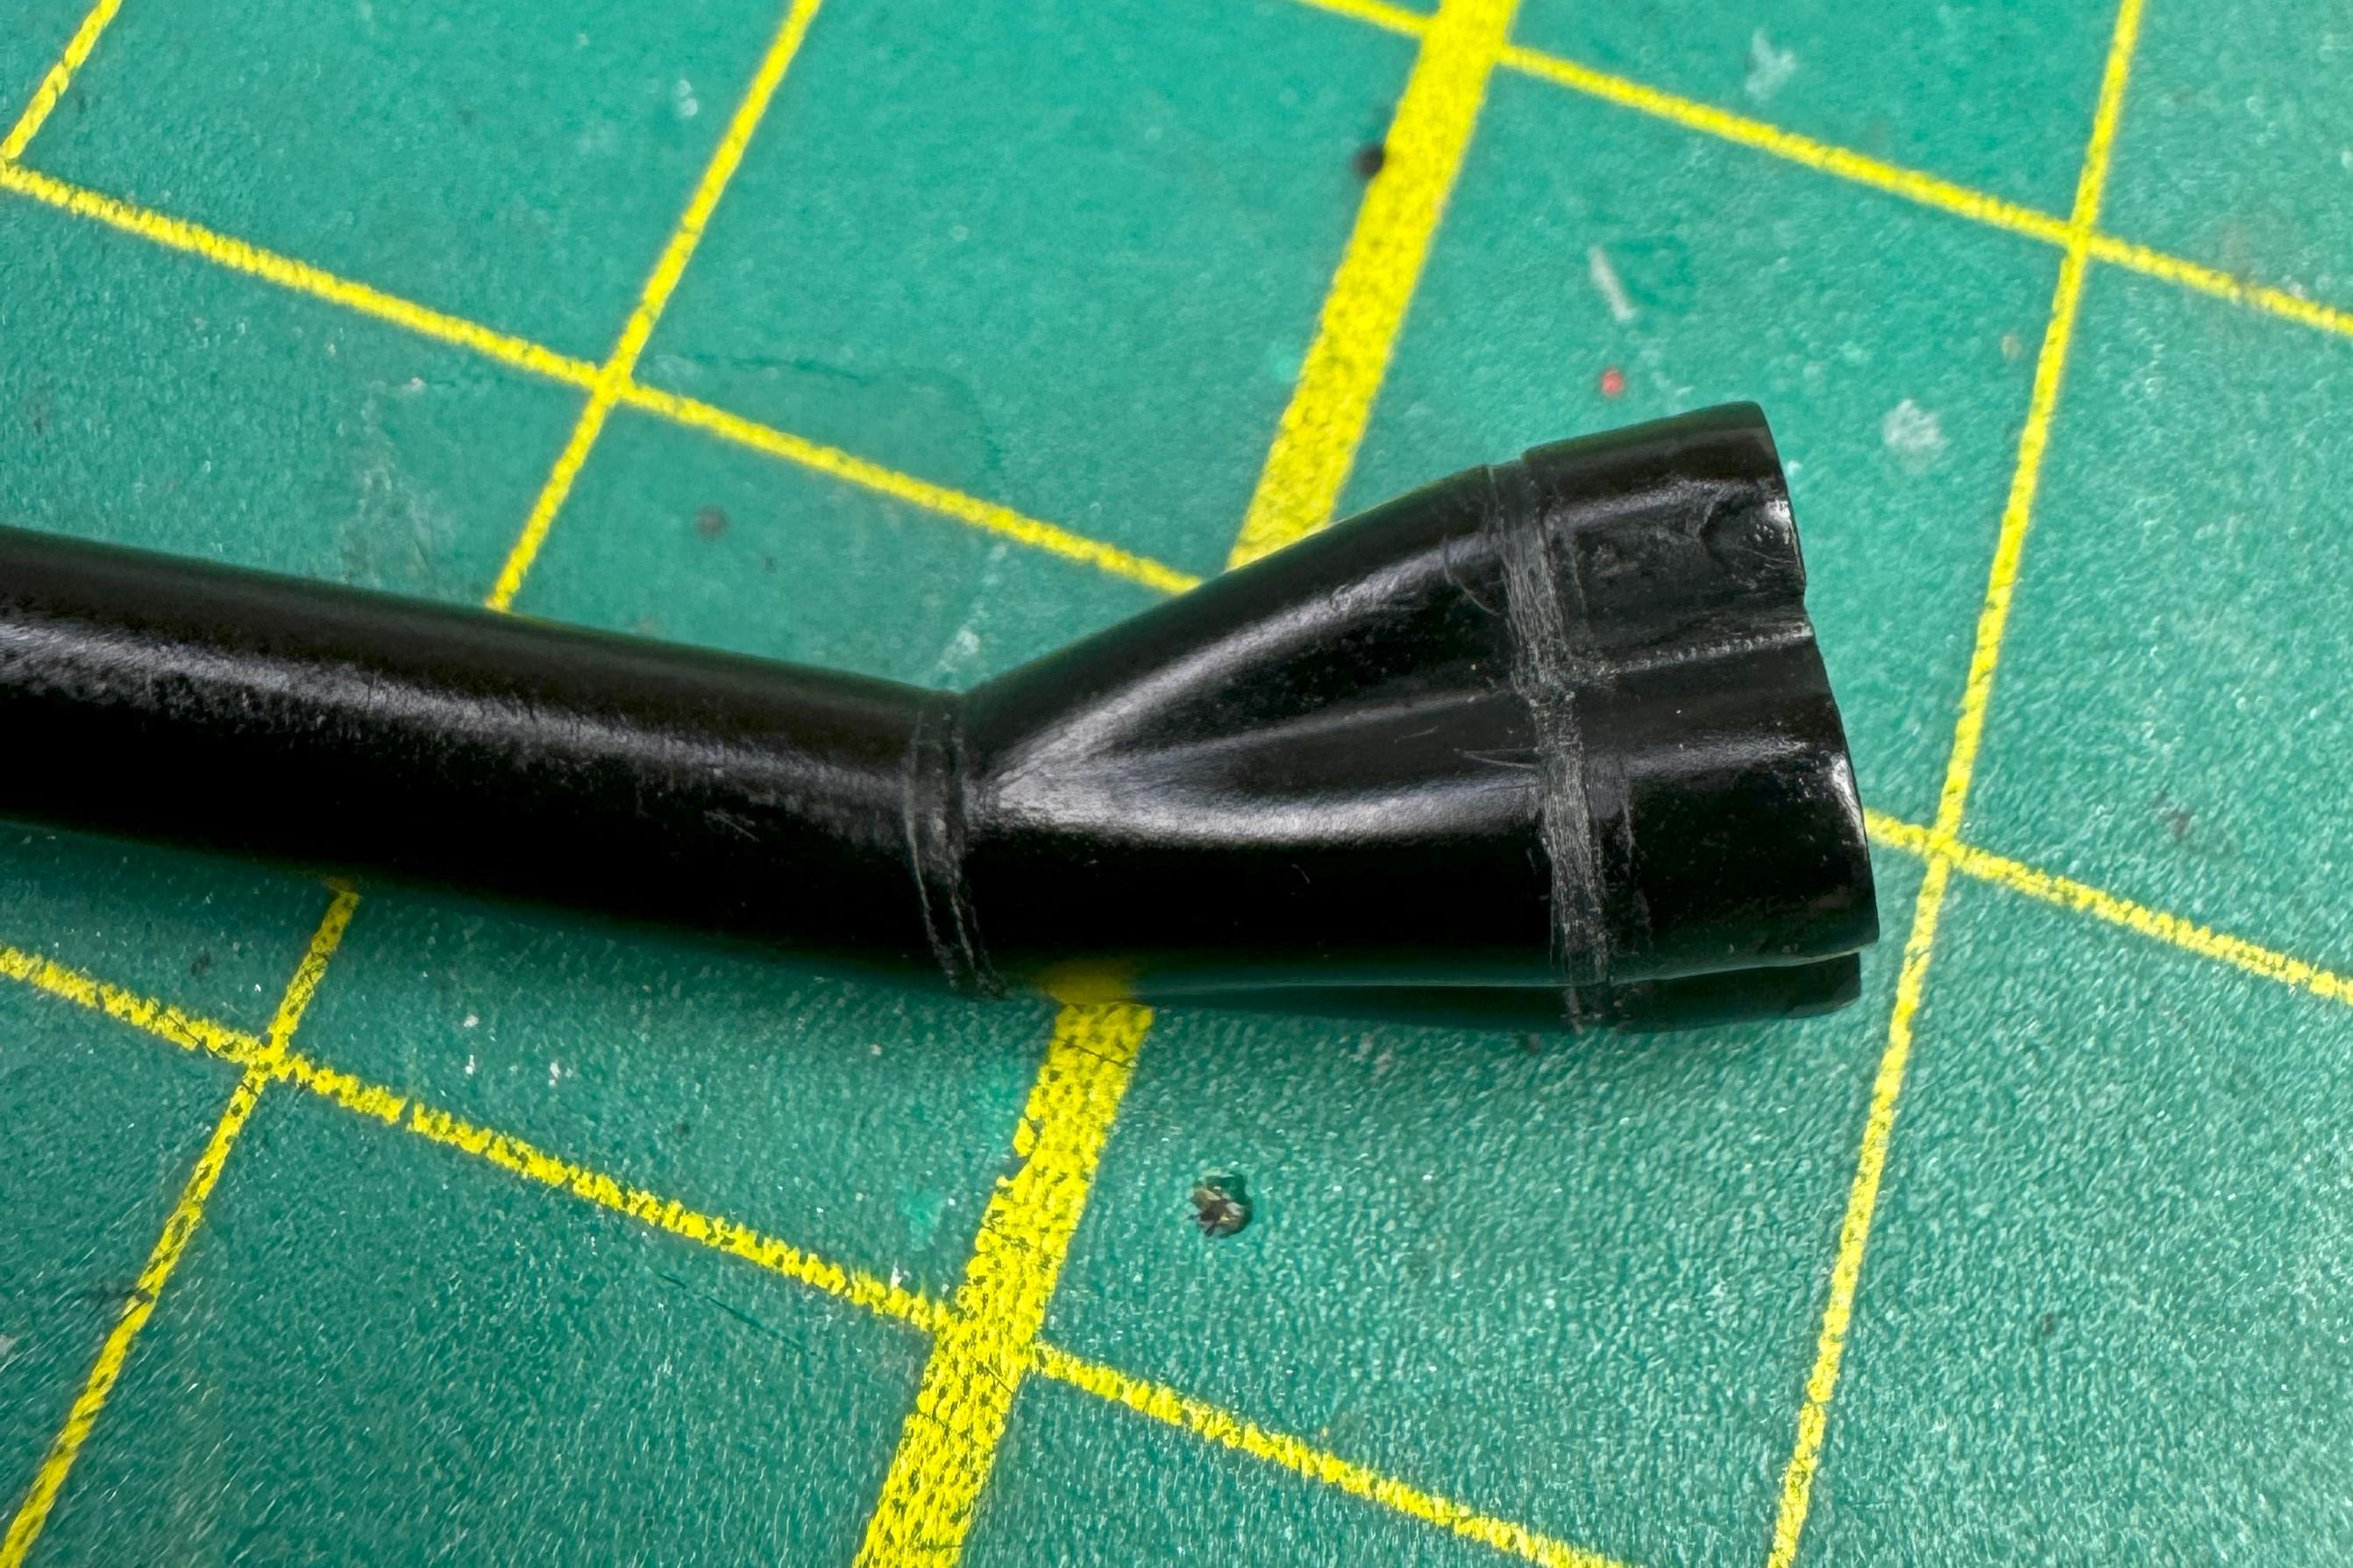
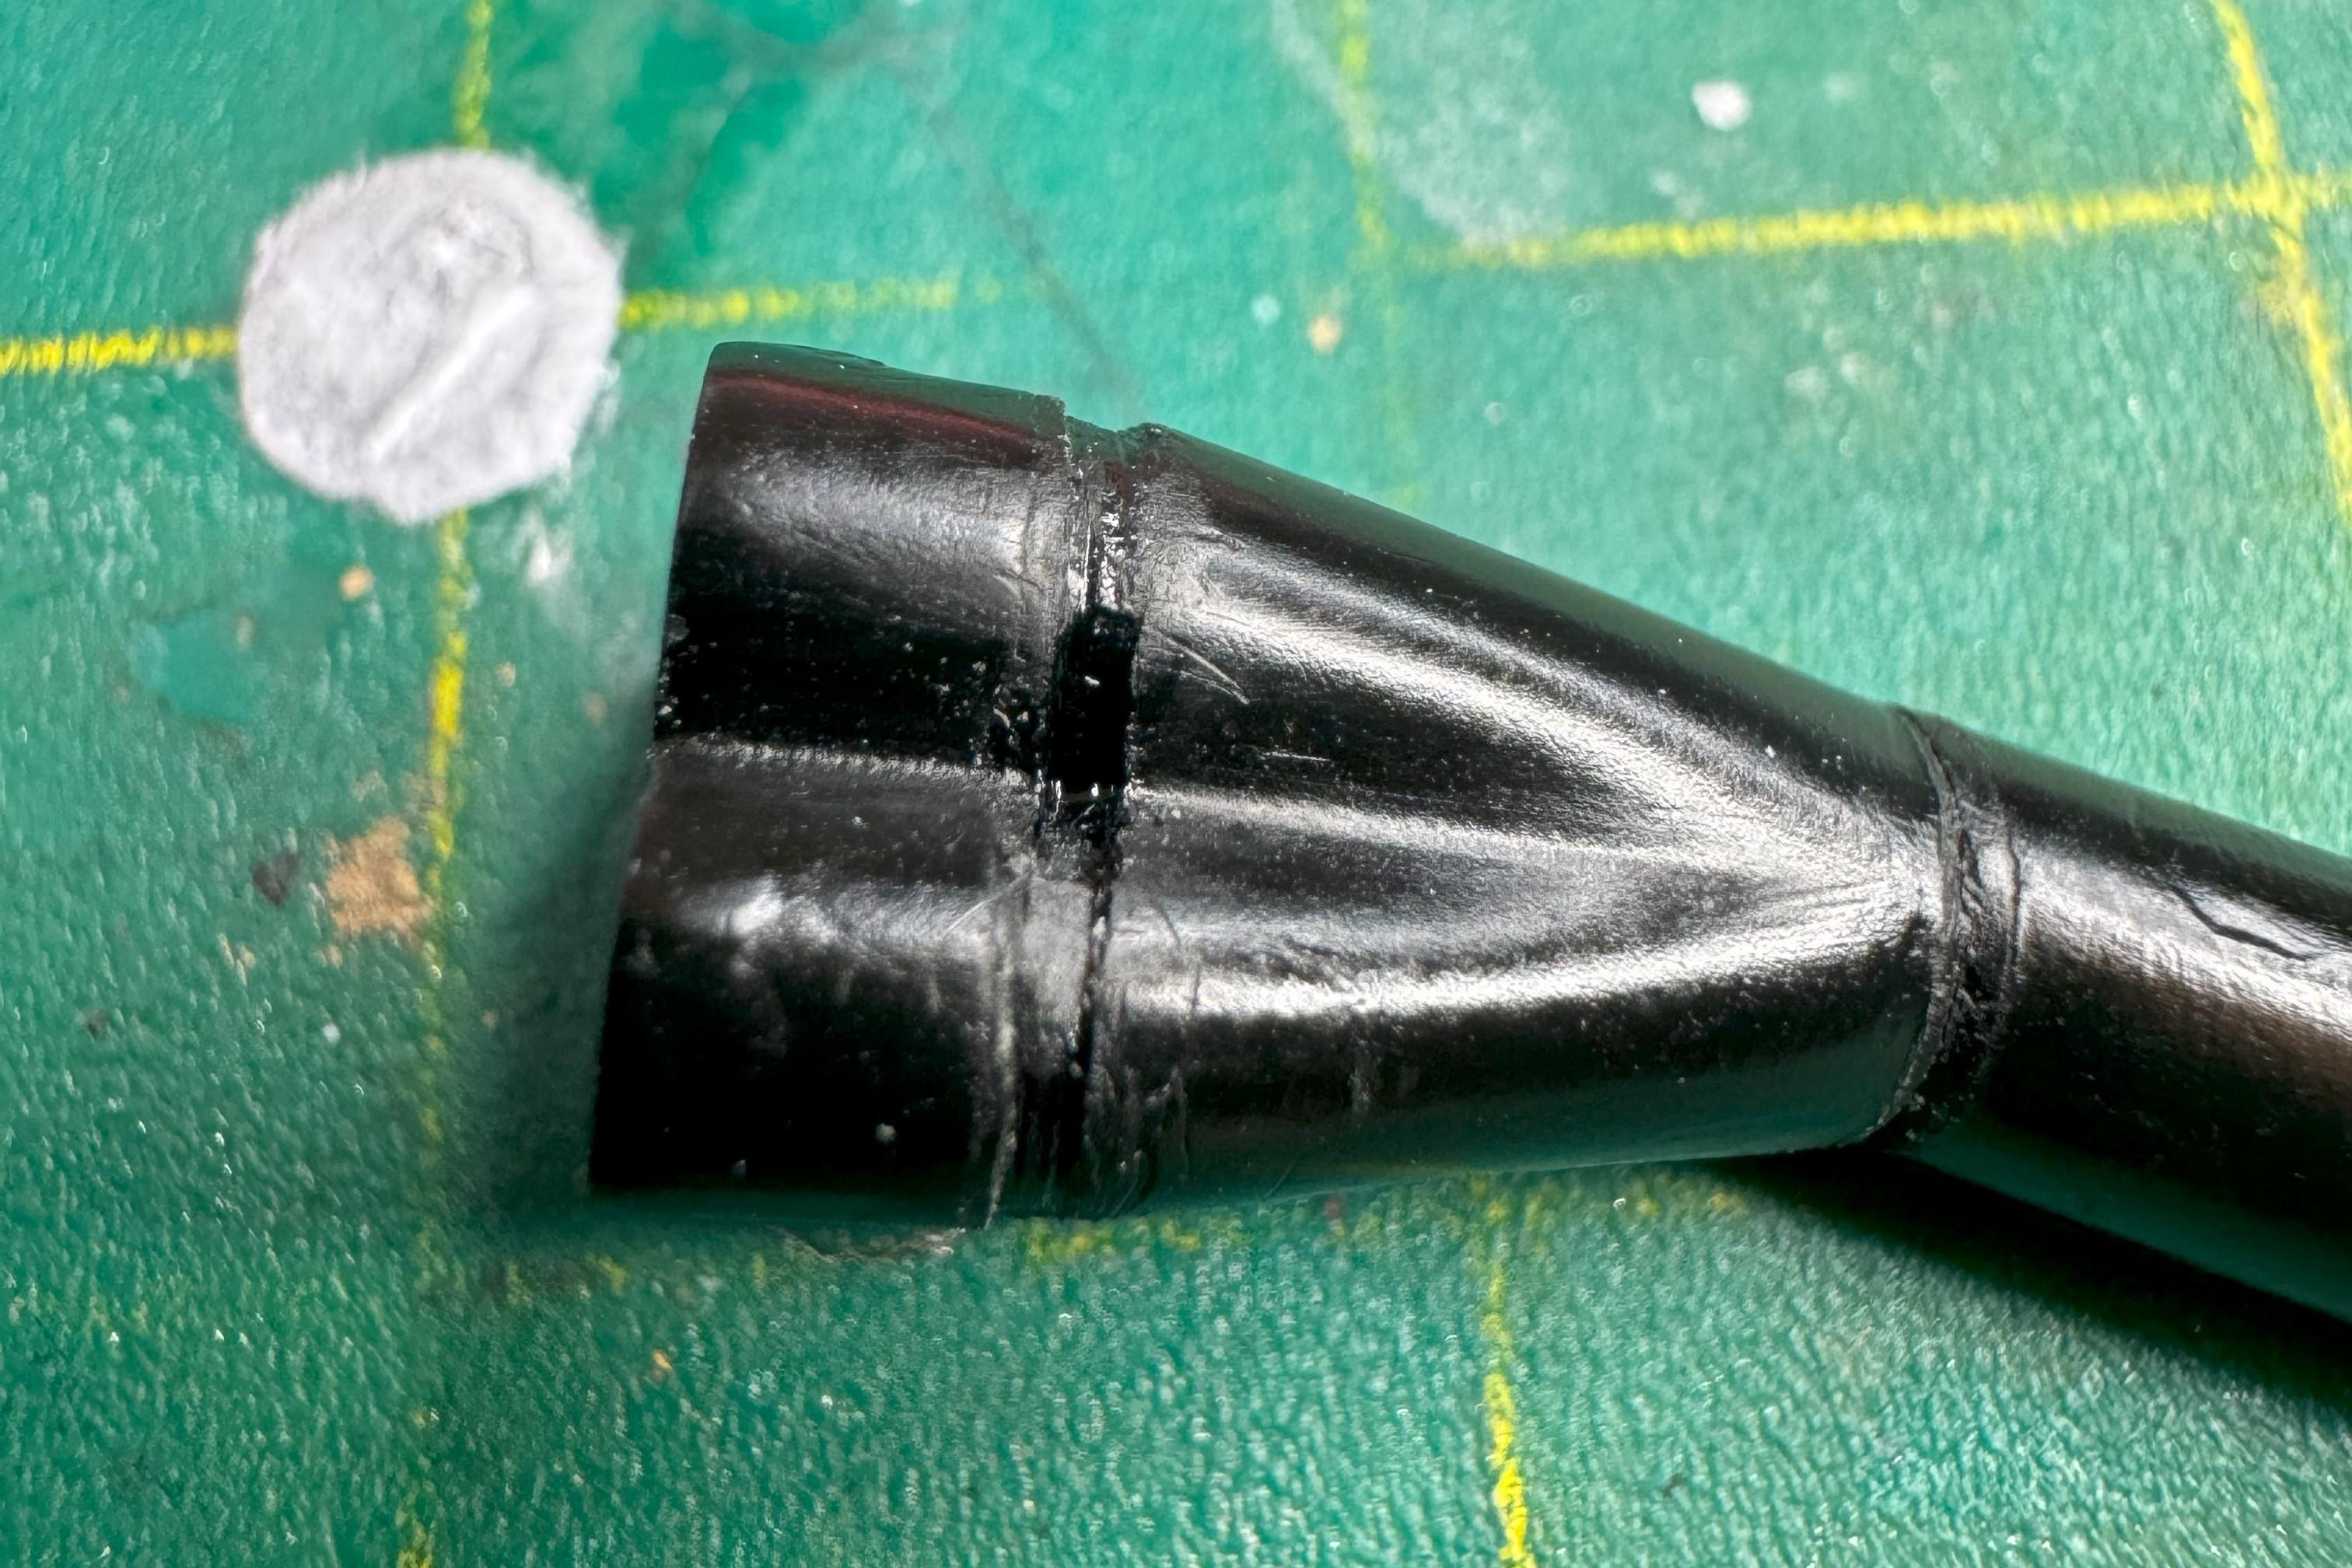
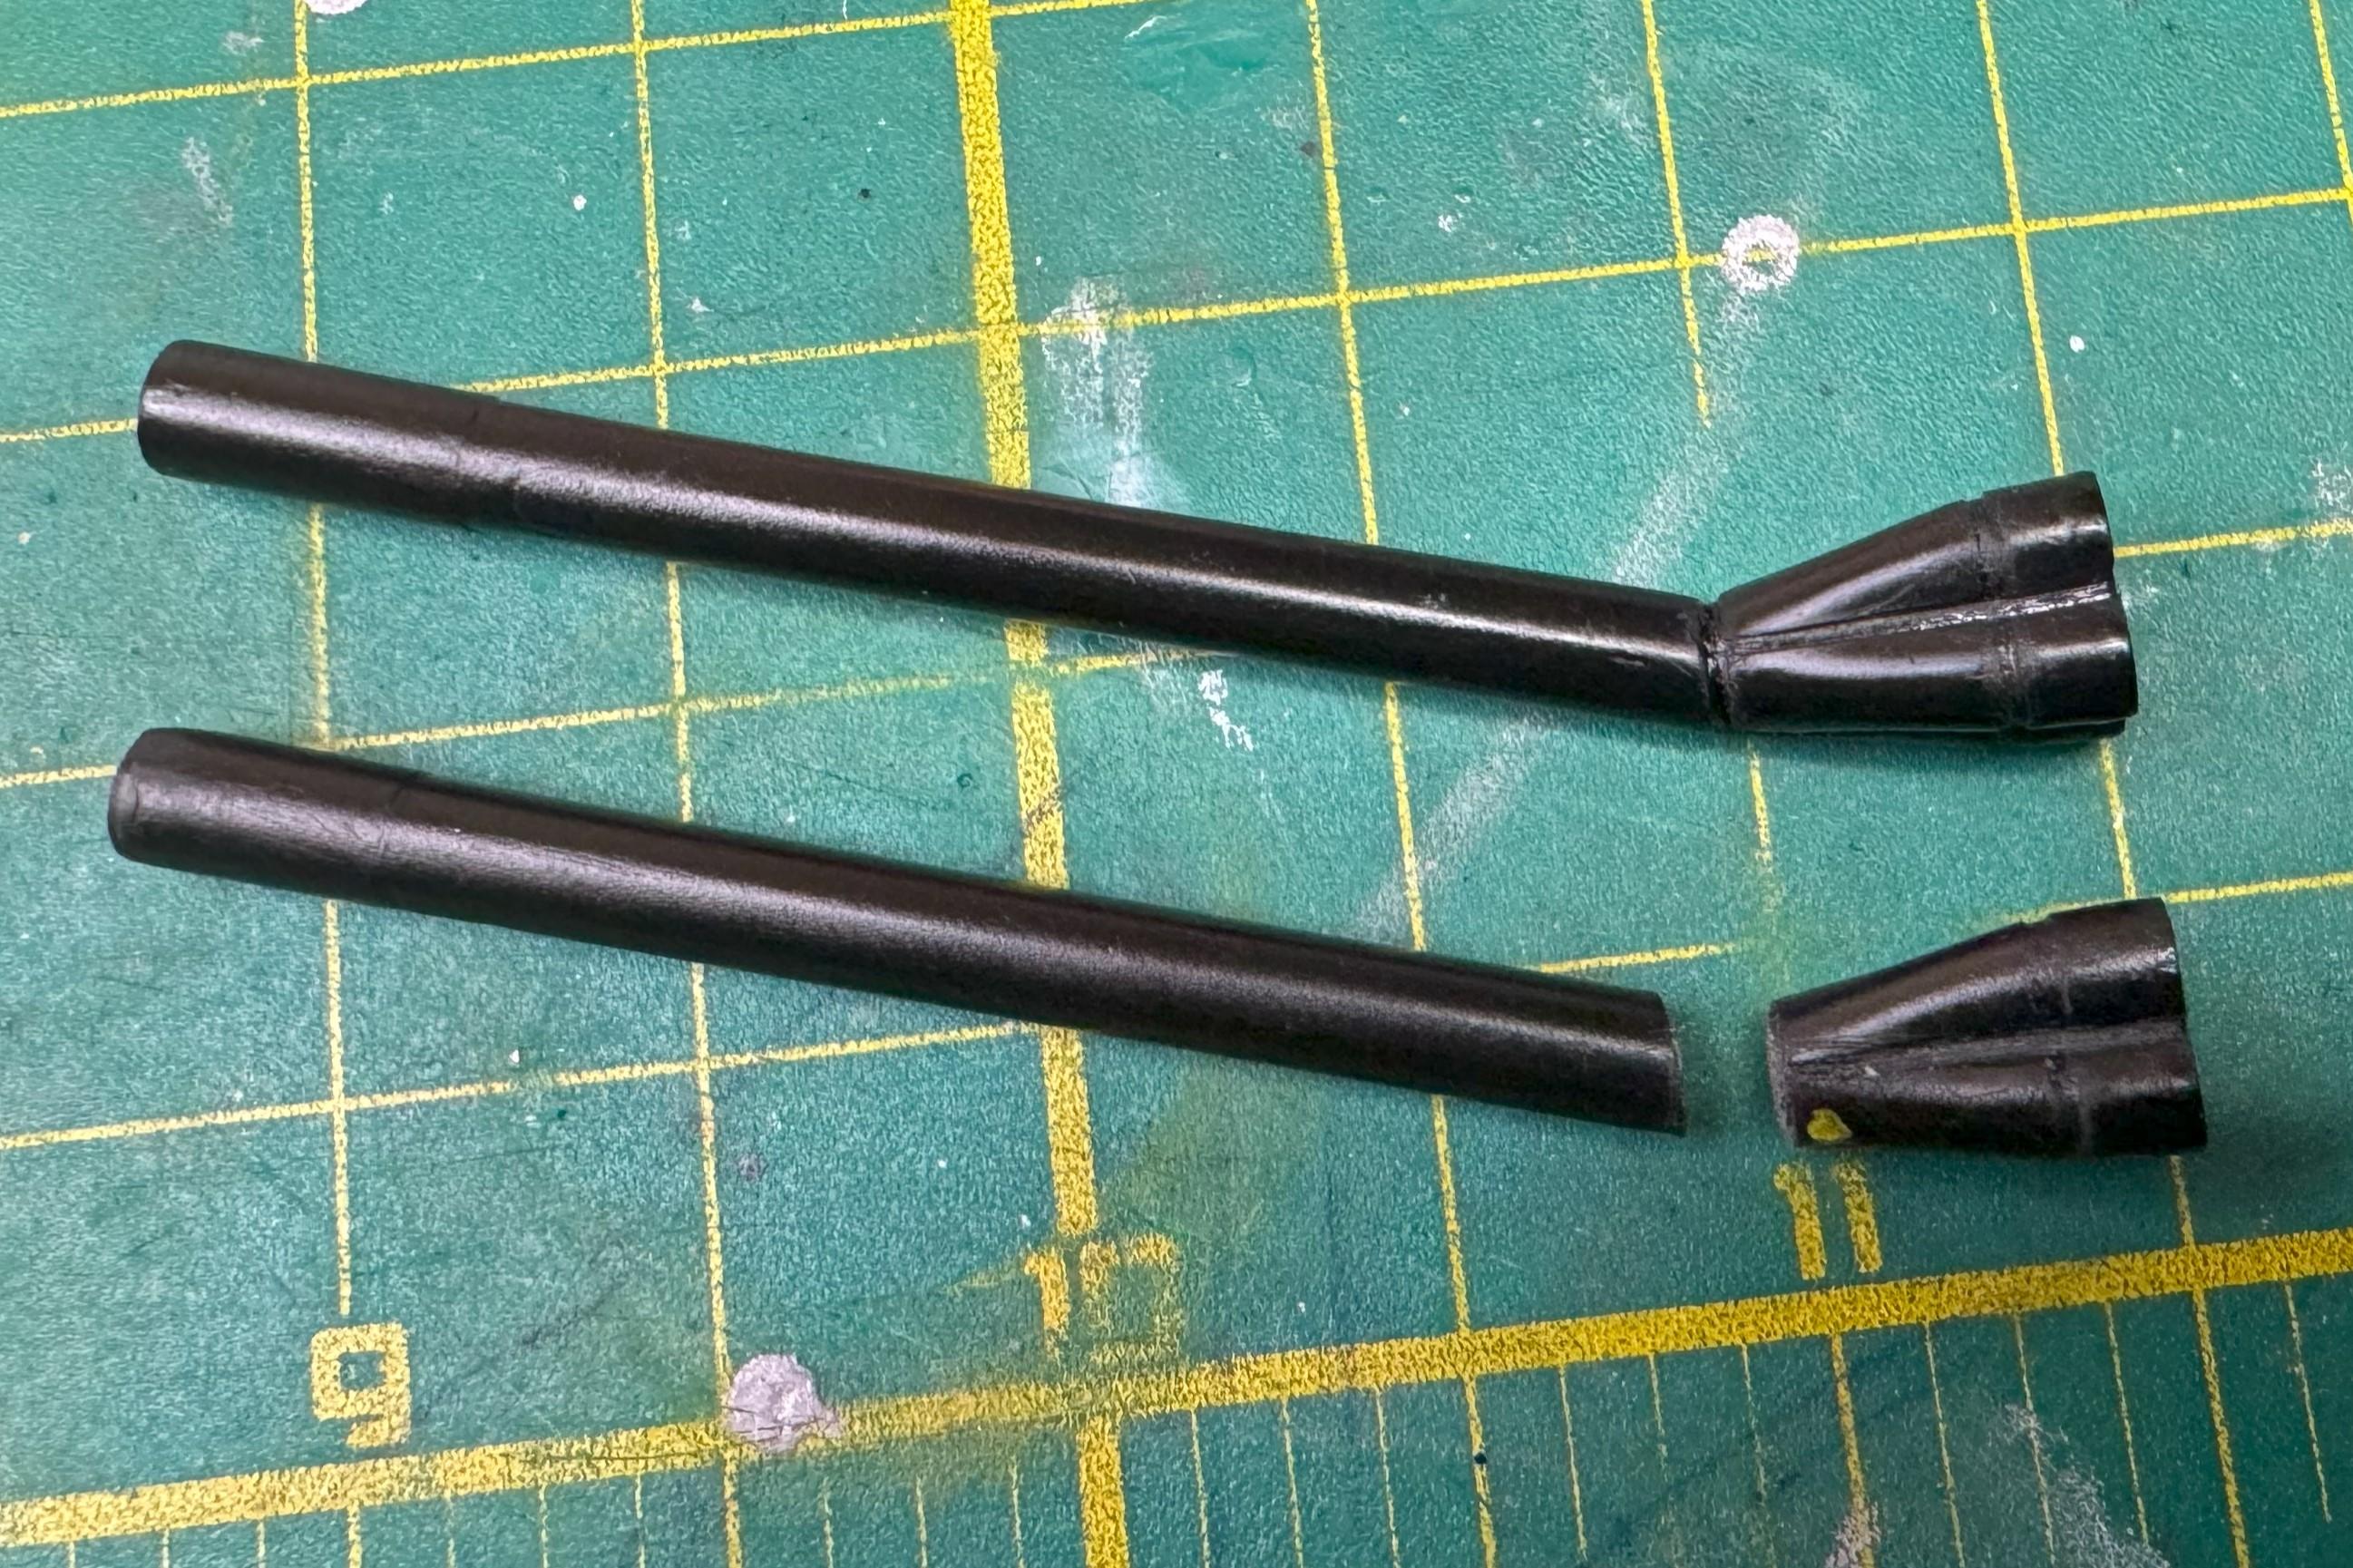
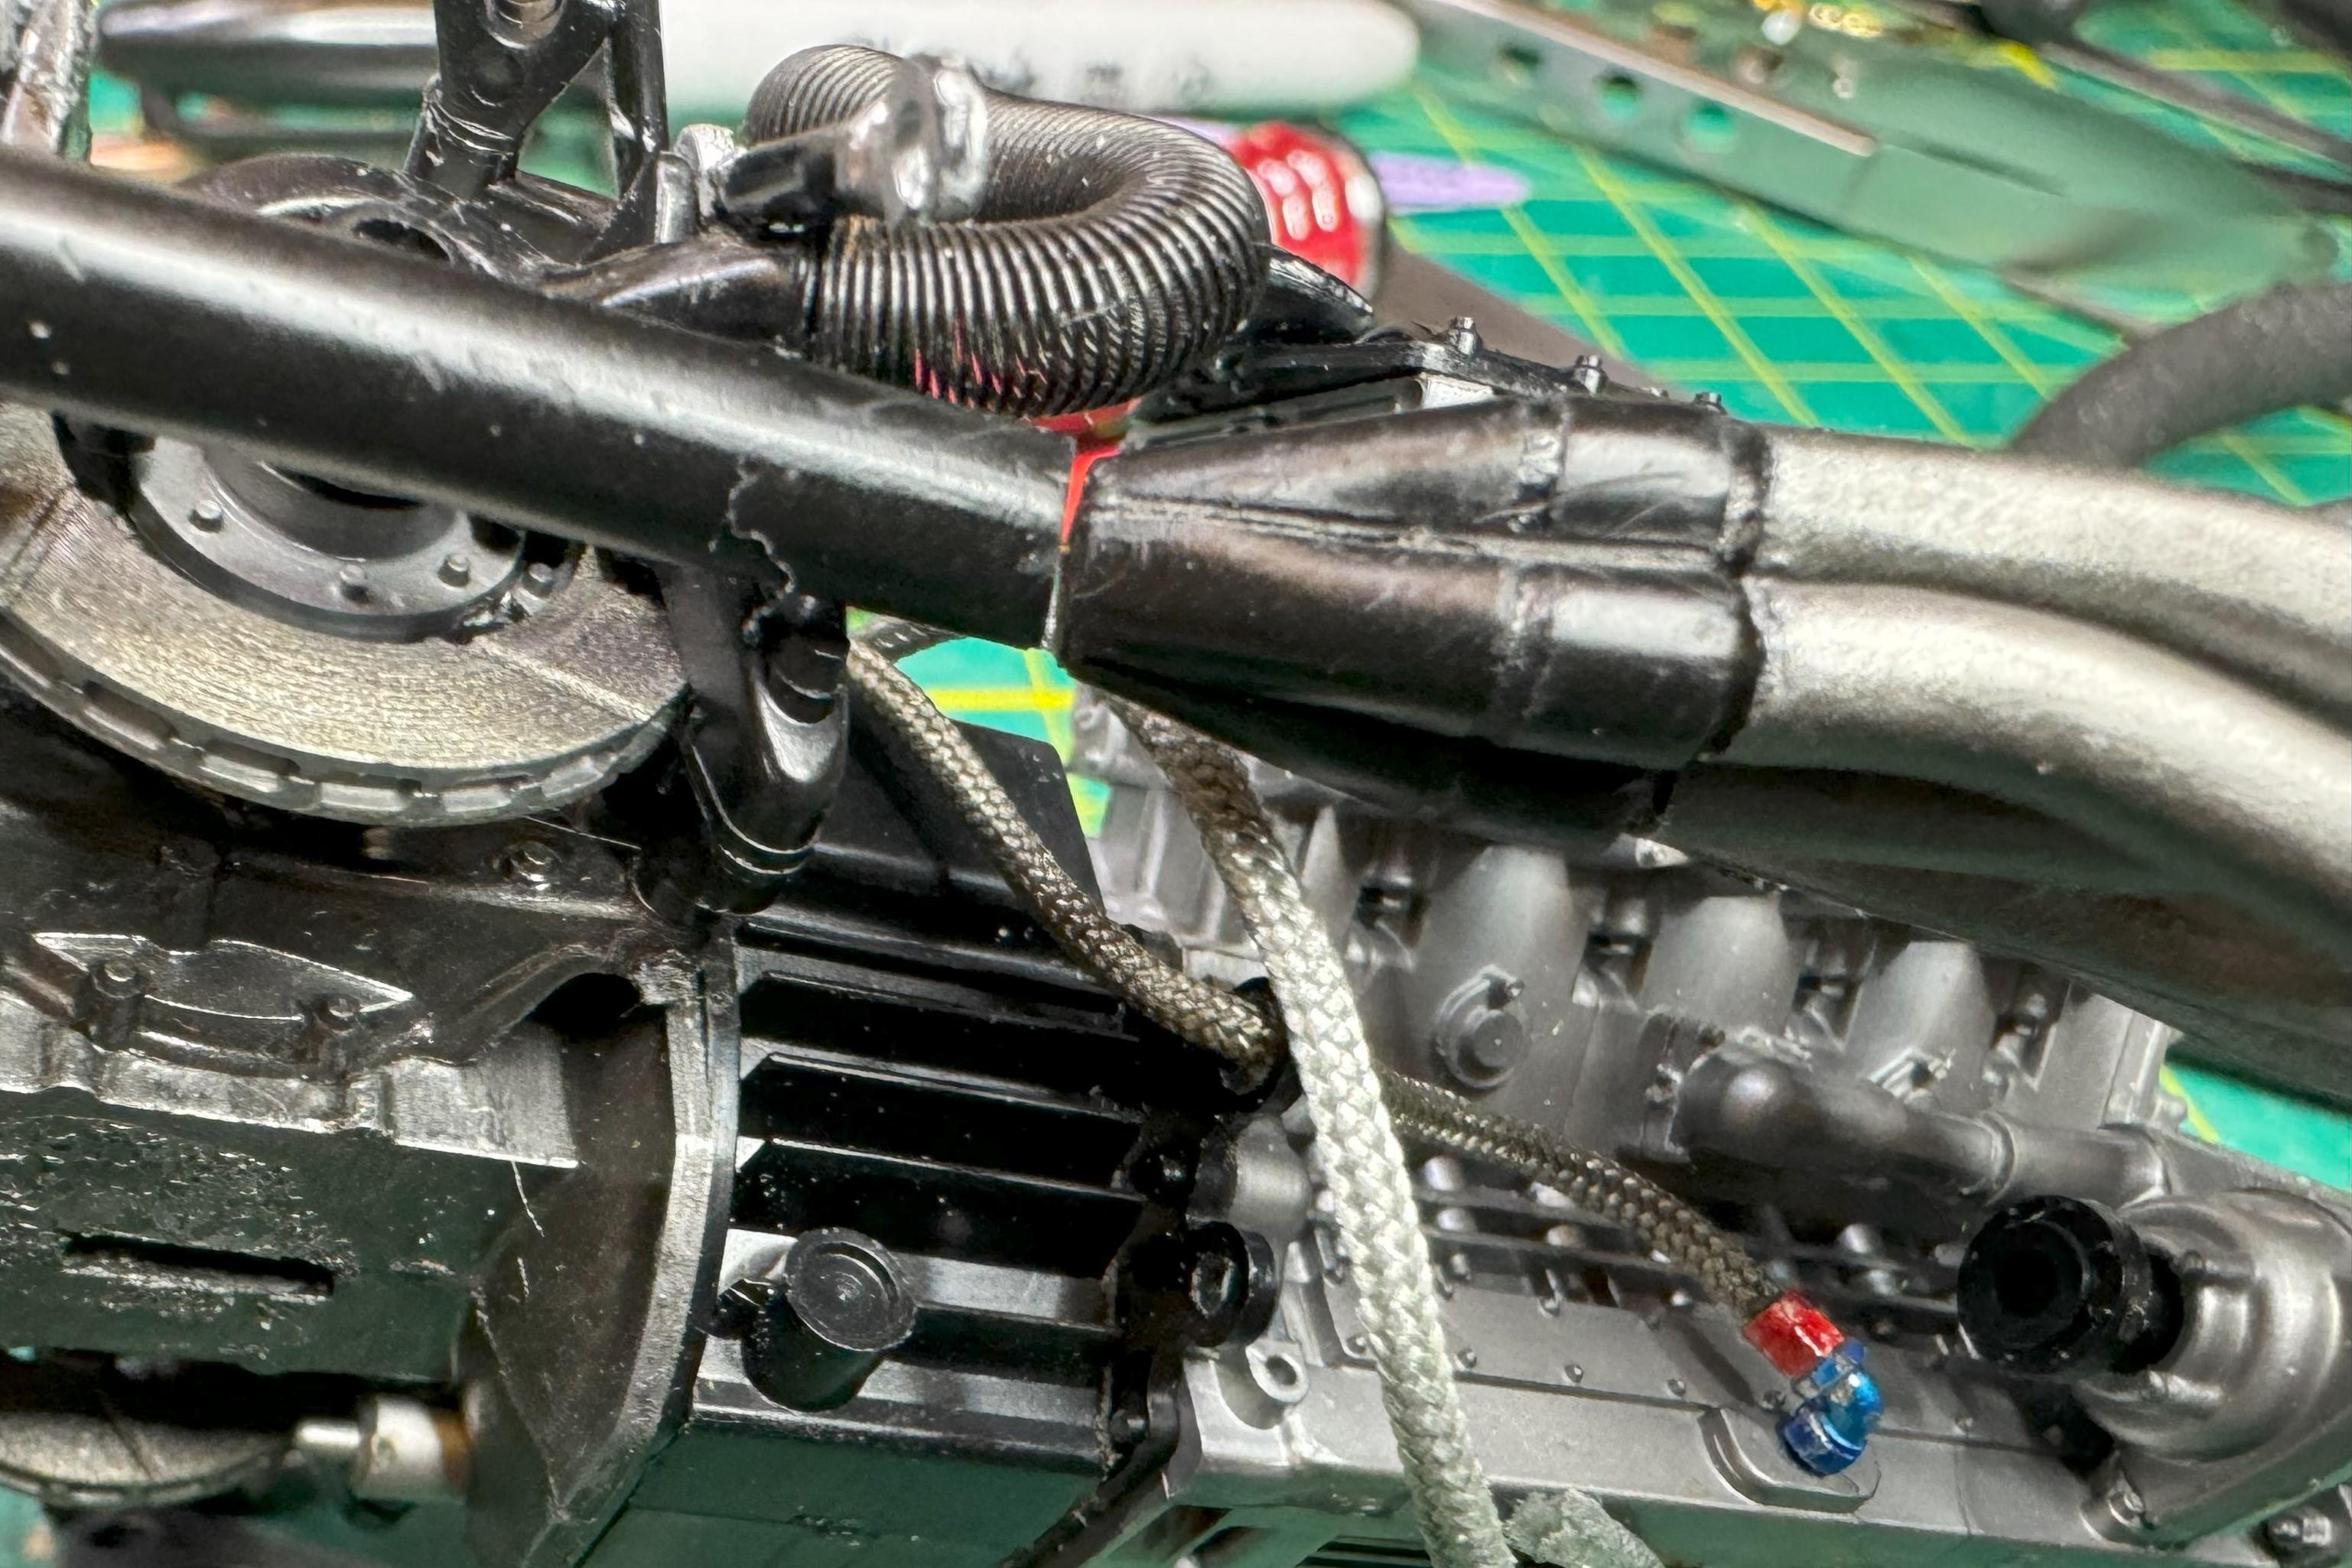
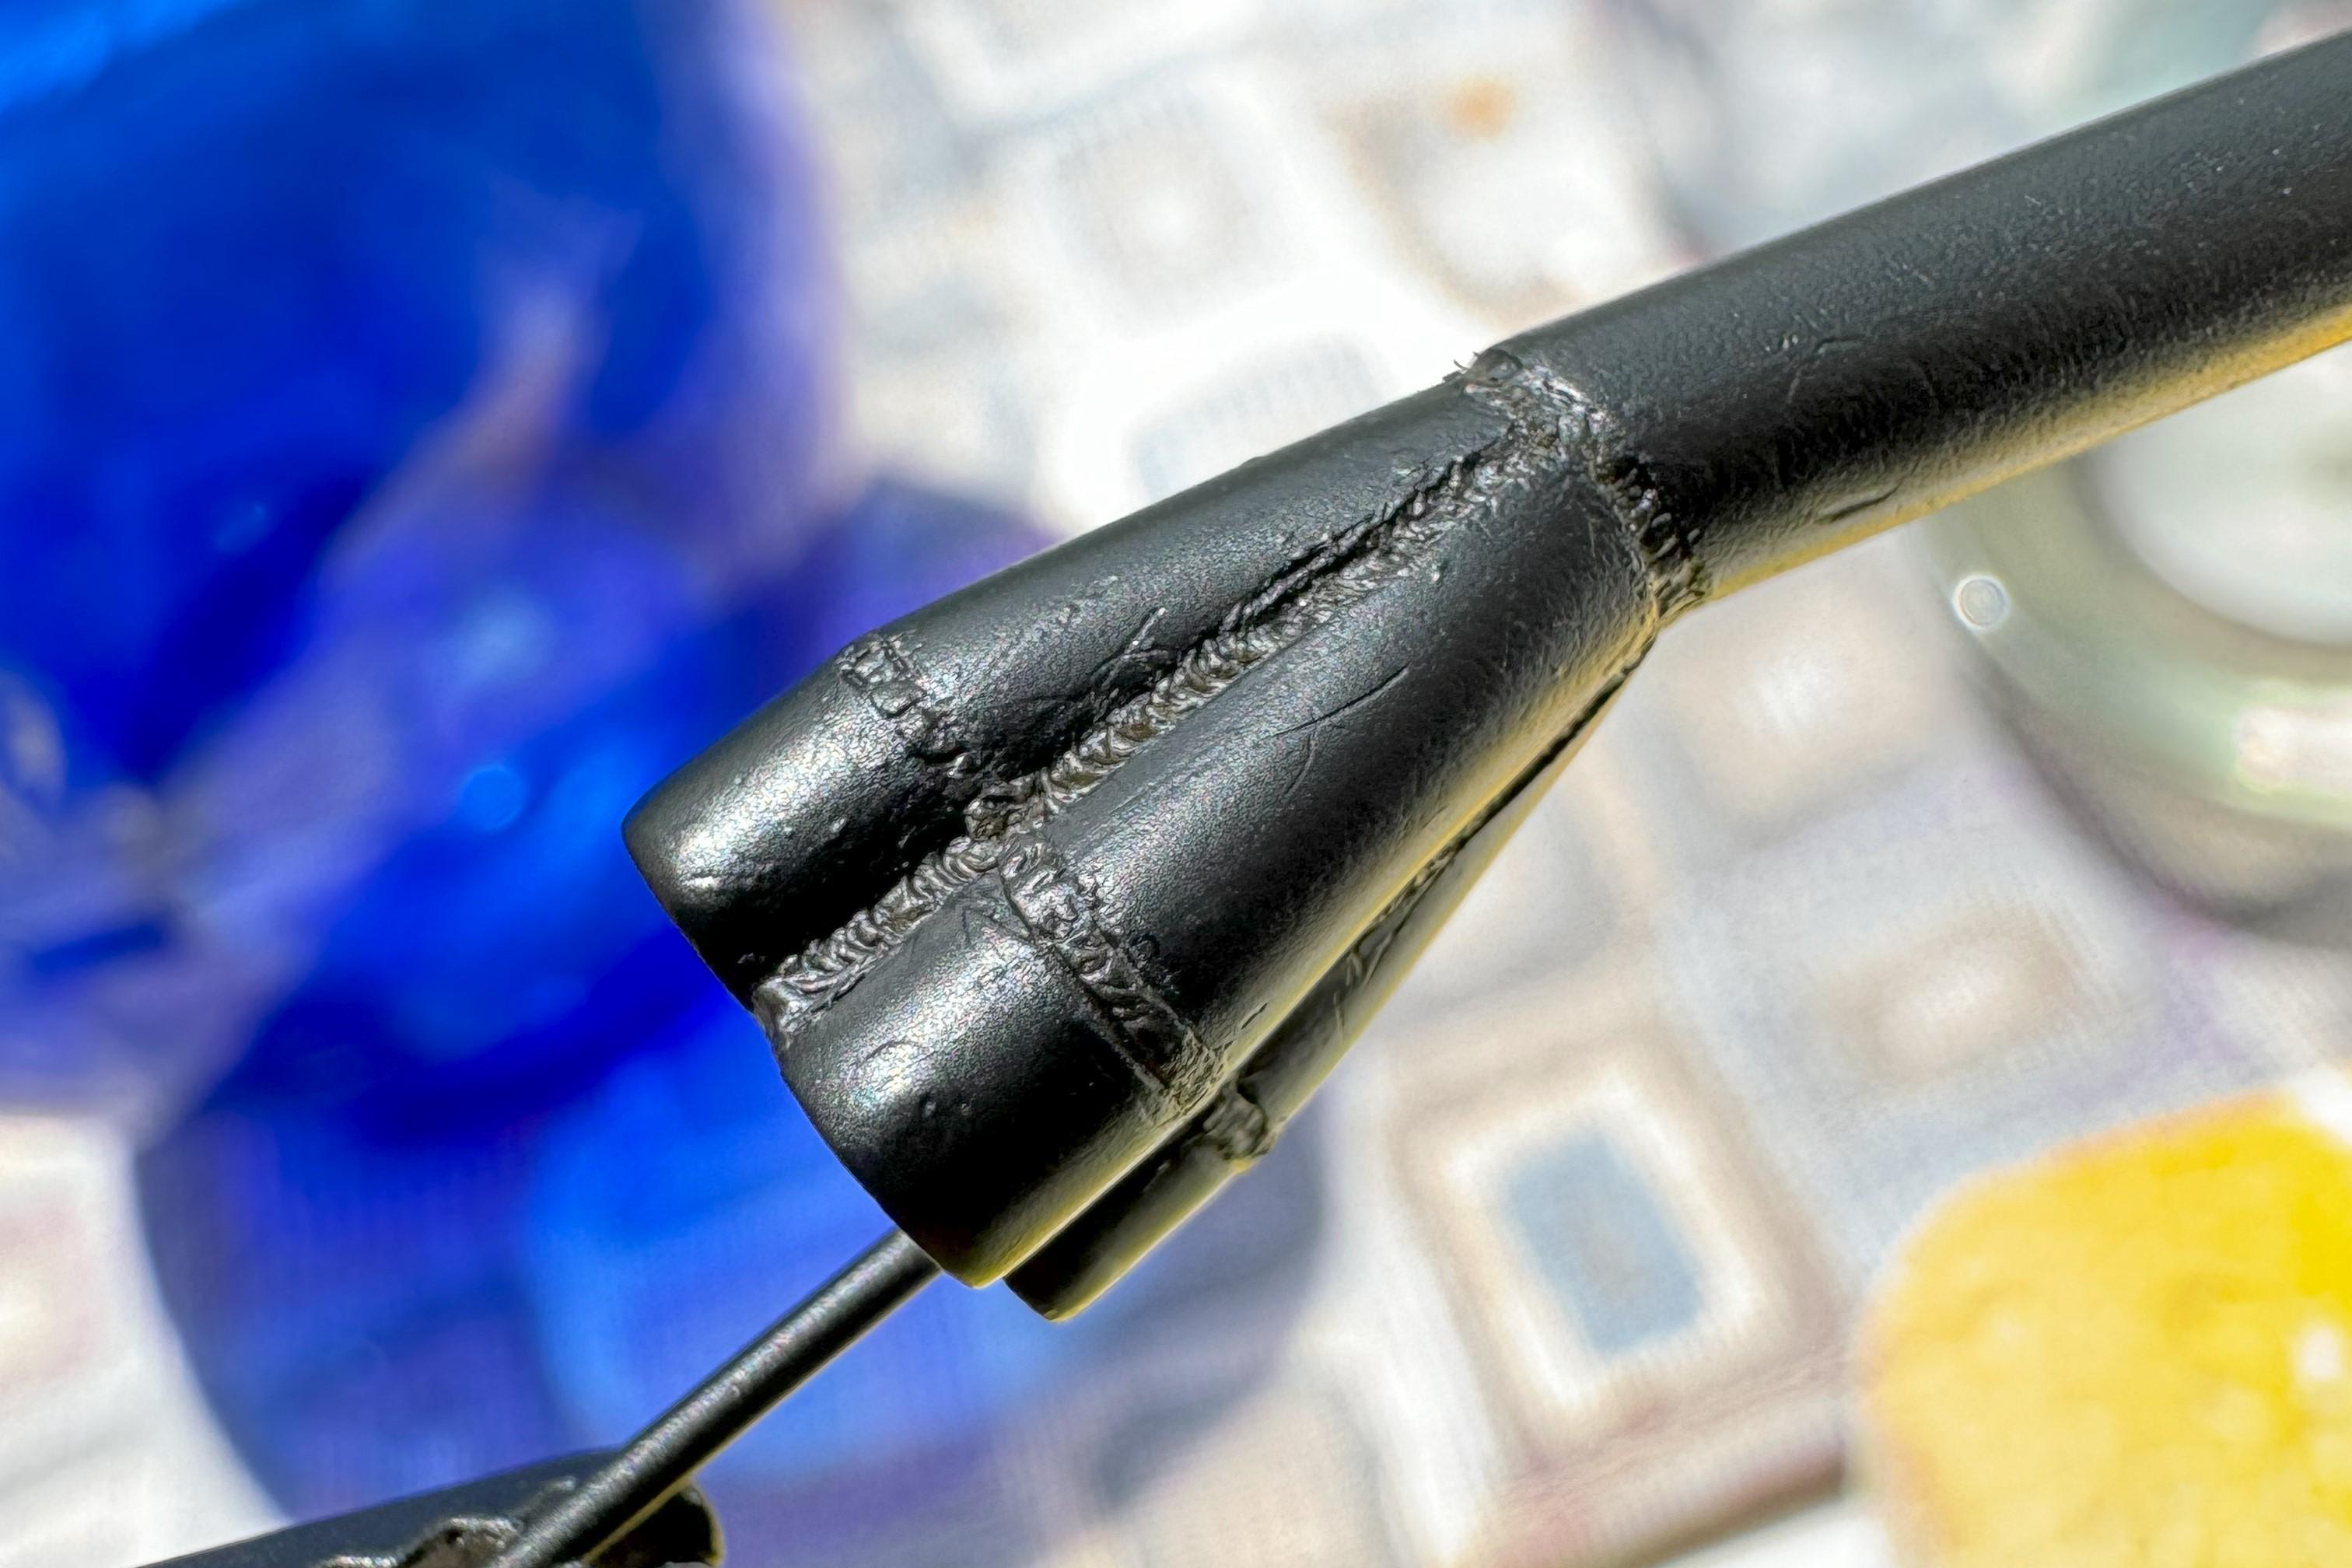
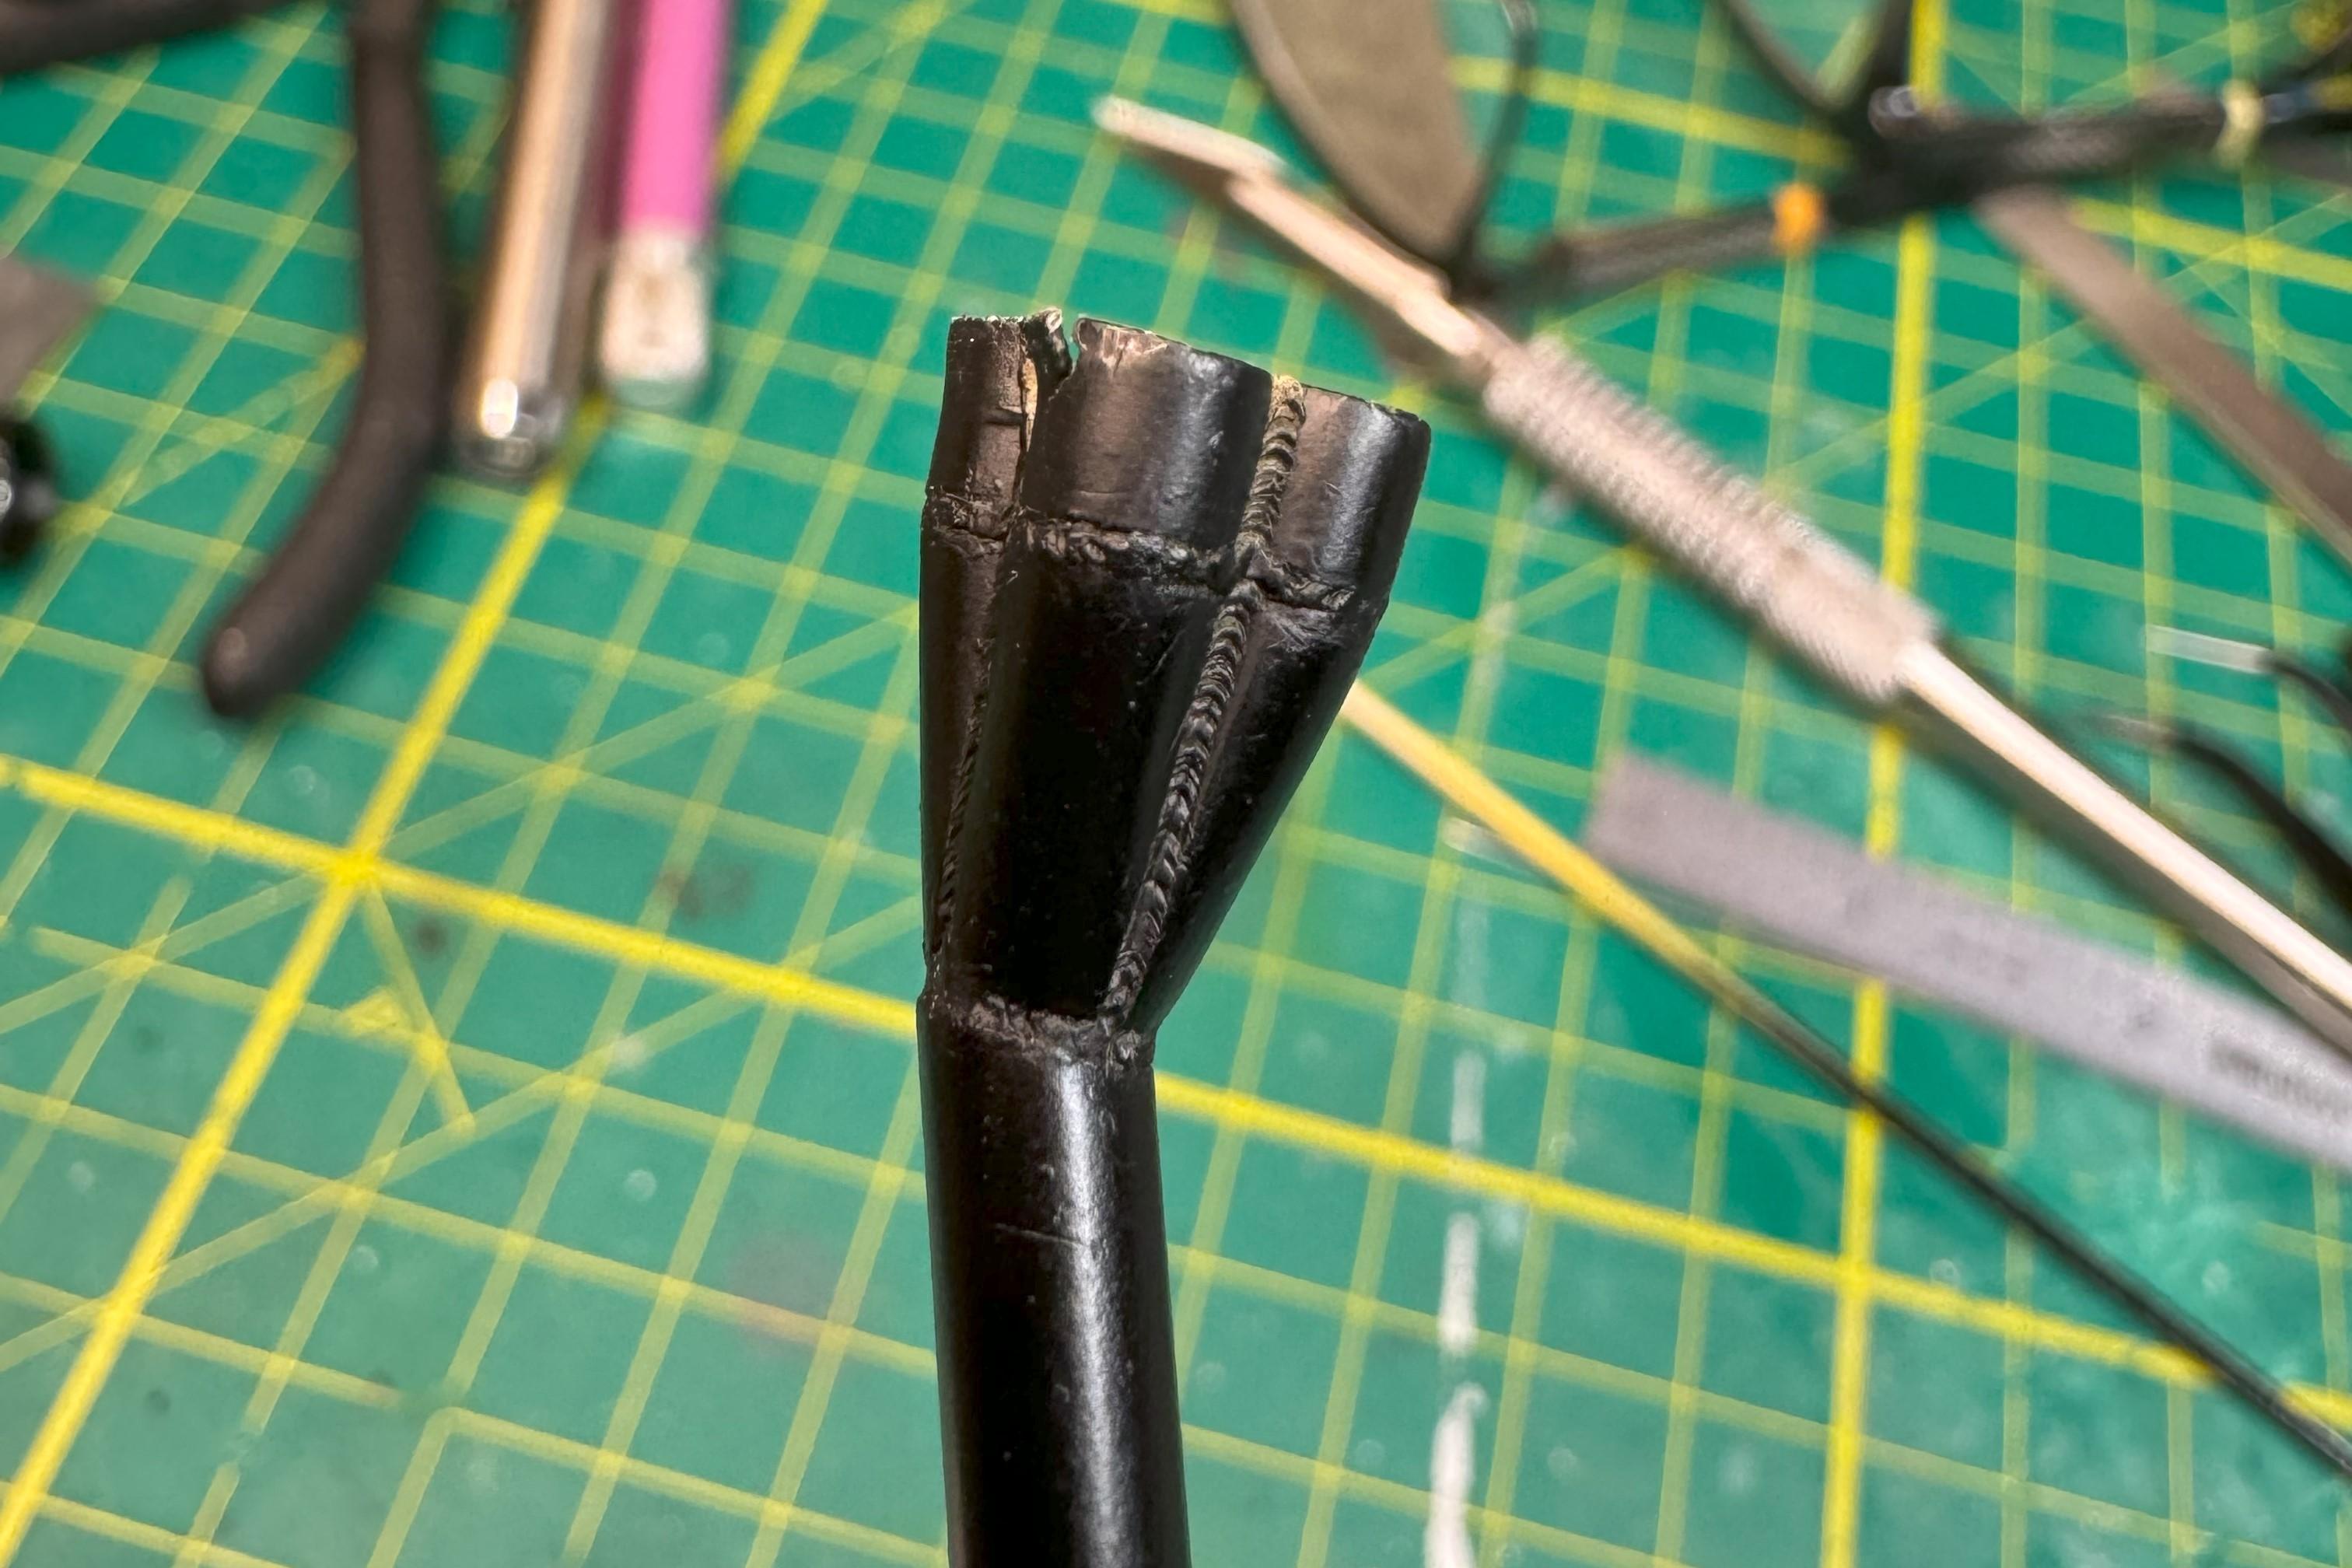
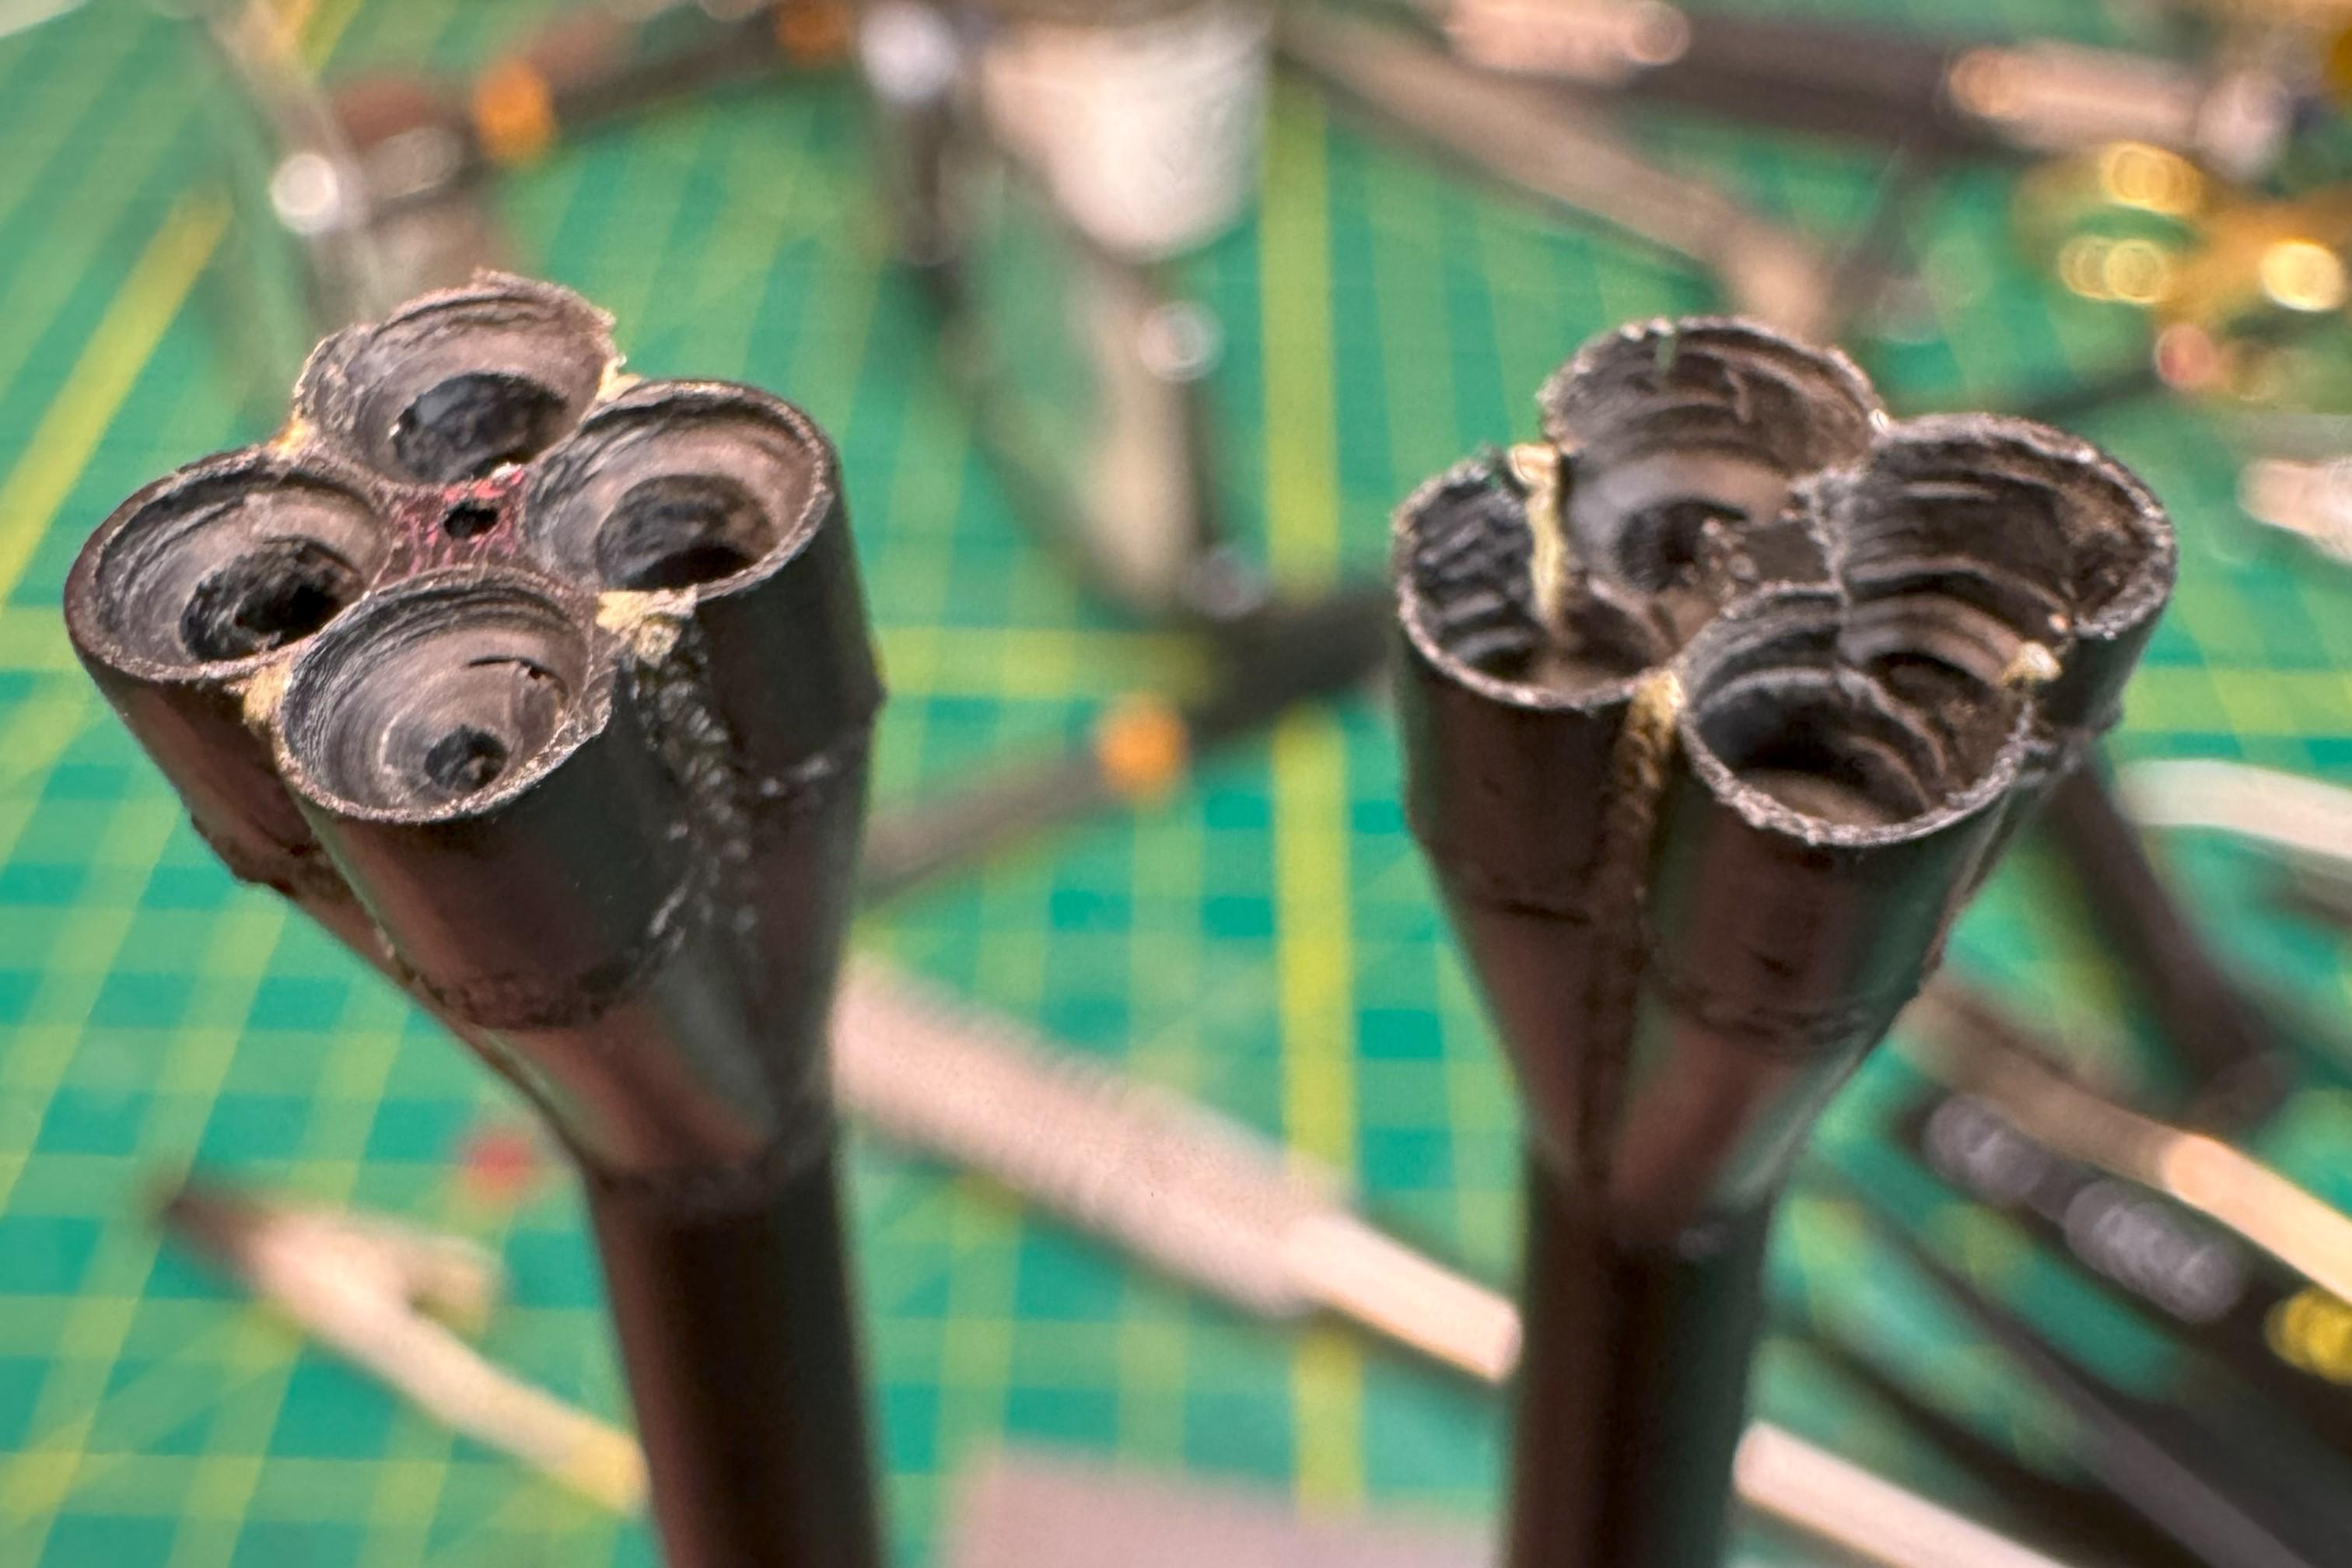
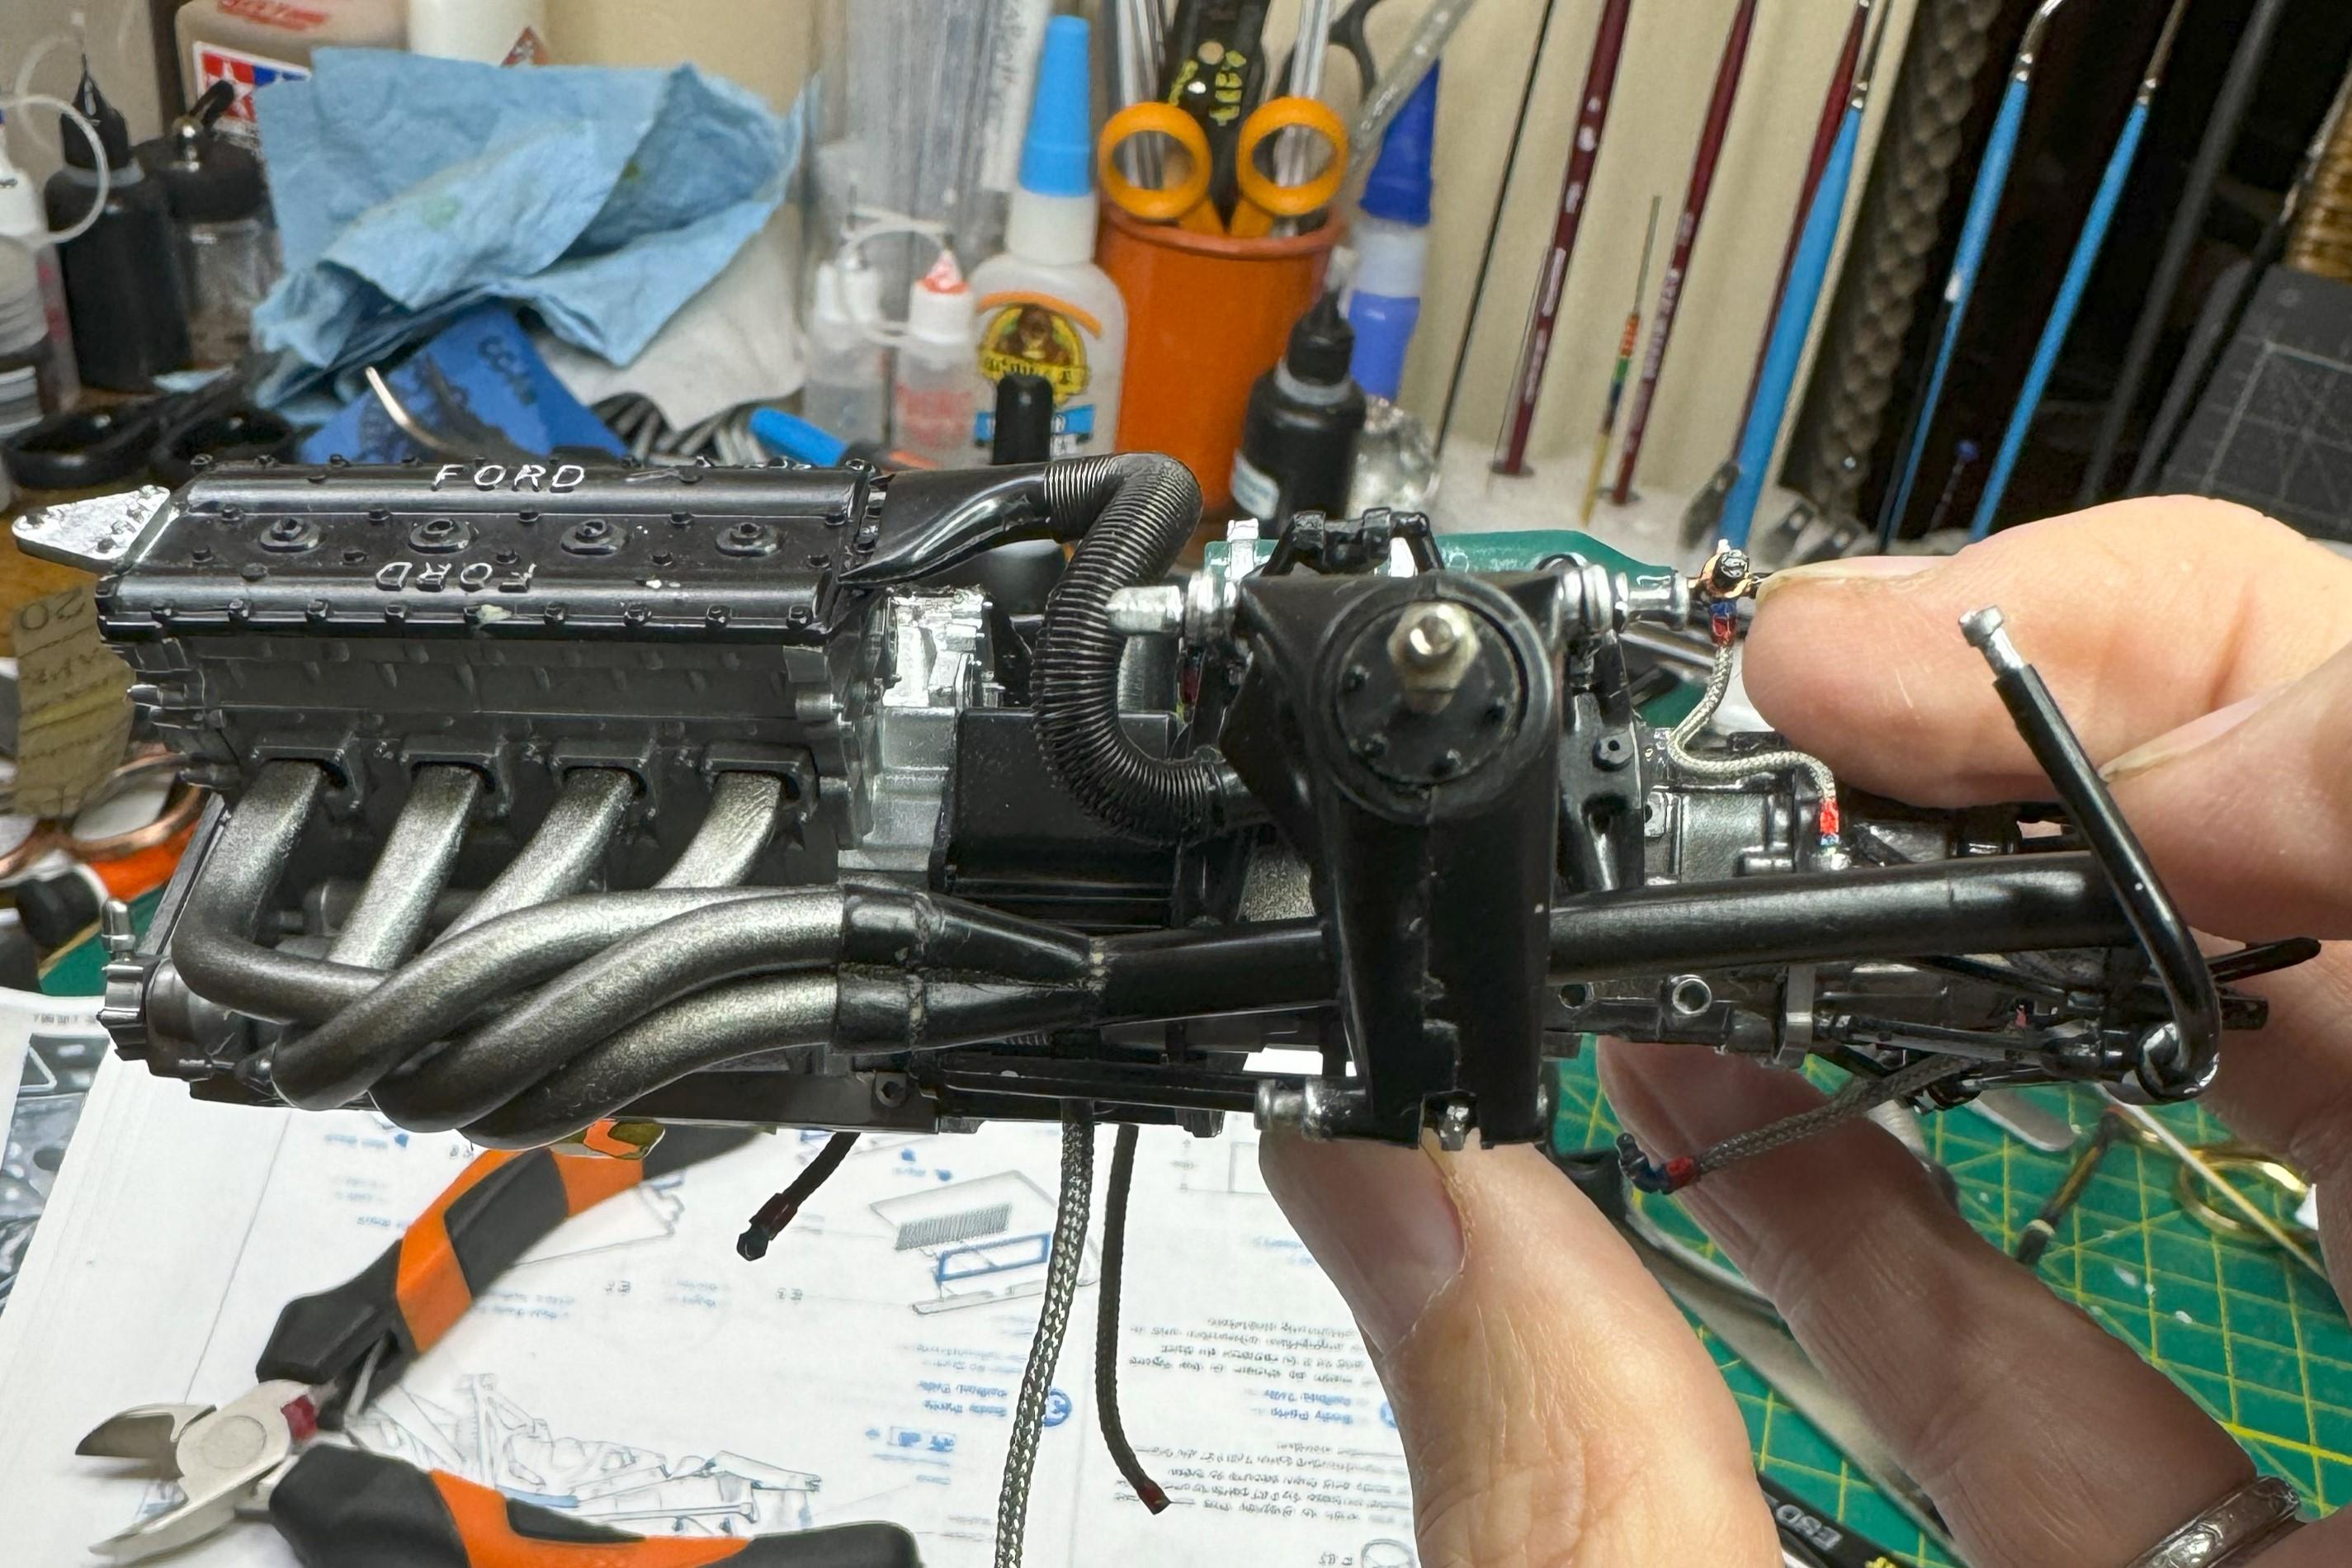
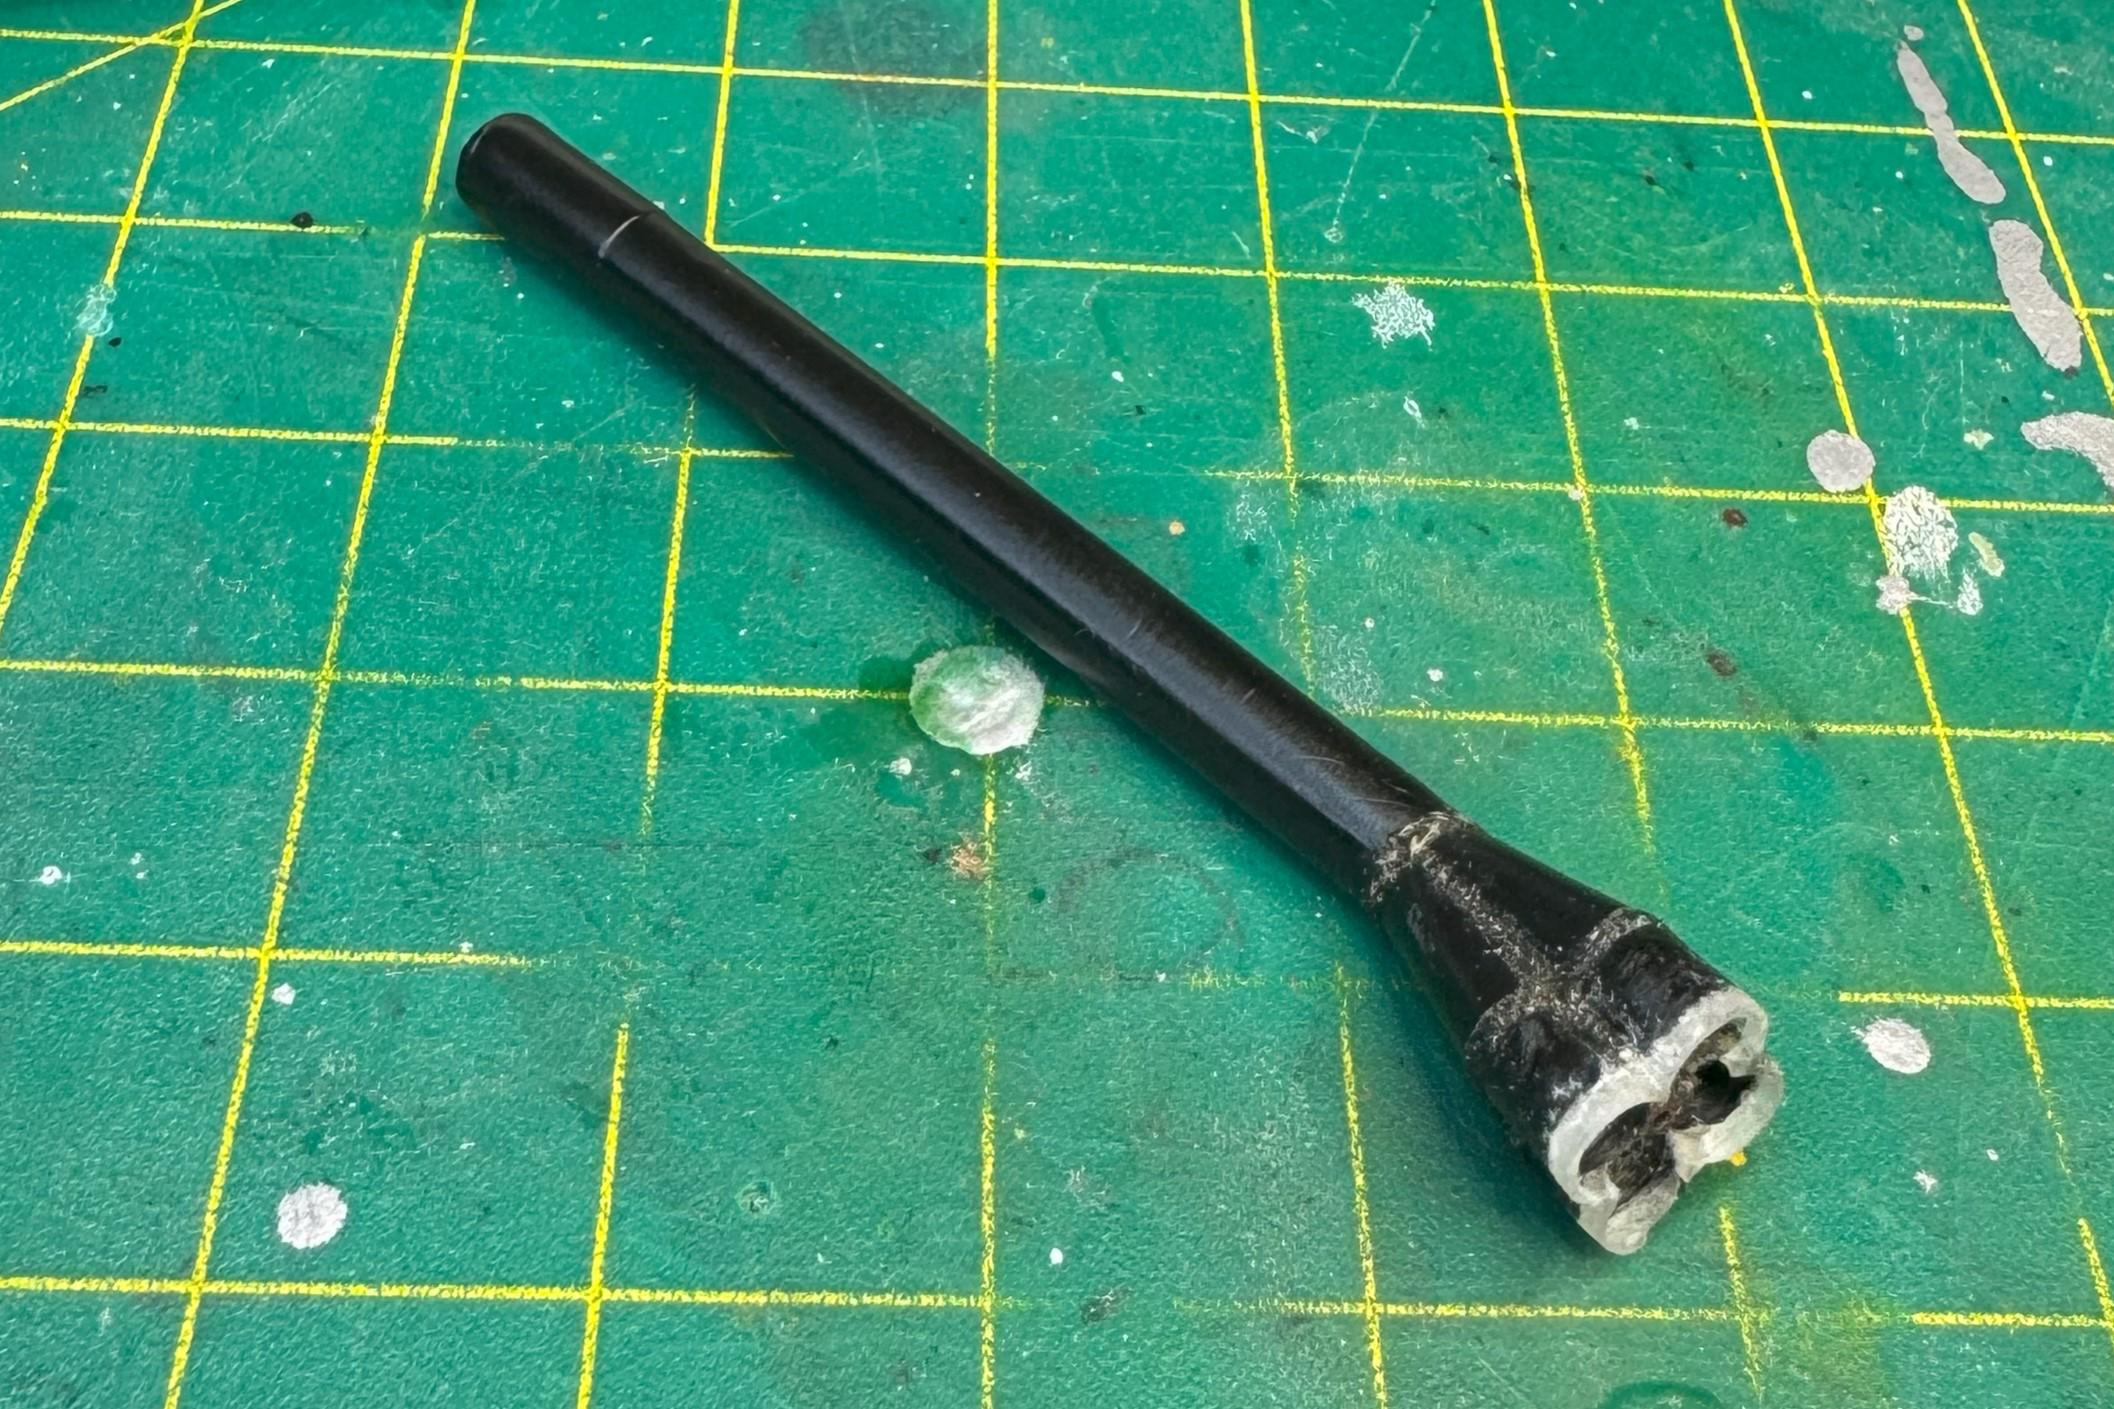
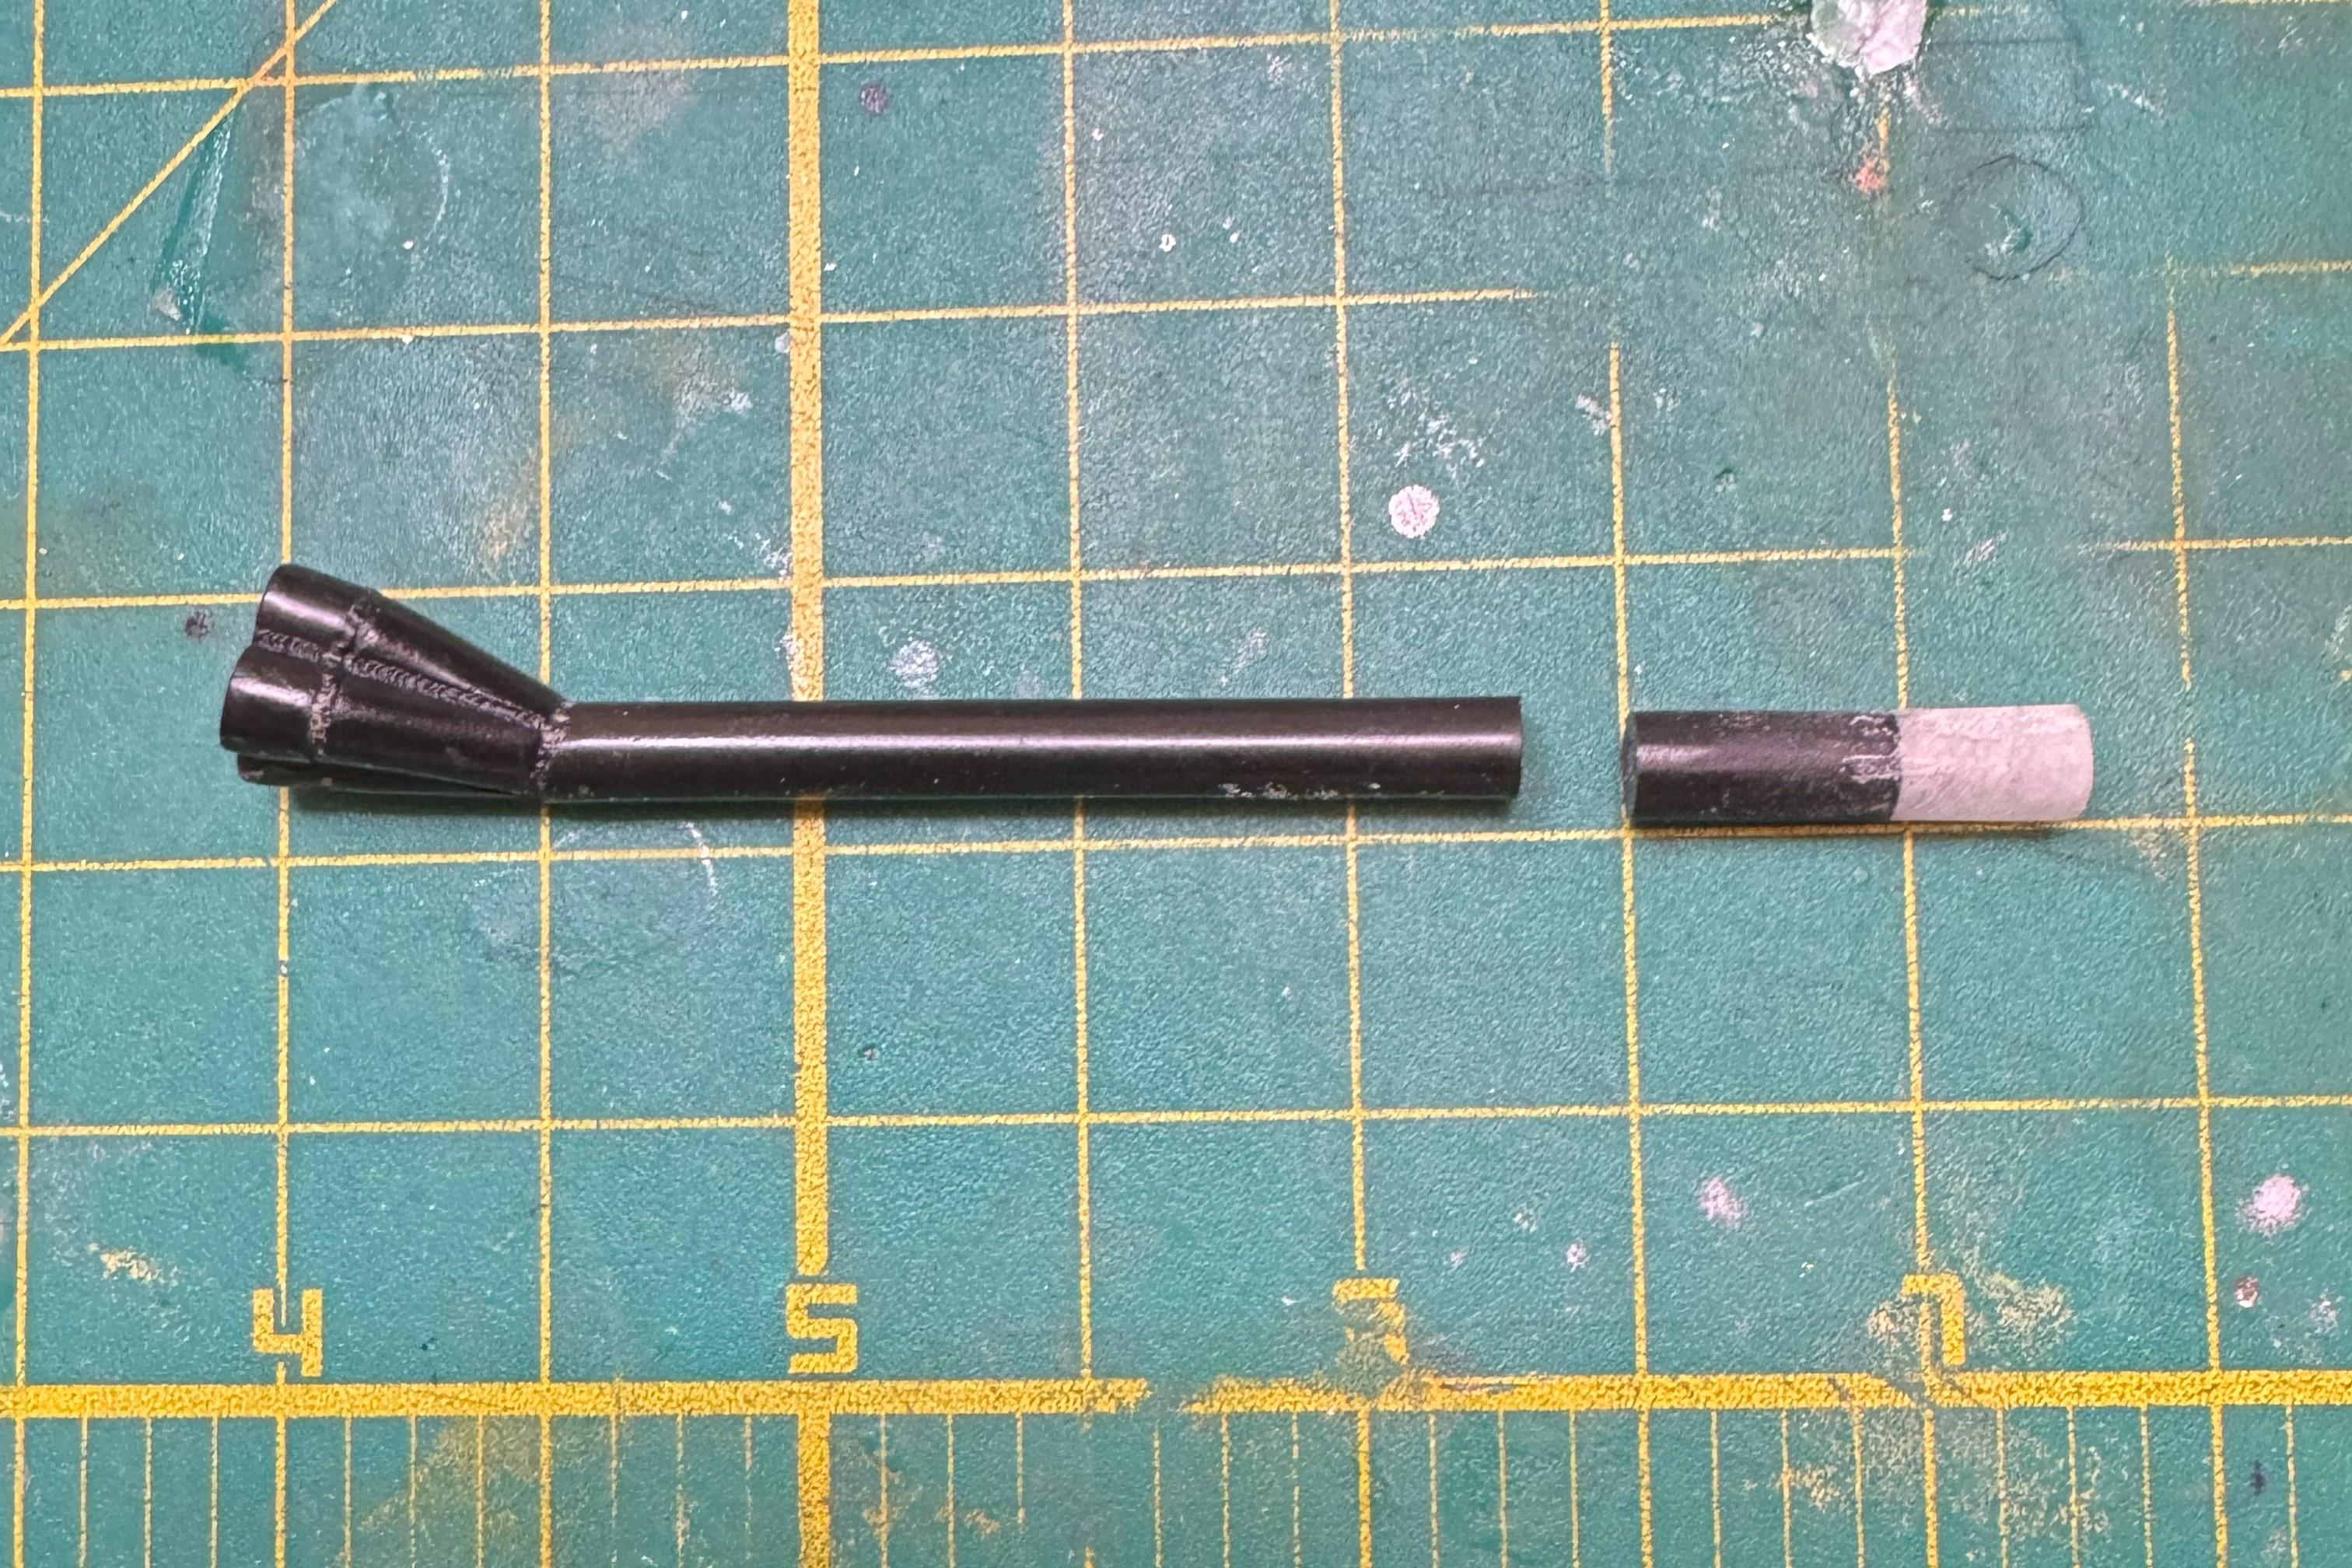
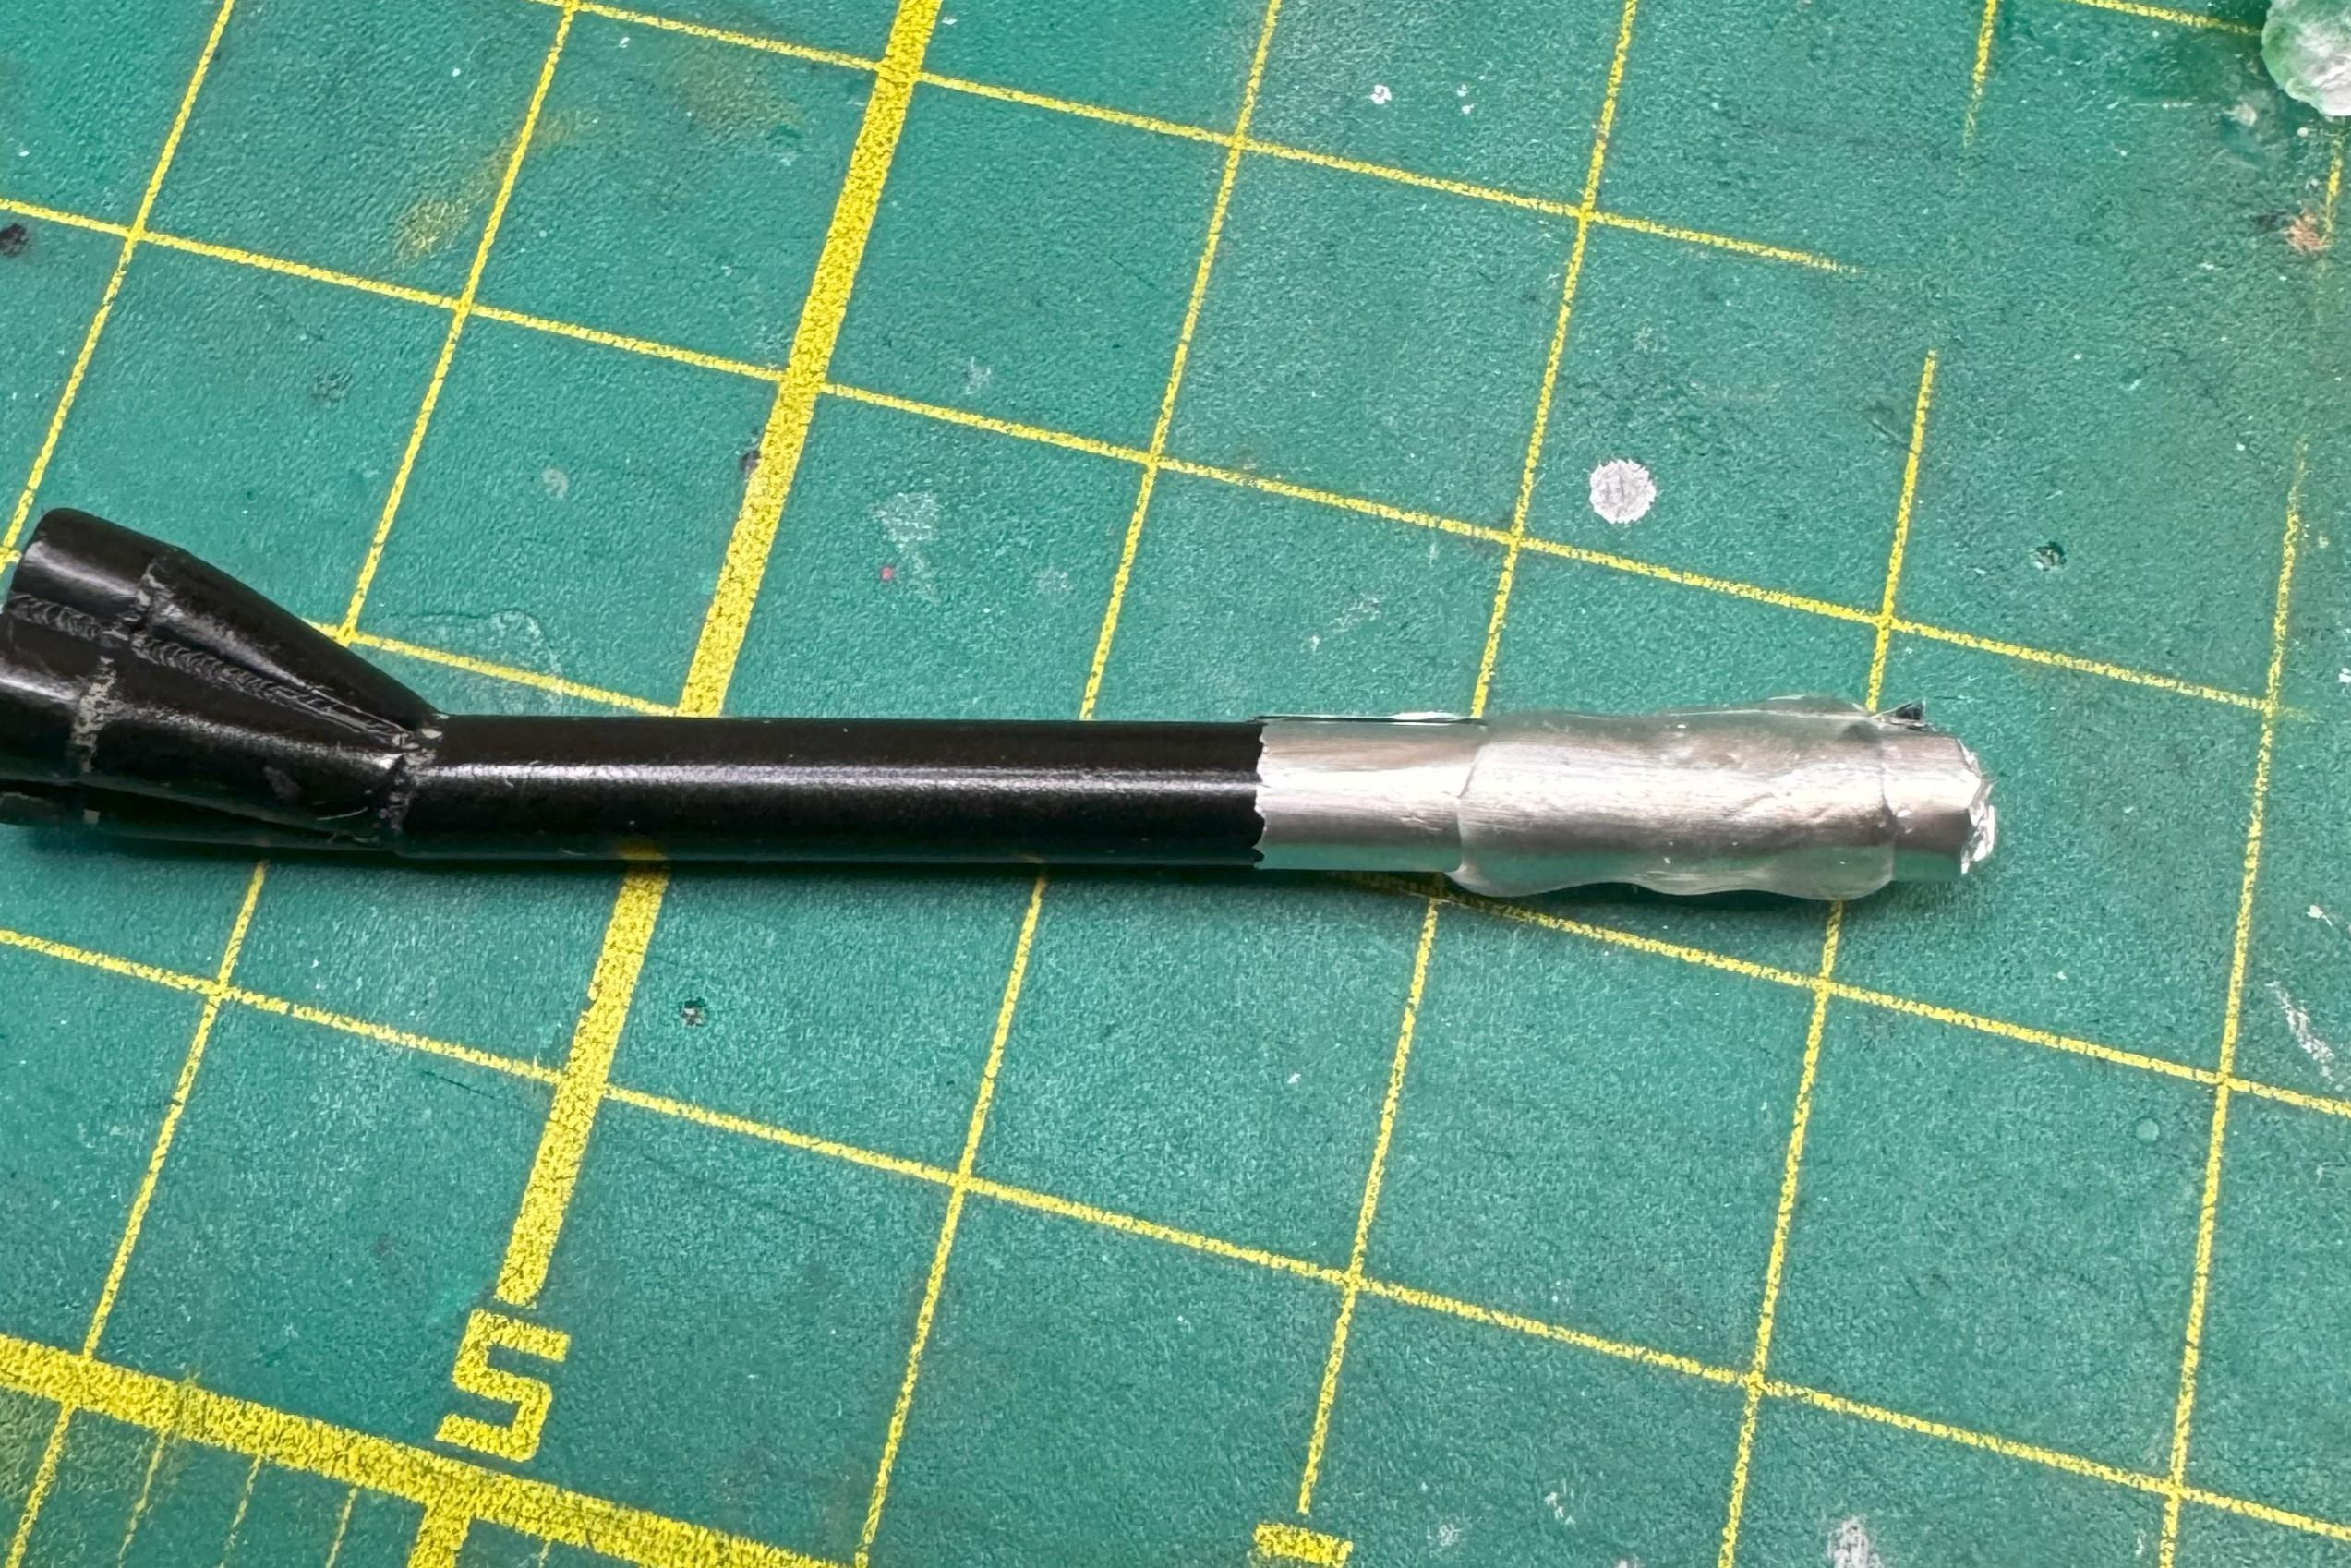
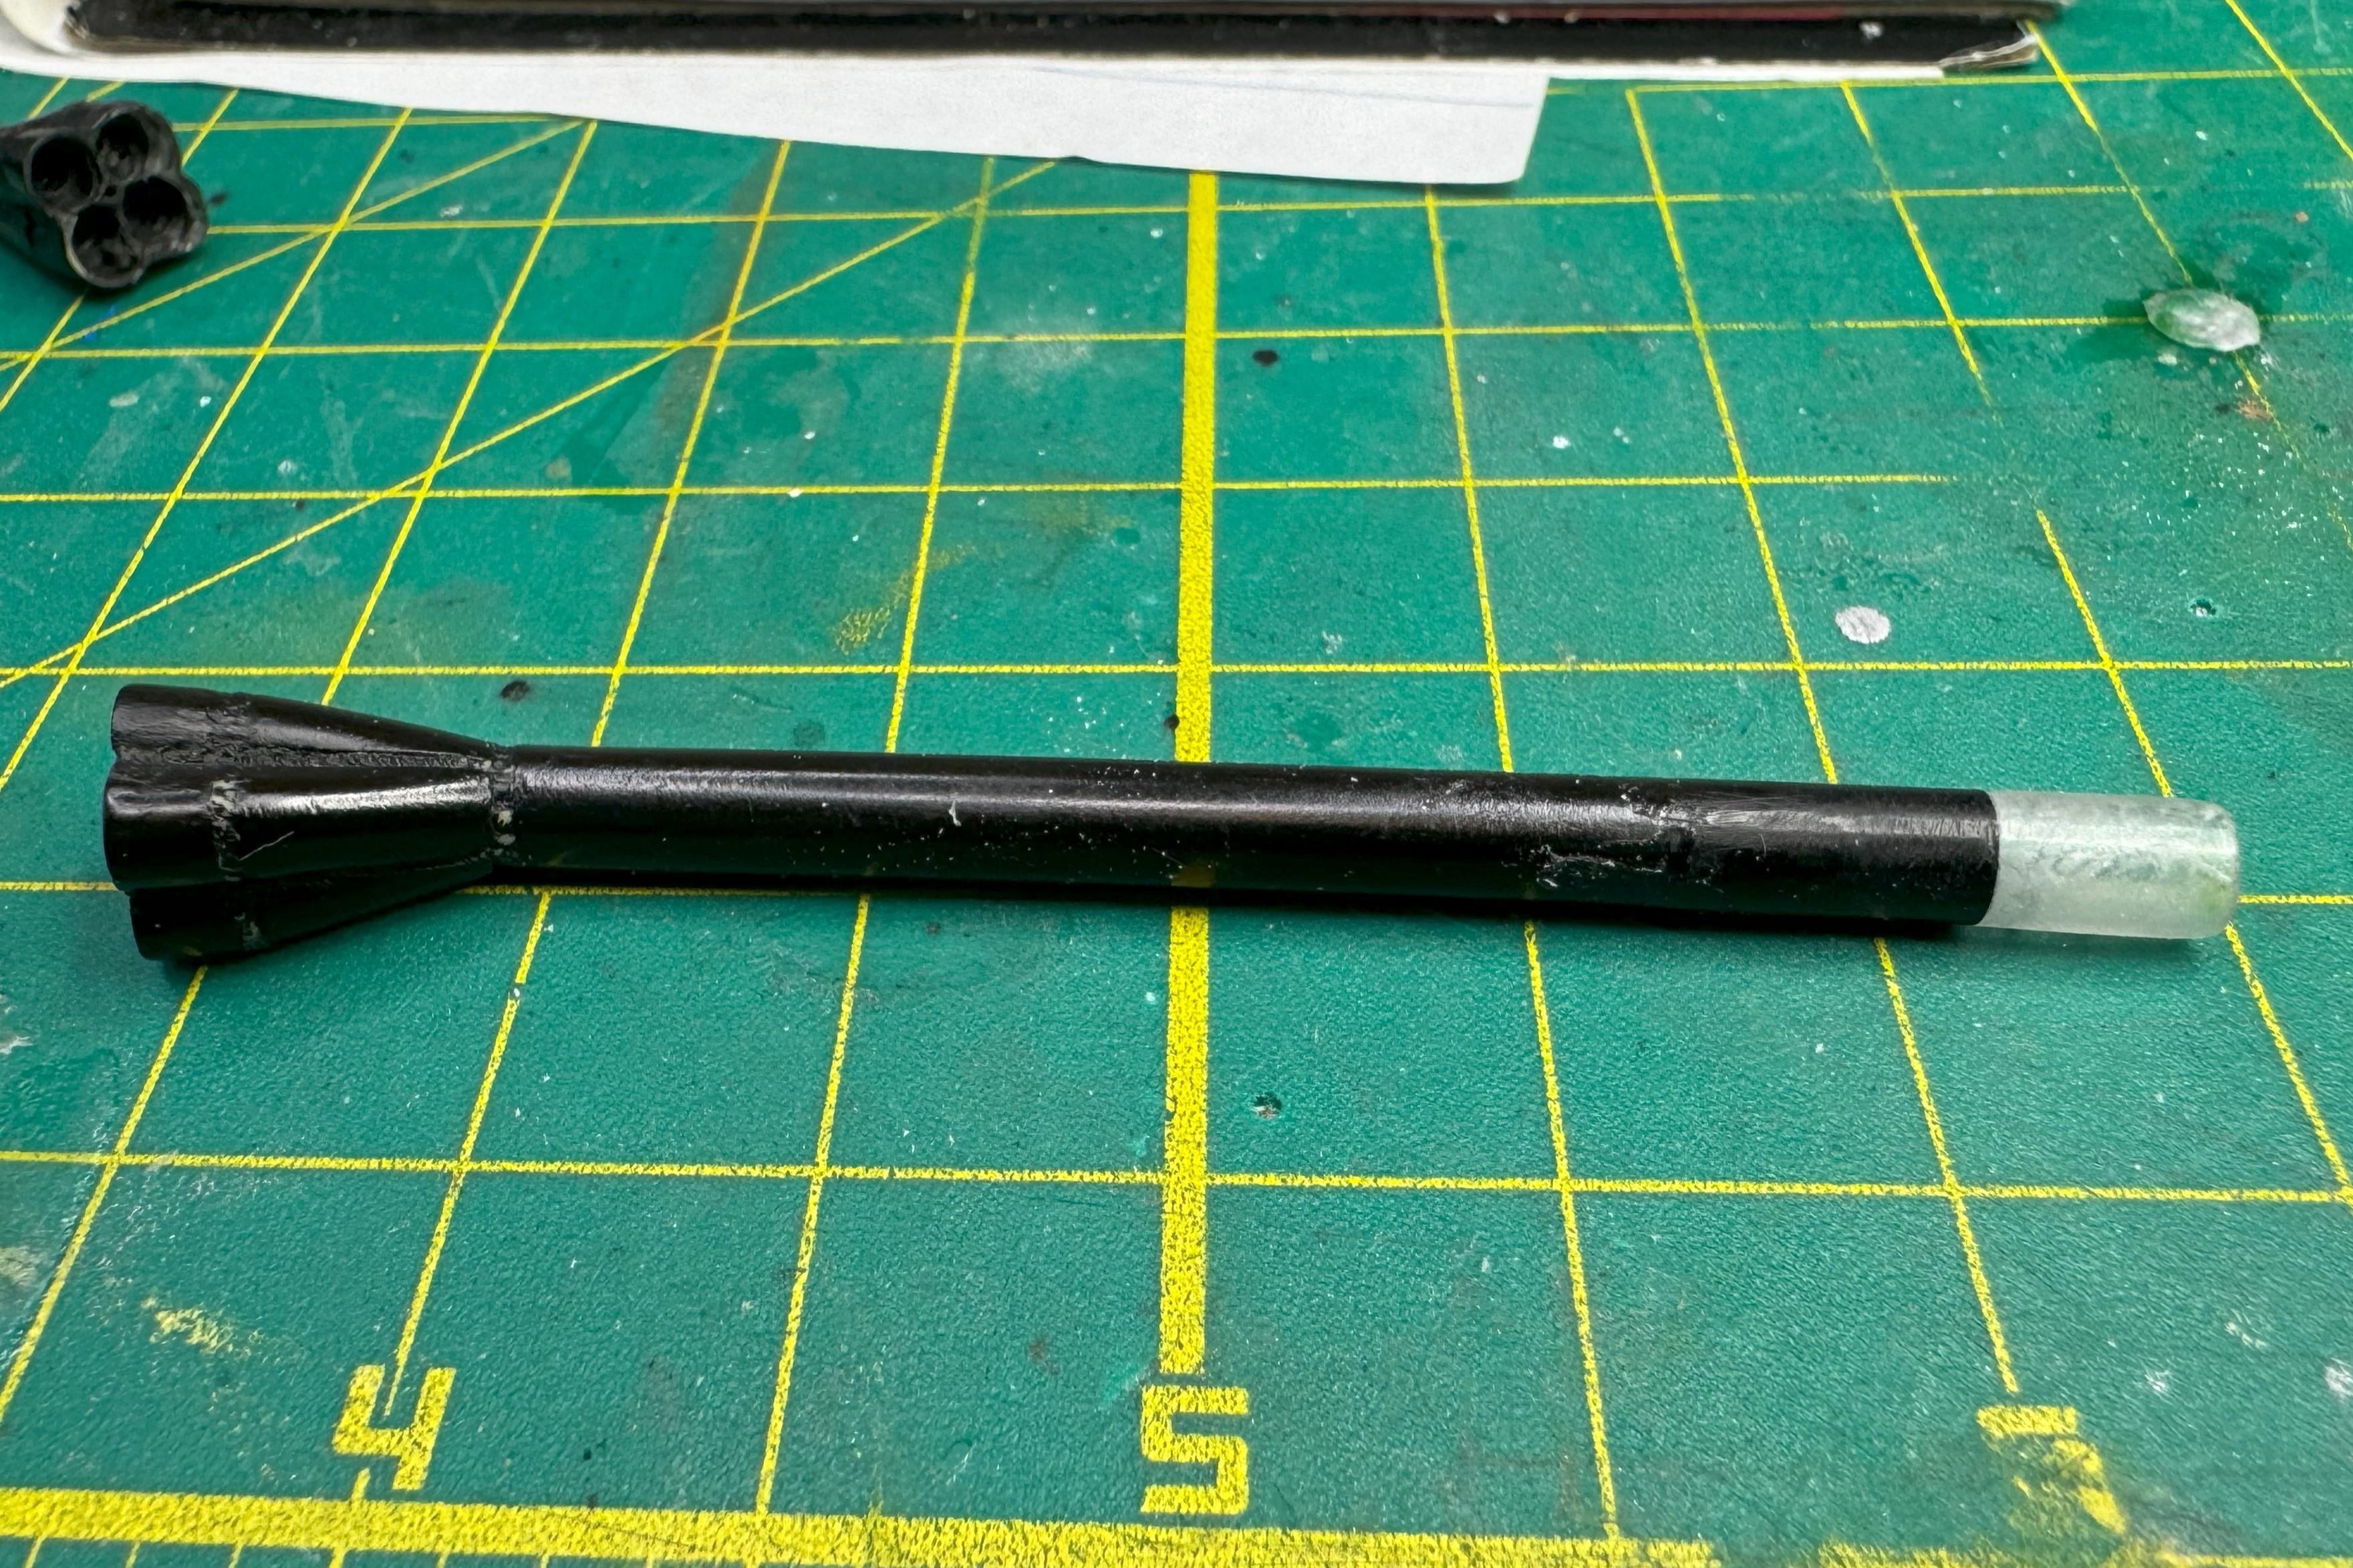
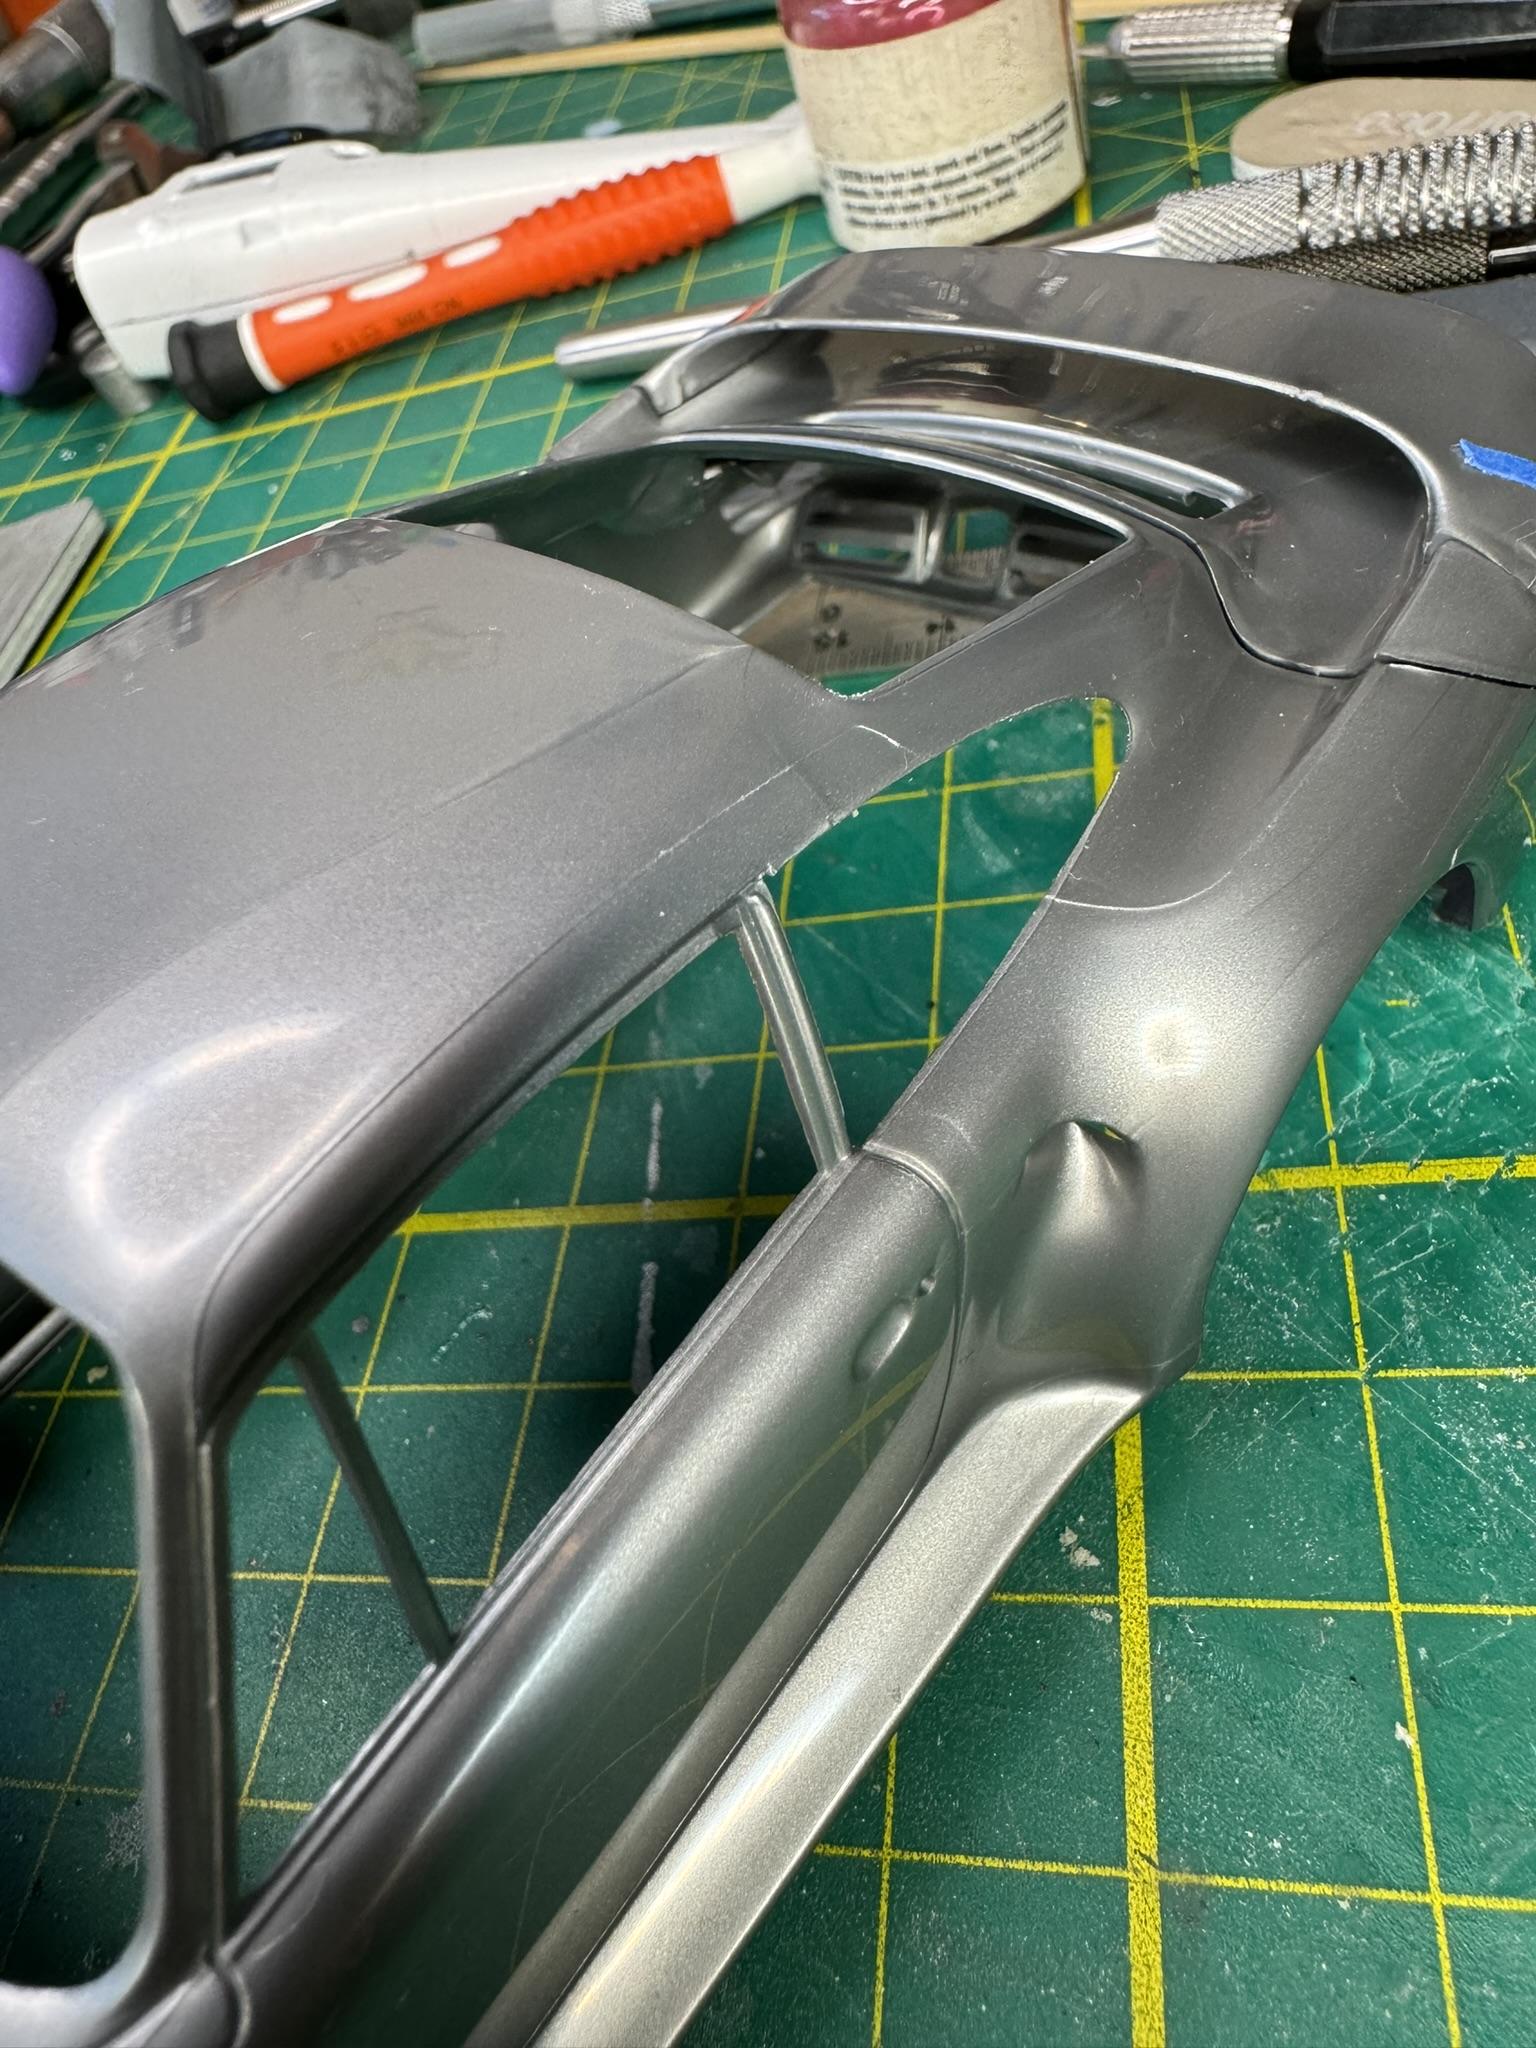
OMG, that fact that this site doesn't autosave. This is the second time I've wiped out a post that I'd invested a significant amount of my waning energy writing. I don't normally yell when I'm alone. Just now was an exception. Hold on! What just happened. All of a sudden all the pics from the lost post got loaded into this one. Holy crapoly, if I'd have waited would what I wrote have populate this post? Anybody know? The Exhaust Here's where a month of this year went to pot. From overhandling, I broke off the headers on one side. I'd been using them like handles to hold the engine while I worked on it. The lasted months! Like so many other efforts in this thread, popping them off gave me the opportunity to do something I'd been thinking about for years: add weld beads to the collectors. Then I got the great (disastrous) idea to sink the headers into the collector, thinking it would ad a level of realism. My idea was drill out the collectors about 1 mm deep for each pipe. Like I said, it was a disastrous thought. Just awful, as it turned out, because my execution went terribly awry. With each day, I had more difficulty understanding how I got to the place I found myself. It started innocently enough, the exhaust on one side, manifold-back, came of in my hand. This was an opportunity to add those long thought about weld beads, as well as erase from existence the battleship gray headers, not to mentions all the join lines, sprue ejection marks, etc., and do something I'd never seen done before... actually collect the header in the collectors. The weld beads. I tried several versions of the idea had over the years: imprint something, anything that look like a welder's ripple, into a piece of wire. My thought was to pound into the metal the face of a jewelers file. It's always disappointing when what seemed like a good idea, in practice turns out to be crud. More so when you've been holding that idea for, oh, twenty or so years. lol. I tried stainless steel rod, which is what I had pictured all those years. With just a sledge hammer on anvil, SS was much to stout and non-compliant. Brass rod was better, but far from presentable. SS tube was pretty close, but the sharp ridges didn't take to paint very well. But copper tube?... At last. The copper tube was as close as I was going to get. But the whole concept was unworkable because I couldn't find anything useful to imprint and, once struck, to work with the result to create any that wasn't a circle of semi-circle. This was a good as it got: The copper still didn't take to the primer and paint, but at least it didn't sparkle like the SS. Next up was the method I learned about hear in a post that had a link to, who else, Plasmo. In is typical fashion, it was downright simple. Scribe a groove in which to put some Tamiya regular putty. Make a "custom tool" out of a piece of a soda can and a stick. Put the putty in the groove and use the tool to make the welder's ripple. In practice it's not much harder than the explanation. And the finished product: Given that I'd never scribed anything except a few panel lines to practice, I wasn't to upset with the collateral damage. But then this happened, and it opened a can of worms: And then this happened, the beginning of tens of hours steadily going backwards: That last bit of damage was after drilling out the collectors and attempting to fit the pipes. I'm going to post this now, even though there more to document, including what I think is useful method for lining up straight part... like an exhaust pipe. More later. Thanks for looking in.

-
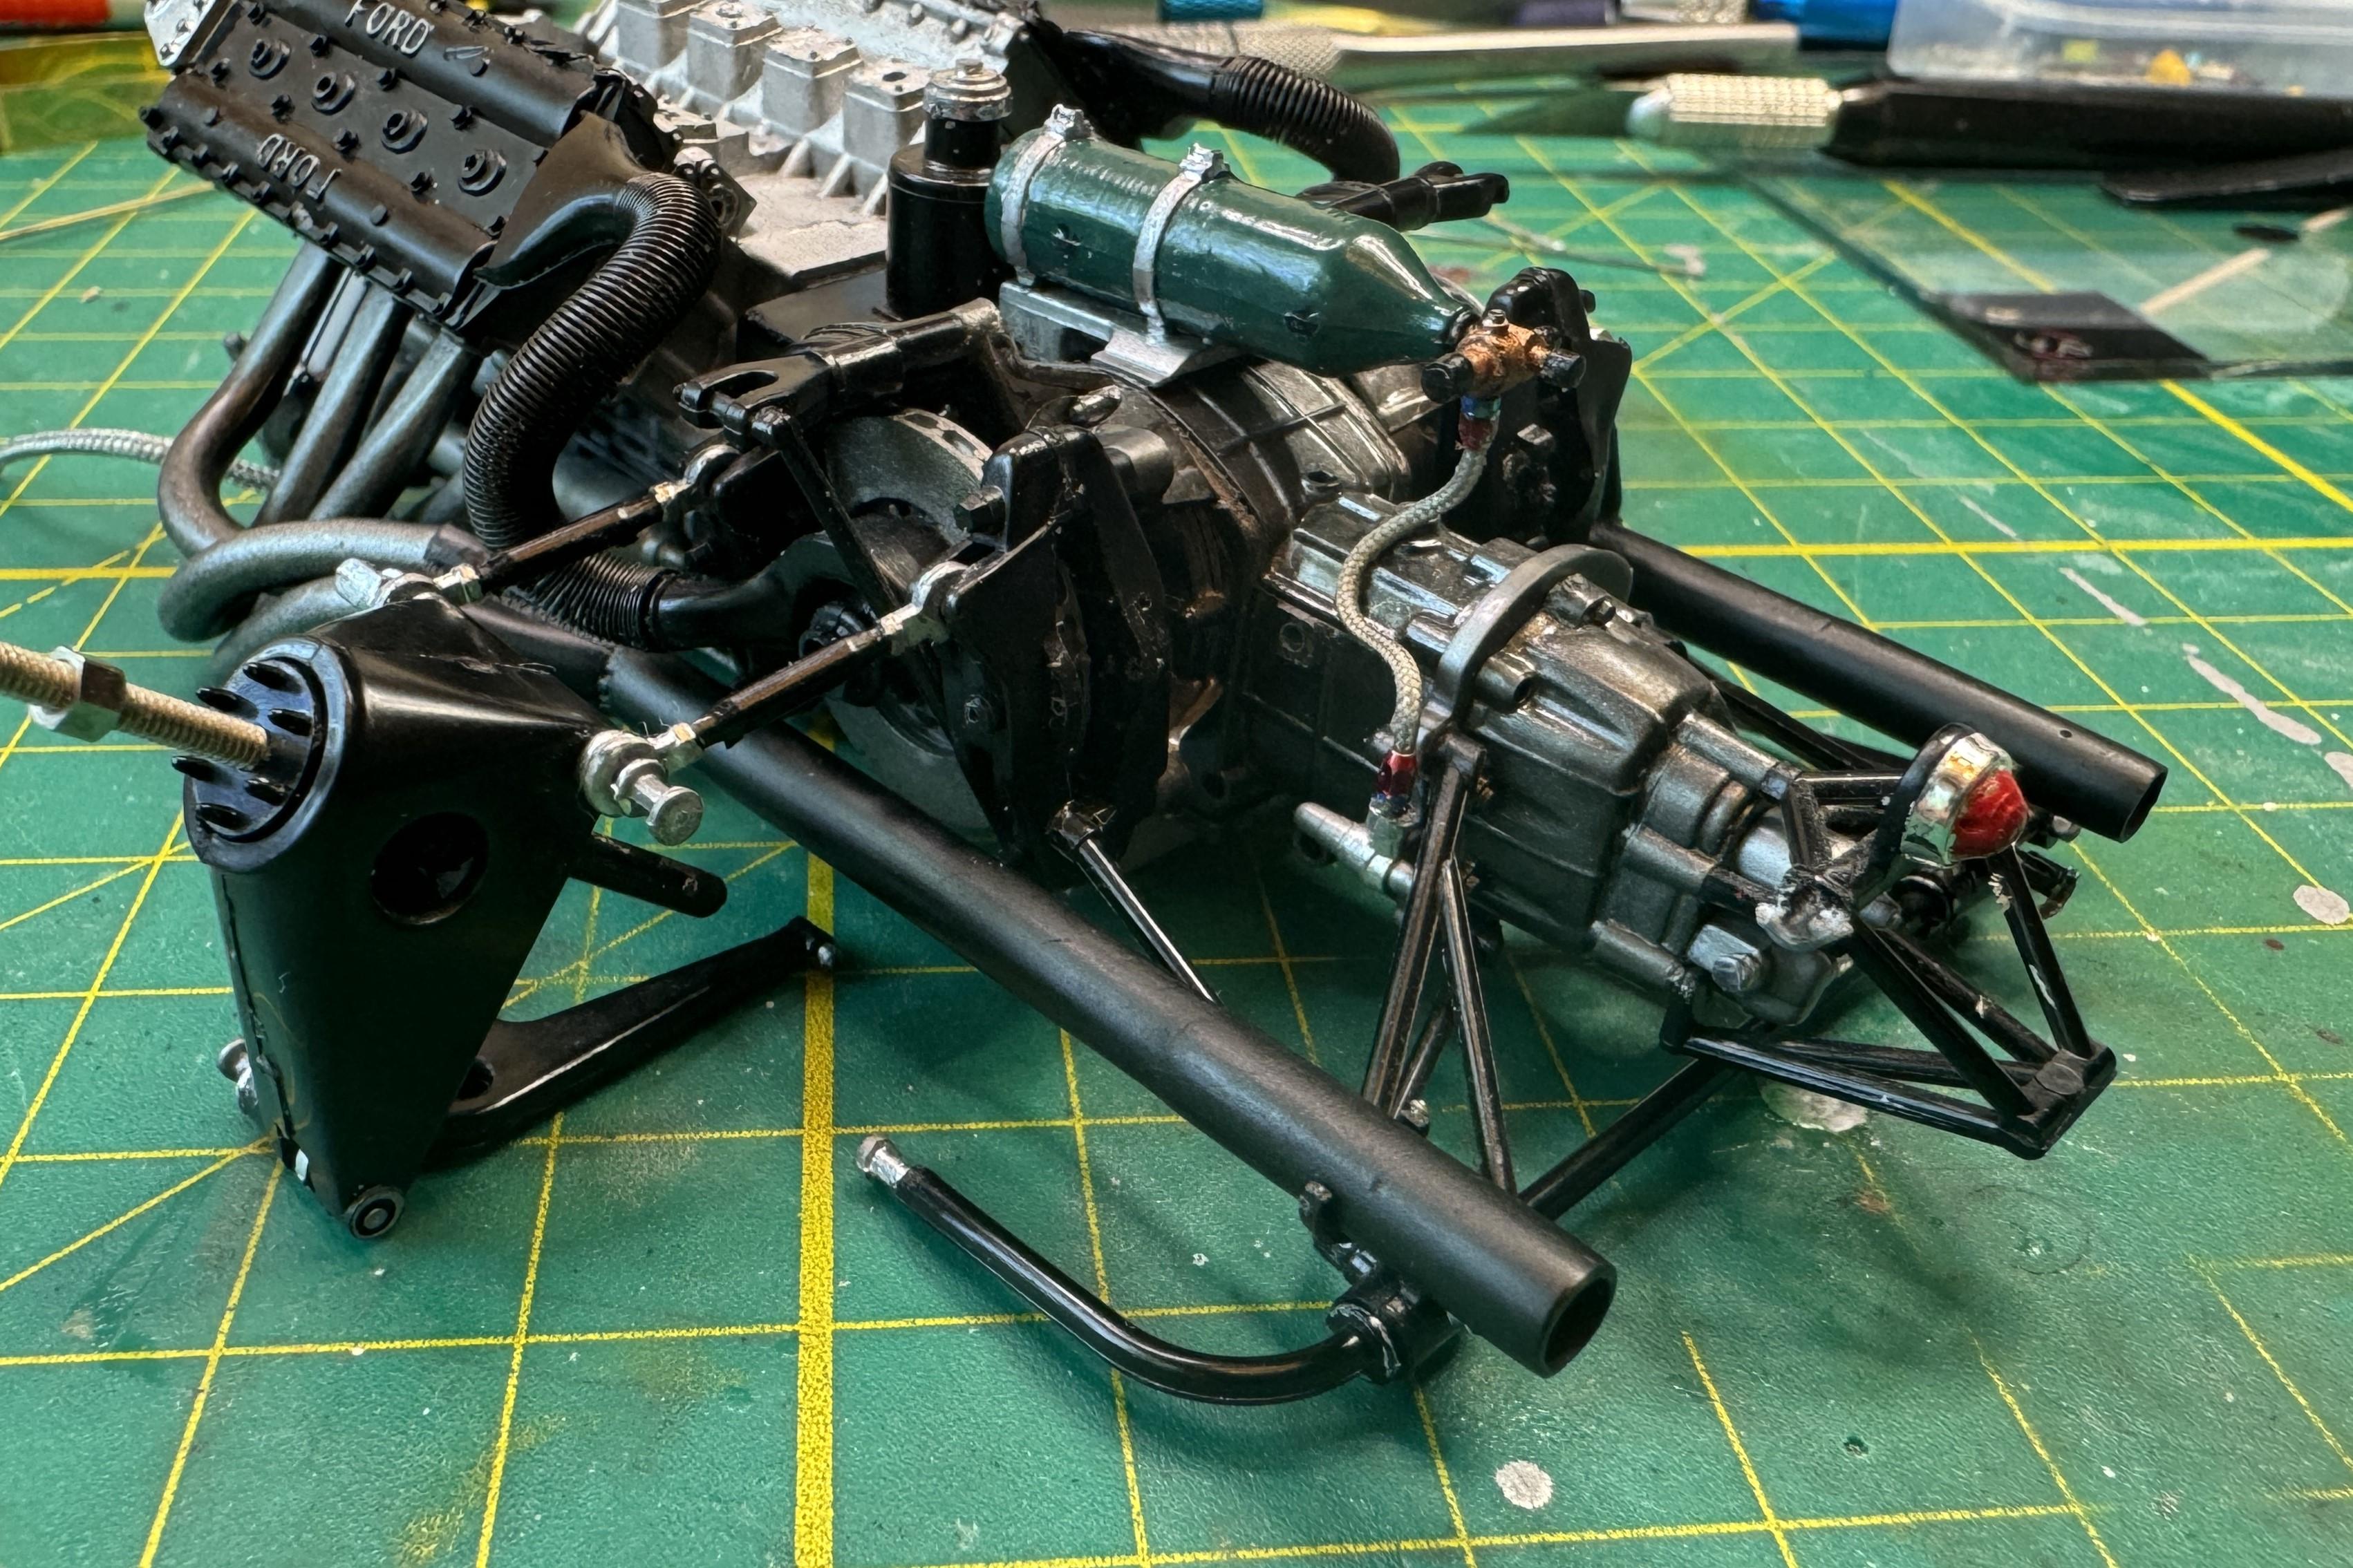
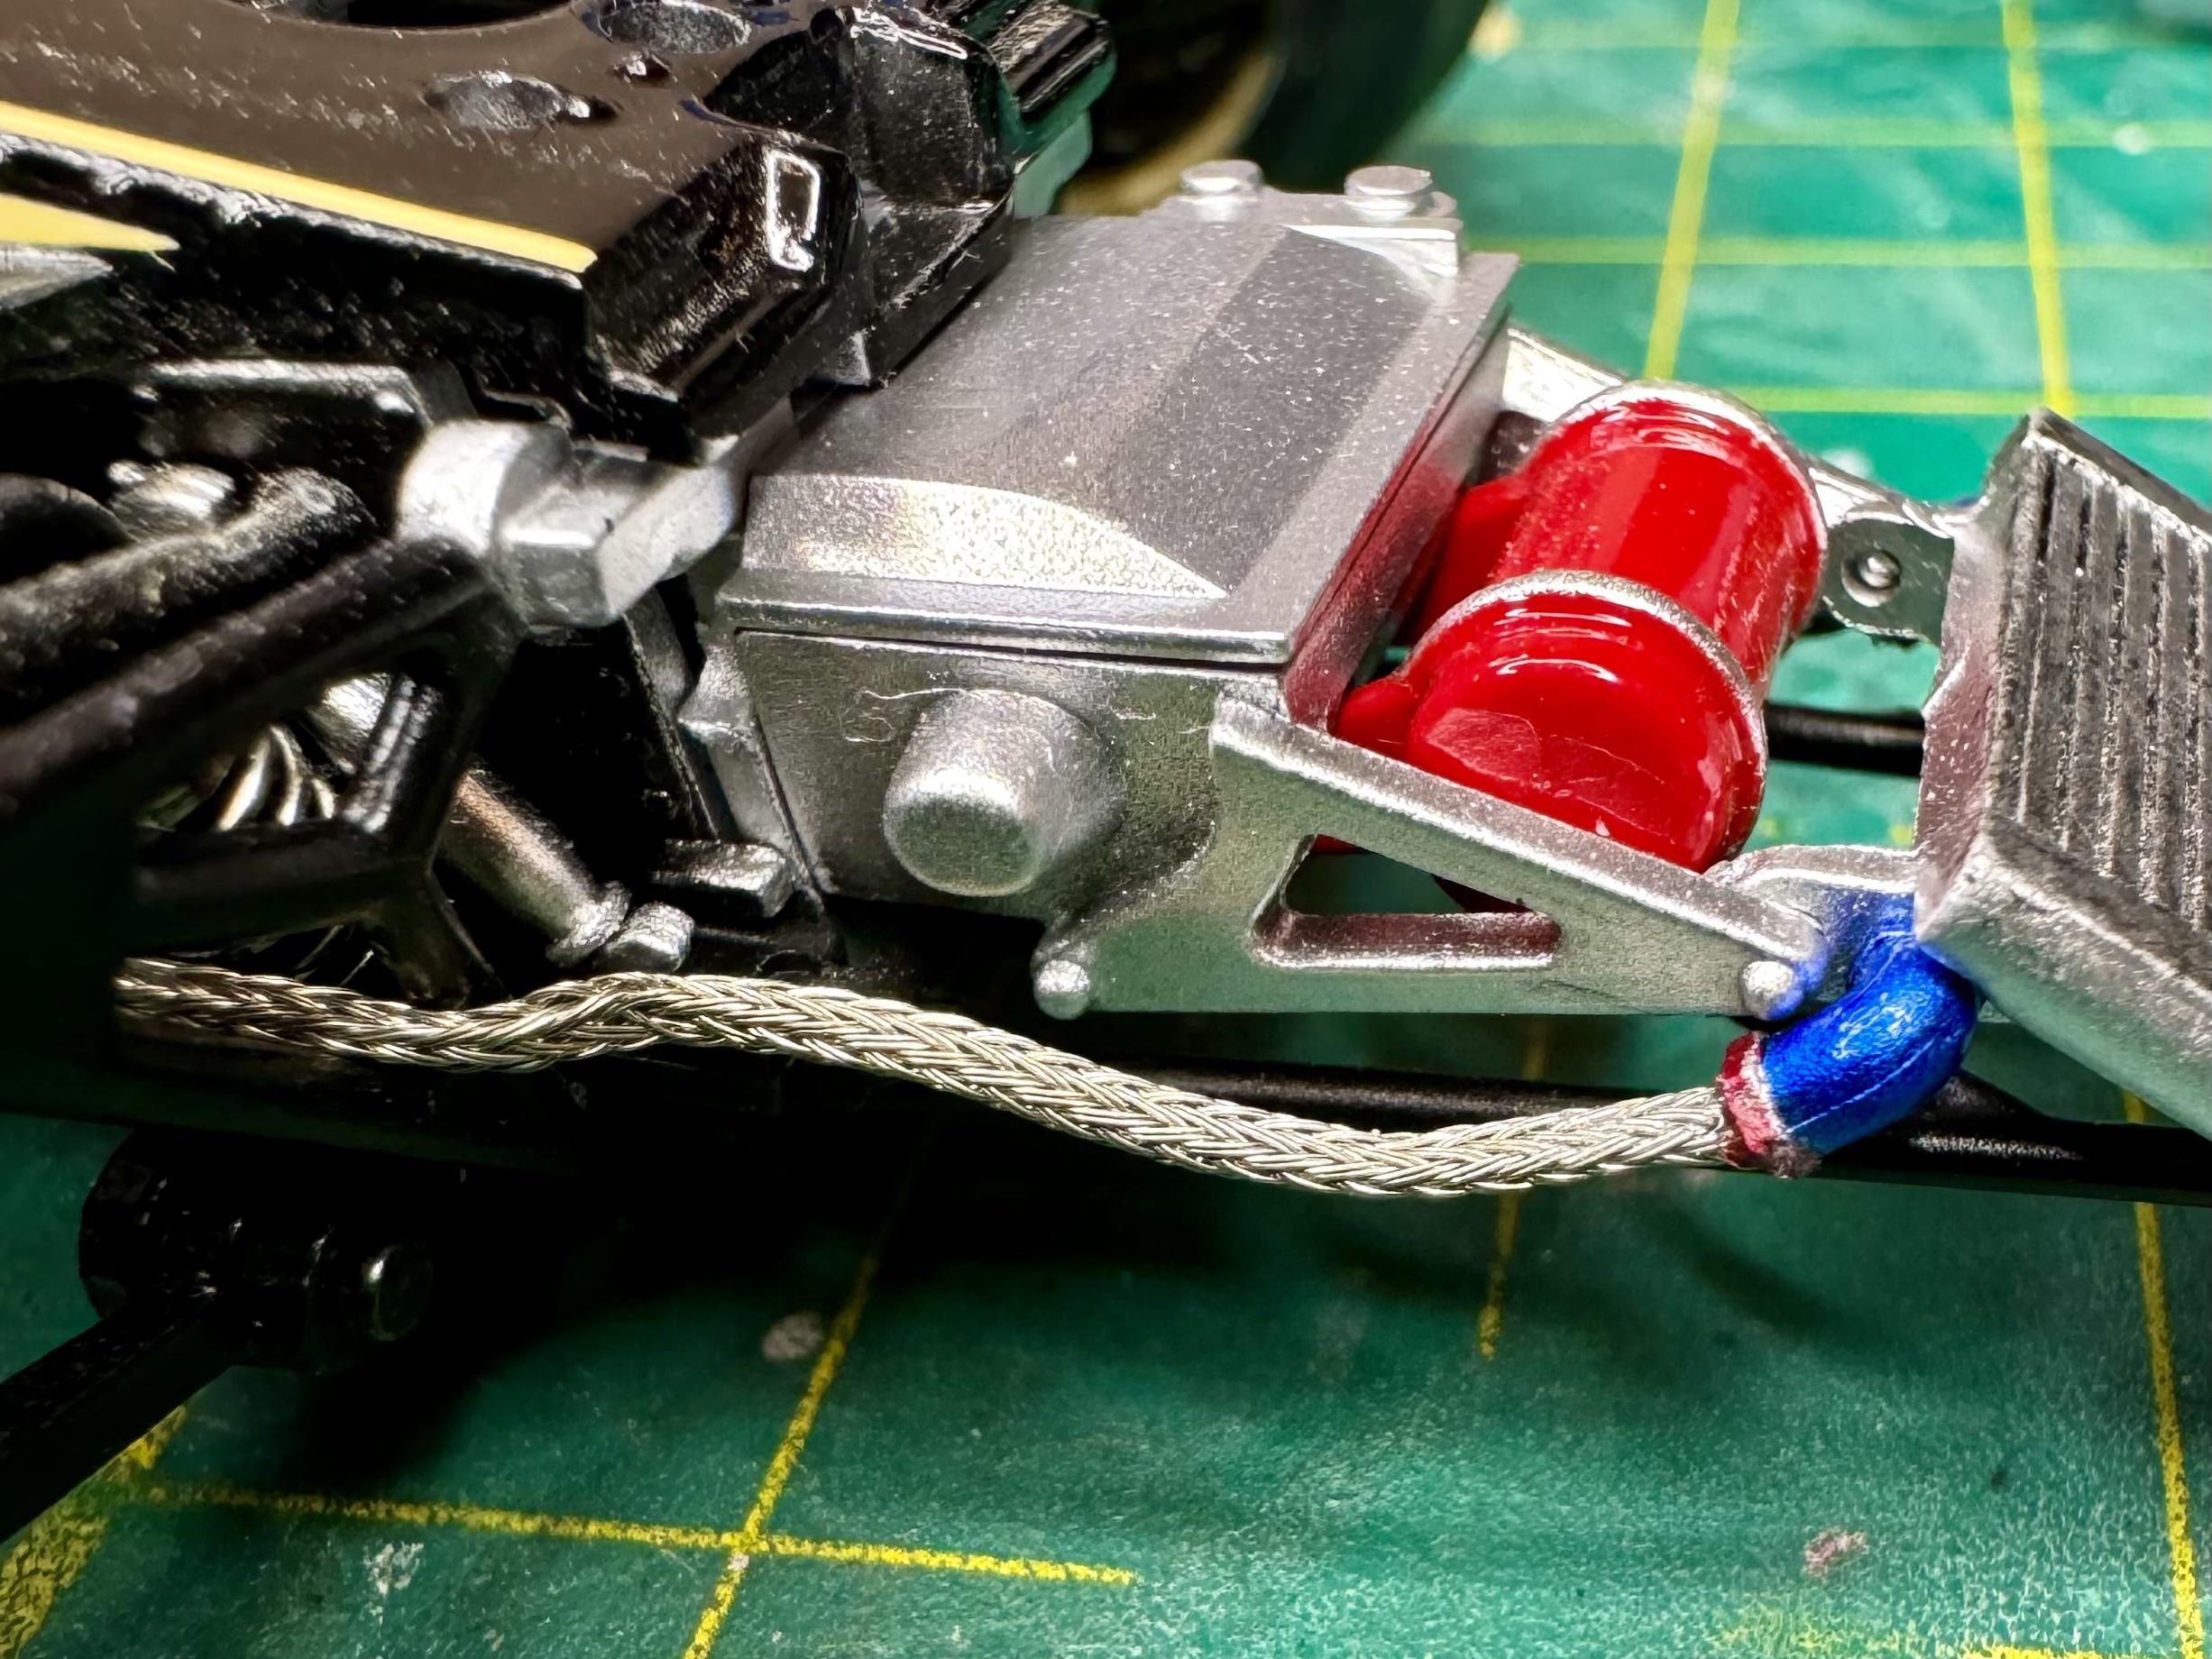
I could have sworn you recommended old routers. And, bingo!, I took apart an early-century Linsys and (ding, ding, ding) it had three antennas, all with beautiful steel braided ground wires. Then I moved onto a dell laptop from 2000, and it had a ridiculously long antenna with a larger diameter core than the Linksys ones, and with thicker steel (0.4 vs 0.2 mm). It's a simple matter to change the diameter of these because the core wire is so easy to remove. However, the bigger you go, the shorter the length of braided wire you have to use. For example, using the Linksys wires: The inner wire is 0.65 mm. When I inserted a 1.5 mm core, the length was reduced by almost exactly two thirds. Excellent, excellent find. Thank you.
- 35 replies
-
- 1
-

-
- lotus 78
- mfh detail kit
- (and 2 more)
-
Paint Strippers - What to Use?
4knflyin replied to pbj59's topic in Model Building Questions and Answers
I recently found a product called ELO. You brush it on (warning about submerging parts), and when the paint start to separate, use a brush to remove the pain... or decal. Yes, it's advertised and I've used it for both paint and decals. So far so good. The only unusual mandatory step is washing the stripped surface with detergent afterward. The washing really is a must, but it all works, so worth a try. -
I've been having a hell of a time getting a good paint result, so my next victim is going to be the subject model that is of low value to me when compared to some of the kits I have lined up. I've noticed what are identical to paint and decal cheater lines on the car. But that doesn't make any sense to me. Before I go a remove them, can somebody enlighten me as to why they're there? They run from bumper to bumper. I don't know of a popularized paint job that was two-tone, much less one that follow those lines. This pic can be confusing. The prominent line you see under the headlight is actually the mold join line. If you look closely, you'll see the cheat line runs around the outside of the lamp. Then it make that funky turn to bisect the b-pillar window before riding the ridge to the back of the car. (Again, there's a mold join before the funky turn that can throw you off.)
-
Trumpeter Ford GT40 with my twists
4knflyin replied to kensar's topic in WIP: Other Racing: Road Racing, Land Speed Racers
Boot clamps? Regardless, nice work. -
Trumpeter Ford GT40 with my twists
4knflyin replied to kensar's topic in WIP: Other Racing: Road Racing, Land Speed Racers
Funny those toggle switches... I paid good money for some almost-as-good ones from Top Studio. Nicely done. Craftsmanship and cleverness are a great combination. Oh no! I just noticed... not the exhaust. You should have bend the panel. Also, did you add a governor to keep the top end to 70 kph, or just down a couple cylinders? -
That build is gorgeous. I'm going to have to look it up
-
Trumpeter Ford GT40 with my twists
4knflyin replied to kensar's topic in WIP: Other Racing: Road Racing, Land Speed Racers
Nice! Very nice!. The cabinet on your desk reminds me of those old traveling salesman foldouts. The sander would not have been my first gutss, but it makes perfect sense. I have an entire house and I choose to sit at a particular window and so am limited to a 40" wide desk! My dining room room has the rest of my BLAH_BLAH_BLAH_BLAH. I just got an order of paints and that's pushing me over the edge to find a new solution. Thanks for sharing where all your delicious custom work comes to life. I wouldn't know where to begin if I go the 3DP route. -
Unconventional Materials - From the jewelry area
4knflyin replied to Jiml0001's topic in Tips, Tricks, and Tutorials
Care to post a pic? I’m having trouble envisioning what it is you’re talking about. -
Unconventional Materials - From the jewelry area
4knflyin replied to Jiml0001's topic in Tips, Tricks, and Tutorials
Well done. It looked like foil insulated hose. ? -
Unconventional Materials - From the jewelry area
4knflyin replied to Jiml0001's topic in Tips, Tricks, and Tutorials
LOL, I have a couple! You know what I’m about to go do. Thanks for the tip. And thanks to Bruce for turning me onto this thread… great stuff guys -
Trumpeter Ford GT40 with my twists
4knflyin replied to kensar's topic in WIP: Other Racing: Road Racing, Land Speed Racers
Ken, I really hope you follow through with this. I'd bet my house that lots of people, members and web surfers, would be glued to it. I don't know where you'd put such a thread, but announce it here when you do, please. This build is great. I'm still blown away by you exhaust from a long time ago. Any chance that you could start posting larger res photos, even if it requires you to post them directly on the site? That last series made me realize you're getting to the point where a lot is going on and some hi-res pics would be beneficial. Thanks for sharing so much. -
Trumpeter Ford GT40 with my twists
4knflyin replied to kensar's topic in WIP: Other Racing: Road Racing, Land Speed Racers
Sorry to jack your thread, Ken but, abs, have you seen them. I can't figure out what they did. Multiple inspections have left me 1) wishing for some better pics than they have released, and 2) I'll keep with TS and keep hoping they start releasing larger options (though I hear they're going to stop producing them completely... them and the metal AN fittings. Boo hoo). -
Yeah, I get it. But while you're here, have you ever seen braided line hose like that? If I found it, I'd be buying that stuff in every size possible and in quantities that I couldn't explain. Was it ever available commercially? EDIT: Oops, we were ships passing at night. I was posting at the same time you were replying, so you didn't see what I'm talking about. It's the last pic in the decals post directly above your reply.
- 35 replies
-
- 1
-
-
- lotus 78
- mfh detail kit
- (and 2 more)
-
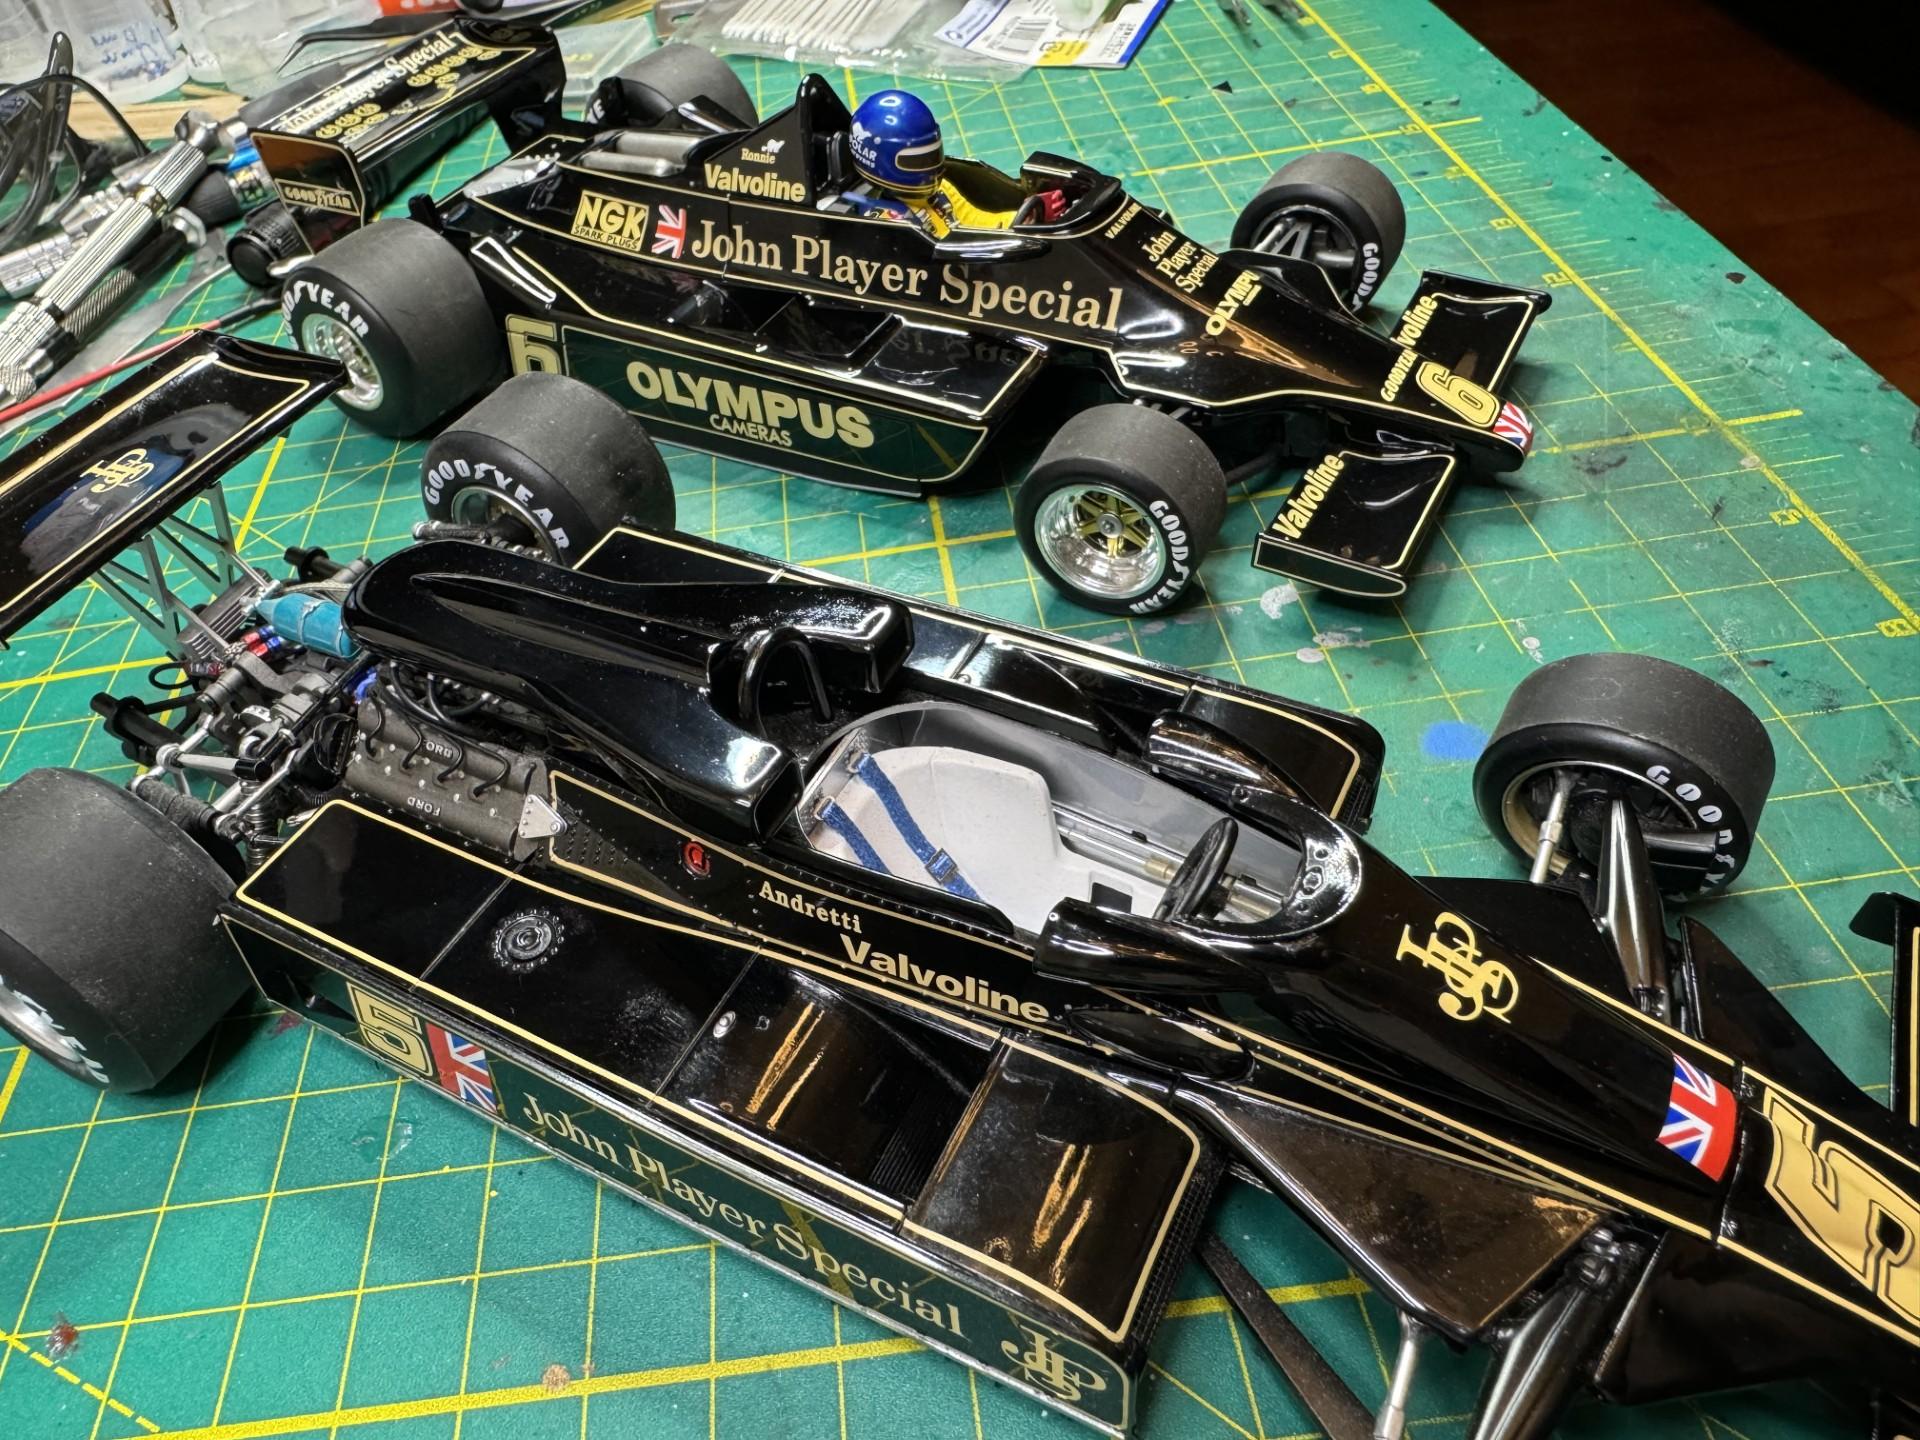
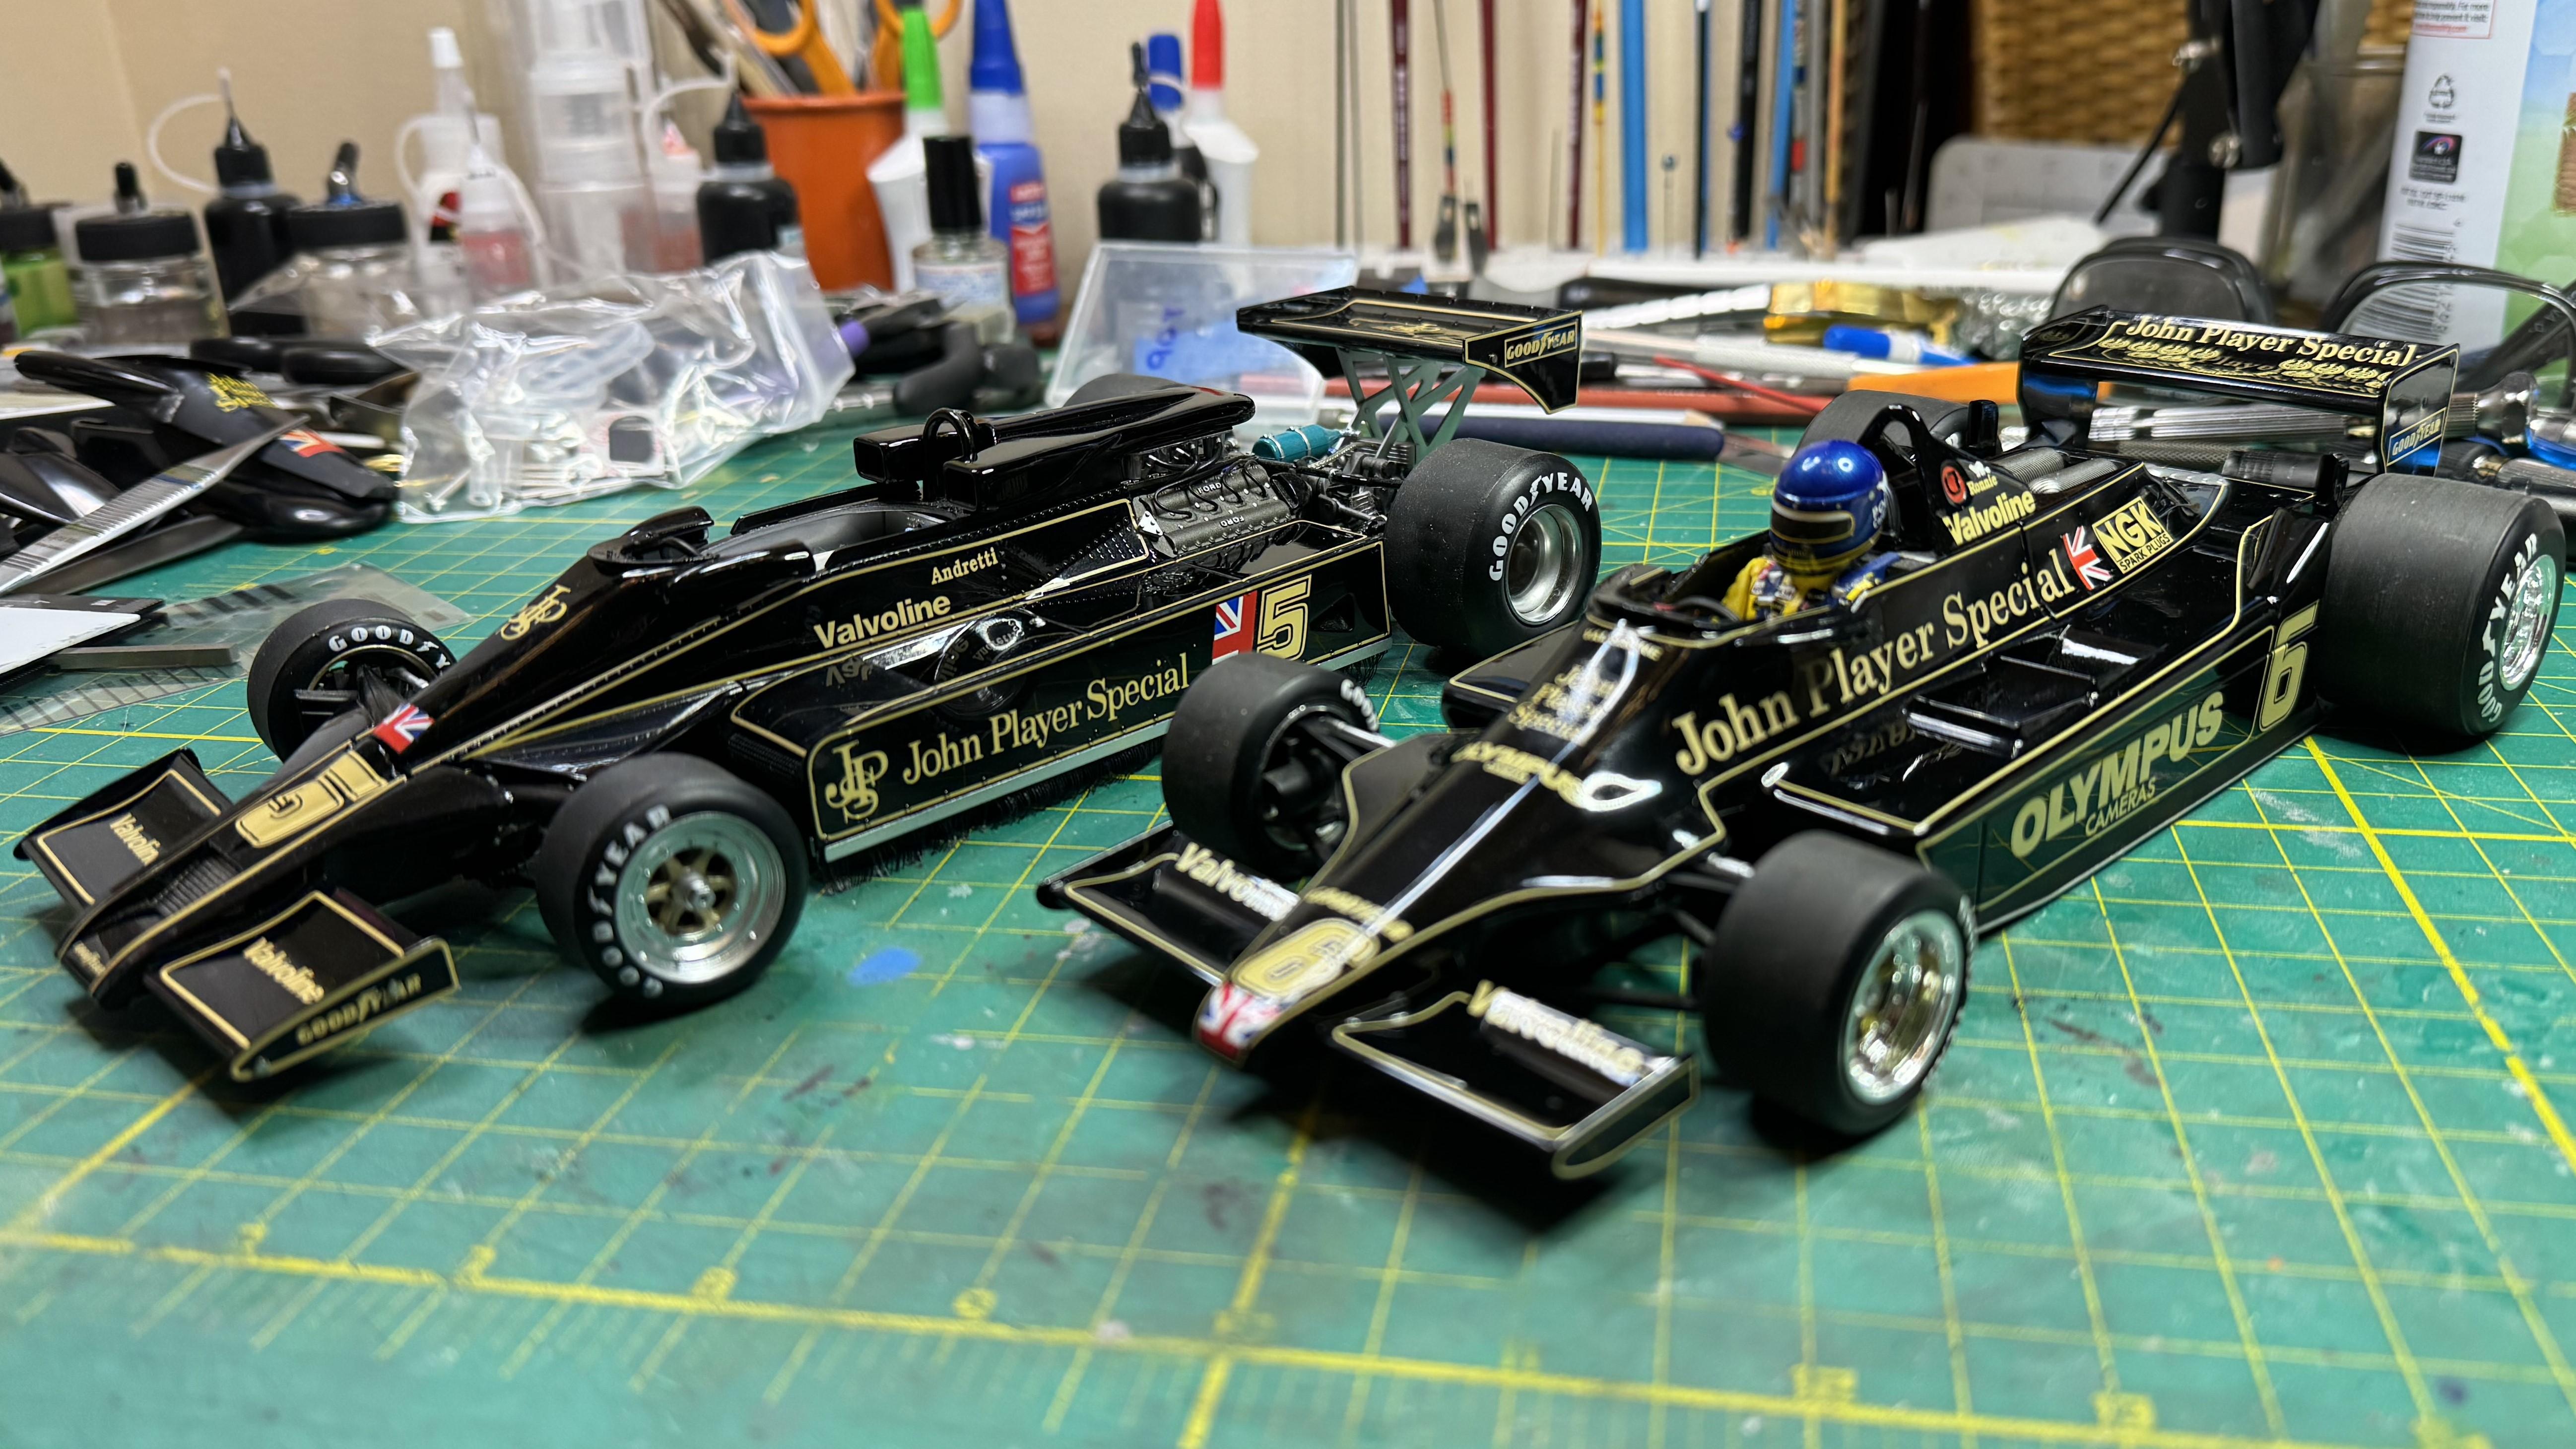
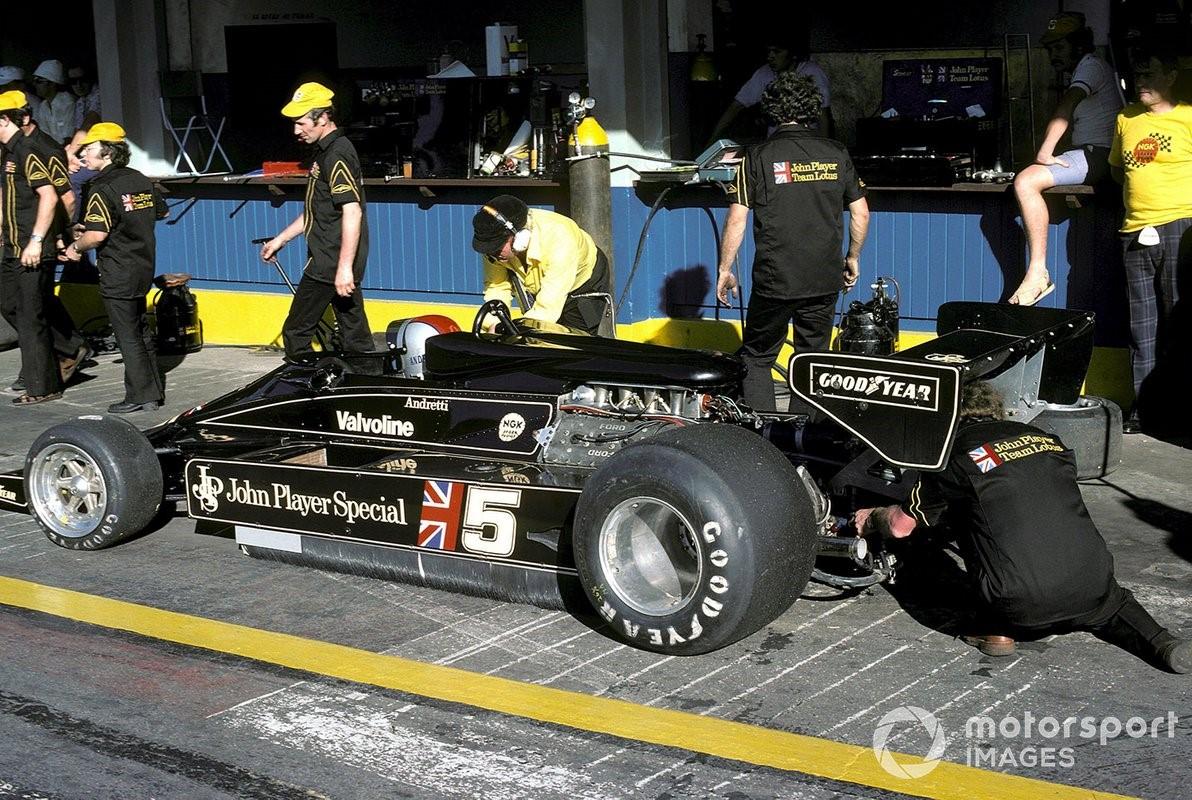
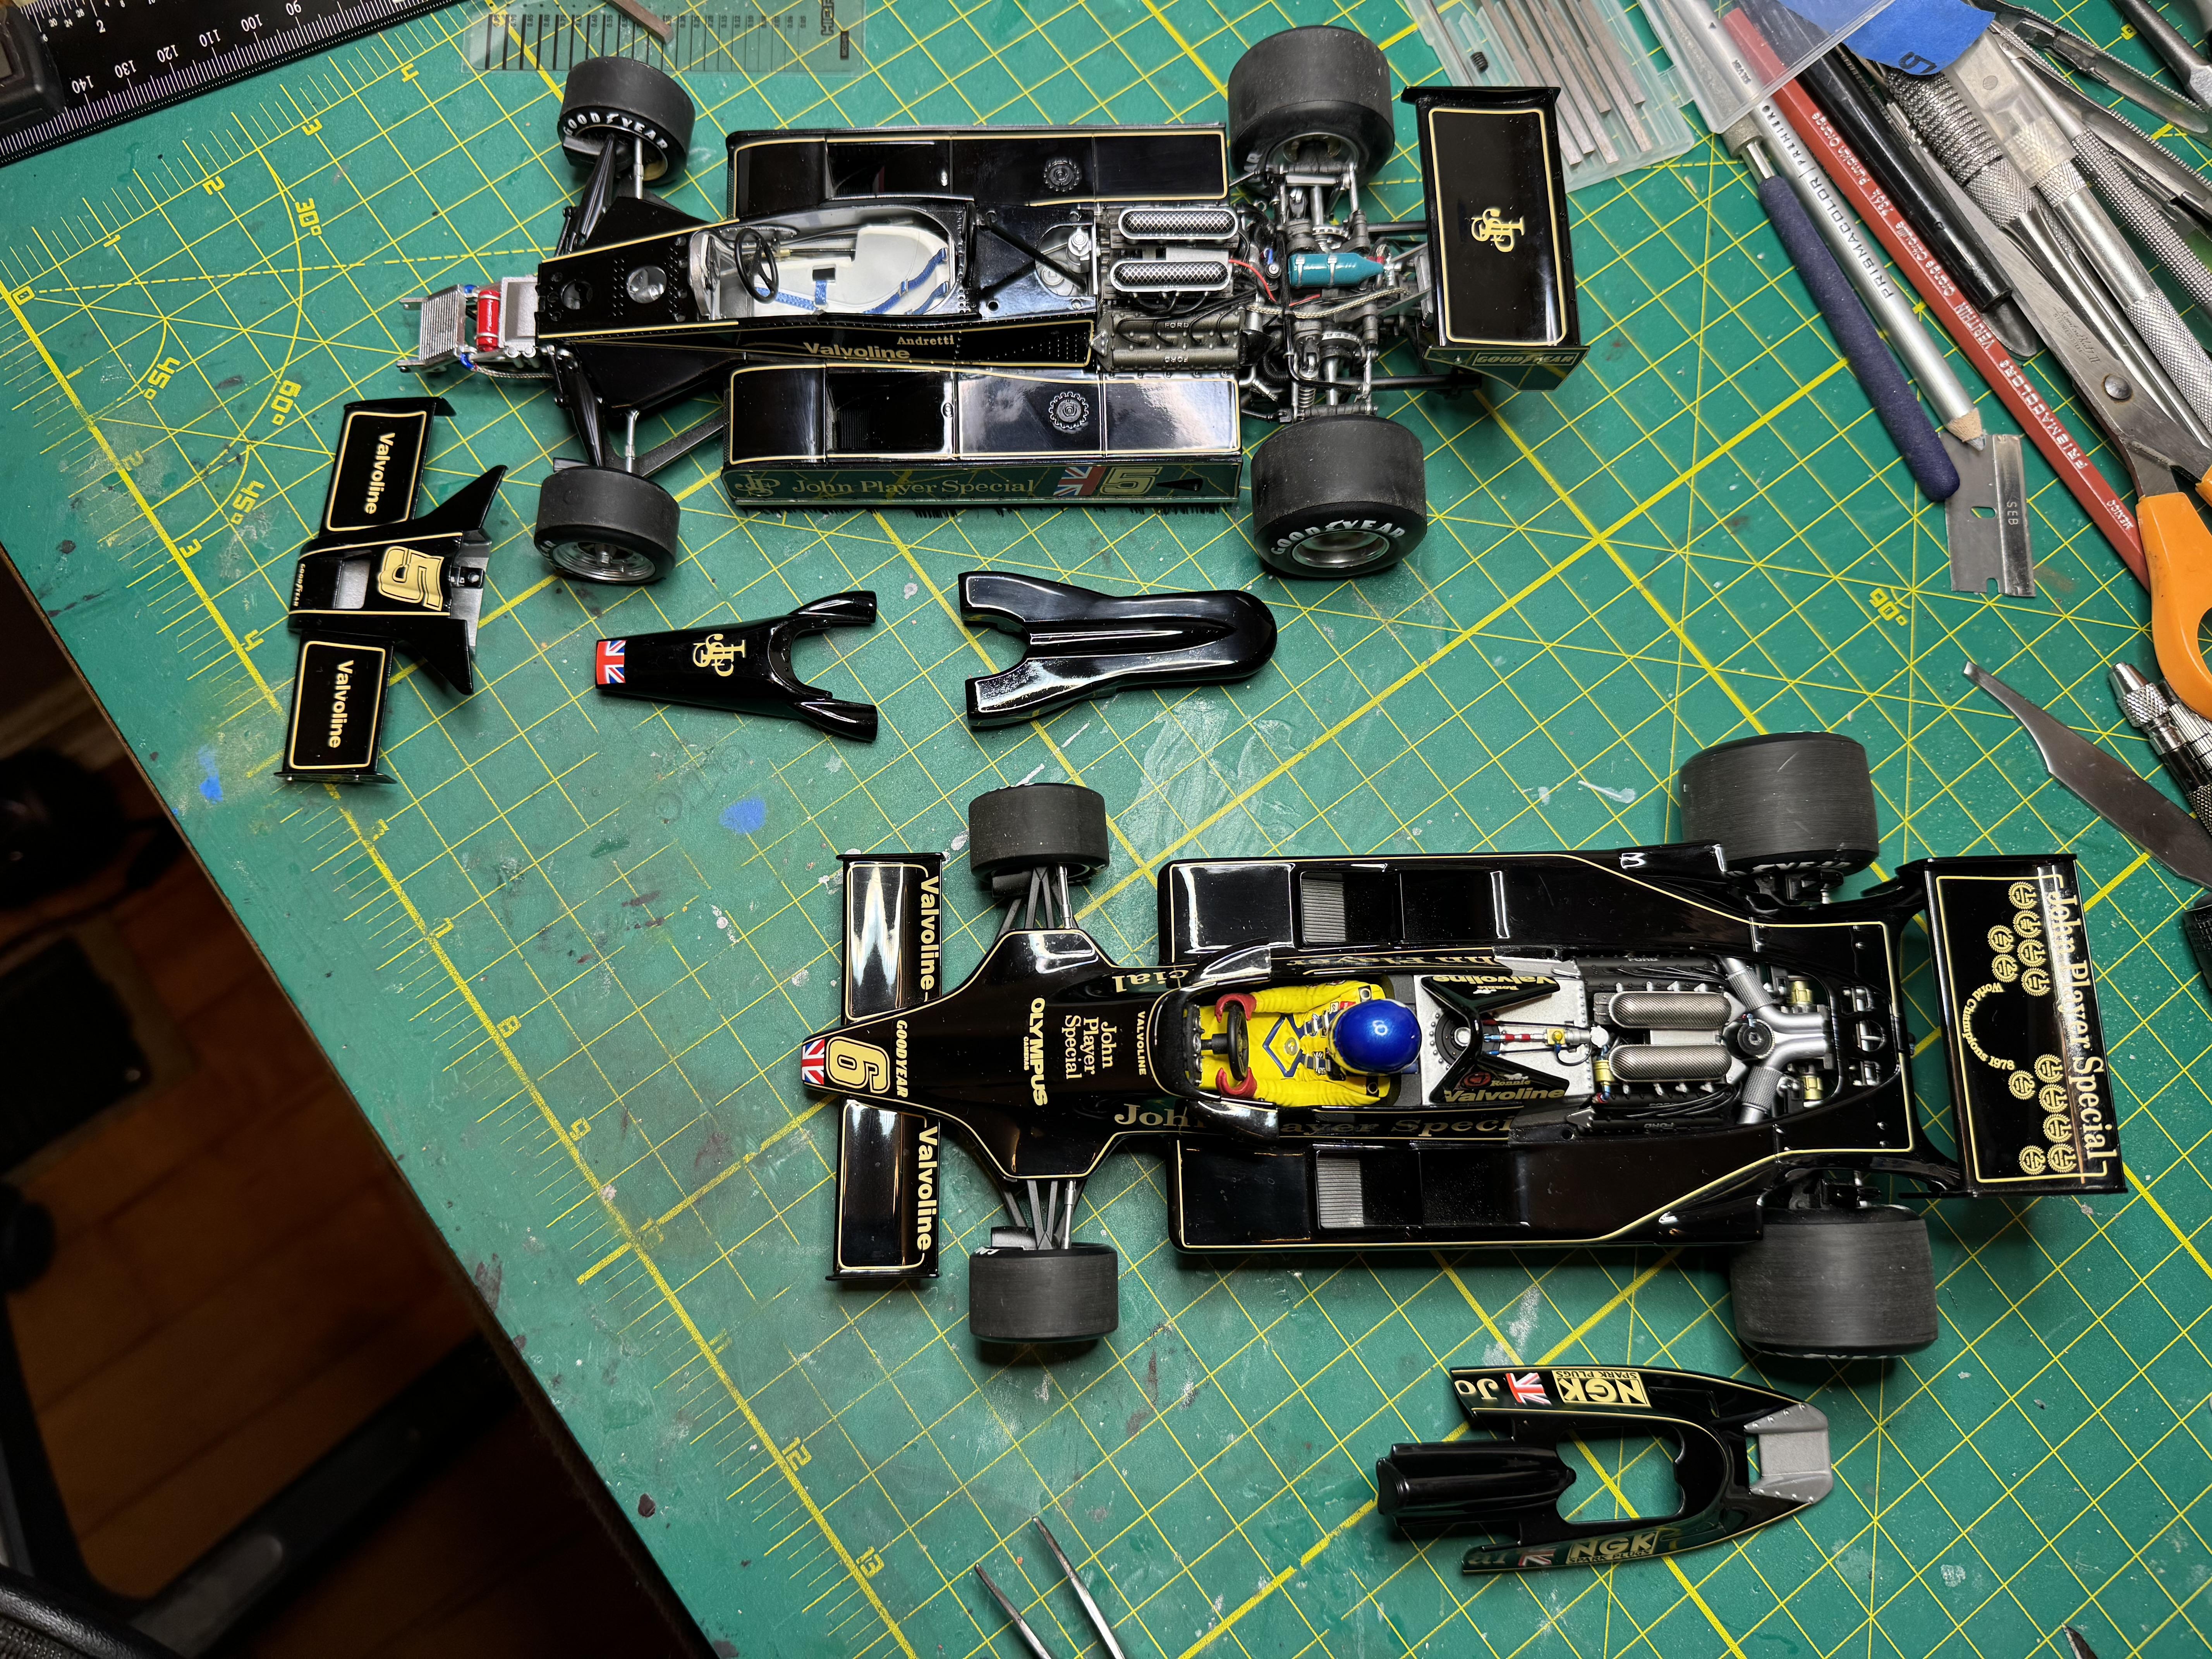
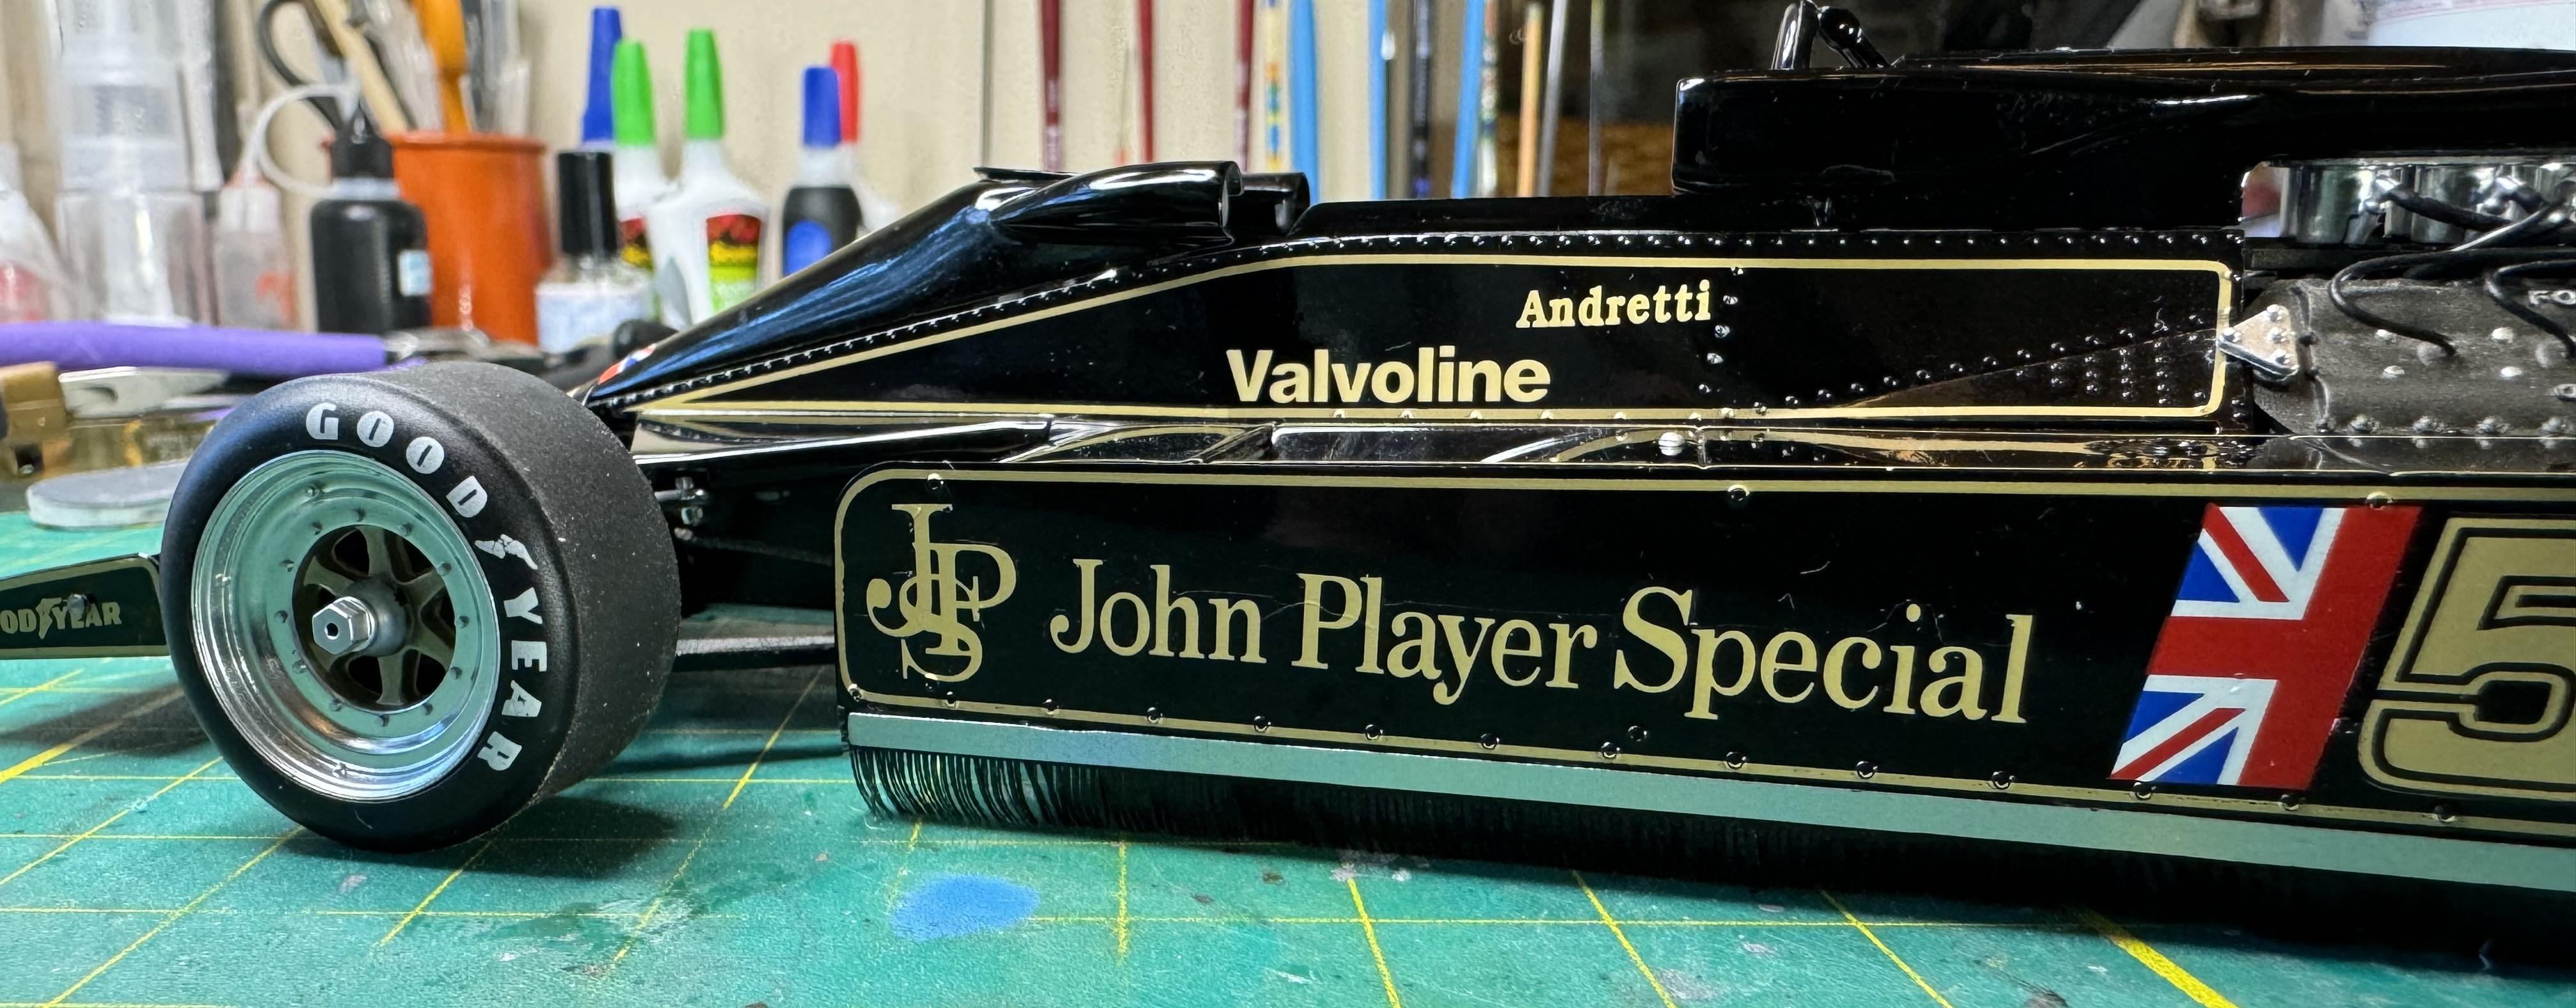
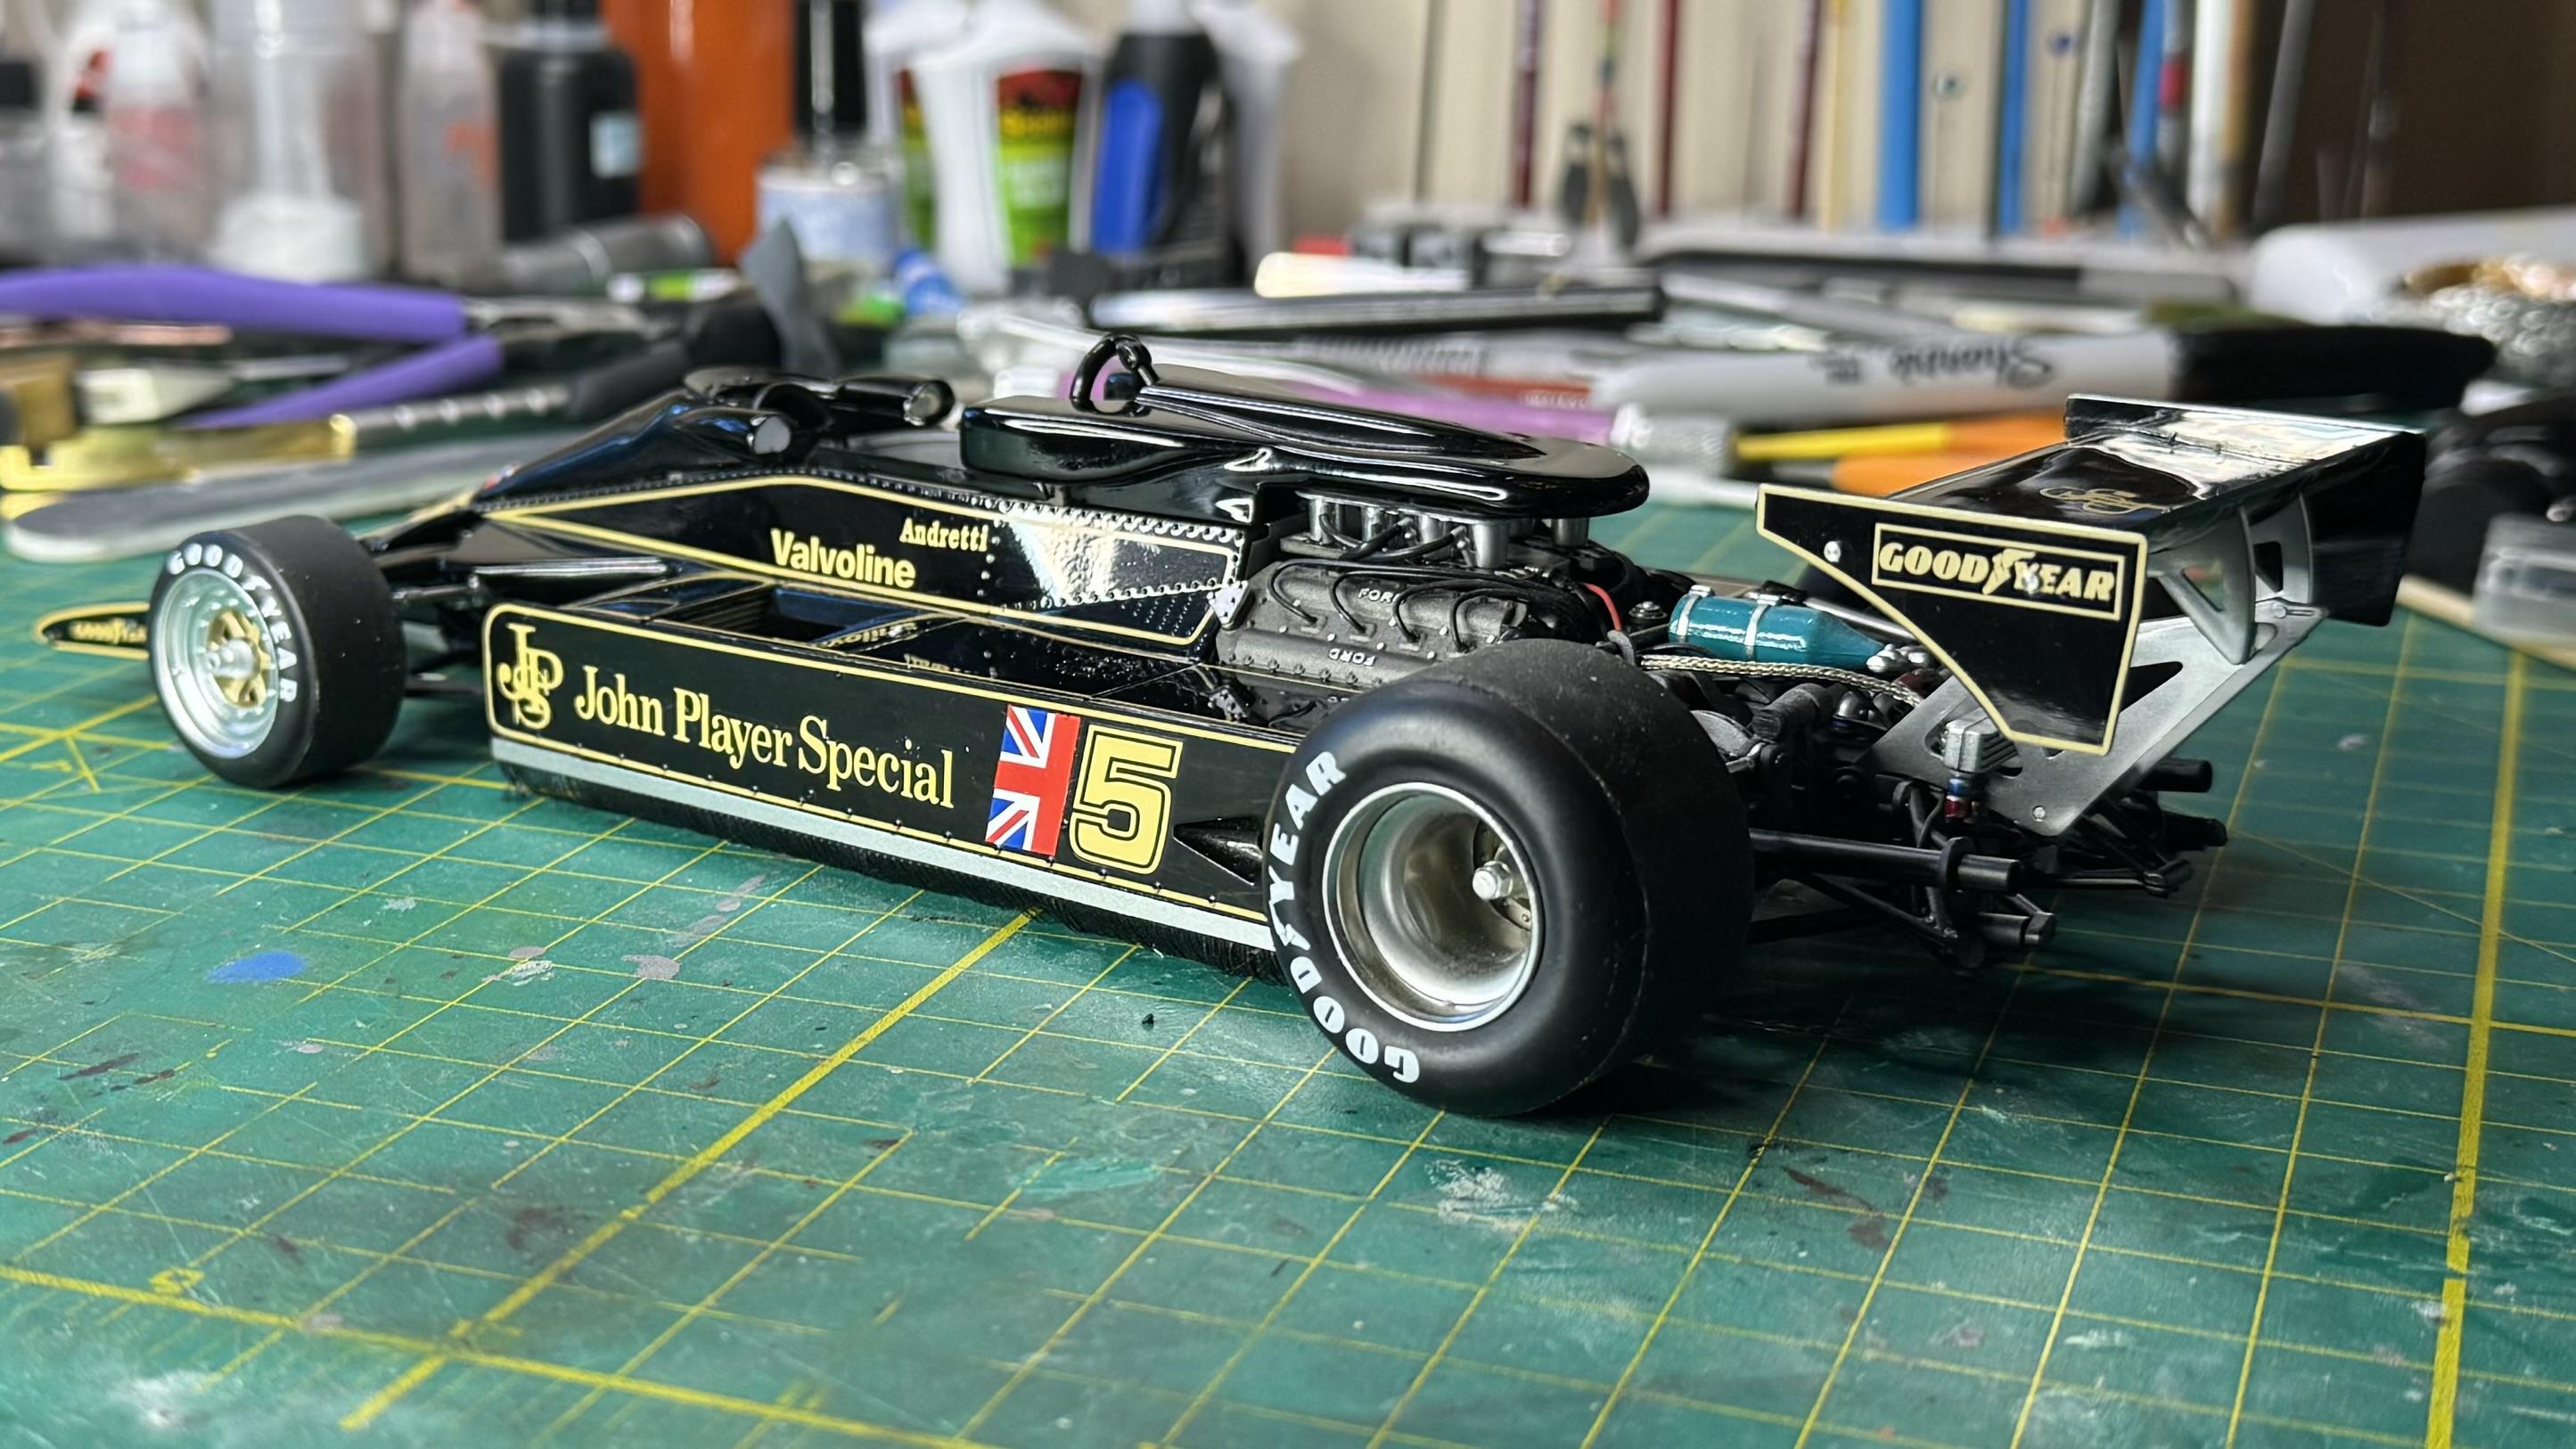
Just for grins: Last night I spent my time at my workbench applying the tabu, unerlaubt, sponsorship decals. The 1978 Type 79 is a Minichamps build, and the 1977 Type 78 is TSM (TSM even got it correct right down to the white seat!). Also, BTW, I bought the models in 2020, spent the next three years searching for and buying three separate 1:18 decals, none of which sufficed on it's own. It required having all three before I was able to complete the job. Let's not talk about the 18 months the three sets of decals just sat around wanting for attention. A large part of that was that between two cars and three decal sets, I had five distinctly different-colored decals. On the cars, you get away what seemed like it was going to present a serious clash. That the two cars came with markings that were such different colors I thought was strange. Noticeable, the TSM coming closest to the wheaten of the 1:1 cars got the top prize. And all three sets of decals were different colors, one of them was even the offensive goldish yellow that Tamiya supplied in the kit that's the subject of this thread. From that set I used only the British flag for the Type 79. Yet somehow, five different sets of decal colors seemed to work okay. Either that or my eyes are worse than I know. For your amusement: I had to graft the 'S' and 'l' on the right side of the 1977 car to spell the whole thing out. Sheesh. And now for one that shows something that has bothered me since I first saw it, and I wasn't even building at that time. Why is is that they have access to such beautiful actually wire braided lines and we have to put with cloth imitations?! Somebody needs to explain this to me before I have a heart attack one time when I'm reminded of it. A comparison of detail. On top, the TSM has more parts to remove because they have more to share. There's really not much comparison in this department. Detail matters, even if we can't see it without some effort, as we all know better than most. We're a rare breed. As a reminder, the white seat is correct for 1977, and not only for Team Lotus. I was surprised to find this out. And know the real comparison: The TSM (look at the wild job the assembler did on the spark plug wires): The broom bristles, in case you missed them. Shows how little they understood at this point in the car's development. EXIT: Wow. That decal work looks horrible, even if I can be excused for much of it because of the poor quality of the decals themselves. But looking between “John“ and “Player“, I remembered that, last night, I thought it was was funky. So I worked on it with solvent abhairdryer and what all, and I just couldn’t get it to look any better. Today, it looked like there was a hair trapped underneath it. Except I know better, and it was more likely excess carrier film. So I grabbed the model and, sure enough, it was that junk this decal sheet just would not let me get rid of prior to applying it to the car. Here’s a pic after working on it for 10 minutes, not daring to go further o dry decals for fear of wrecking it all together. I also removed some gro m the ‘JPS.’ Thanks for looking. Have a great day!
-
Unfortunately, that sexy rubber is for the next decade’s — the 80’s — F1 cars. I have to say though, my fear 45 years ago that a bad paint job would look worse than no paint job were unfounded In the end, I think. Even with the cracking paint and paint outside the lines, I prefer it. The nice new shoes were bought with the MP4/6 sitting in my pile in mind. That’ll be a good use of them, no? thanks for reading and commenting. It’s been a bit dry lately. I was thinking that, perhaps, I broken some unspoken rule. Lol ?
-
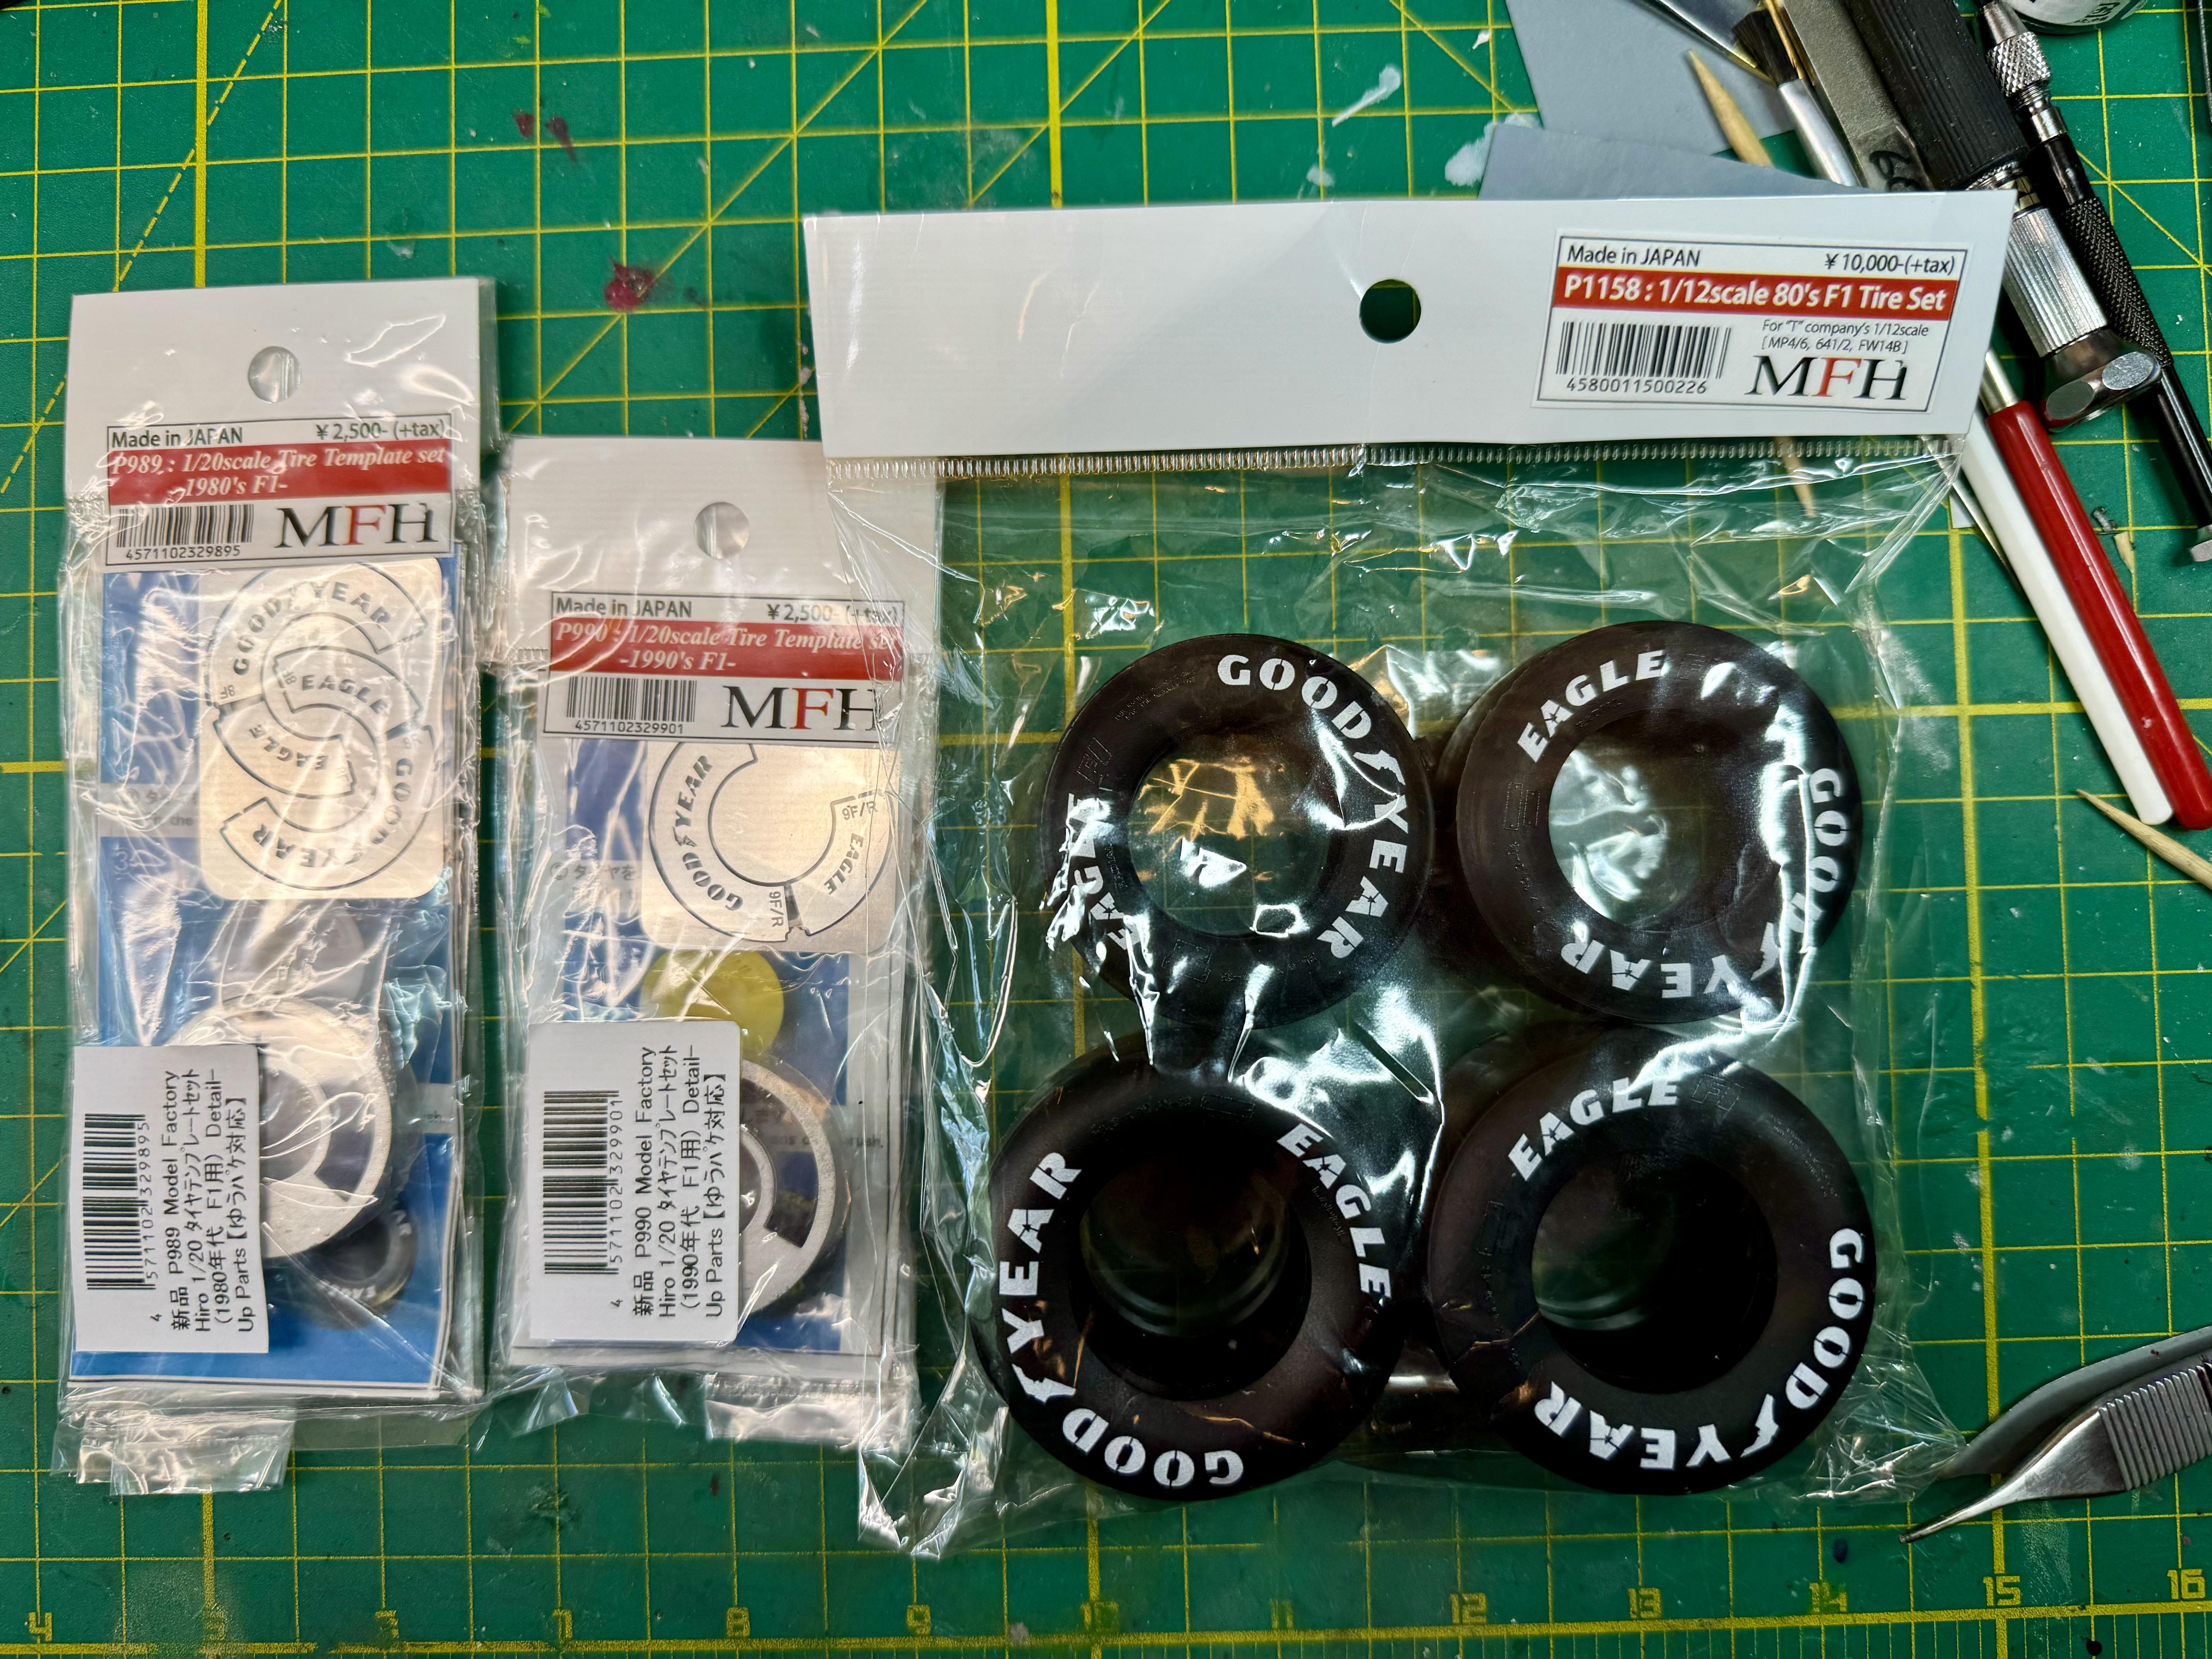
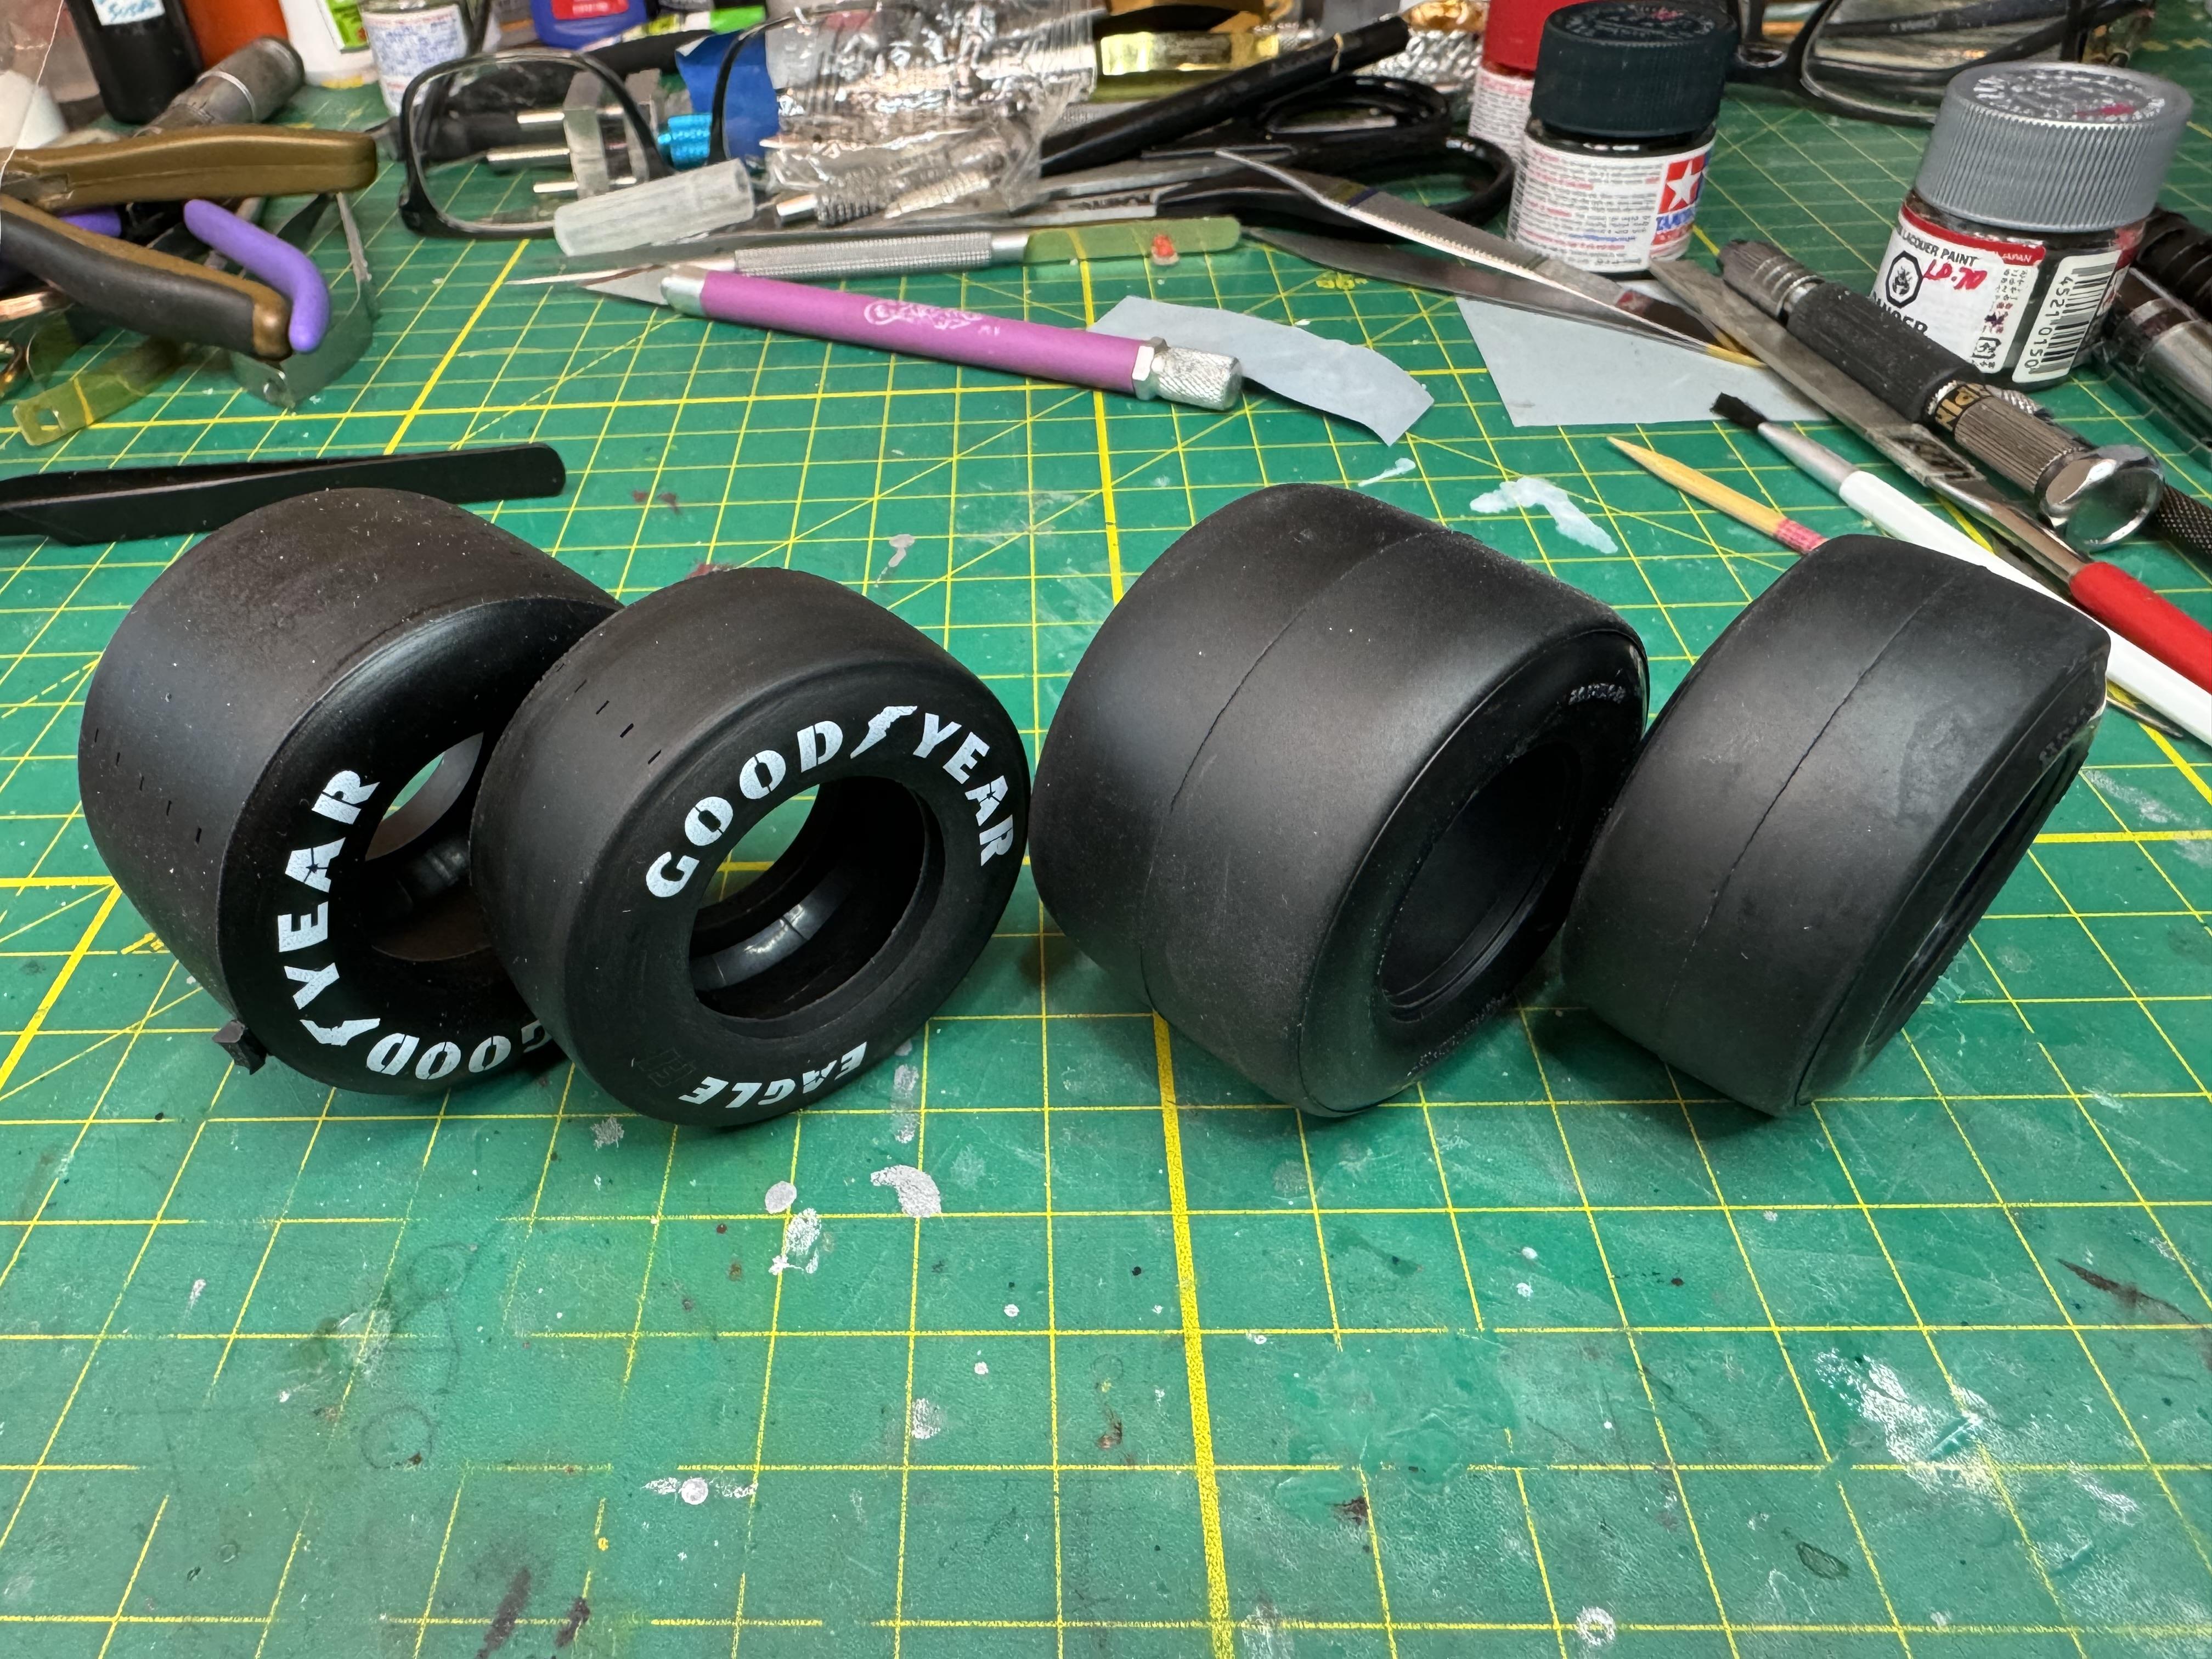
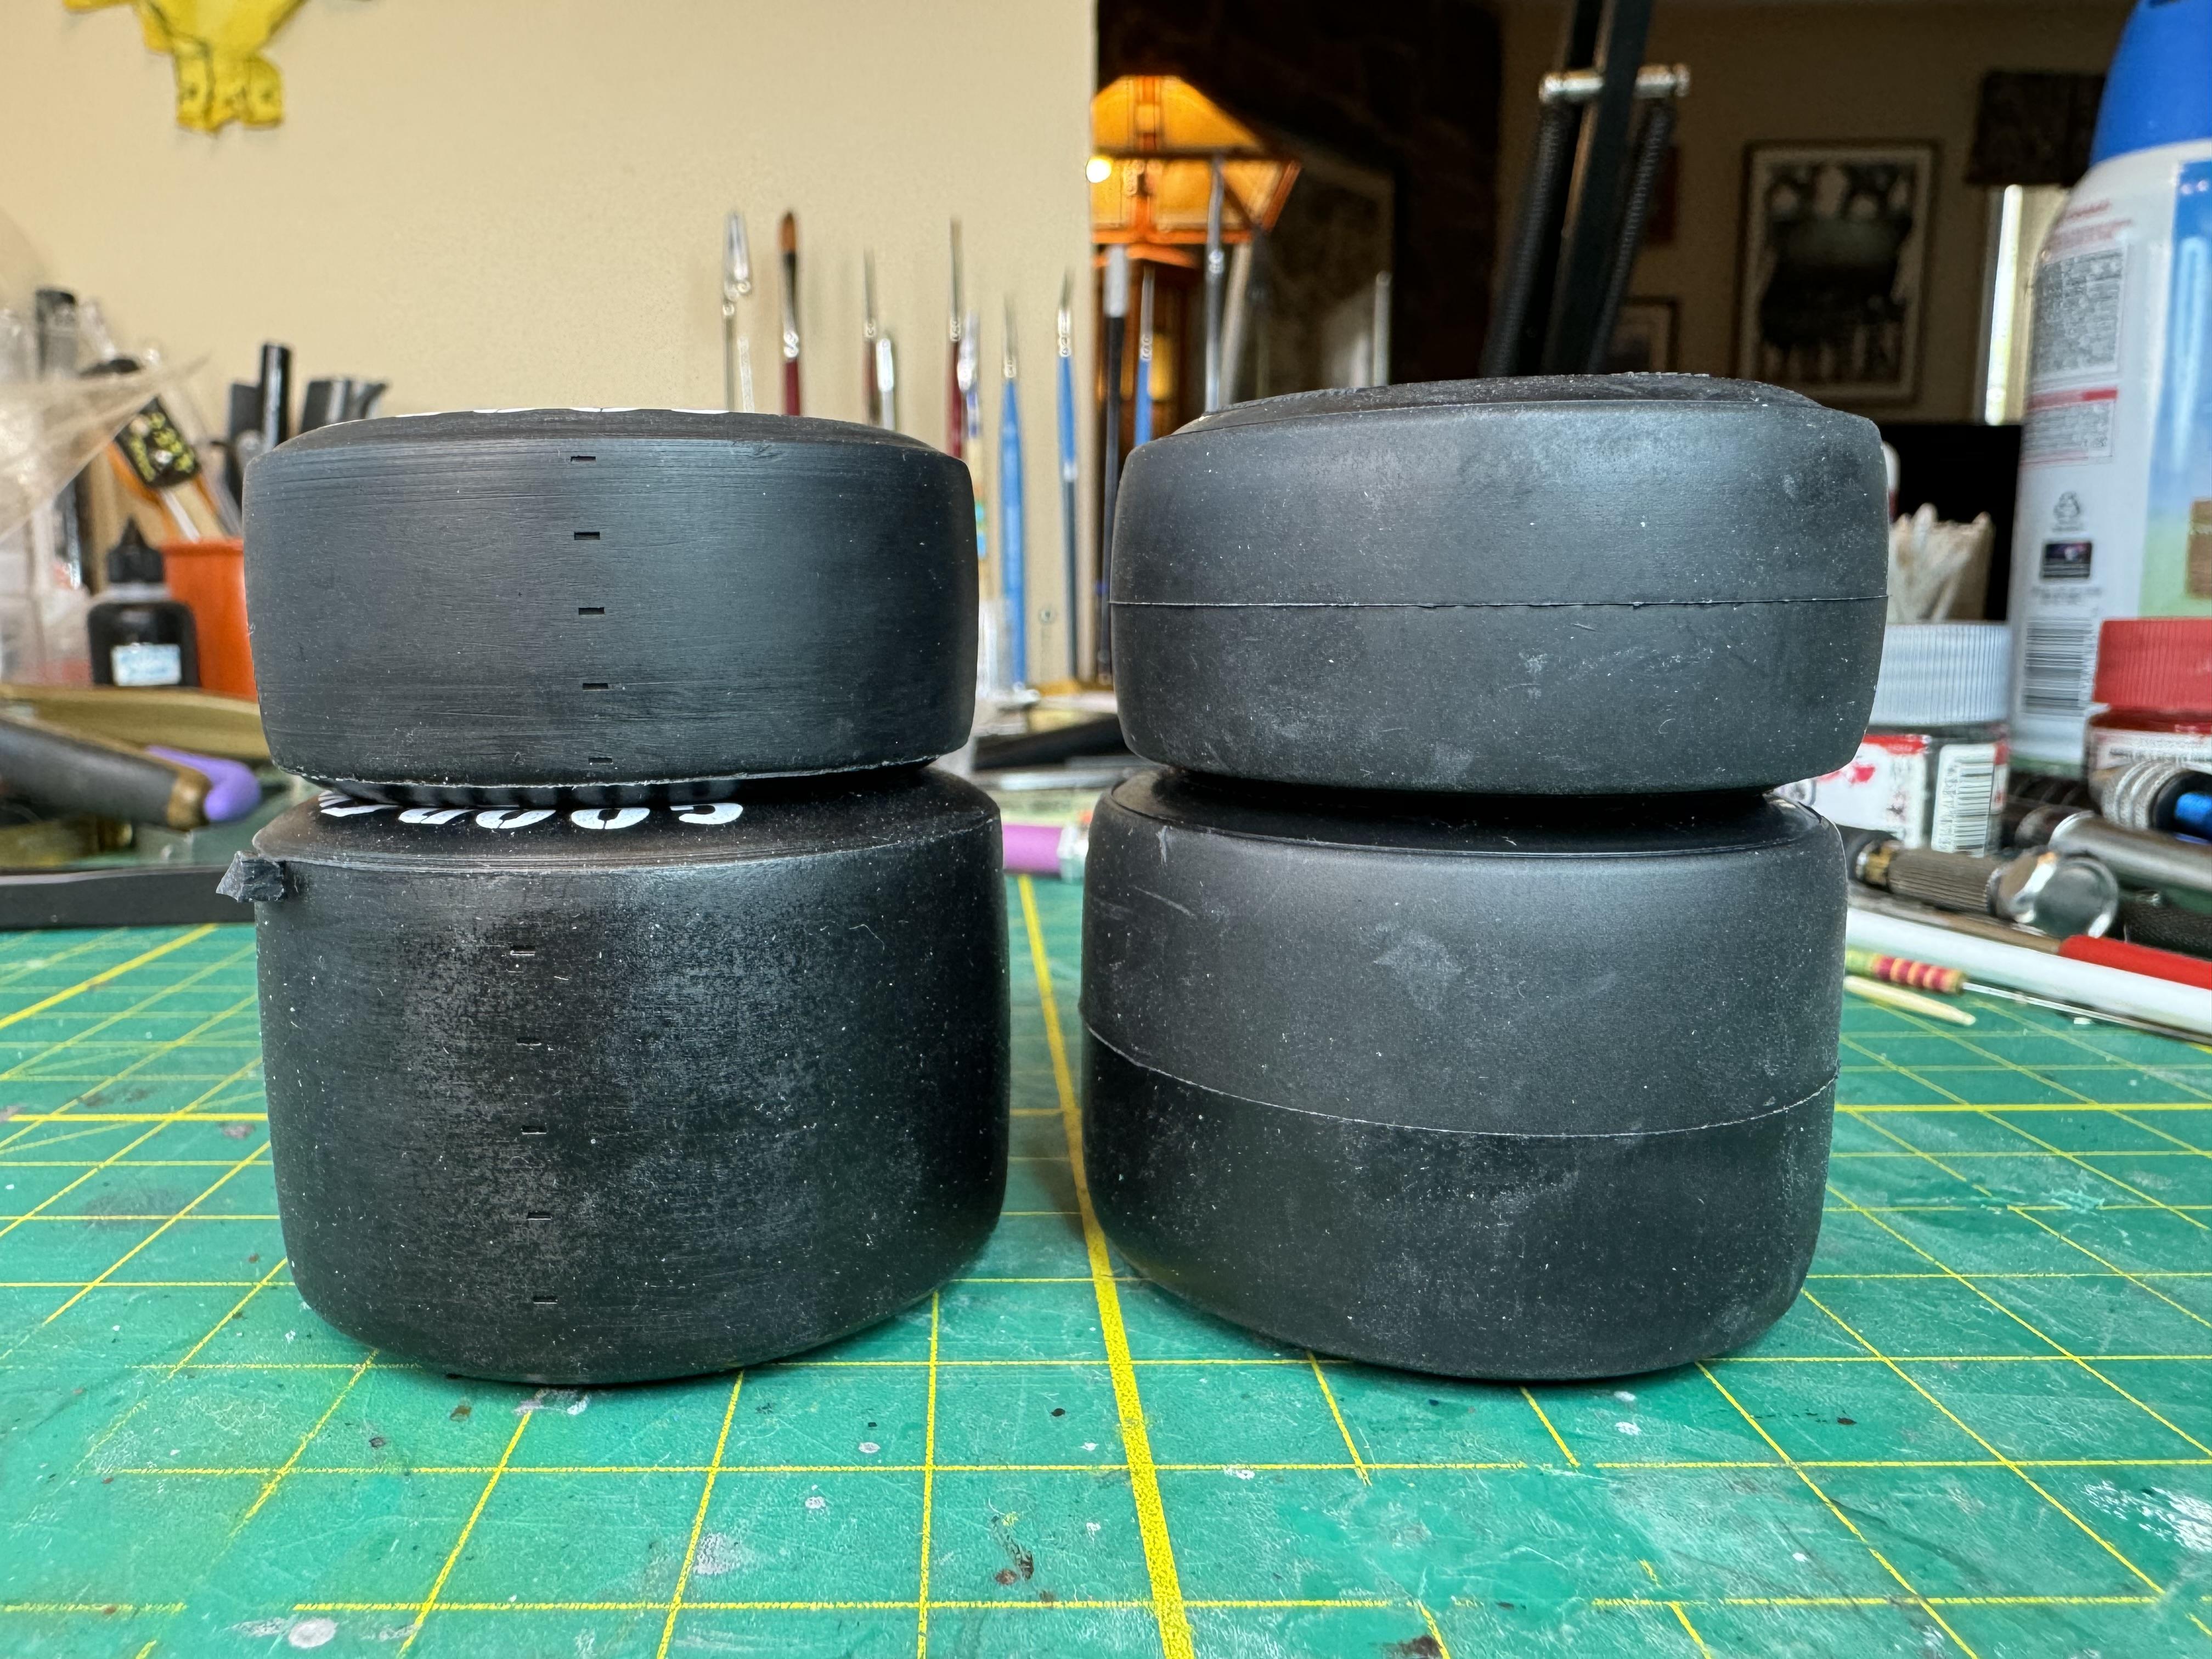
I’m sitting here waiting at the pharmacy, something more painful than seeing my recent work. So, instead of showing you that, I’ll show you something that delighted me almost as much as your assistance: tire markings made easy!! I still can’t get over how poorly my tire painting came out when I compare it to others’. I neglected to research it prior to starting, which I’m guessing would have helped. I would hope so, anyway. But in the meantime, these should help on a few of the kits in my queue. The pre-painted ones are going on a MP4/6. They are heavy! The feel is so different from the Tamiyas. I feel like, for all centricity, I should etch full-wet grooves in them. They have that feel to them. Aside from the molding tab left on them, which are tricky to remove, they are gorgeous. A worthwhile, one time, ¥10,000 purchase. Side by side with the Tamiyas from the McLaren box (no seam!): Next up? The trumpets and ignition are as done as they’re going to be ?