Mike Slapattack
-
Posts
215 -
Joined
-
Last visited
Content Type
Profiles
Forums
Events
Gallery
Everything posted by Mike Slapattack
-

Squarebody Wheels
Mike Slapattack replied to Mike Slapattack's topic in Car Aftermarket / Resin / 3D Printed
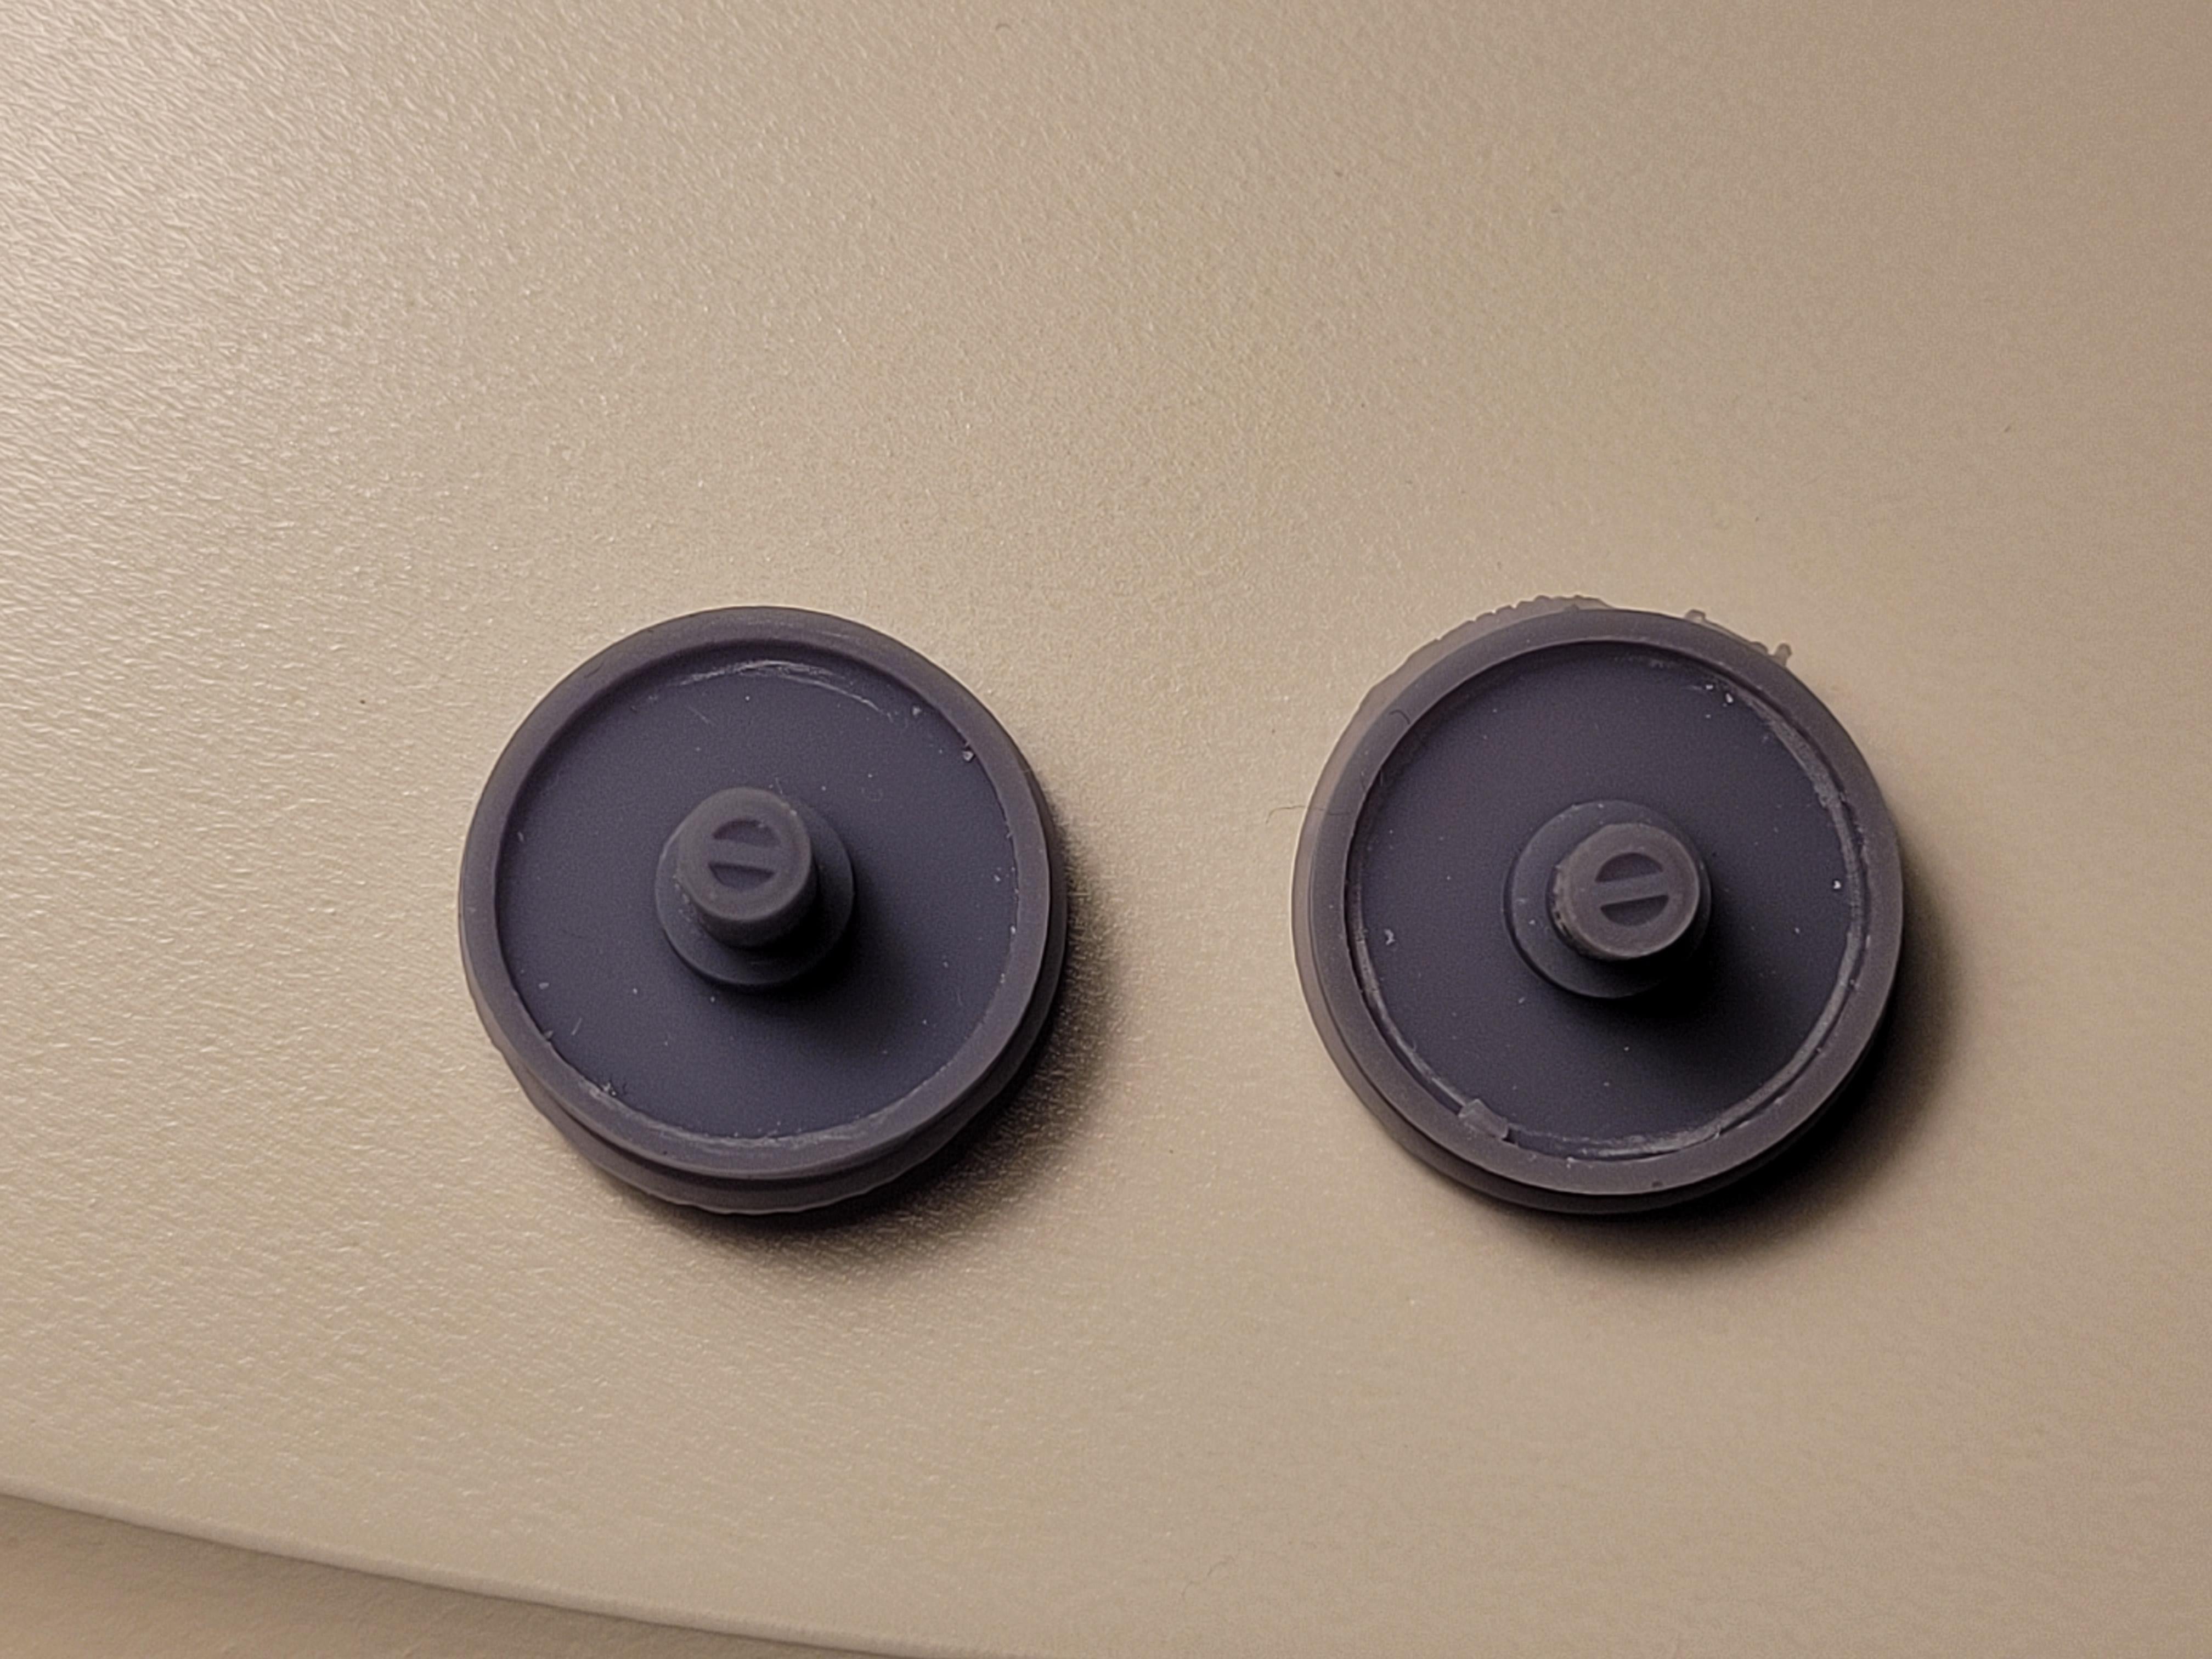
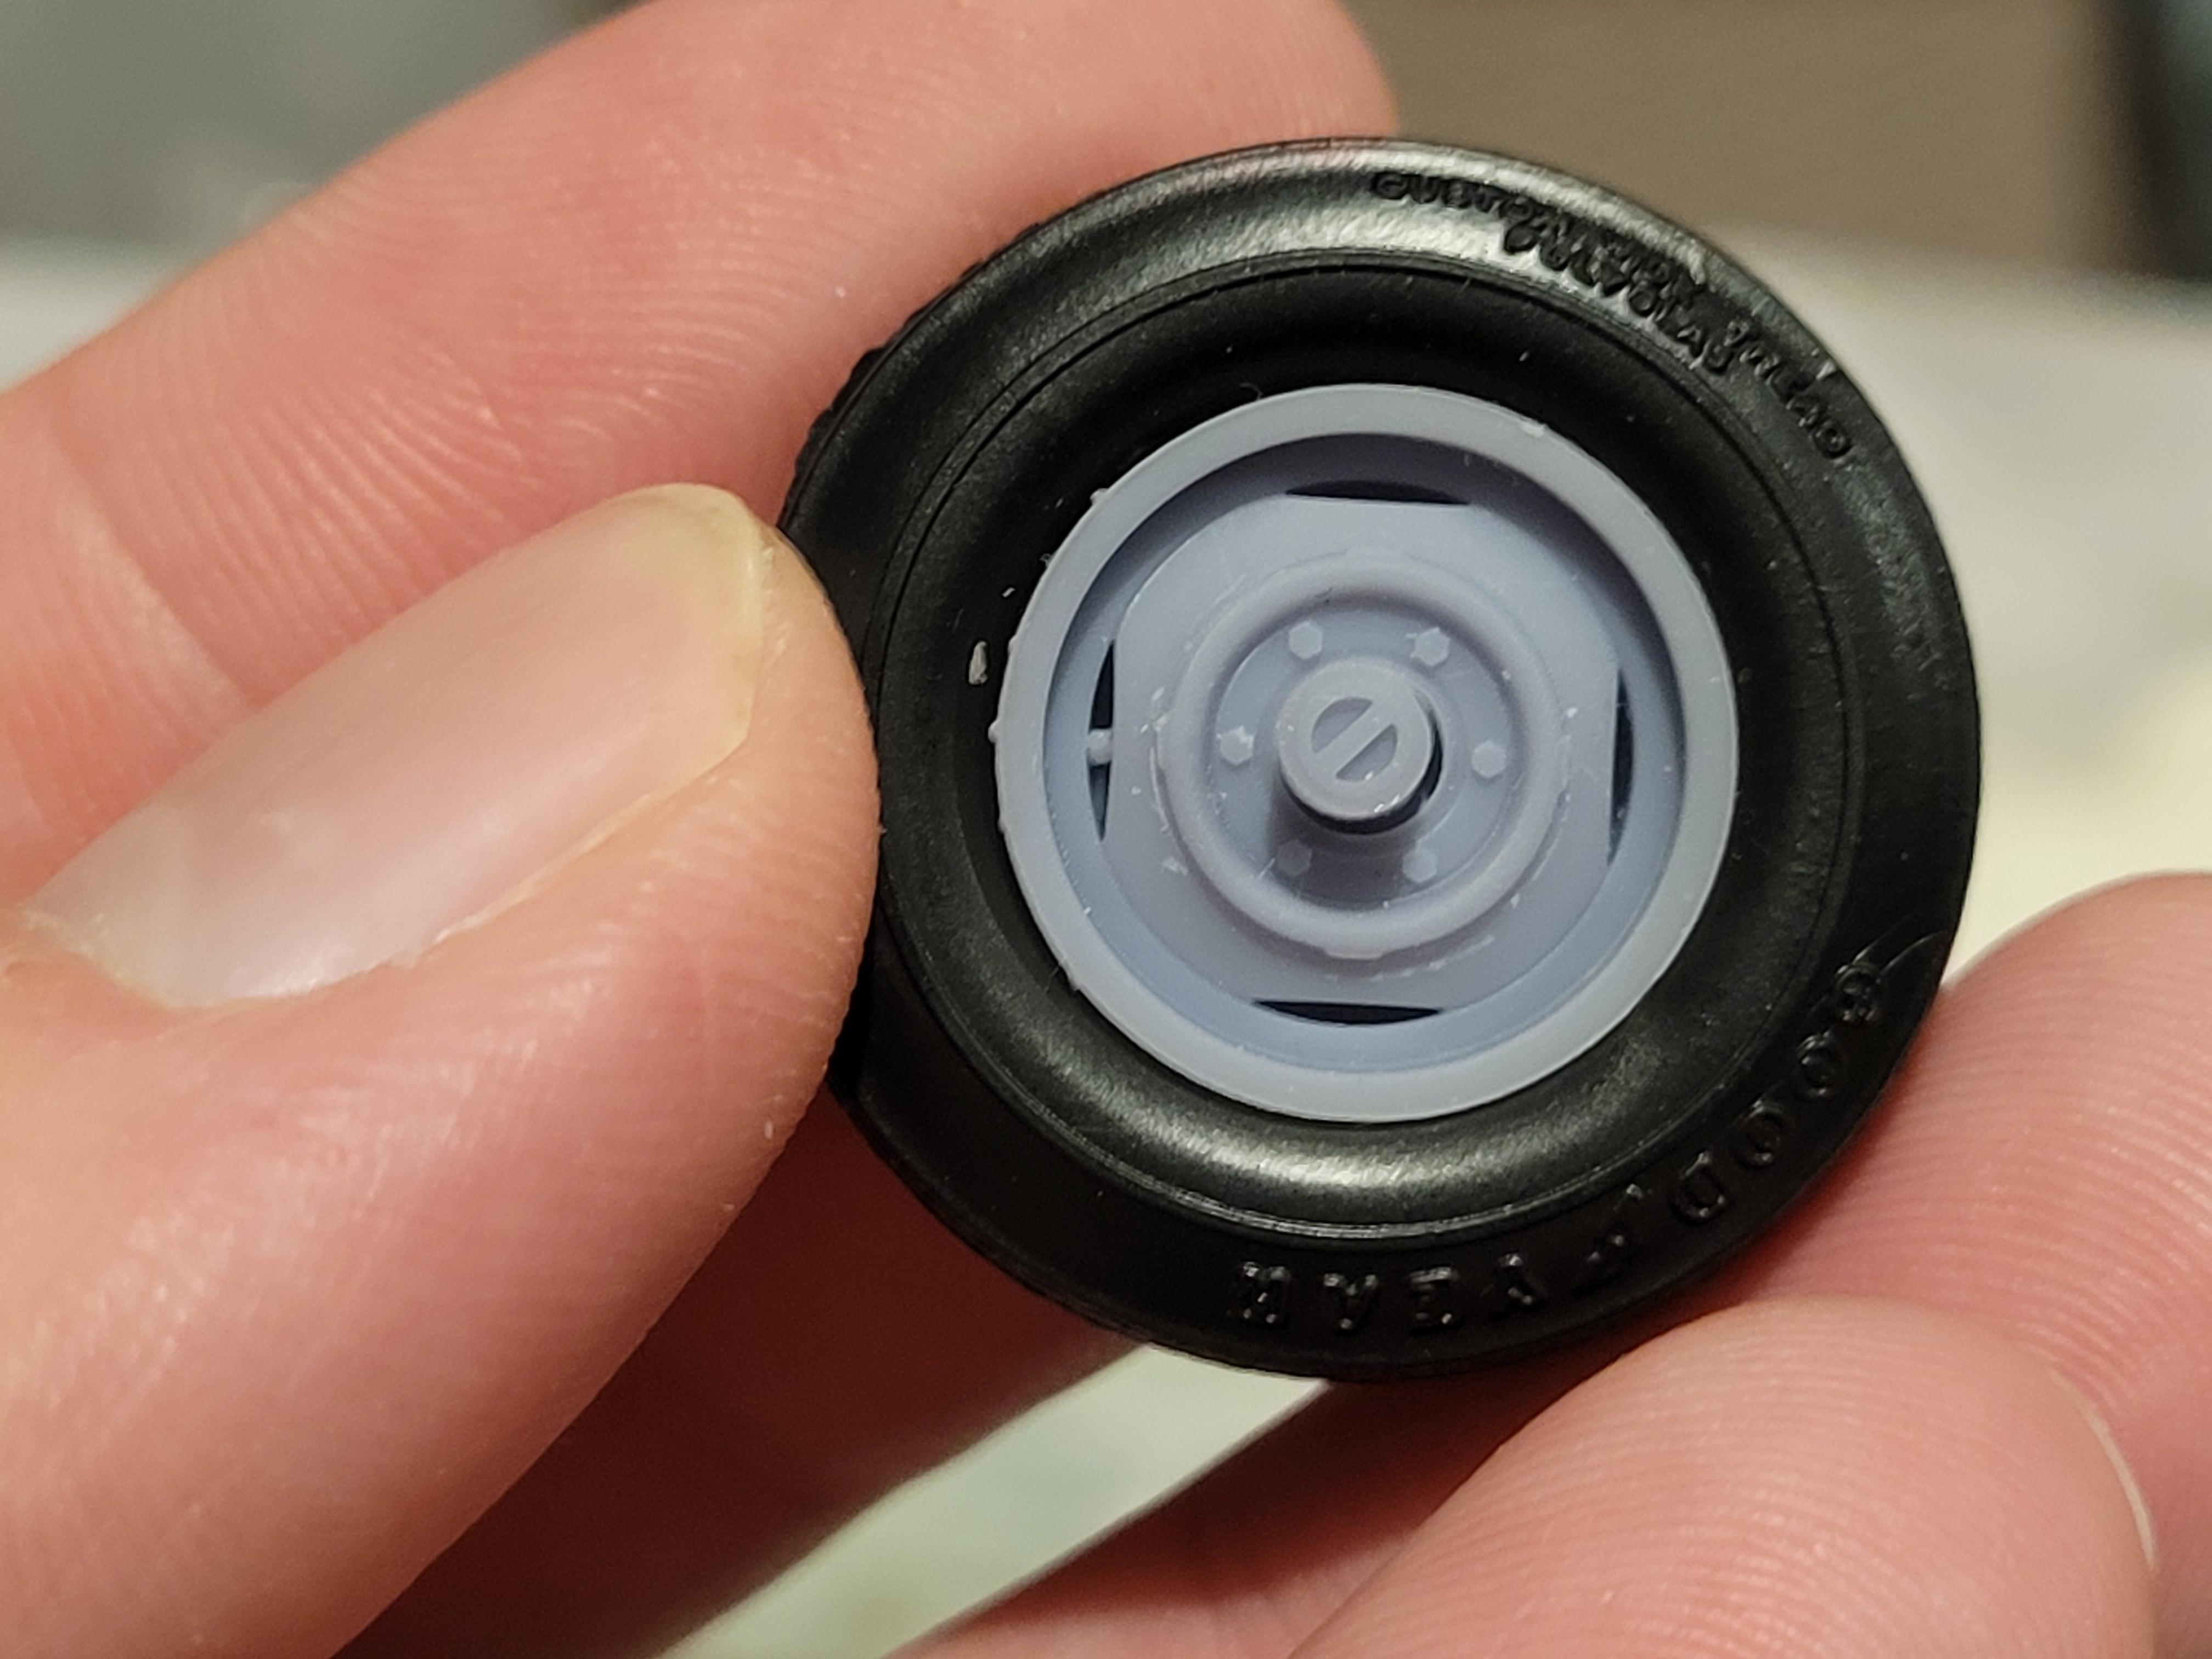
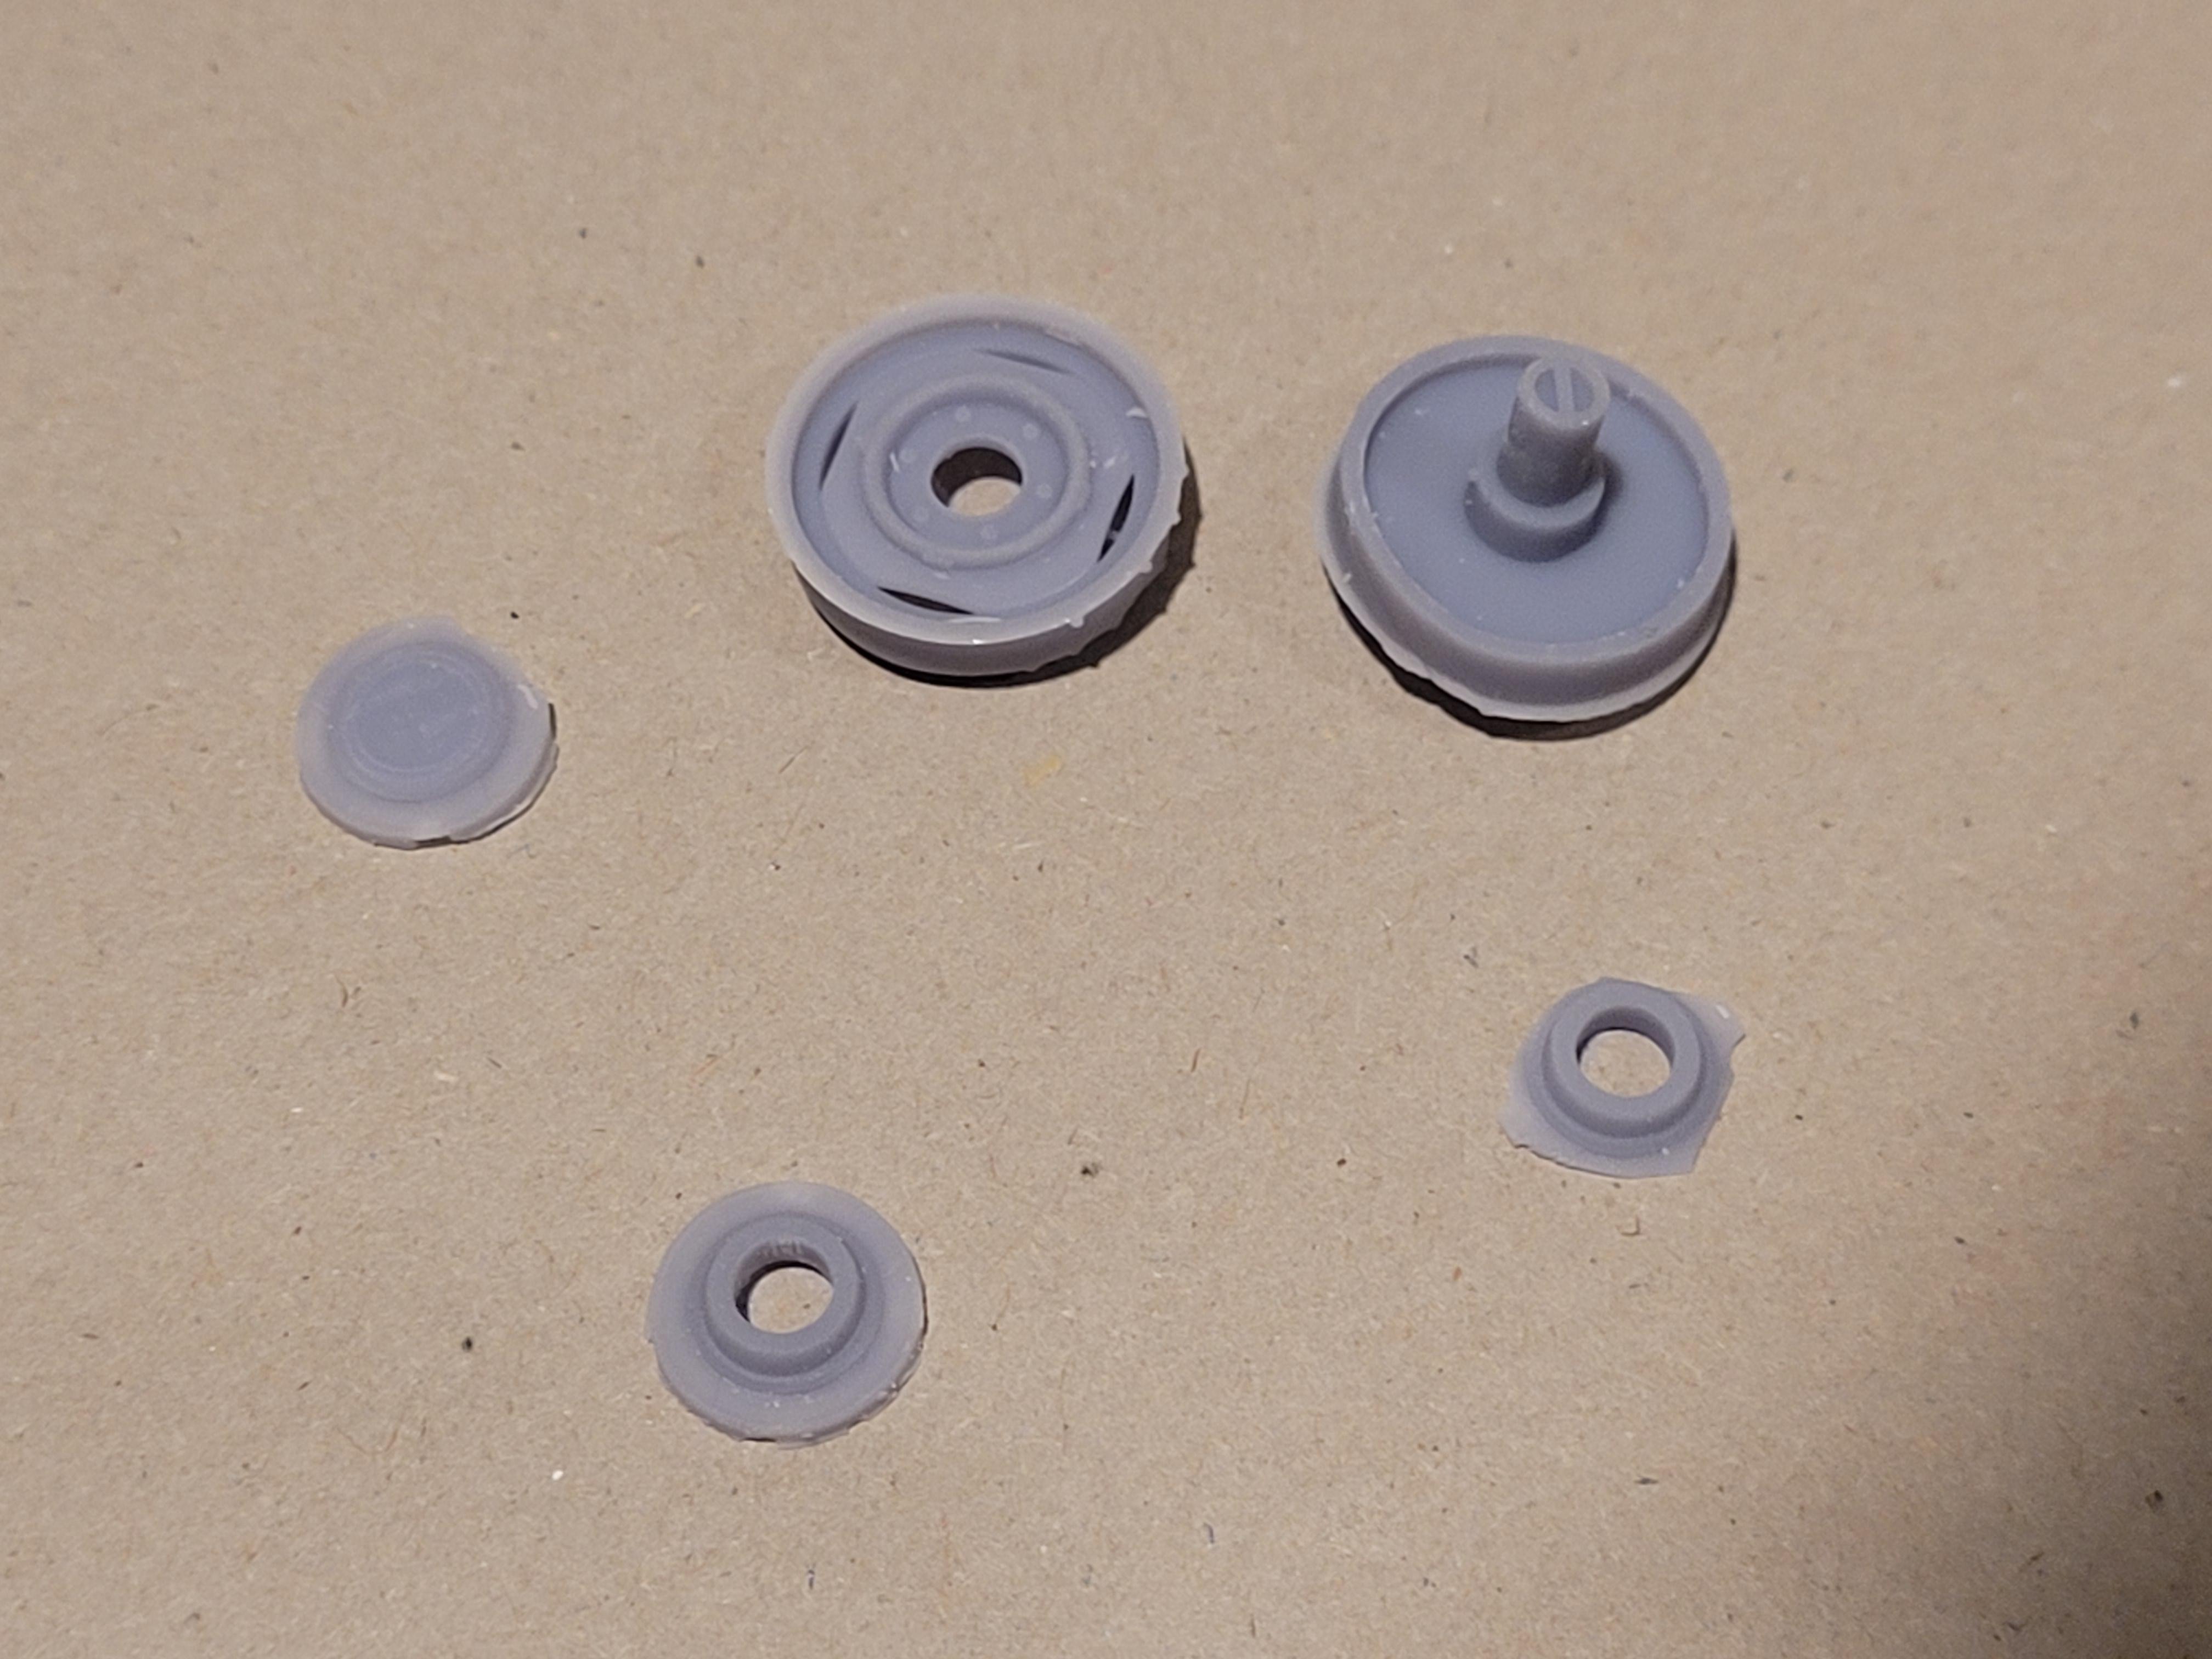
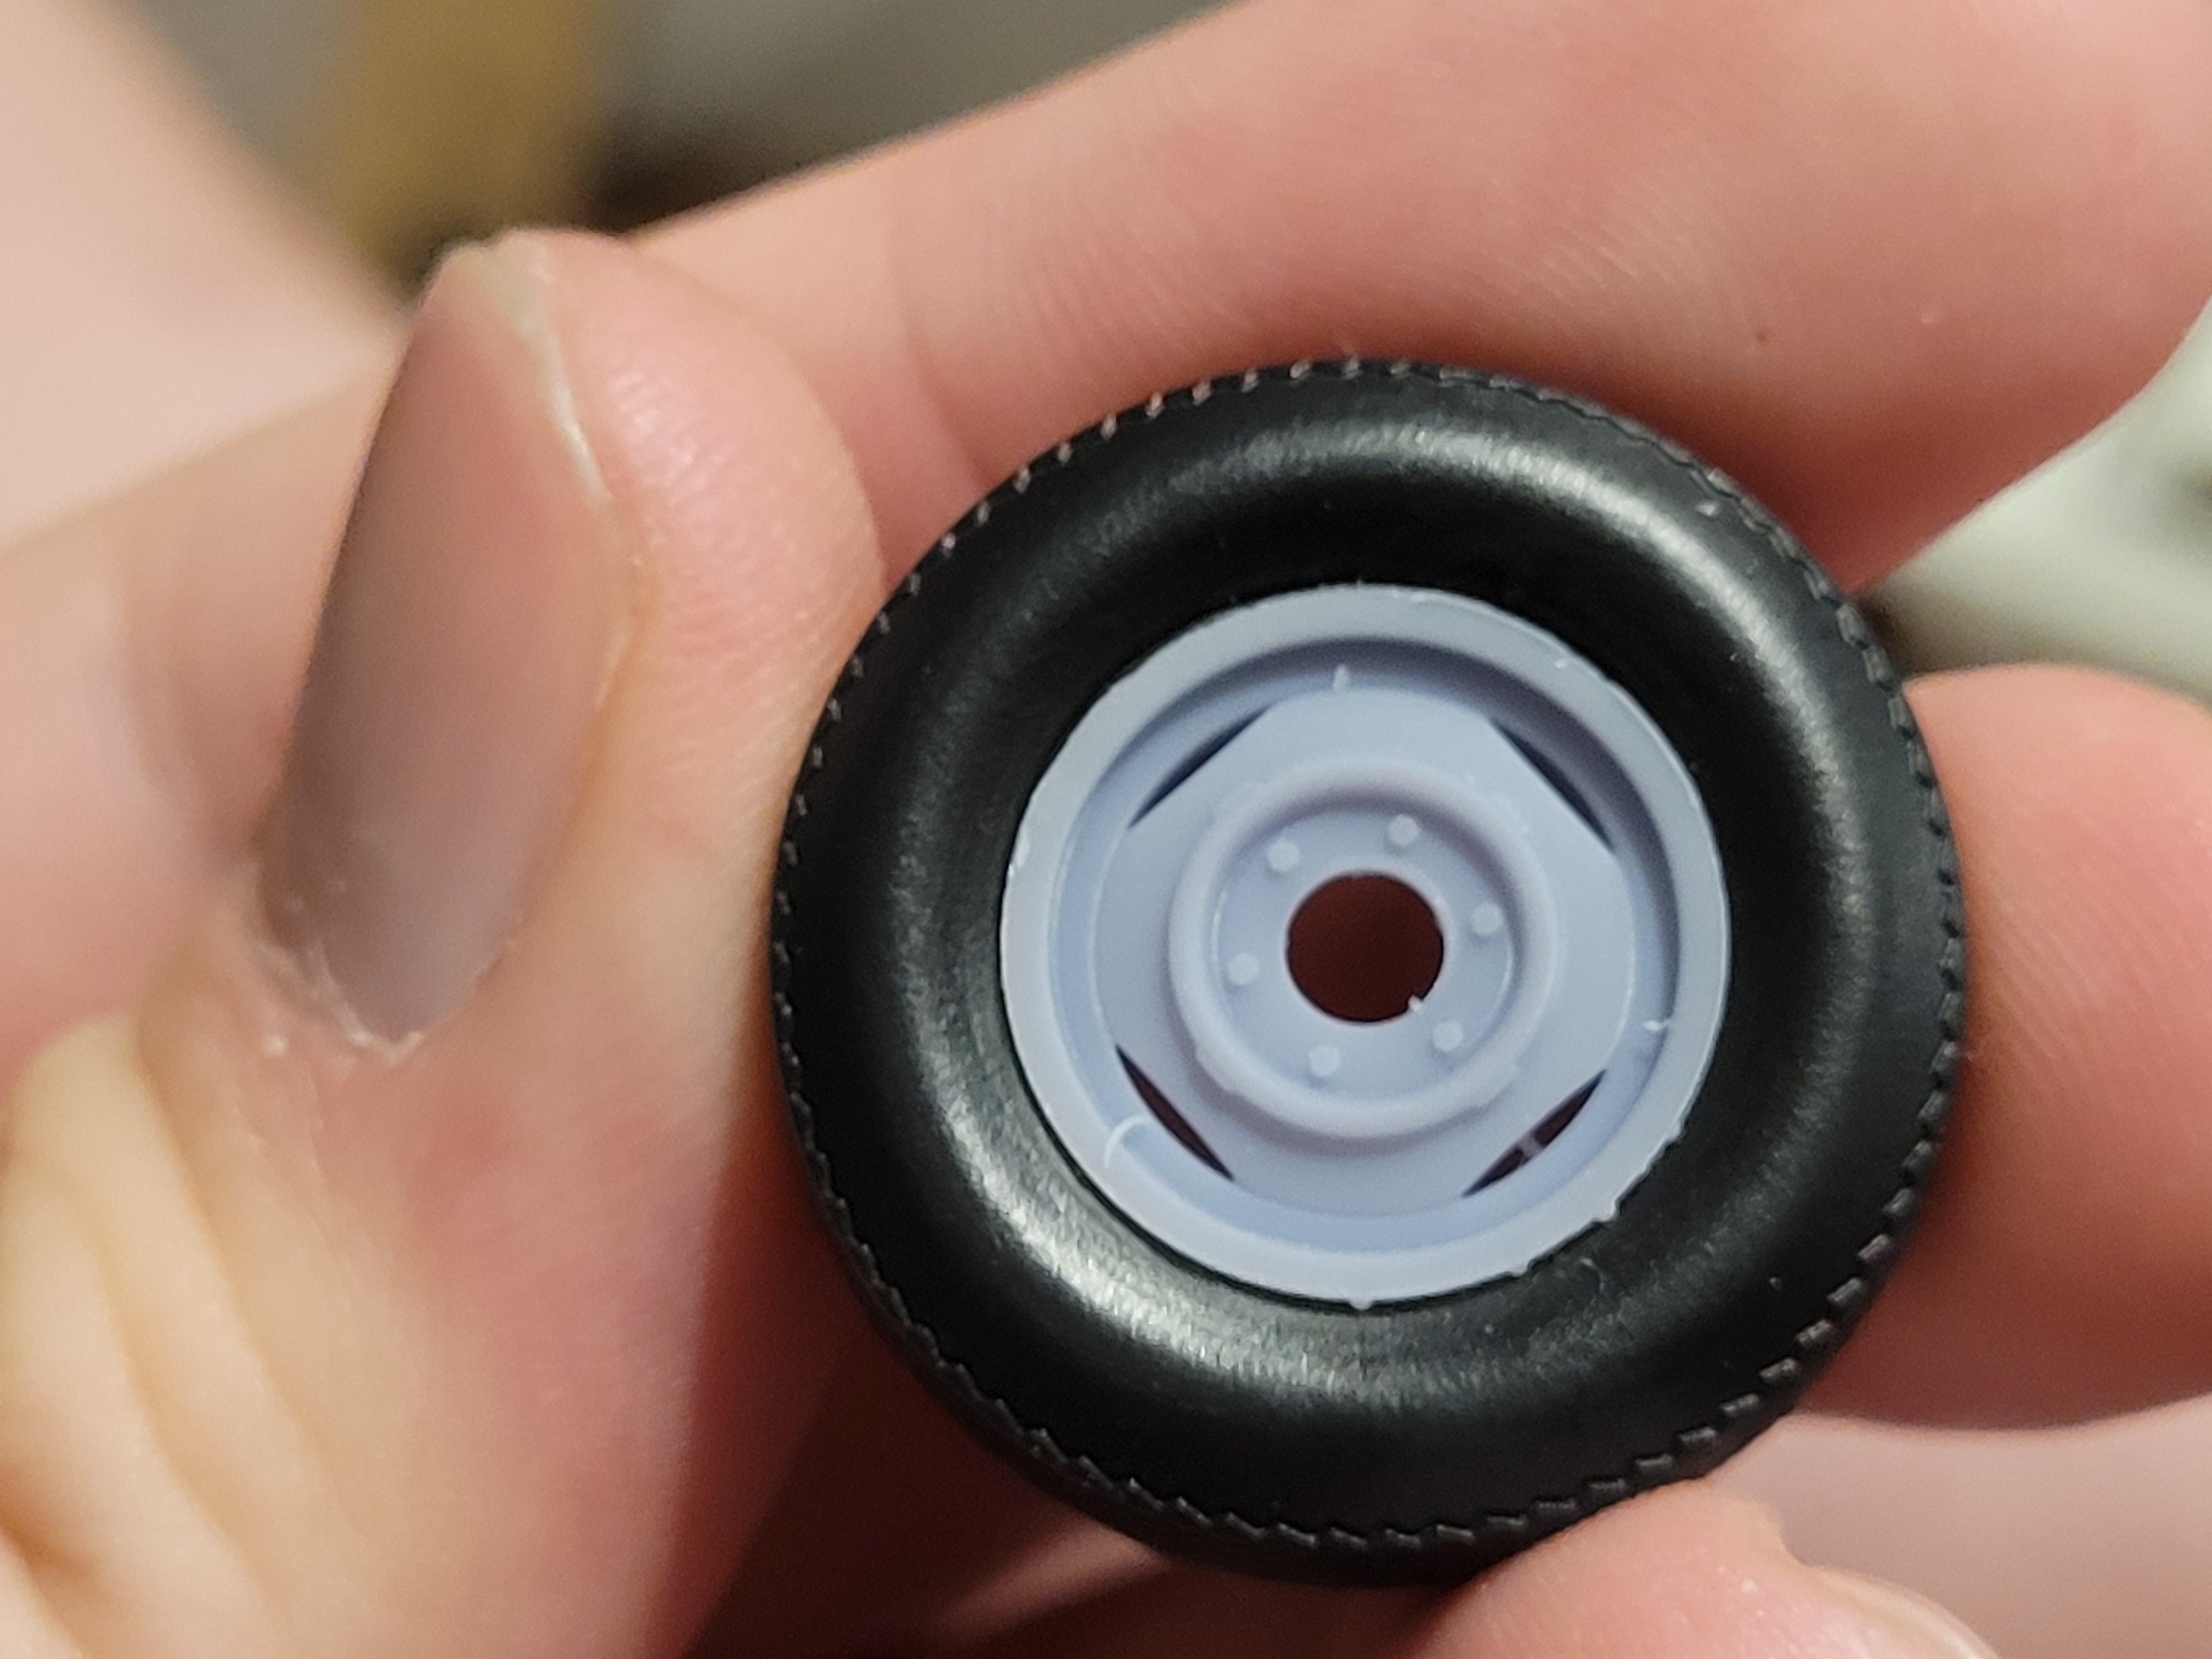
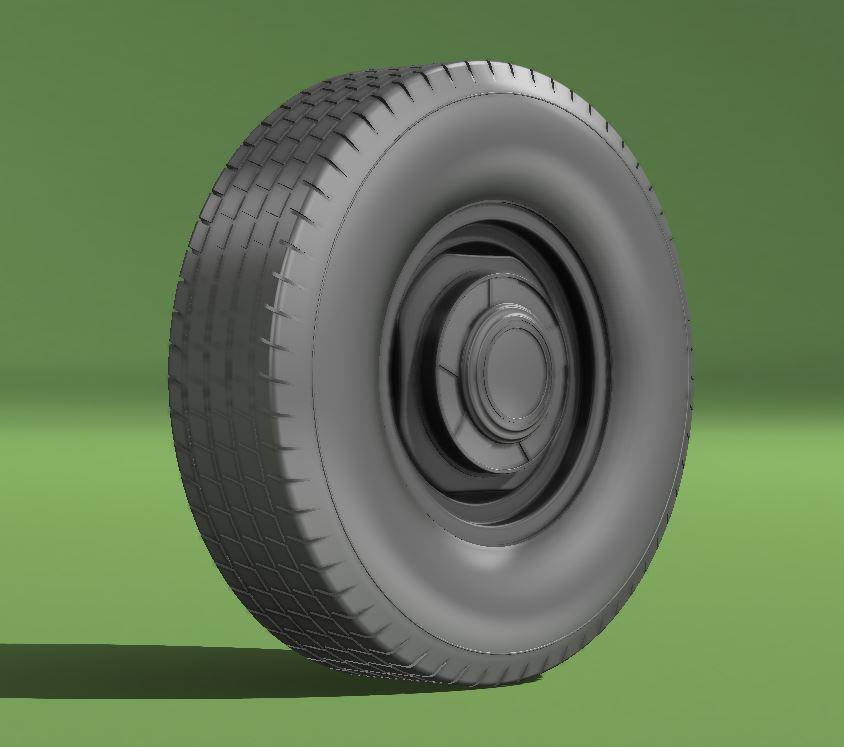
Great news! I ran another test print and things are heading in the right direction. I'll start off with a picture of the front and back wheels posed up with some tires from the MPC Turtle Wax Dodge Van kit. These tires fit like a glove and are easily accessible as this kit is pretty much everywhere. I highly suggest them as a compliment to my wheel kit. They are pretty darn close to what the real standard factory spec trucks used, and have some nice period correct detail. I will be making another post with them posed up in a mockup with a Deserter kit body so you guys can see how they fit proportionally. Keen eyed observers will also notice some new detail... I was successfully able to print both the Chevy and GMC logos on their respective hubcap variants! This is too cool, I wasn't sure if my printer was capable of such small detail, but it is! This embossed and engraved detail will hopefully make the logos pop a bit more than simply using a decal. Just make sure to get a good pair of magnifying glasses and a quality fine tip brush when you paint them. Below you can see both variants with a Canadian Loonie for scale. I will note though, please excuse the rough edges and broken parts, I'm still perfecting my post processing techniques and trying different things. I thought that removing the supports after curing would be a good idea because the parts would be more rigid but in actuality it wasn't good because the supports were too rigid and hard to cut off without chipping a part. I just learned about a method that involves dipping the uncured model in hot water and removing supports before curing that seems to work for a lot of guys doing super delicate wargaming figurines, so I'll be trying that on my next test print. Another success I made in this test print was fixing the out of round issue I had on the rim backs. After consulting some forums I found it to be as simple as adding more supports to the edge of the rim closer to the build plate. I tried that out and it worked! You can see a before and after here. It's hard to capture in a photograph but look at the left before model and right after model, I'm sure you'll see the difference (just disregard the flash lol, and the scratches on the inside of the rim are from the flange on the rim front). I also have a picture of the front and back rim held together, and I think this is where the real demonstration of the fix is. They slide together super nicely. I'm really excited to share this stuff with you guys. Its satisfying to dive into a completely new technology and slowly see improvements as I go. It will still be a long learning curve to fully become proficient with this machine, but I'm at the point where I have a basic understanding of what it's limitations are. Since I'm still learning and my results are a bit inconsistent, I'm toying with the idea of just printing off a small number of good bucks and resin casting the wheels I will actually sell, at least until I can fully dial in the machine. This way I can get more repeatable results. I found a good local source for quality Smooth-On resin for about the same cost as the printer resin I'm currently using (standard grey Elegoo resin), so that is definitely feasible.
-
Squarebody Wheels
Mike Slapattack replied to Mike Slapattack's topic in Car Aftermarket / Resin / 3D Printed
And a Chevy version...
-
Squarebody Wheels
Mike Slapattack replied to Mike Slapattack's topic in Car Aftermarket / Resin / 3D Printed
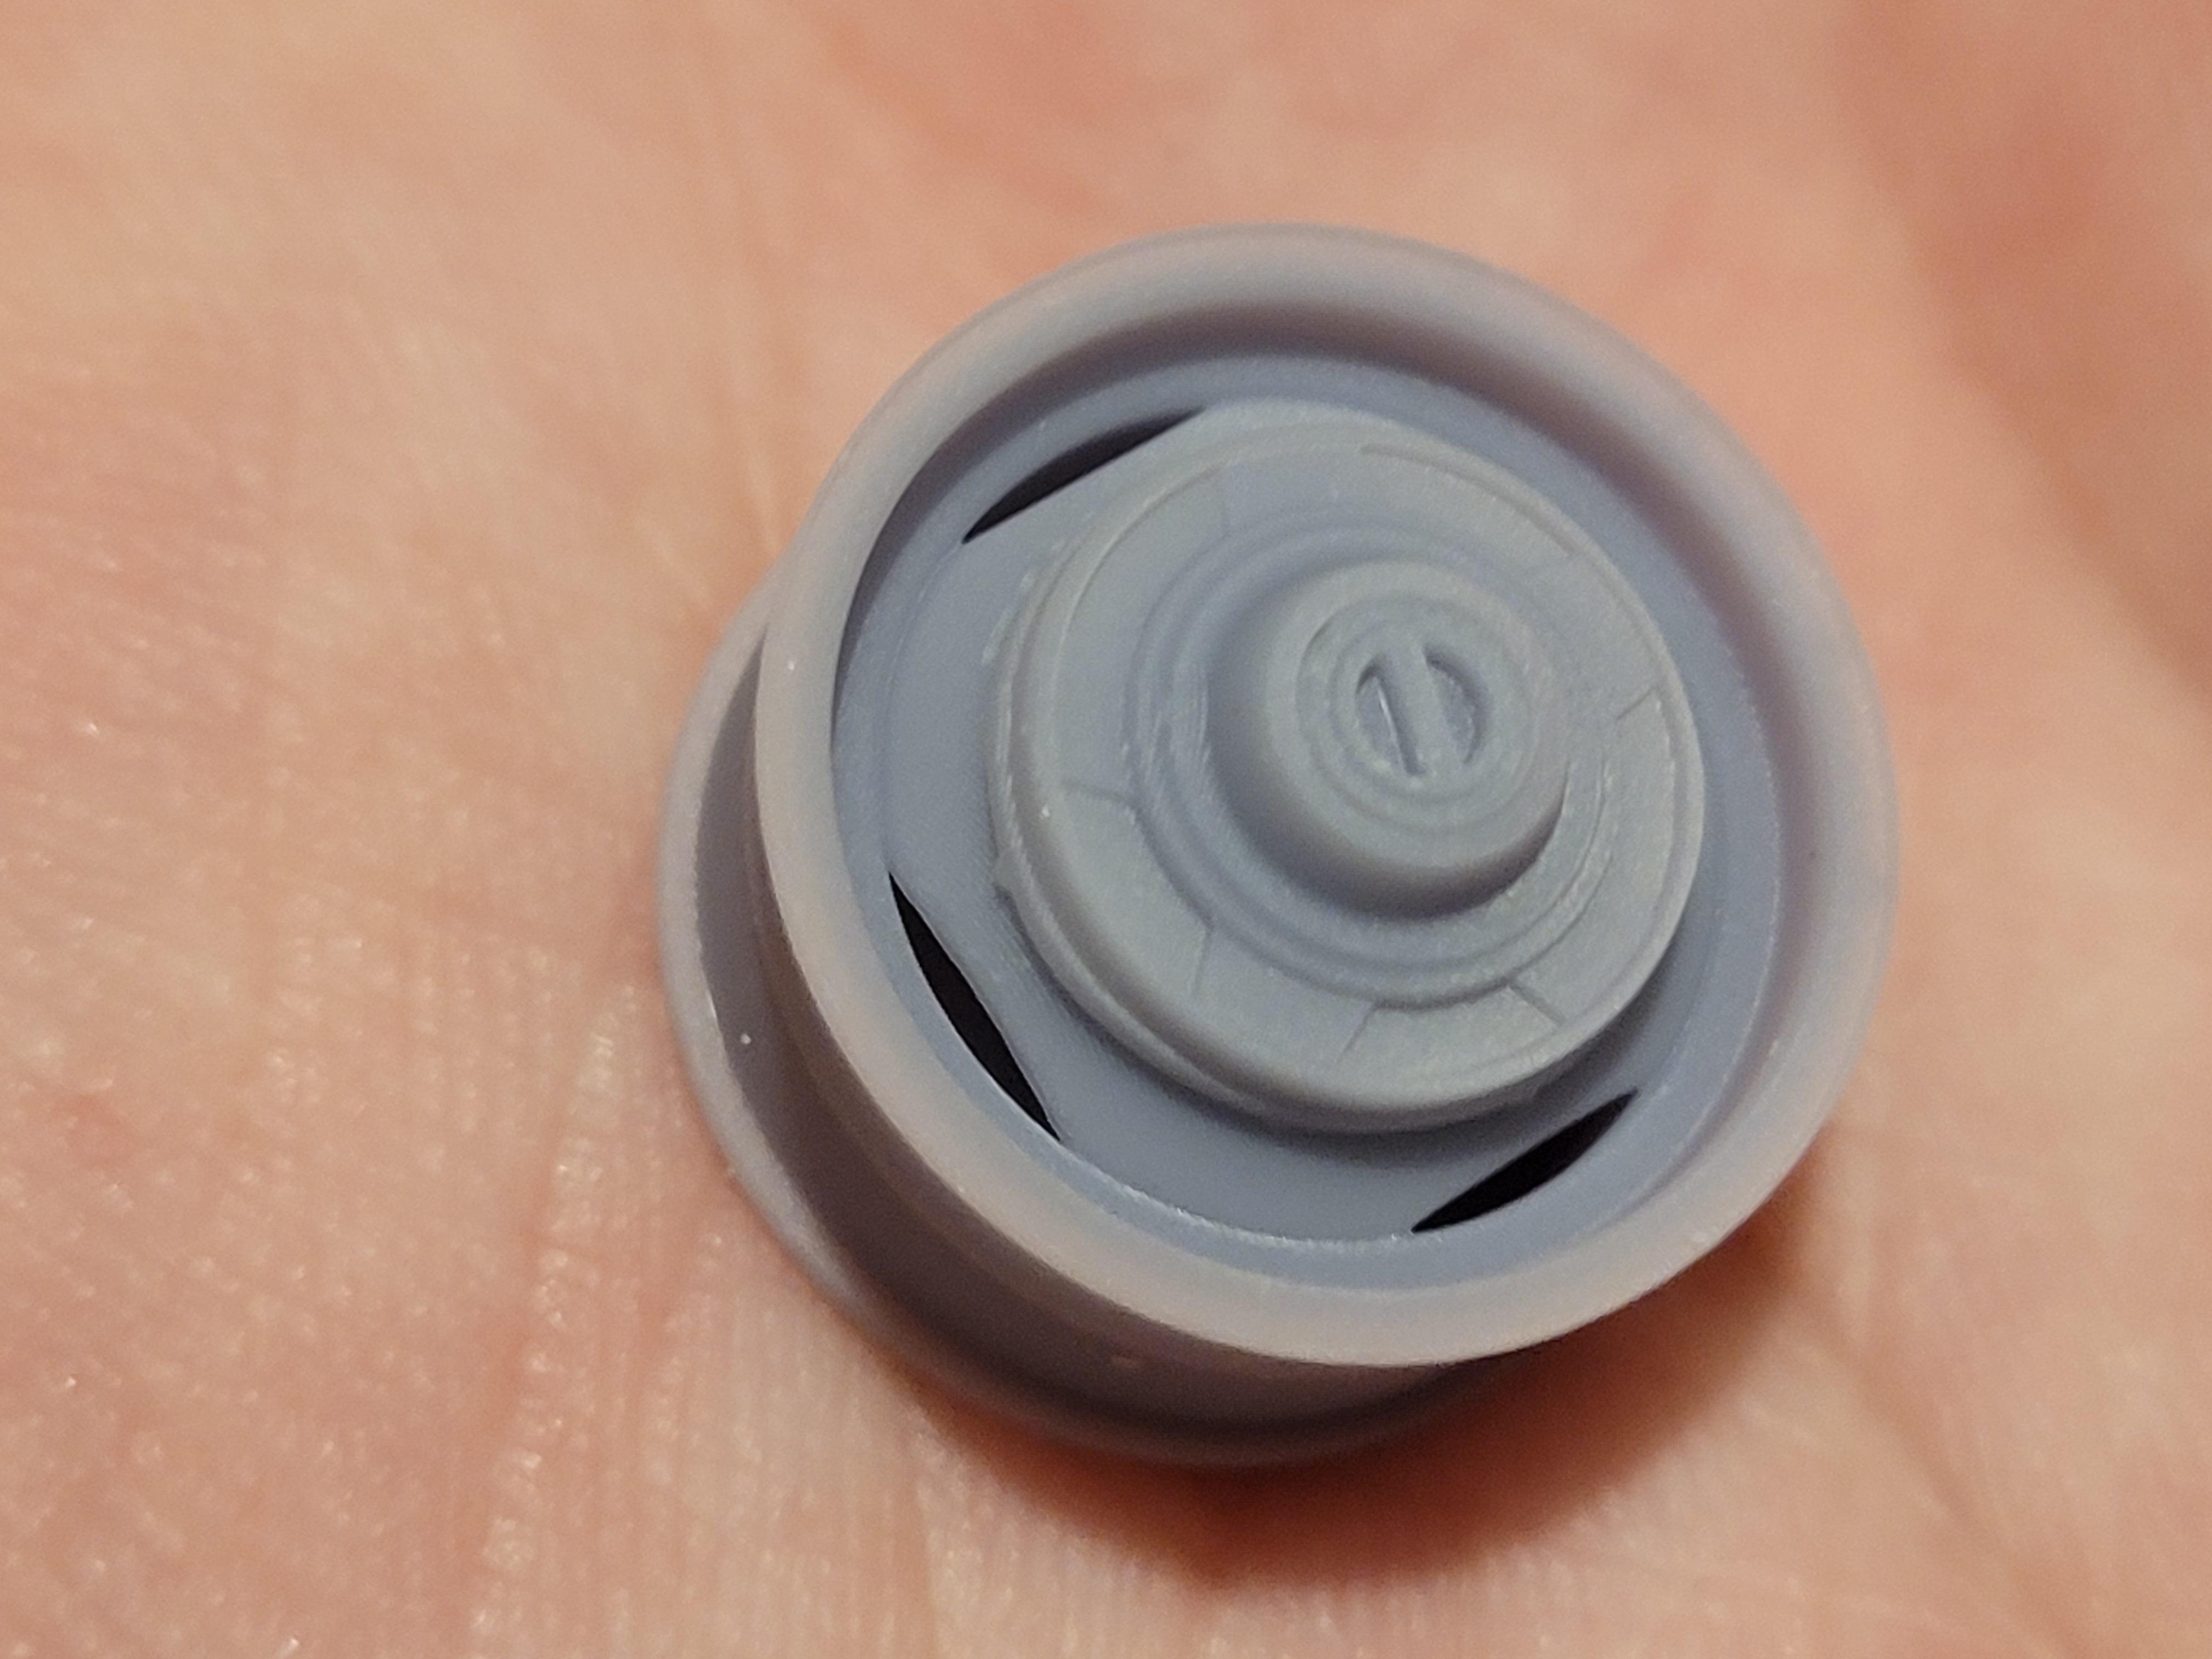
I engraved a GMC logo onto a hubcap to see how it would look. It looks great in CAD and I'll see how it comes out in my next round of test prints.
-
Squarebody Wheels
Mike Slapattack replied to Mike Slapattack's topic in Car Aftermarket / Resin / 3D Printed
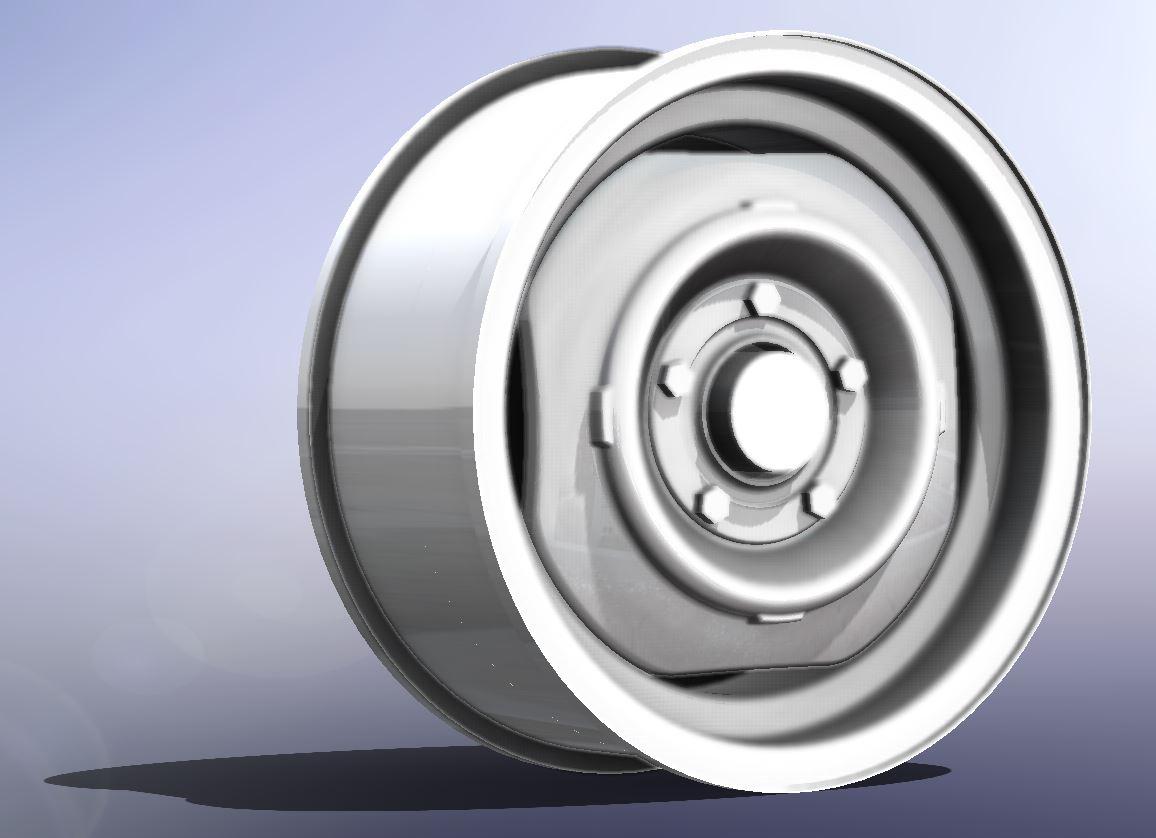
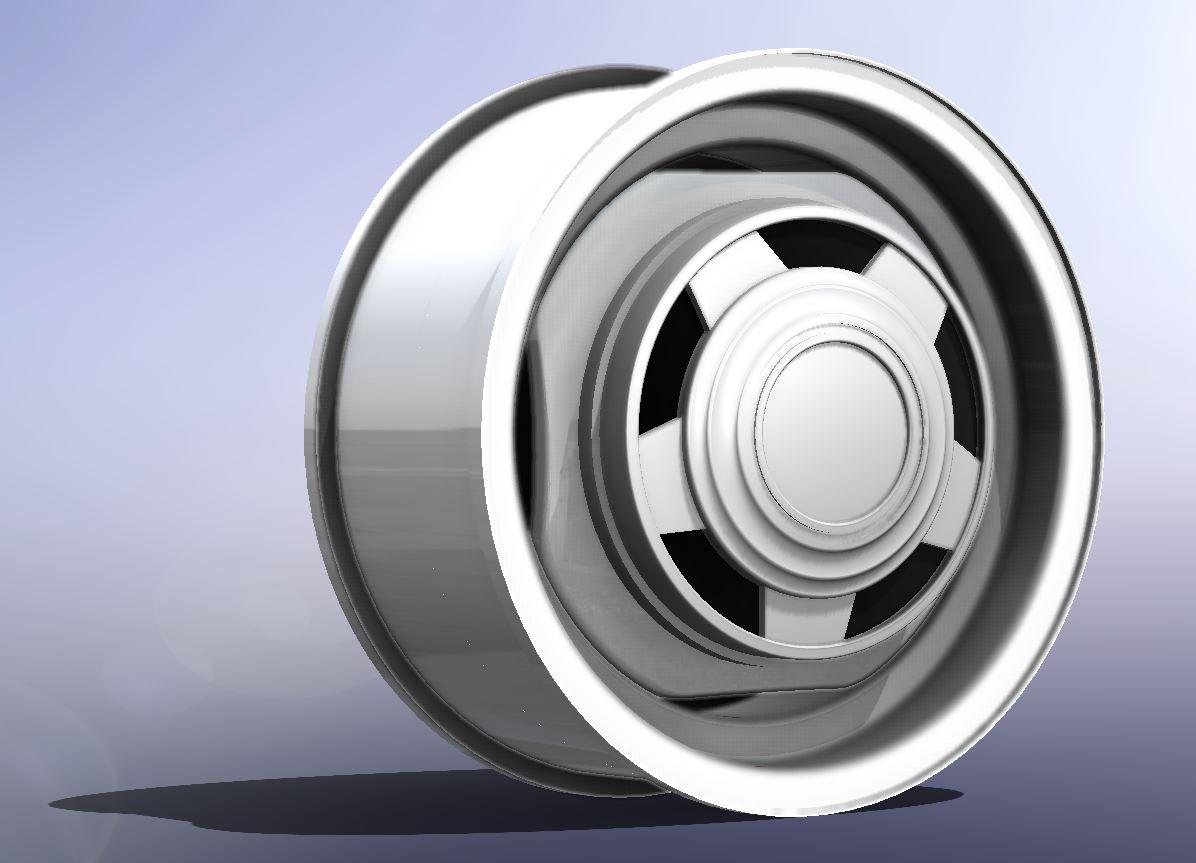
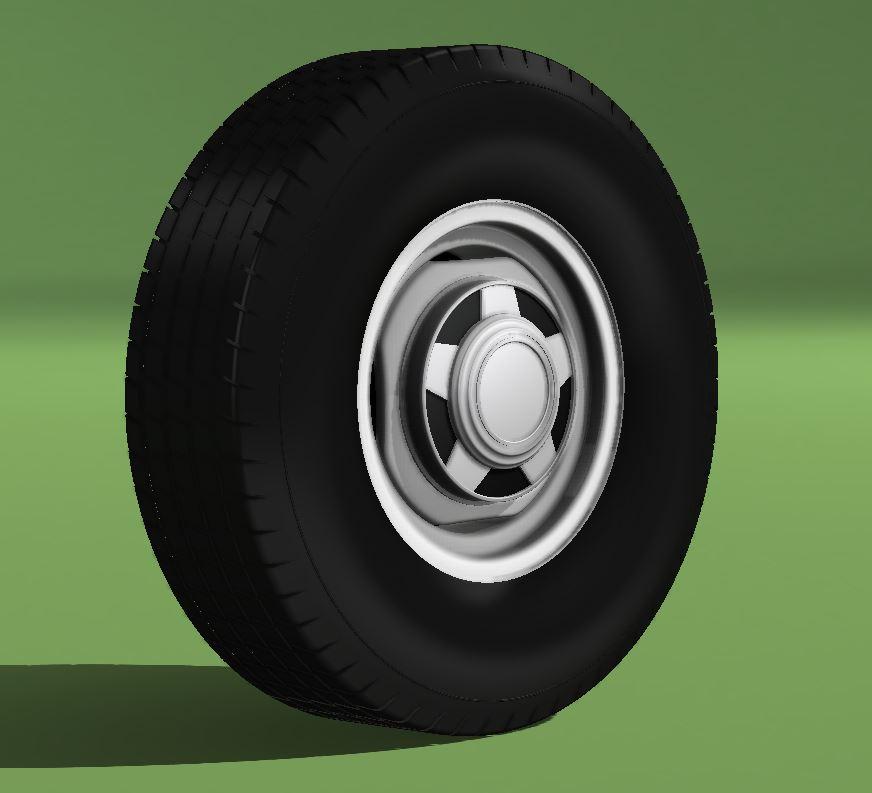
I'm glad you could give some word on your experience! It's good to get the perspective of a 3D-printed product customer. You'll know what to expect then! Also, for everyone I'll give an update on the 4x2 rim set. It's very similar with the obvious differences. Here are the latest renderings.
-
Squarebody Wheels
Mike Slapattack replied to Mike Slapattack's topic in Car Aftermarket / Resin / 3D Printed
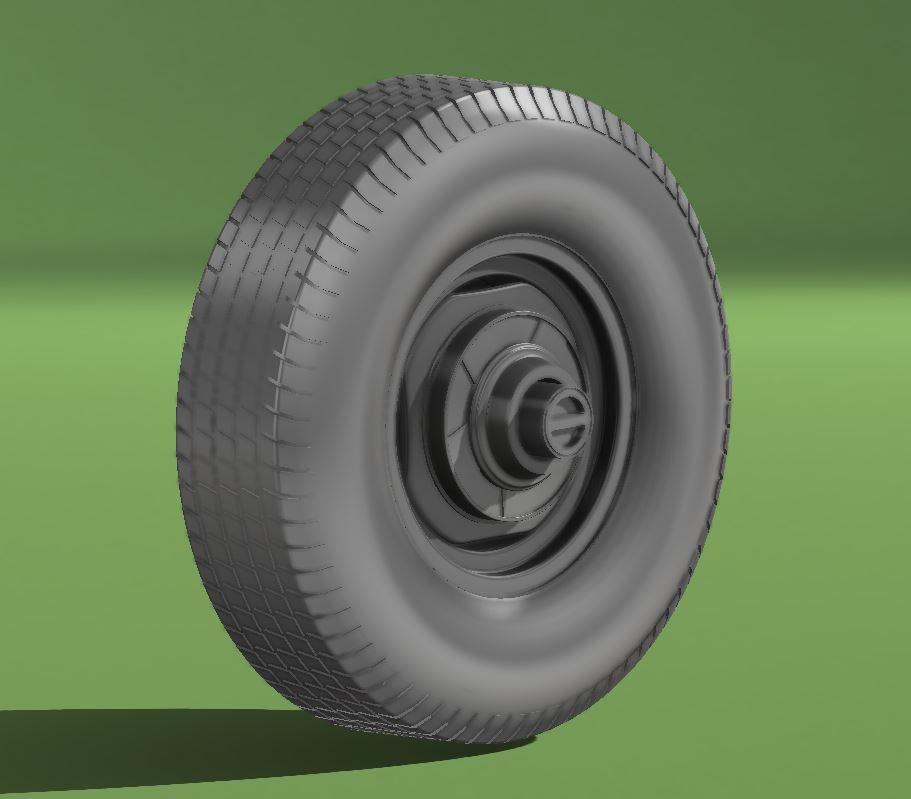
Thank you for all the support guys! I will check out that 3D-printing thread for sure. I changed up the models a bit to be stronger and more defined, re-levelled and reaaallly tightened the printer's build plate, and did another test print. It is also possible that my previous G-code file was corrupted, so I also made sure that there were no visible problems with the new G-code file by reverse engineering it back into a 3D model and checking for issues. Thankfully all of this effort paid off there has been a vast improvement! I also changed up my post processing procedure. Instead of removing the supports before UV curing the resin (which most YouTubers and people on forums reccomend), I cured the parts with the supports. I think for small parts like this it's better to leave the supports there rather than risk damaging the vulnerable uncured parts. I've seen a lot of other model part guys do that and let's be real, it's not like we modelers haven't removed parts from sprues before ?. Overall everything came out very rigid and snipping off the supports was a breeze. I even tested out a few different kit tires! The rims fit any ordinary '70s fullsize car tire, however I found that these tires were too low profile to give the right proportionate look when posed up in the wheel well. I may try picking up one of the newer '92 Silverado kits and try the tires out of one of those. They seem to be closer to the 235/75/R15s these came with from the factory. As you can see, the wheels look a bit small, but from my visual comparison with photos and brochure illustrations the tire is where the difference is. So yea, overall going well, however there is still ONE part giving me issues: the wheel back. It seems to have the exact same issue in the same spot as before, which was a layer shift causing it to be out of round and not fit right in the back of the wheel front. Based on the repeatability of this issue I'm thinking that it was an error on my part in laying out supports. I'll be playing around with those settings in the software to see what works. I'll also be consulting that printing thread to see if they have any ideas!
-
Squarebody Wheels
Mike Slapattack replied to Mike Slapattack's topic in Car Aftermarket / Resin / 3D Printed
Not able to 3D-print from where I am right now, so I decided to go ahead and start on the 4x2 1/2-ton rims!
-
Squarebody Wheels
Mike Slapattack replied to Mike Slapattack's topic in Car Aftermarket / Resin / 3D Printed
Some good news and some bad news for today. I did my first test print, and the rims do fit normal kit tires! Unfortunately though, most of the pieces failed. I'm not sure if this is a software or prep issue, but I am investigating it. Some parts, like the hubcaps, had edges that were too thin as well and crumbled. I will be thickening those as that's an easy fix. There will be a little bit of change to the level of detail but that's just the reality of manufacturing, every method has its limits. Like I said I am new to SLA 3D-printing so I sort of expected I will have to trouble shoot and fine tune things. I will be spending a good chunk of my weekend trying to sort this out. Here I have attached some pictures of how things came out. As you can see, the detail on the rim fronts is superb, and they actually came out really well! But the wheel backs and hubcaps need some adjustment. If anyone on here doing 3D resin printing has some advice on how to fix the distortion and outright missing areas on the wheelbacks please let me know! I'm using an Elegoo Saturn 2. I have conducted a screen exposure test and it works fine. I also thoroughly clean the machine after use and regularly inspect the FEP film. I'm not sure what else to check.
-
That's in the plan! Of a matter of fact they actually were the standard wheel trim in 1979. Steelies with these pie plates were standard and you could option the full wheel covers, wire wheel covers, or rally wheels..
-
Squarebody Wheels
Mike Slapattack replied to Mike Slapattack's topic in Car Aftermarket / Resin / 3D Printed
Yea I absolutely agree, and I also love the "poverty" look with the basic stuff. As far as similarities between divisions, the hubcaps look identical except for the center, which I believe was a separate insert fastened or brazed in somehow. The Chevrolet ones had a black insert with a gold bowtie and the GMC ones had a plain metal one with the red GMC logo. There was also a painted ring around the insert, with the Chevy's being gold and the GMC's being red. As far as I have seen, these hubcaps were also used on the 1/2 and 3/4-ton G-Vans. I'm still debating on whether I will actually print embossed logos into the hubcaps, and I won't decide that until I can determine whether my printer is capable of such detail. It likely is, but in the case that it isn't, you could always use a decal. Here are some reference pictures on Ebay: https://www.ebay.ca/itm/204559621821 https://www.ebay.ca/itm/204255416801 https://www.ebay.ca/itm/266296973845 As you can see from the third link, on the front hubcaps on the 4x4s, the insert was replaced with a conical ring with a center hole to allow for the hub to pass through. Also, after I get these 1/2-ton wheels out I will be doing the 3/4-ton and 1-ton wheels, which were larger and had similar but different hubcaps with 6 simulated "spokes" instead of 5. OEM wheel covers are down the line too. -
Squarebody Wheels
Mike Slapattack replied to Mike Slapattack's topic in Car Aftermarket / Resin / 3D Printed
I managed to add a taper, I hope this works!
-
Squarebody Wheels
Mike Slapattack replied to Mike Slapattack's topic in Car Aftermarket / Resin / 3D Printed
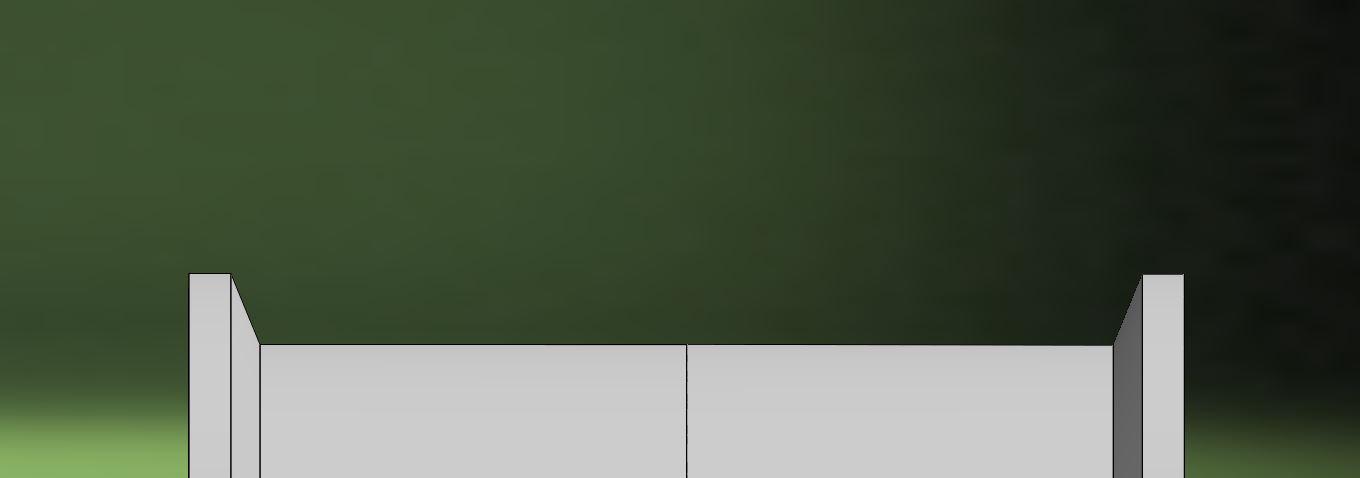
Yea, that's what I'm aiming for, the factory stock look. I'm scouring brochures and old magazines from my collection to find good references. Right now the rims aren't too far off from being able to fit a kit tire, and that definitely is a goal. I don't want to create an exclusivity situation where you have to use my tires, that wouldn't be fair or very flexible. I need to change up the flanges a bit and do some trial and error test prints with normal kit tires. The wheels are already sized to the typical 15x6 size, so I'm confident that they should fit tires from a kit like the AMT '71 Chevy Van or MPC '76 Caprice or any of the full-size OEM spec car or truck kits from back in the day. Right now the bead flanges have a square profile, but tapering should do the trick. The tricky part is leaving enough thickness on the flange for it to keep it's strength. My printer has a minimum layer height of 0.01 mm and a pixel size of 0.028 mm, so I try to design parts to a precision with a margin above those, keeping dimensions above at least 0.05 mm or in that ballpark. Of course, dimensions that small are overkill to consider, but I am trying my best to make quality repeatable parts. I'm new to MSLA printing but I got a pretty high end printer. Also, for reference, according to specifications I found in my reference material, 1/2-ton 4x4 Squarebodys came standard with 235/75/R15 radial all seasons, with a variety of other tires made available through dealers of course. As to what tires exactly these were, it most likely depends on where the truck was made. A truck made in the US would likely have had Goodyears or Uniroyals, while a truck built in Oshawa could possibly have even had Michelins! -
Squarebody Wheels
Mike Slapattack replied to Mike Slapattack's topic in Car Aftermarket / Resin / 3D Printed
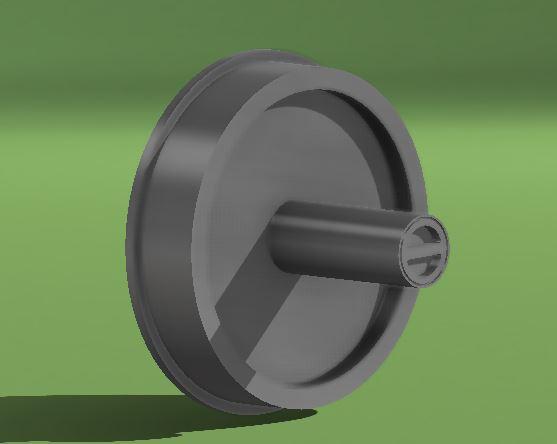
Front wheel assembly started! The wheel back will have a hub that passes through a hole in the wheel front. I still need to adjust the wheel back to accommodate the kit axle properly, but I'm working on that. I've also changed up the tires a bit!
-
Squarebody Wheels
Mike Slapattack replied to Mike Slapattack's topic in Car Aftermarket / Resin / 3D Printed
I'm going to need you guys' feedback! What kind of tires would you like to see available with these rims? For now I'm planning to release them with some generic Uniroyal Laredo-esque radials. I'm still pretty new to modelling tires, so I need some subjects to practice with. Here's the work so far:
-
Squarebody Wheels
Mike Slapattack replied to Mike Slapattack's topic in Car Aftermarket / Resin / 3D Printed
Got it, thanks! Let's keep in touch. -
I was making some steel wheels for Squarebody trucks and realized that they are very similar to the Nova steelies. With some adjustments I am able to make some proper Nova steelies that will be available instead of the full wheel covers I showed earlier. They will come with dog dish hubcaps.
-
Squarebody Wheels
Mike Slapattack replied to Mike Slapattack's topic in Car Aftermarket / Resin / 3D Printed
Oh of course, I'm going to include pictures of the printed products once I can make them. I won't sell a single thing until customers can see what they're actually getting. -
Squarebody Wheels
Mike Slapattack replied to Mike Slapattack's topic in Car Aftermarket / Resin / 3D Printed
I haven't but it's certainly something I can do! -
Squarebody Wheels
Mike Slapattack replied to Mike Slapattack's topic in Car Aftermarket / Resin / 3D Printed
I don't yet! I'm still figuring out the logistics of how I'm selling stuff. I'll make a public announcement with details on where to buy once I have my first product ready for production. -
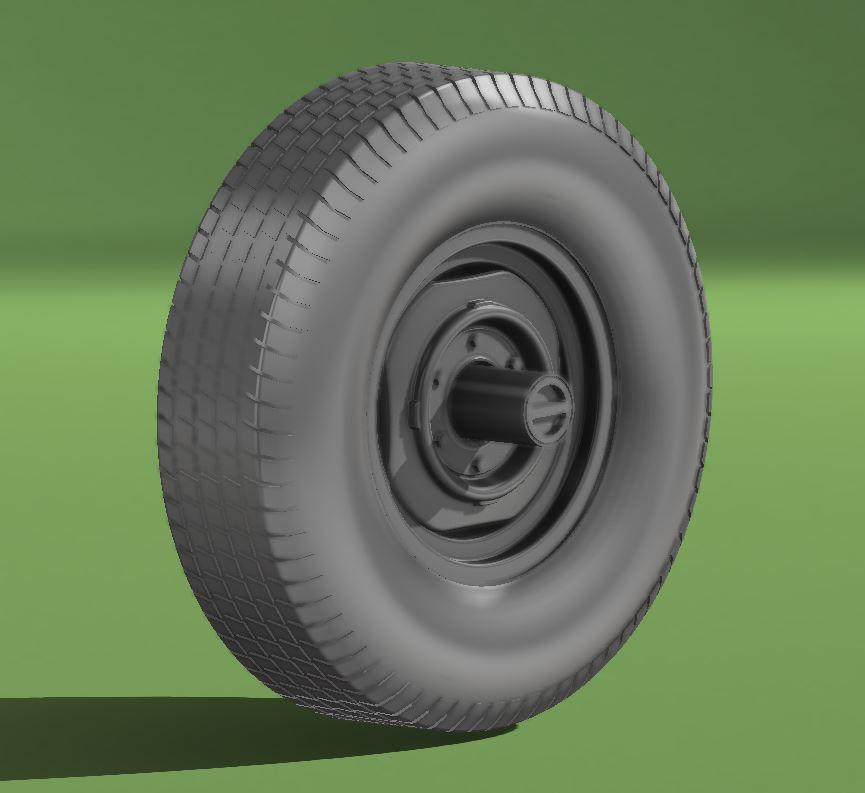
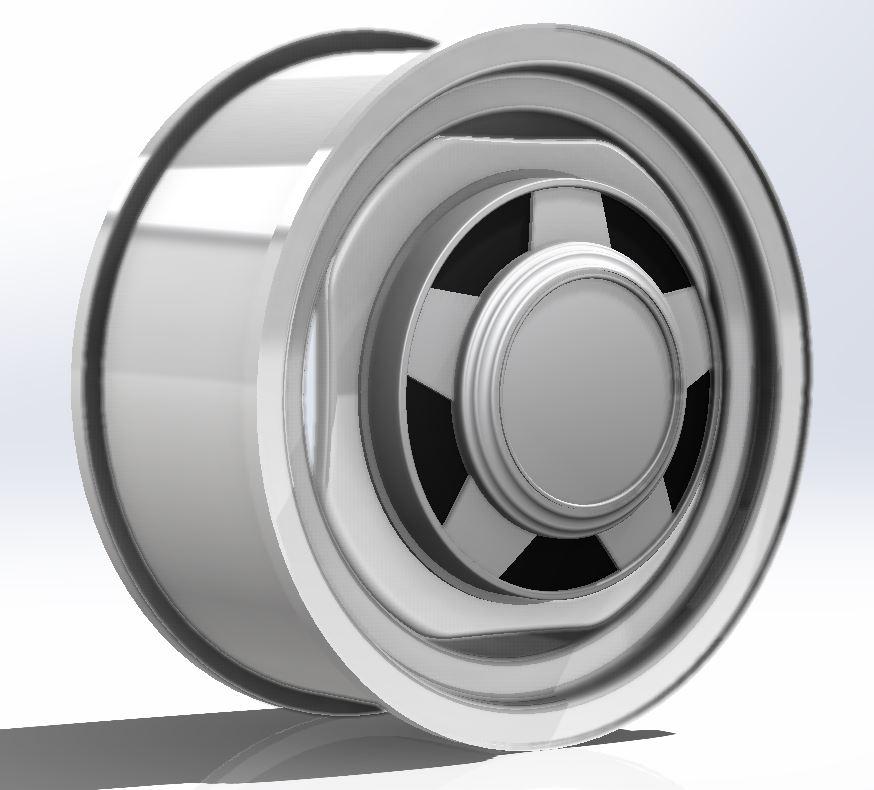
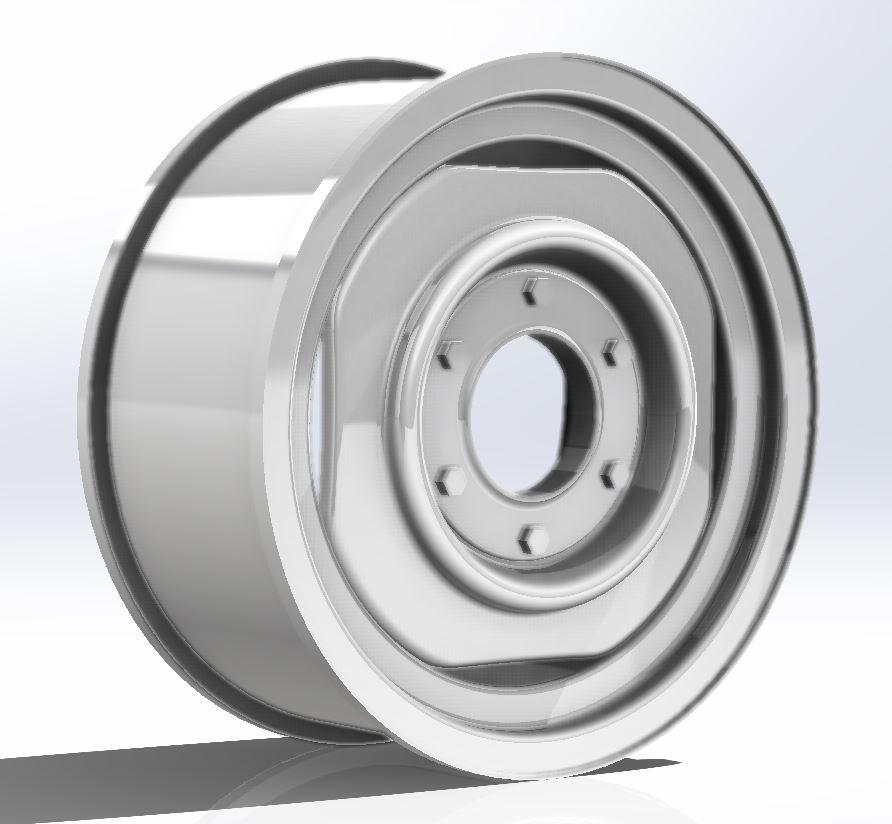
I was planning out a 1987 GMC V1500 project the other night and decided to whip this up in SolidWorks. This is an OEM 15x6 6-lug steel wheel for 1/2-ton 4x4 Squarebody trucks, along with an OEM hubcap for 1977-1991 1/2-ton Squarebodys and 1977-1995 1/2 and 3/4-ton G-Vans. I still need to fine turn the proportions and curves, but eventually this will be available for sale. It will be a set of 4 that includes tires. Eventually I will branch out and do even more Squarebody wheel products. These will be printed on my Elegoo Saturn 2 resin 3D printer I just set up. I will possibly just print several bucks and resin cast them to save time but that's yet to be decided.
-
Sorry, I didn't write that properly, I meant to say the front bench seat with the full seat back that isn't split. Also, the MPC kit does appear to be a hatchback because it has a panel seam all the way up around the rear window. It also has a silly "Hatchback" badge on the C-pillar that doesn't belong there.
-
I know there are some 4-door bodies floating around! I hope you find one. I may make one in the future, but I have quite a few projects lined up. I can however make the proper full back bench seat for the sedans. To my knowledge the sedans did not have a split rear bench, but maybe you can fact check me on that.
-
Thanks for the input! I will for sure do that. I was trying to find reference pictures in old magazines but most of the ads only show pictures of fancy radials.
-
The very beginnings of a correct 1977-1979 dashboard:
-
I may be remaking the Beaumont grille from scratch. The model is very inefficient and hard to adjust. I just got a SolidWorks license and I am far more competent with that software.
-
Finished the steering wheel!