JNordgren42
-
Posts
51 -
Joined
-
Last visited
Content Type
Profiles
Forums
Events
Gallery
Everything posted by JNordgren42
-
Thanks! I'm really pushing myself on this one. It's the first model I've done lighting on and me being me, I had to not just roll my own, but go completely overboard. ? I'm having to learn a lot of new skills, and I've gotten a lot of help from various Arduino and modeling communities and I'm taking it slowly. Thanks everyone! I appreciate the kind words.
-
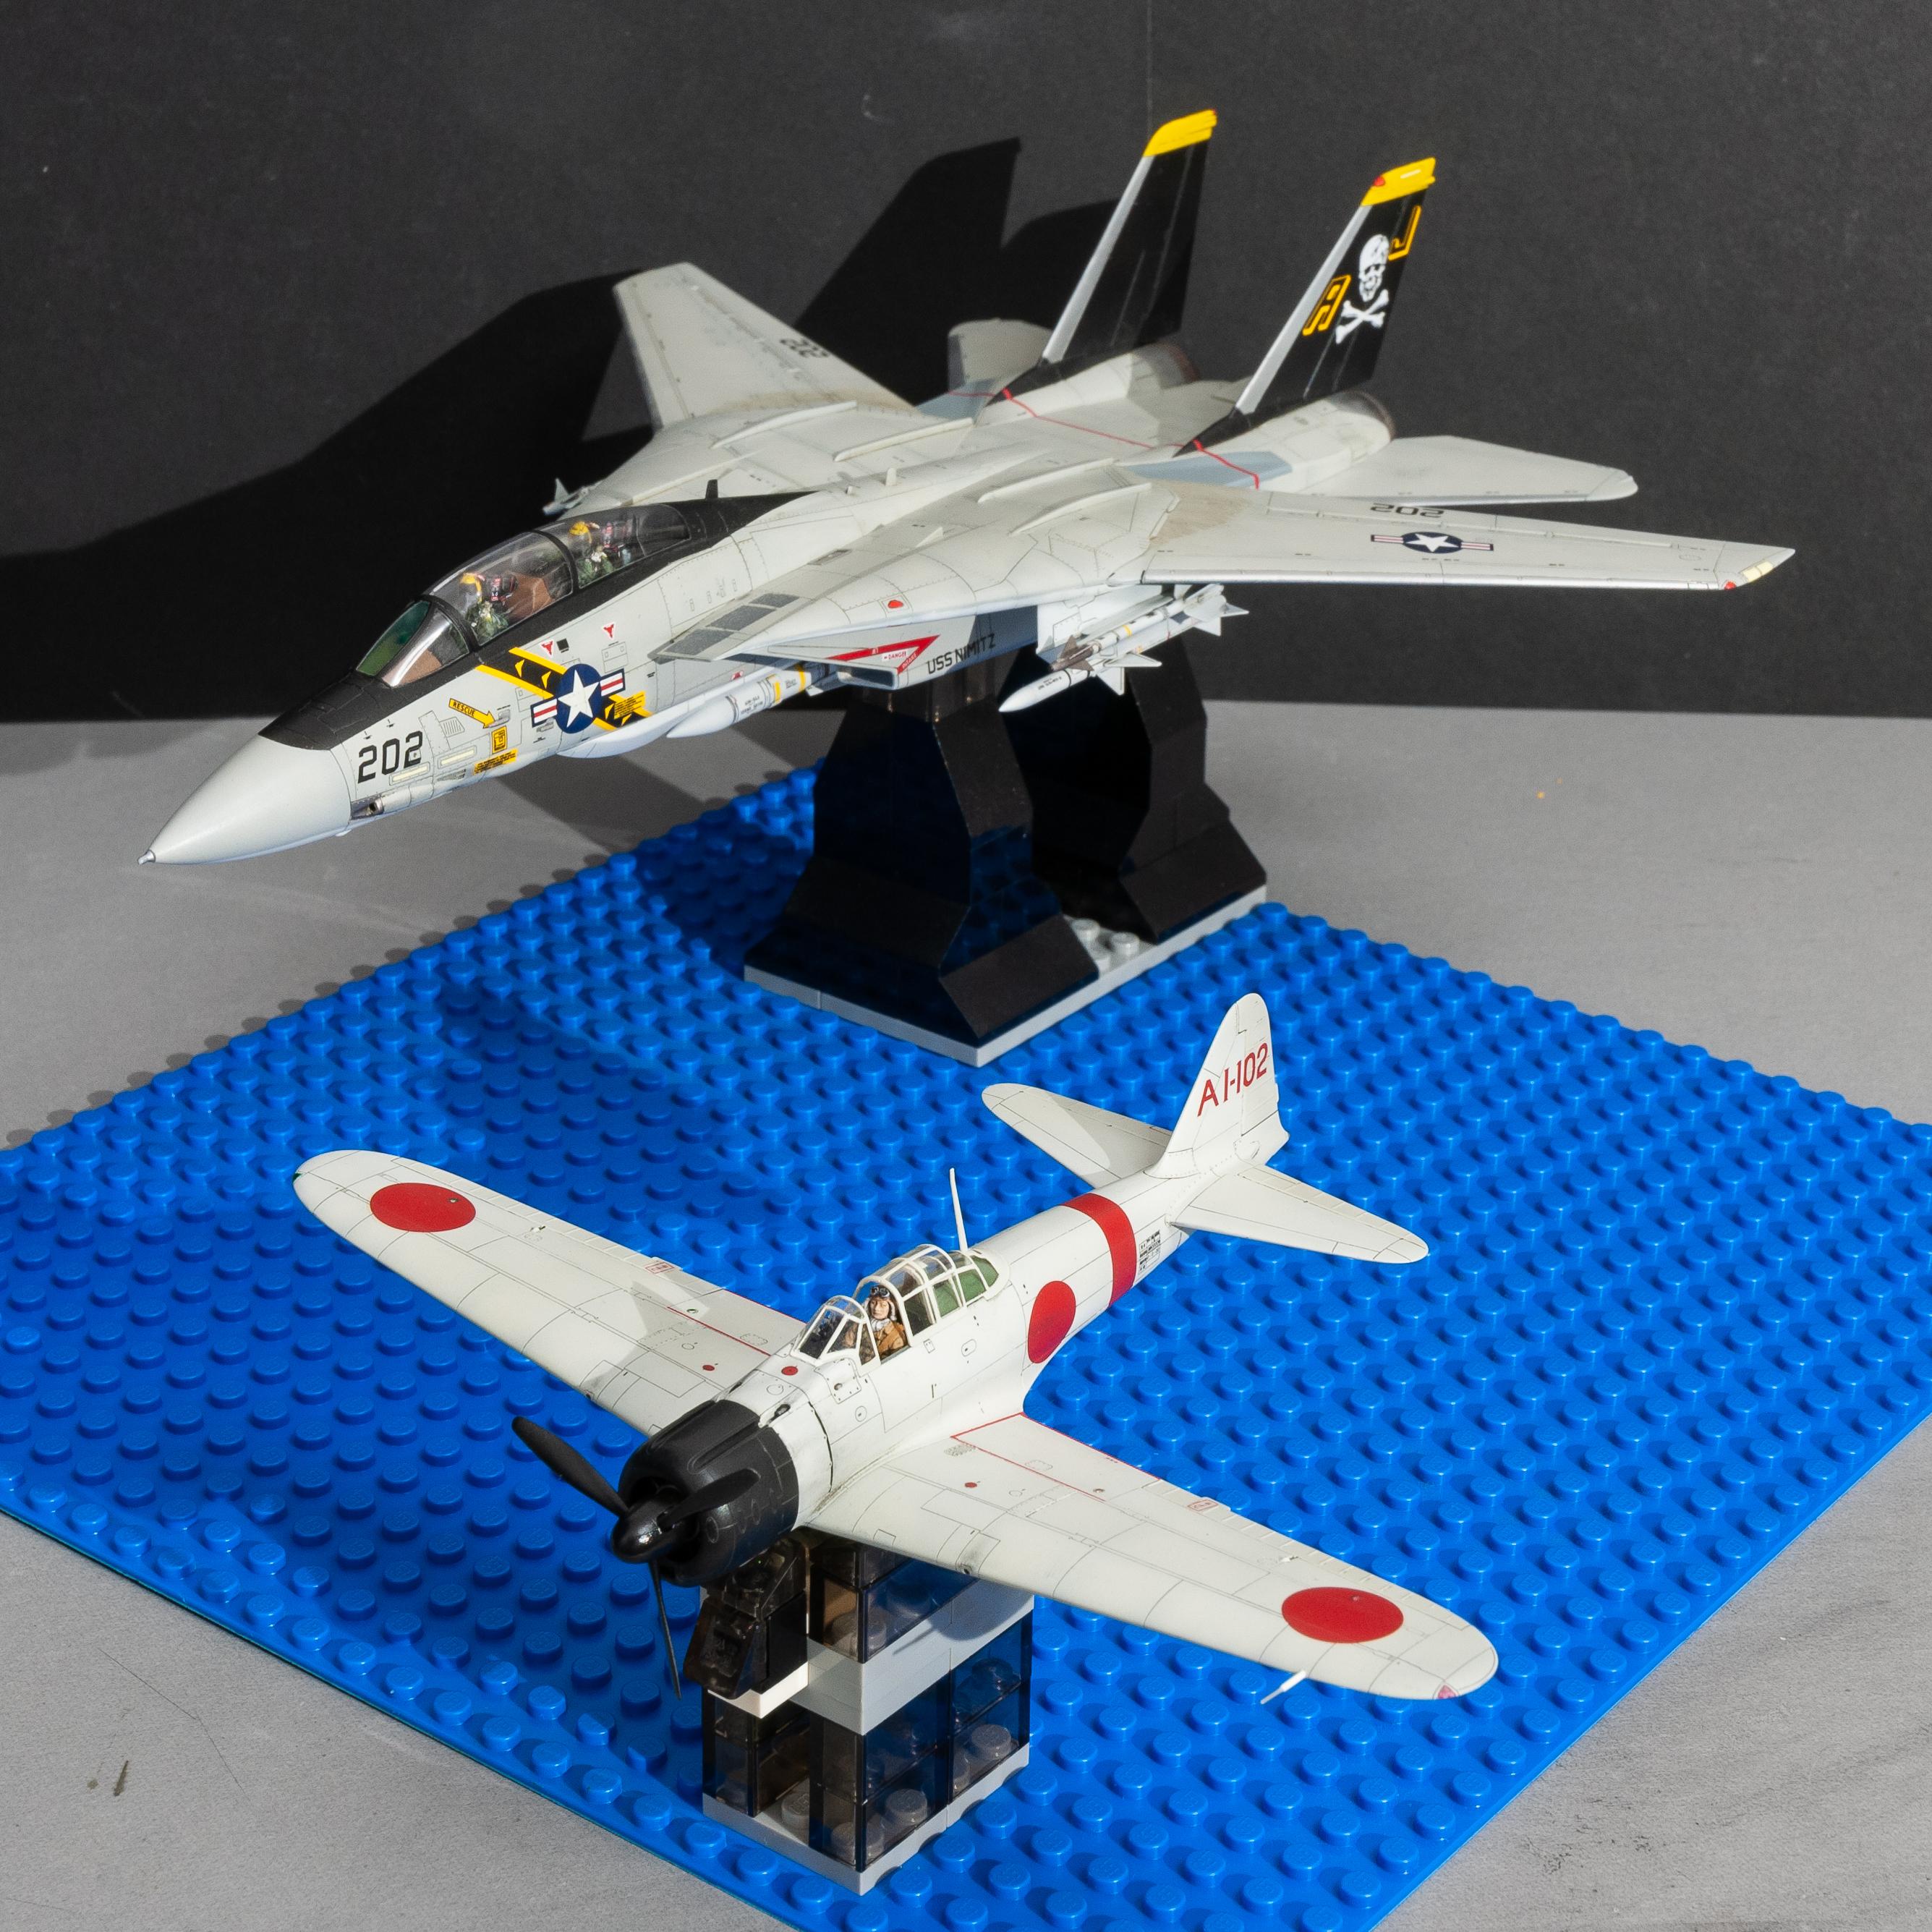
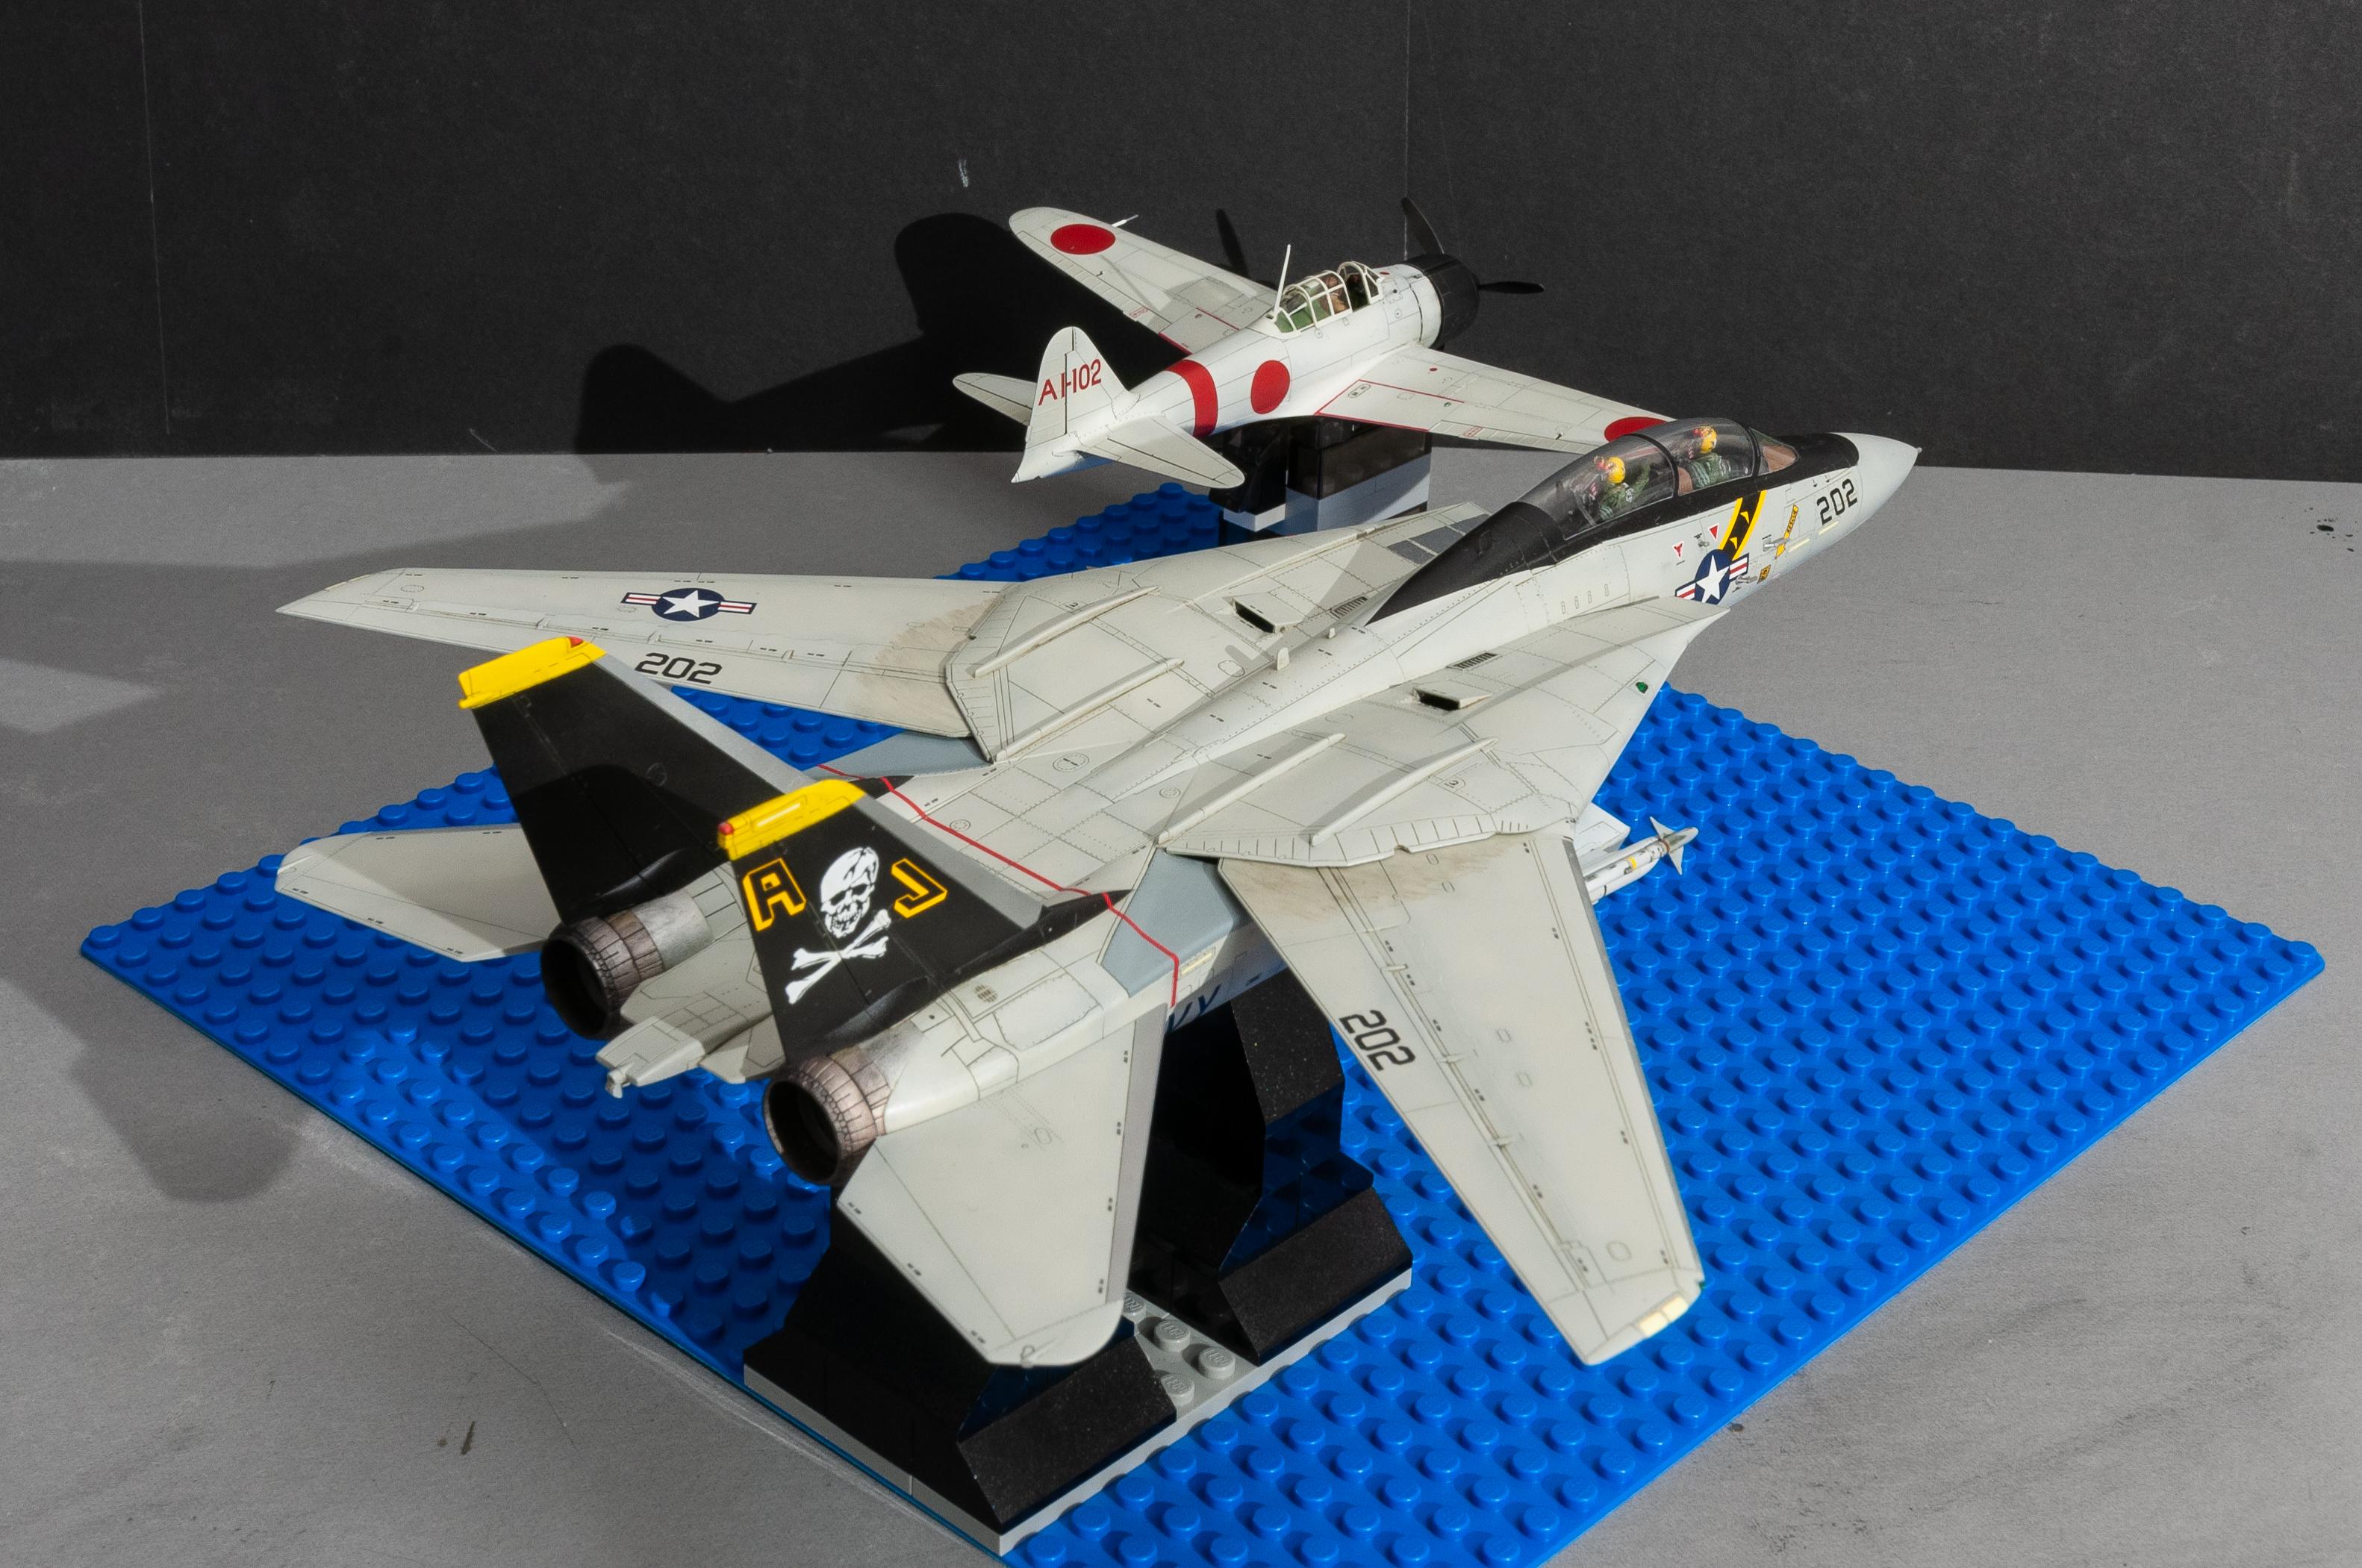
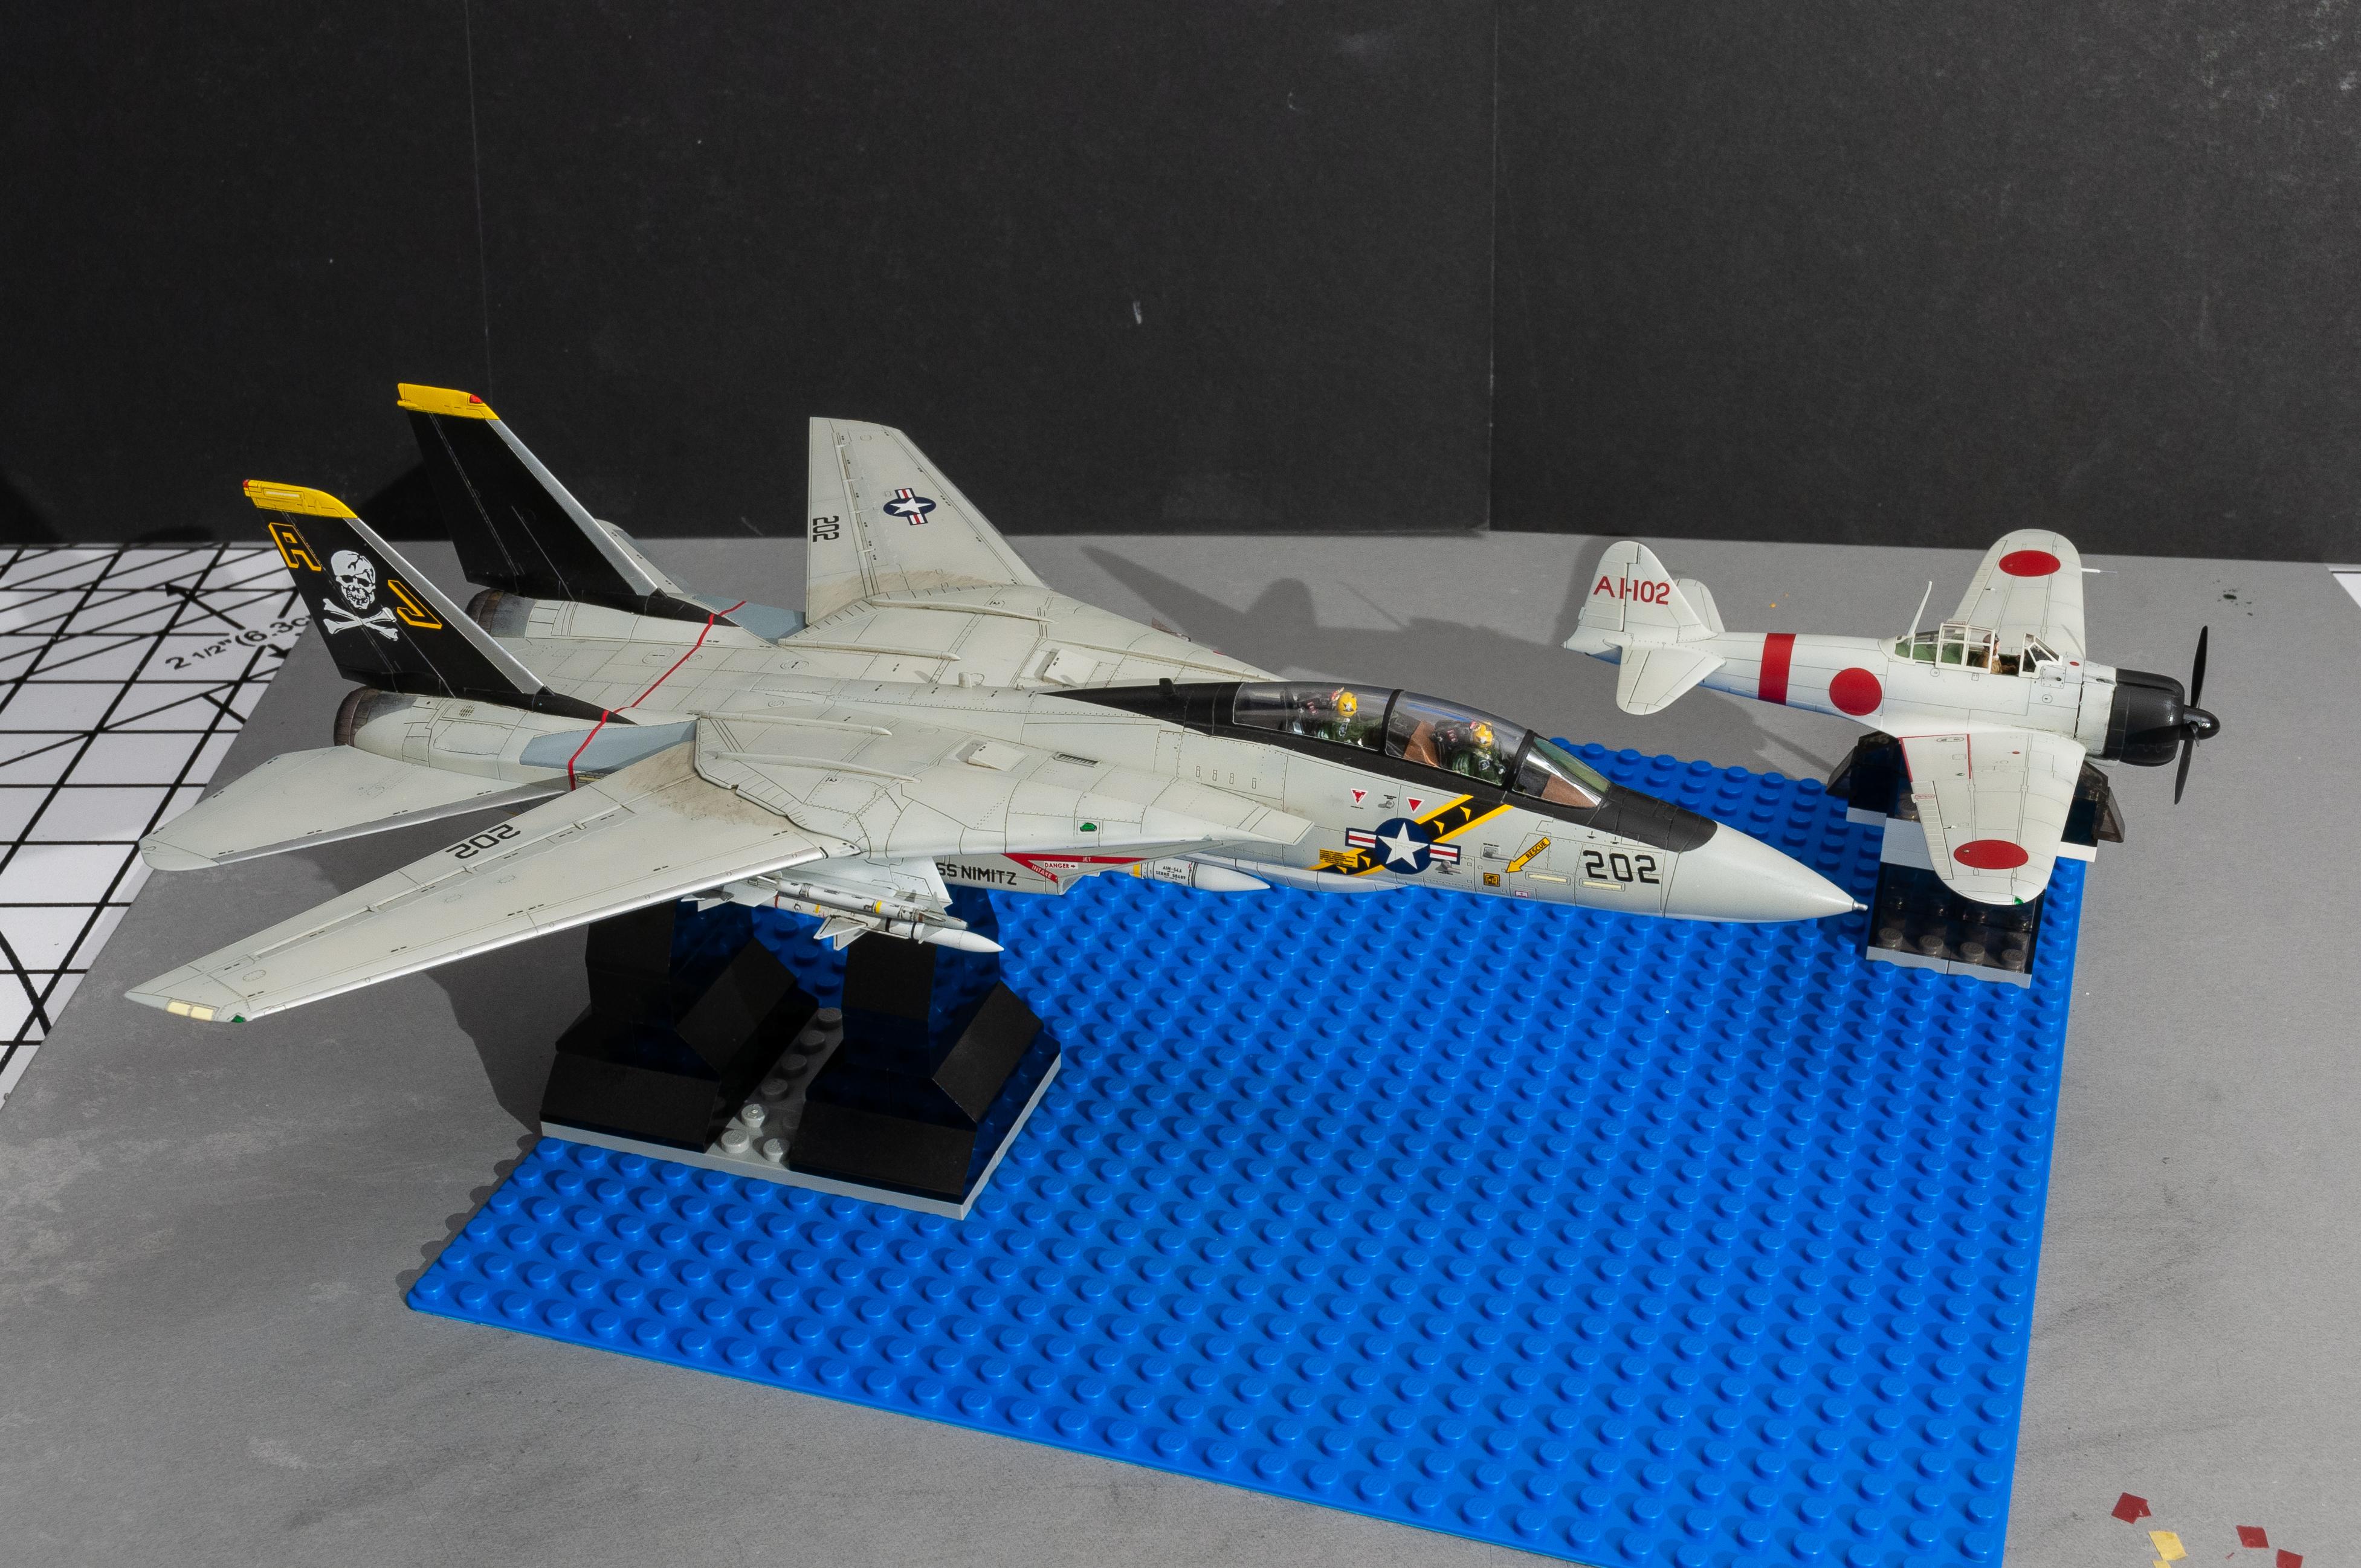
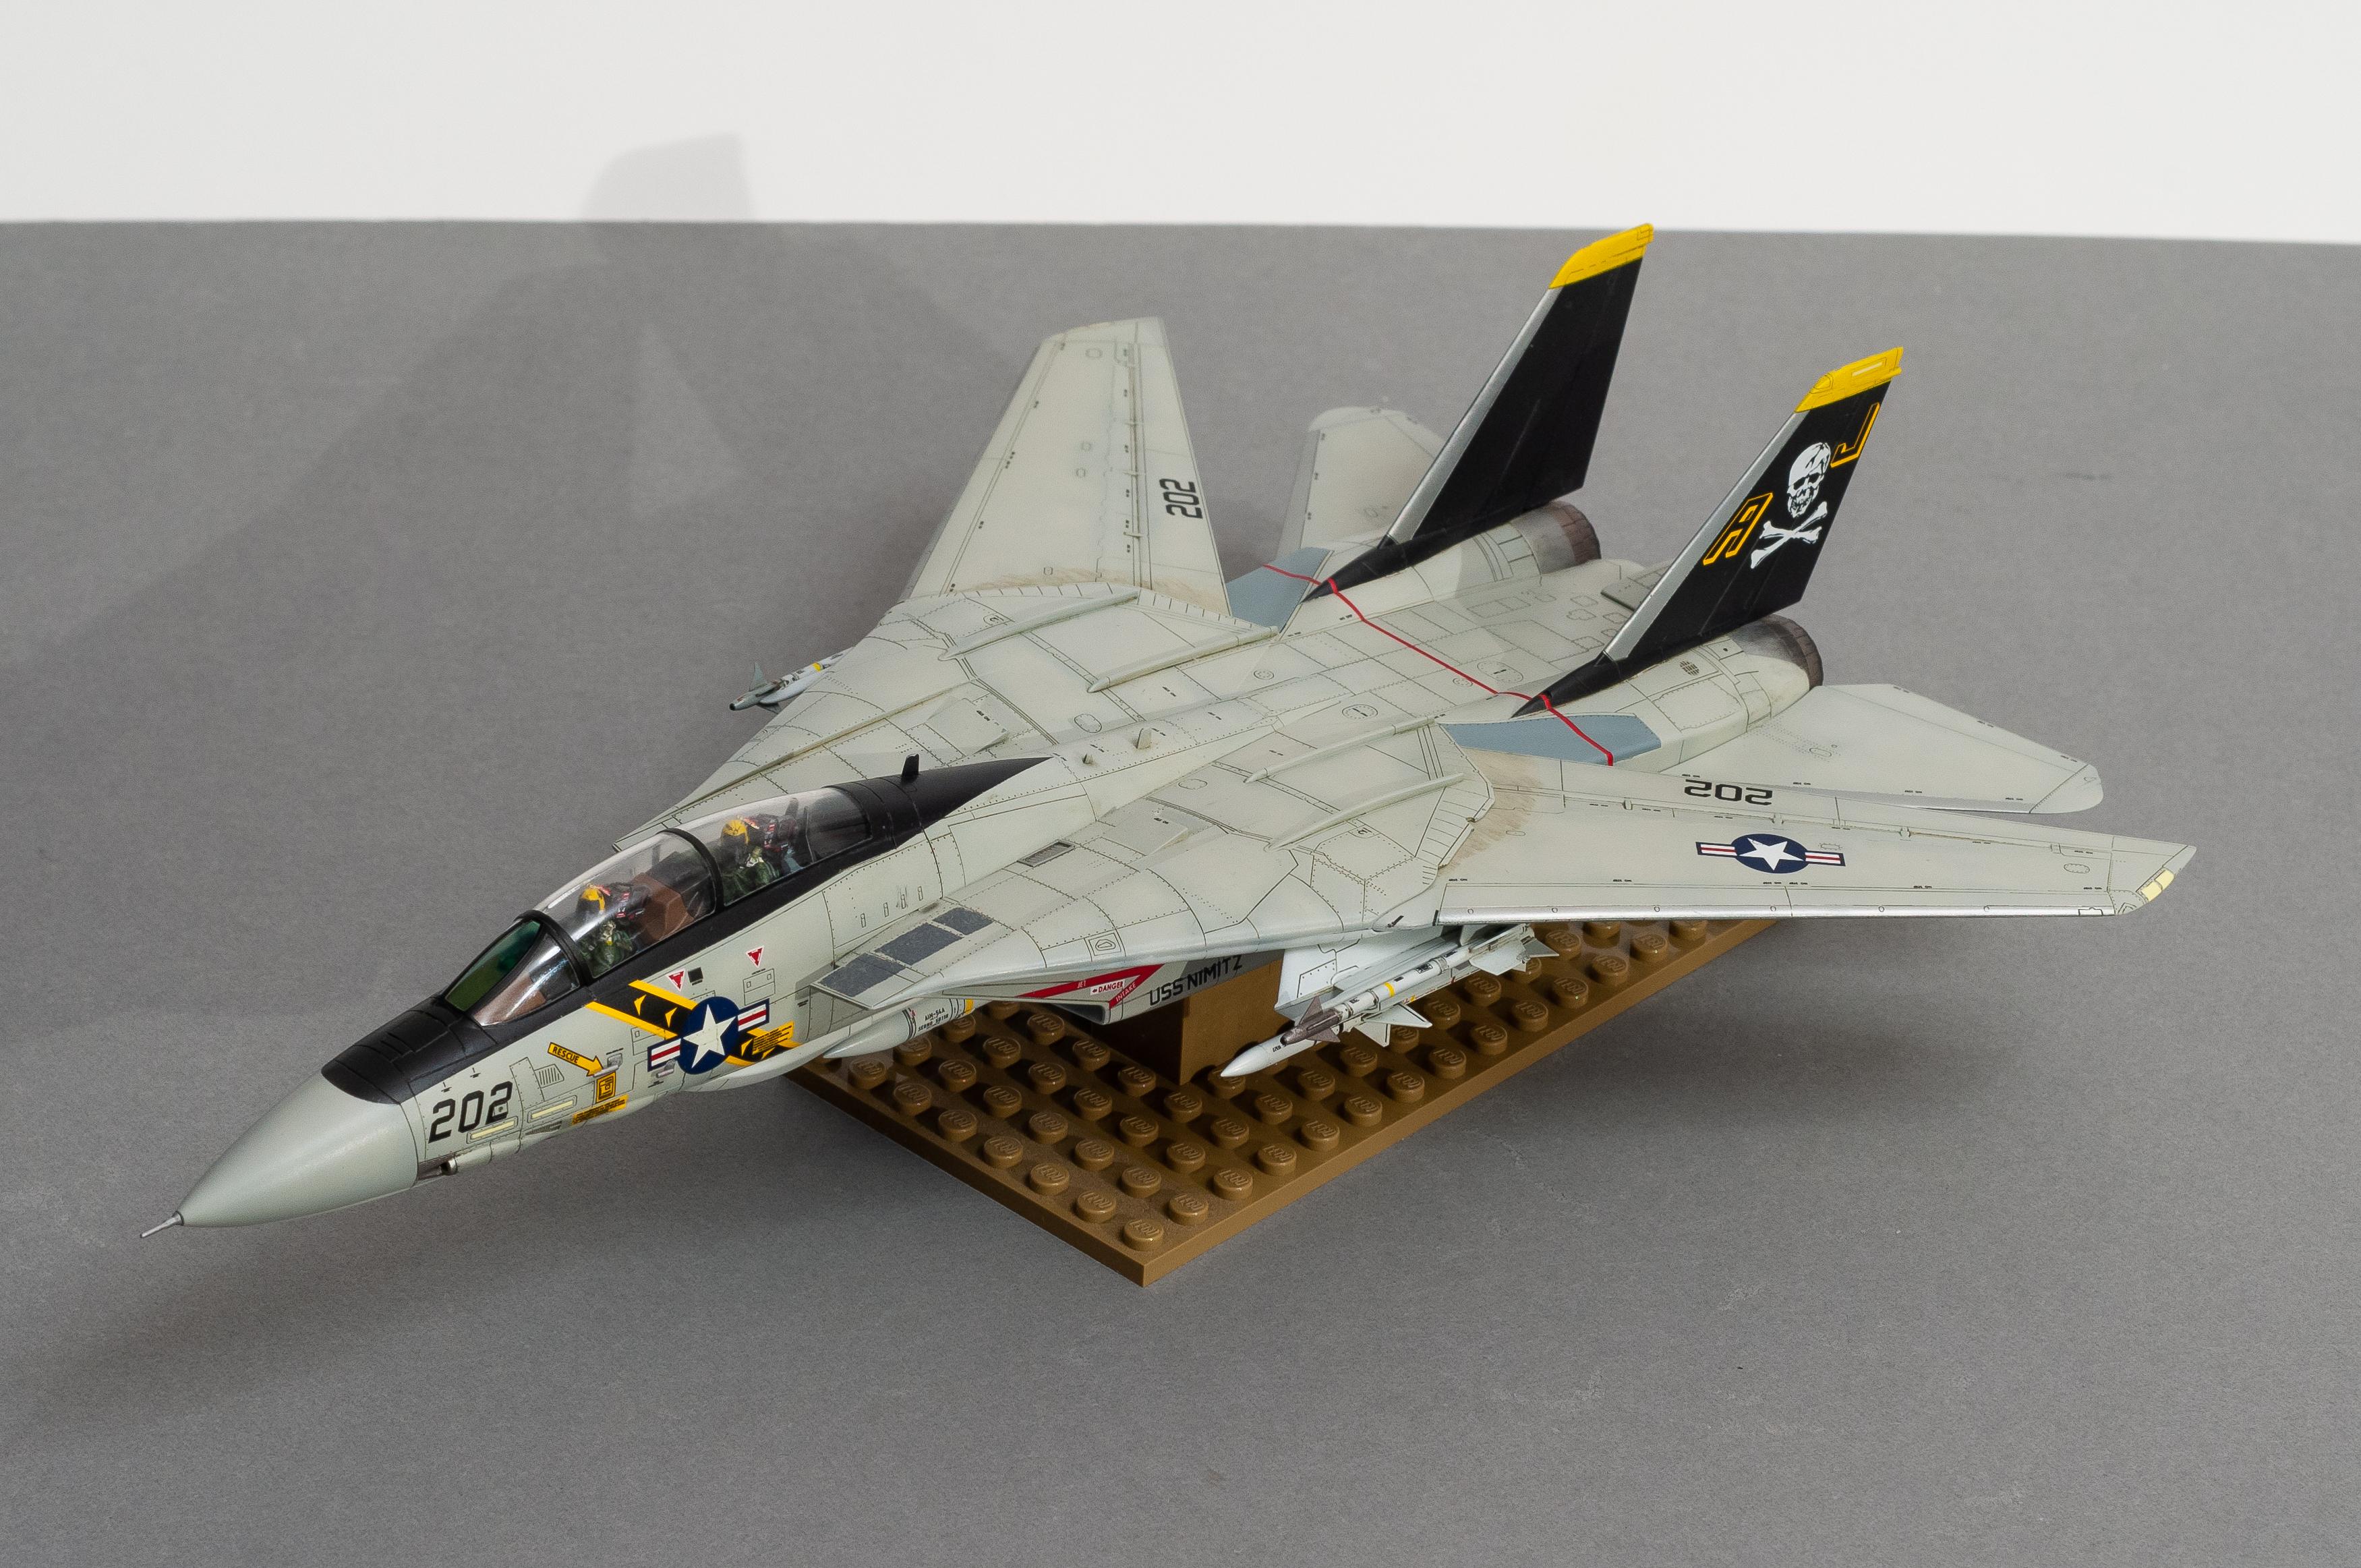
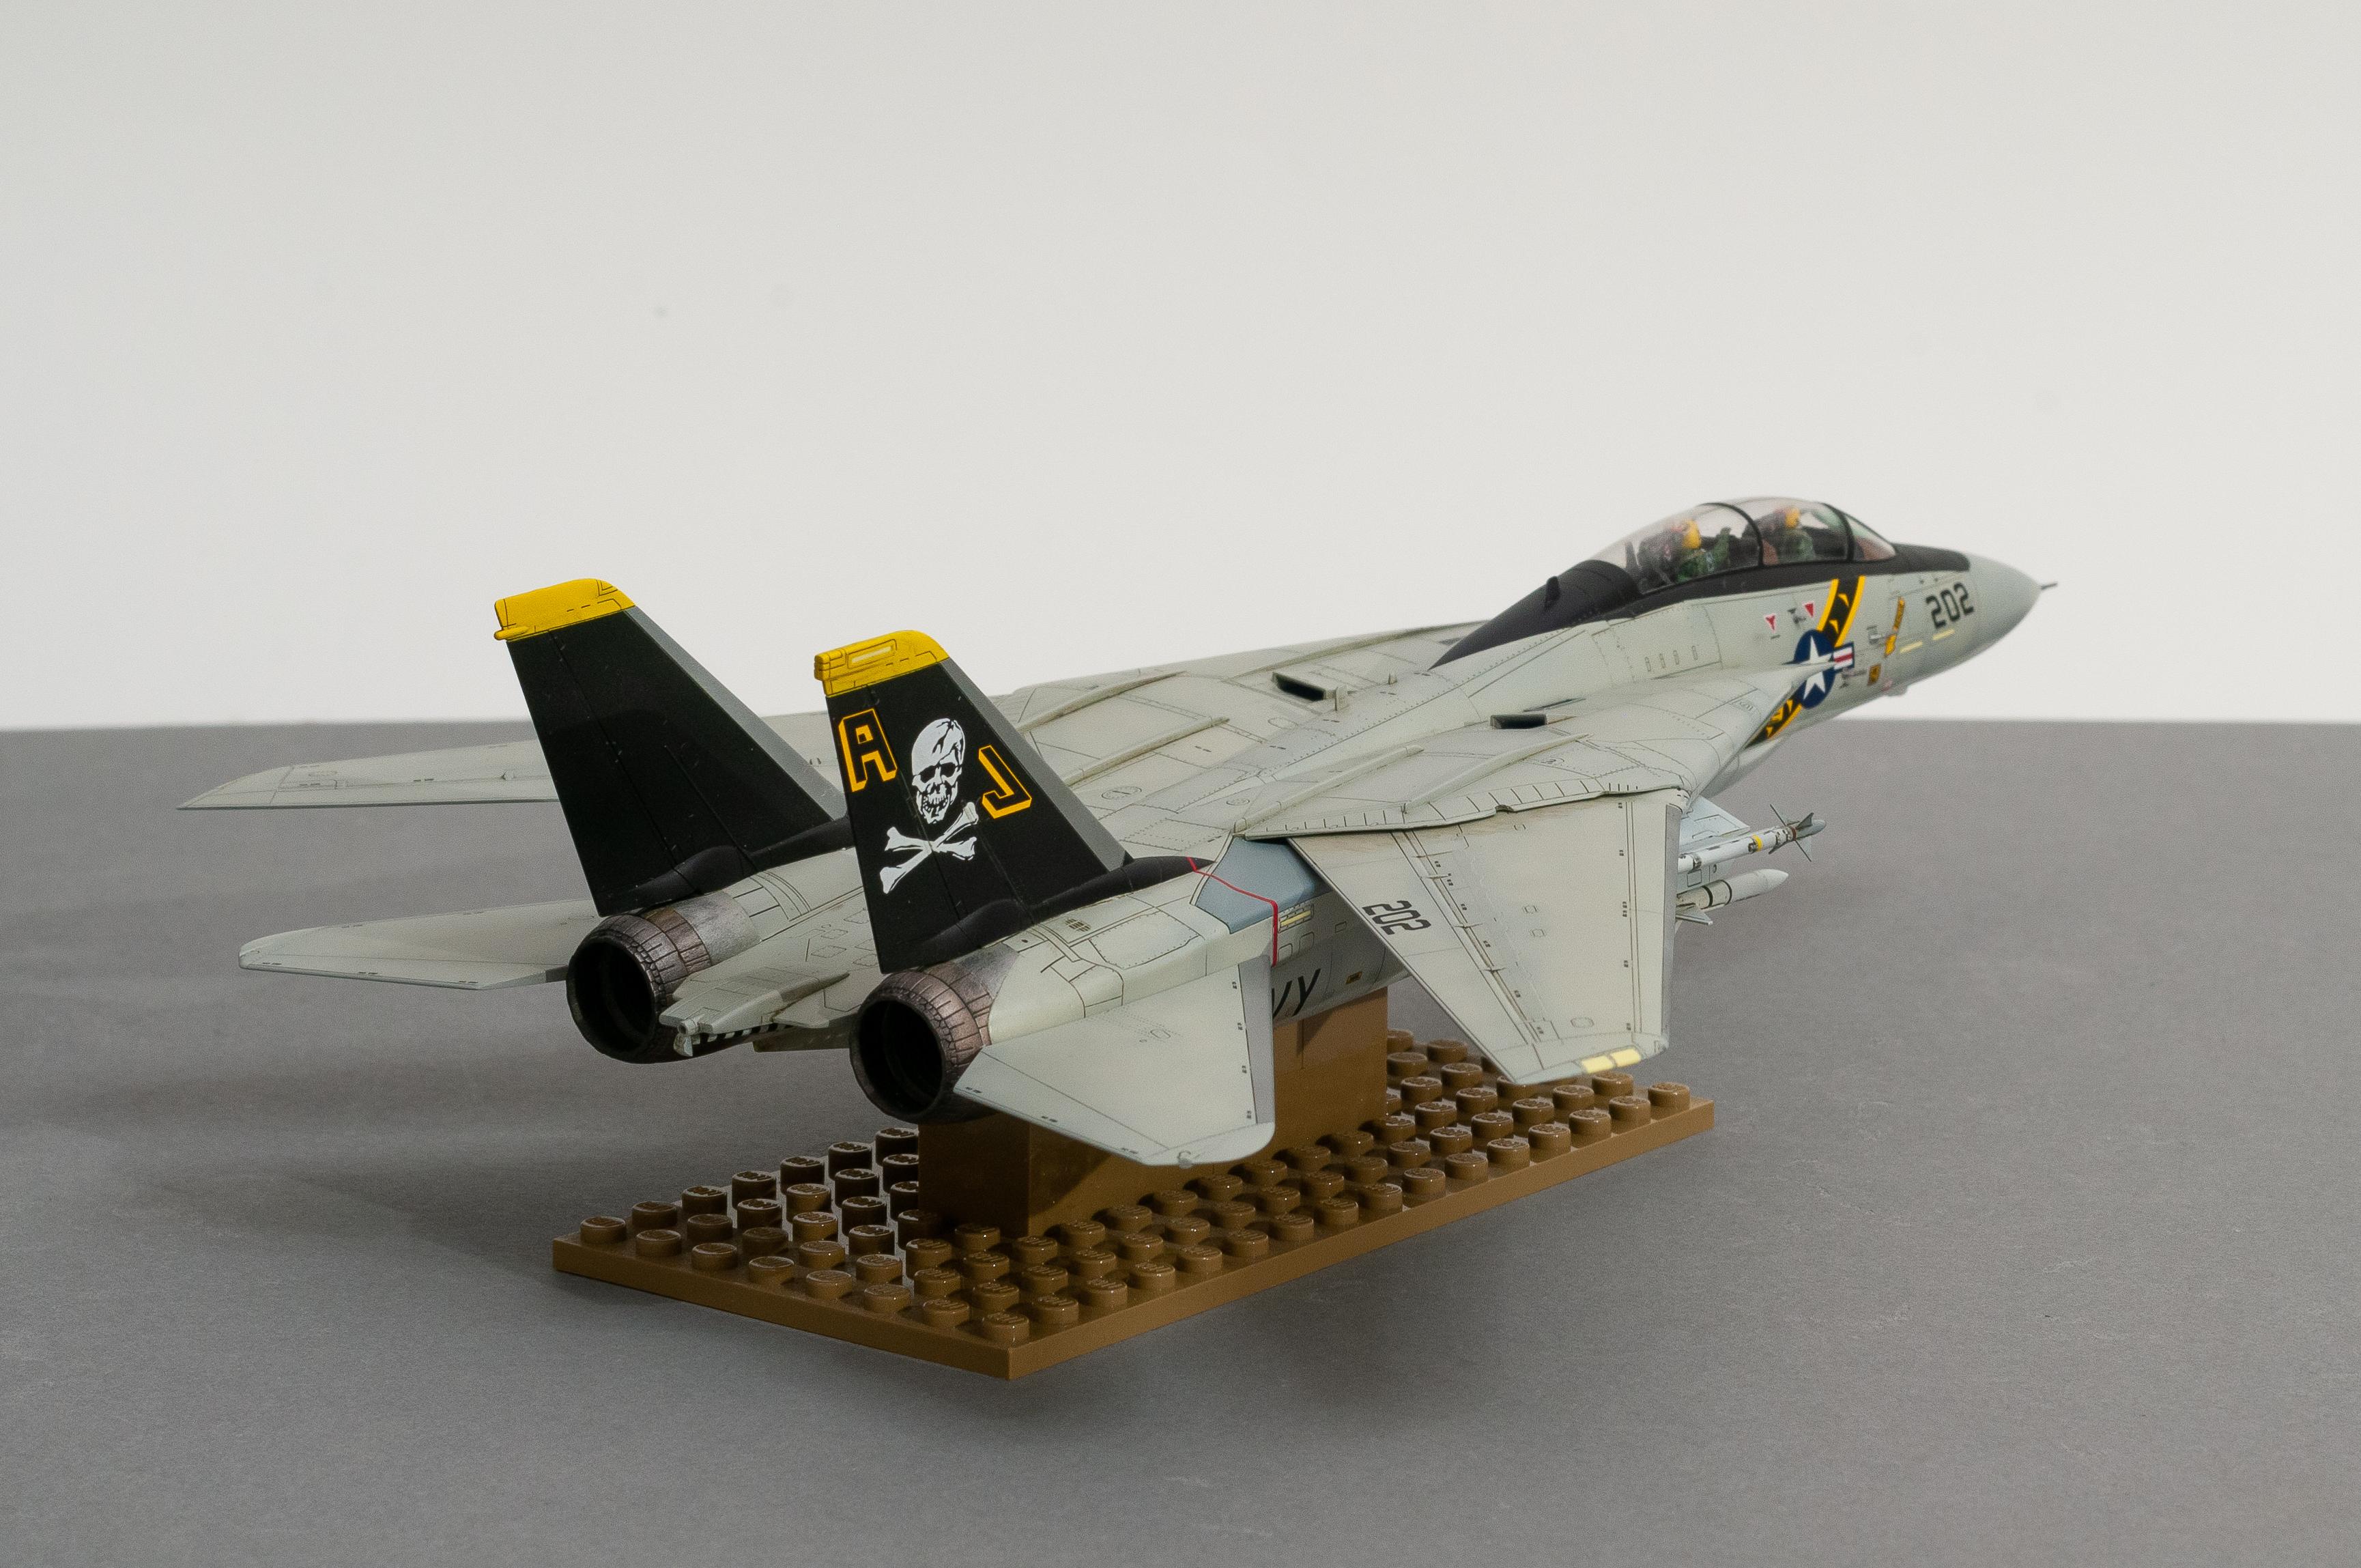
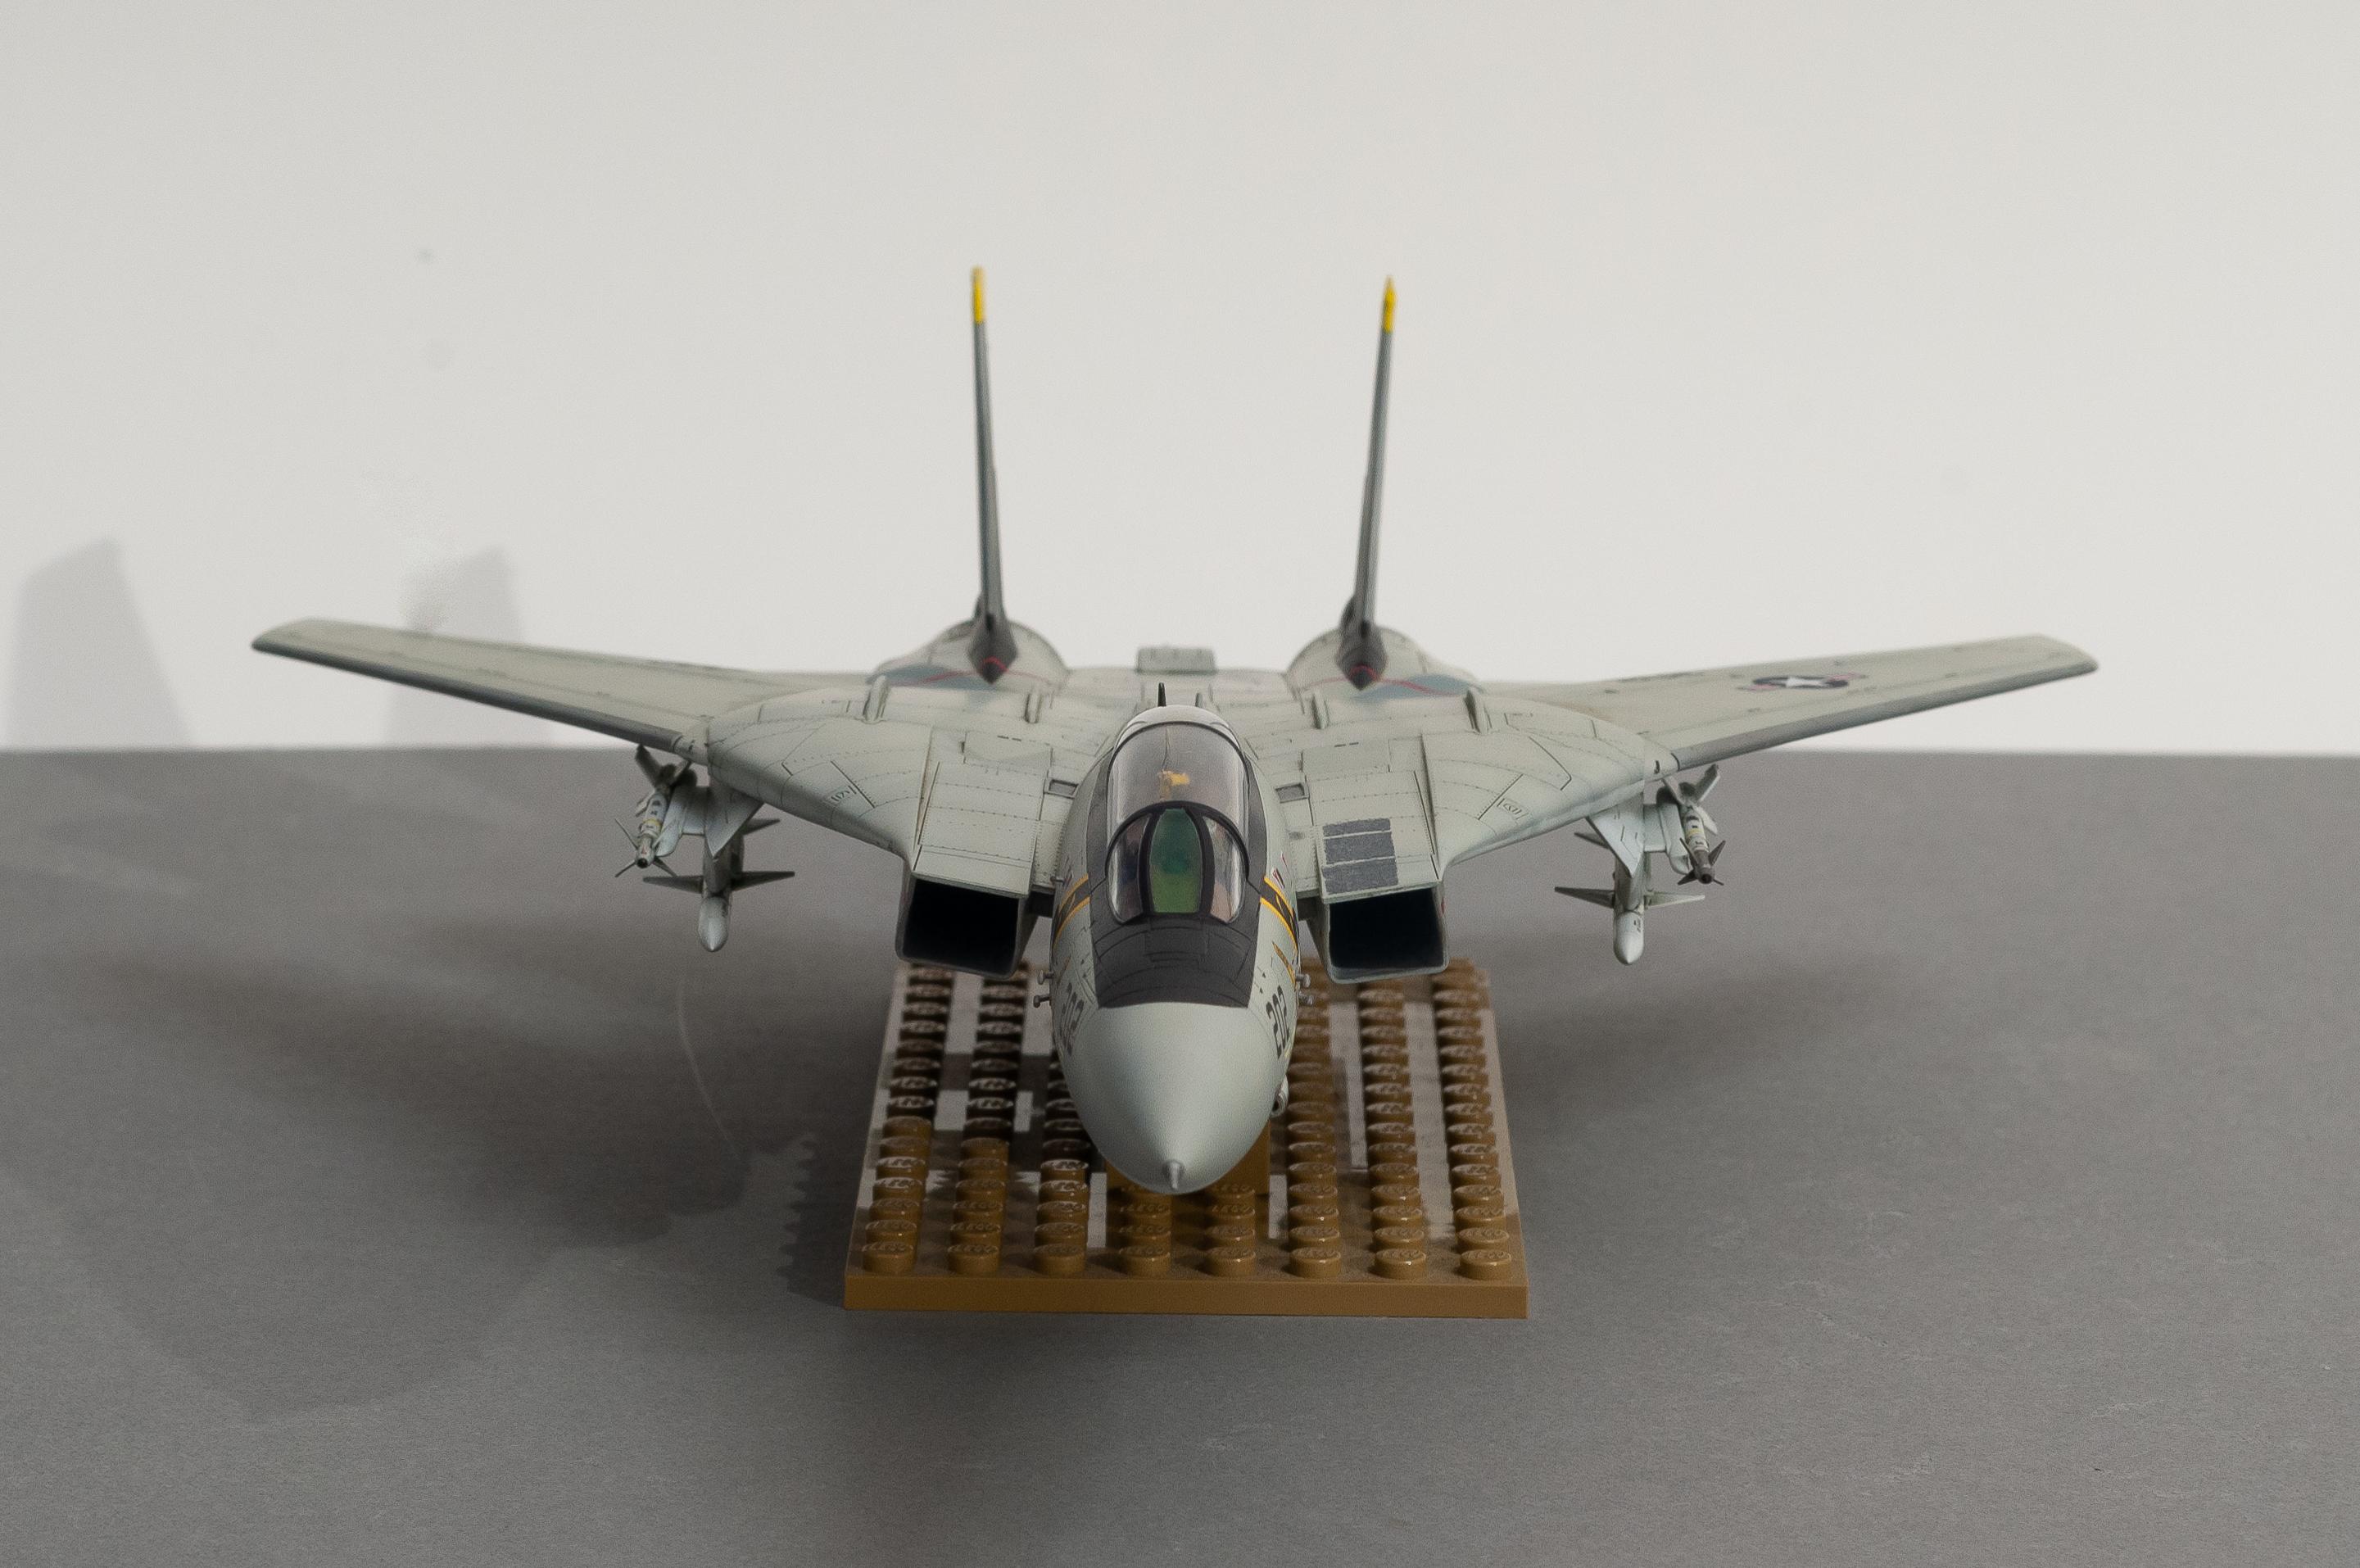
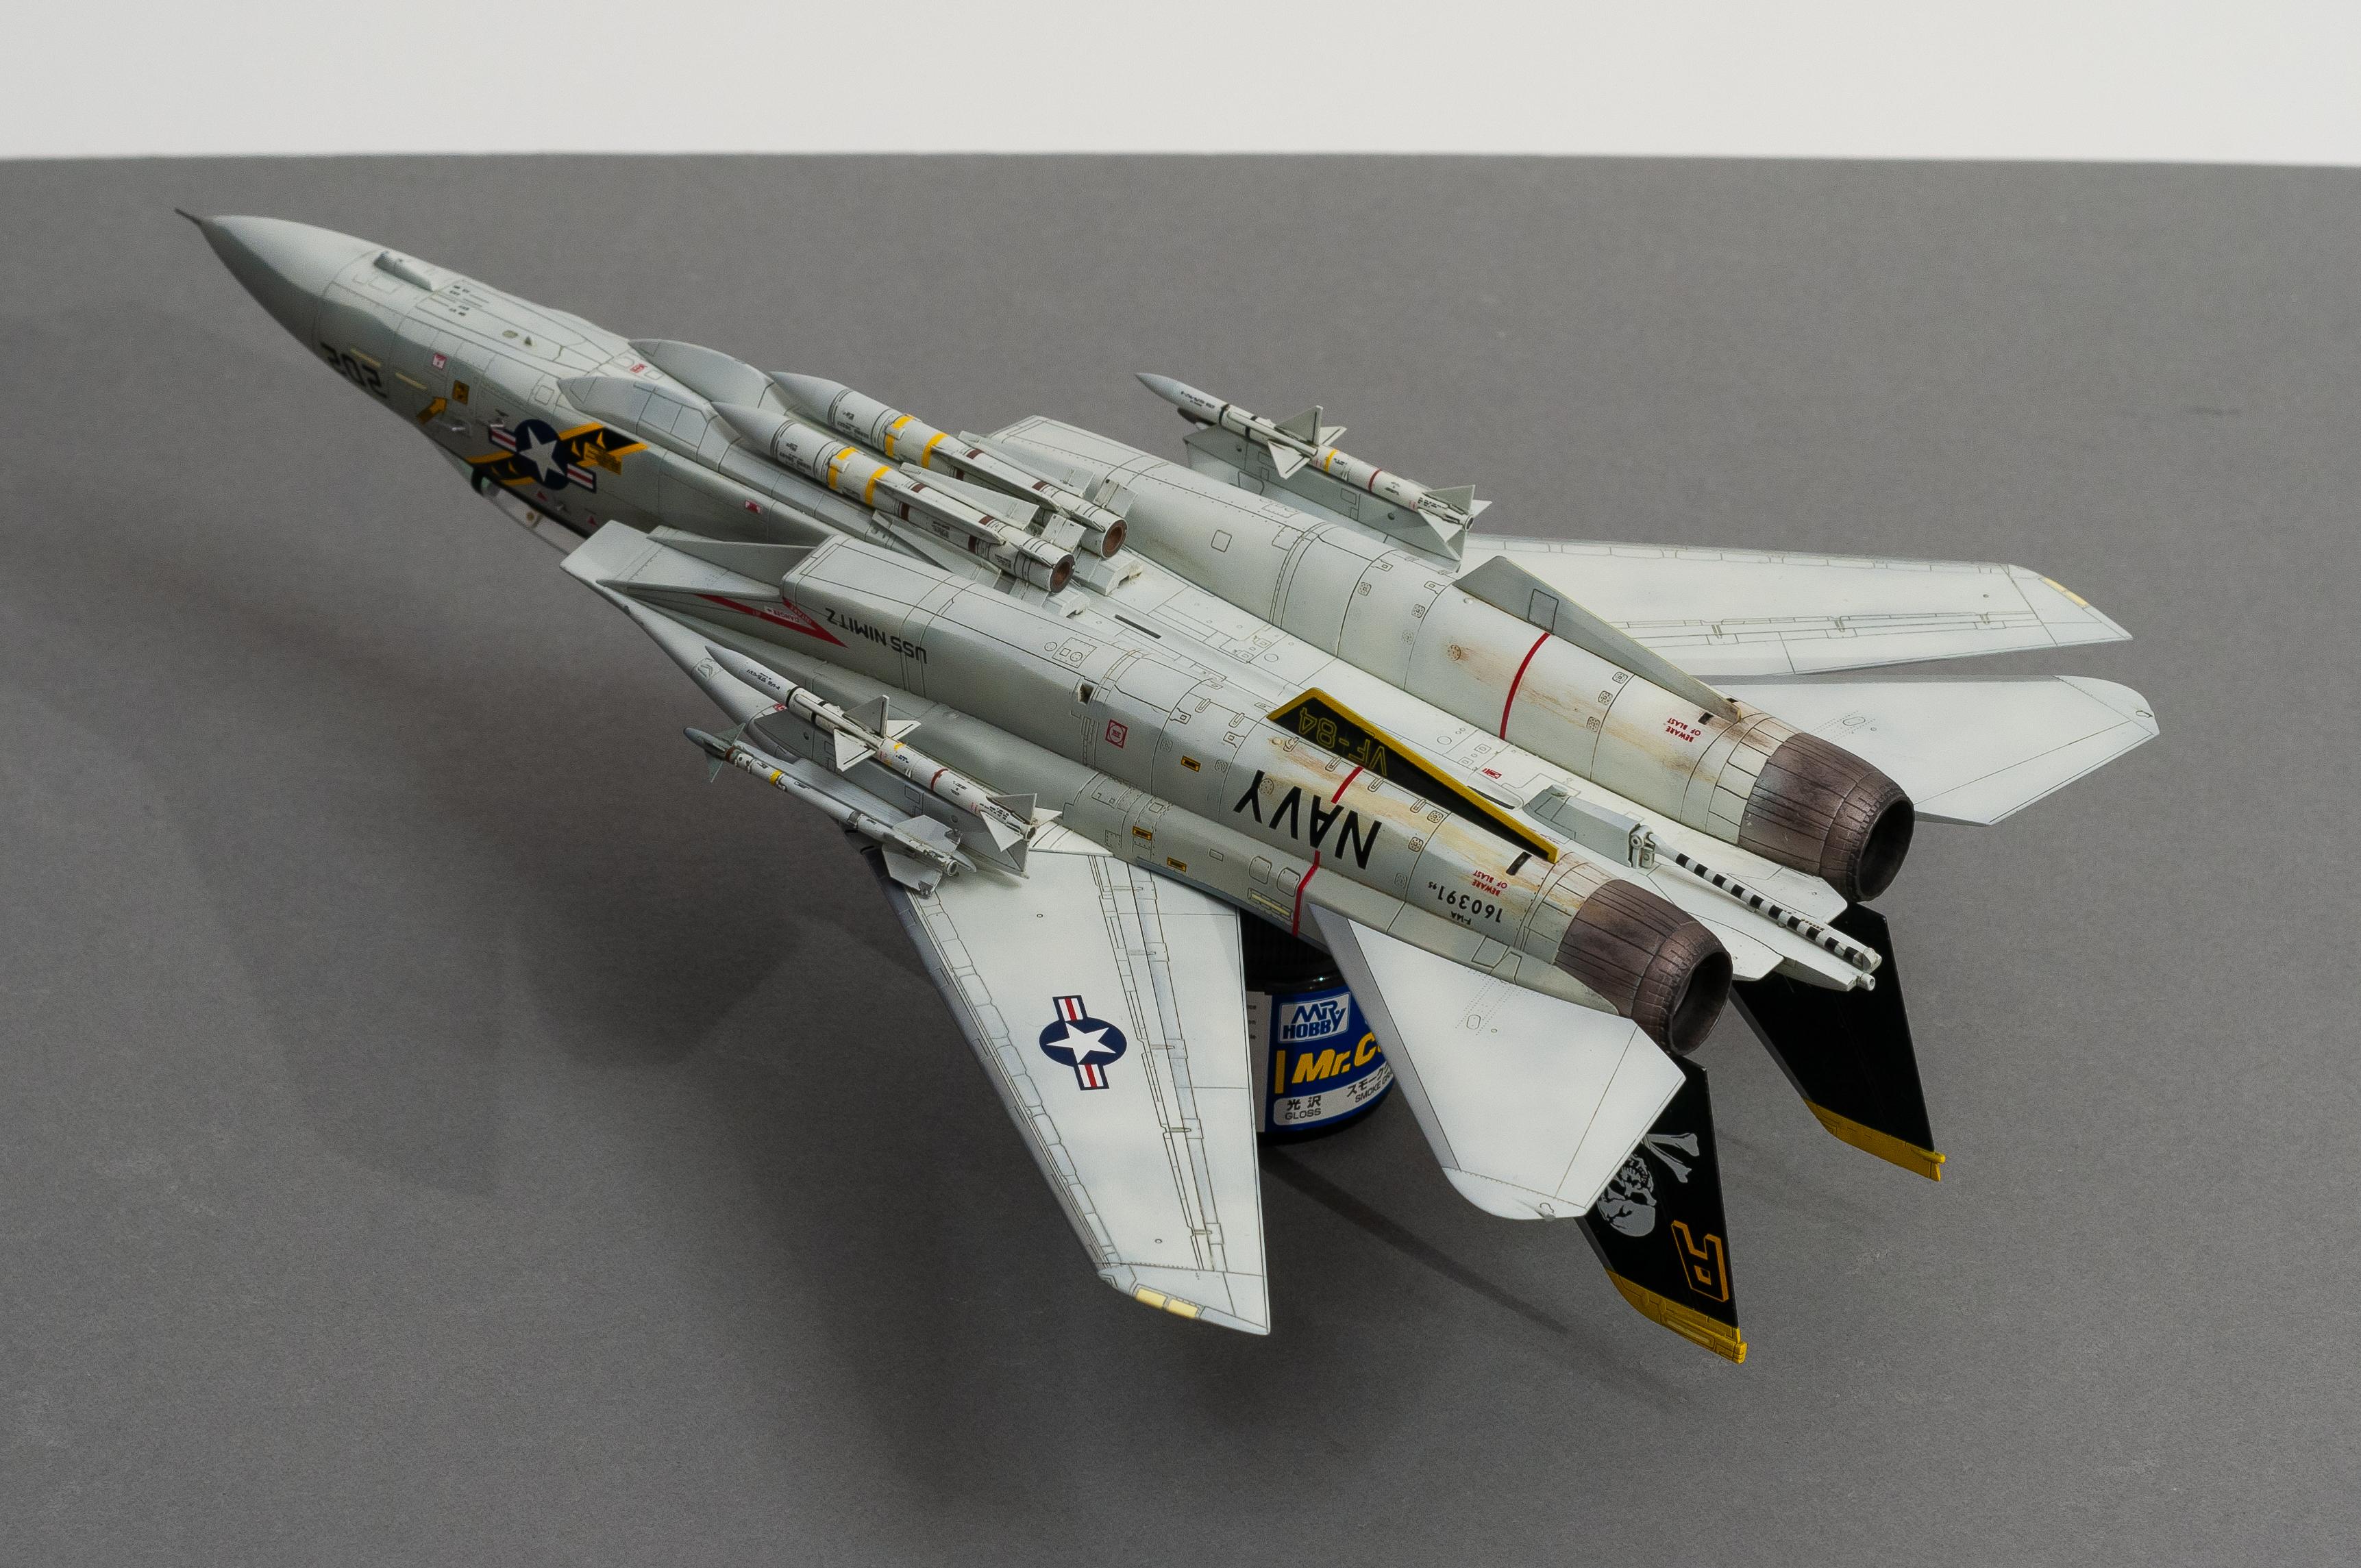
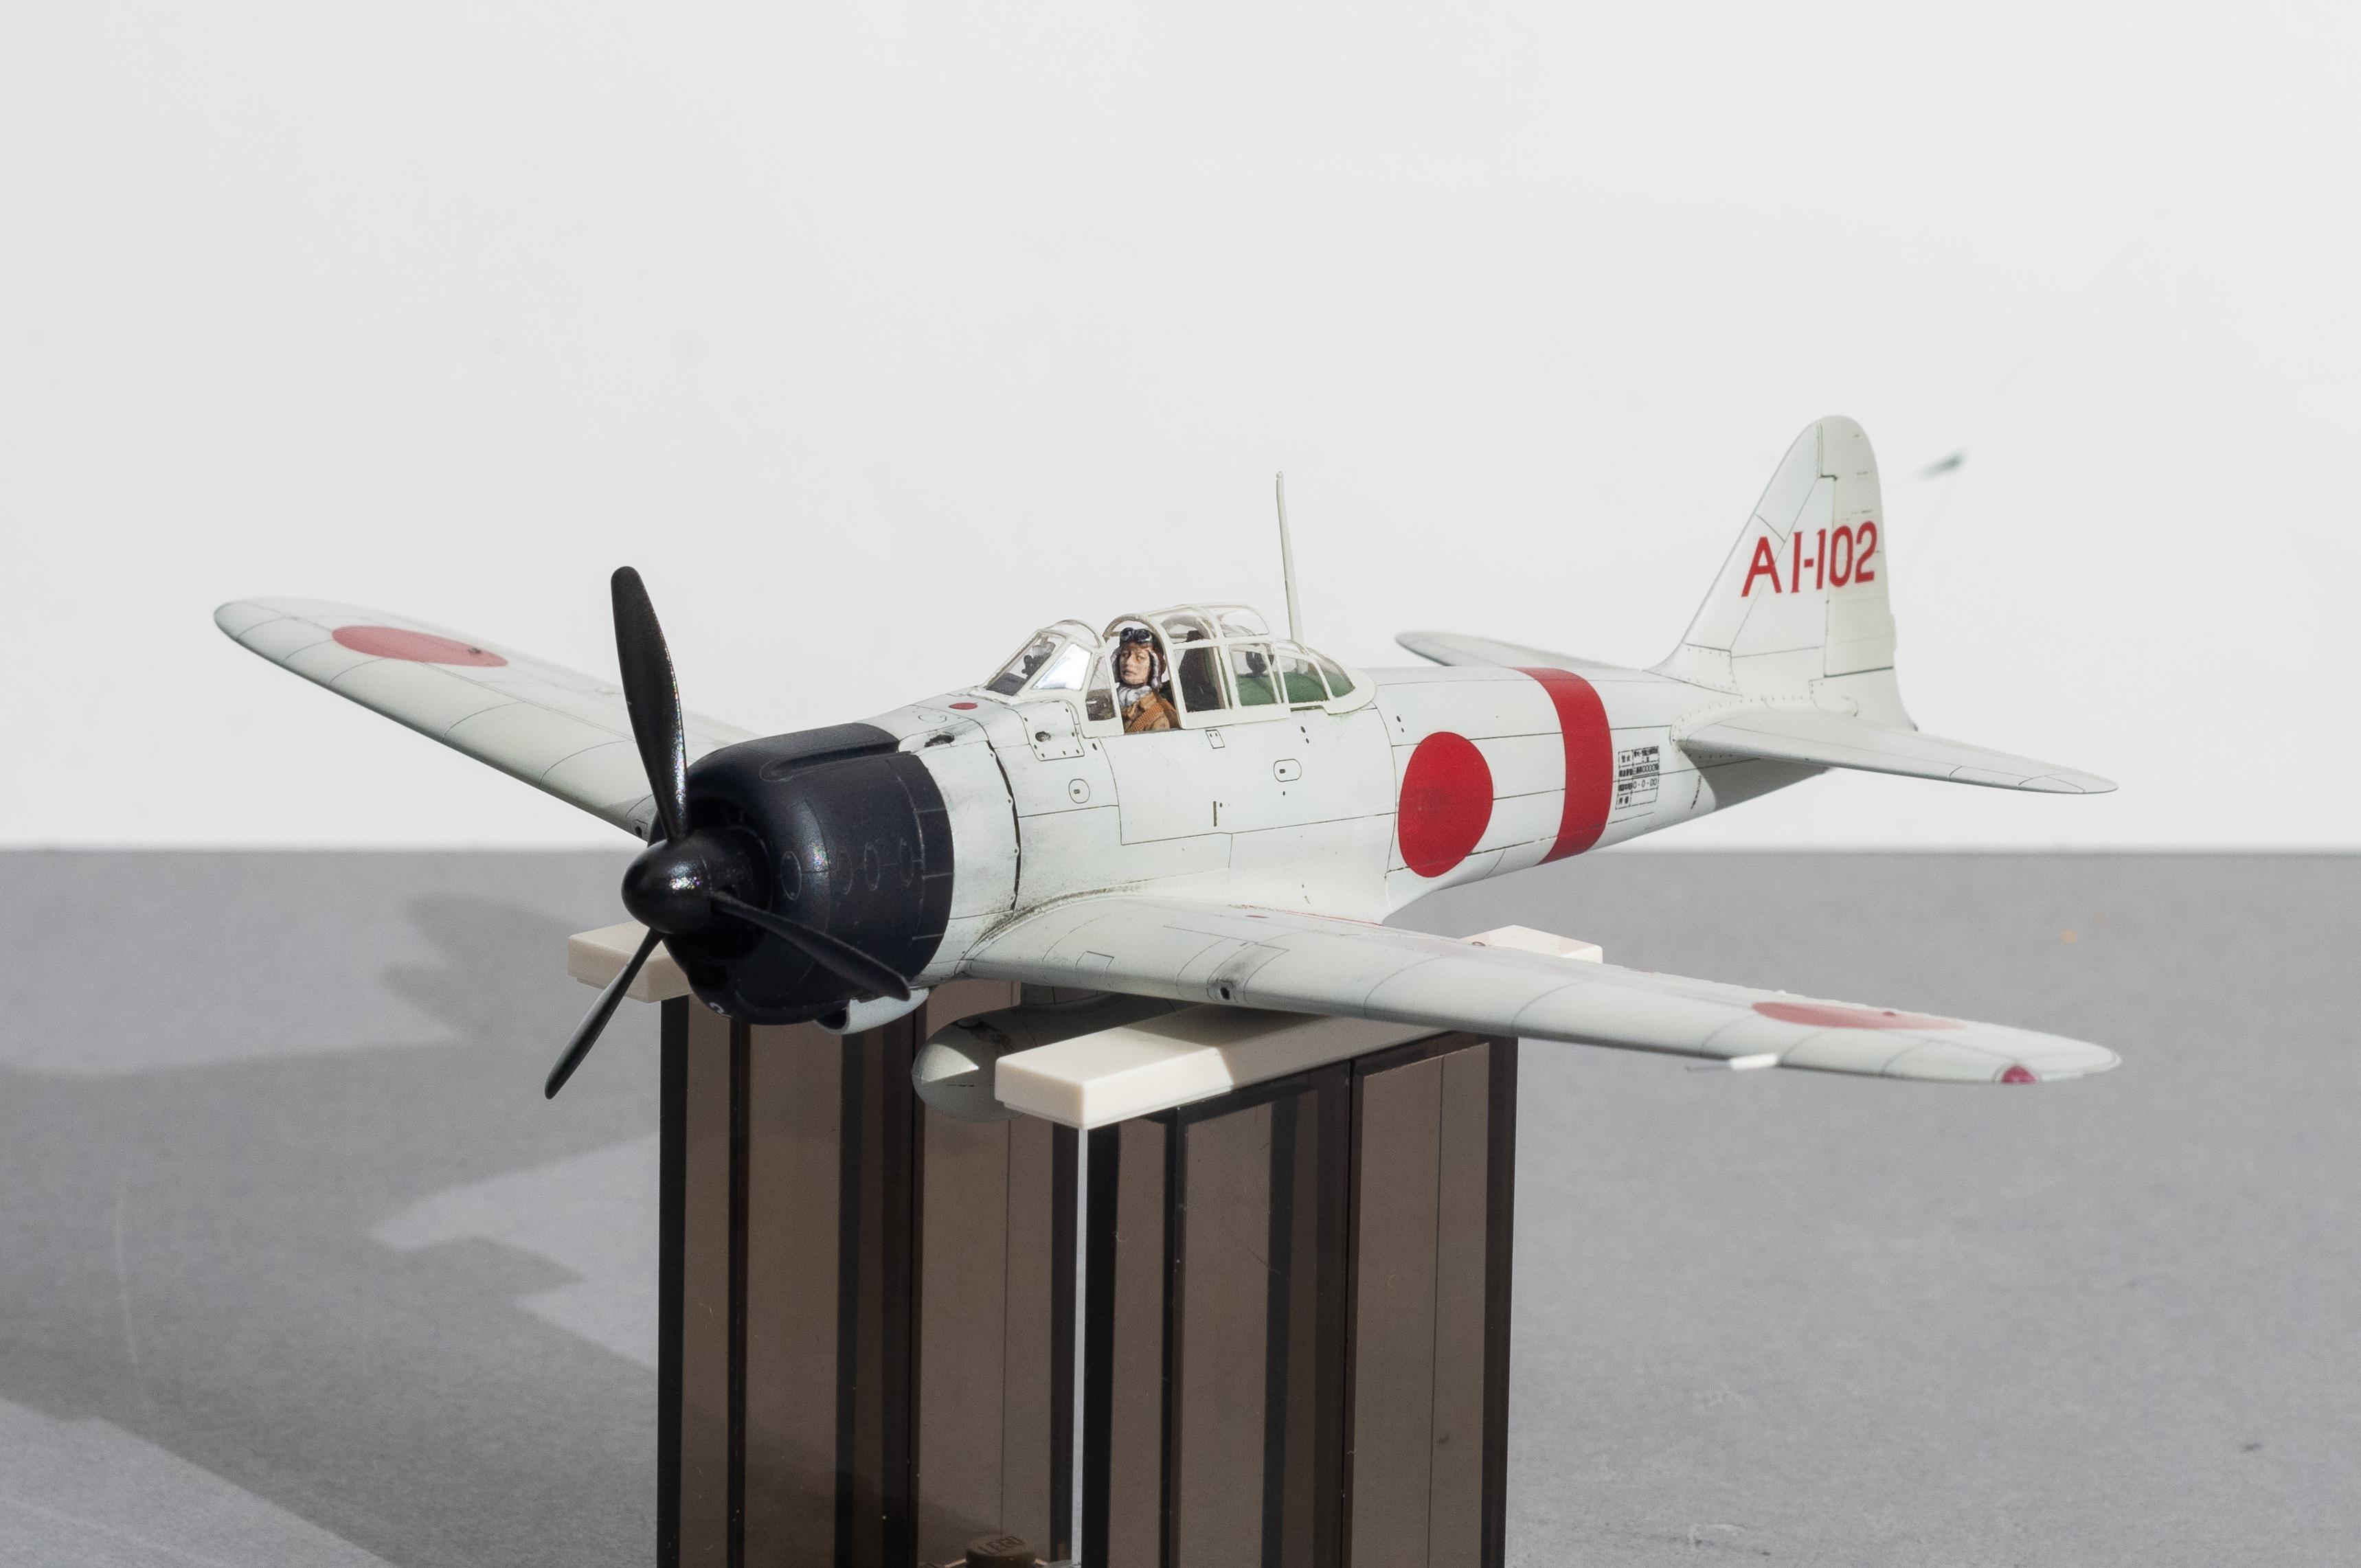
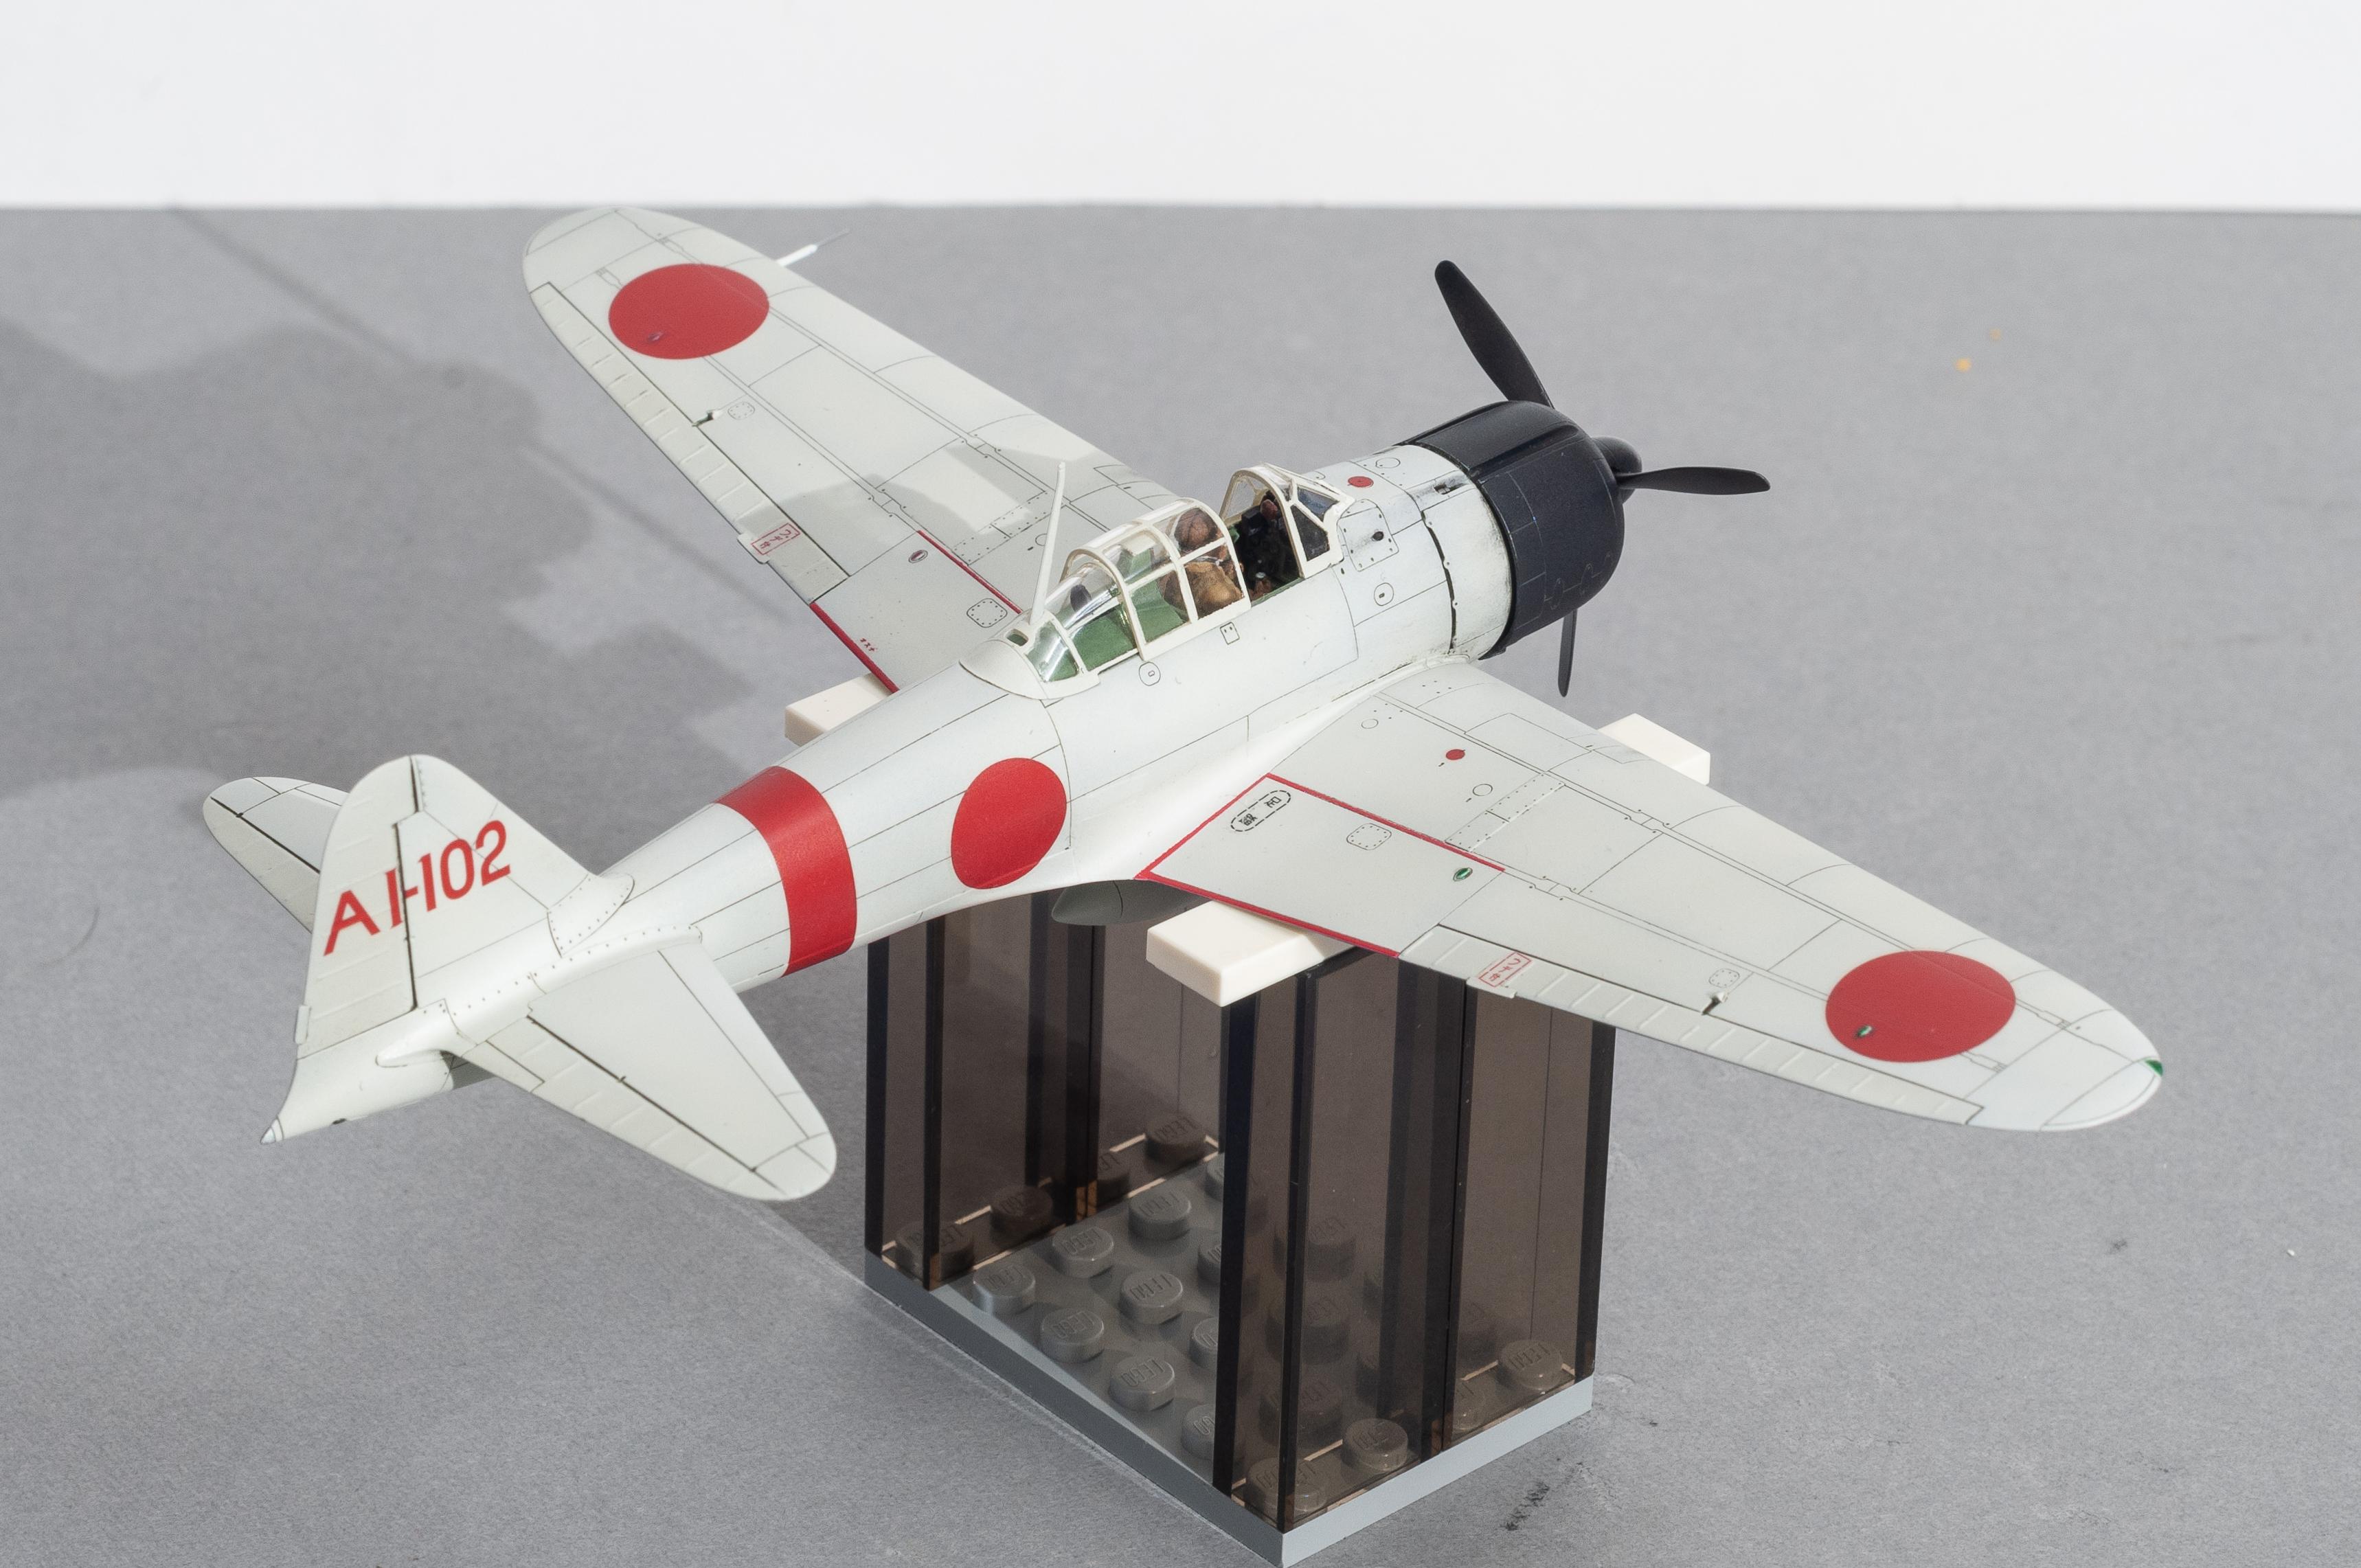
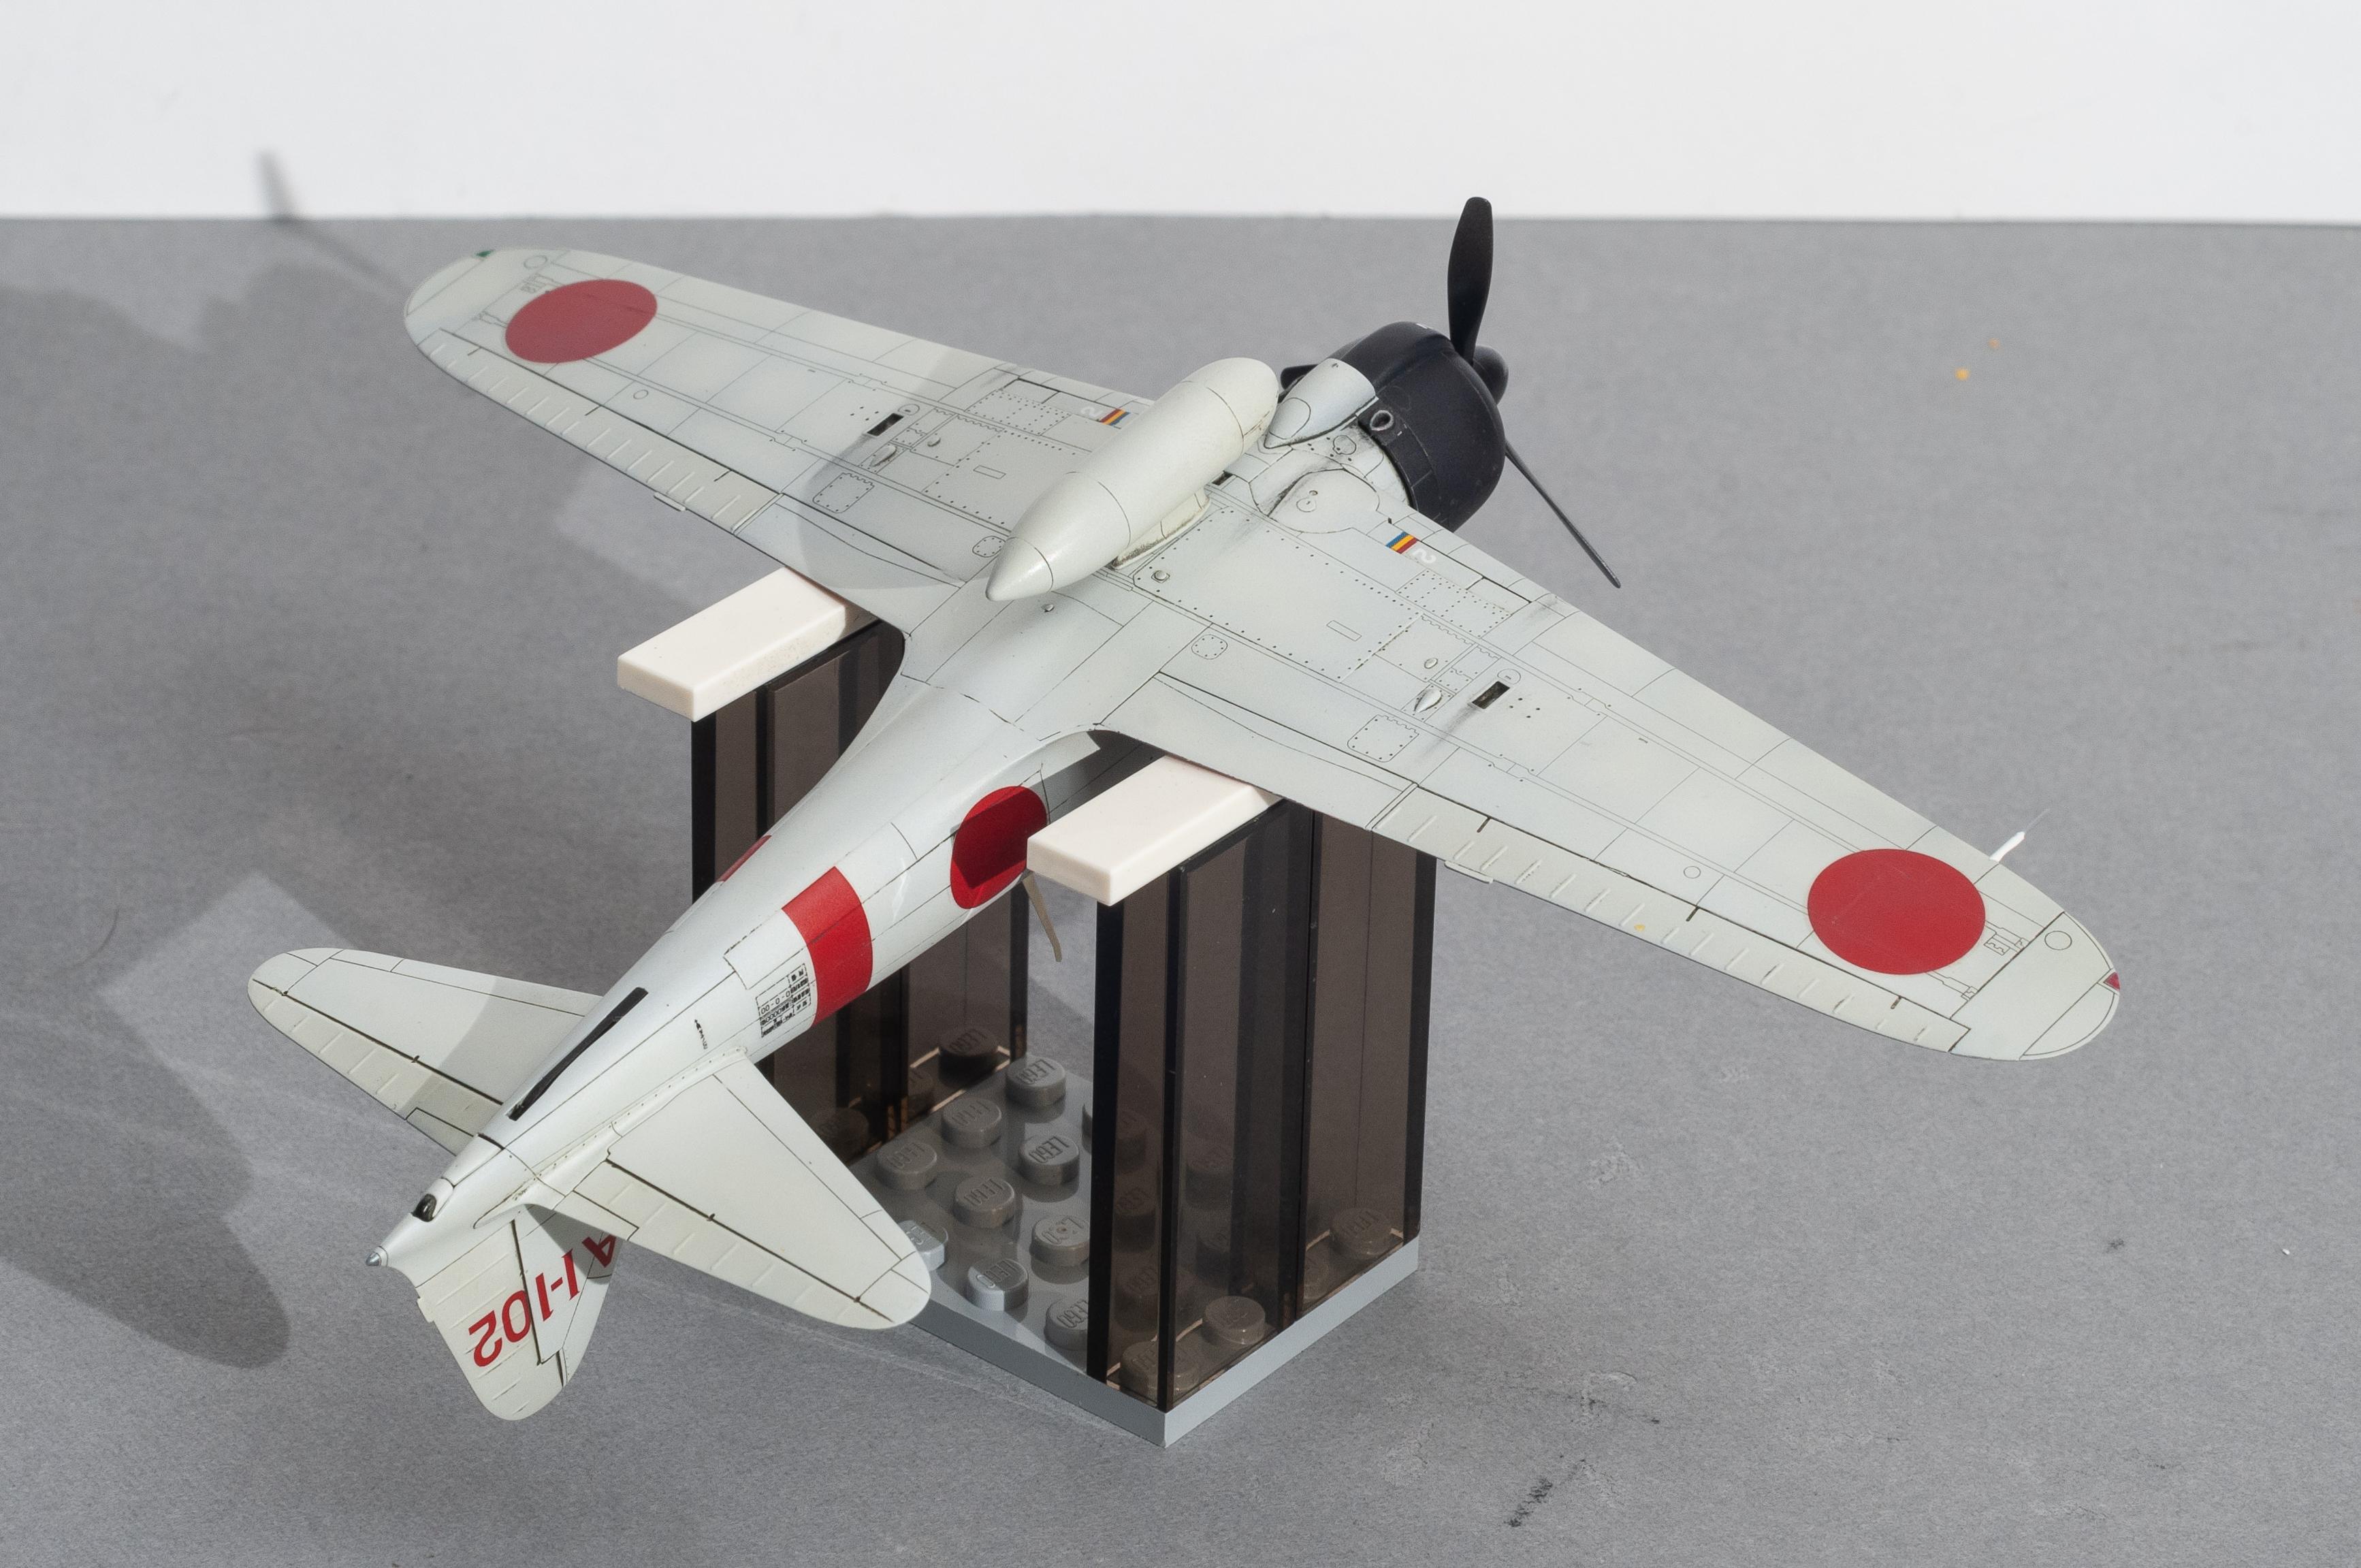
Here are the completed models for the first half of my Final Countdown dogfight build. I did the 1/72 Academy F-14A first, with 3D printed cockpit decals by Quinta Studio, pilot figures by Reedoak, VF-84 decal set by Wolfpack Design, and ordinance by Reskit (the stock ordinance was one of the very few let downs in an otherwise stellar Academy kit). The Tamiya 1/72 A6M-2b Zero was built out of the box with only the addition of a Hasegawa pilot figure from their IJN pilot set. They're both still on a temporary LEGO base until I get the other pair built and come up with a more permanent and dynamic display.

-
Really well done! I'd love to do a complete Red Squadron one day, but for the moment I'll have to be happy with just Red 5.
-
That's an amazing build! One of these days I'd love to tackle a 1/350 aircraft carrier, but that's a whole other class of modeling.
-
That's a great build of one of the most beautiful aircraft ever created. The Air Legends Foundation recently completed a restoration on a C-121A and made it flight worthy again. It's an incredible sight to behold. https://youtu.be/GCZLfDFLhJI?feature=shared
-
Really nice job on your Hawk! I've got a 1/72 Eagle that's in bench purgatory while I design 3D printed hyper detail parts for it and figure out lighting.
-
Thanks! Yeah, it's definitely a beautiful aircraft. There isn't a bad angle or line on it, IMO. Thanks! He definitely loves it, although there was a little drama when presents arrived. We got his sisters a bunch of Barbie stuff that went in one box and the model and some other gifts went in a separate box. The box with the model got stuck somewhere in the bowels of the USPS and didn't arrive until after Christmas, so there was only the Barbie stuff when they opened presents. All was made better when it finally did arrive though. ?
-
Thanks! This is definitely an advanced build and I'm really stretching my skills. It's the first kit I've done lighting on and the first time I've done anything with Arduino or addressable LEDs. I'd say if you want to get your feet wet in sci-fi start with some of the Bandai Star Wars options. Their kits area all immaculately engineered and executed and can produce amazing results. Some of the newer Round 2 Star Trek offerings are very nice as well. People speak pretty highly of the 1/1000 Discovery Enterprise (although I haven't seen it in person or built it). The older Star Trek kits can be hit or miss, with some of them being nice and some of them being complete nightmares (the 1/537 Refit Enterprise is particularly horribad).
-
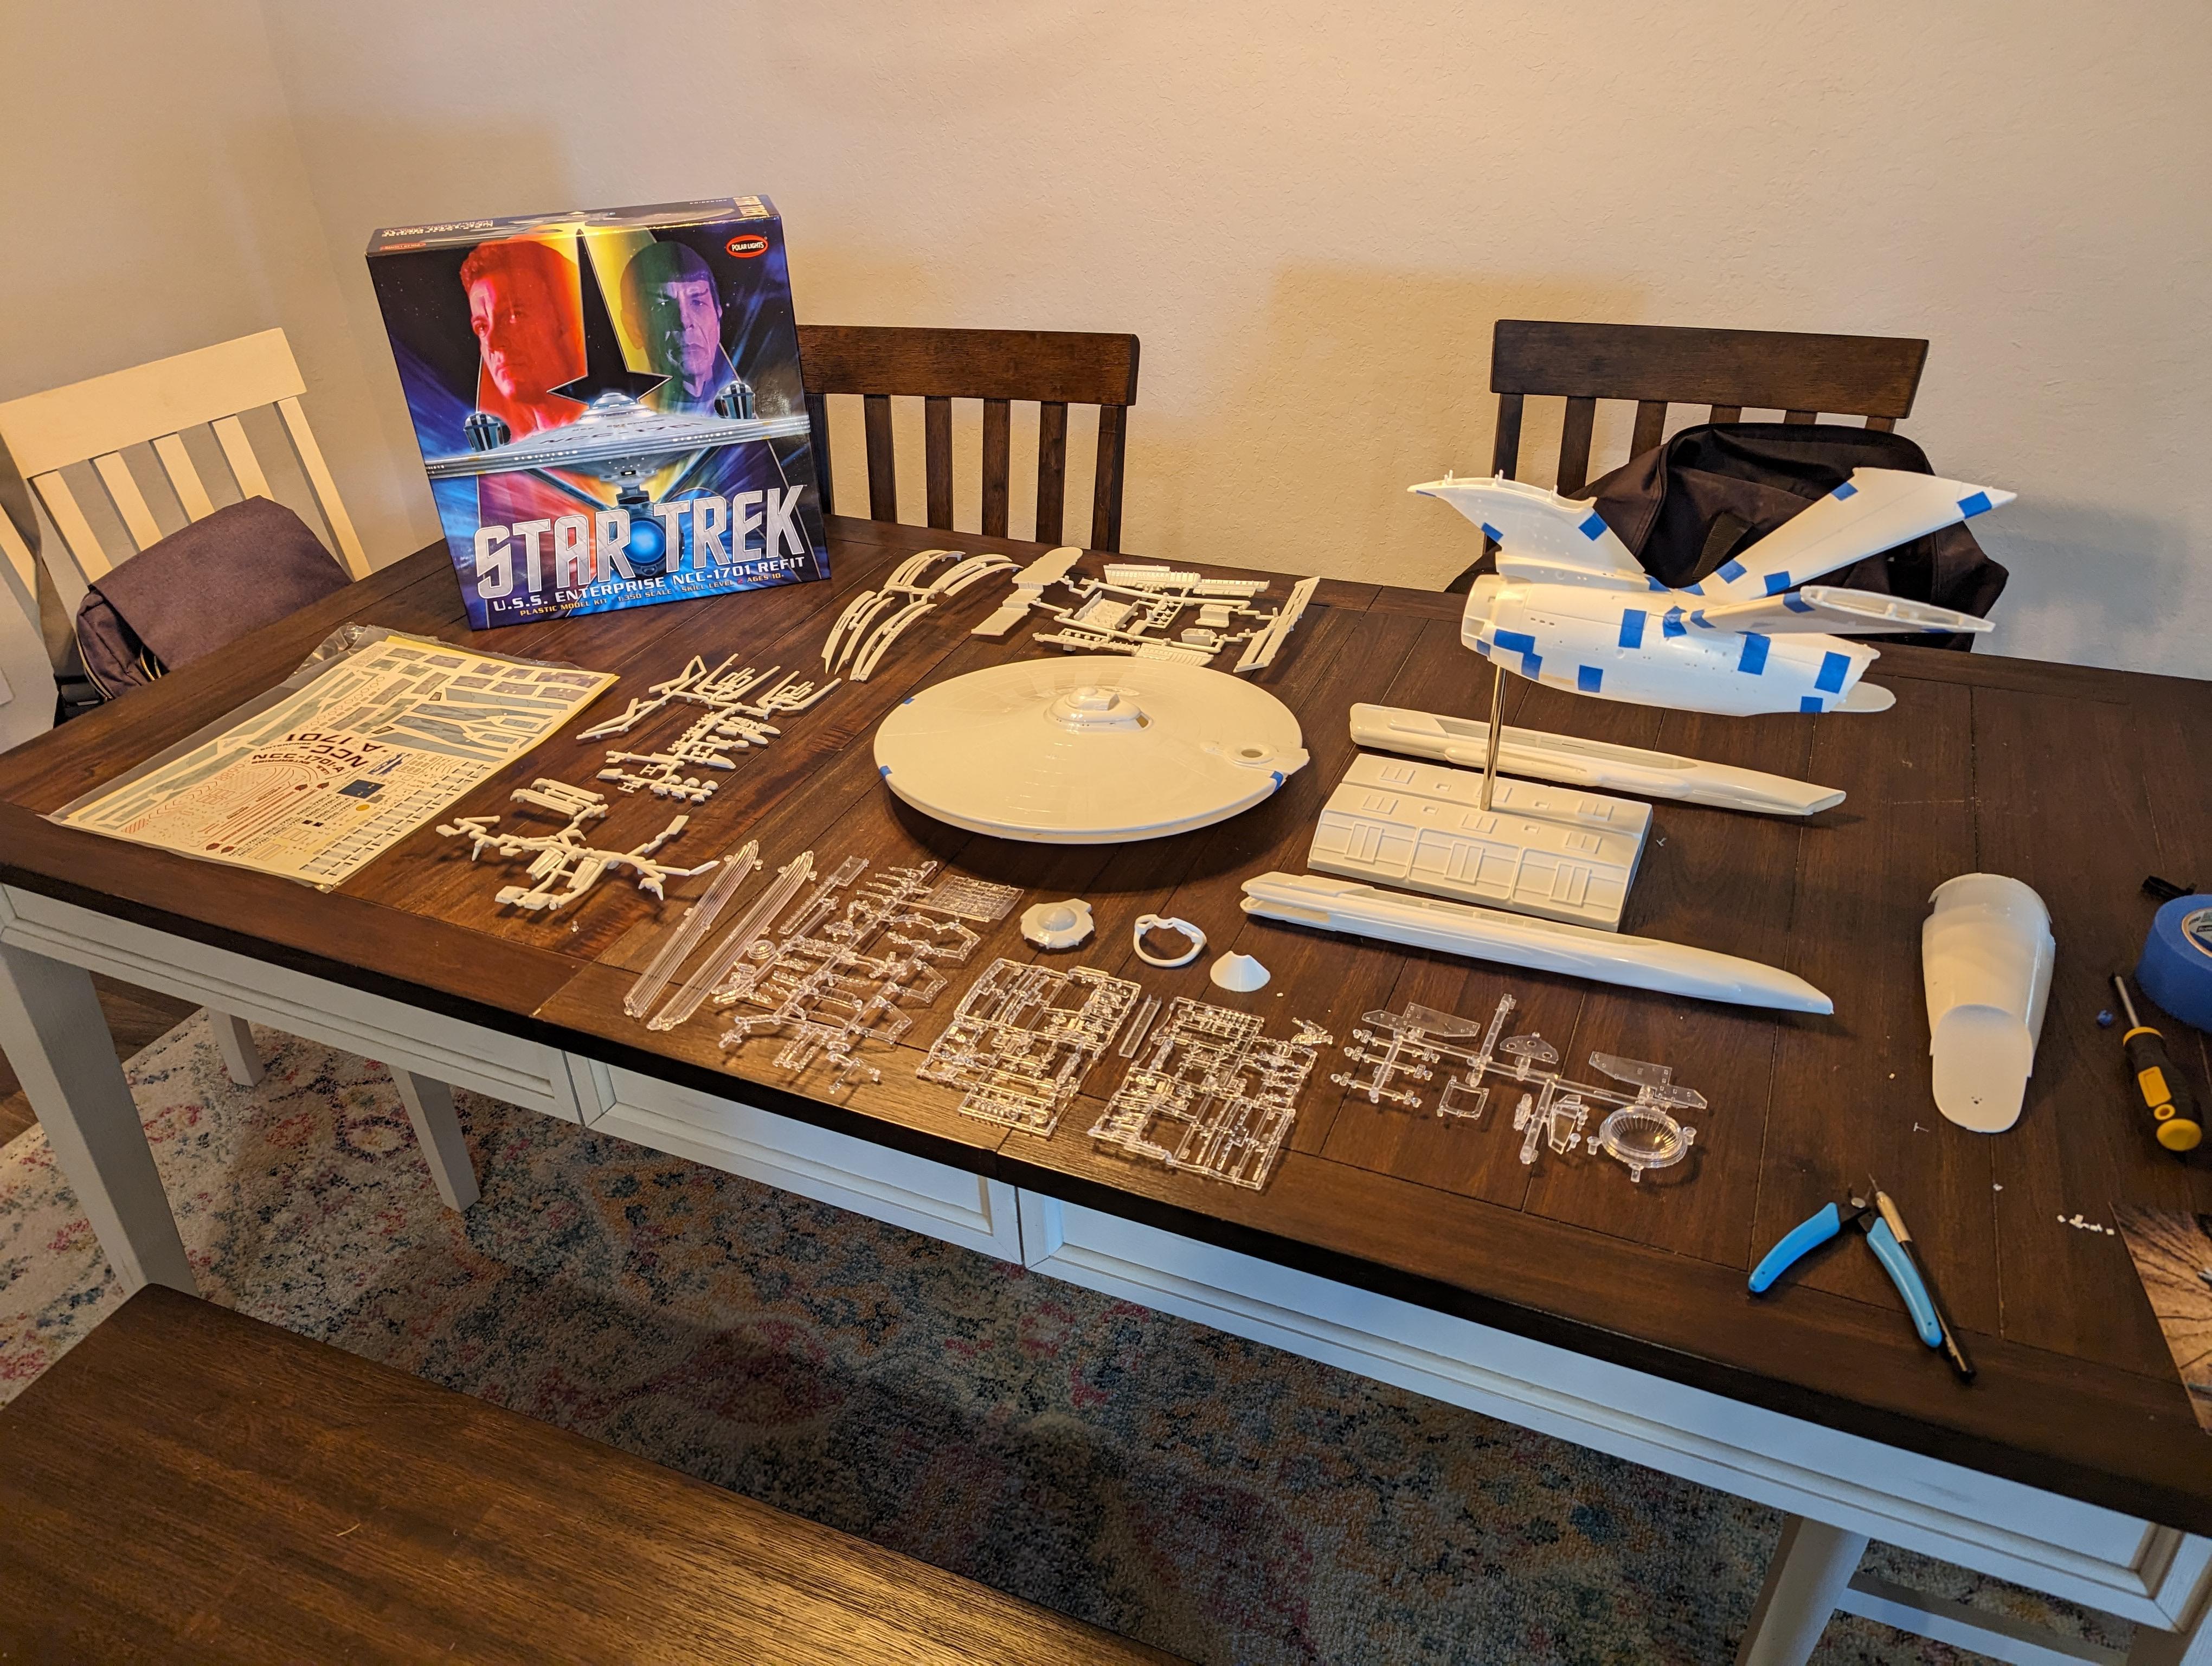
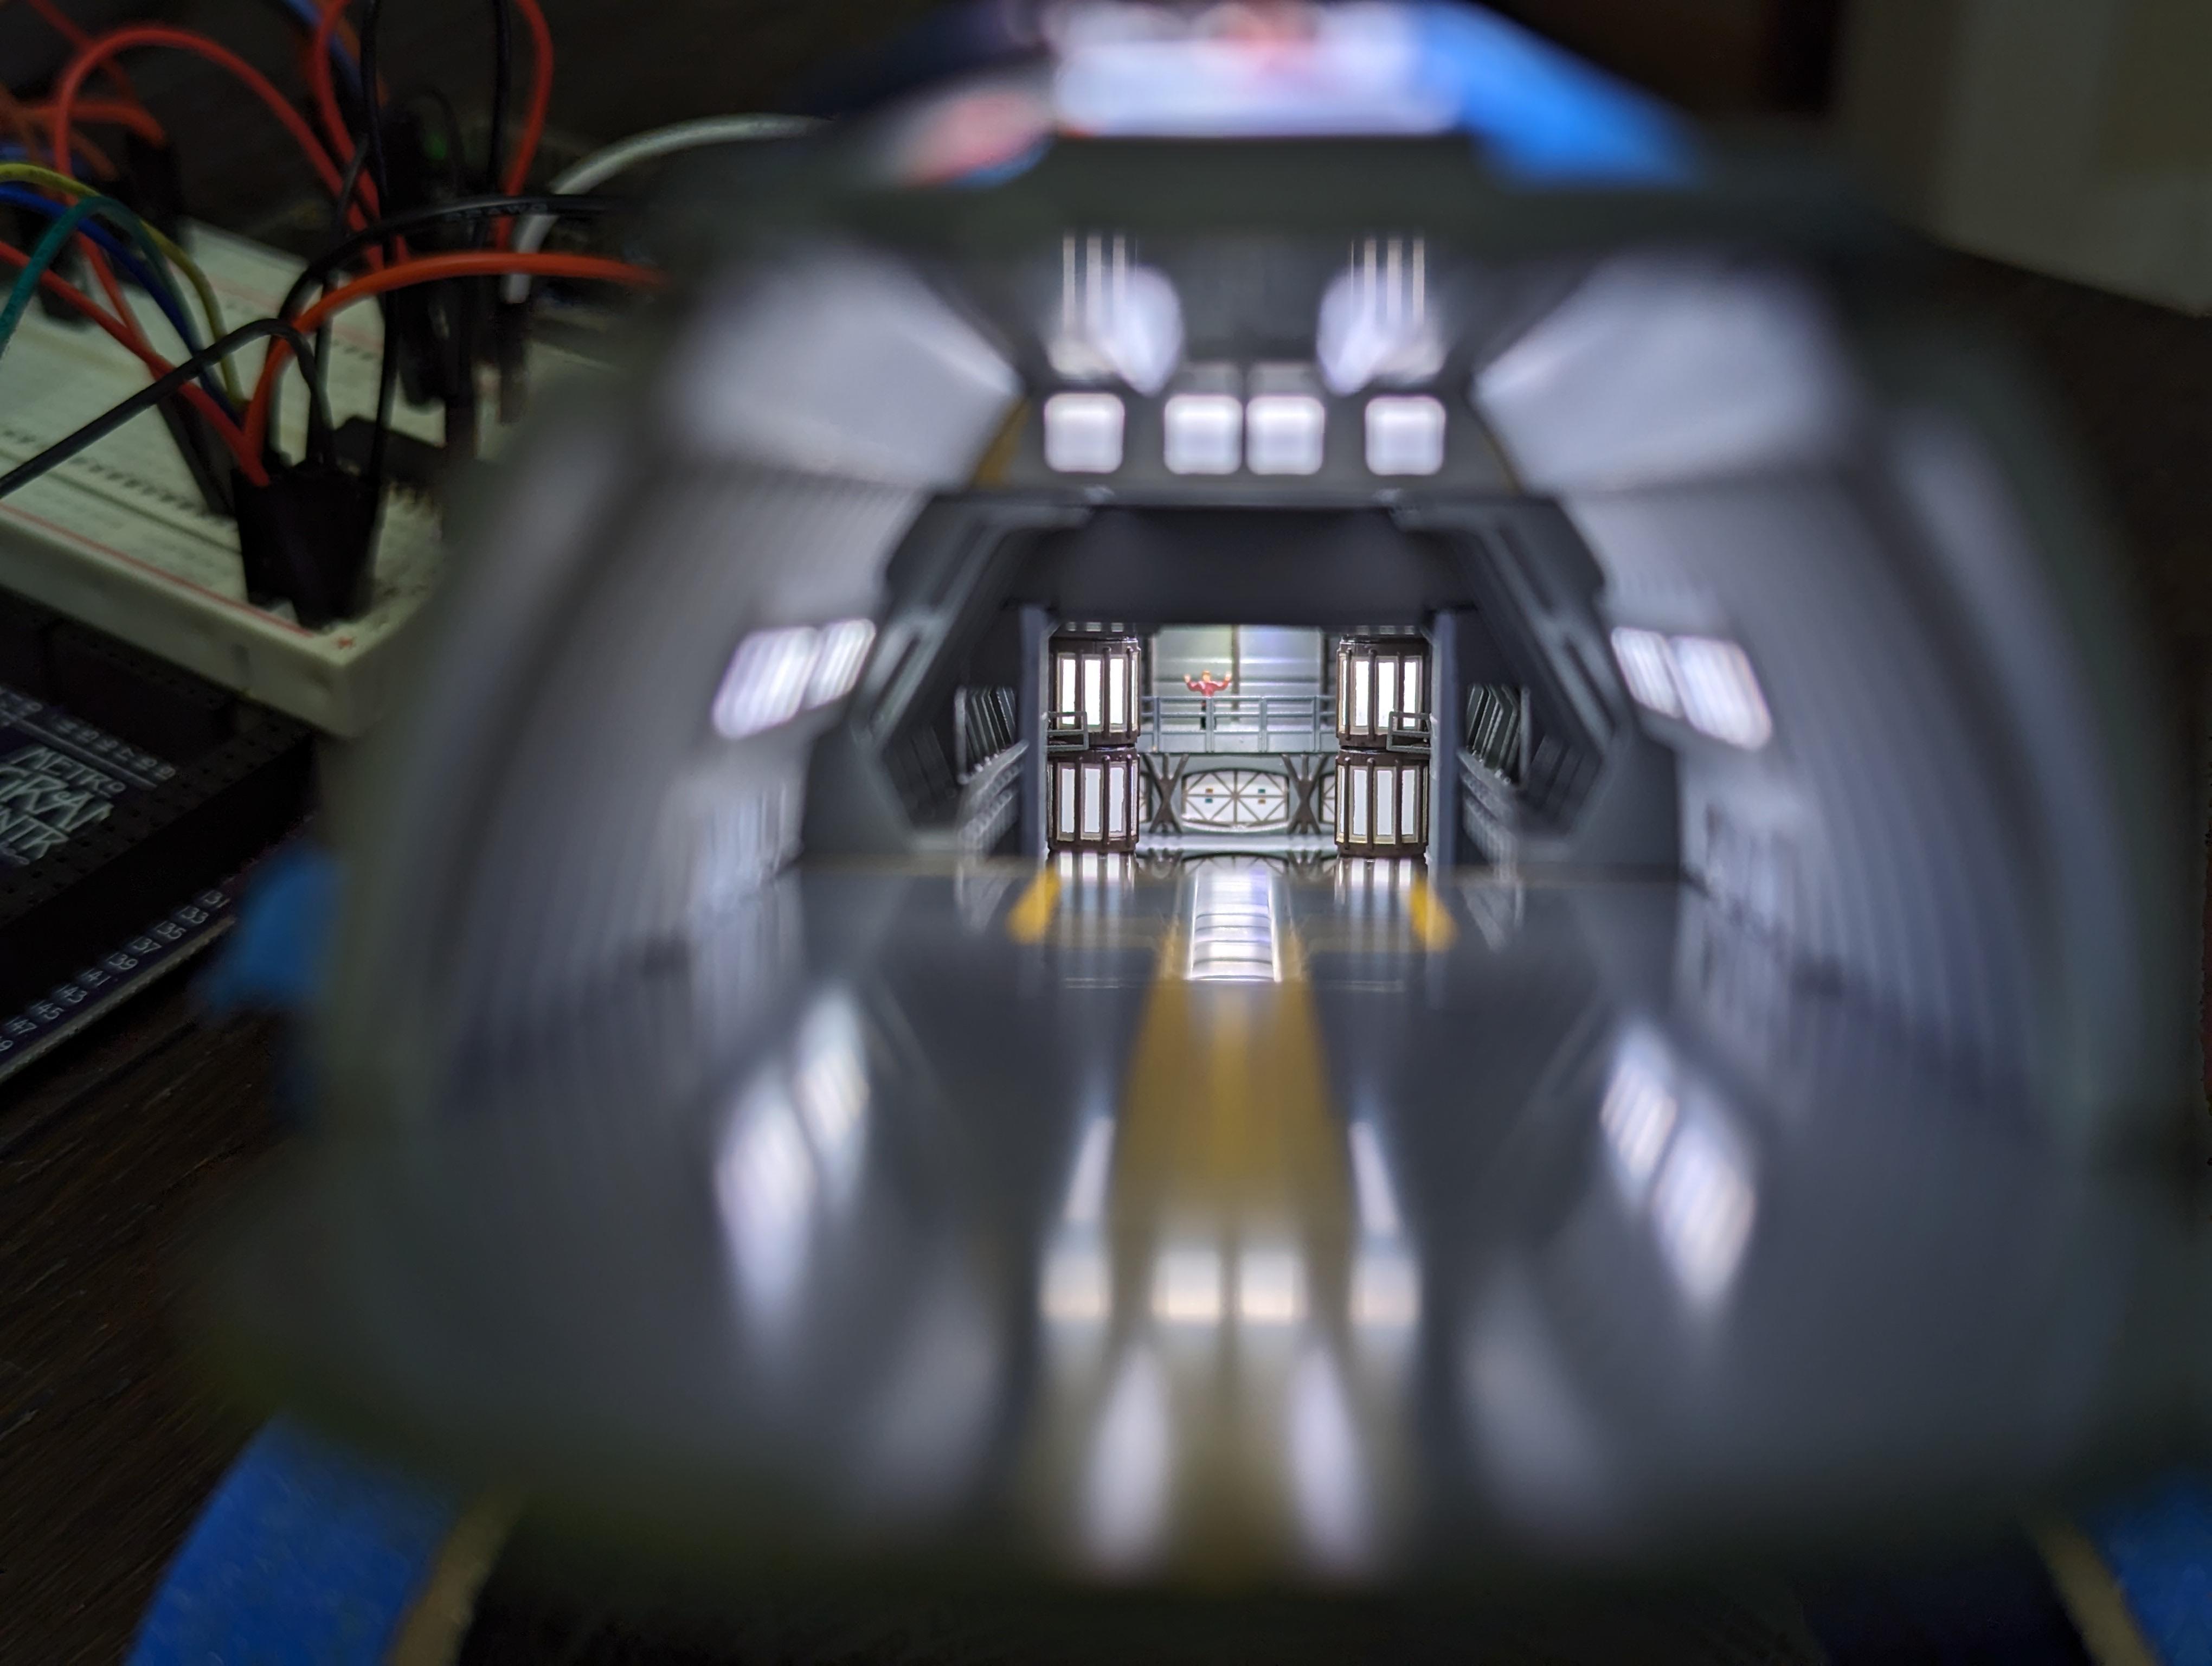
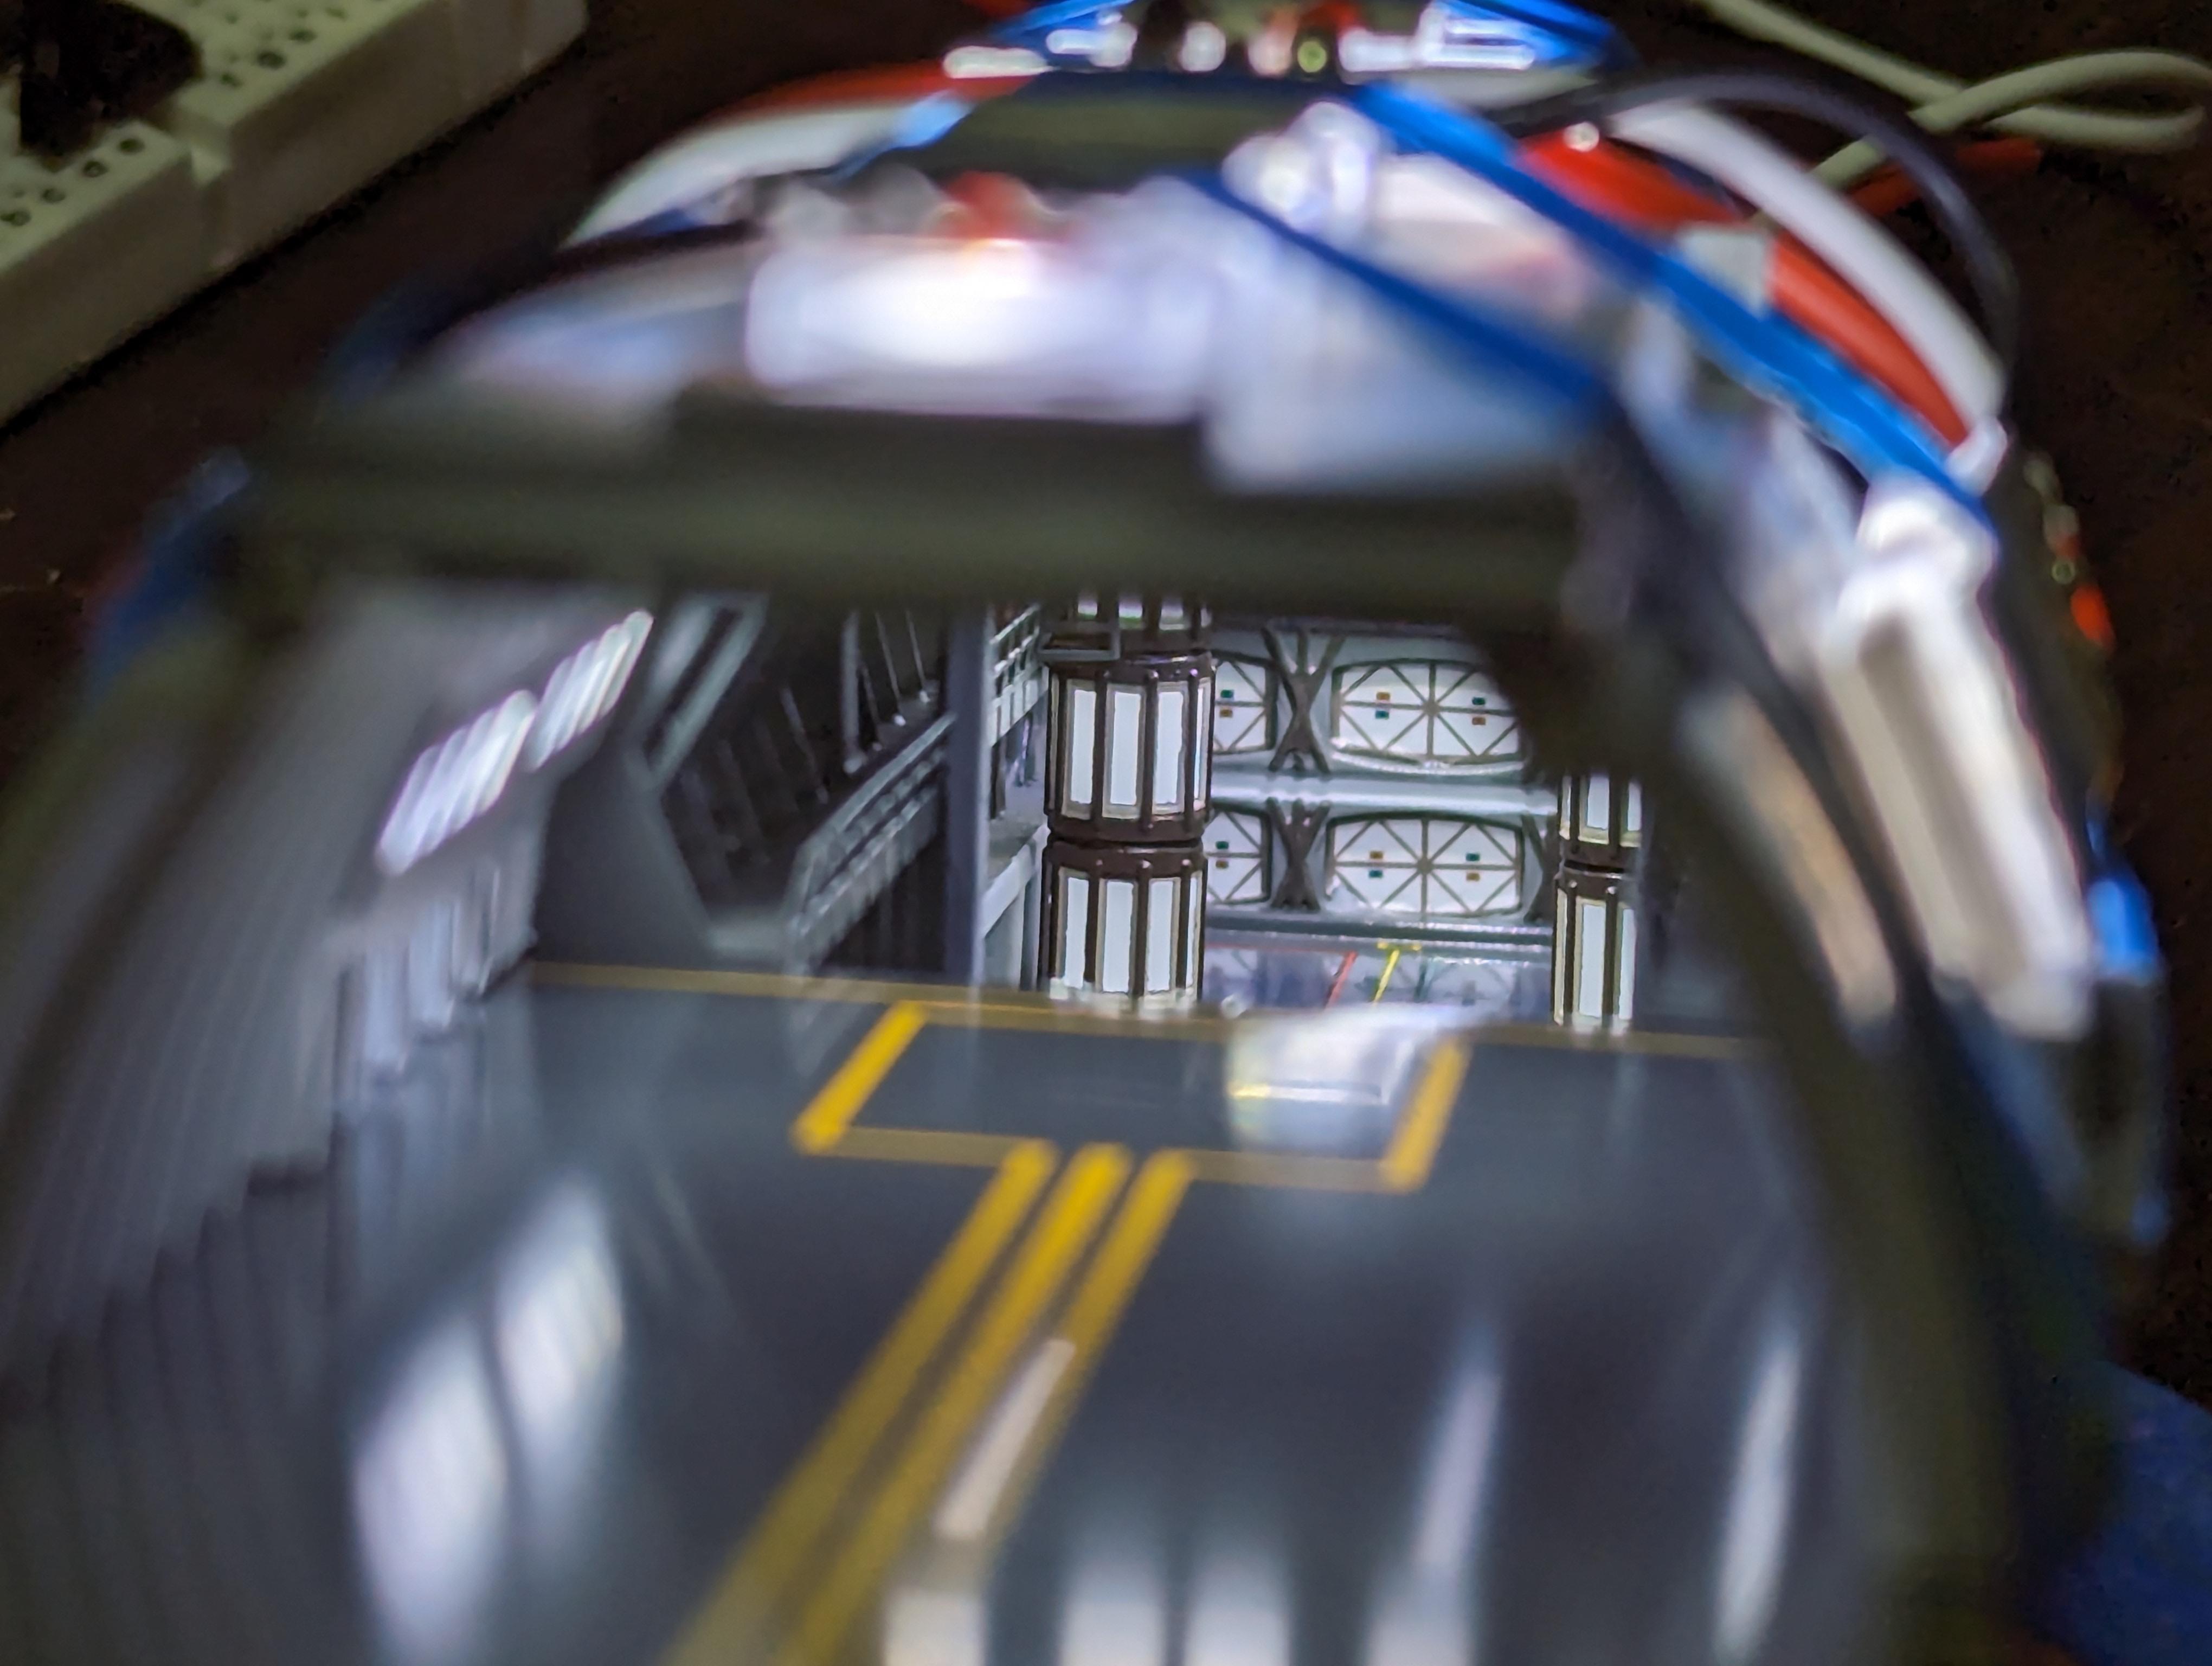
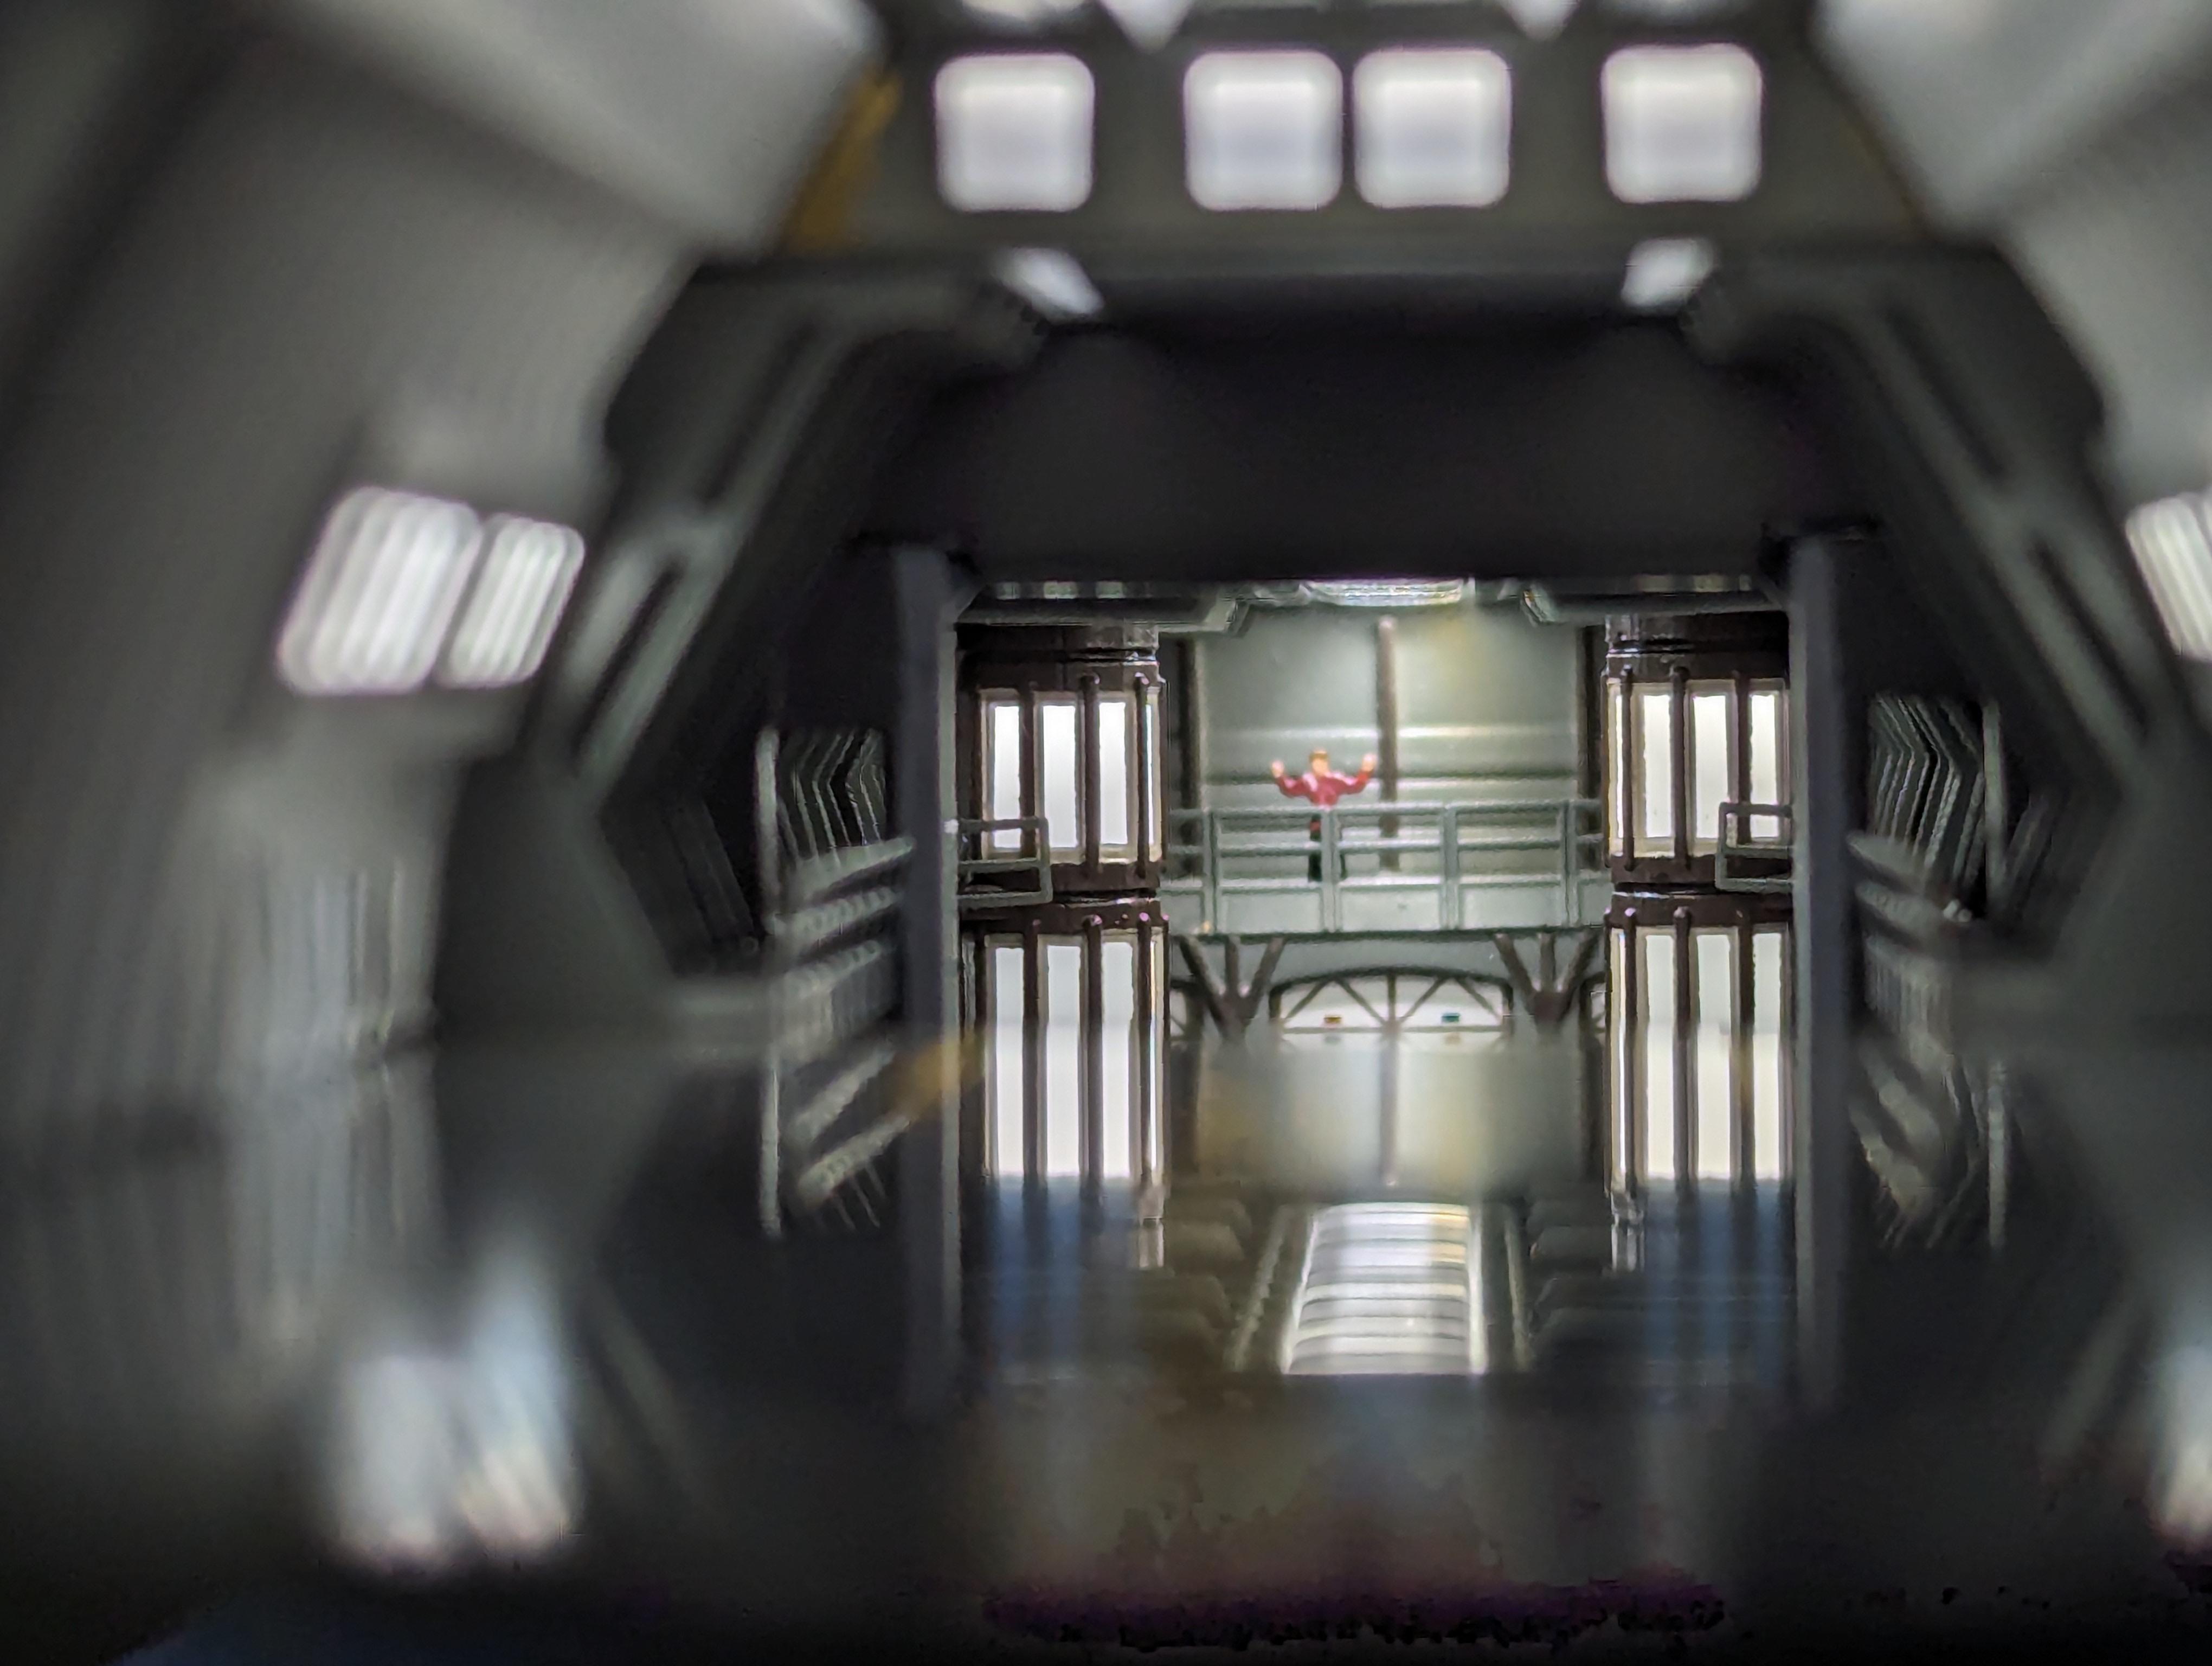
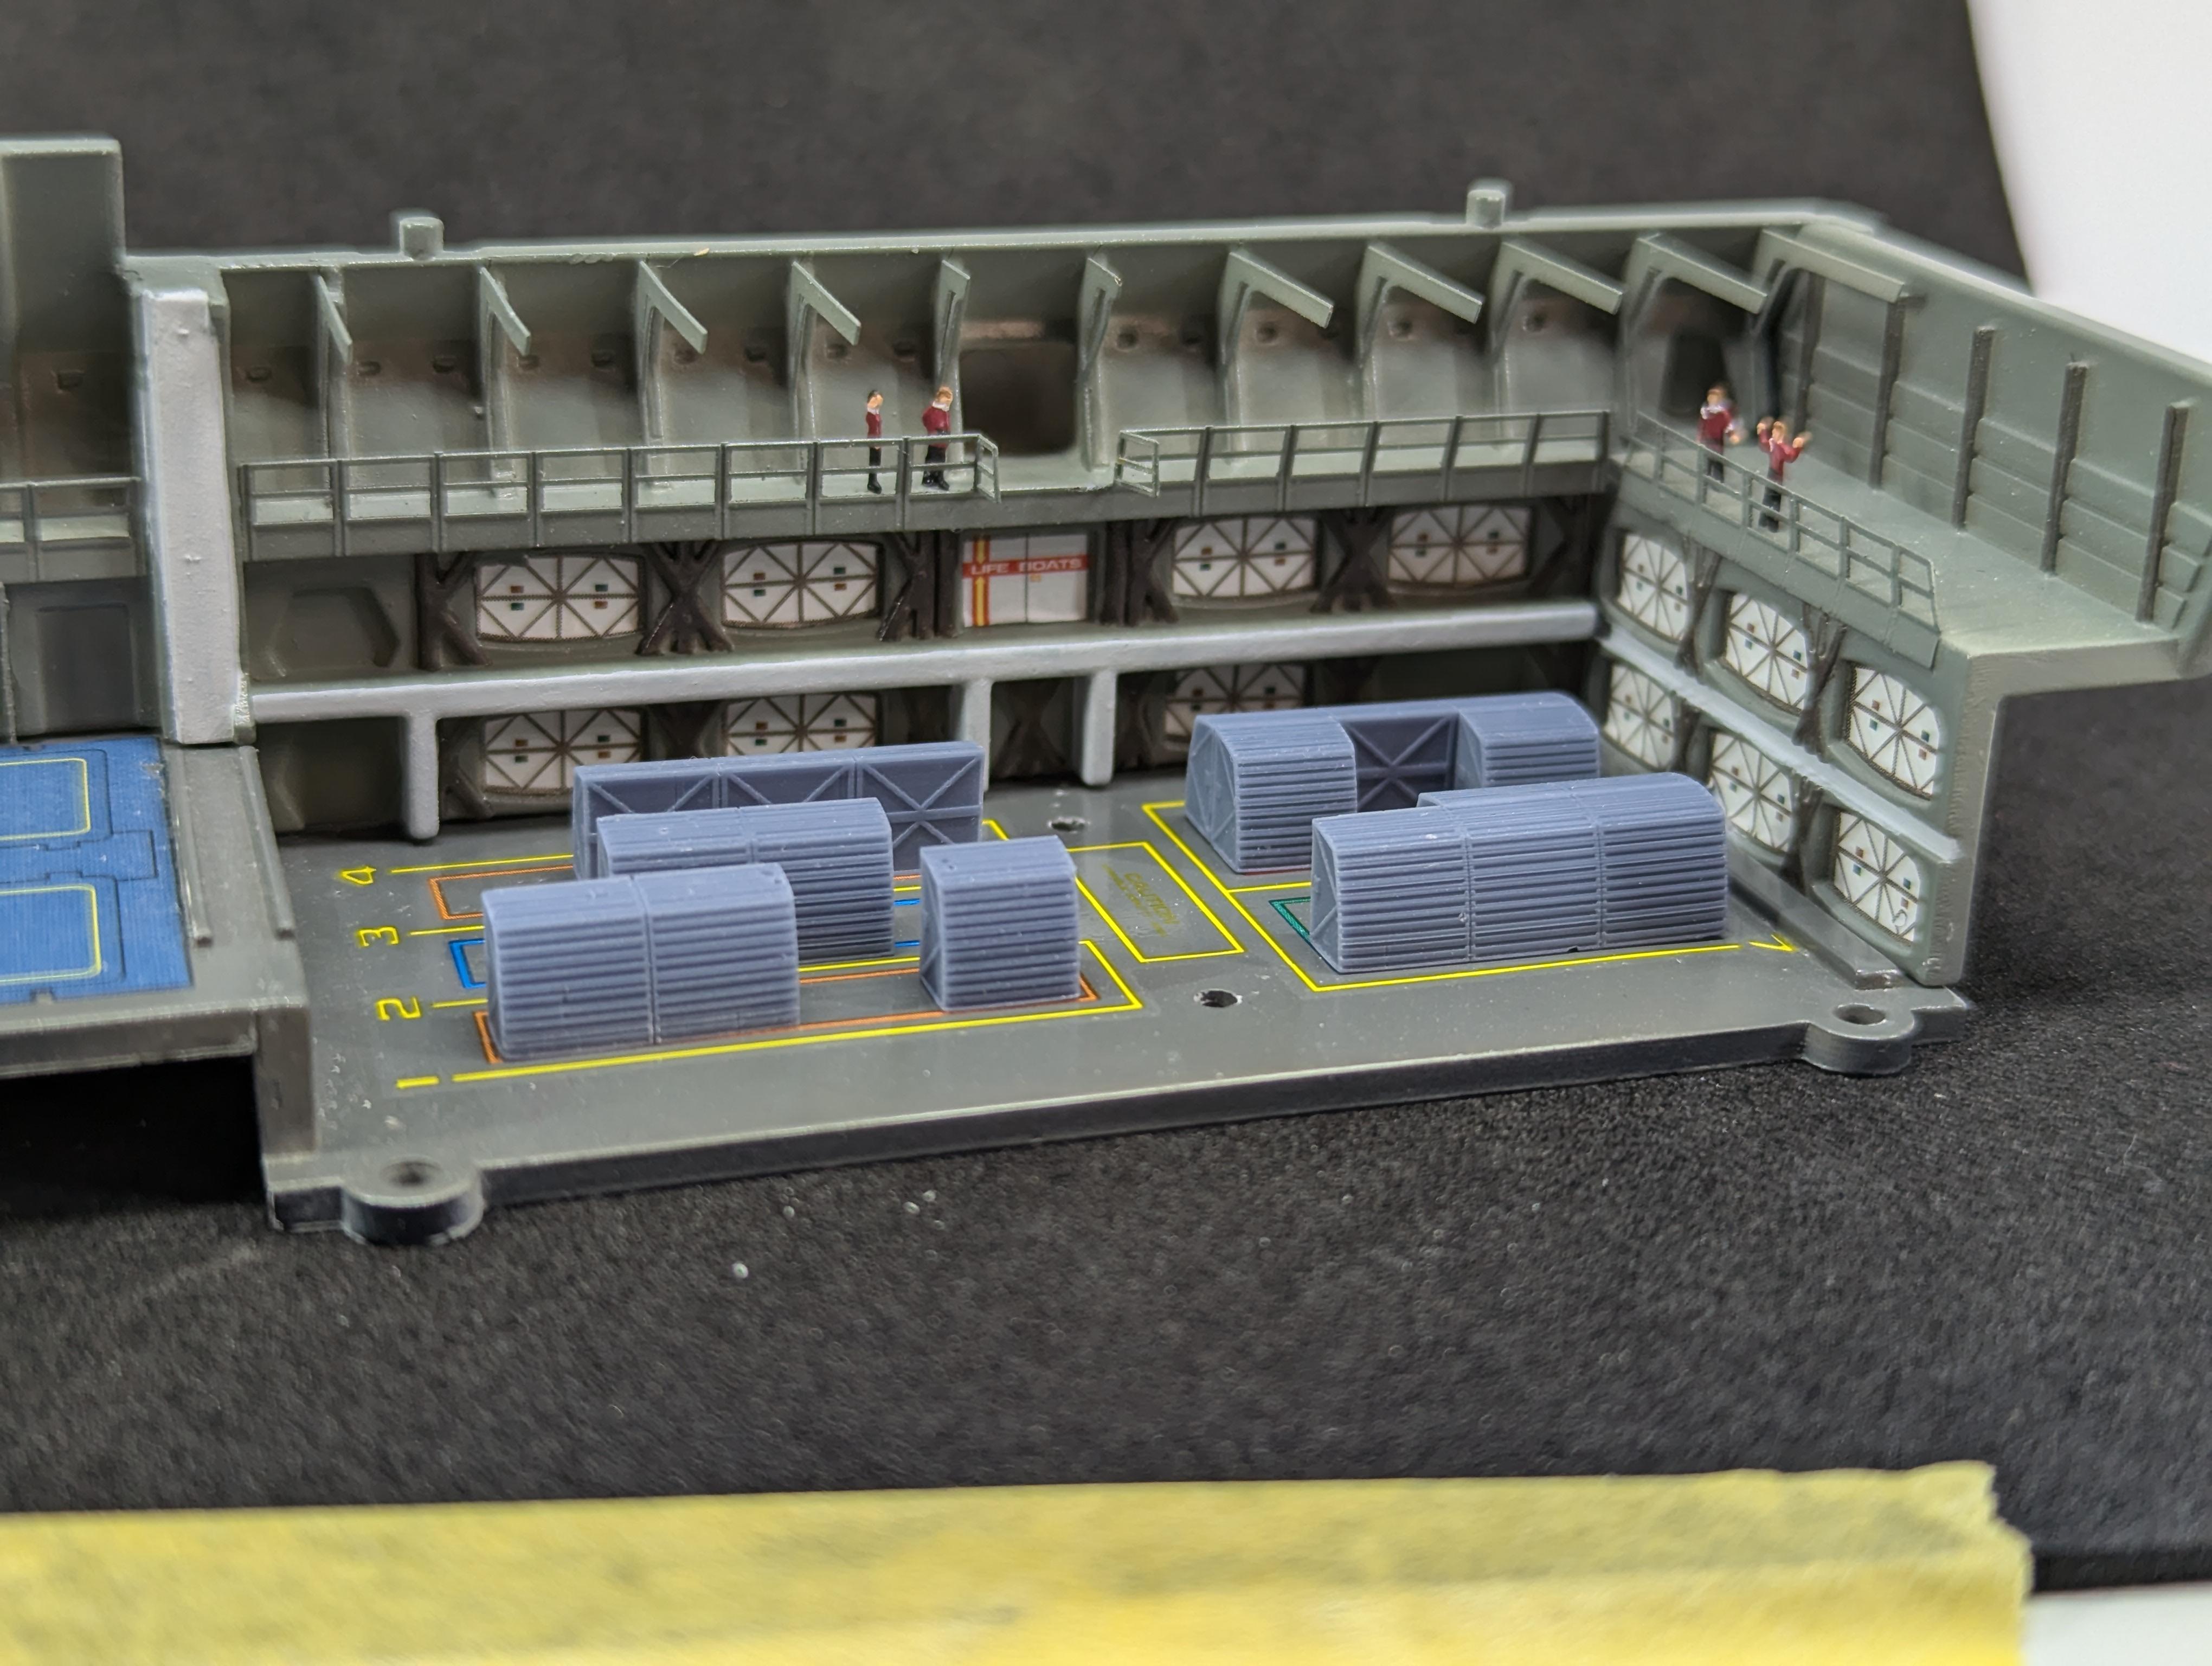
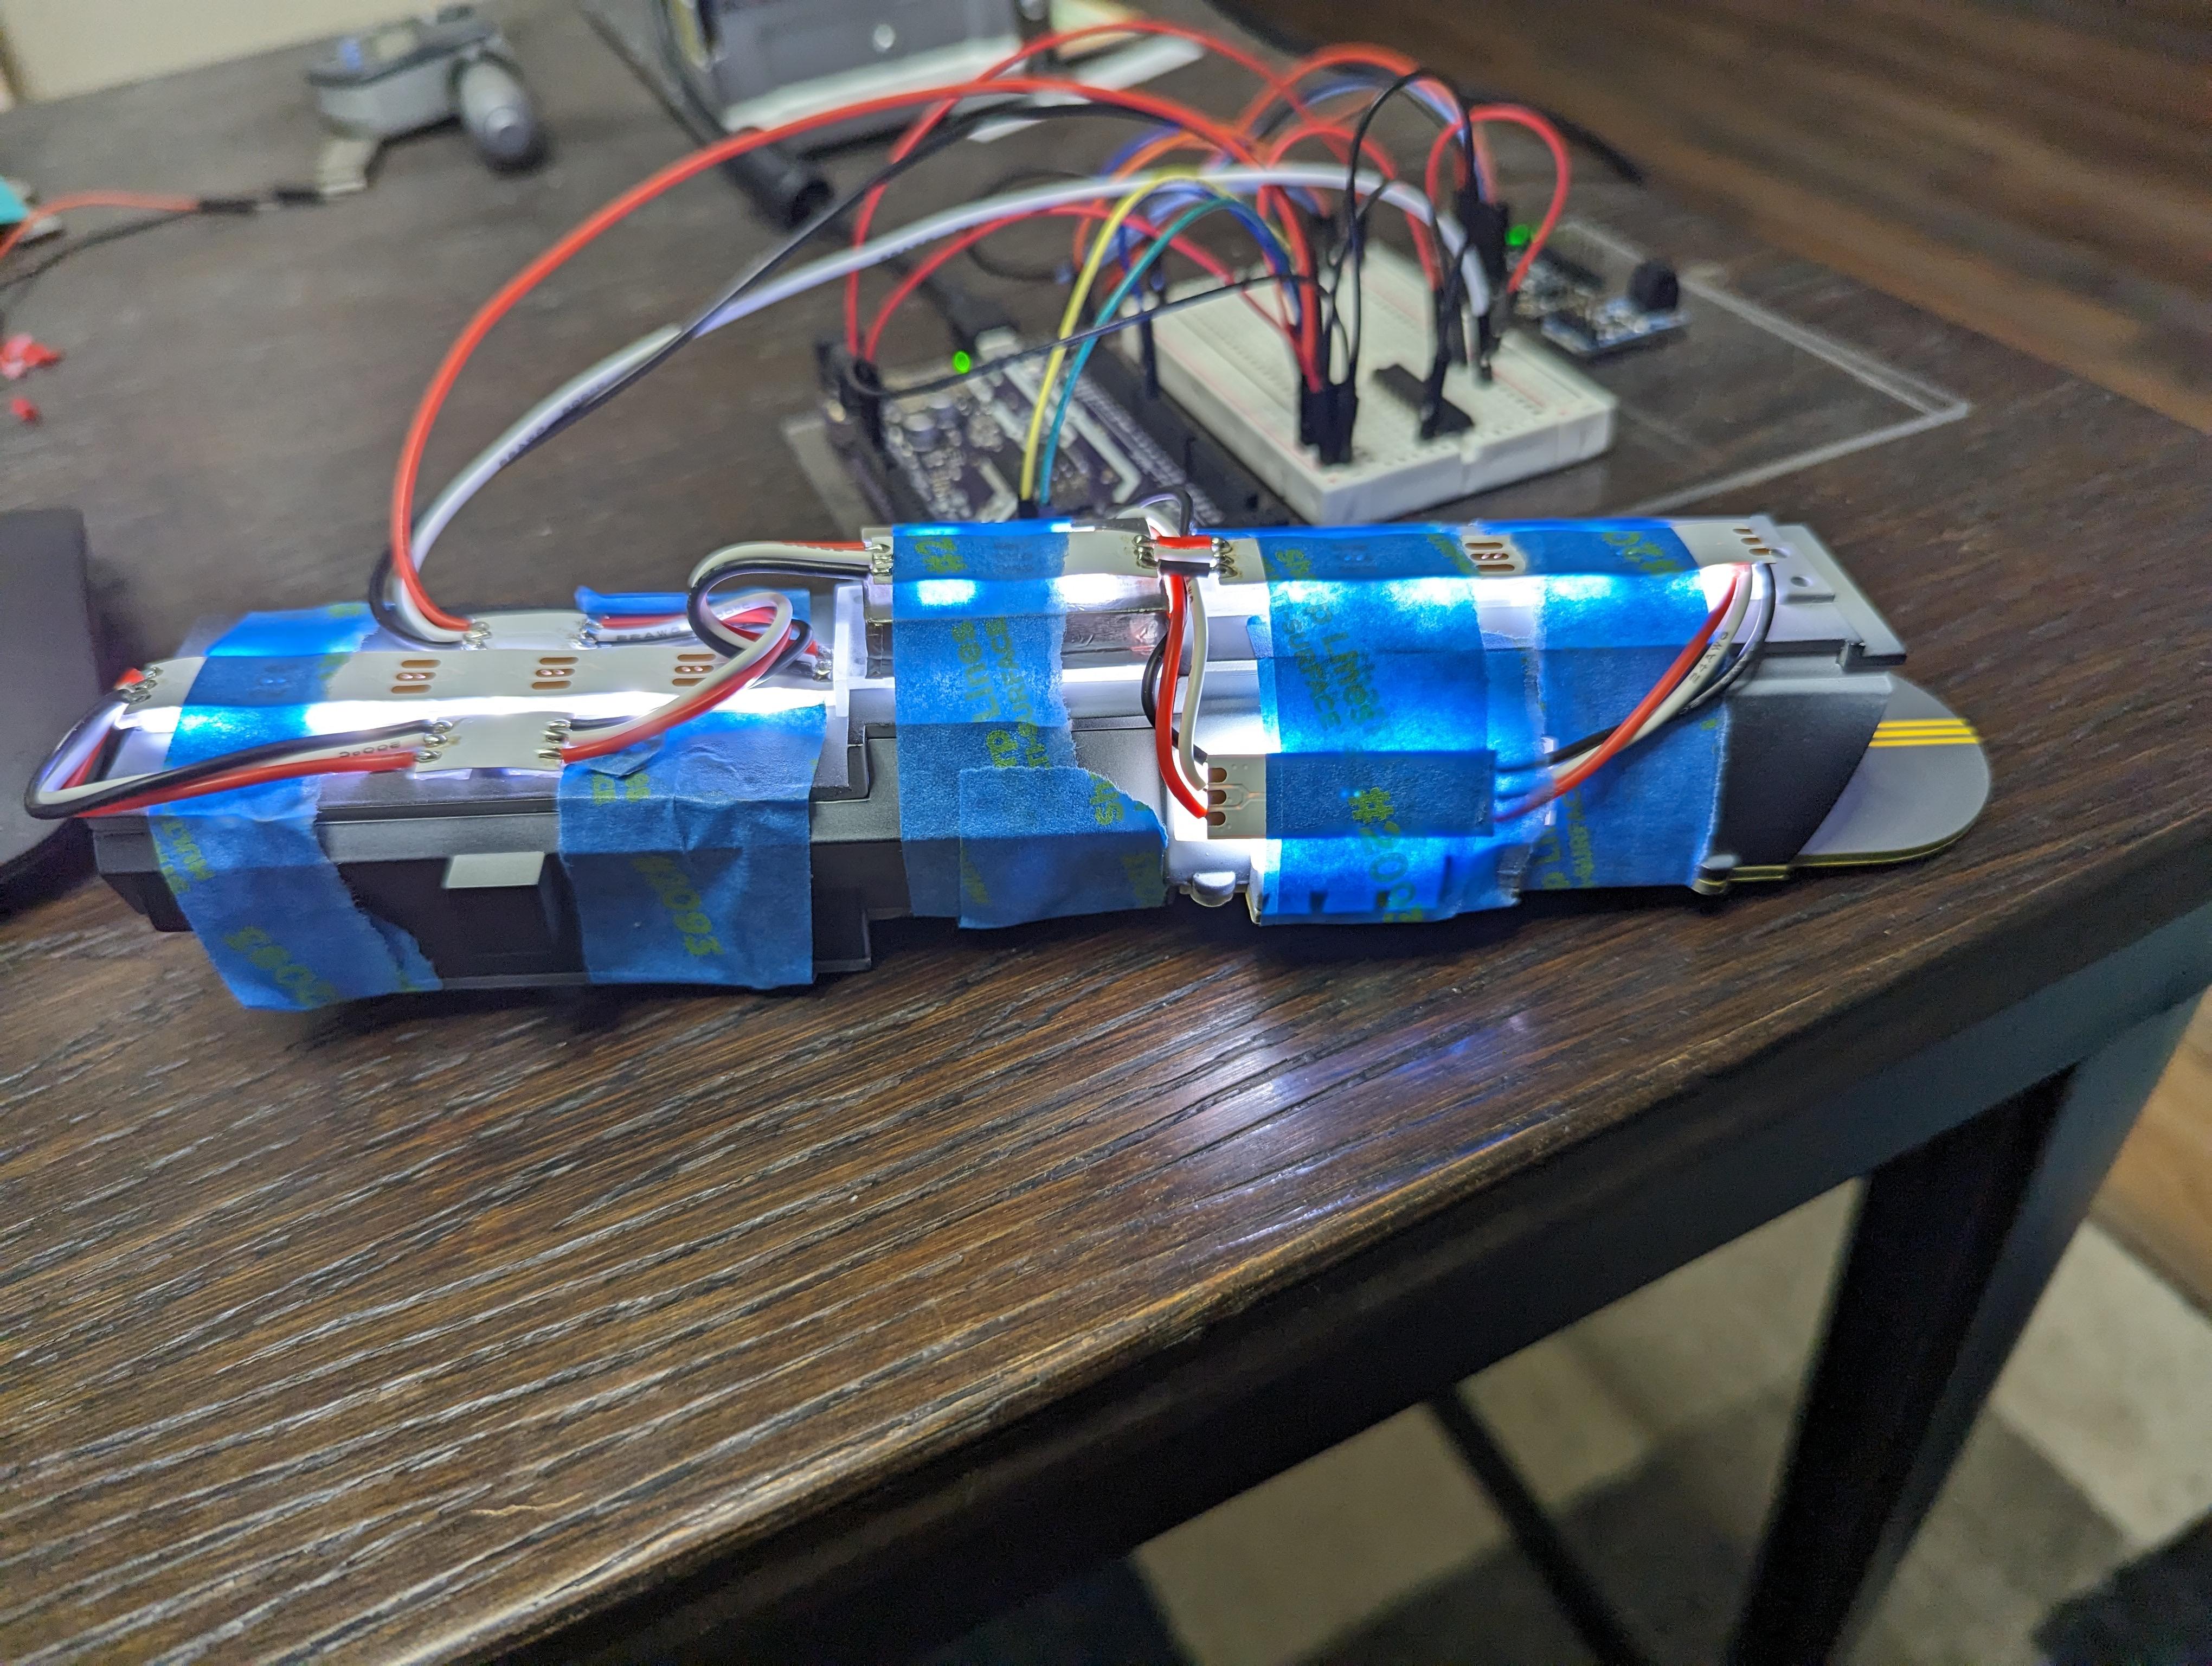
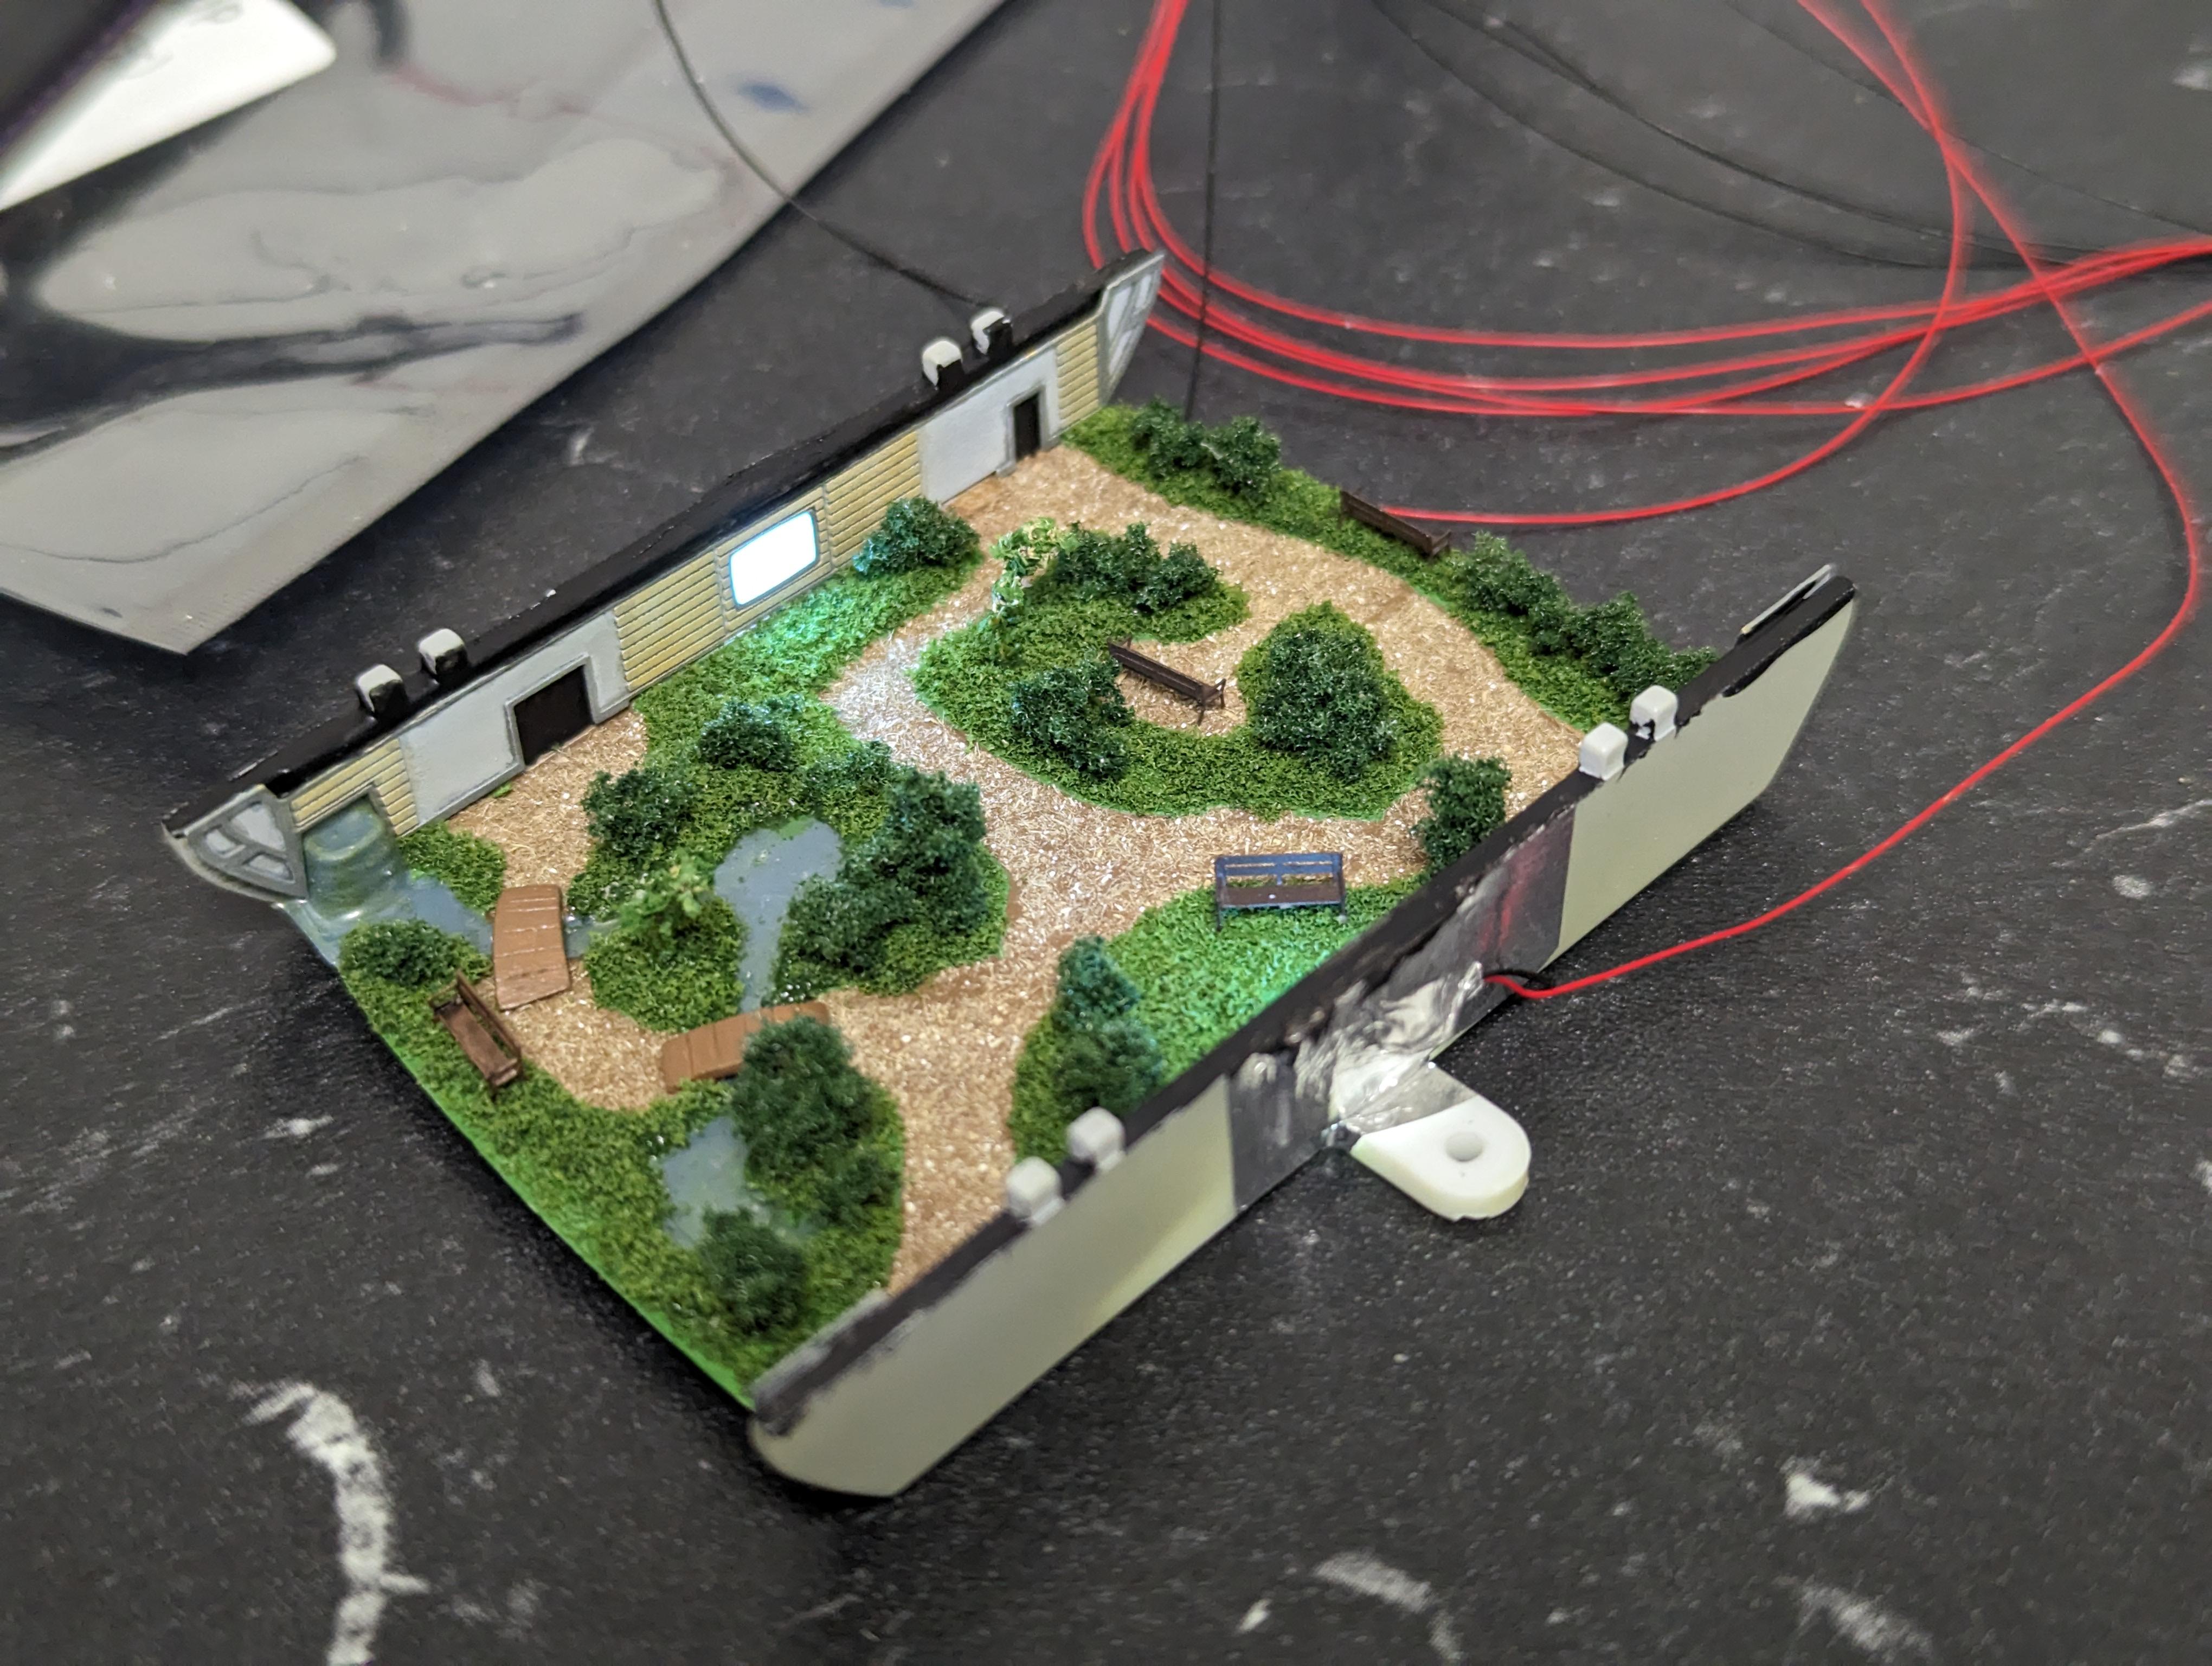
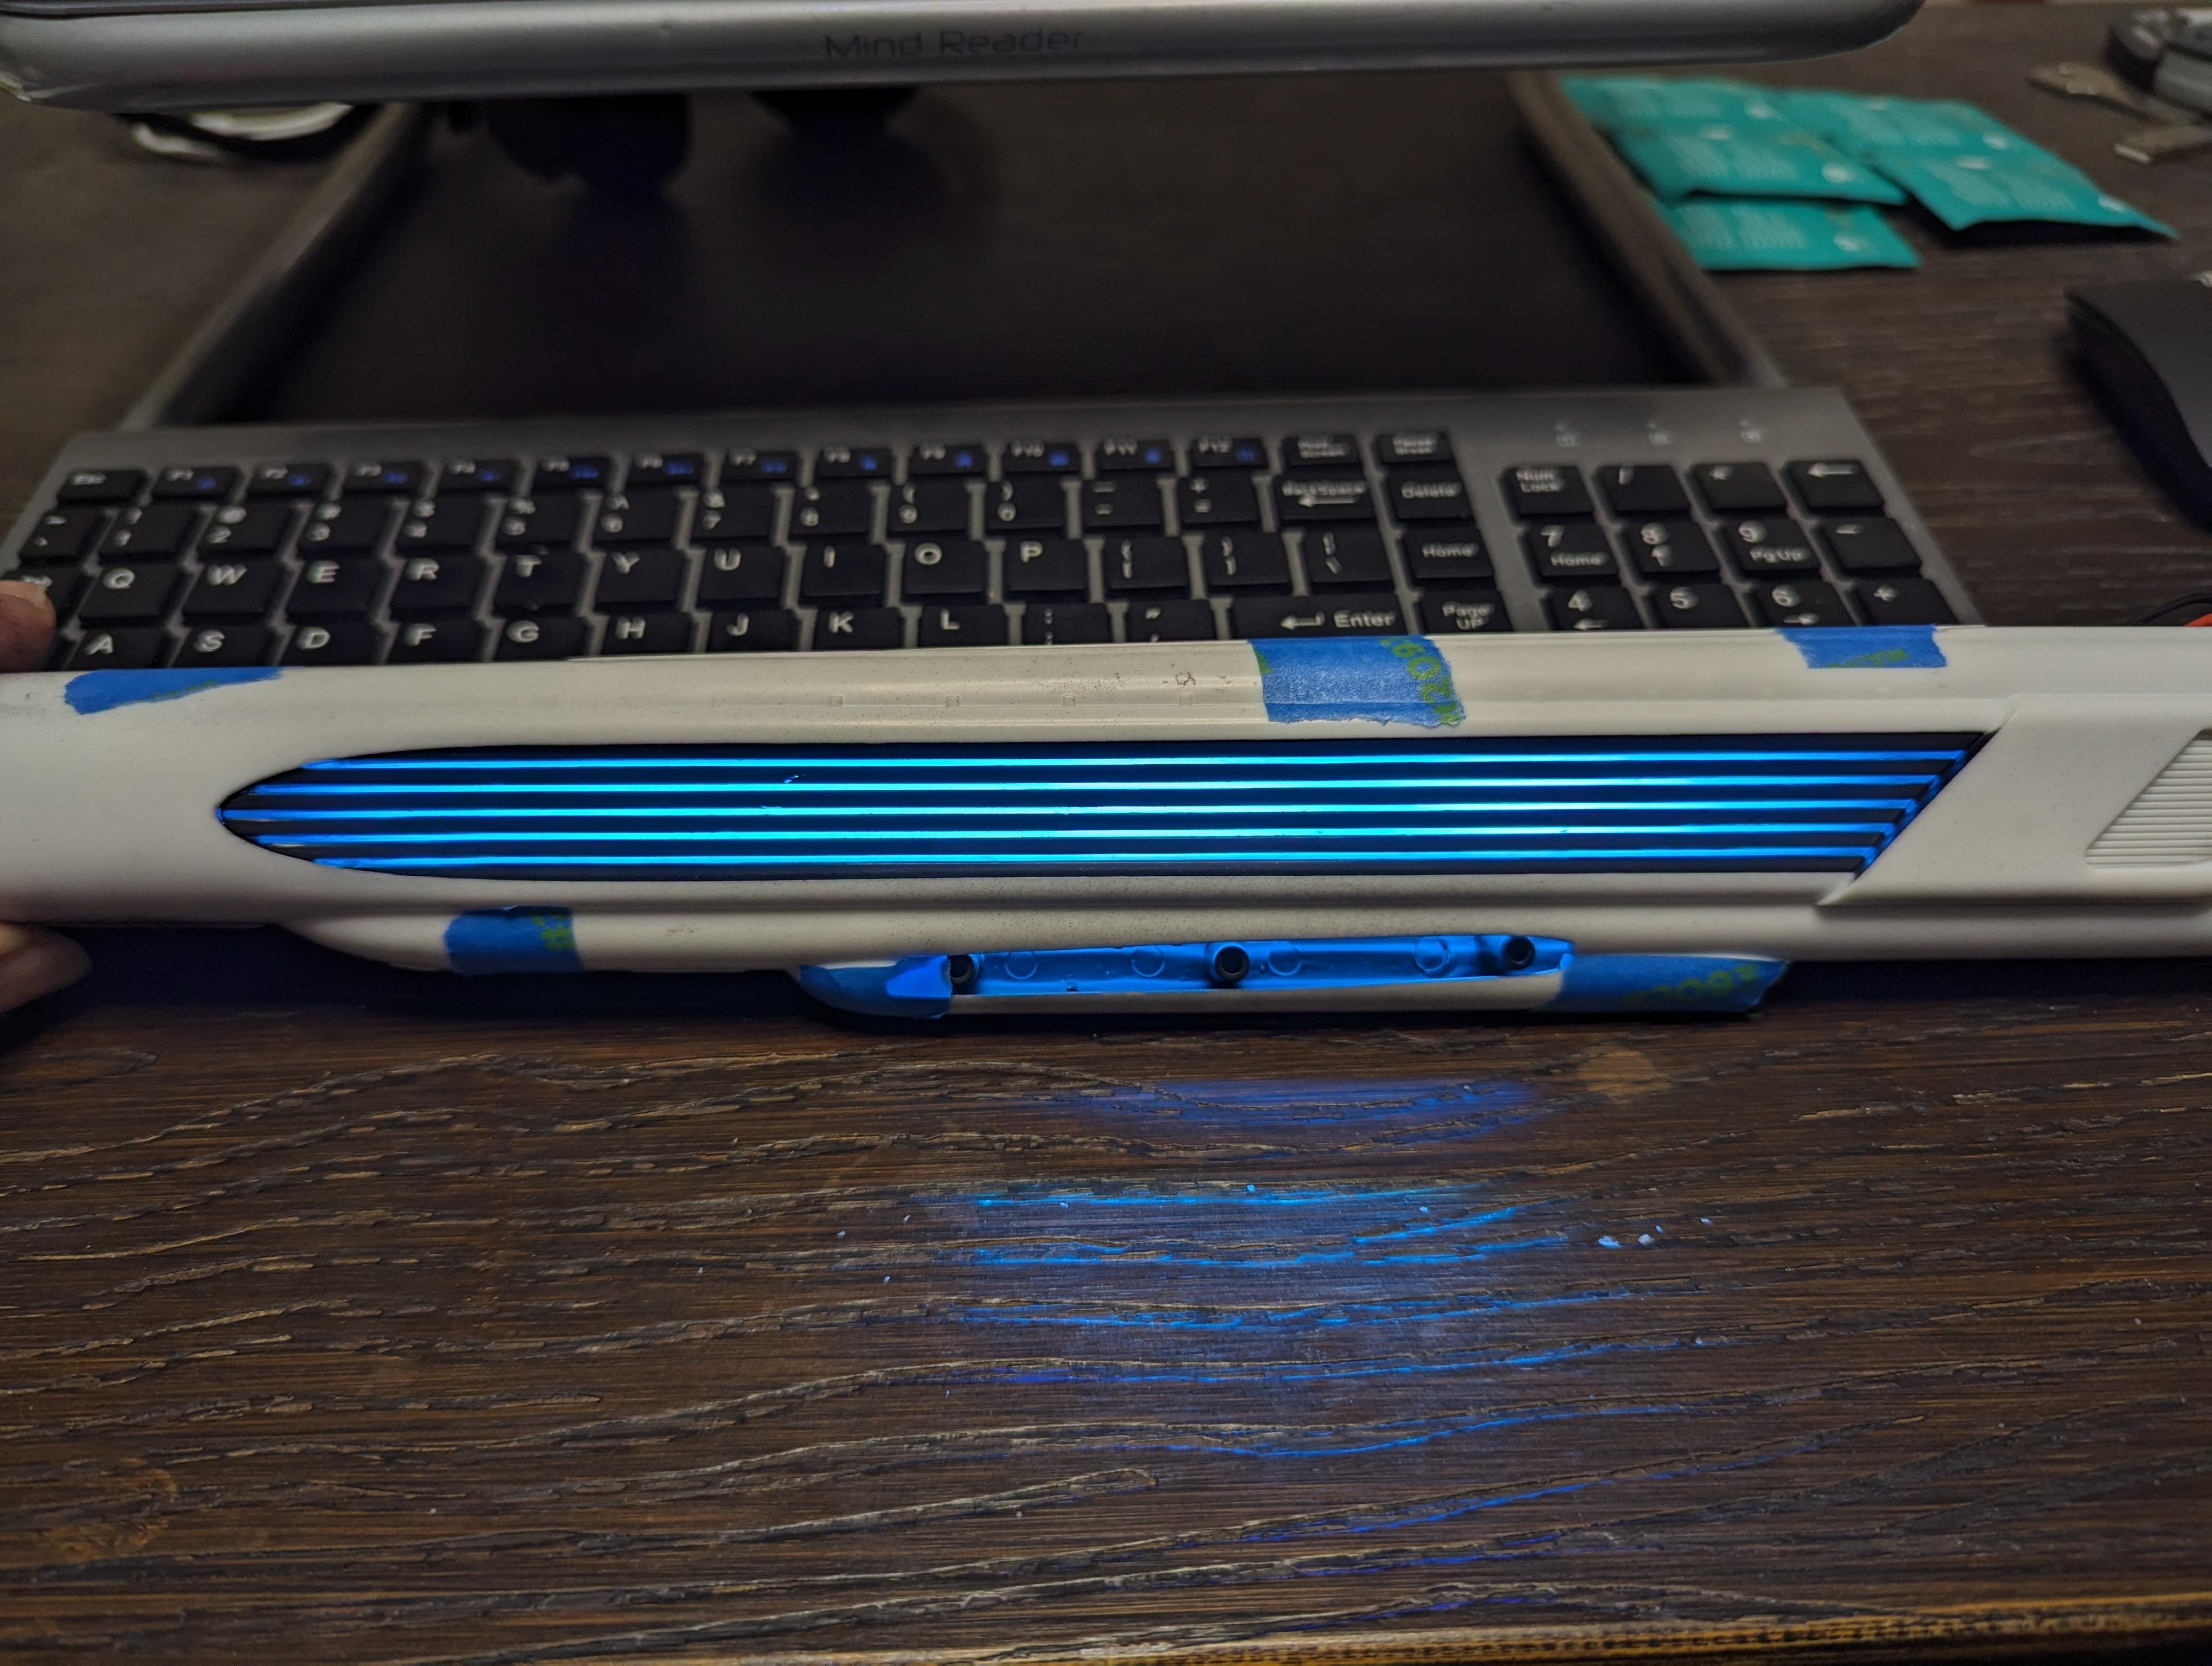
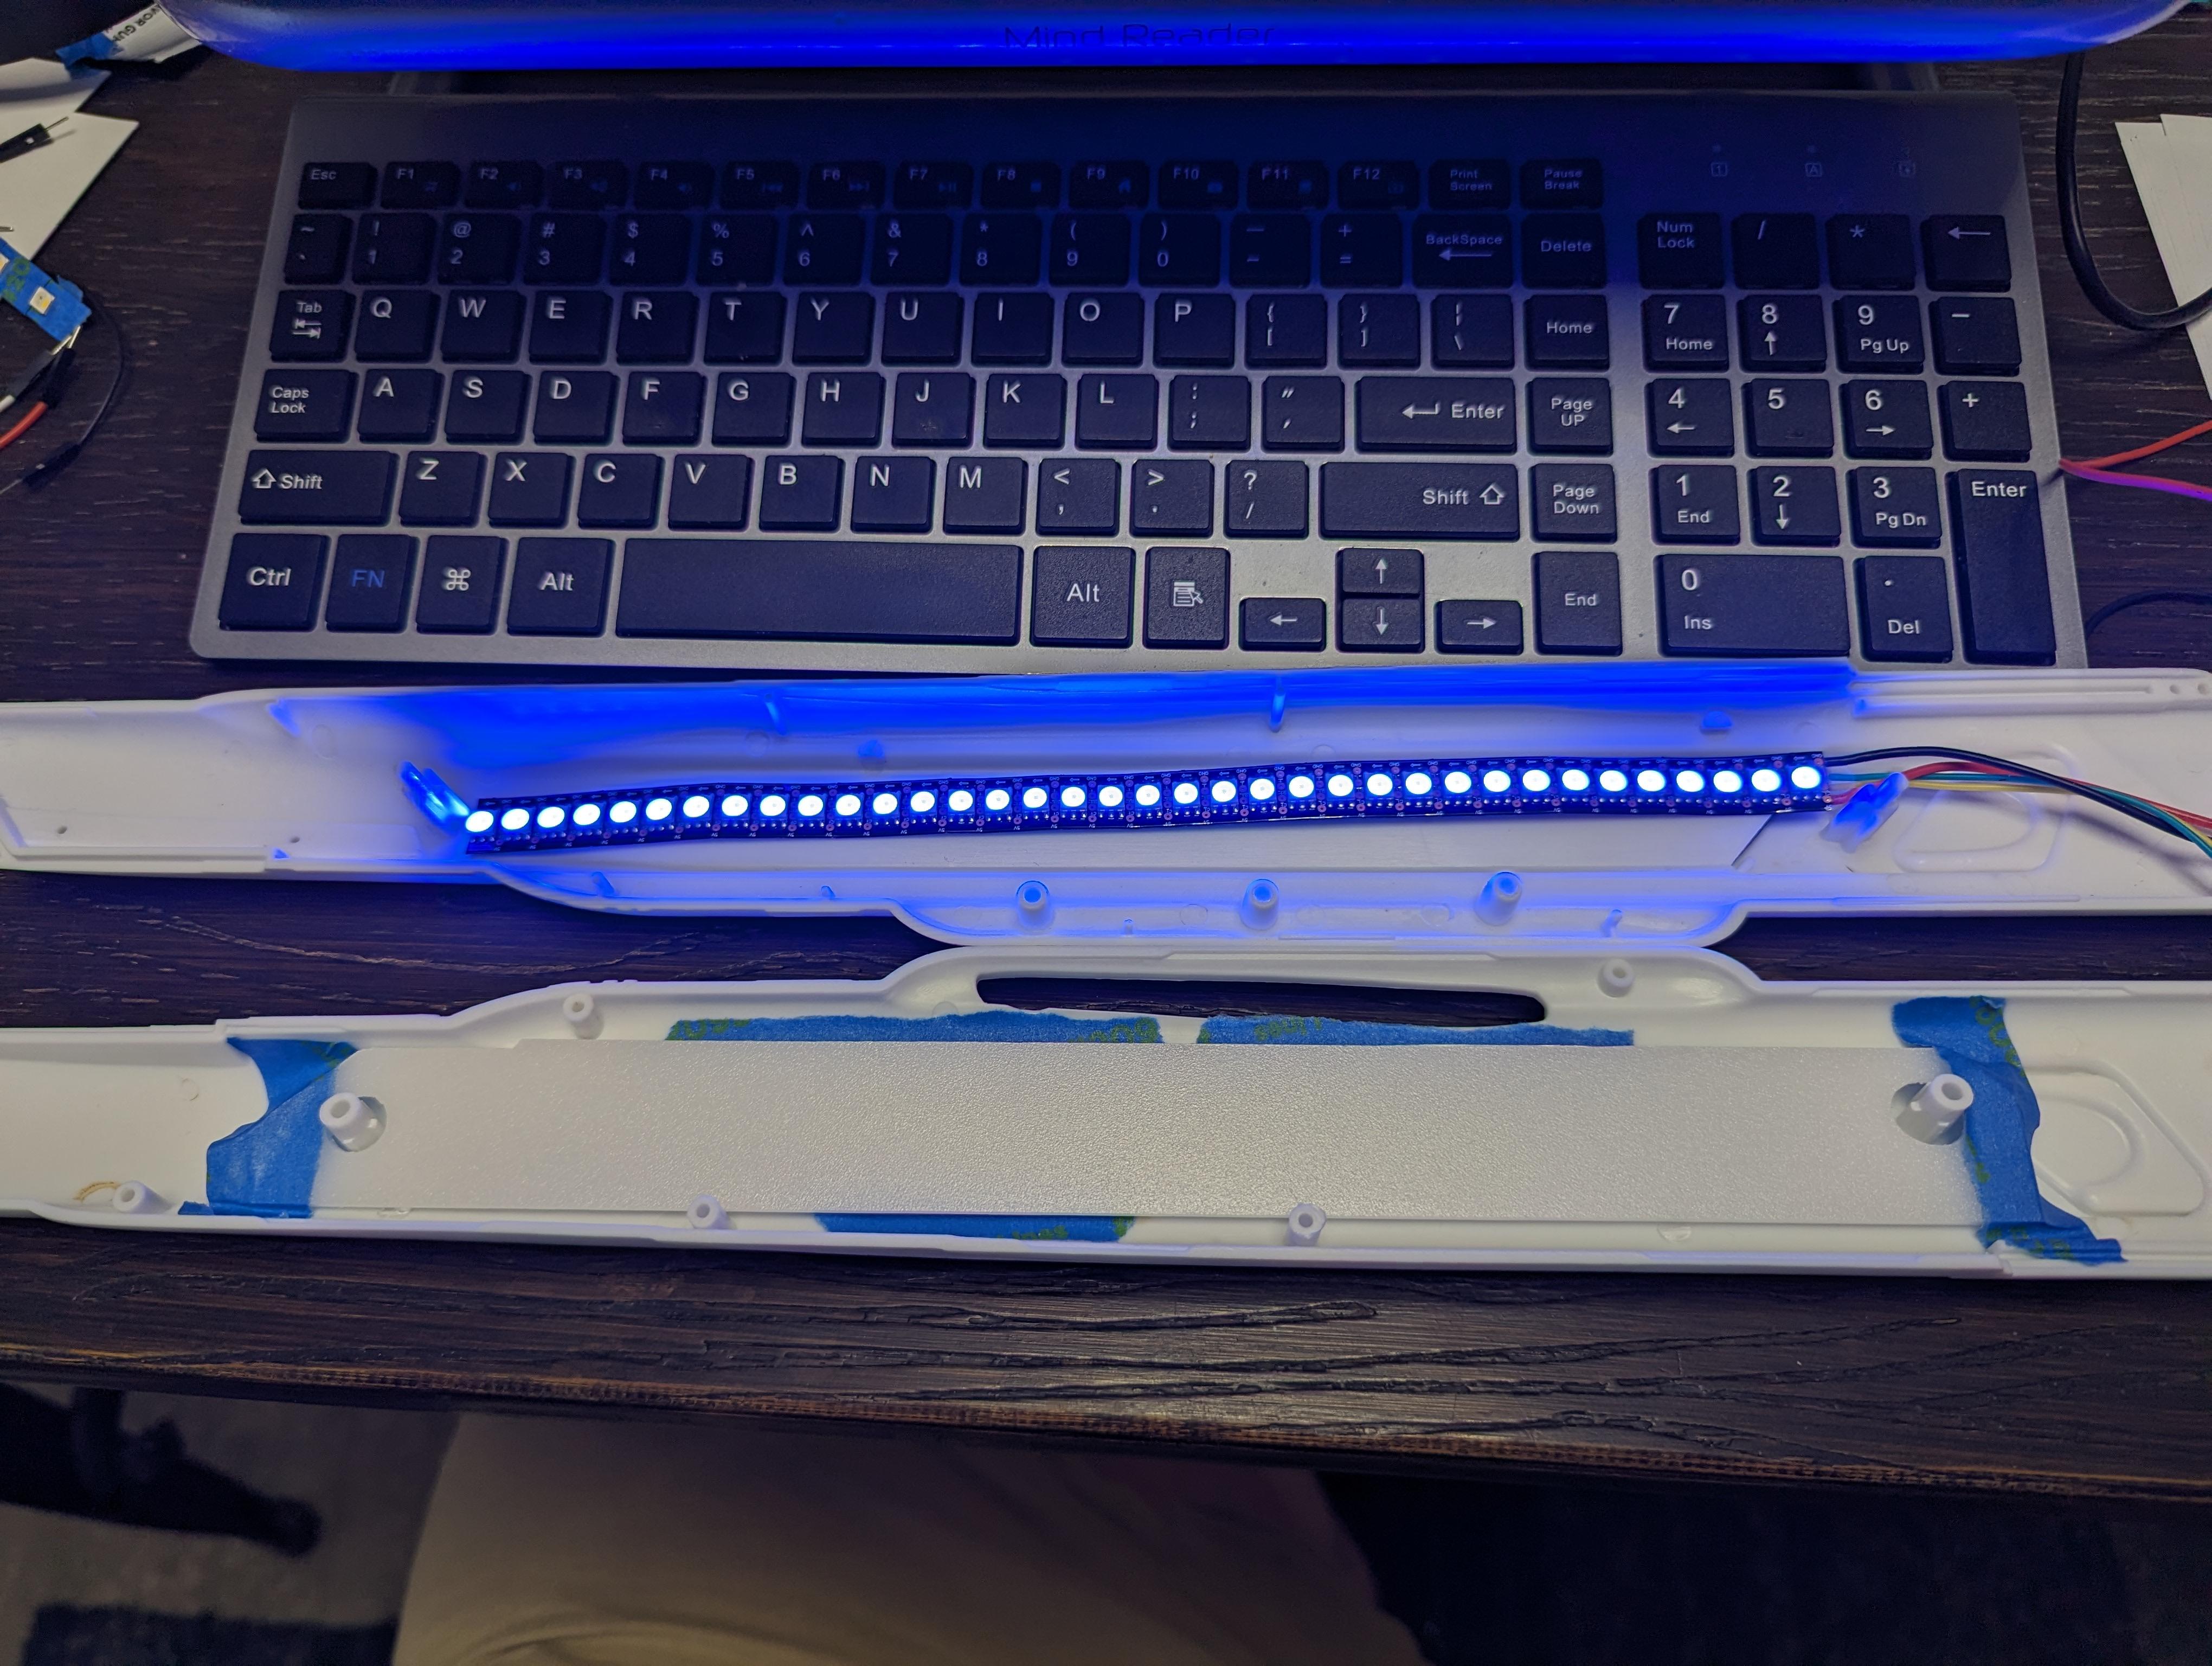
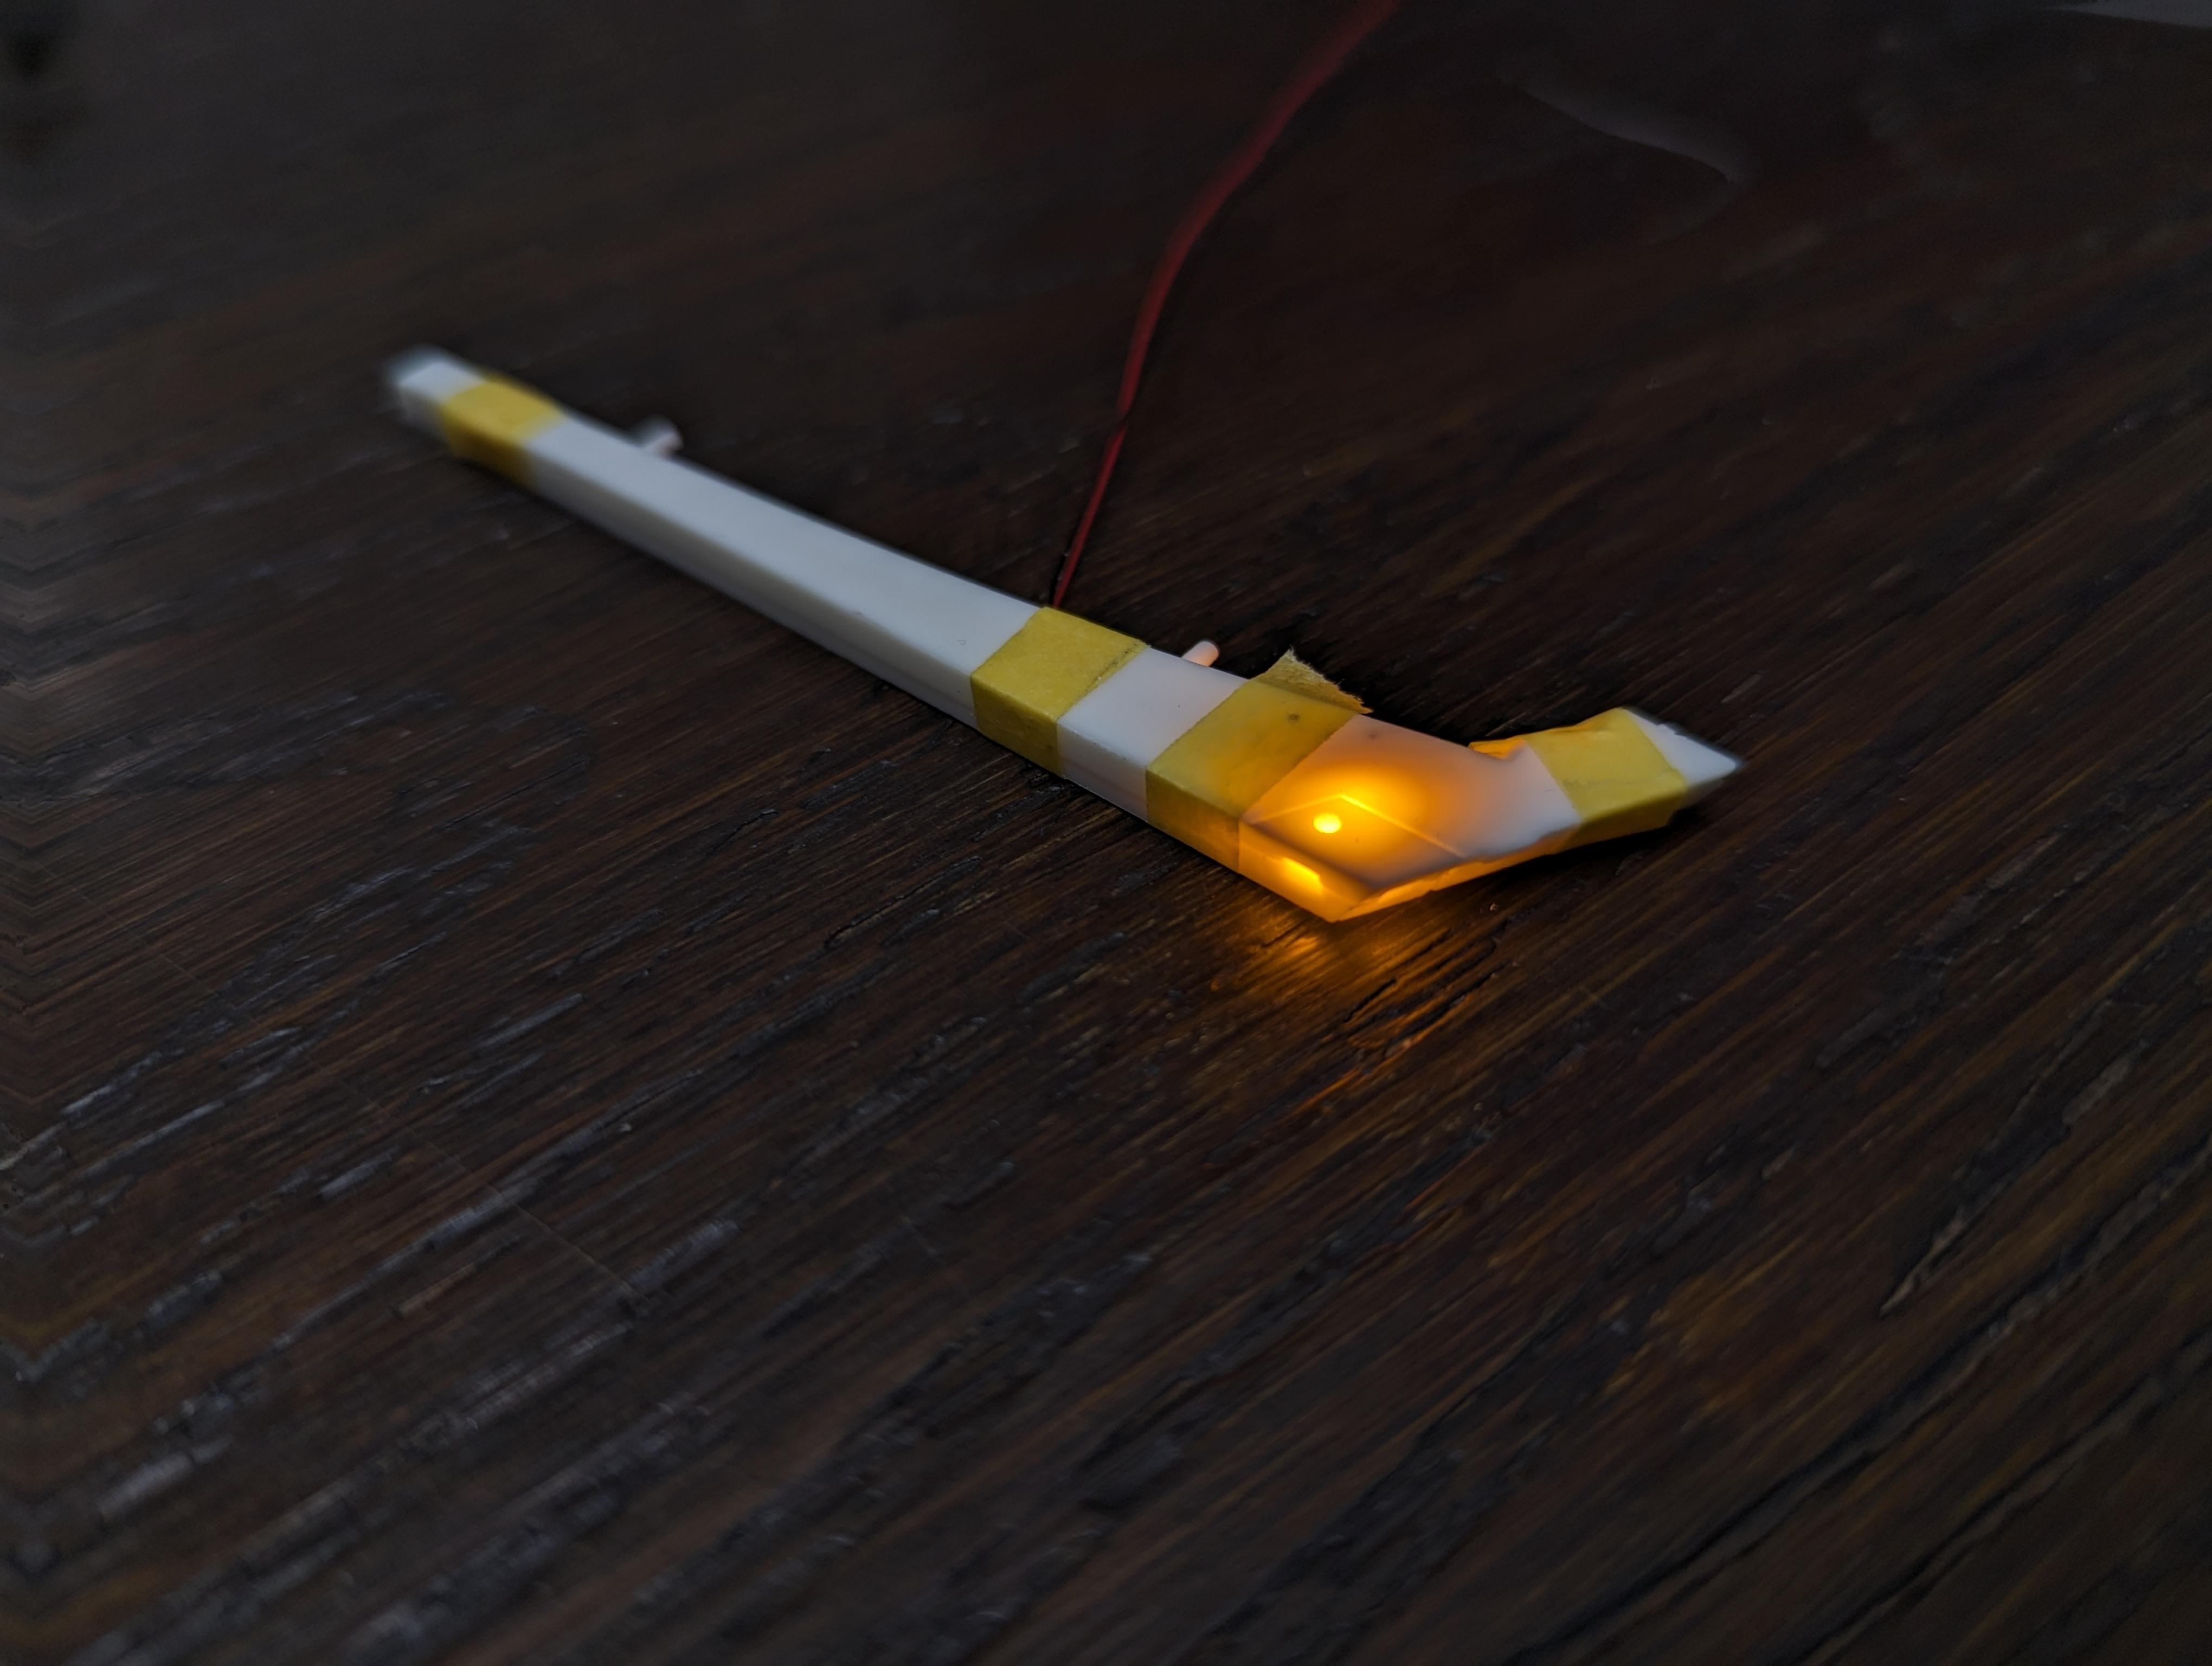
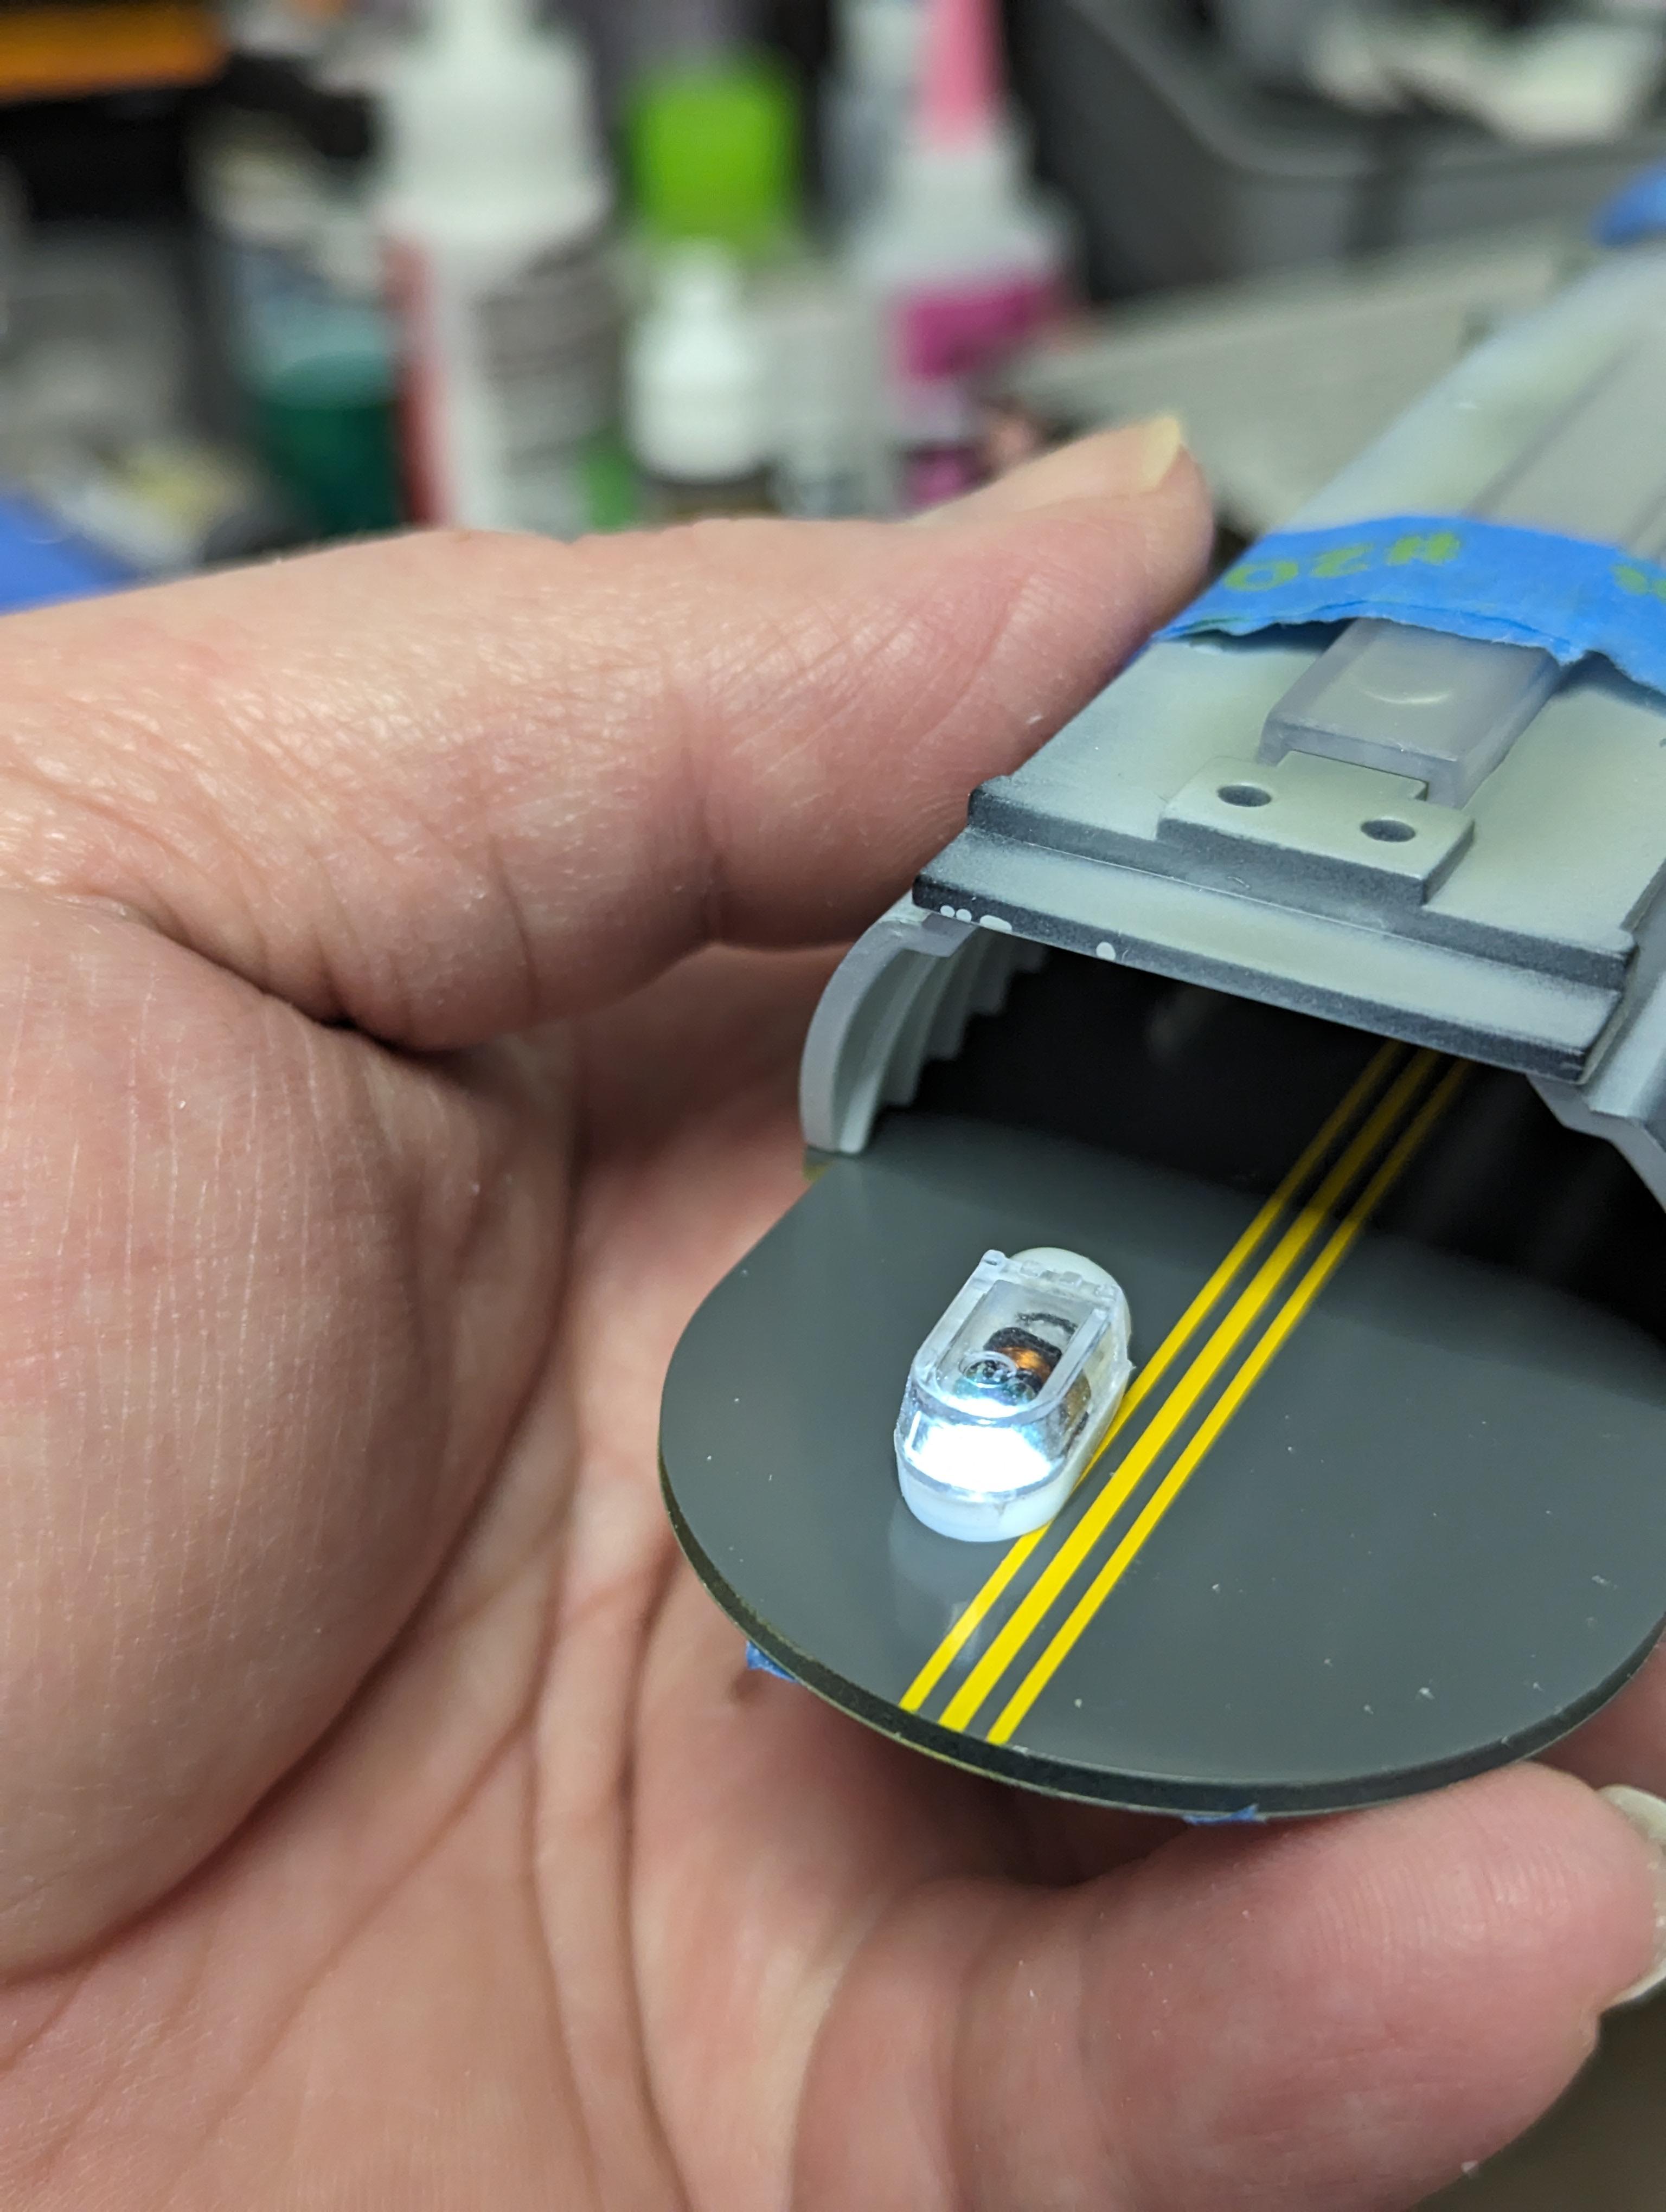
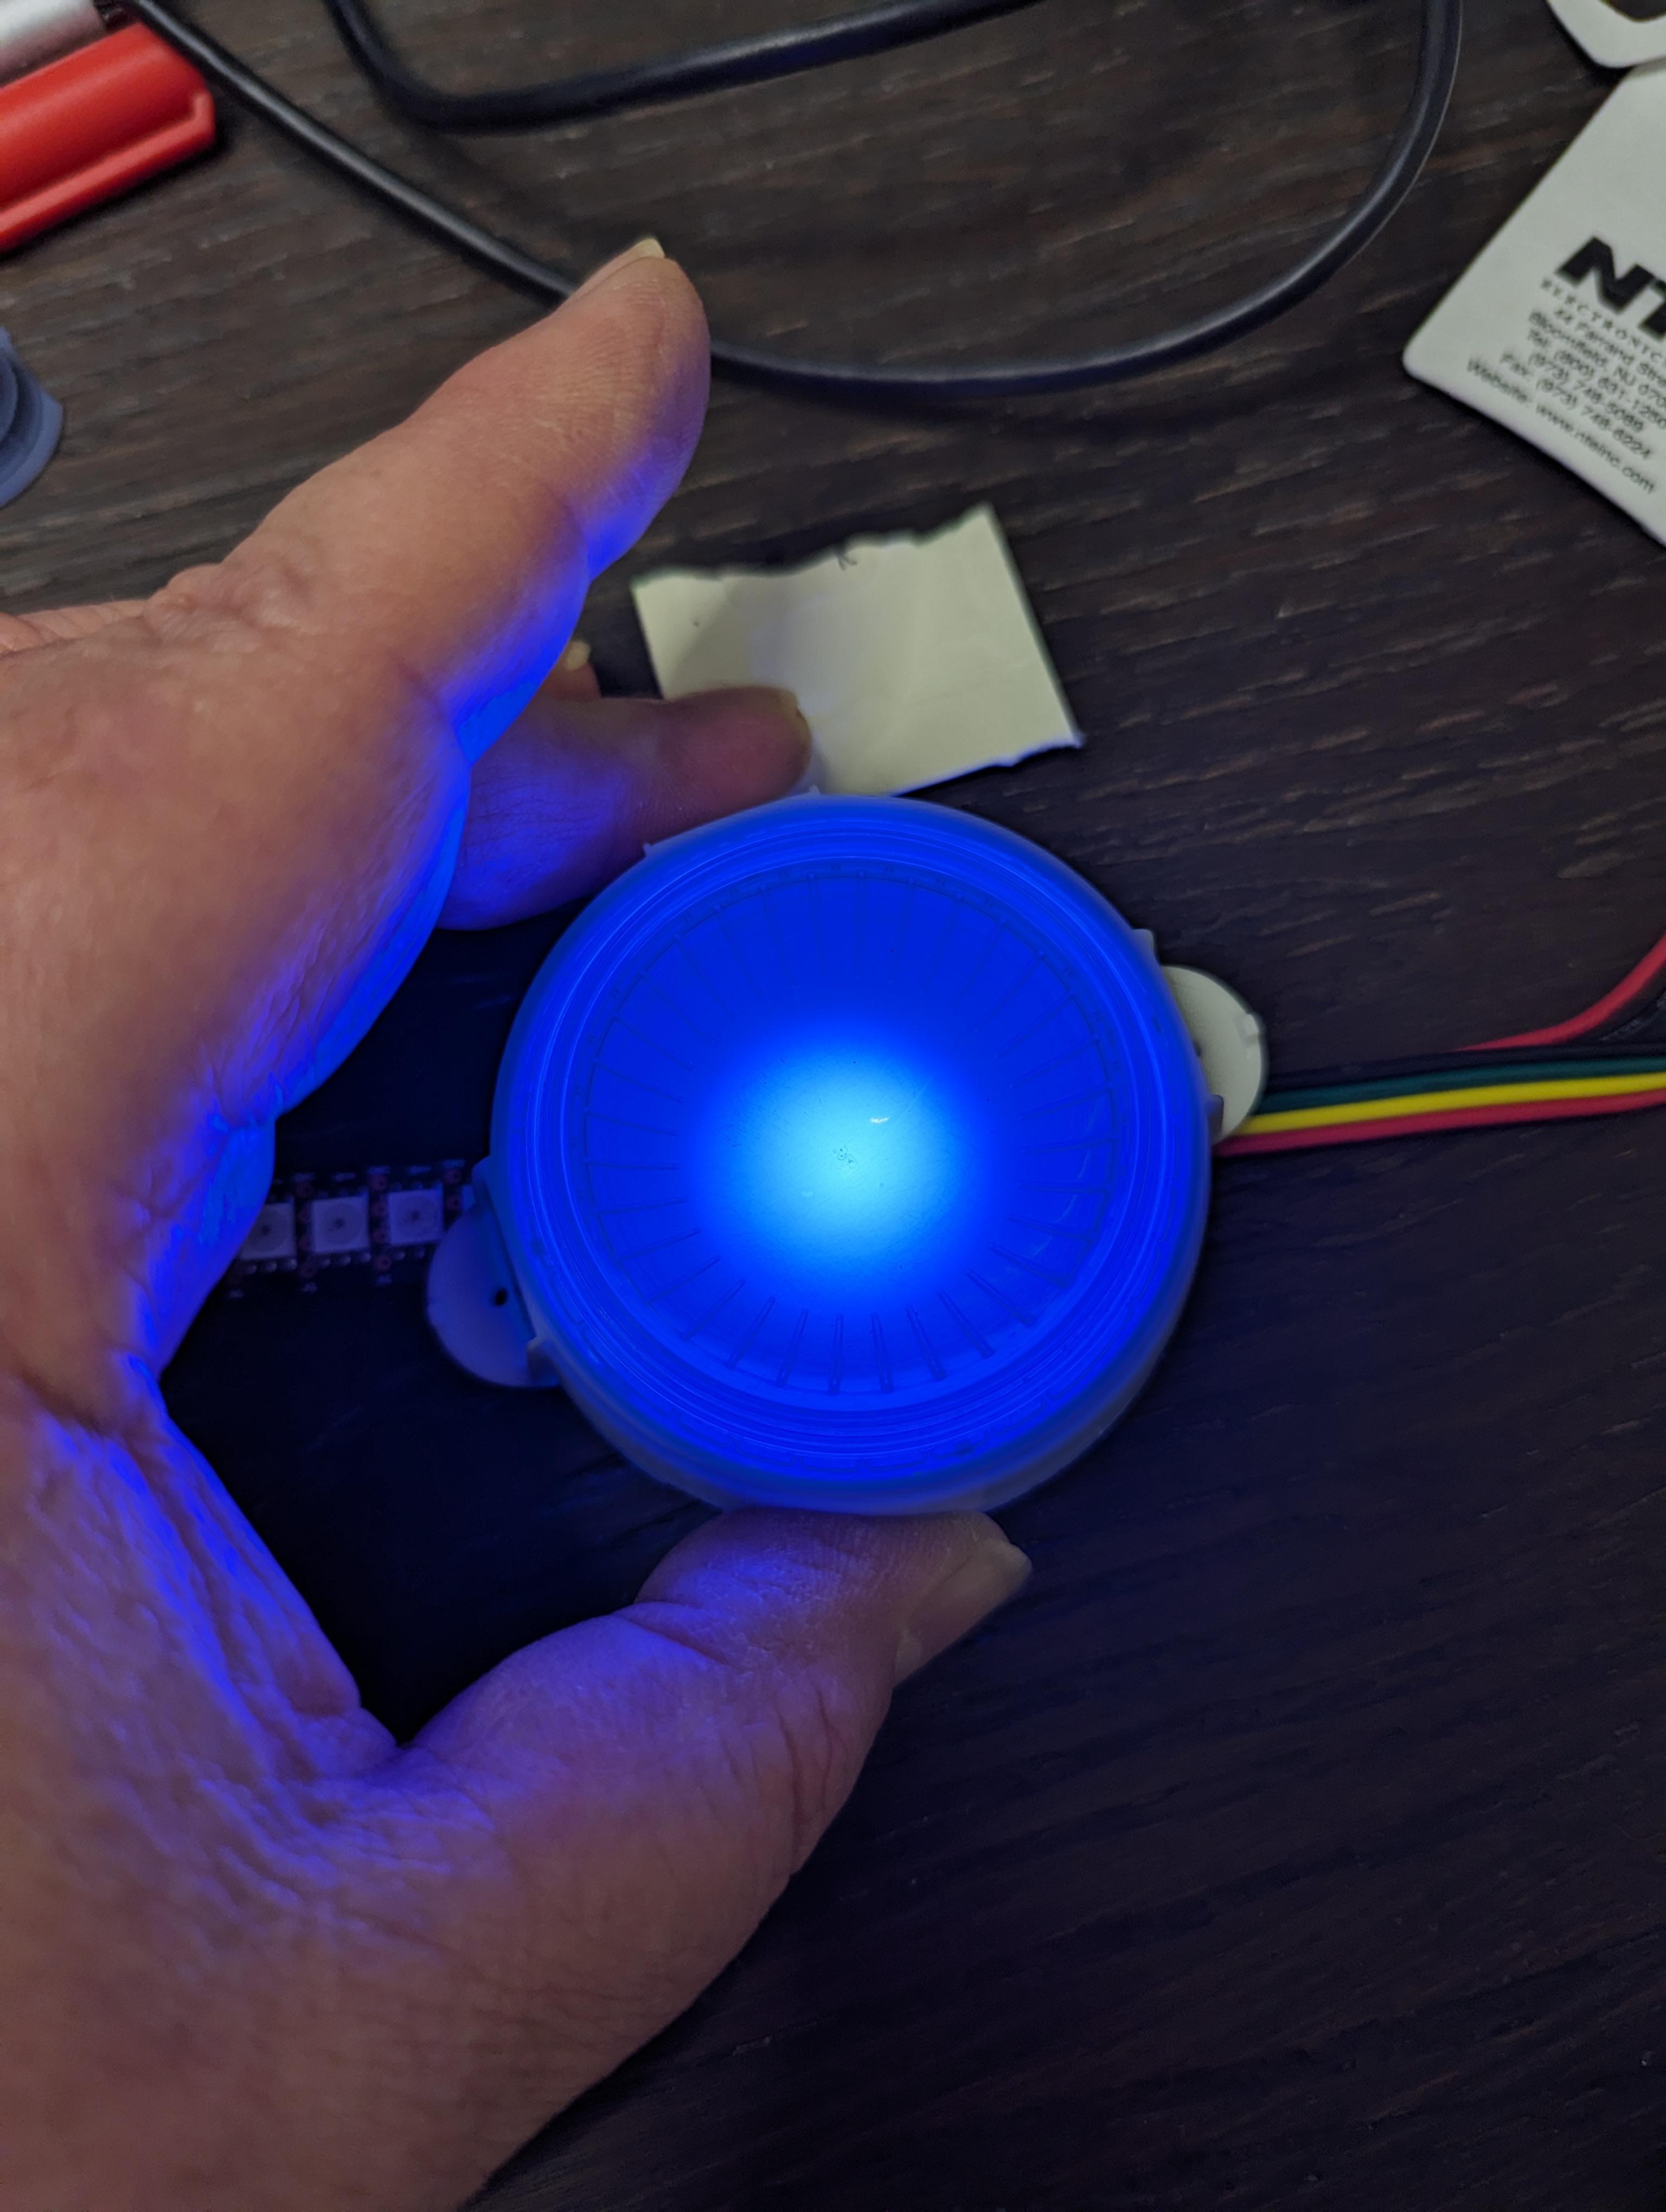
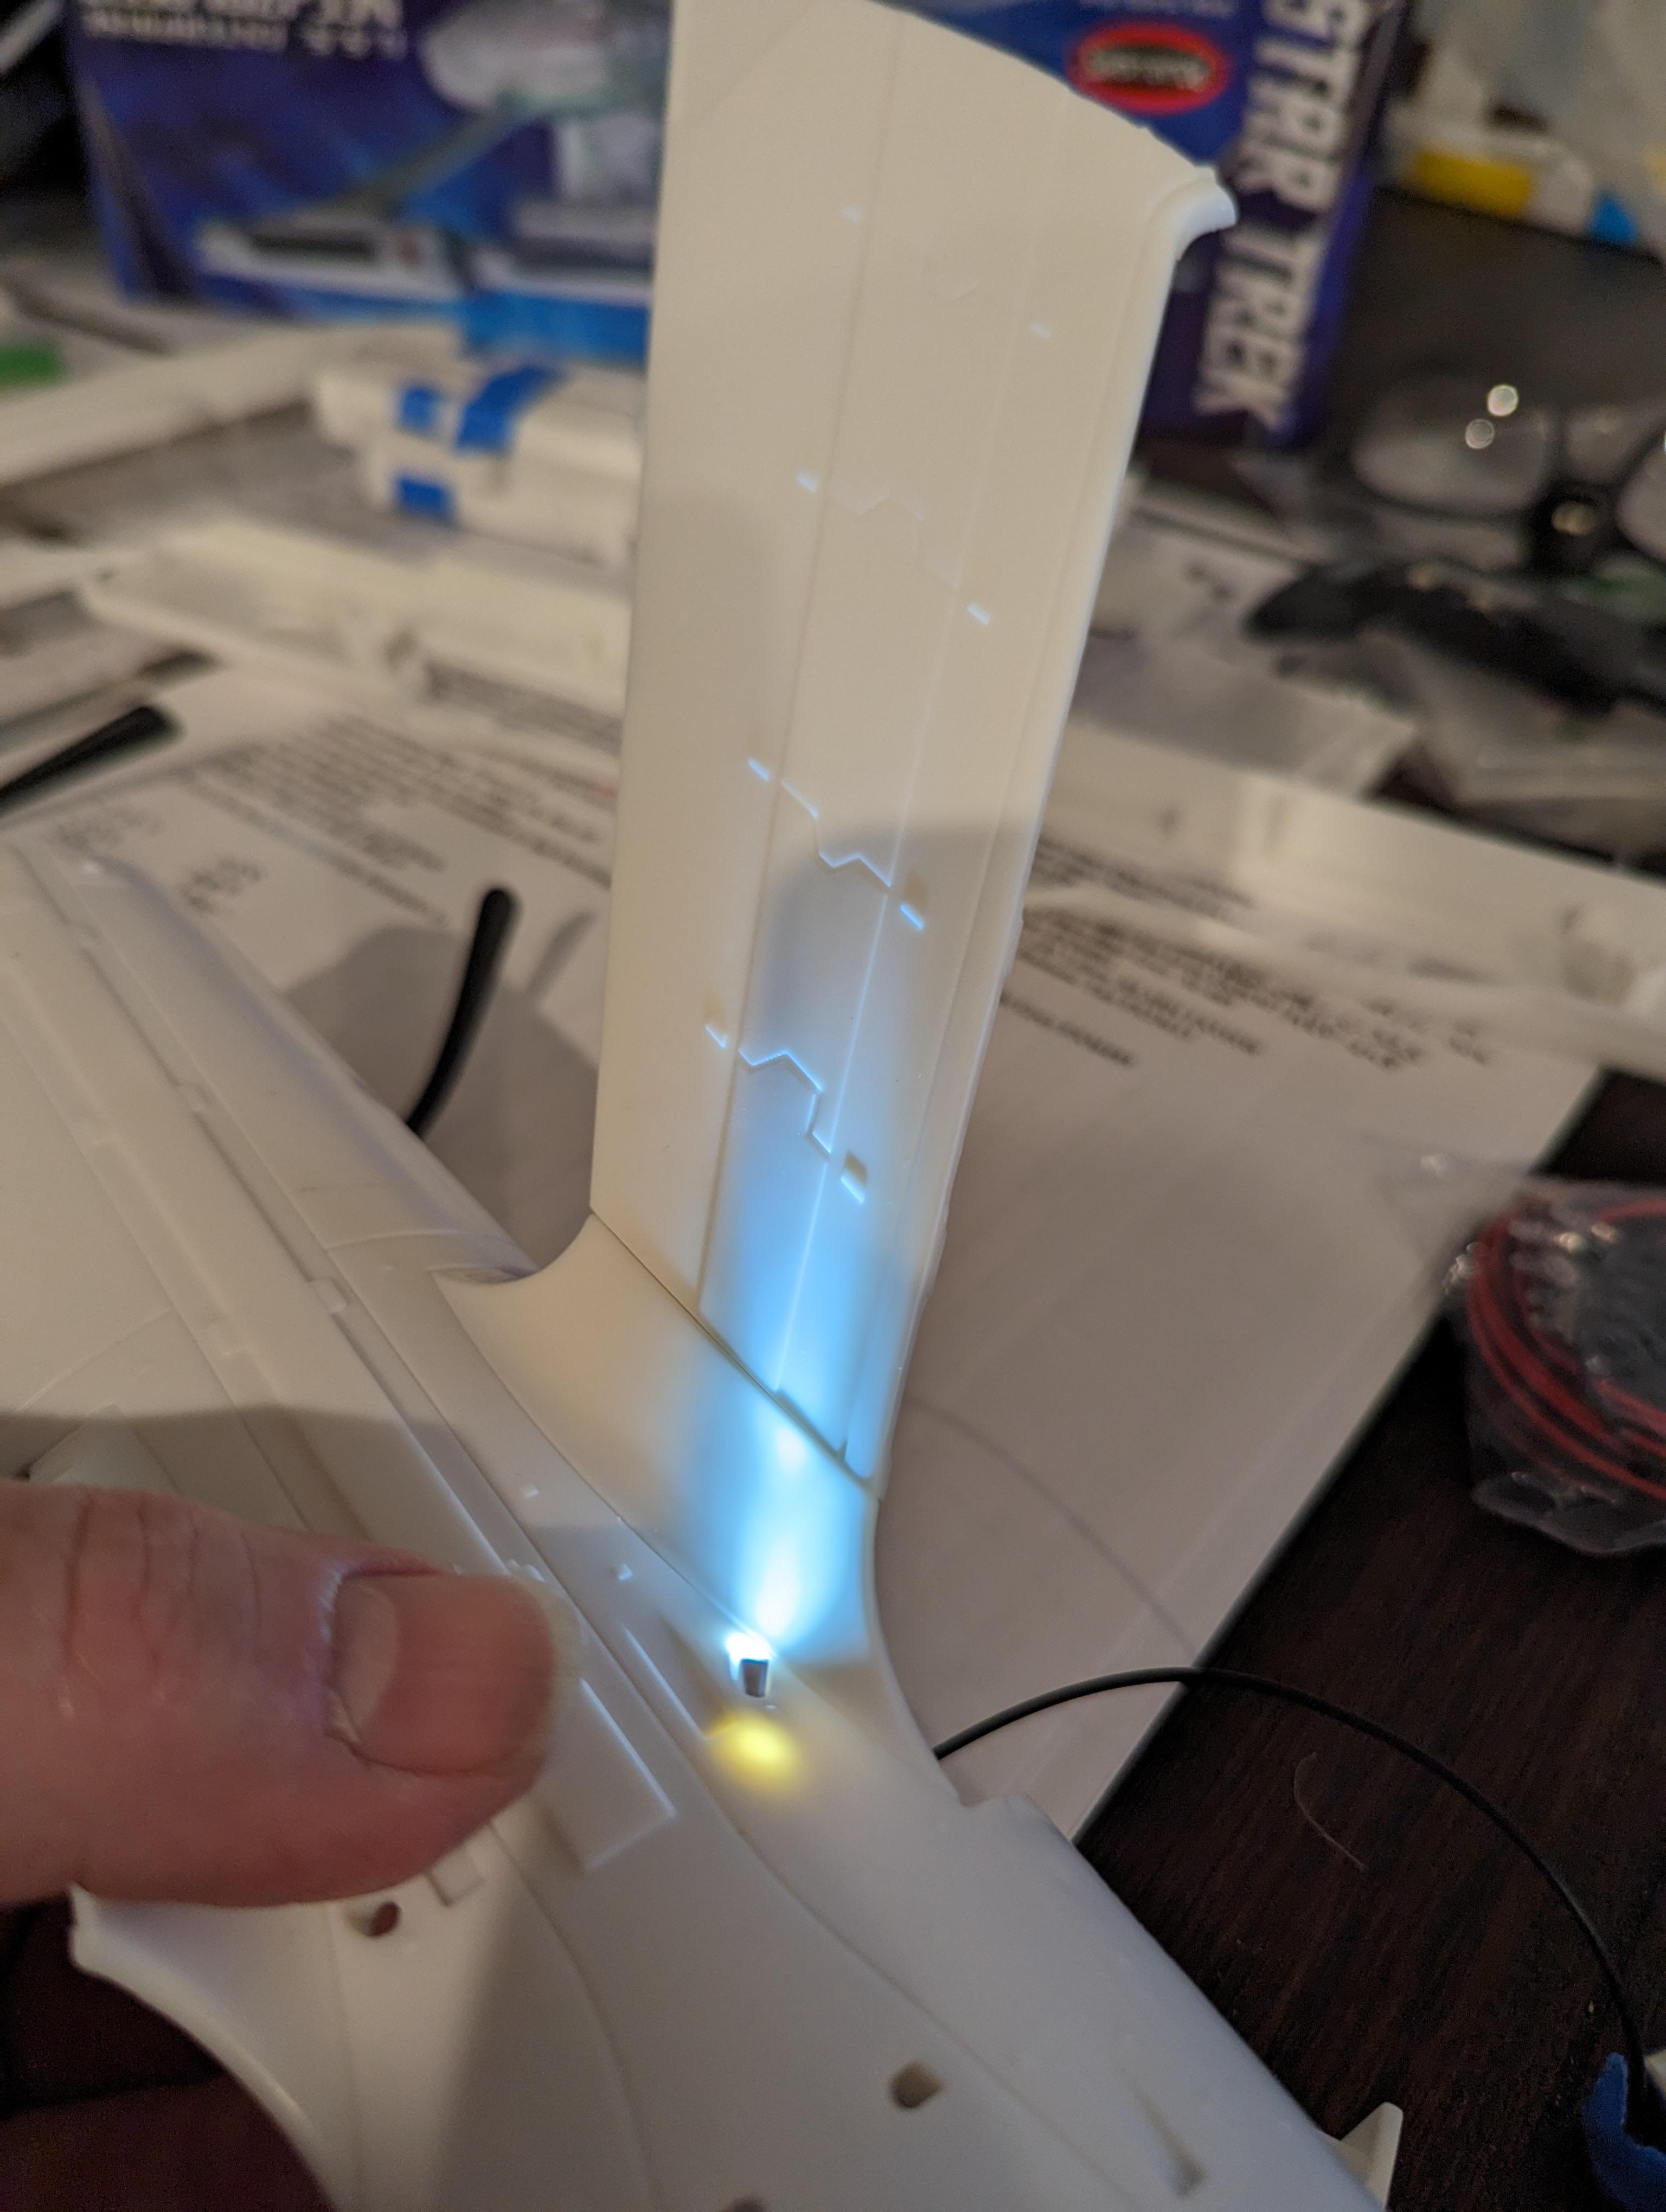
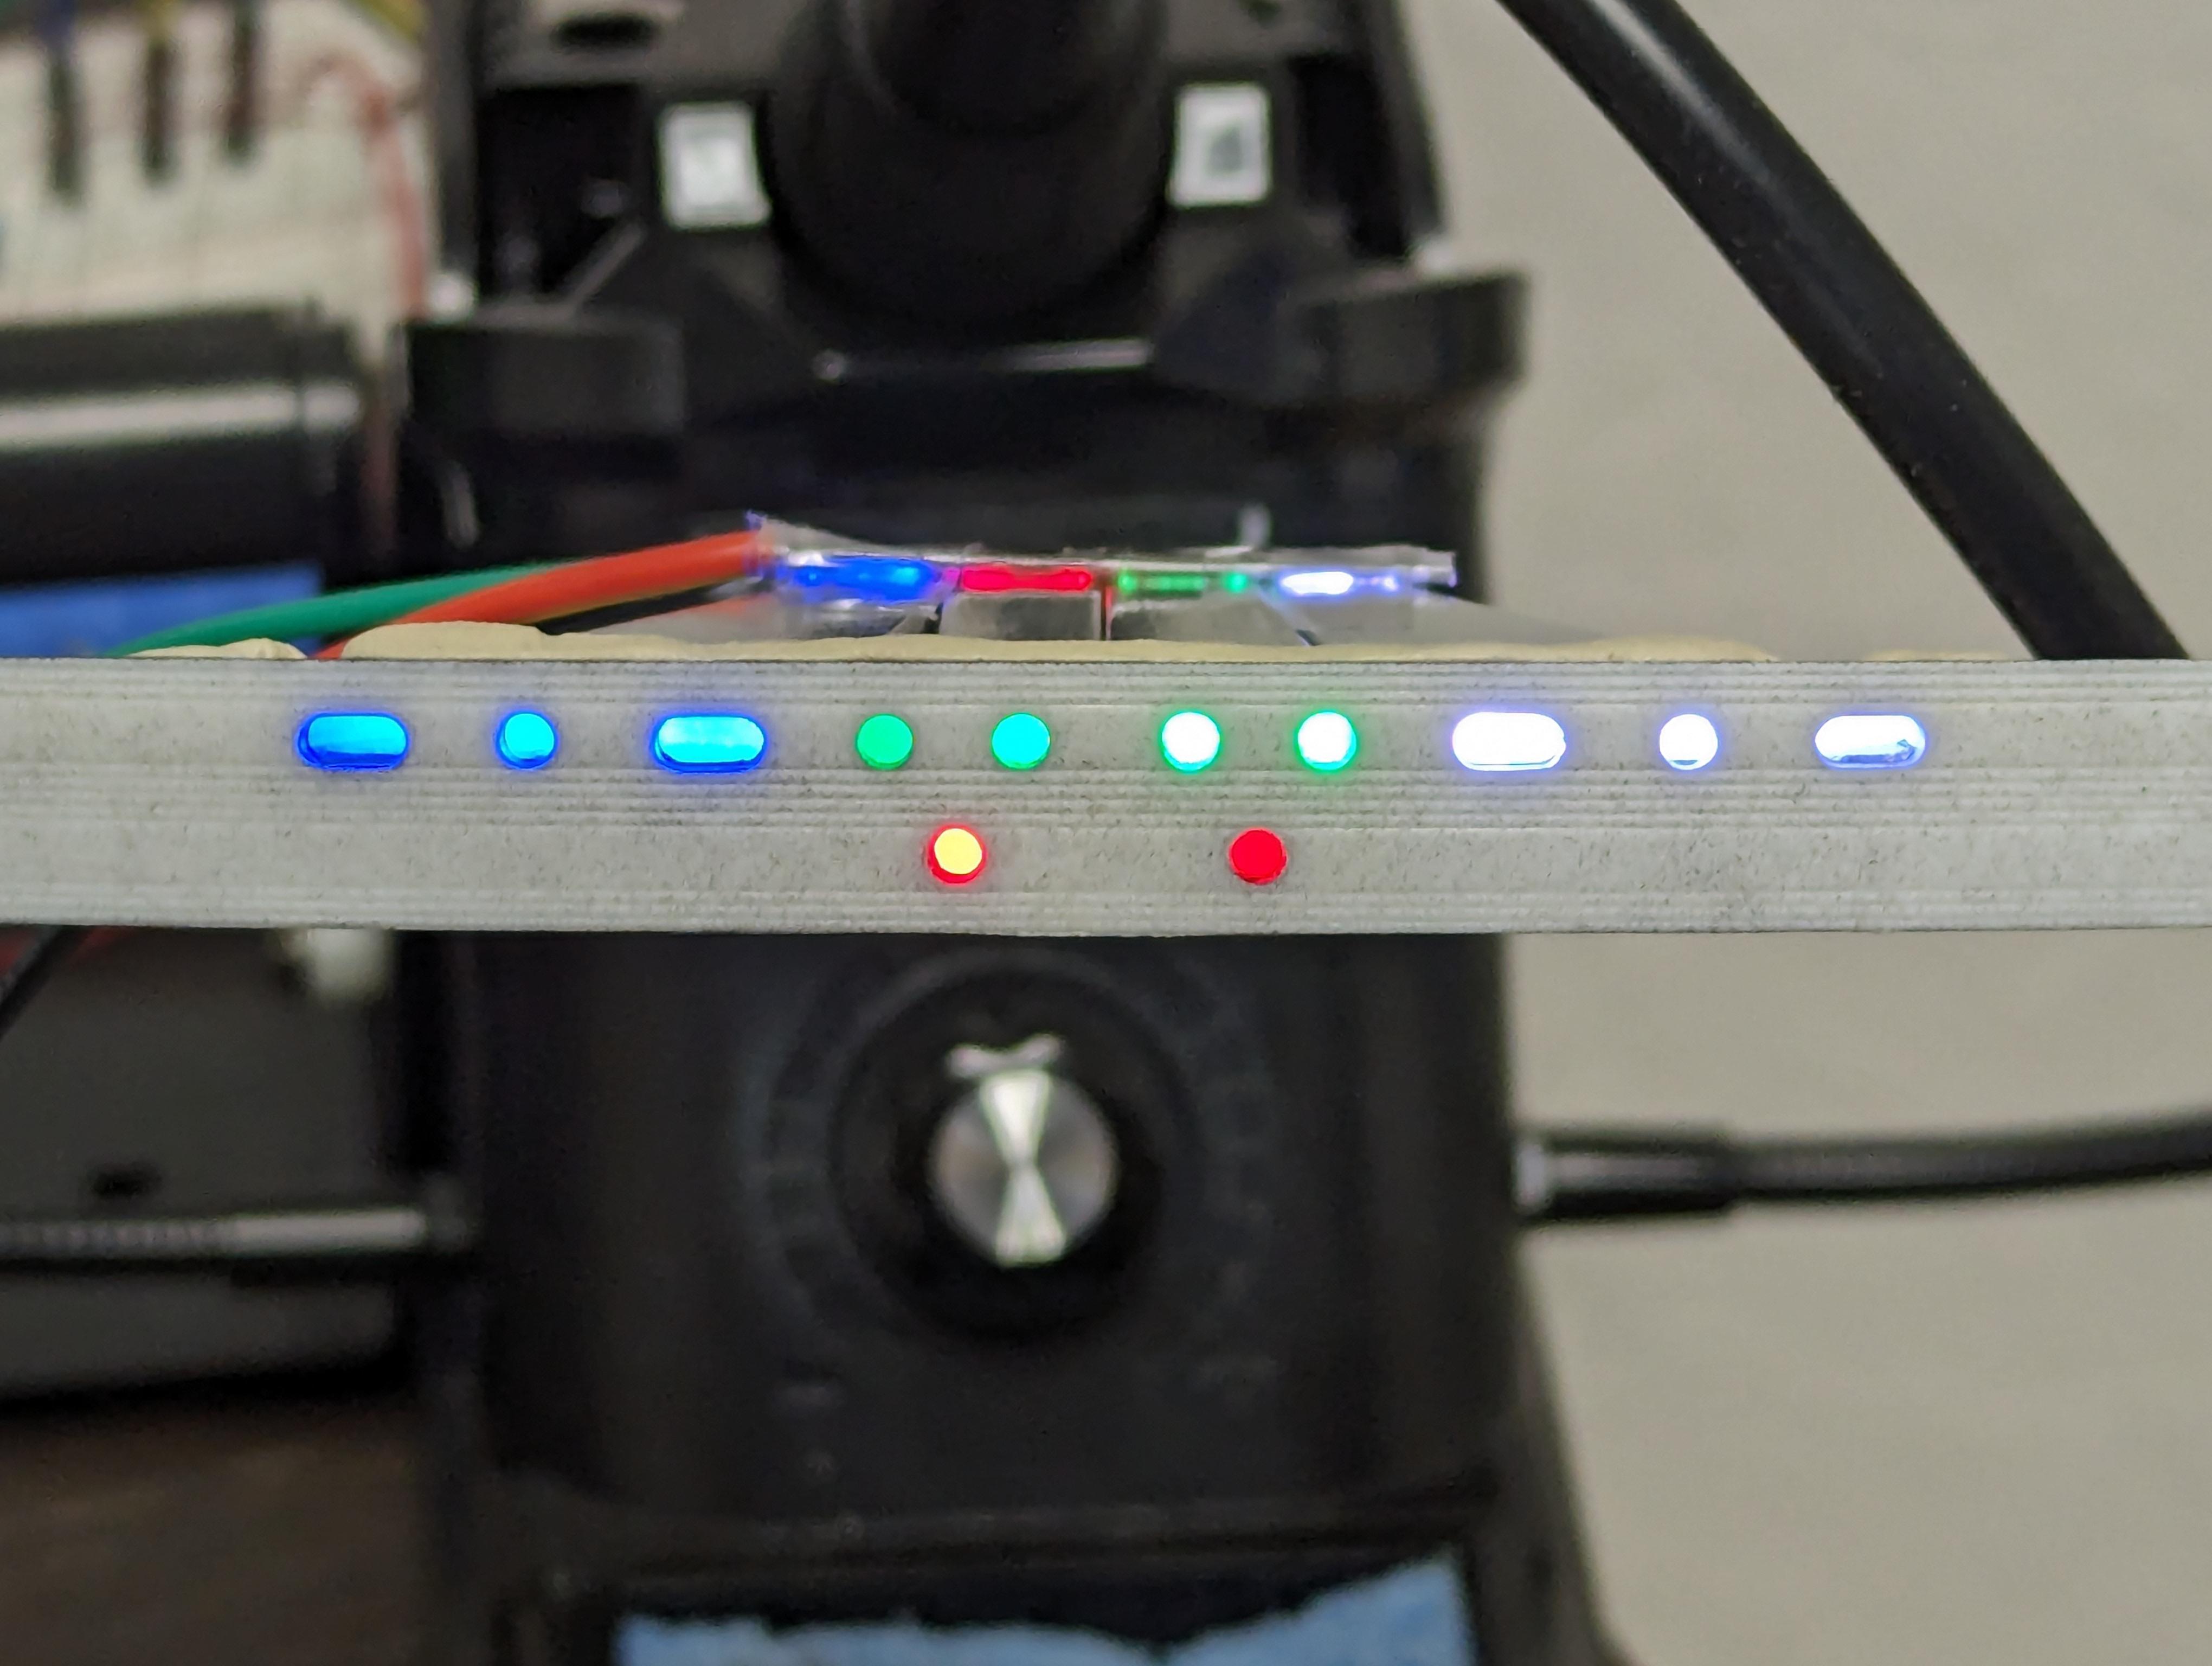
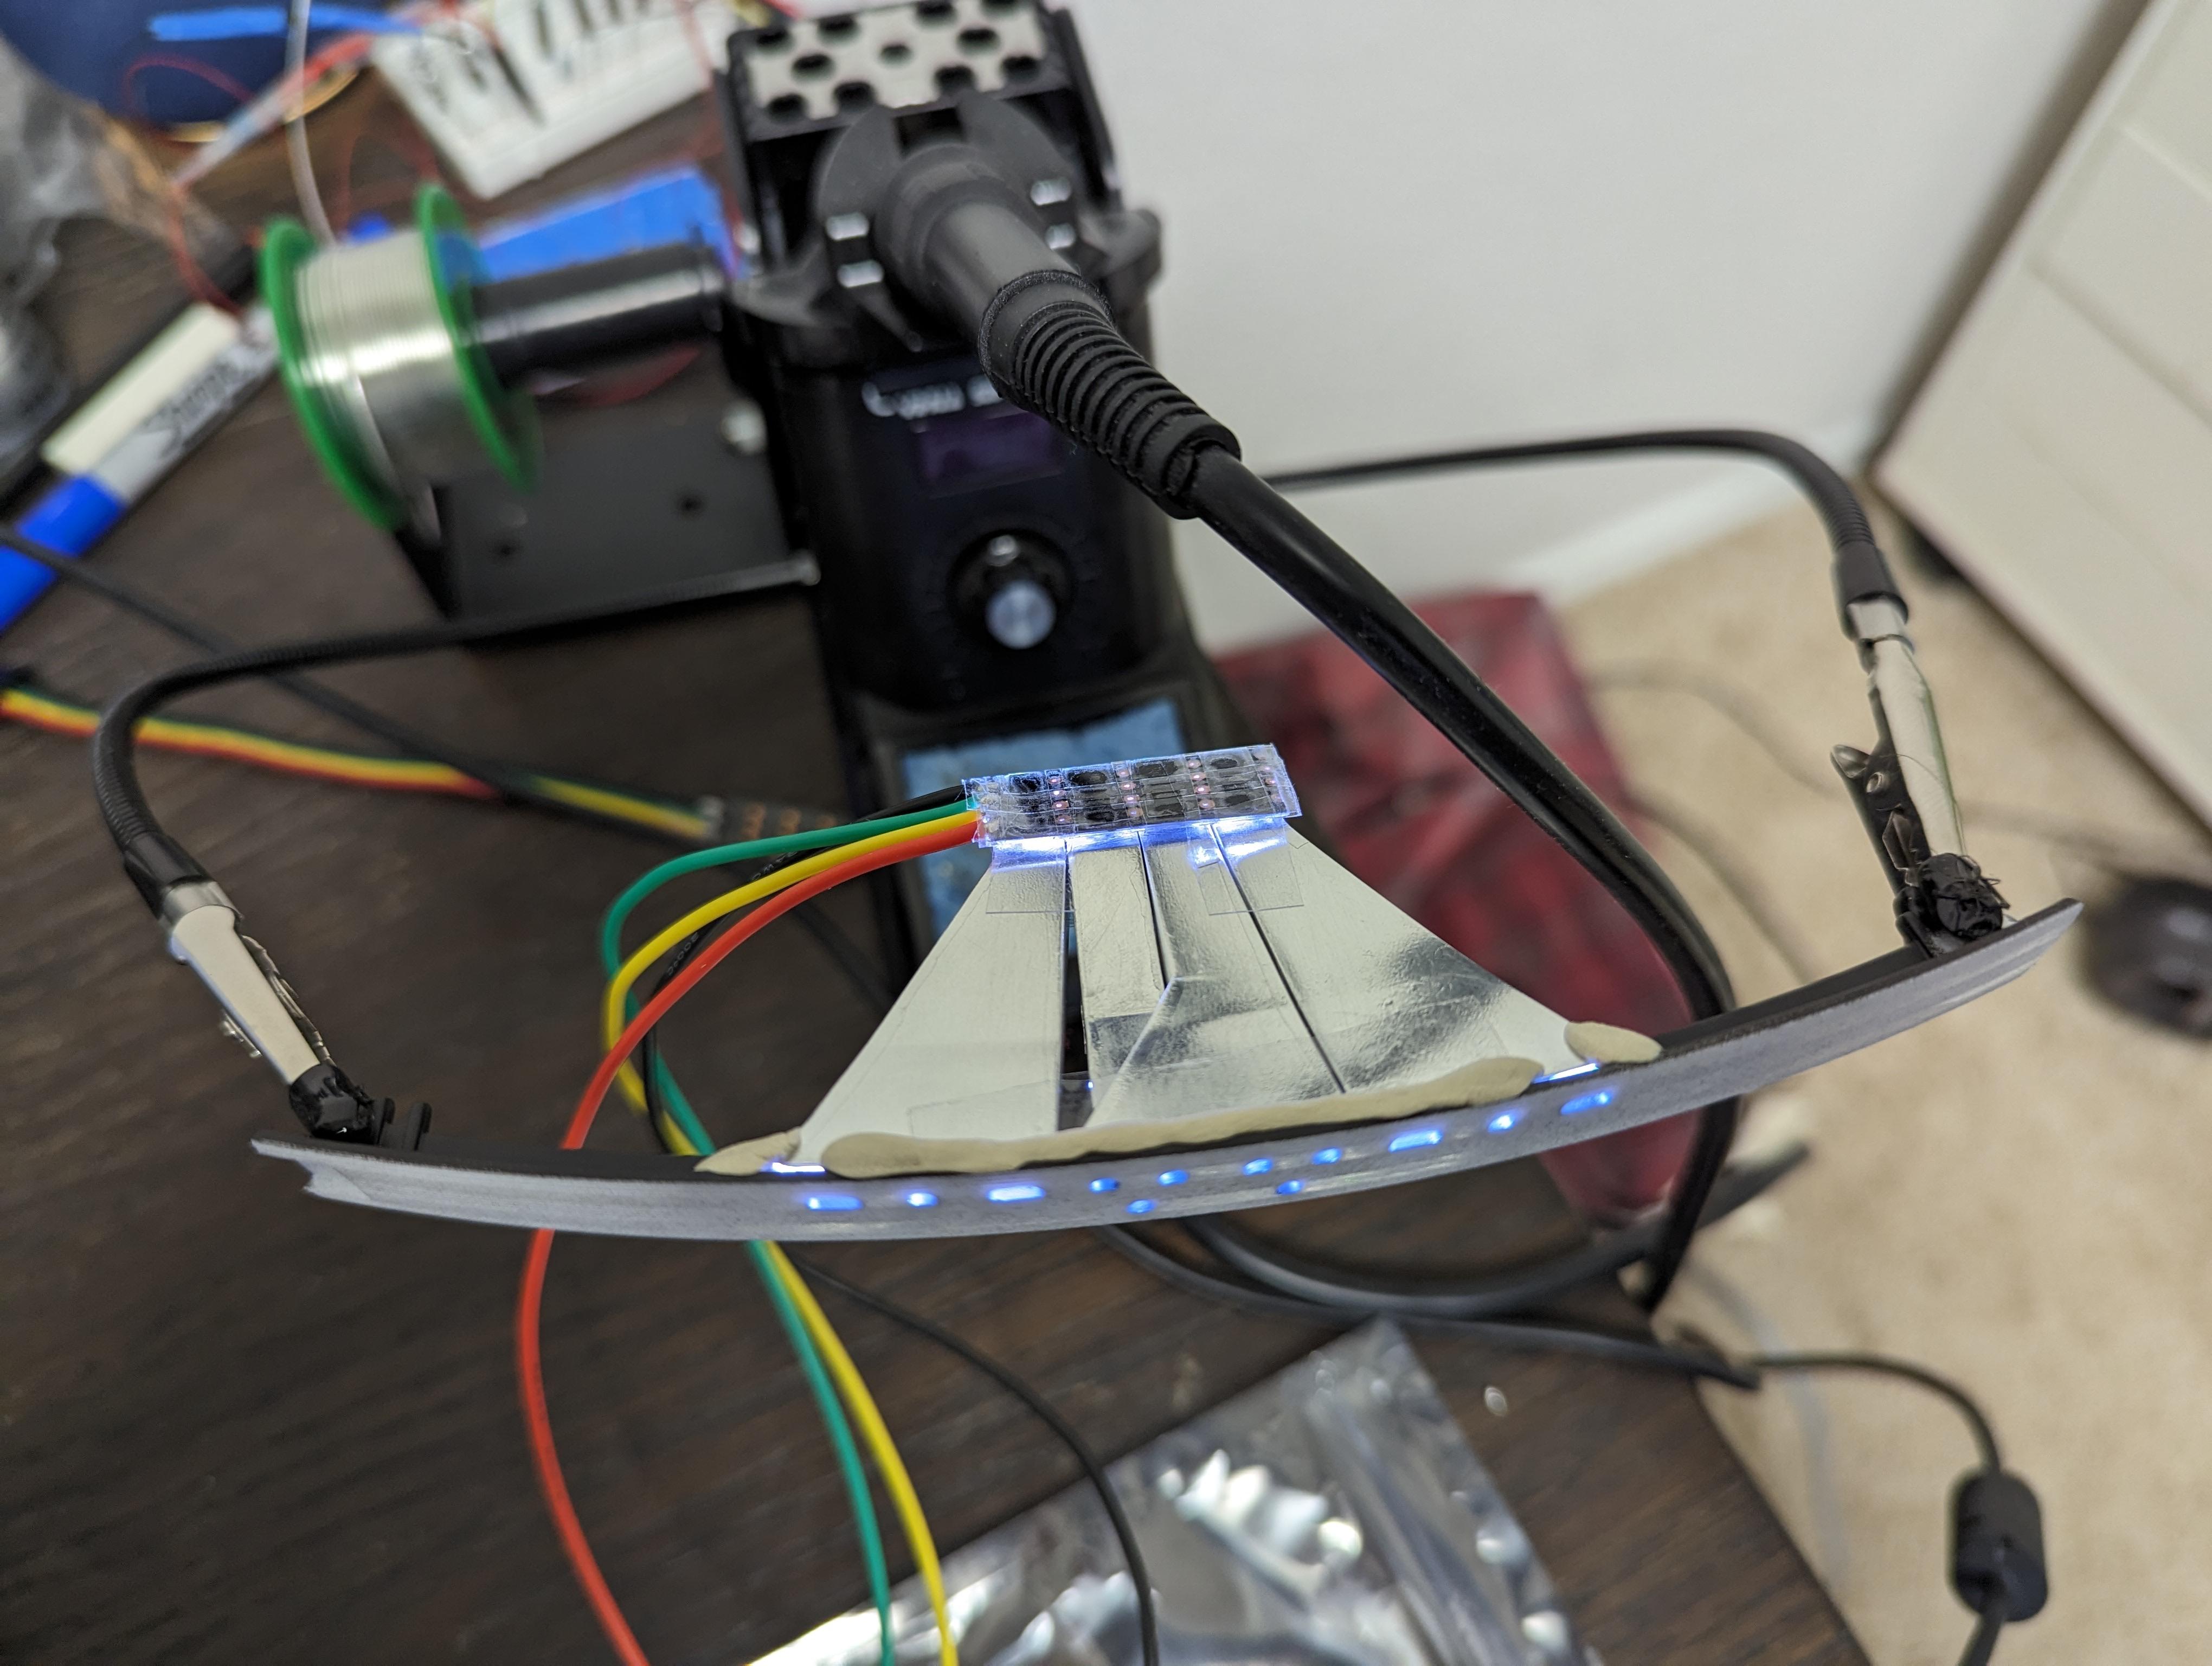
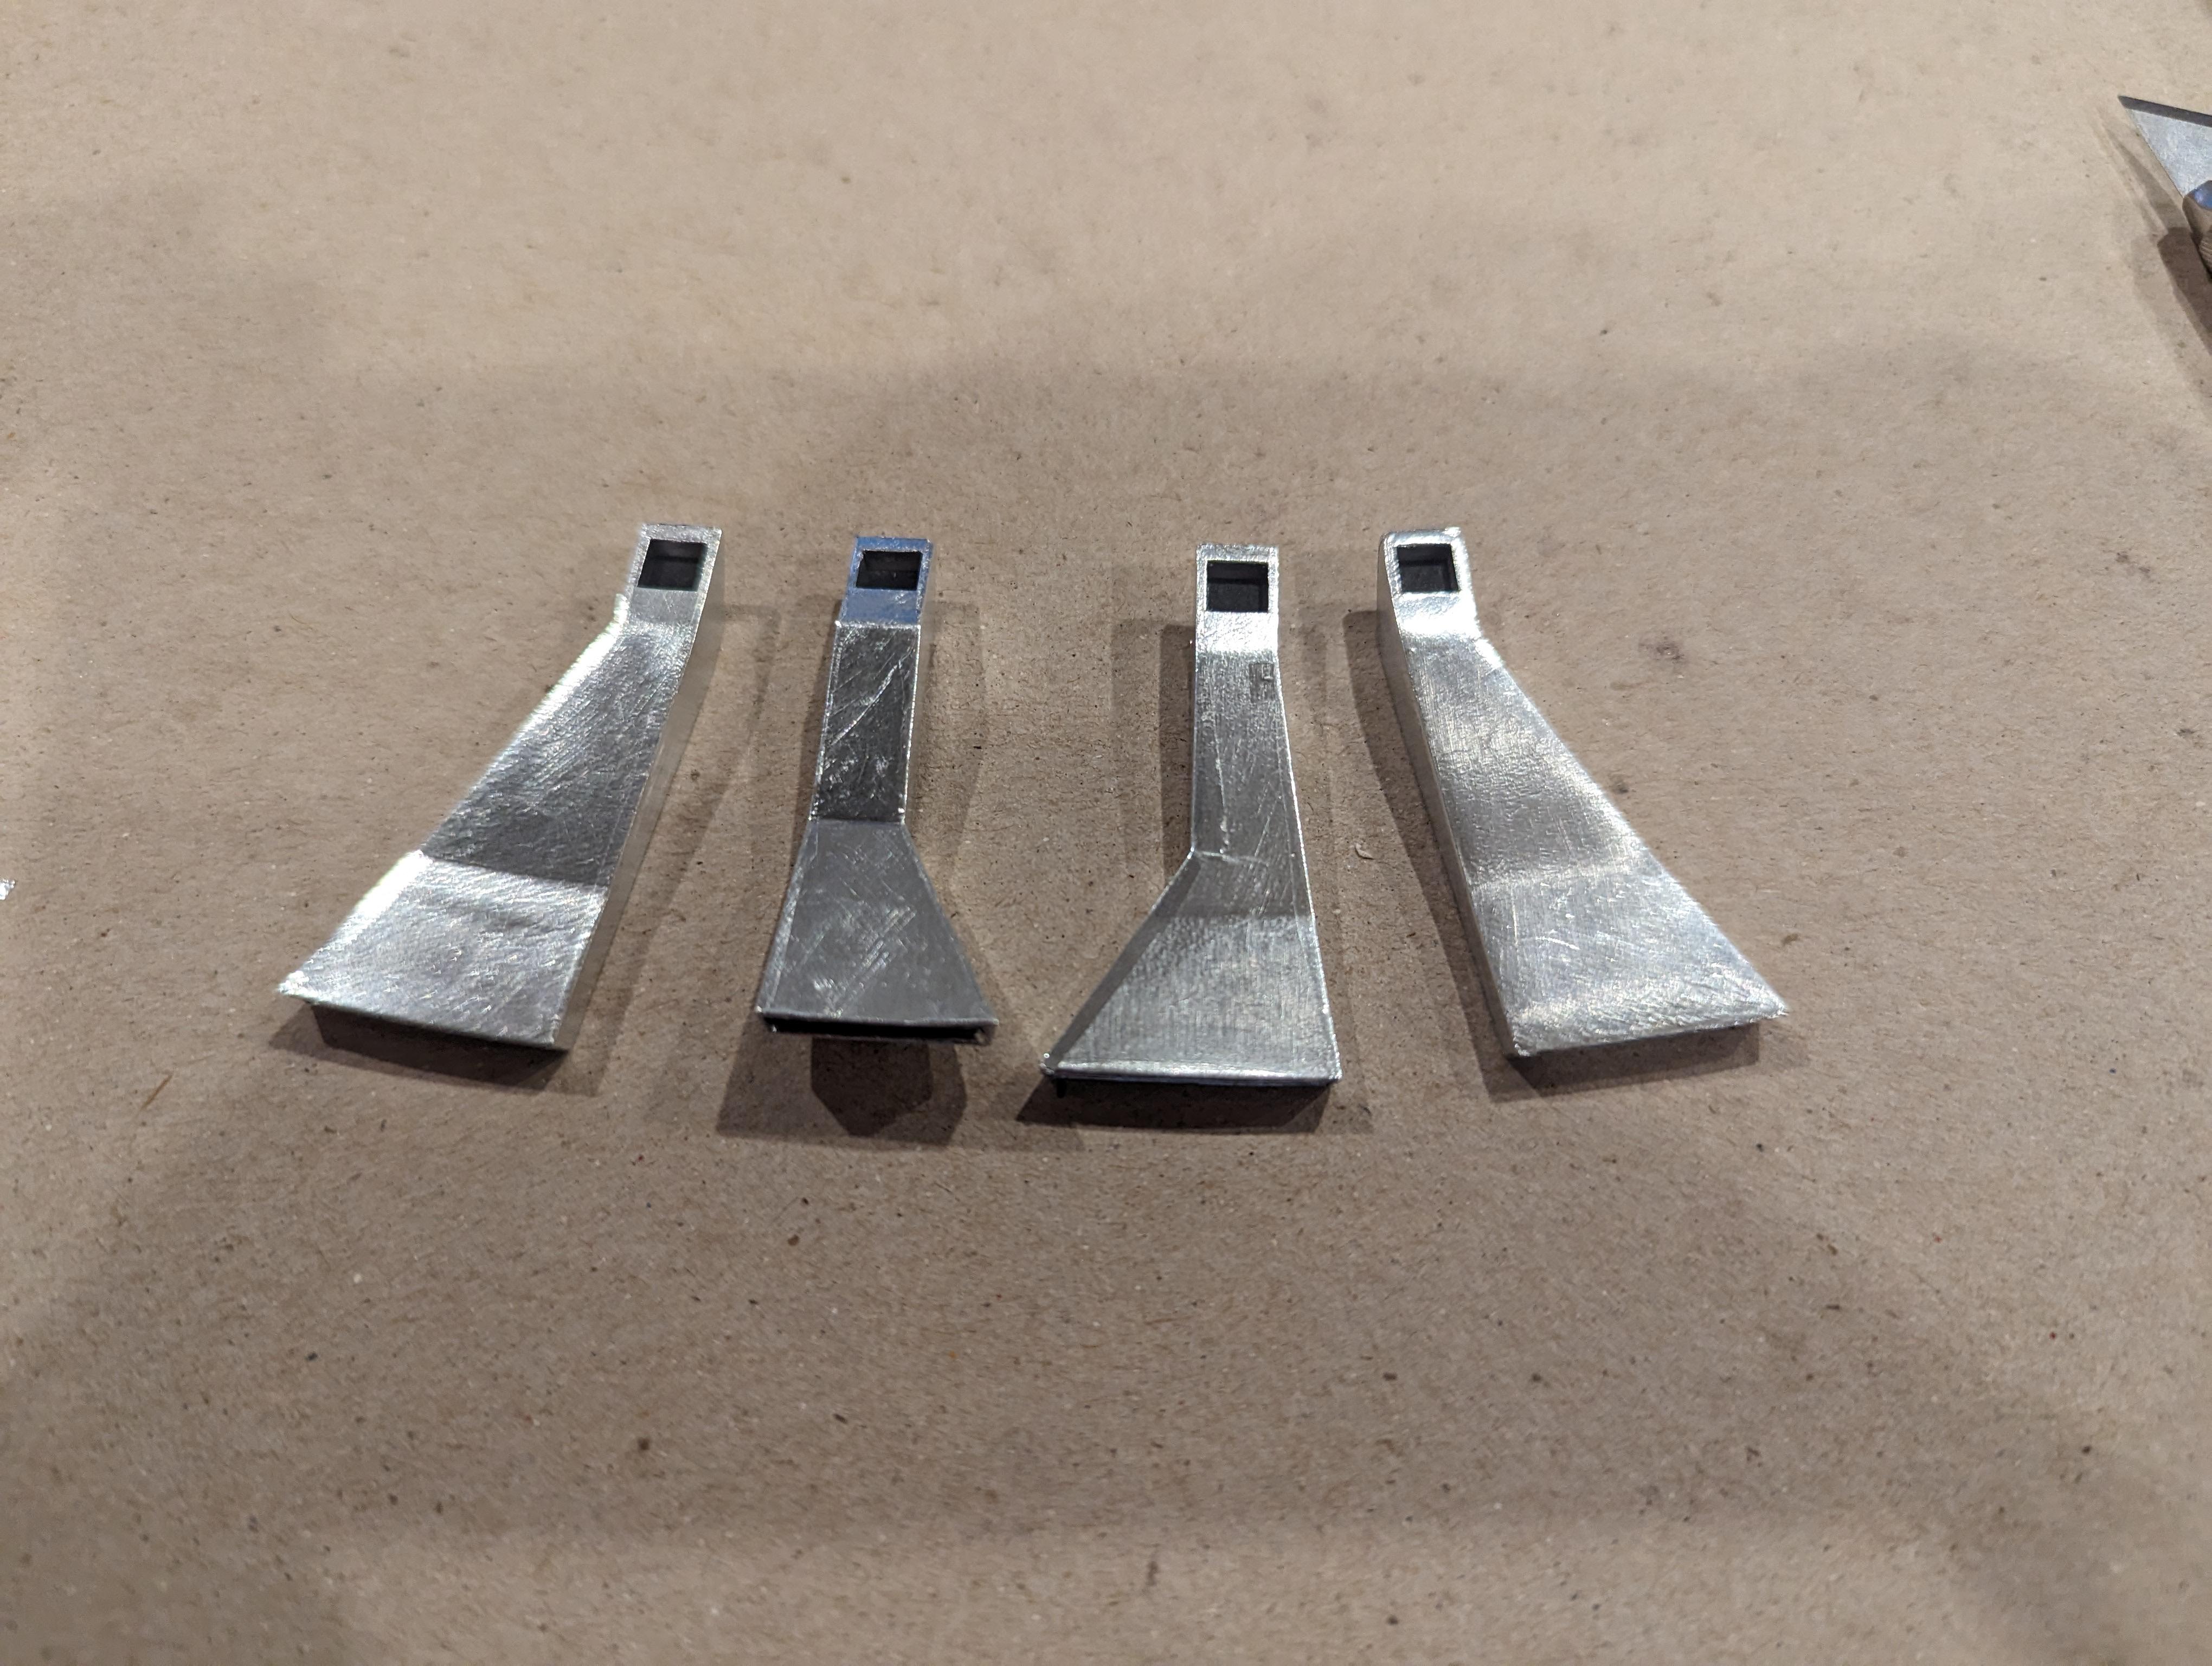
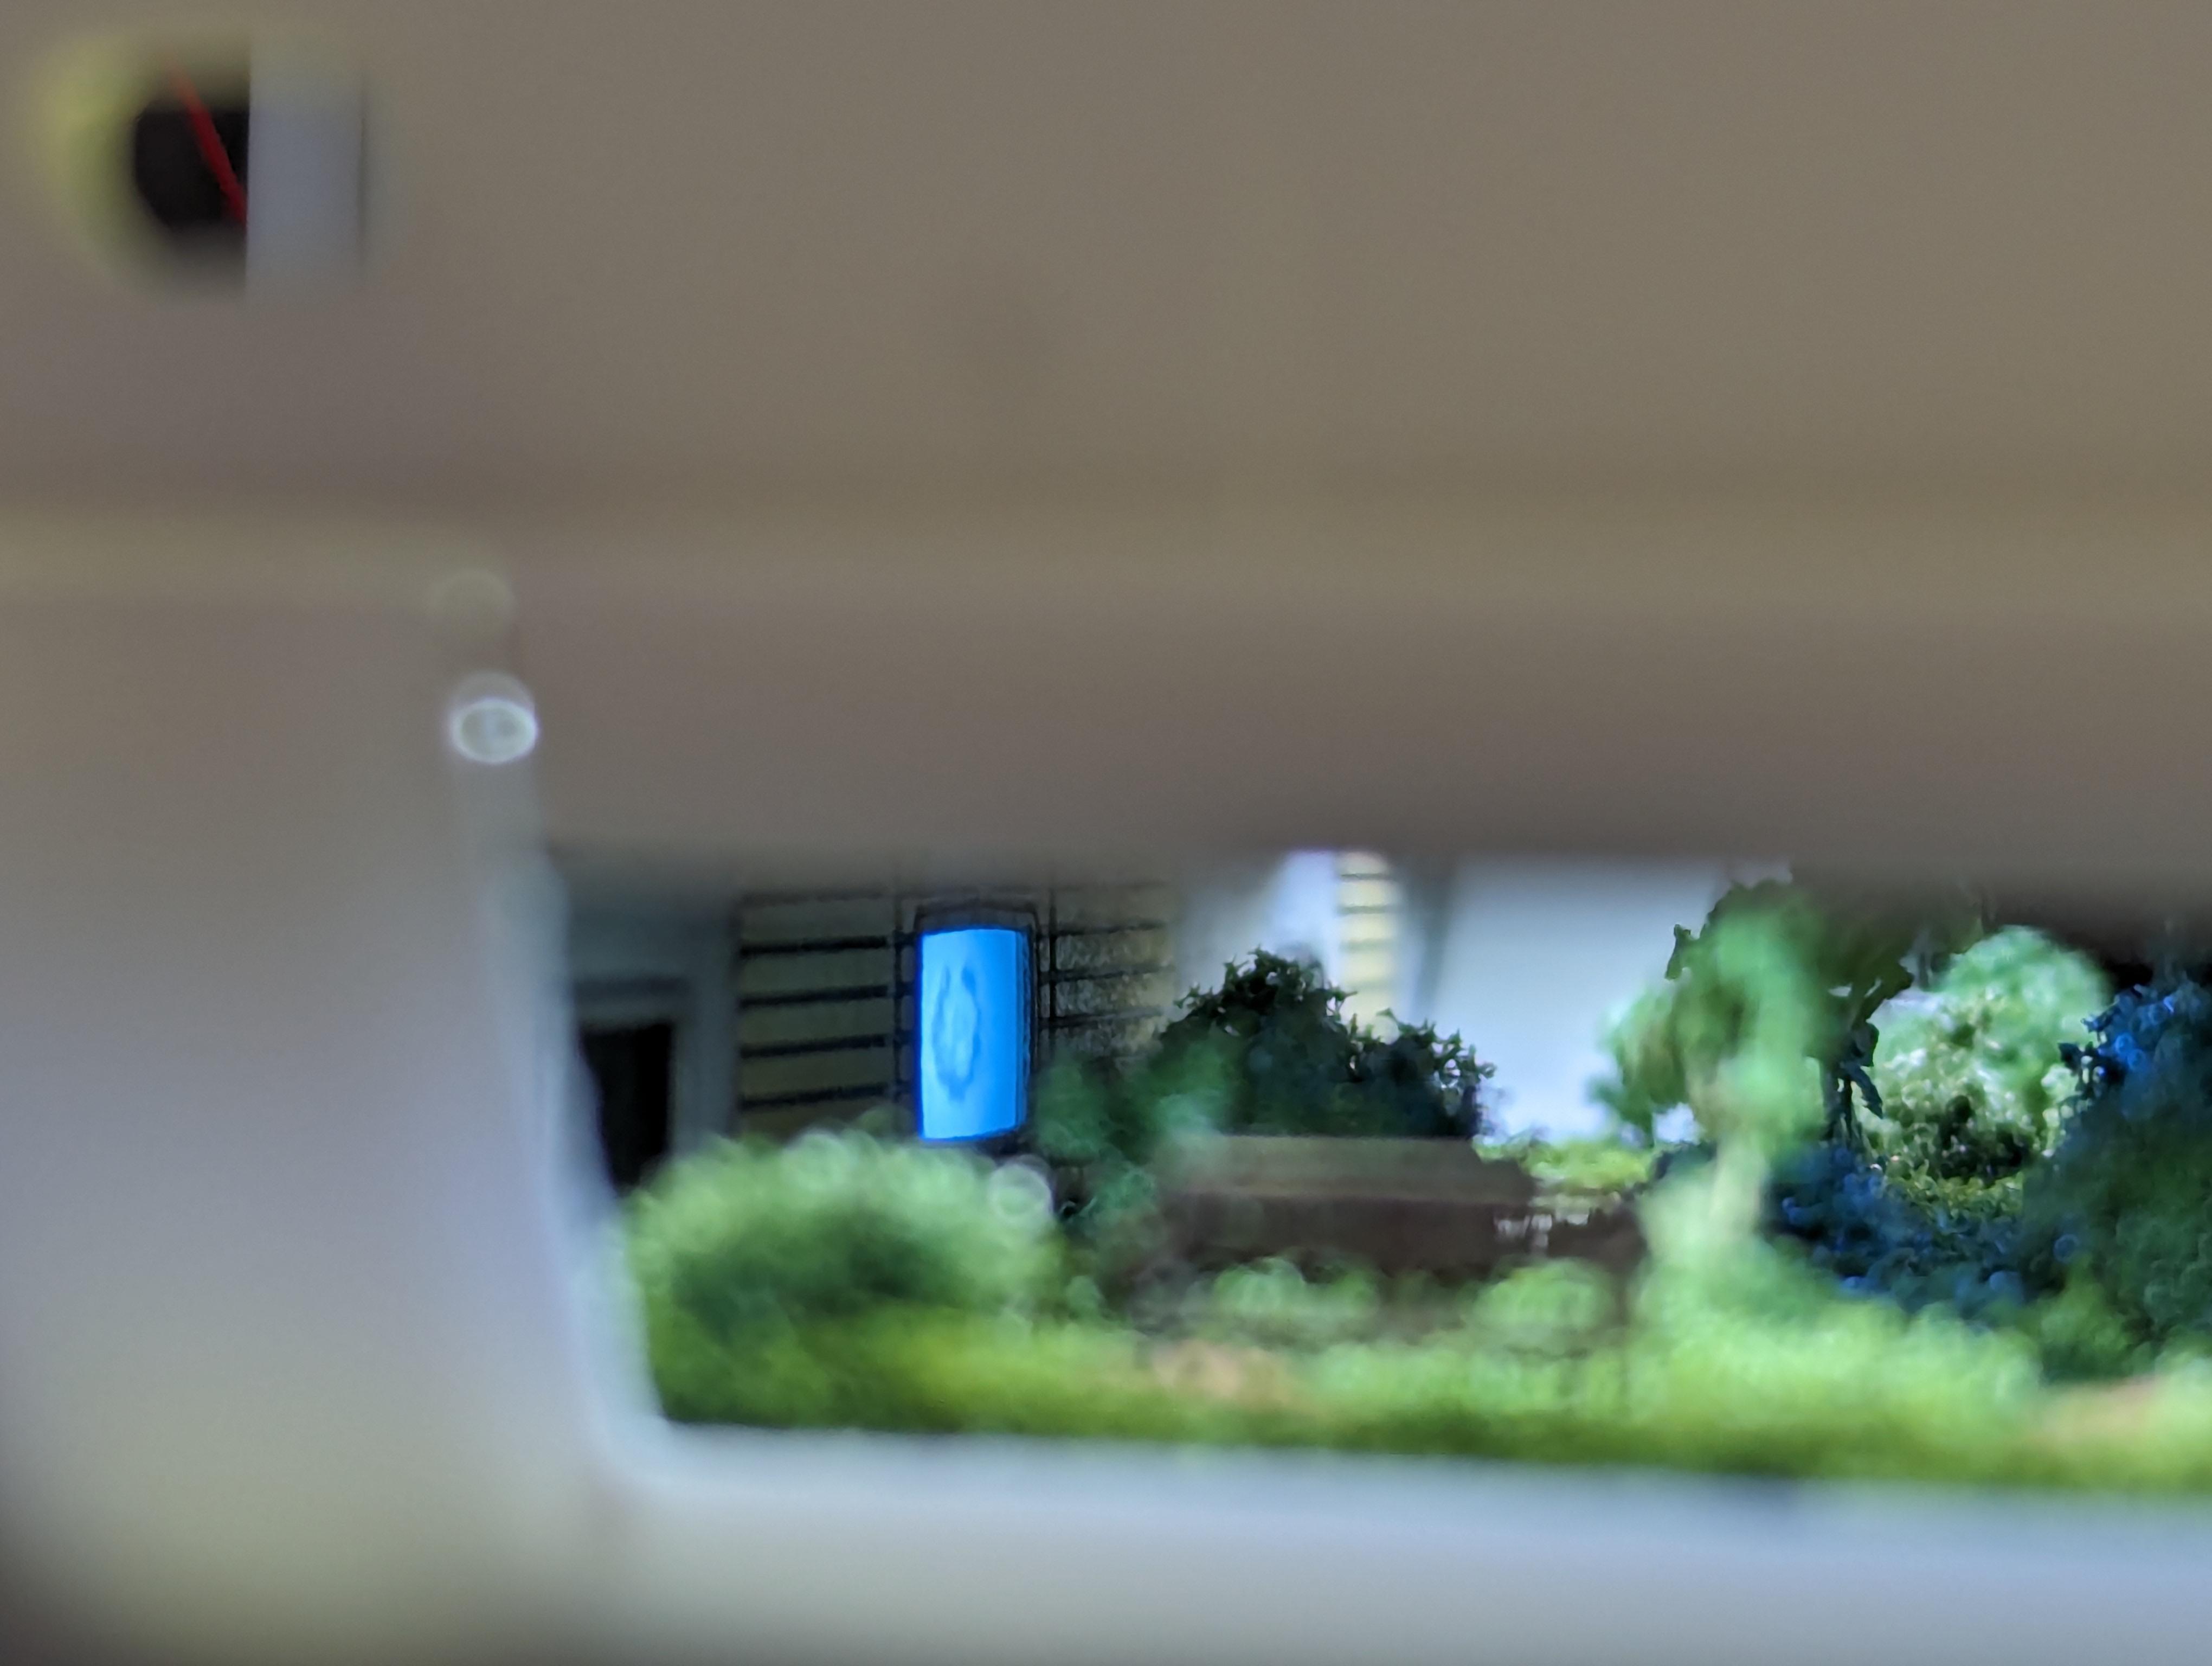
I'm almost a year into one of my bucket list builds, the 1/350 Polar Lights U.S.S. Enterprise Refit from Star Trek: The Motion Picture. I'm going all out on this build with aftermarket photo etch, resin, and home brewed 3D printed upgrade parts as well as a home brew lighting system based around a beefy Adafruit Grand Central M4 Arduino board and addressable RGB LEDs. At this point I've made good progress on the individual lighting components with lots of tests and proof of concepts, but I've yet to integrate the full system in either wiring or programming. I have also made good progress on the interior spaces, the arboretum and shuttle bay is nearly complete and I'm working on the officer's lounge below and behind the bridge. I've also done a lot of work on the lighting concept for the numerous porthole windows, I'm using Neopixel RGBW LEDs with custom designed and 3D printed light pipes. Each "room" on the interior has its own LED and I can set the lighting parameters individually as well as program special effects animations (like a red alert mode where the lights pulse red). Also on the plan is a full 5 color iridescent paint scheme that will be as close as possible to the beautiful and unique filming model. All of the parts arrayed and the primary and secondary hulls test fit before beginning the project in earnest. There is apparently a lot of variation in fit depending on when exactly individual kits were produced. Thankfully, I got a really good copy and there are very few fit issues. Shuttle bay assembly and lighting test. Light test of the 3D printed turbolift tubes for the shuttle bay. I also designed and printed some cargo containers. They still need to be cleaned up and painted, but they add some interest to the cargo bay floor. They'll be difficult to see, but I'll know they're there. Shuttle bay cocooned in painters tape and LEDs. There are 17 Neopixel RGBW LEDs just for this part. Arboretum. I extensively modified this part, grinding off the cartoonish tree, bench, and bridge details, as well as grinding down the stream bed. I built up the grass areas with putty, used some various Woodland Scenics diorama foliage, filled in the stream with clear resin and added photo etched details (benches and bulkhead walls). I also cut out the bulkheads and added backlights to the view screens. Warp nacelle lighting test. I used some diffusion material from a dead LED TV to make sure the lighting is nice and even. It looks a little mottled here because it's running an random idle animation I'm testing that varies the brightness in a random water like pattern. The LED strip and diffuser inside the nacelle. Test of the warp nacelle reaction control thrusters. I carved out a tiny sliver of the TV diffuser to provide even lighting to all 4 emitters from a single SMD LED. Test of a concept to provide lighting to the shuttles in the bay without having to hard wire them. I carefully bent an induction coil to fit the underside of the deck and placed a tiny inductive LED in the shuttle. The final shuttle will be light blocked and painted and just the areas that need to be lit will shine through. Test of the main navigational deflector lighting. It's using another RGBW LED and can shift between the amber low power mode and the blue high power mode. Self illumination spotlight testing. I used a 2mm tower LED and put a small piece of aluminum tube over it to control the shape and throw of the light. I'll sand the tube down flush on the exterior on the final version. Test of the porthole lighting and light pipes. The 3D printed light pipes are sanded smooth and polished on the exterior to get rid of any print lines and then covered with bare metal foil for light blocking and to increase internal reflections. This allows me to keep the light were it needs to be as well as control each group of portholes individually. Close up of the arboretum testing out the view screen lighting.
-
Really nice build! Is that the recently released one with updated tooling? I picked one up and lopped the front end off to build a '64 El Camino by merging it with the older '65 AMT El Camino.
-
Beautiful work on what sounds like an extremely daunting kit! It's a different sphere of modeling, but I get the same feelings from the Polar Lights 1/350 U.S.S. Enterprise Refit (movie version) I'm working on. I just passed the first anniversary or starting the build and I'm still working on the lighting rig and the few interior spaces that are visible from the outside. ?
-
Really nicely done! My dad has a '49 Buick Roadmaster Estate Wagon that he lovingly restored. All the wood had to be done from scratch since it was all rotted away. I'd love to build a model of it sometime to give to him, this may be a decent roadmap for me to follow. There would still be a lot of 3D printing involved, but it might be worth using the donor kits to make it a little easier.
-
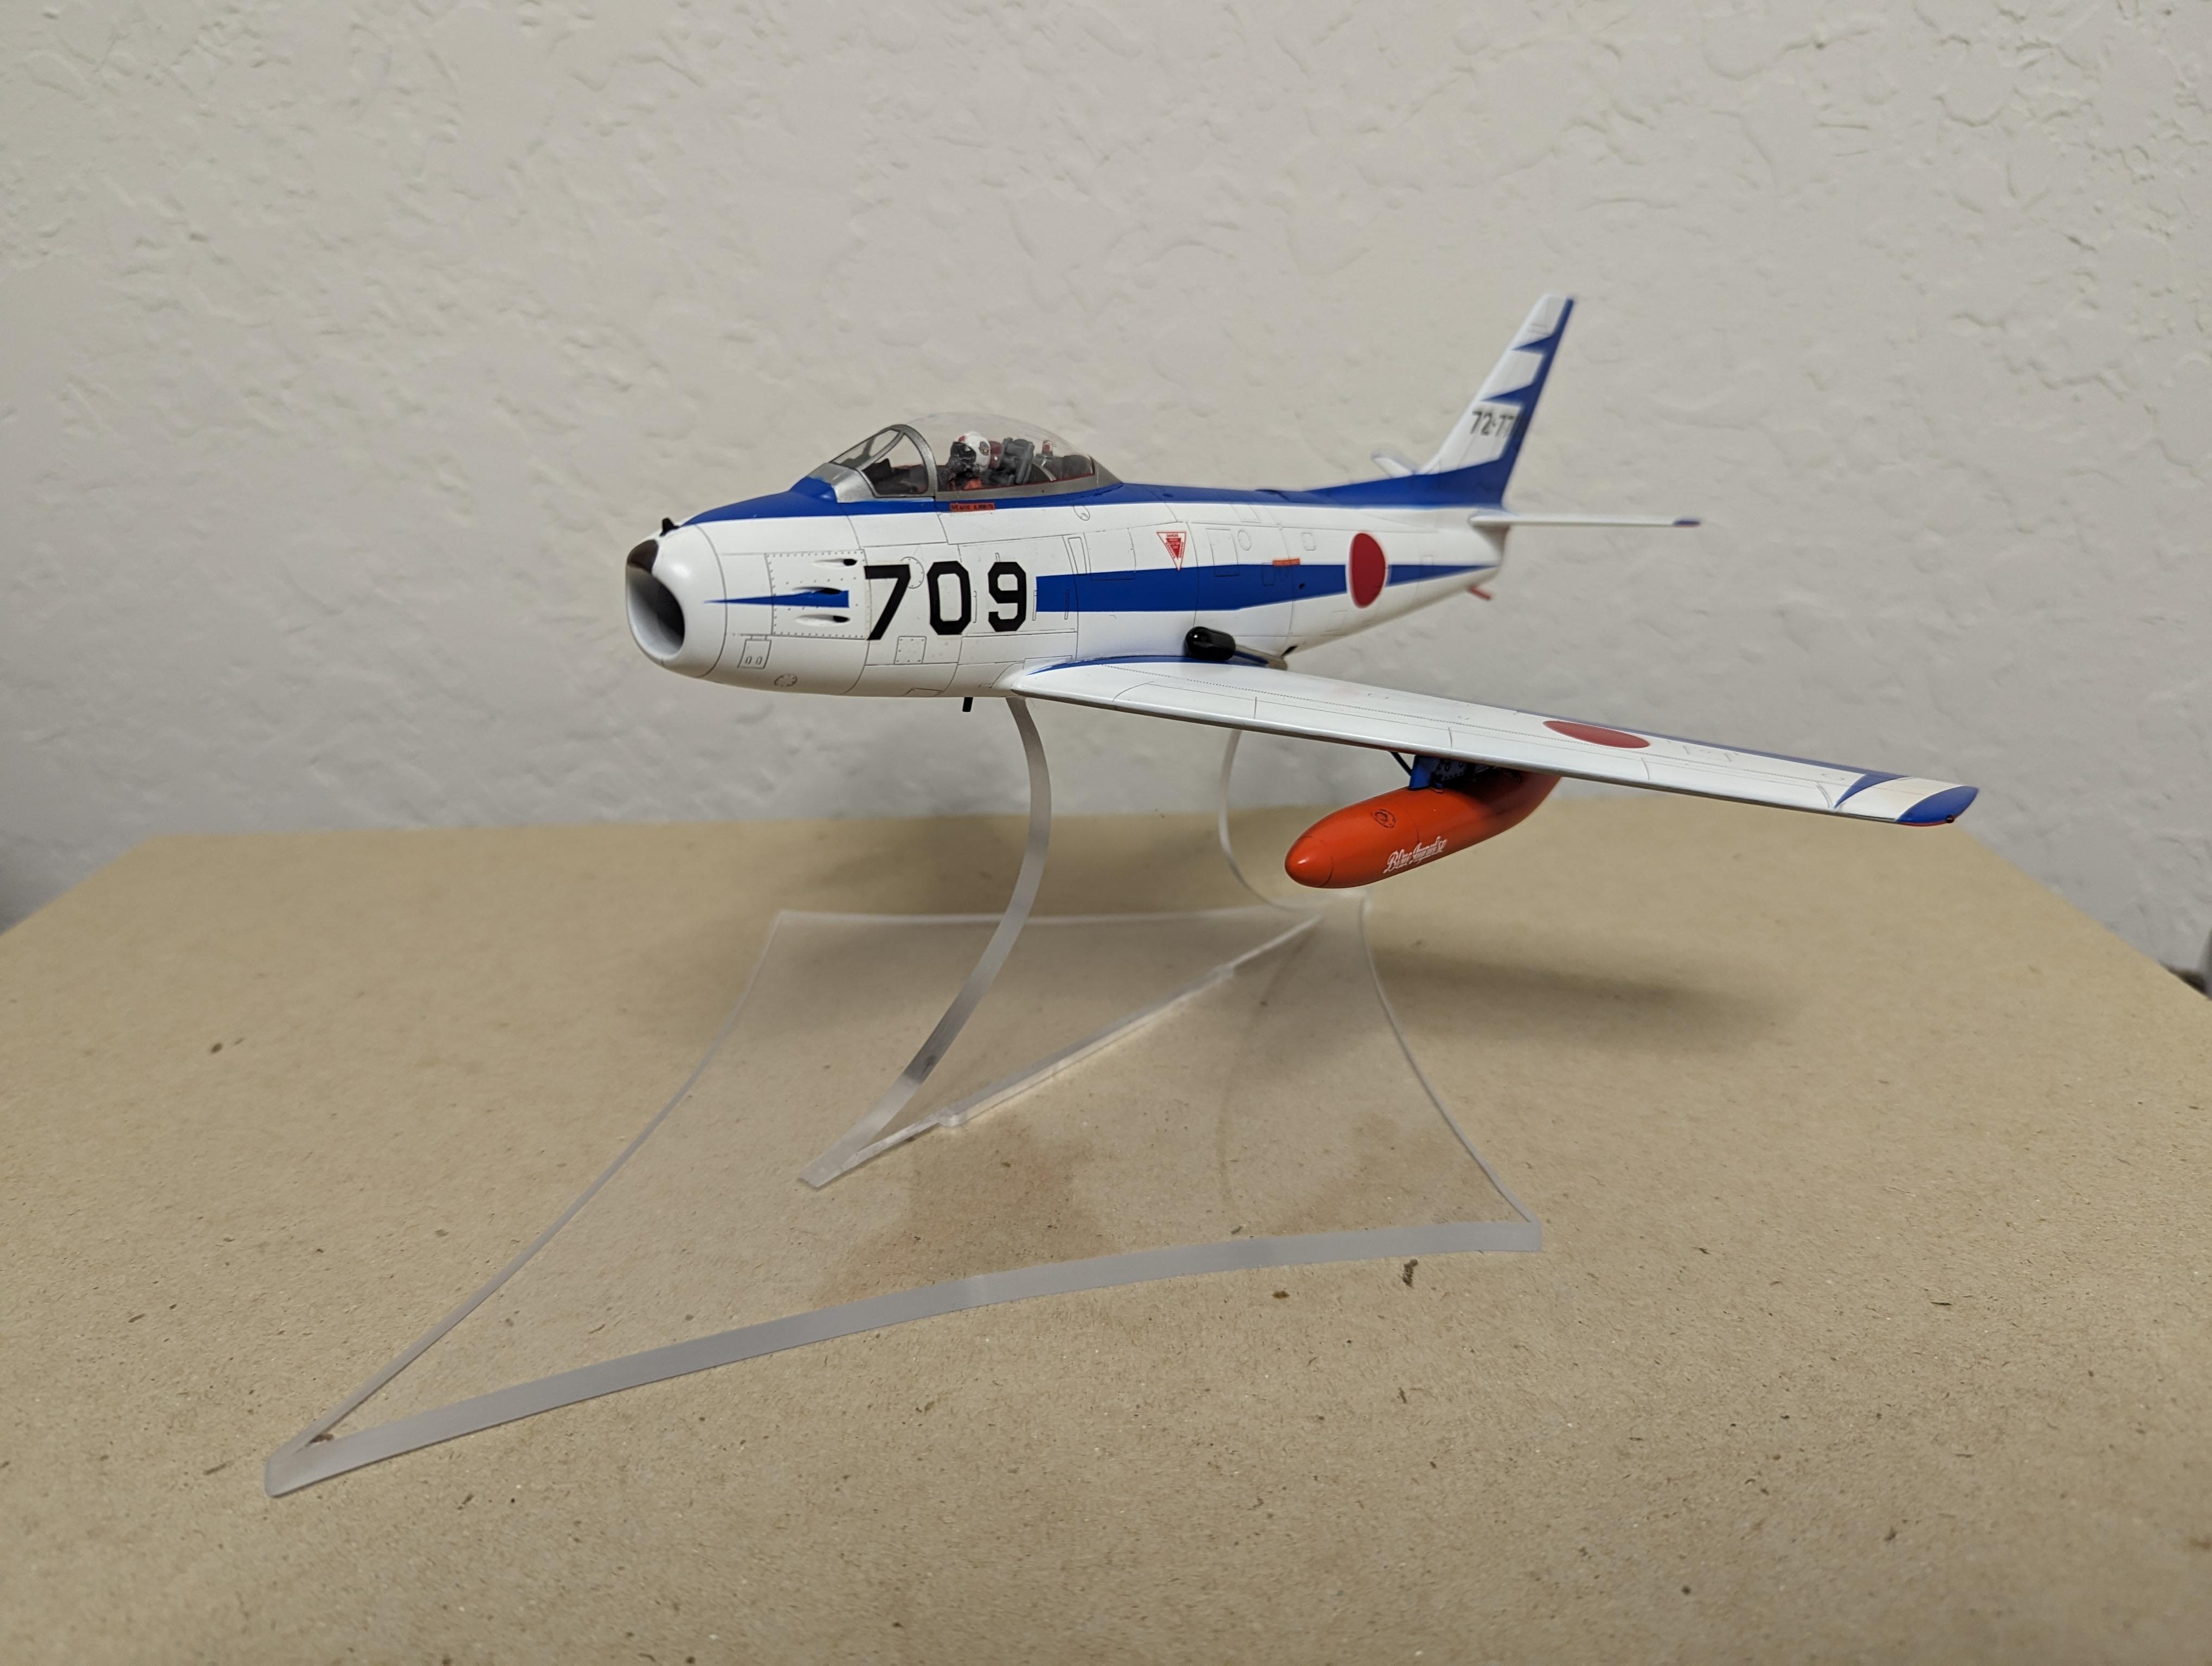
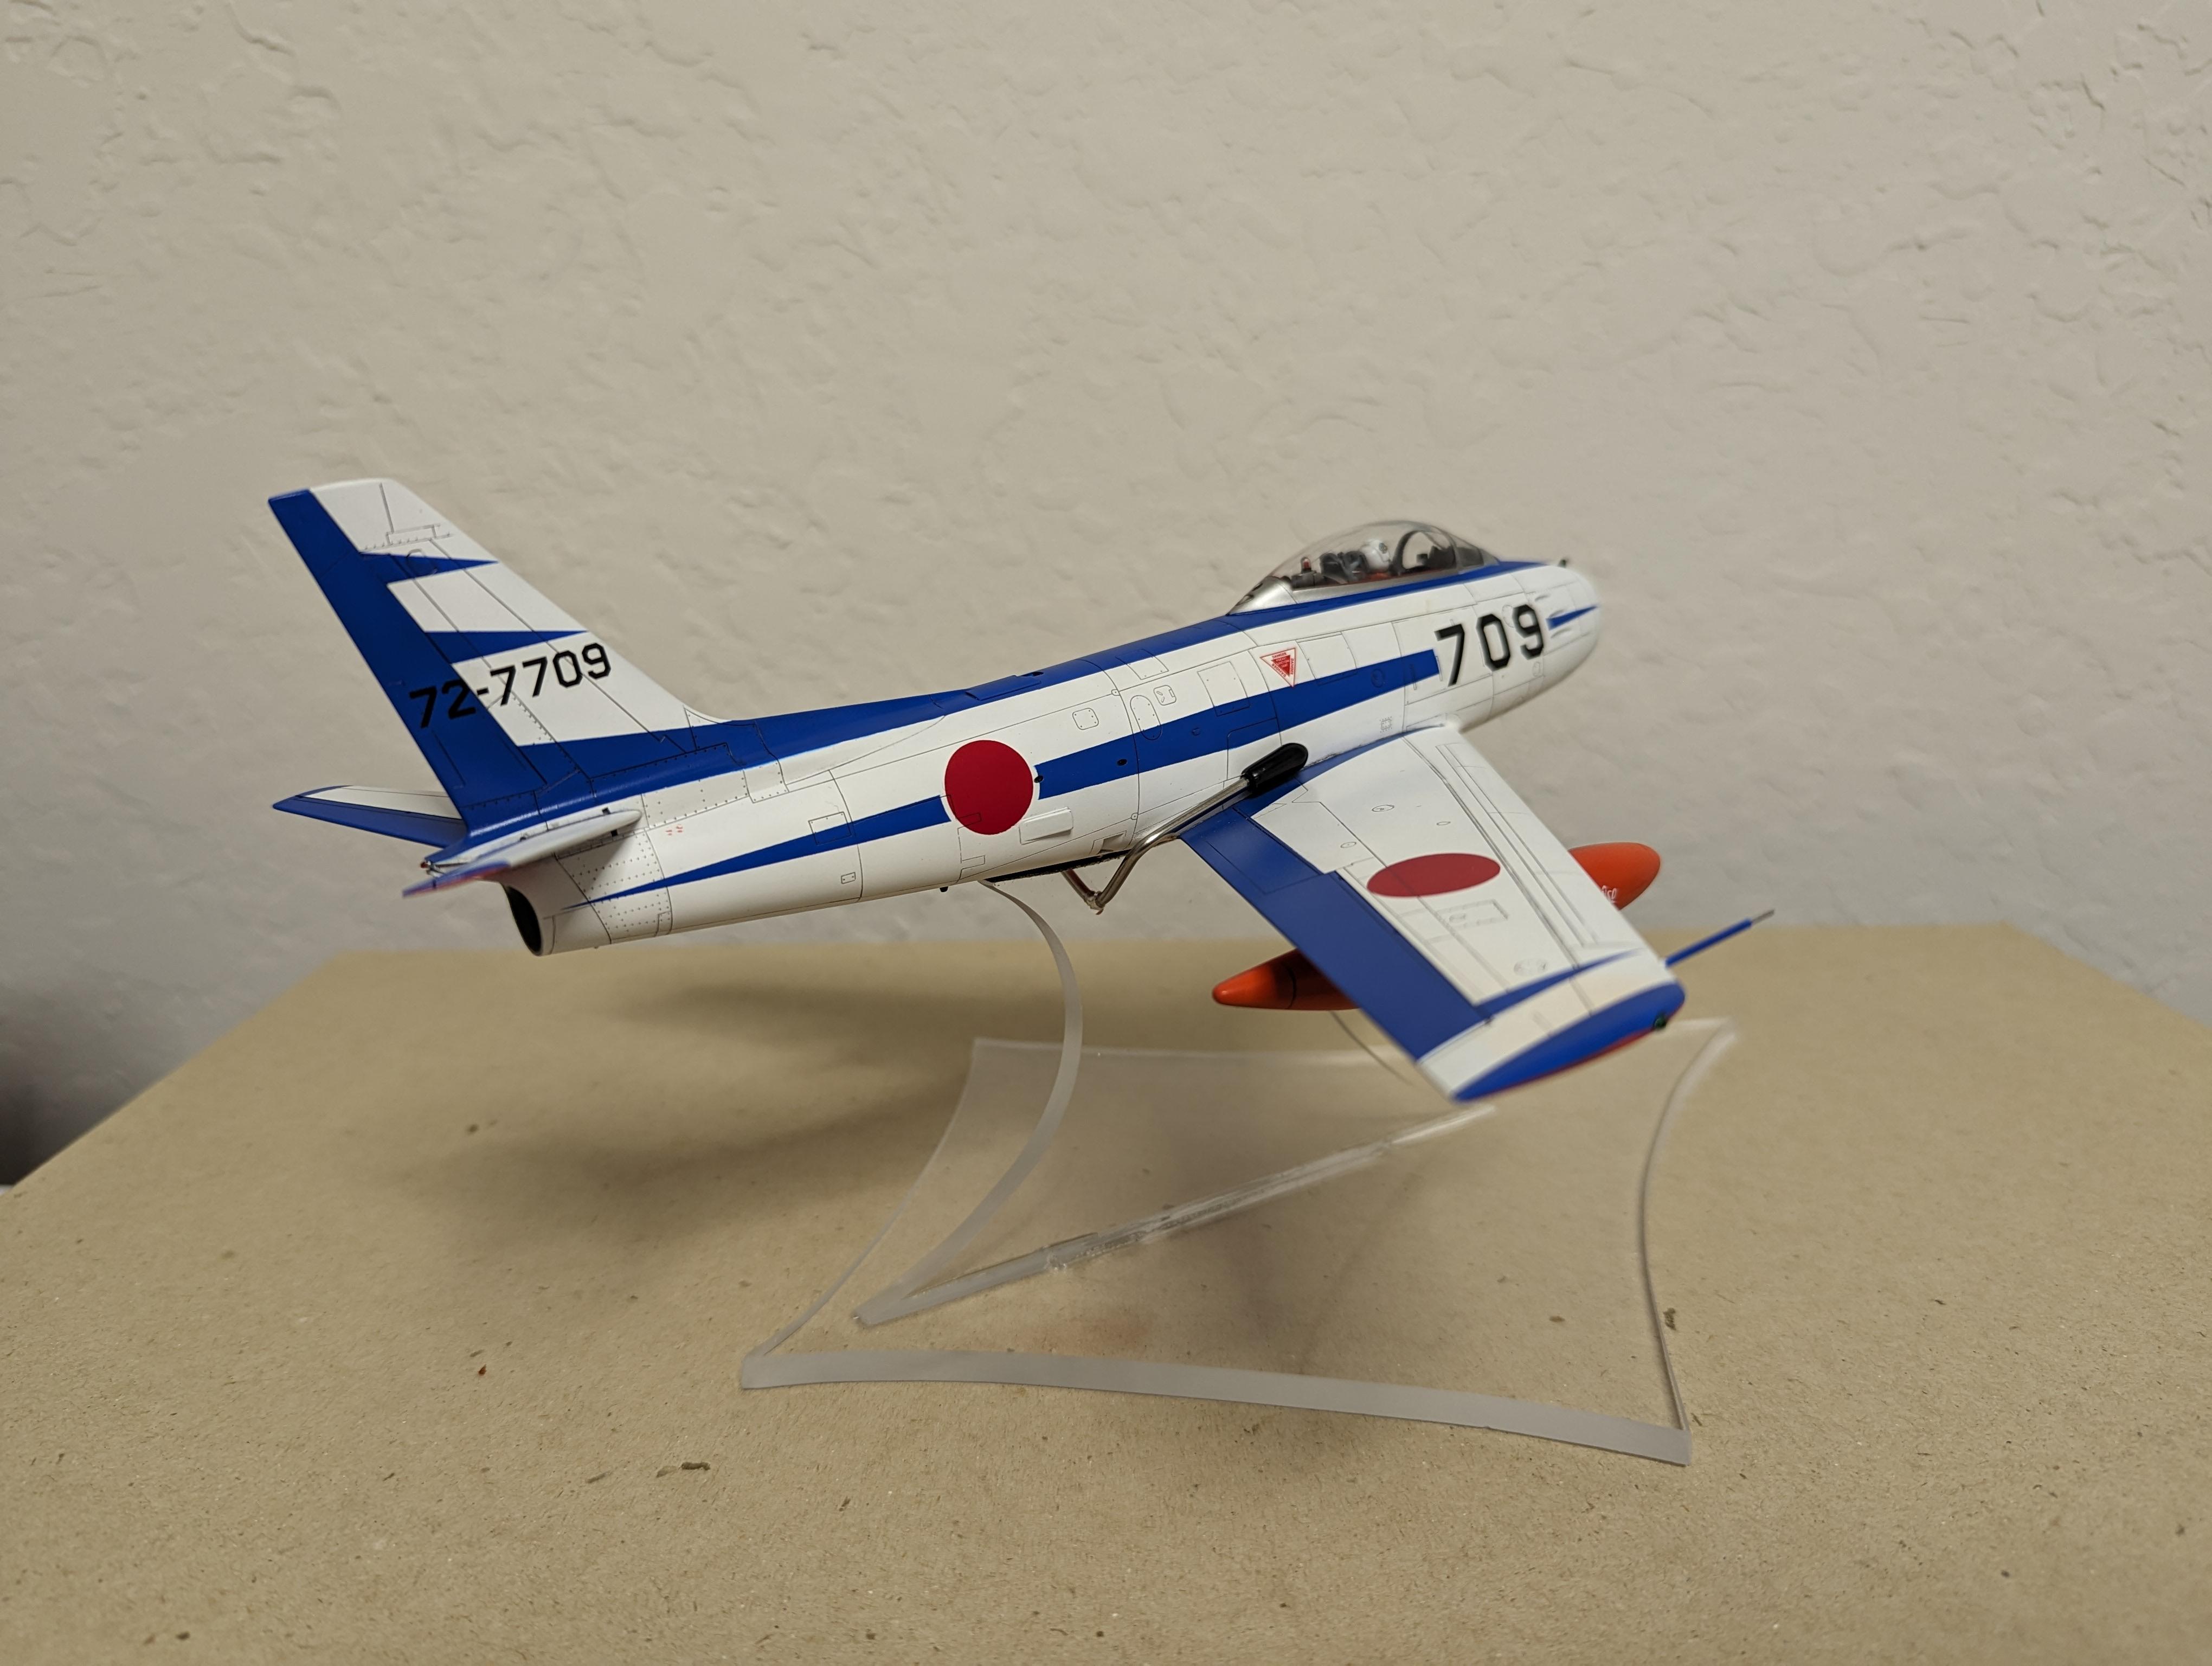
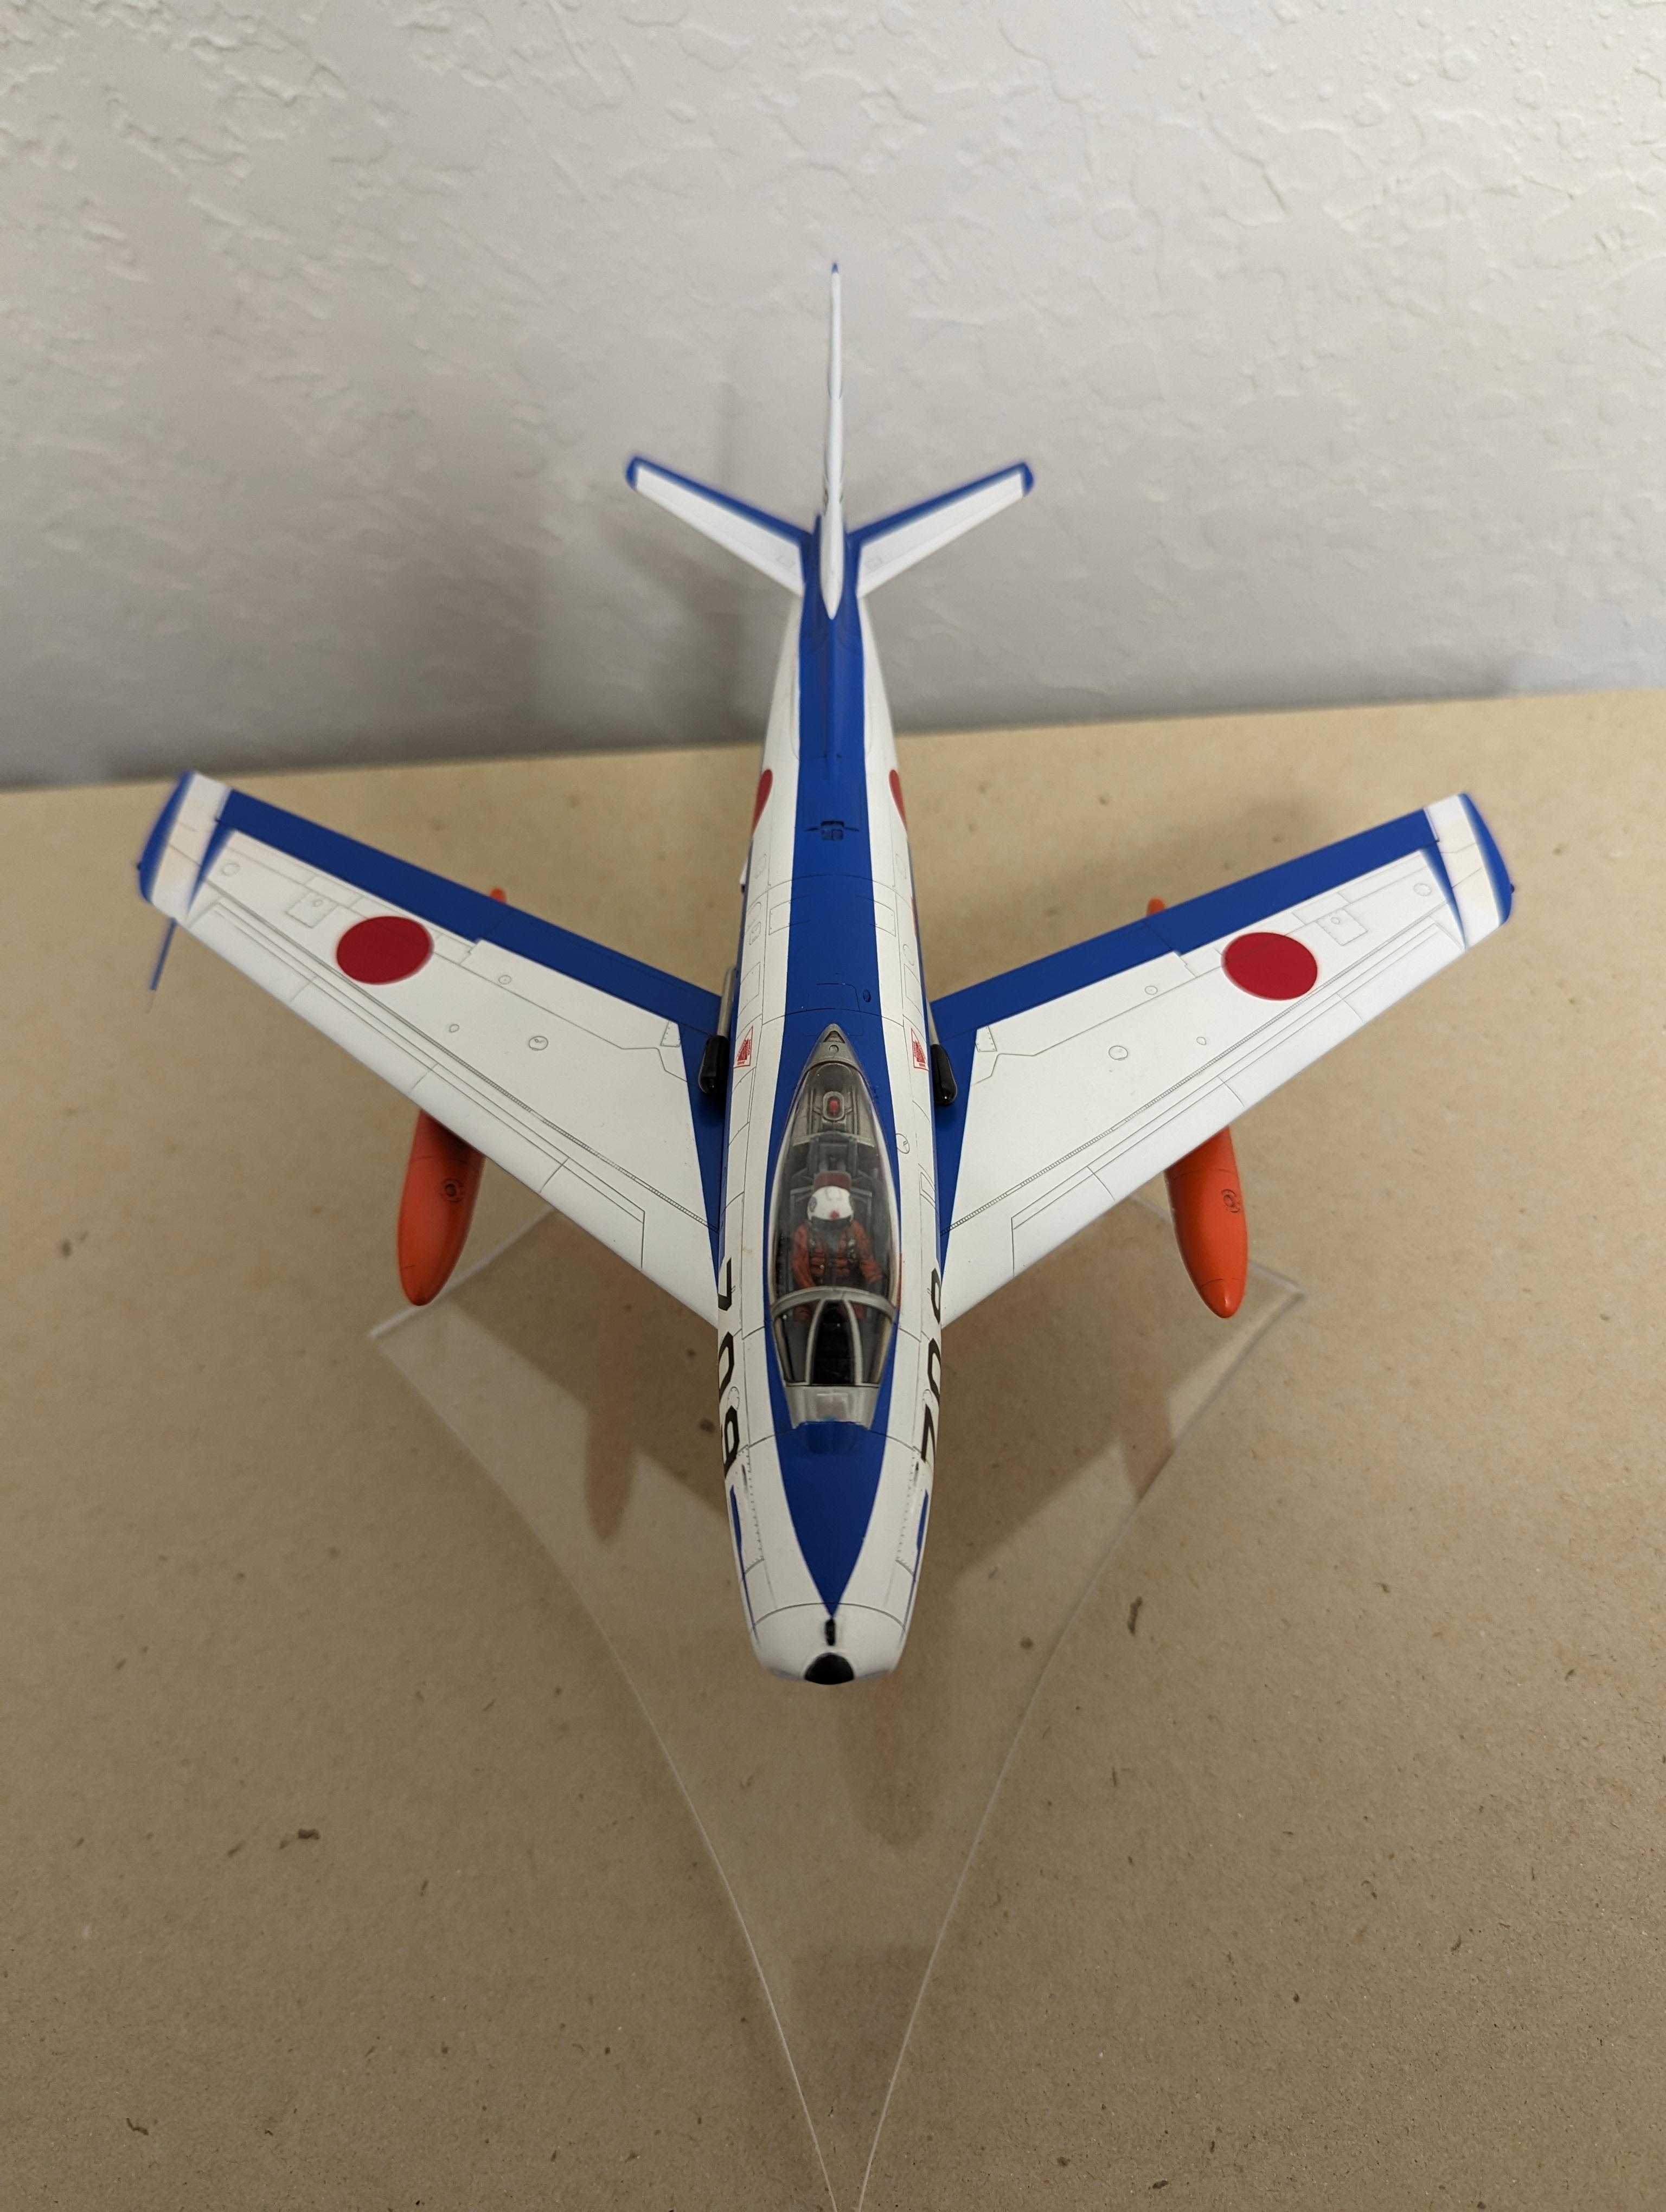
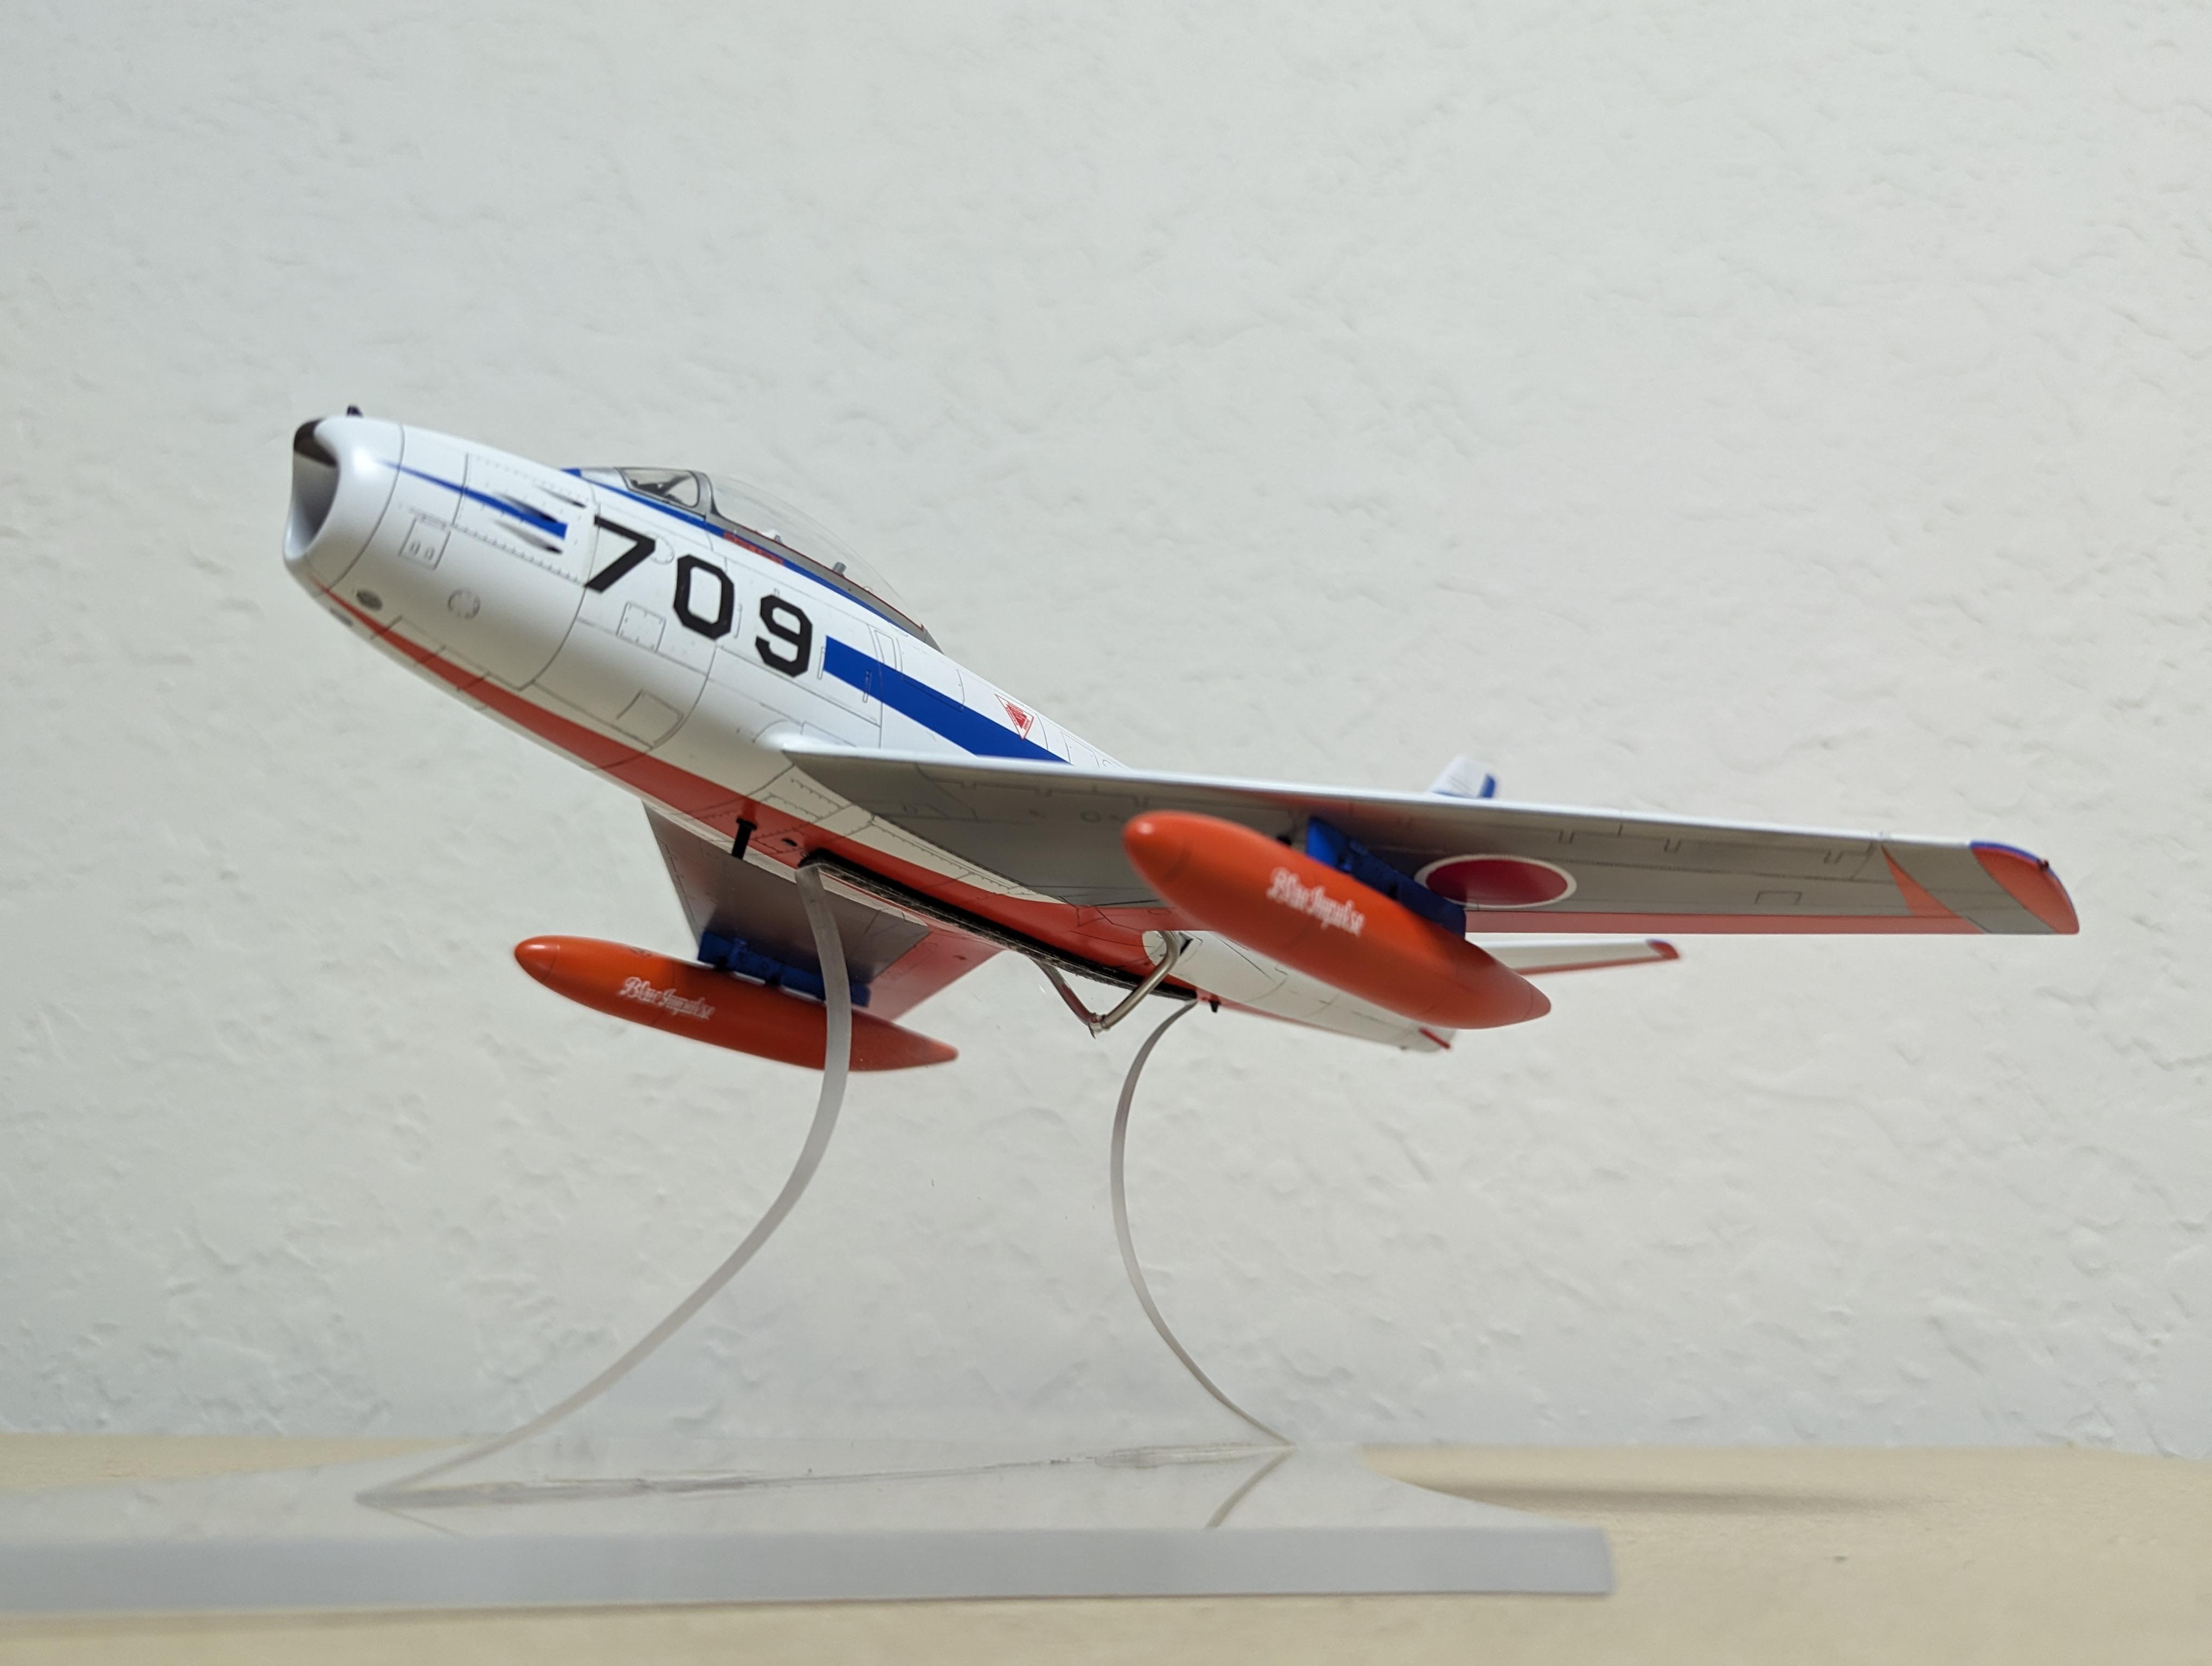
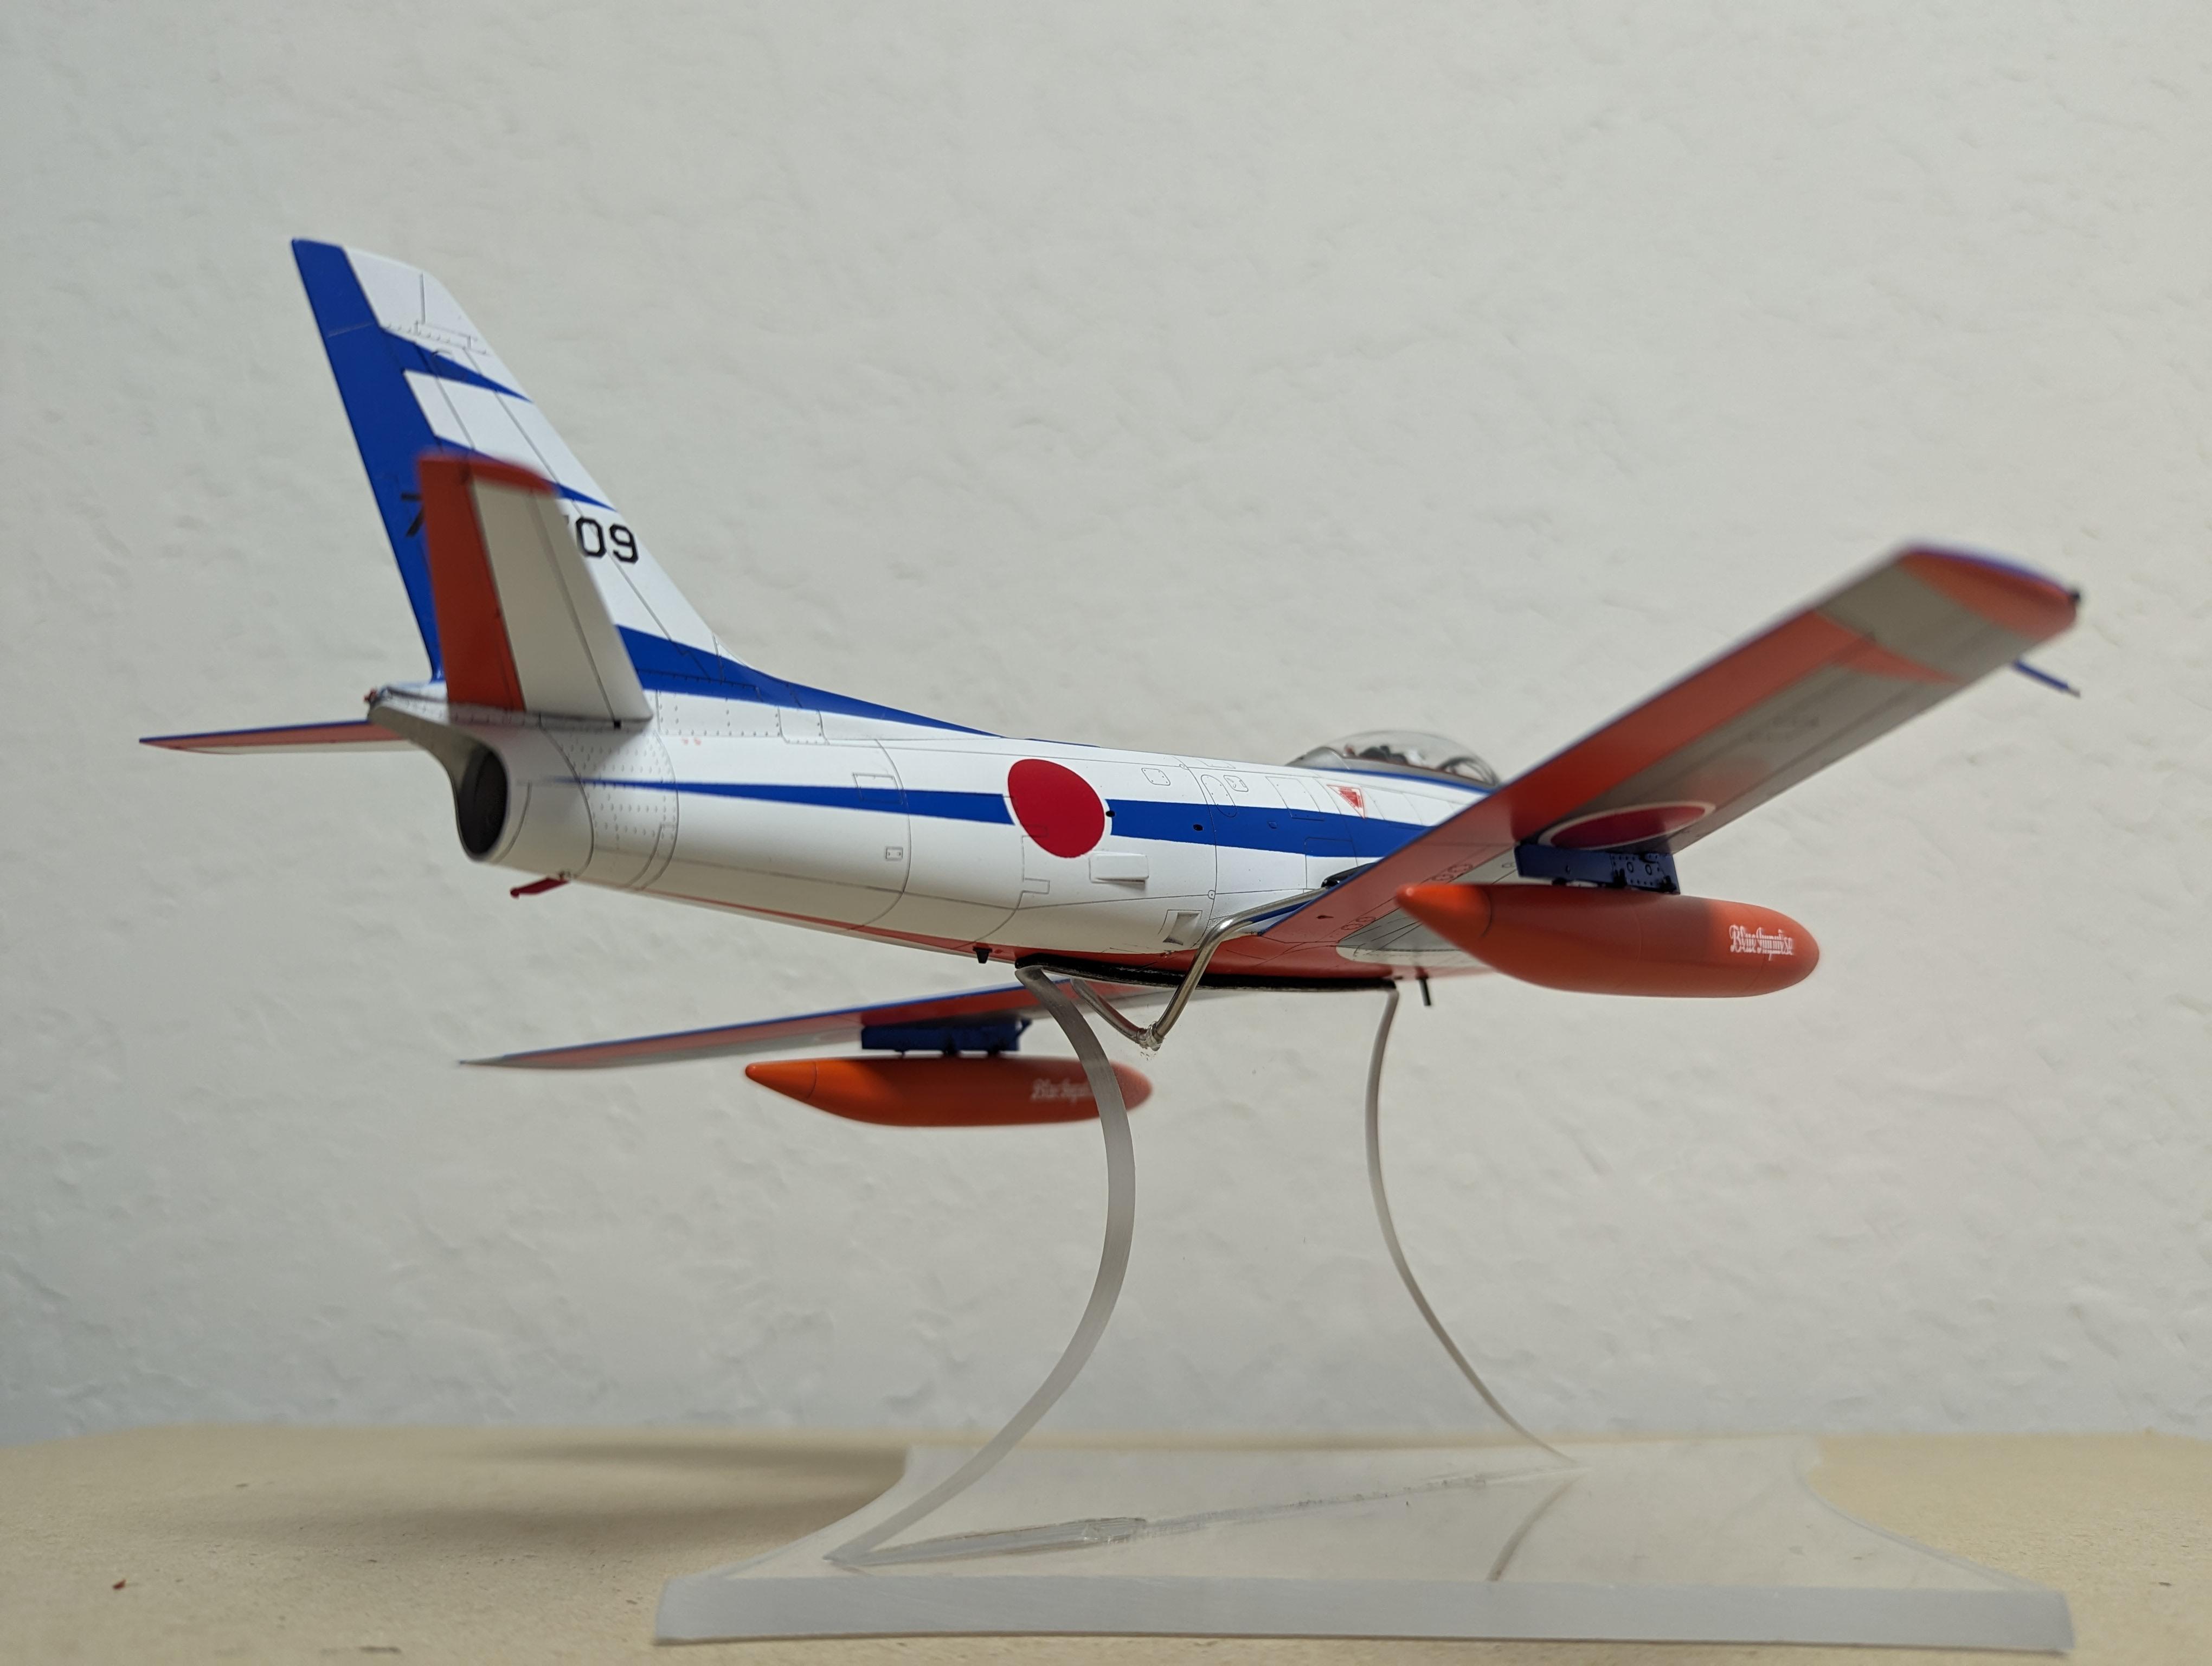
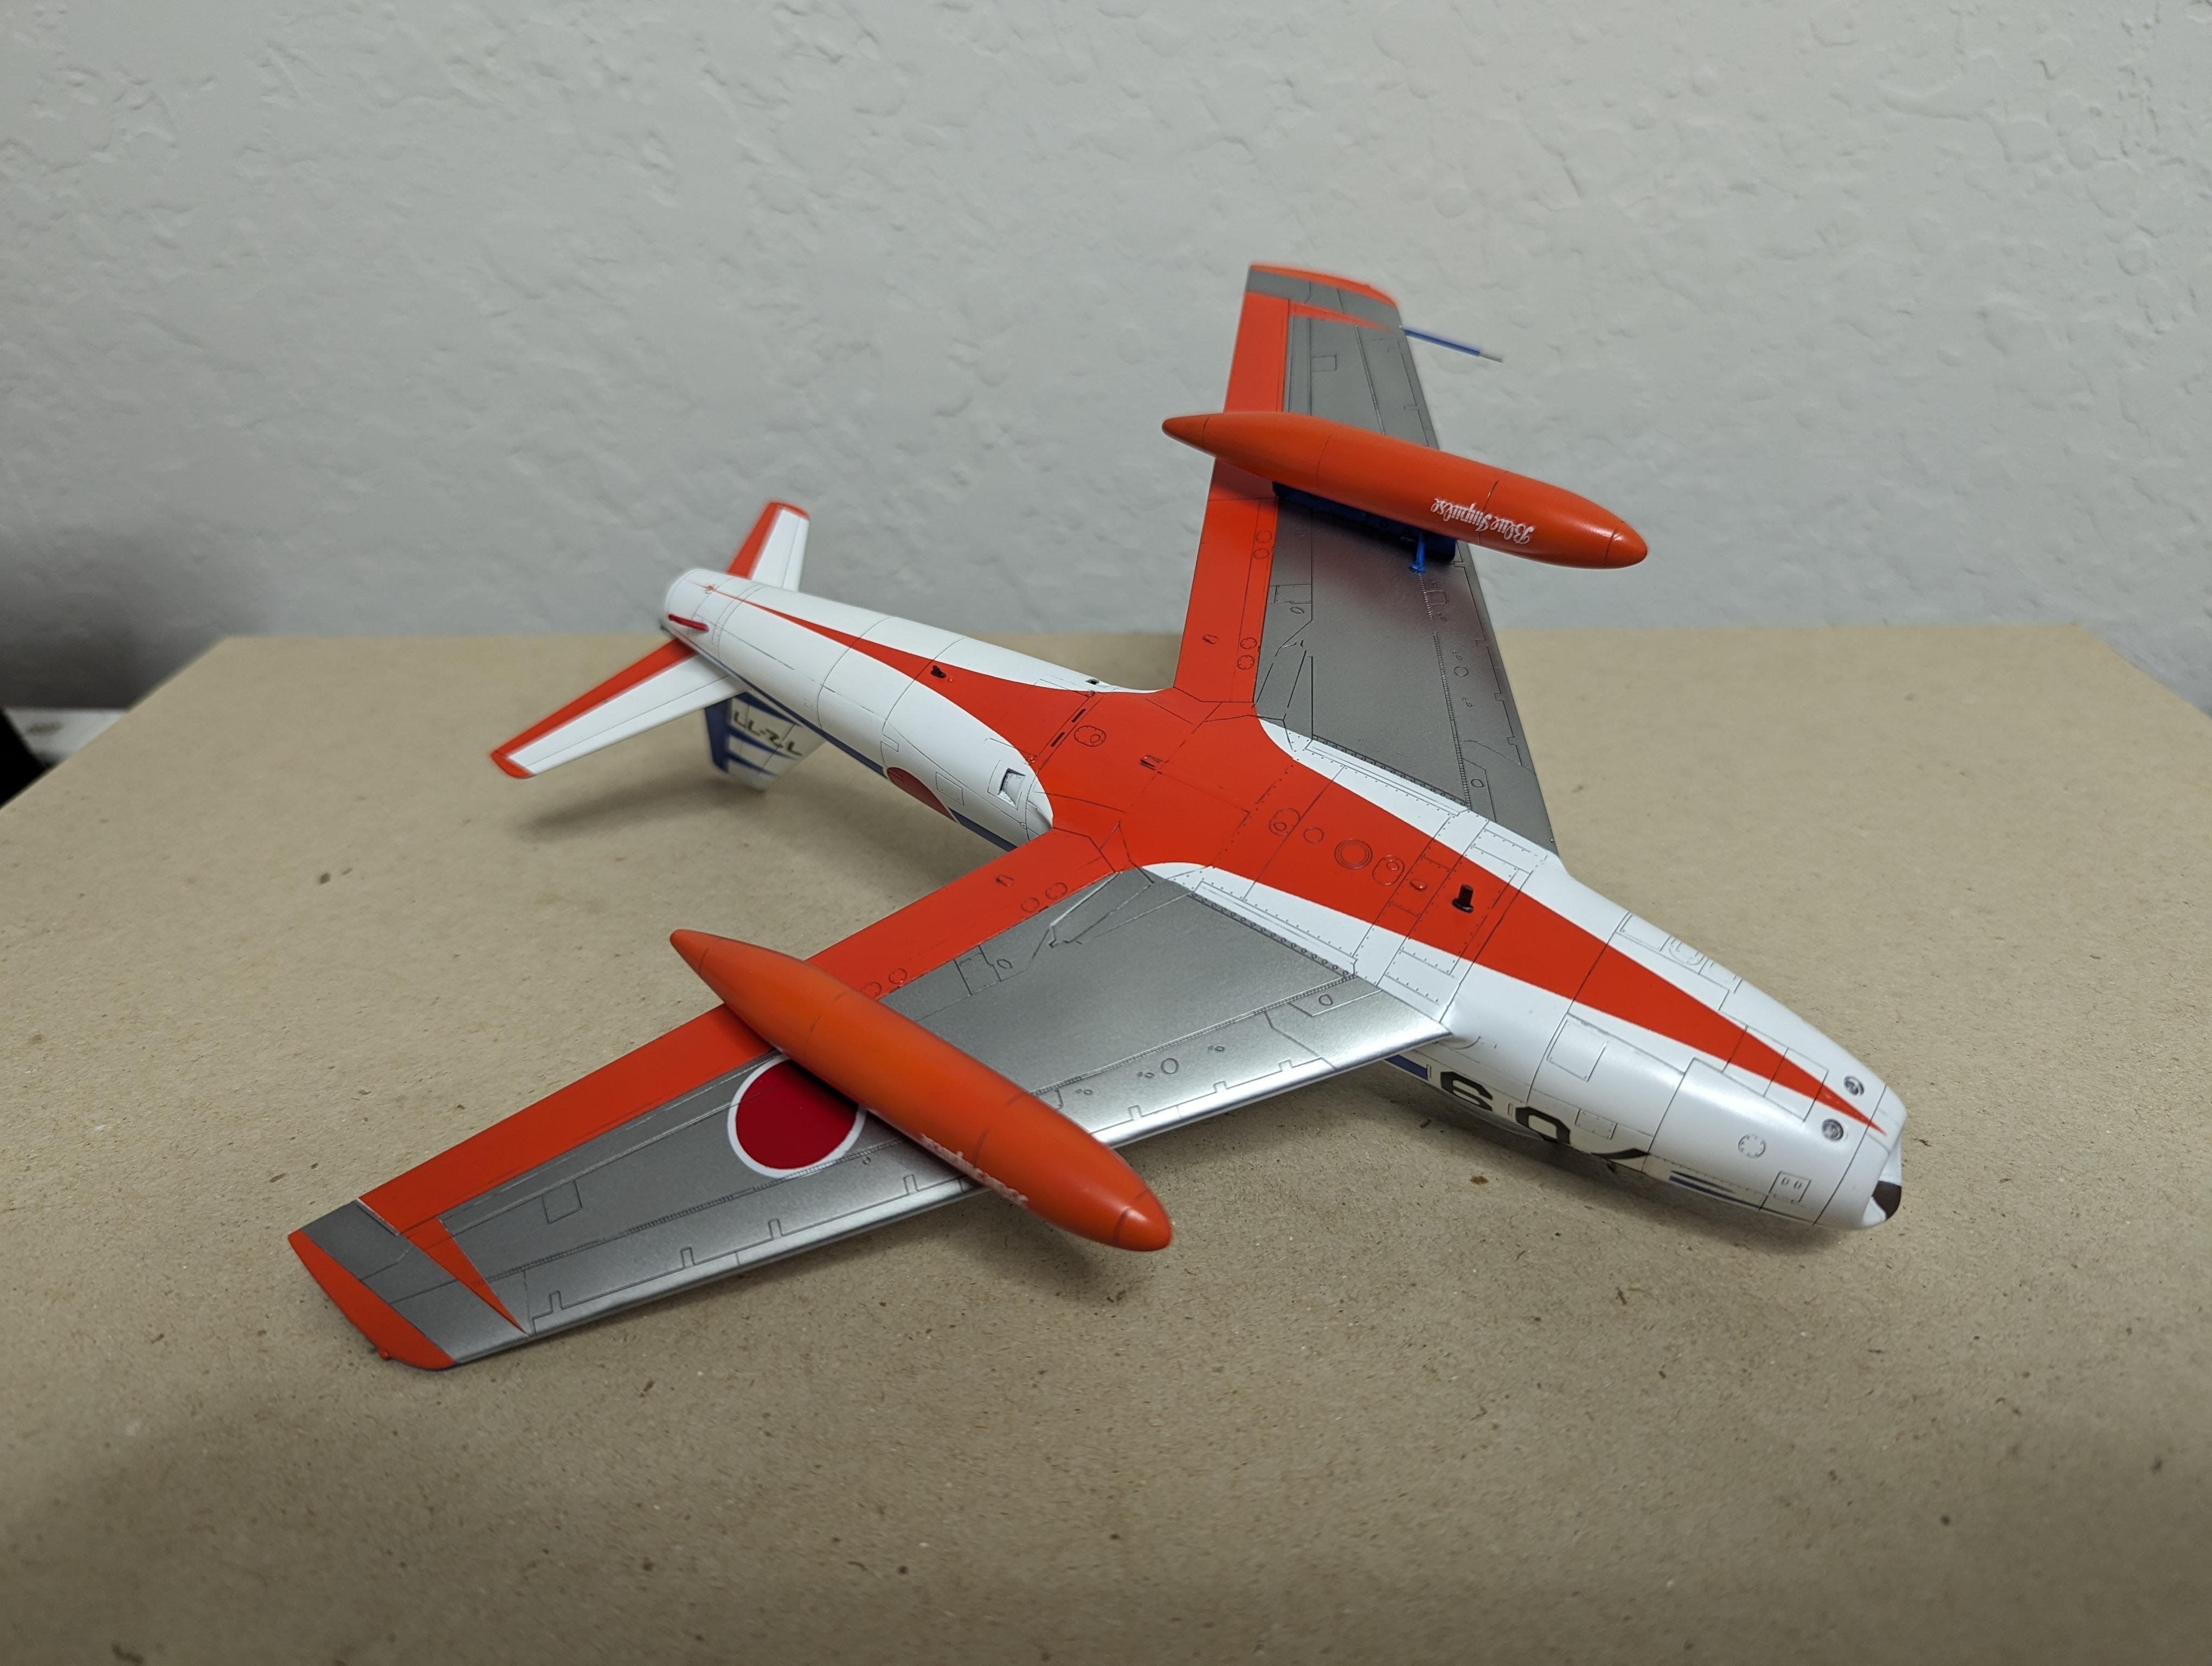
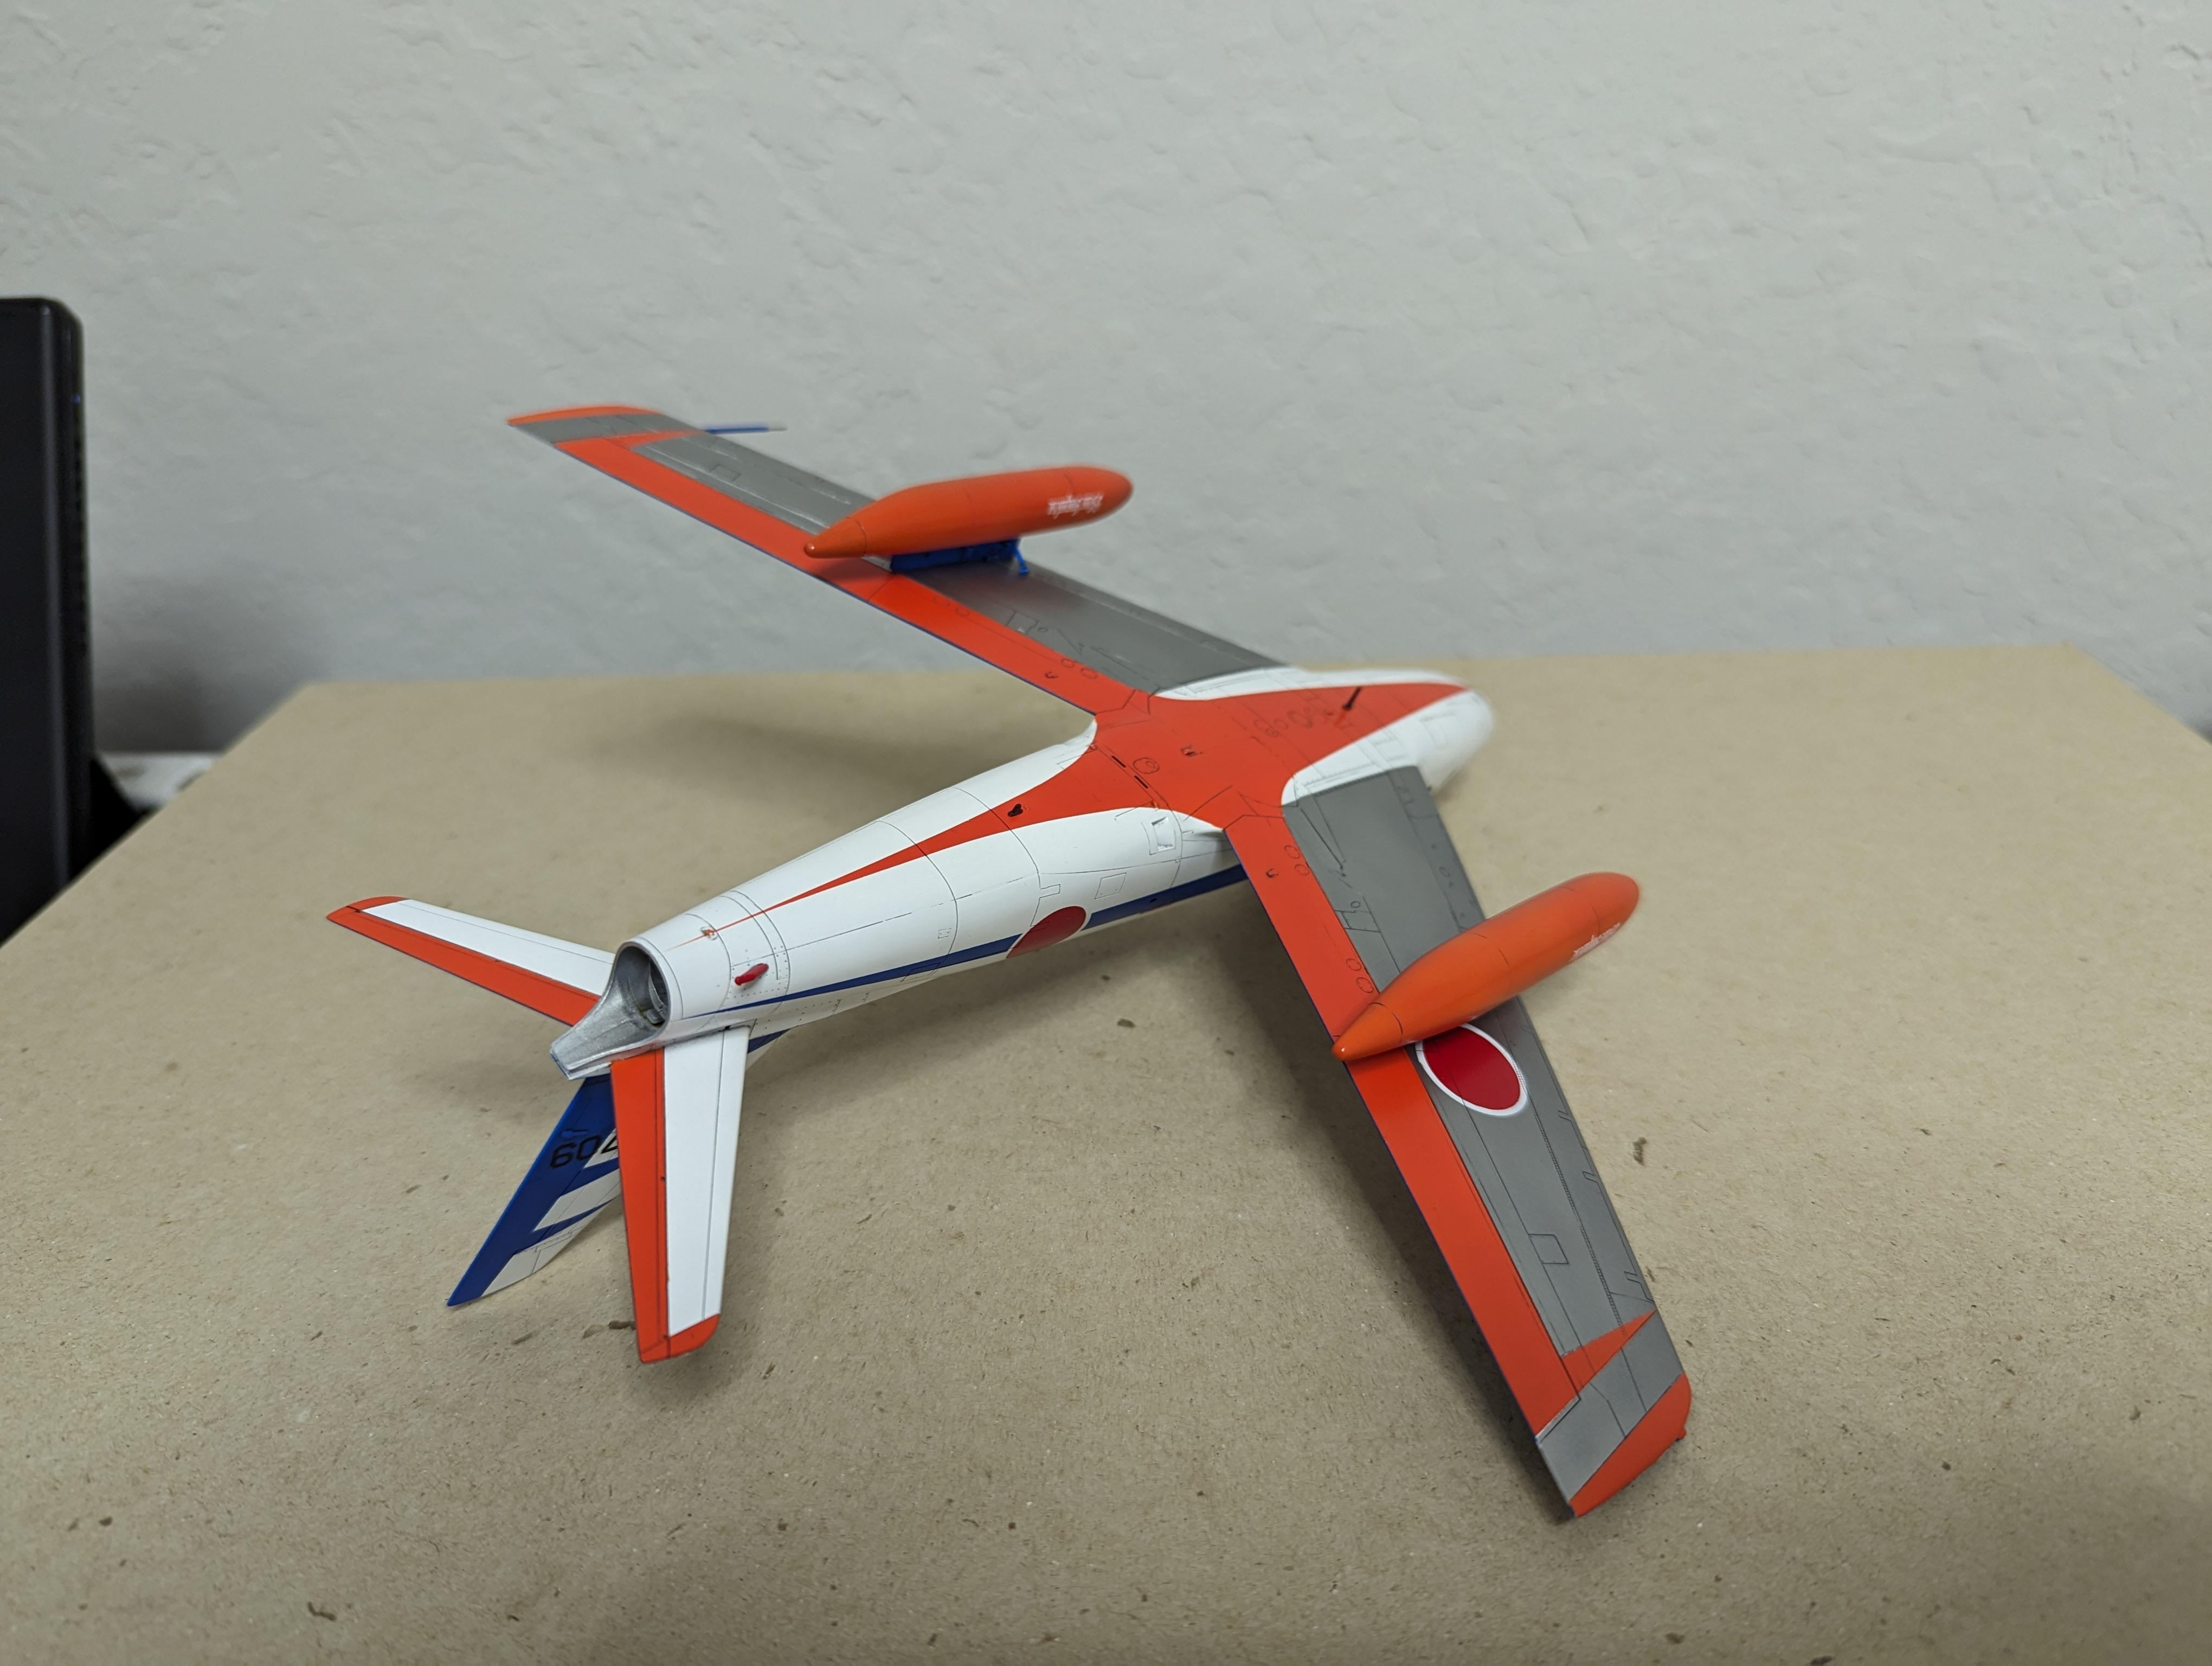
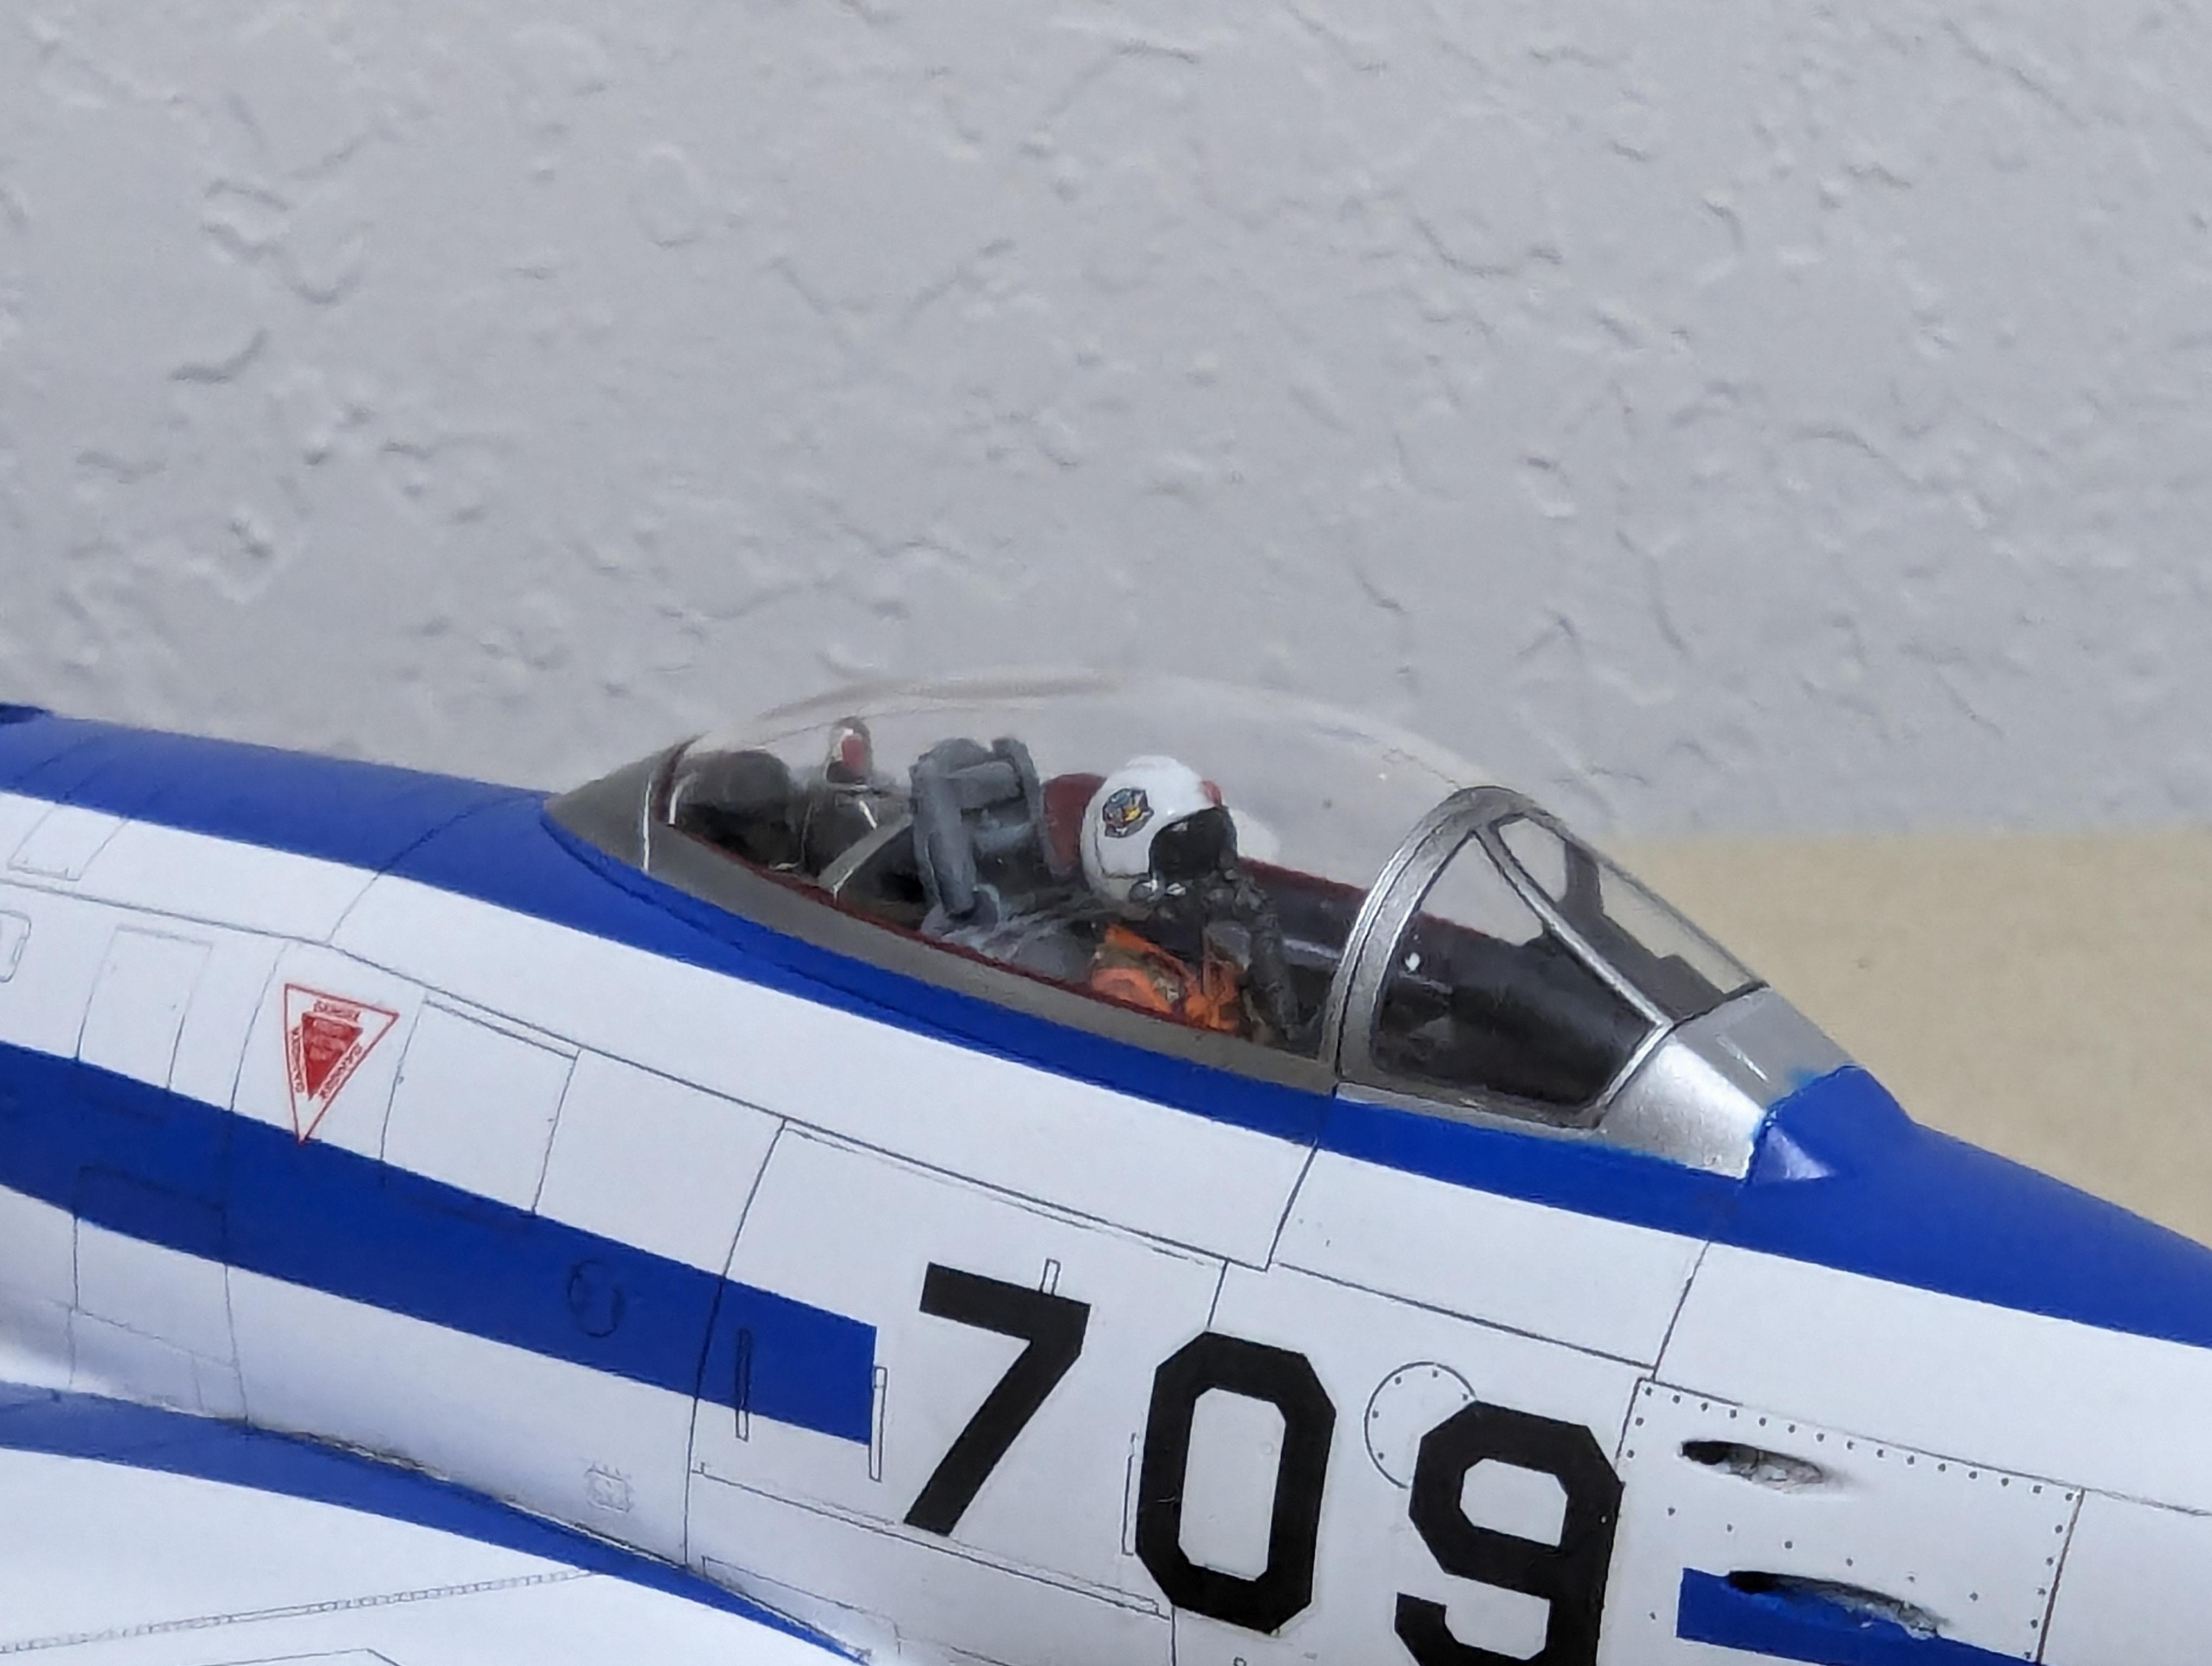
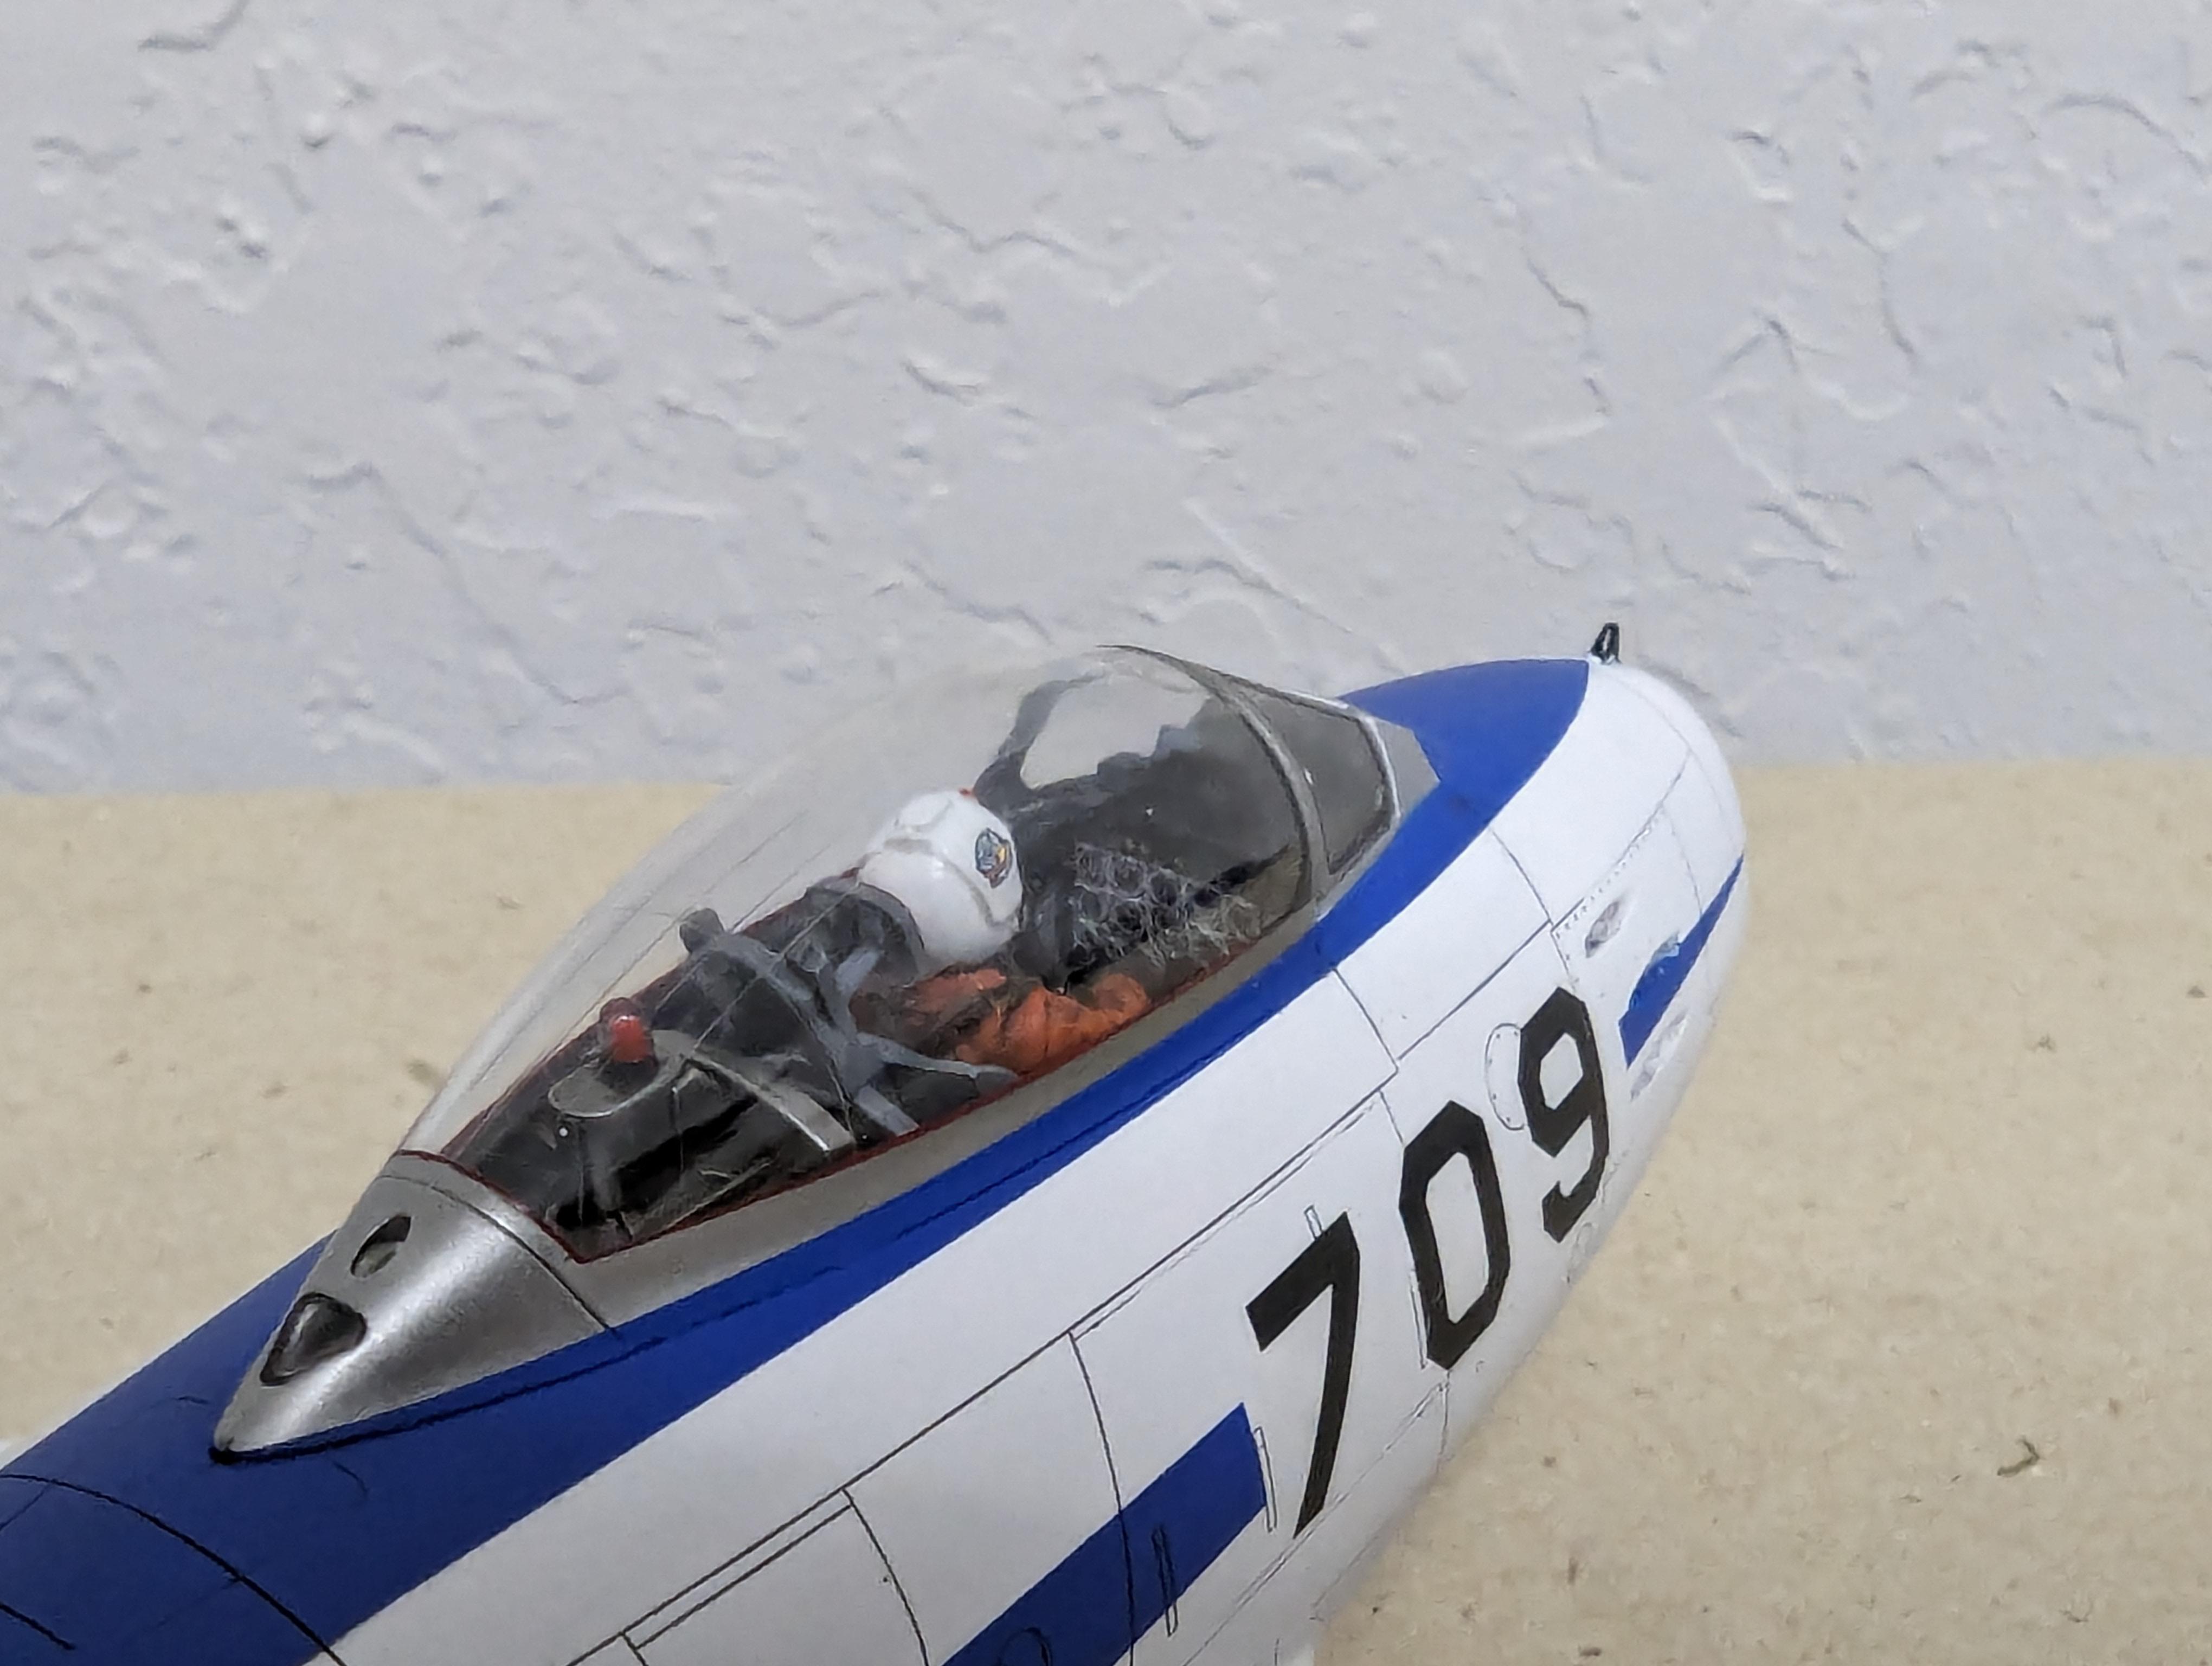
For Christmas last year I built my nephew an F-86F-40 Sabre in the livery of the Japanese Blue Impulse demonstration team. It's a classic aircraft with beautiful lines and the blue, white, and orange color scheme with a bit of bare metal on the bottom is a head turner. The old Hasegawa Sabre kit isn't perfect, but it went together smoothly and has beautiful detail. All markings other than the lettering and stencils are painted, and I had to pull out almost all of my tricks to mask everything off. I'm really happy with how it came out, and more importantly, my nephew absolutely loves it.
-
WIP: Custom AMT 1:25 1964/65 Chevy El Camino
JNordgren42 replied to JNordgren42's topic in WIP: Model Cars
Yeah, home 3D printing is a game changing technology for modelers. It's also a whole other discipline unto itself, but it's well worth learning. ? -
WIP: Custom AMT 1:25 1964/65 Chevy El Camino
JNordgren42 replied to JNordgren42's topic in WIP: Model Cars
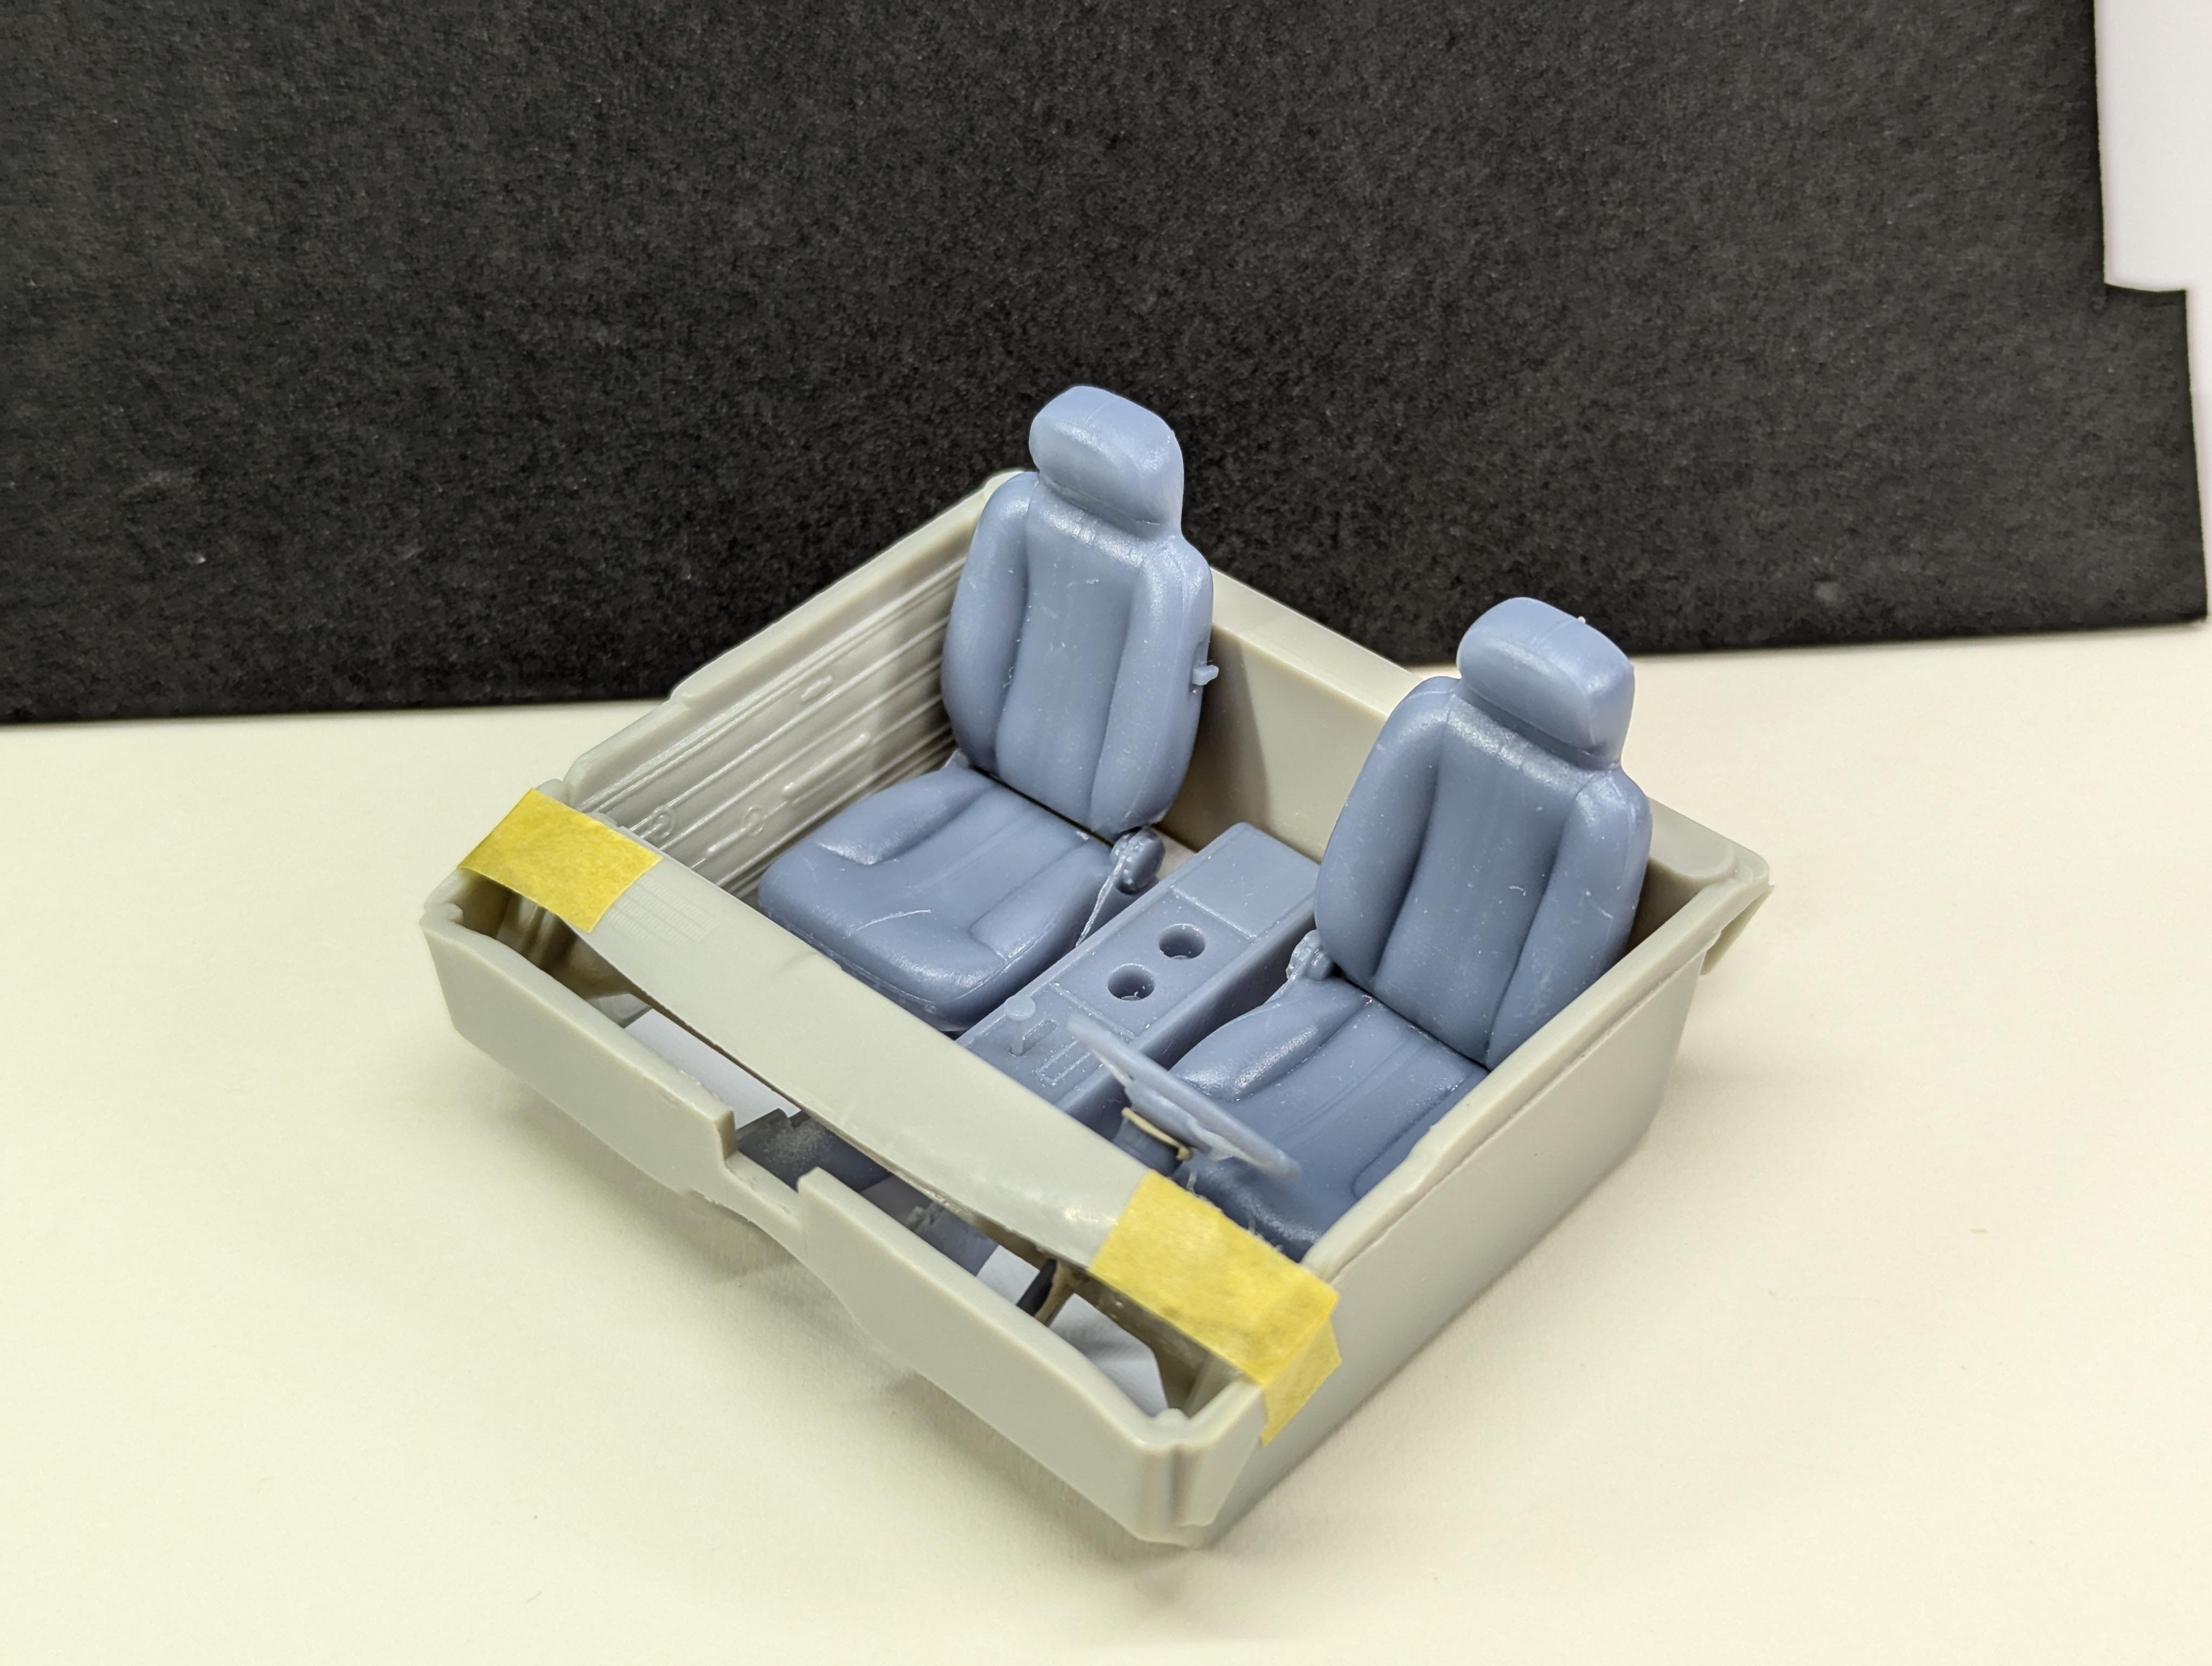
Thanks! The seats are pretty close to the height of the ones in the car but needed a little modification. I cut the headrests off, sanded everything down to a nice shape, and glued them back on with more forward cant. With the headrests fixed, they clear the window correctly. -
WIP: Custom AMT 1:25 1964/65 Chevy El Camino
JNordgren42 replied to JNordgren42's topic in WIP: Model Cars
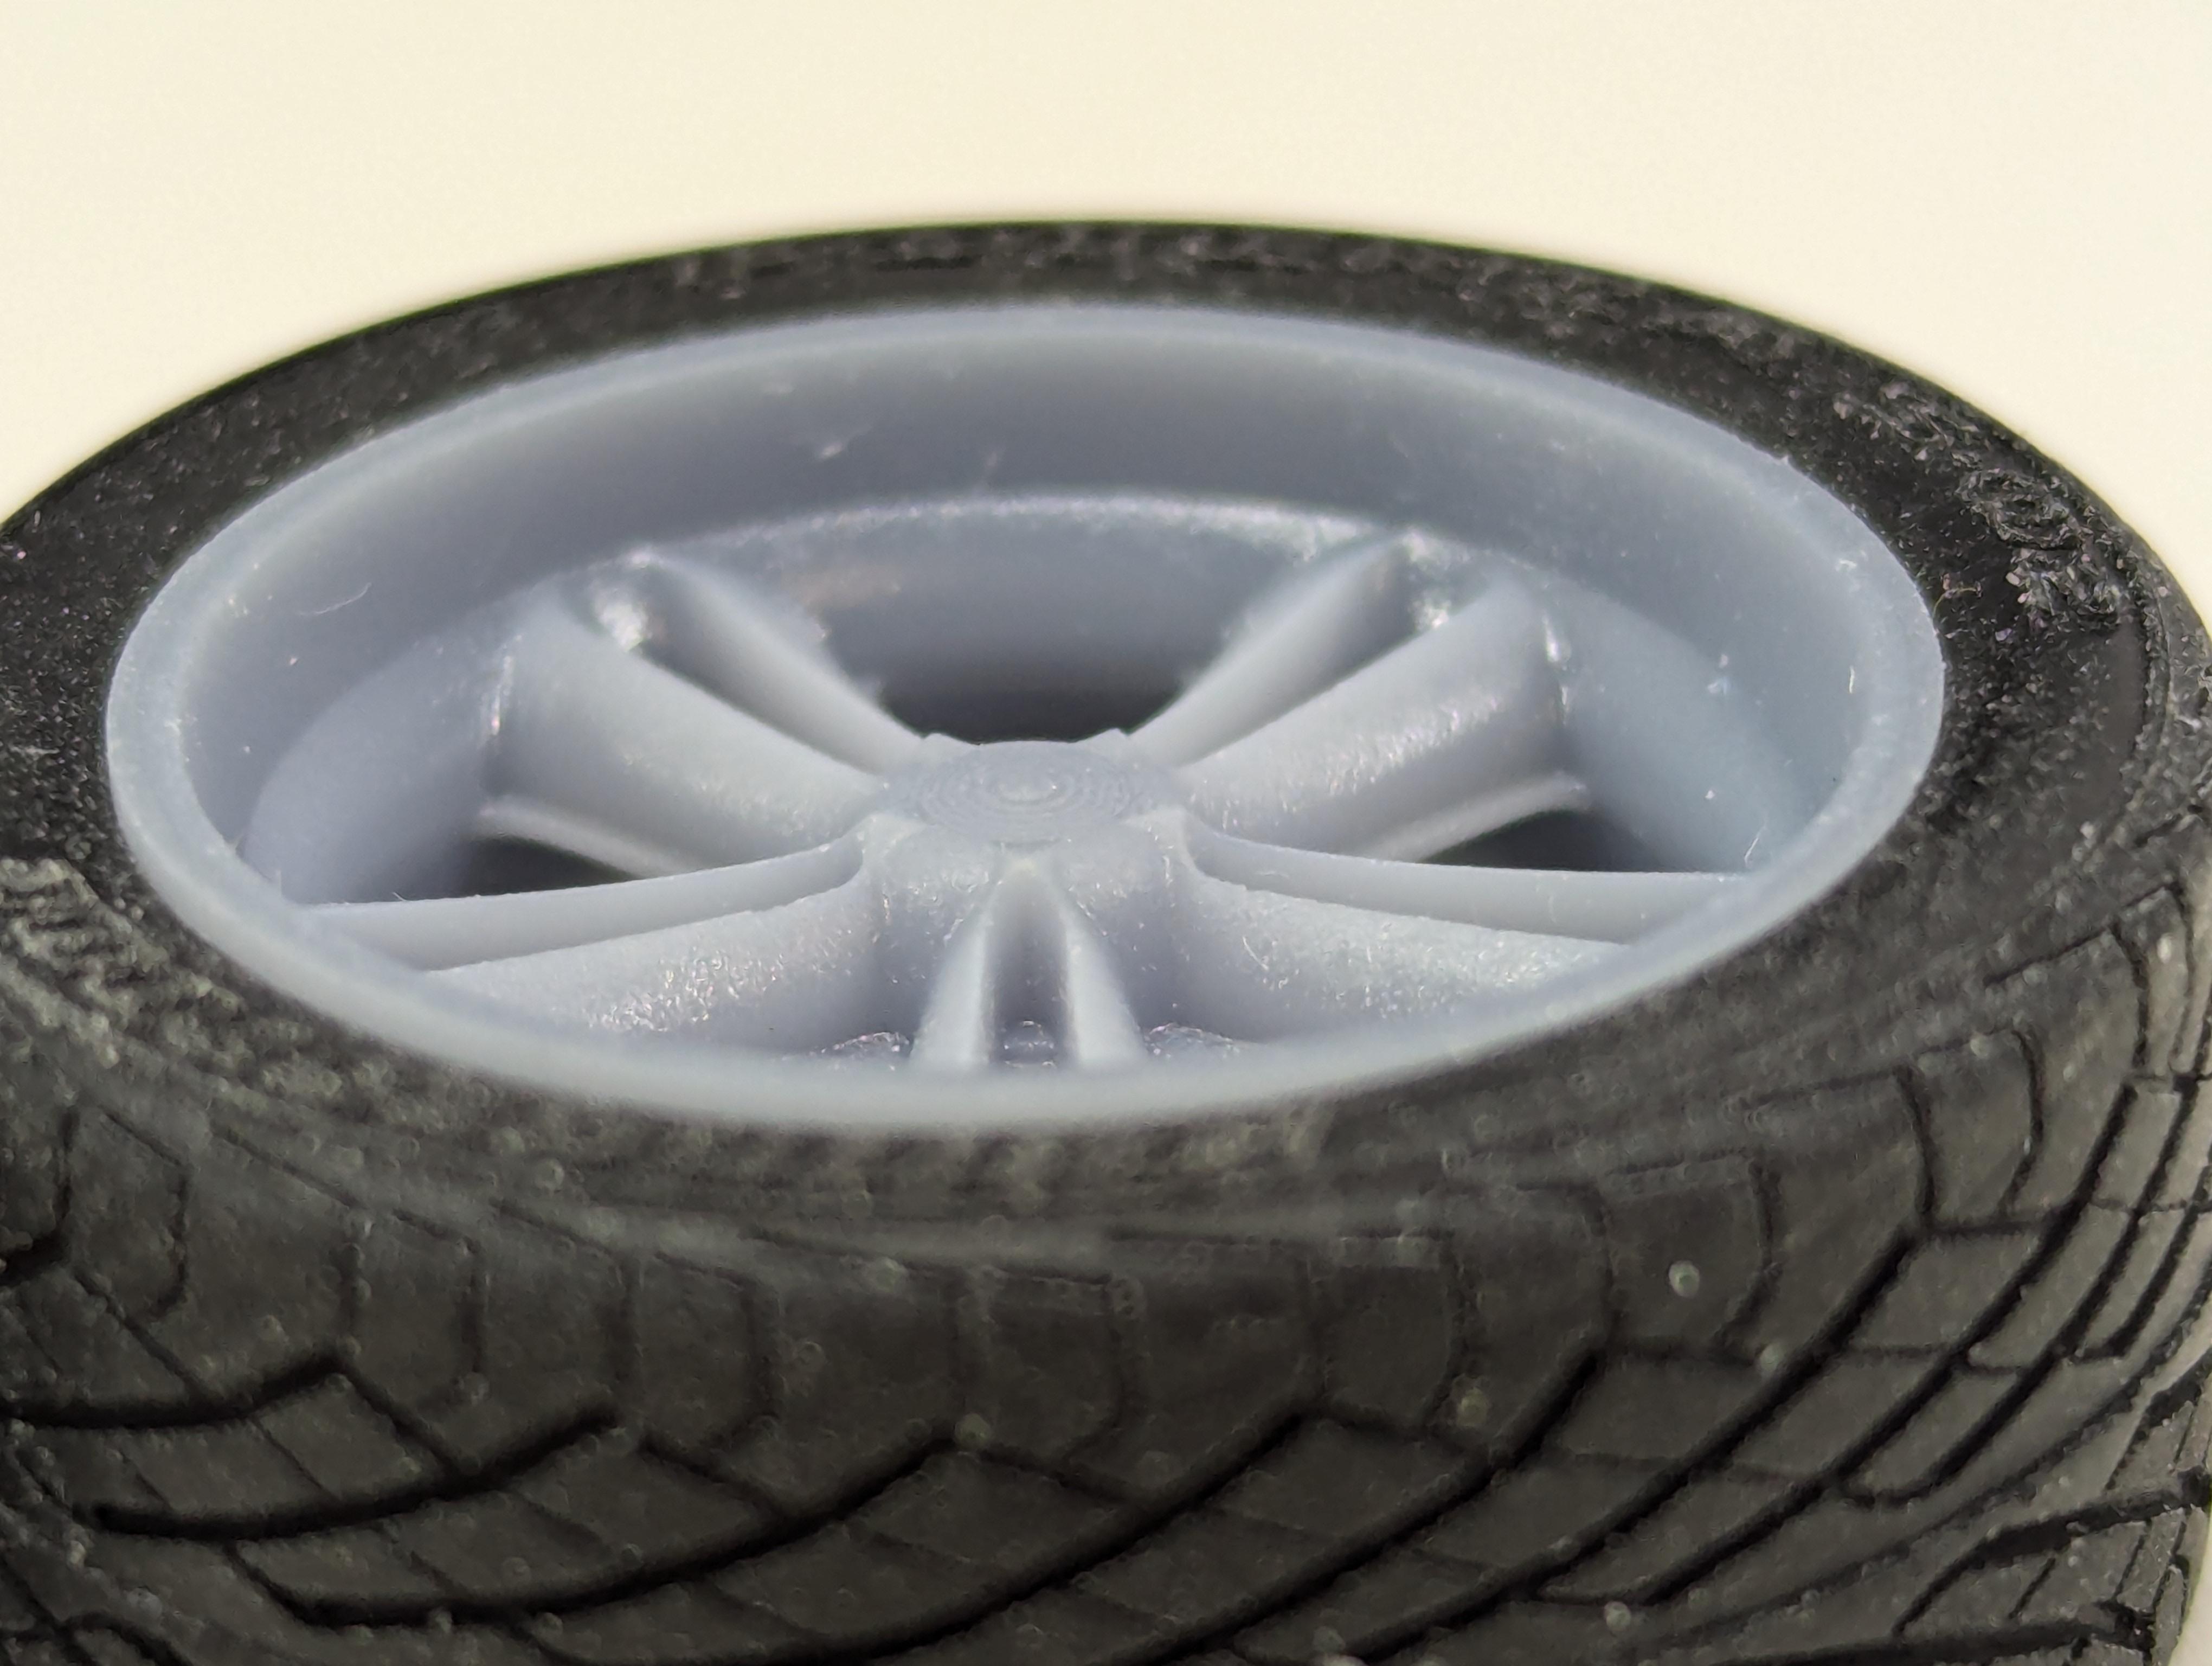
I bought some fingernail chrome powder and did a very quick and dirty test on one of the spare wheels. I need to refine the process, but I'm very encouraged by the results. The biggest hurdle I need to tackle is finding an airbrush able paint that the powder will adhere to, or find a way to thin the UV coat sufficiently so that it doesn't pool in the corners and destroy the details.
-
WIP: Custom AMT 1:25 1964/65 Chevy El Camino
JNordgren42 replied to JNordgren42's topic in WIP: Model Cars
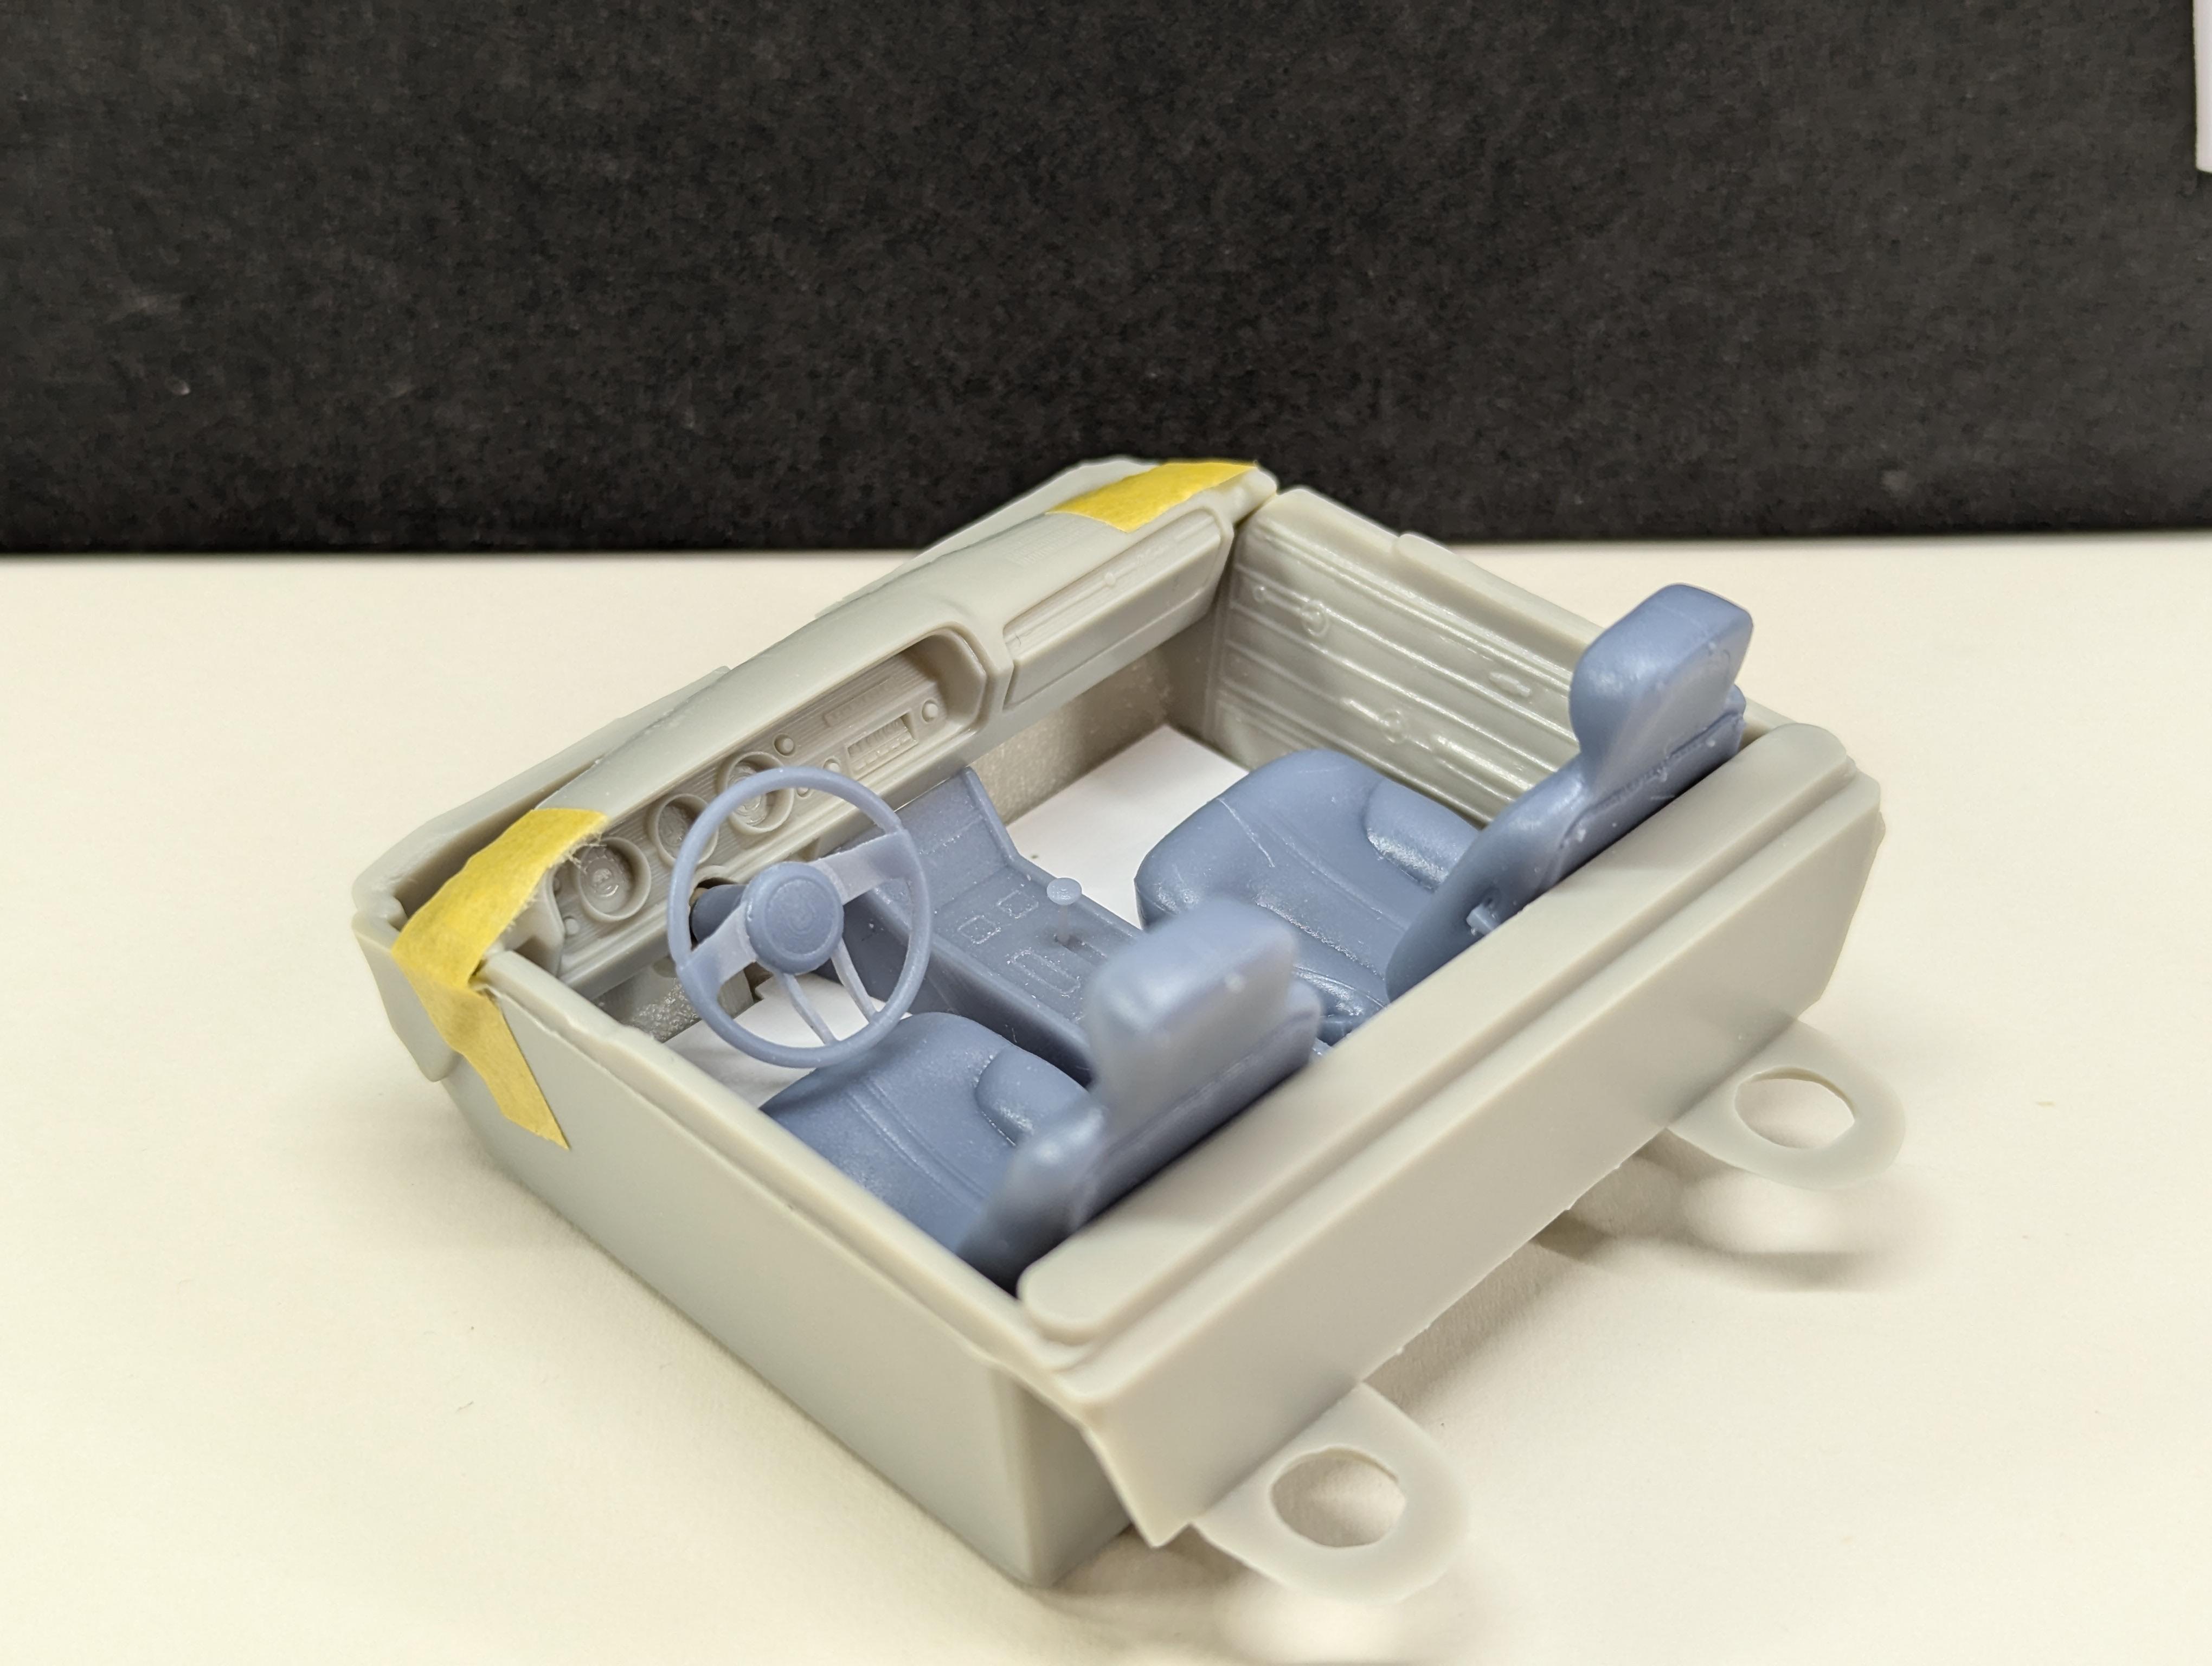
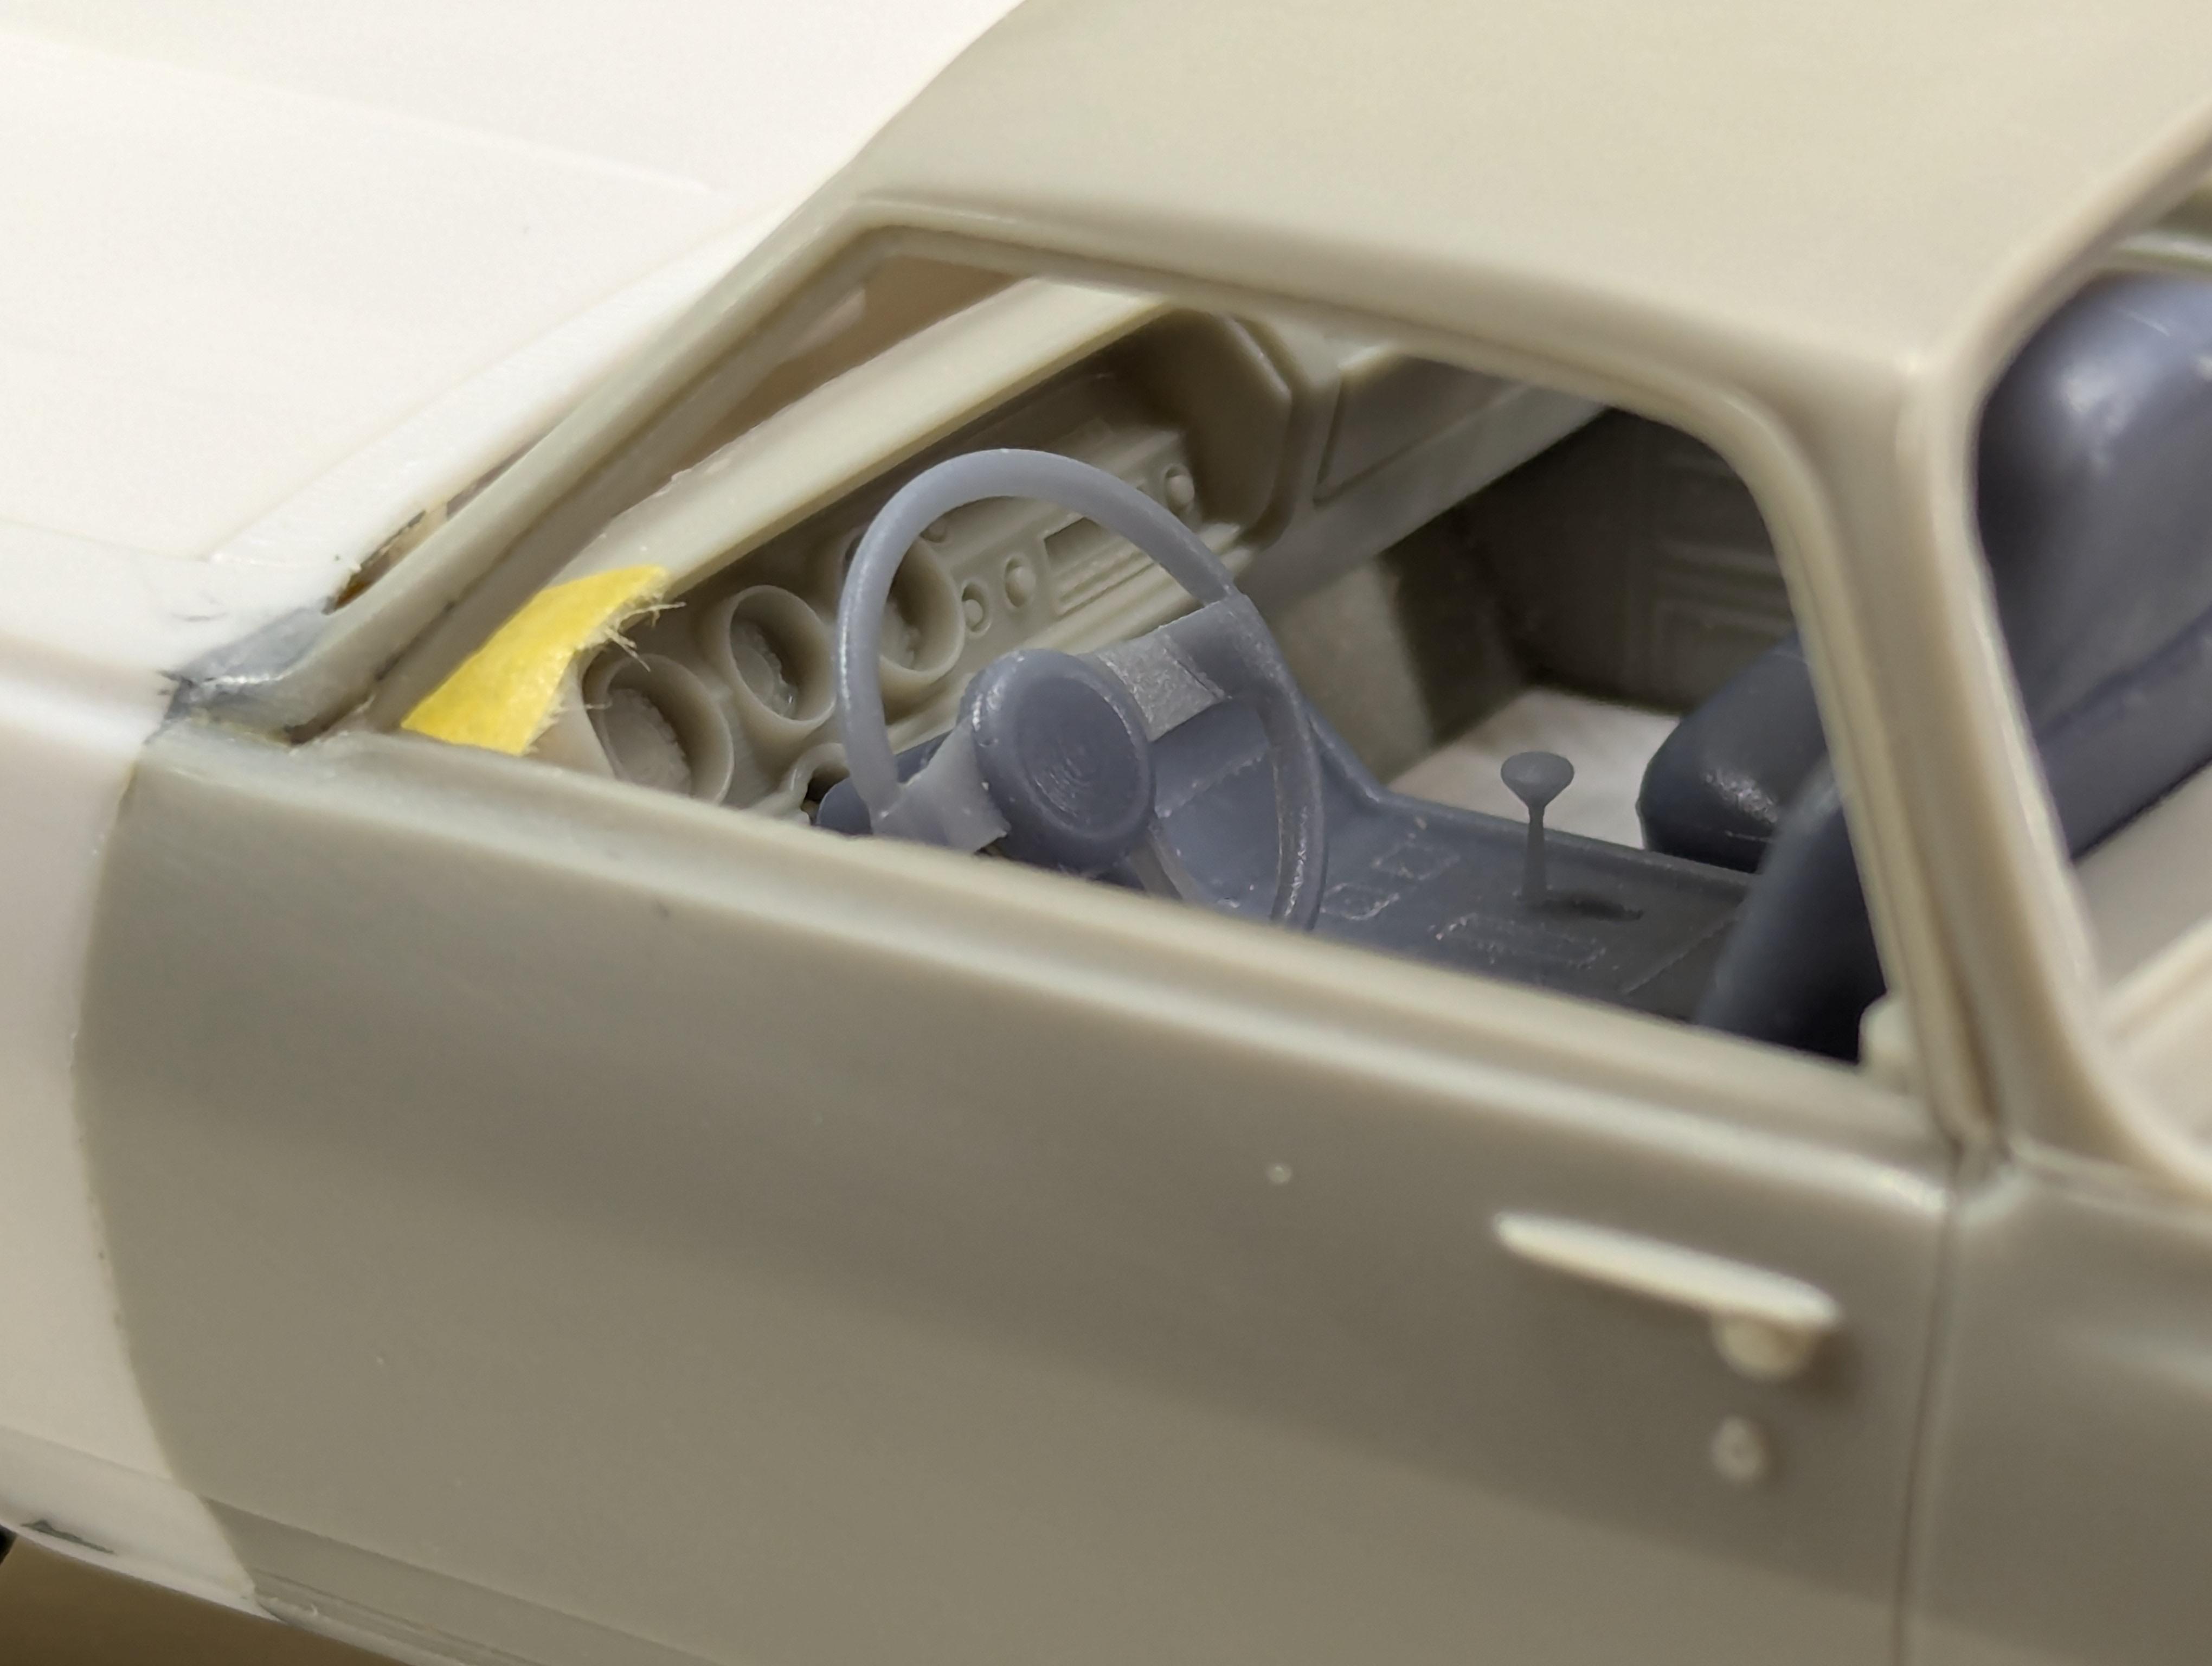
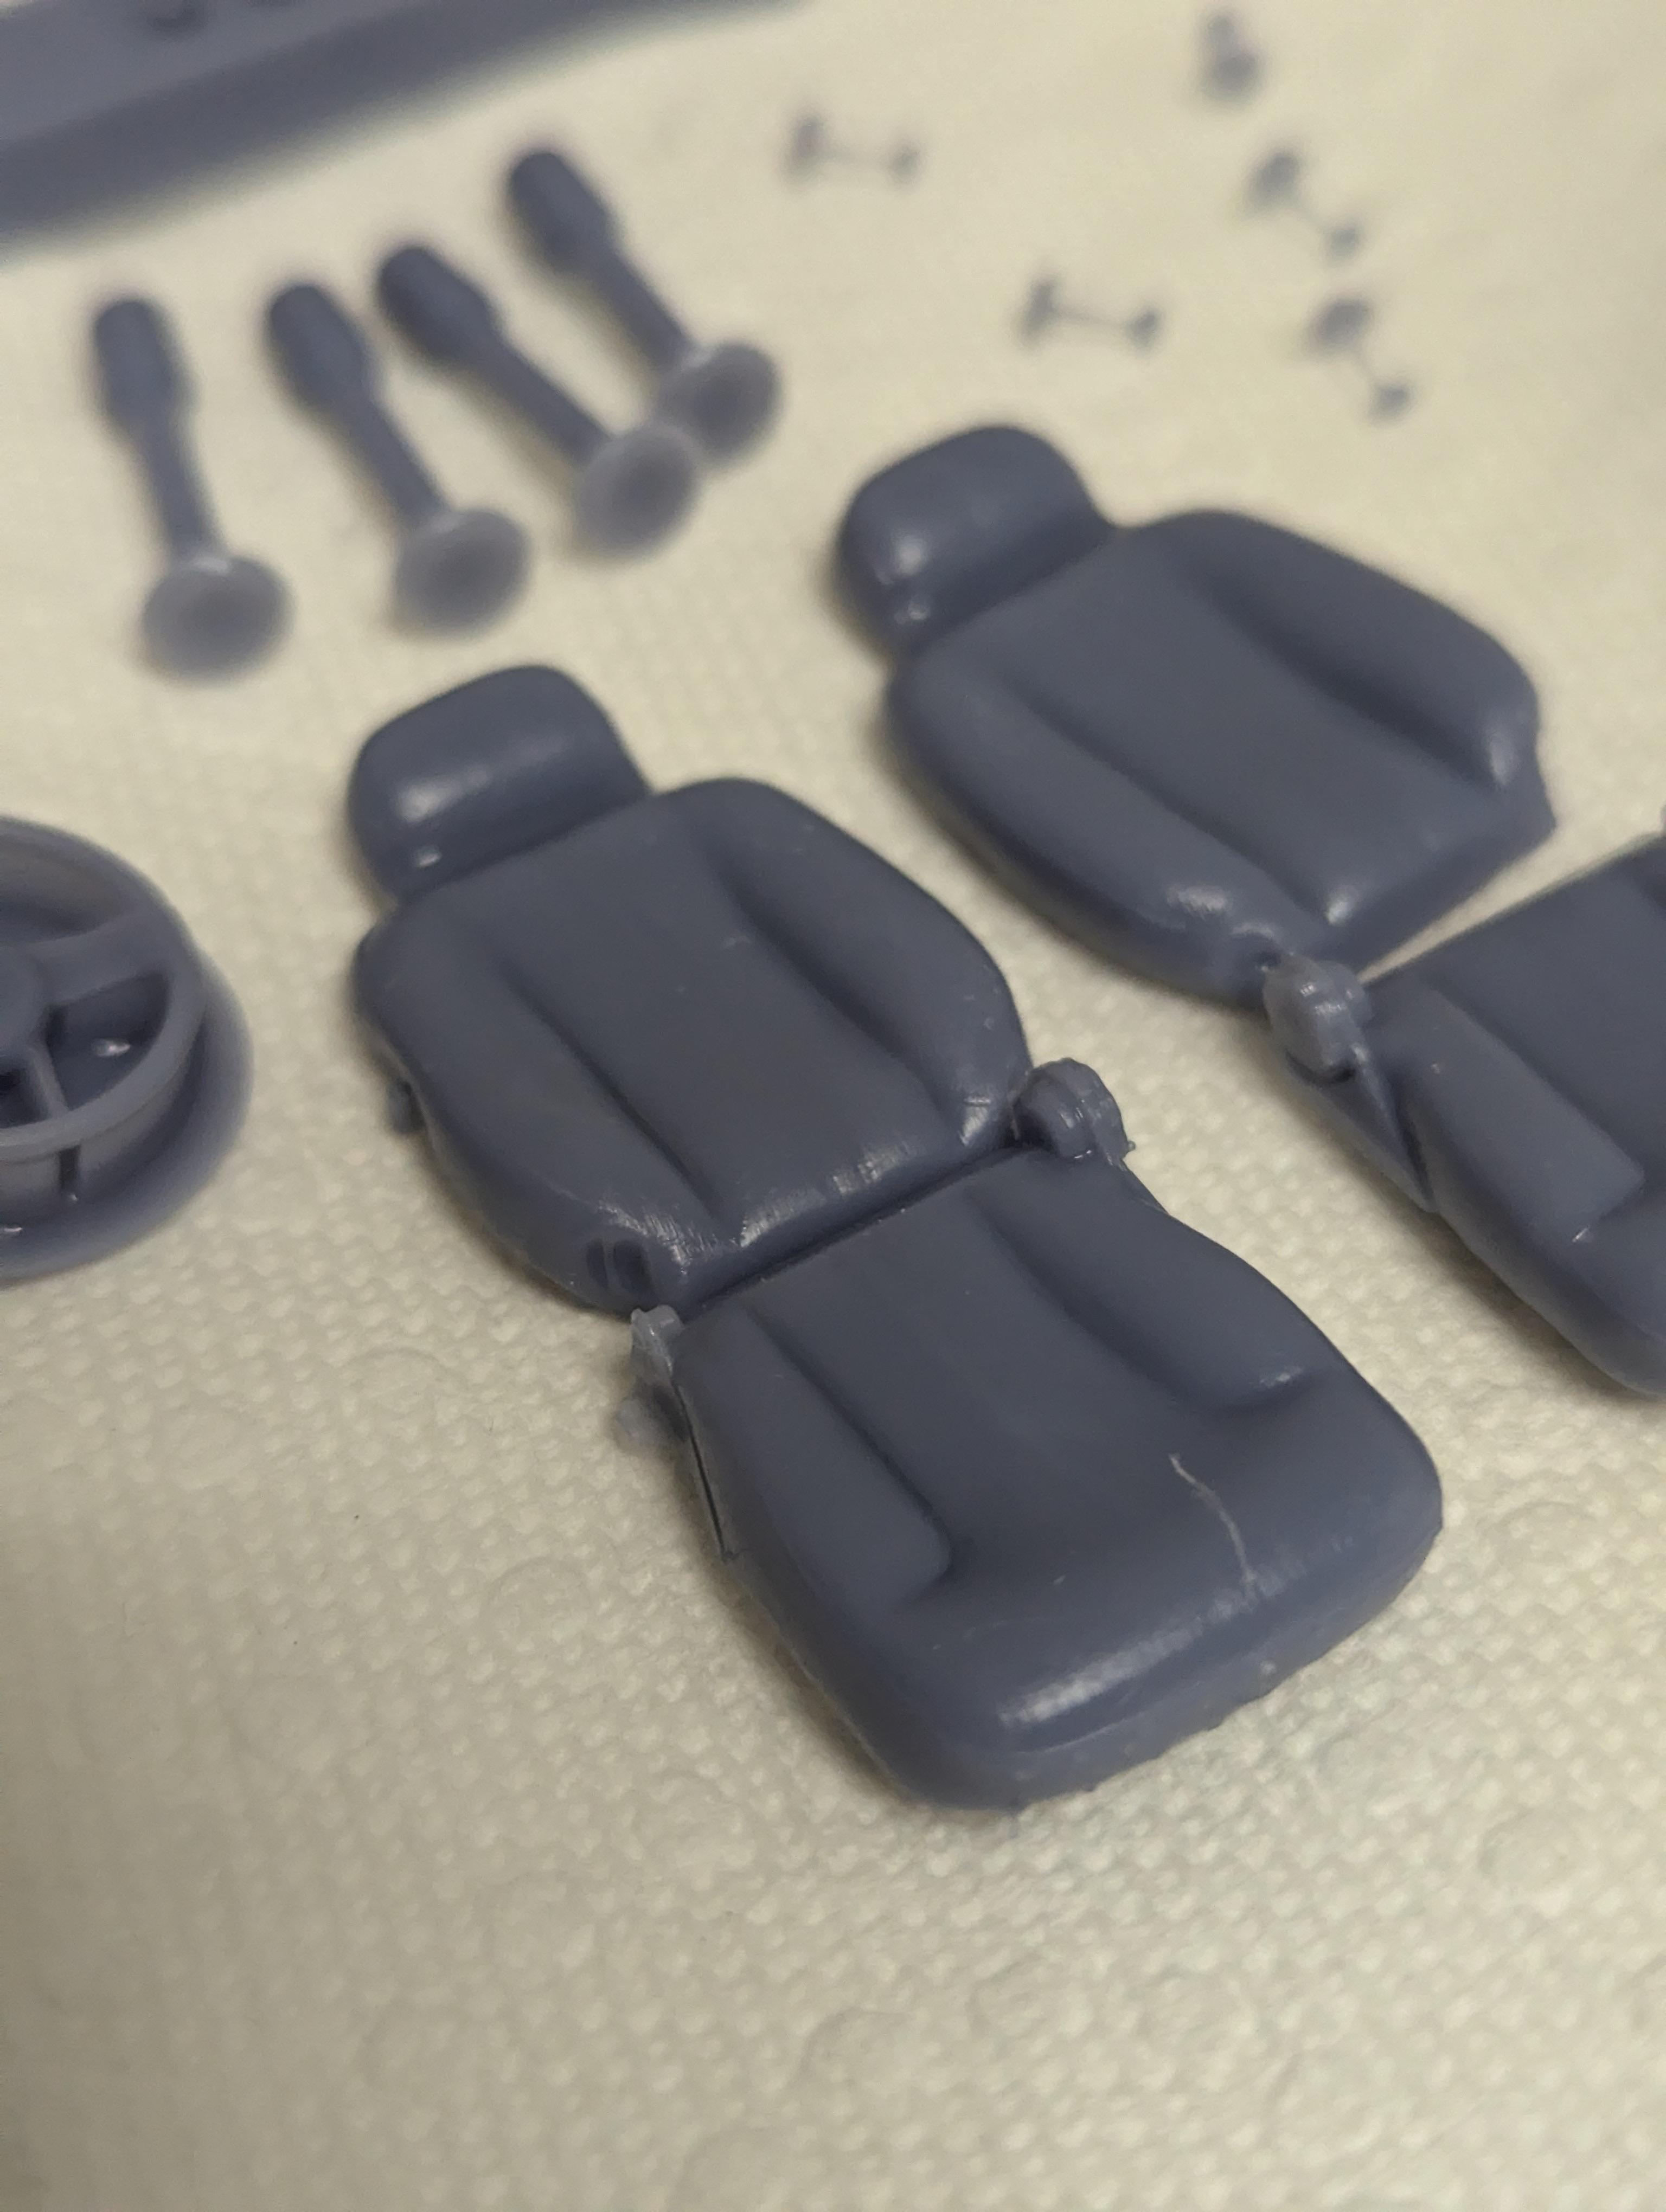
The supports are all removed on the interior parts and they've been post-cured. I did a little surgery on the cabin tub and mocked everything up. I'm super happy with how it's all coming together.
-
WIP: Custom AMT 1:25 1964/65 Chevy El Camino
JNordgren42 replied to JNordgren42's topic in WIP: Model Cars
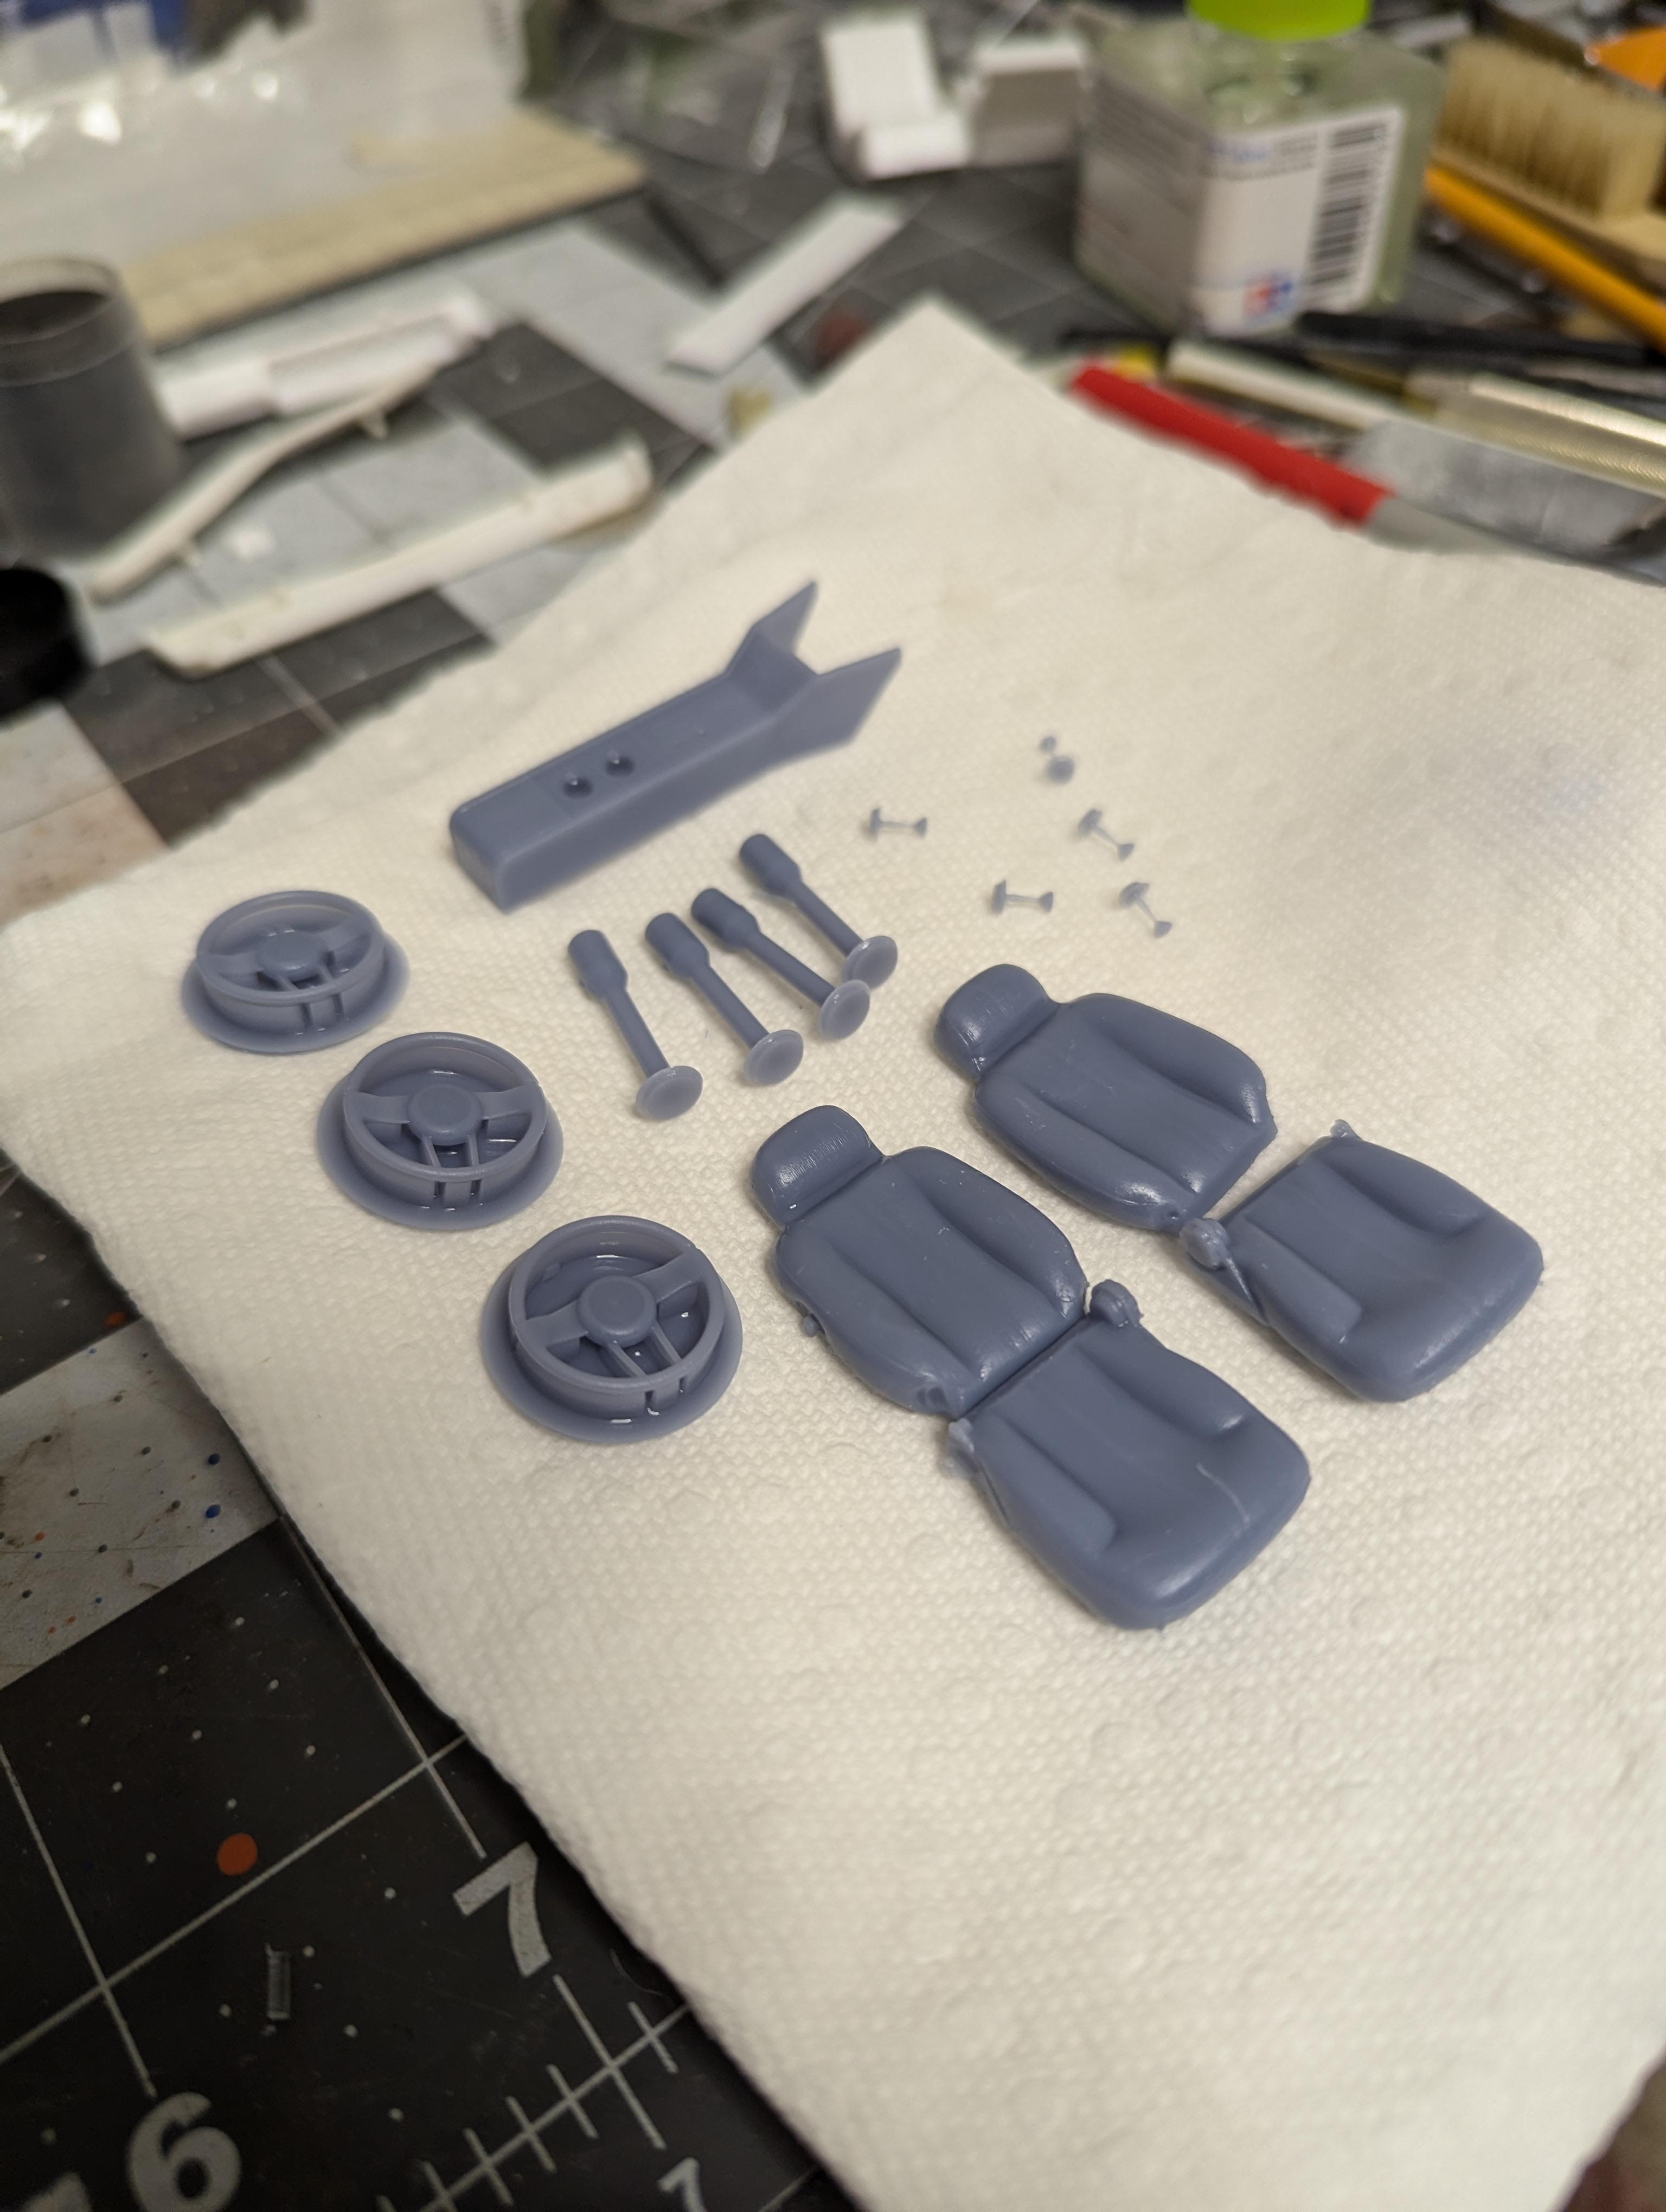
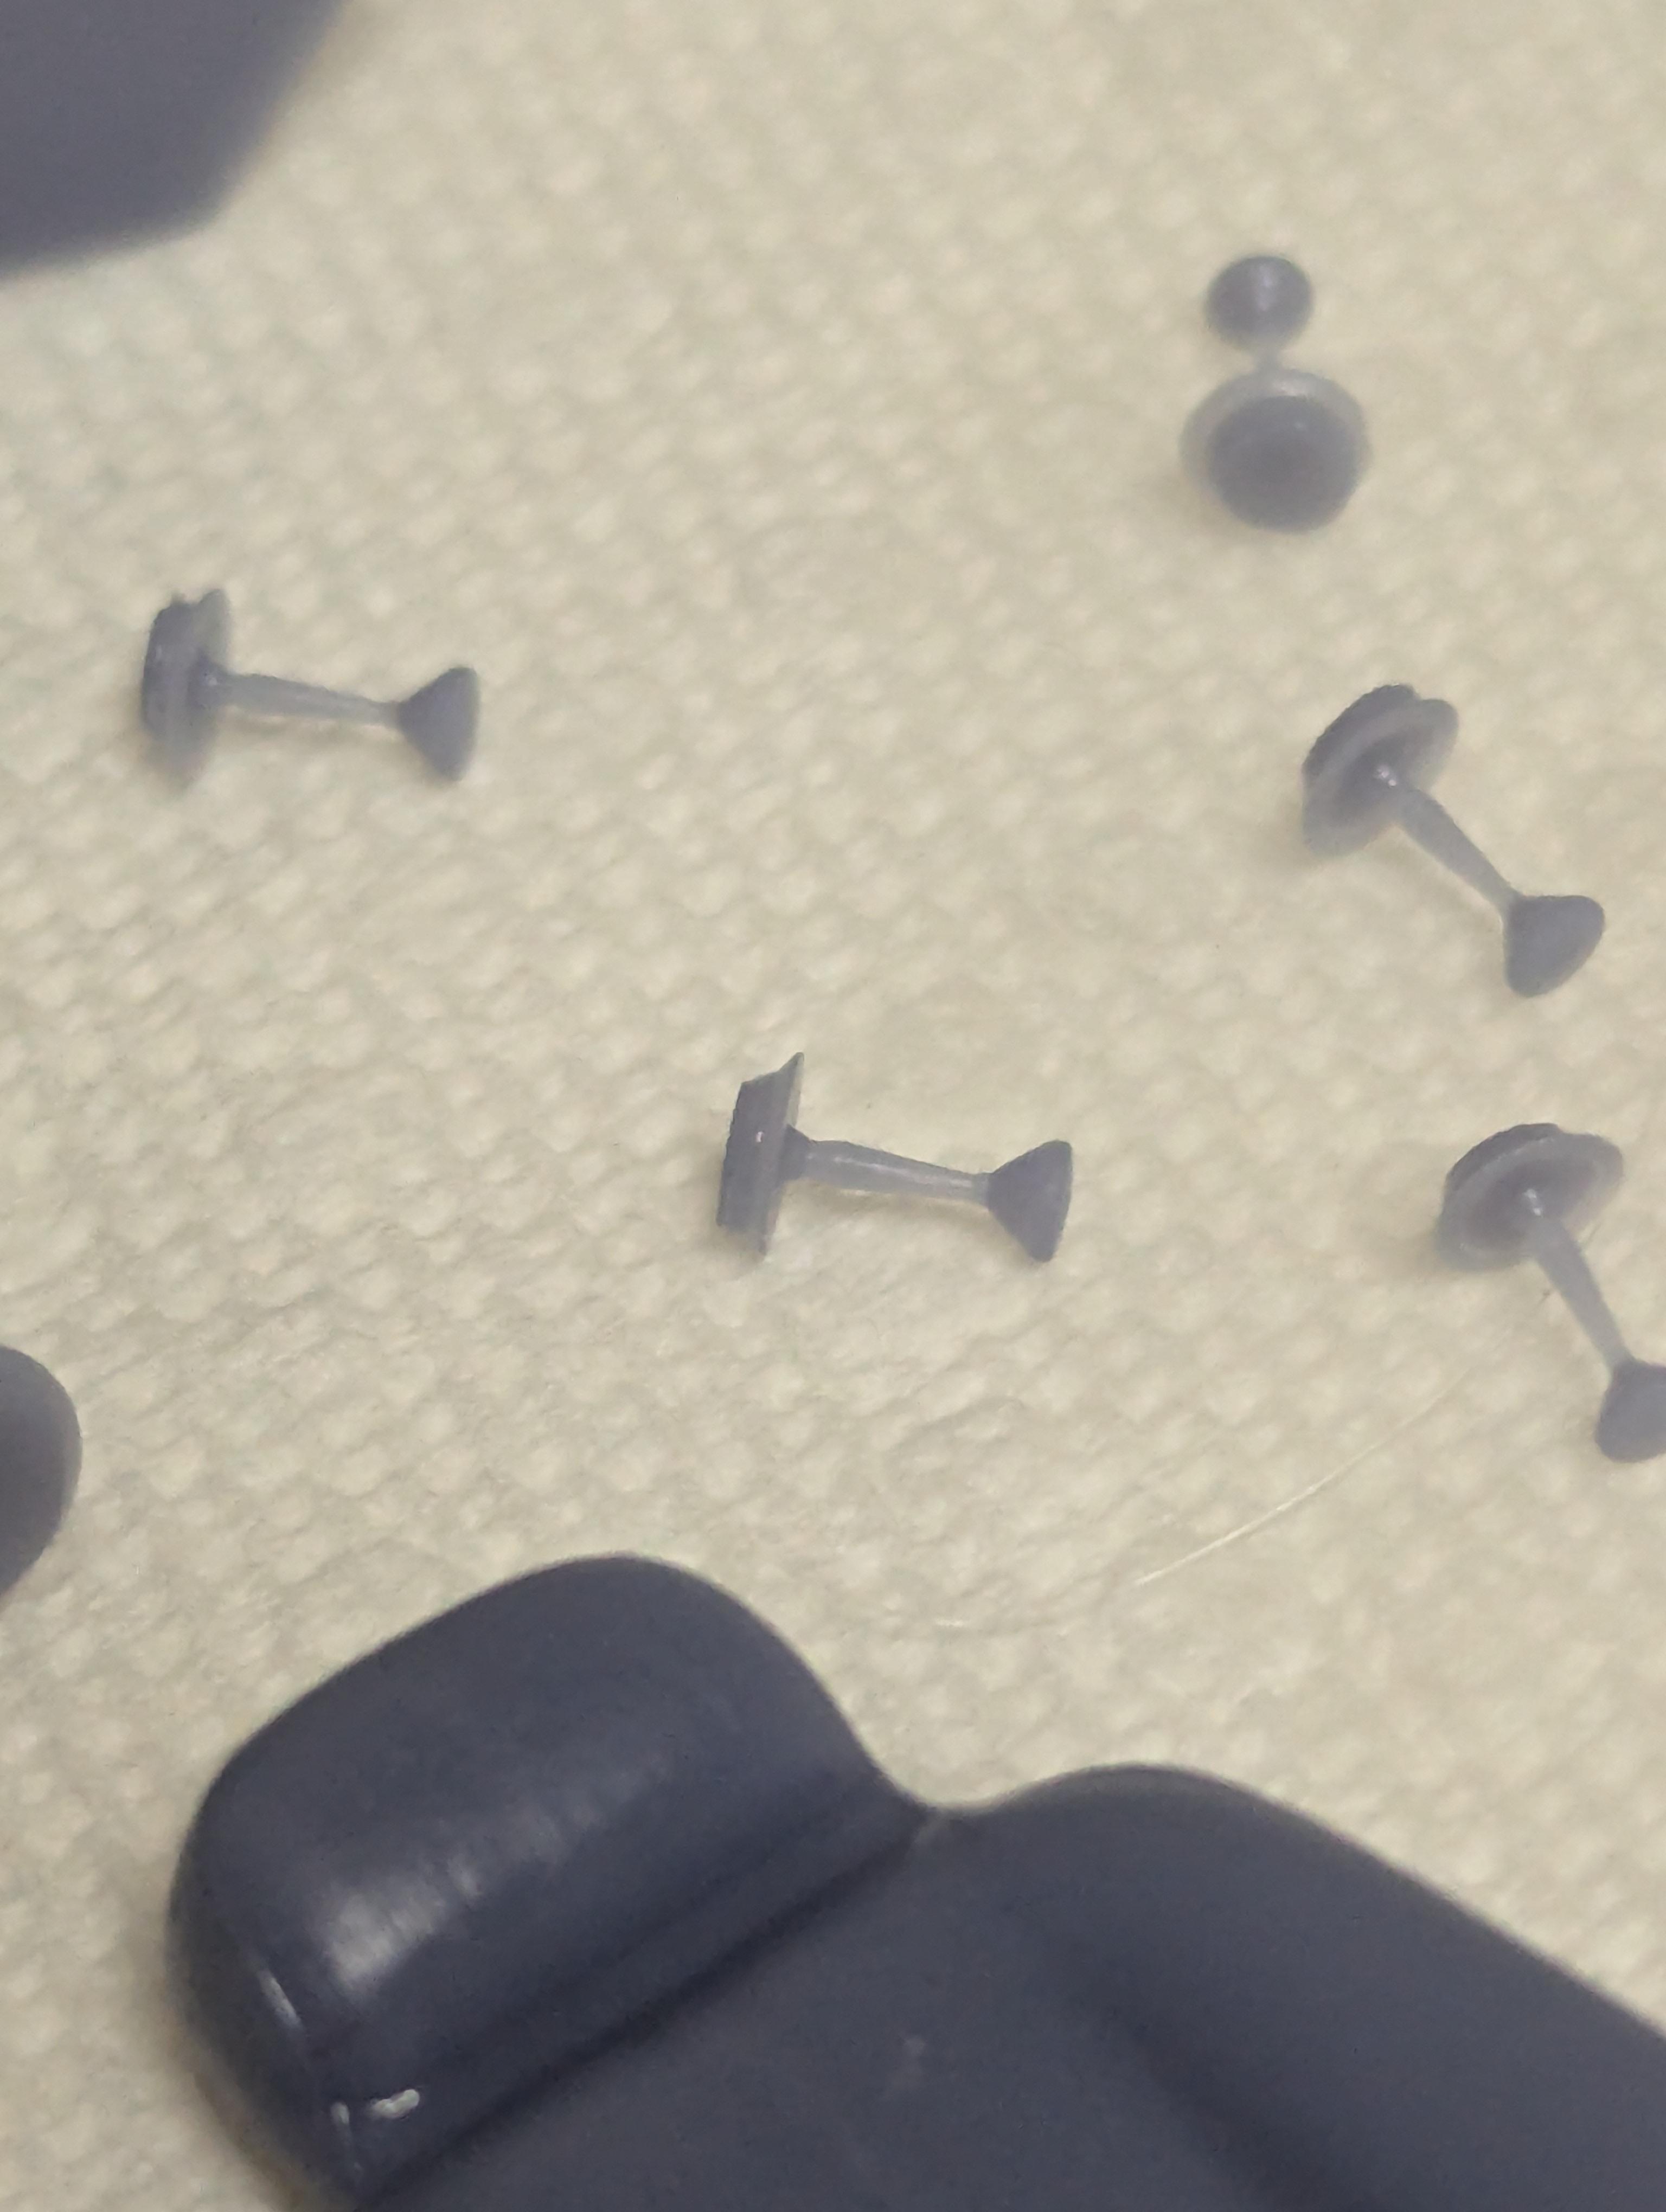
Interior parts fresh off of the printer and out of the IPA wash. I printed extra of the steering wheels, columns, and gear shift levers since I'm always worried about breaking delicate parts. They're drying while I'm at work and I'll separate the steering wheels from the support when I get home and then a quick post cure. I'm really happy with how they came out. Steering wheel close up: Close up of the gear shift levers. They're so tiny you can see the translucency in the resin. Closer view of the steering columns and center console: Seat close up. I didn't design these, they're for the Fanhome 1/12 Back to the Future De Lorian, but they're very close to the seats in the actual car.
-
Fantastic build! I'm almost certainly going to add this kit to my pile. I've gotten into electronics in a big way with a build of the Polar Lights 1/350 U.S.S. Enterprise (refit movie version). I'm rolling my own Arduino based lighting system on that one, and I'm thinking about trying to make as many of the gadgets as possible functional on a potential DB5 build. And those USCP wheels and grill look absolutely amazing with the chrome paint on them. Definitely a must buy if I pick one up.
-
USCP engine for Revell Aston Martin DB5
JNordgren42 replied to PowerPlant's topic in Car Aftermarket / Resin / 3D Printed
The CAD for that is looking awesome. I'm seriously considering adding the Revell kit to my build list so I've definitely put a bookmark on this. I'll probably skip the engine since I'm thinking about making the gadgets deployable and I'll need the space for them. But the wheels and grille look amazing and will get added to the build if I do it. I guess I need to start researching very small linear actuators now... ? -
This is a fortuitous thread, I just saw the new(ish) Revell 1/24 007 DB5 and since I've always loved that car, I thought it would be a great build. Scale Finishes bookmarked for future reference.
-
WIP: Custom AMT 1:25 1964/65 Chevy El Camino
JNordgren42 replied to JNordgren42's topic in WIP: Model Cars
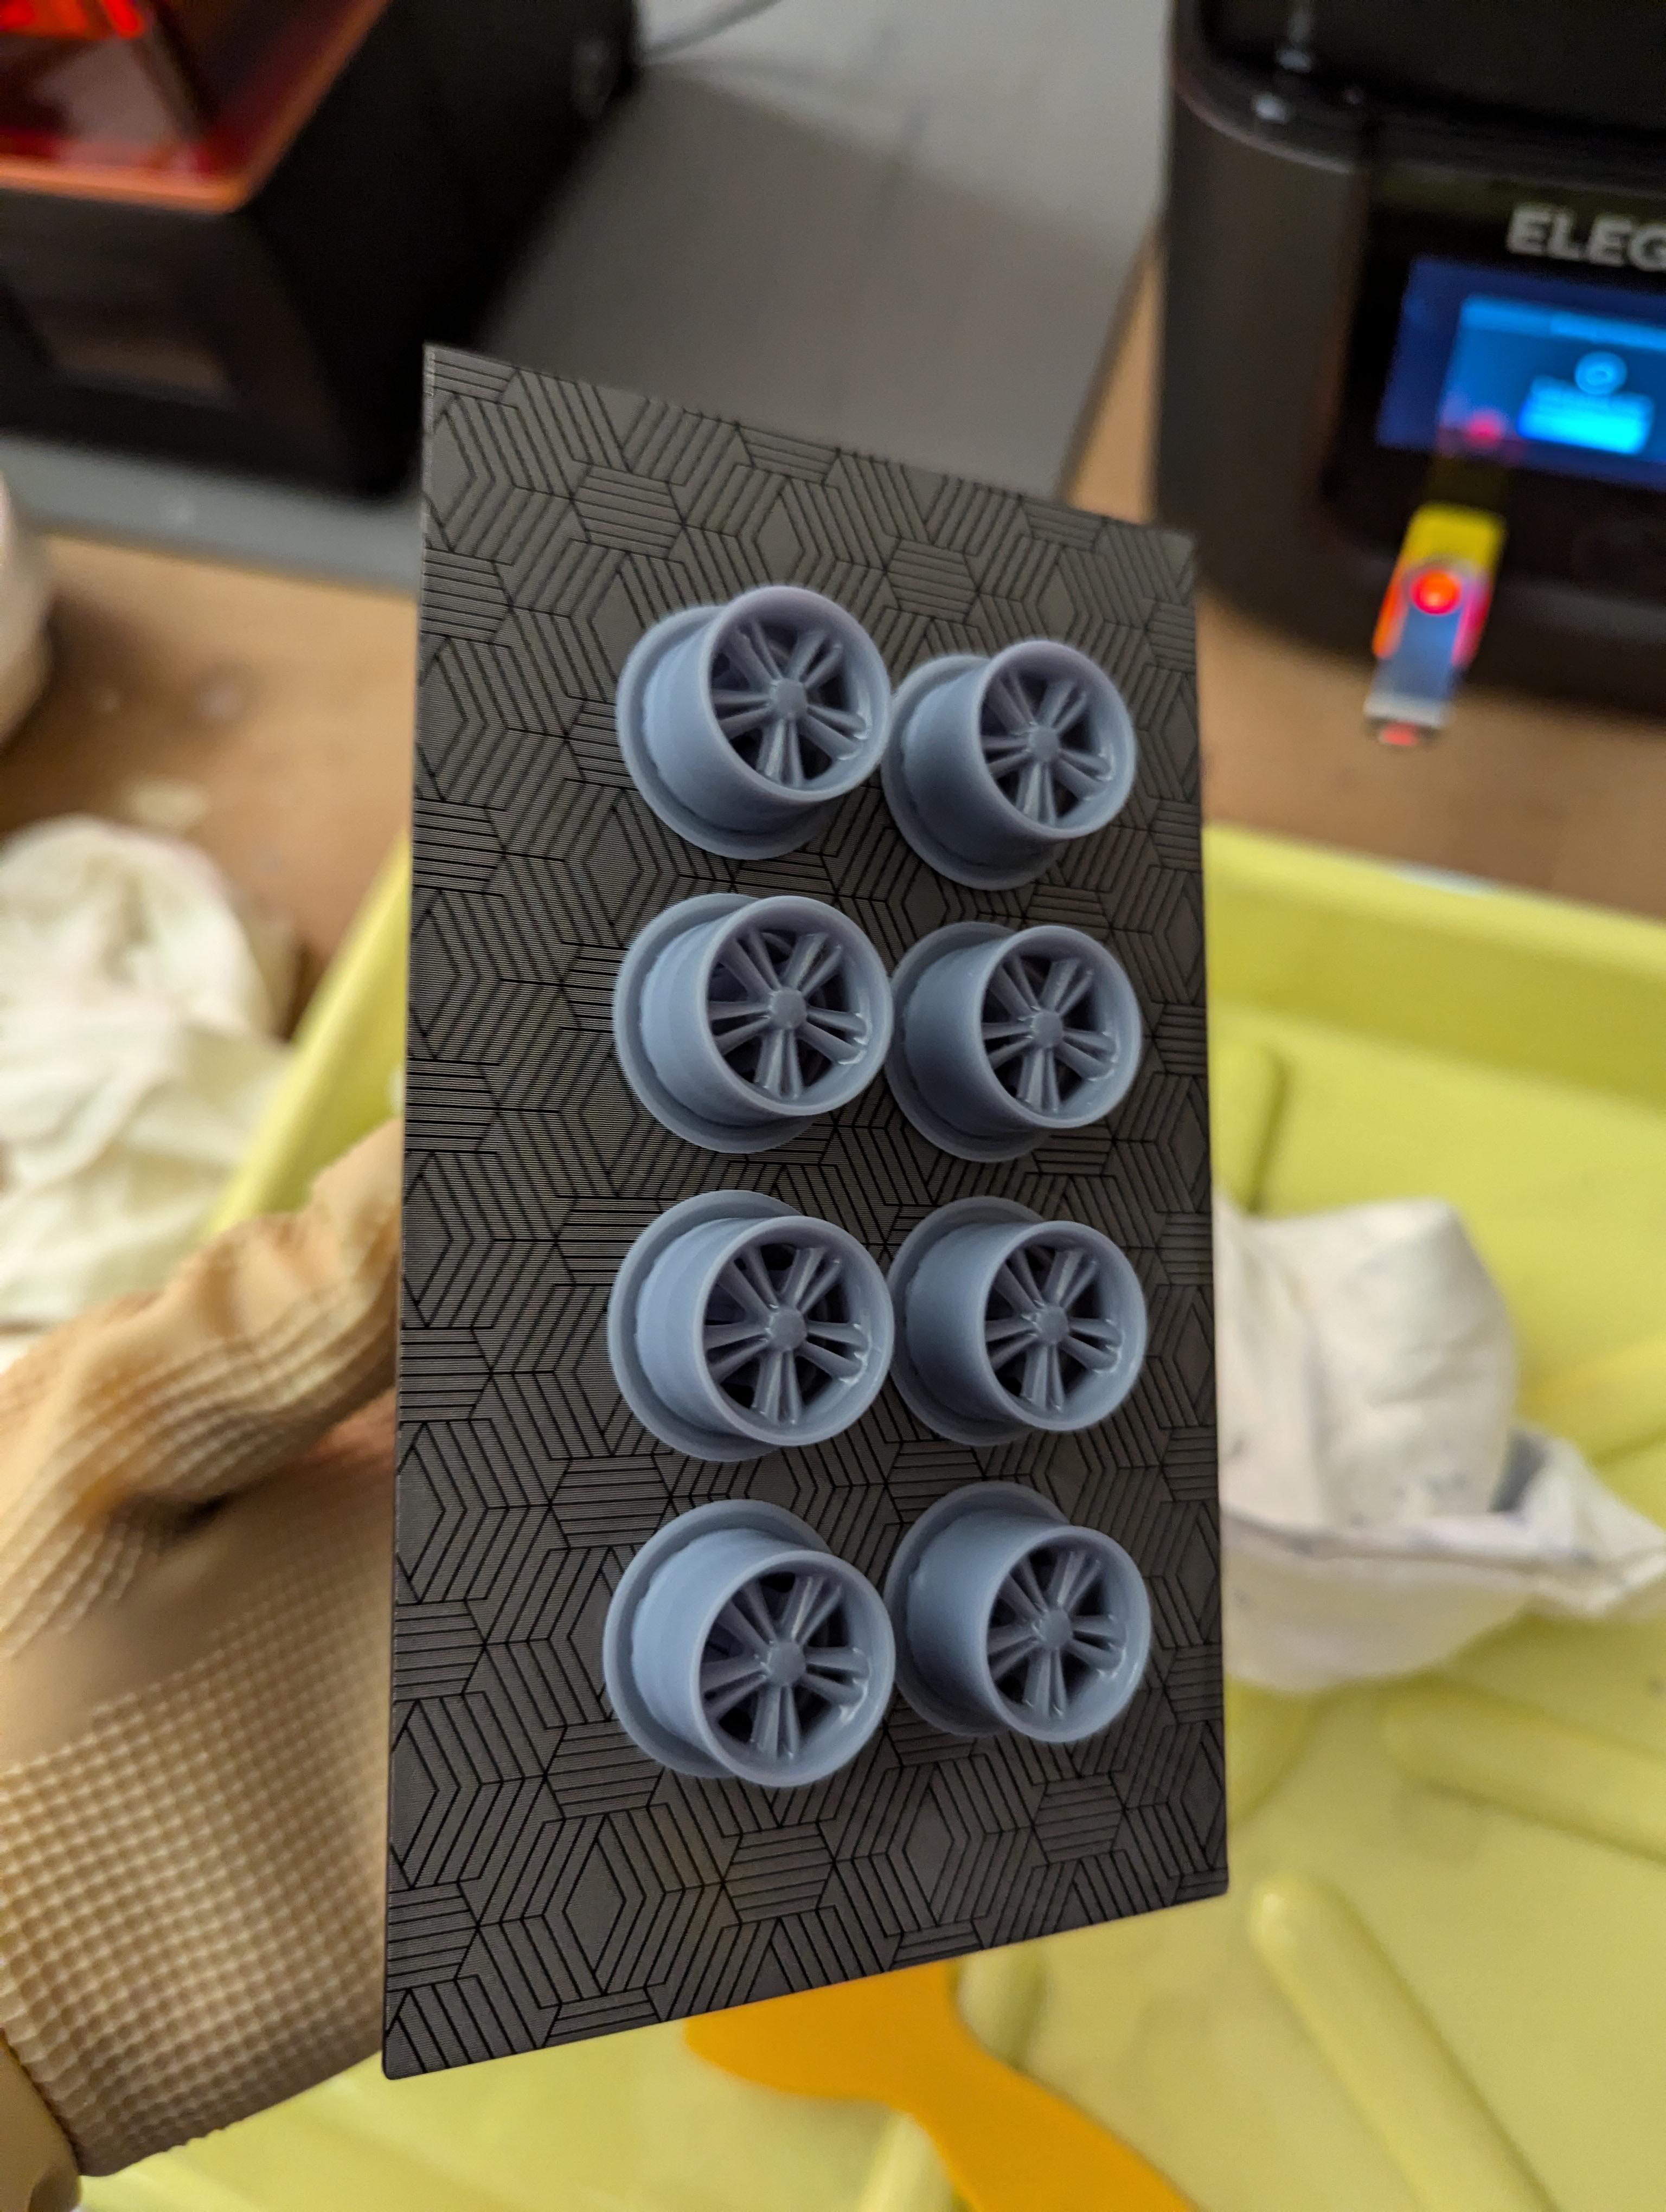
I got a new Elegoo Mars 4 Ultra printer to suppliment my Saturn. The Mars has a smaller build volume but is much higher resolution (18 micron XY resolution vs. 50 microns for the Saturn). I got it set up yesterday and ran some test prints and a batch of the wheels and I'm extremely happy with how they came out, the smoother prints should be much easier to prep for paint. The new hotness on the right and my O.G. Saturn on the left. While the new Mars is much higher resolution, the build volume of the Saturn is significantly larger, so it will definitely still have a place in my workshop. First batch of wheels on the plate. Here are the Saturn and Mars prints side by side. The Saturn is on the left and the Mars is on the right. You can see a pretty big difference in smoothness and the amount of voxel lines. Oblique shot of the Mars print. The voxel lines are still there, but they're extremely small. Oblique shot of the Saturn rim. You can really see how much more pronounced the voxel lines are, especially around the hub and on the spokes.
-
‘55 El Camino
JNordgren42 replied to NOBLNG's topic in WIP: Model Trucks: Pickups, Vans, SUVs, Light Commercial
That's looking awesome so far! I can't wait to see the finished model. And I thought I was being ambitious by sawing the front off of a '64 Malibu and mating it to a '65 El Camino body to make a '64 Elky. -
Who doesn't love a mock-up? Let's see yours!
JNordgren42 replied to Belairconvertable's topic in WIP: Model Cars
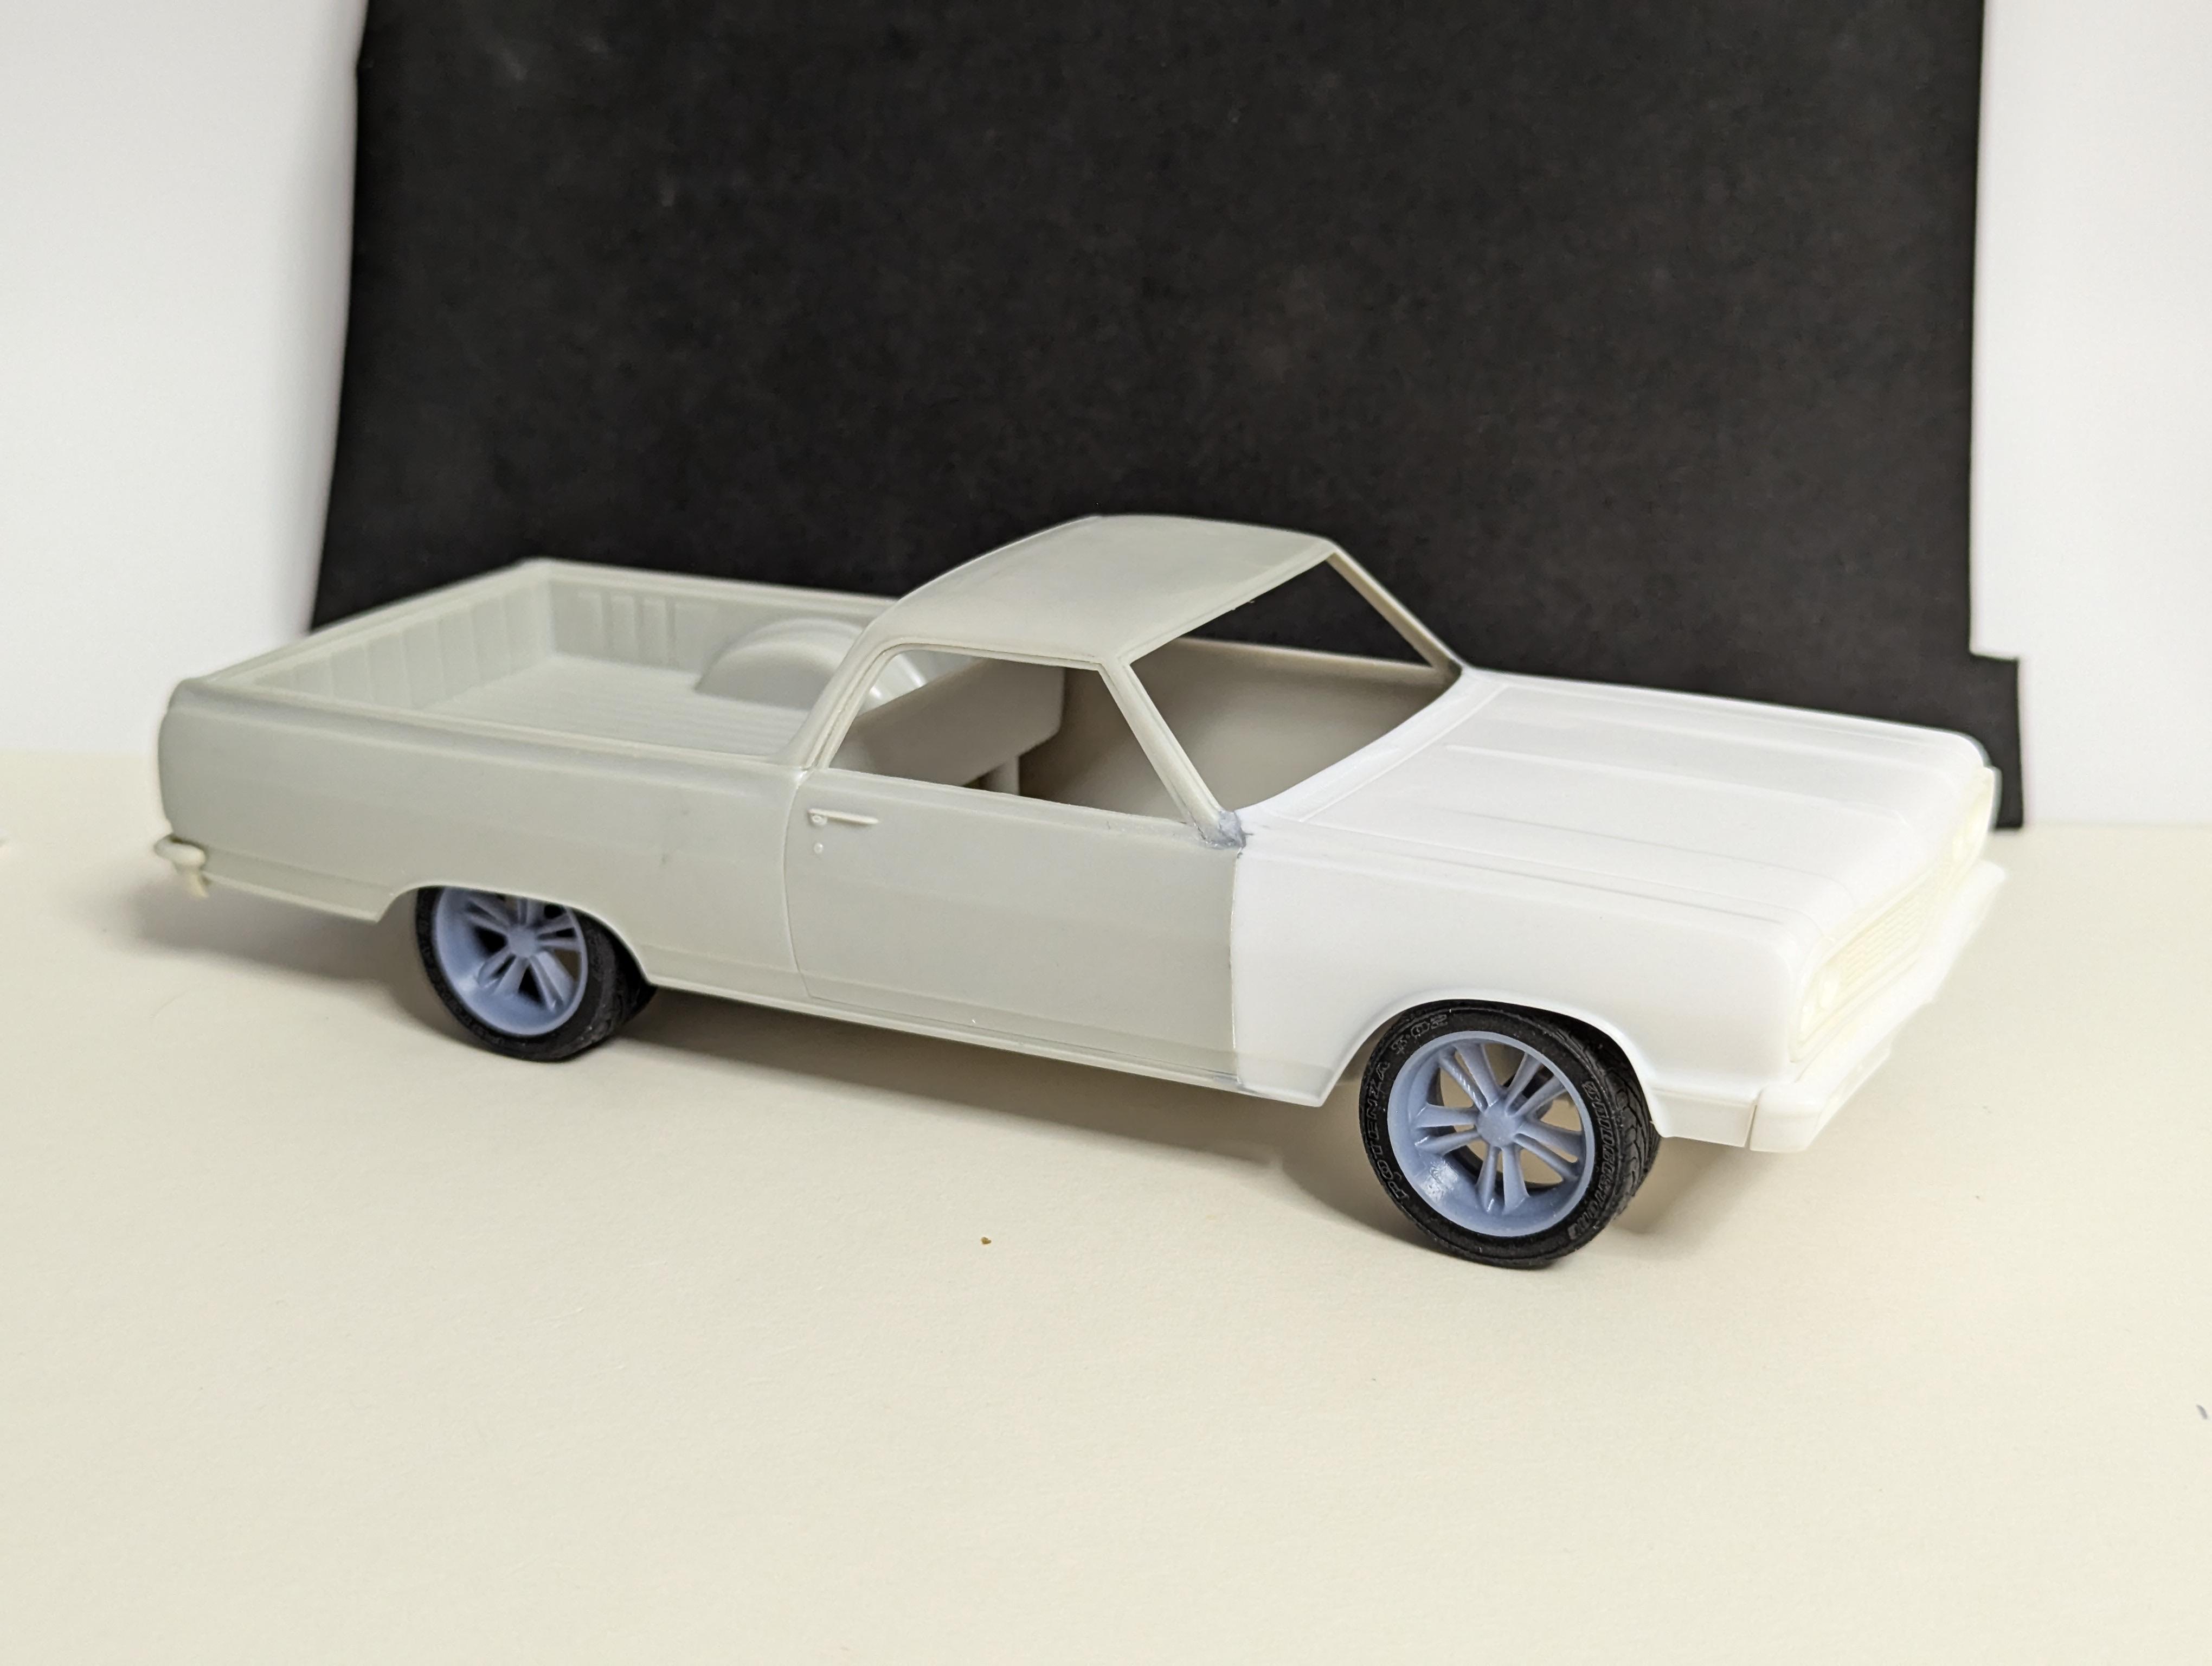
'64/65 El Camino ('64 front clip courtesy of the new AMT '64 Malibu SS grafted on to a '65 AMT El Camino body). With 3D printed Foose Knuckle wheels. I think I need to bring the rear end up and the front end down just a little bit.
-
WIP: Custom AMT 1:25 1964/65 Chevy El Camino
JNordgren42 replied to JNordgren42's topic in WIP: Model Cars
Thanks! I'm hoping it turns out well. I'm going to have to pay very, very close attention to all of the prep because there's absolutely nowhere to hide on this one with that ultra glossy black finish.